Article directory
Preface
This article mainly introduces how to use Docker to deploy MySQL, and combine it with the cpolar intranet penetration tool to achieve remote access to the local database.
Docker provides a lightweight containerization solution that can better simplify the database deployment process. Makes creating and managing MySQL database easier and faster. Let’s share the specific deployment process and put forward some matters that need attention, as well as how to use the intranet penetration tool to access the local database without public network IP.
1.Install Docker
The operating environment of this tutorial is Linux Ubuntu system. Before starting, we need to install Docker.
Execute the following command in the terminal:
Add Docker source
# Add Docker's official GPG key:
sudo apt-get update
sudo apt-get install ca-certificates curl gnupg
sudo install -m 0755 -d /etc/apt/keyrings
curl -fsSL https://download.docker.com/linux/ubuntu/gpg | sudo gpg --dearmor -o /etc/apt/keyrings/docker.gpg
sudo chmod a+r /etc/apt/keyrings/docker.gpg

# Add the repository to Apt sources:
echo \
  "deb [arch=$(dpkg --print-architecture) signed-by=/etc/apt/keyrings/docker.gpg] https://download.docker.com/linux/ubuntu \
  $(. /etc/os-release && echo "$VERSION_CODENAME") stable" | \
  sudo tee /etc/apt/sources.list.d/docker.list > /dev/null
sudo apt-get update
Install Docker package
sudo apt-get install docker-ce docker-ce-cli containerd.io docker-buildx-plugin docker-compose-plugin
Verify the Docker engine installation was successful by running the image
sudo docker run hello-world
2. Use Docker to pull the MySQL image
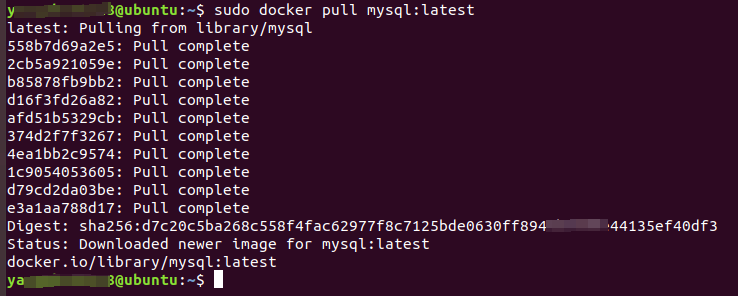
sudo docker pull mysql:latest
Then execute the view image command:
sudo docker images
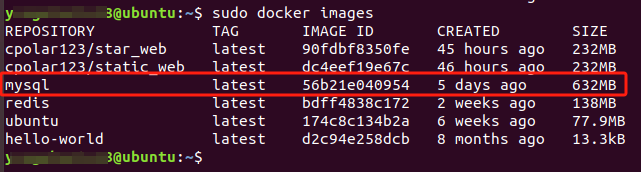
You can see that the MySQL image was successfully pulled.
3. Create and start the MySQL container
After successfully pulling the MySQL image, we can use the image to create and run a MySQL container.
Execute the following command in the terminal:
sudo docker run -itd -p 3308:3306 --name mysql1 -e MYSQL_ROOT_PASSWORD=123456 -e MYSQL_DATABASE=mydb mysql
In this command, a MySQL container named: mysql1 is created and run in the background, the MySQL running in the container is mapped to the 3308 port of the local host (the author's host port 3306 is occupied), and the MySQL root password is set to 123456 , created a database named: mydb.

Then execute the following command to check whether the container is running:
sudo docker ps

You can see that the MySQL container just created is running.
4. Local connection test
4.1 Install MySQL graphical interface tool
Now that we have deployed the MySQL container locally in docker, if we want to test the connection locally,
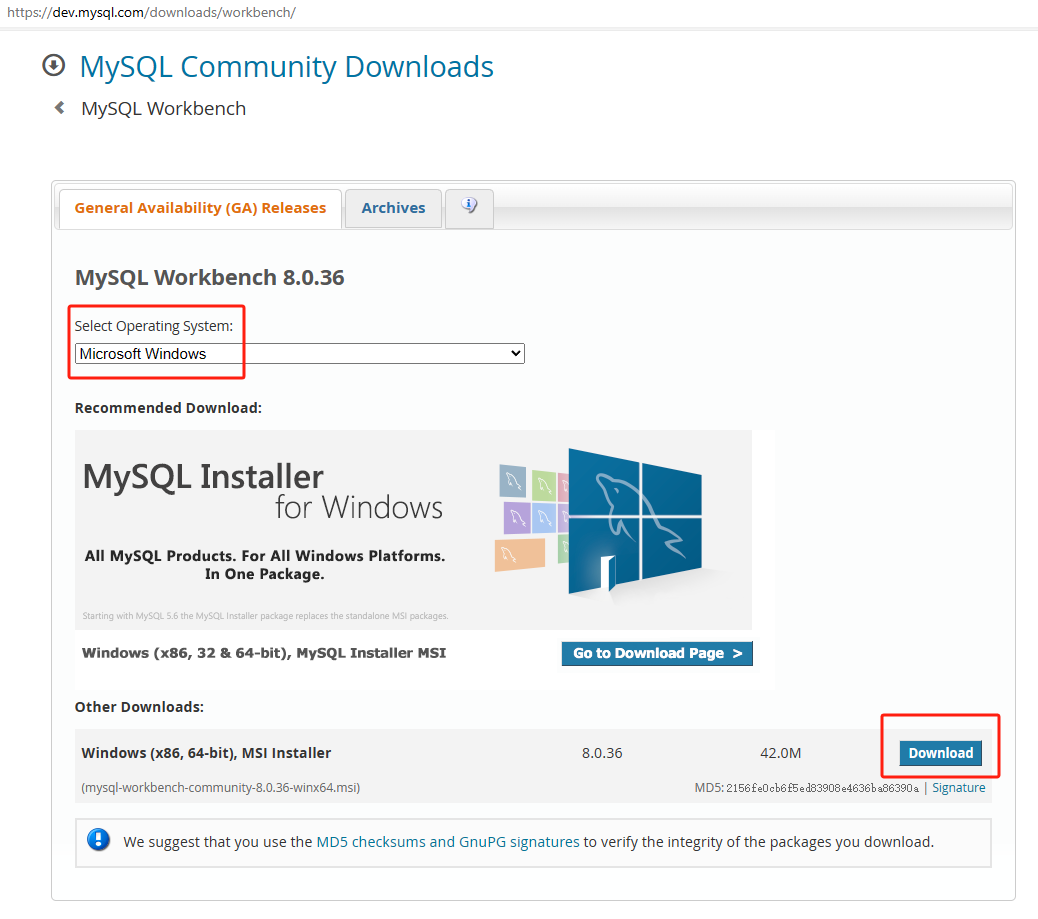
You can download the MySQL graphical interface tool: MySQL Workbench
Download address: MySQL::MySQL Workbench
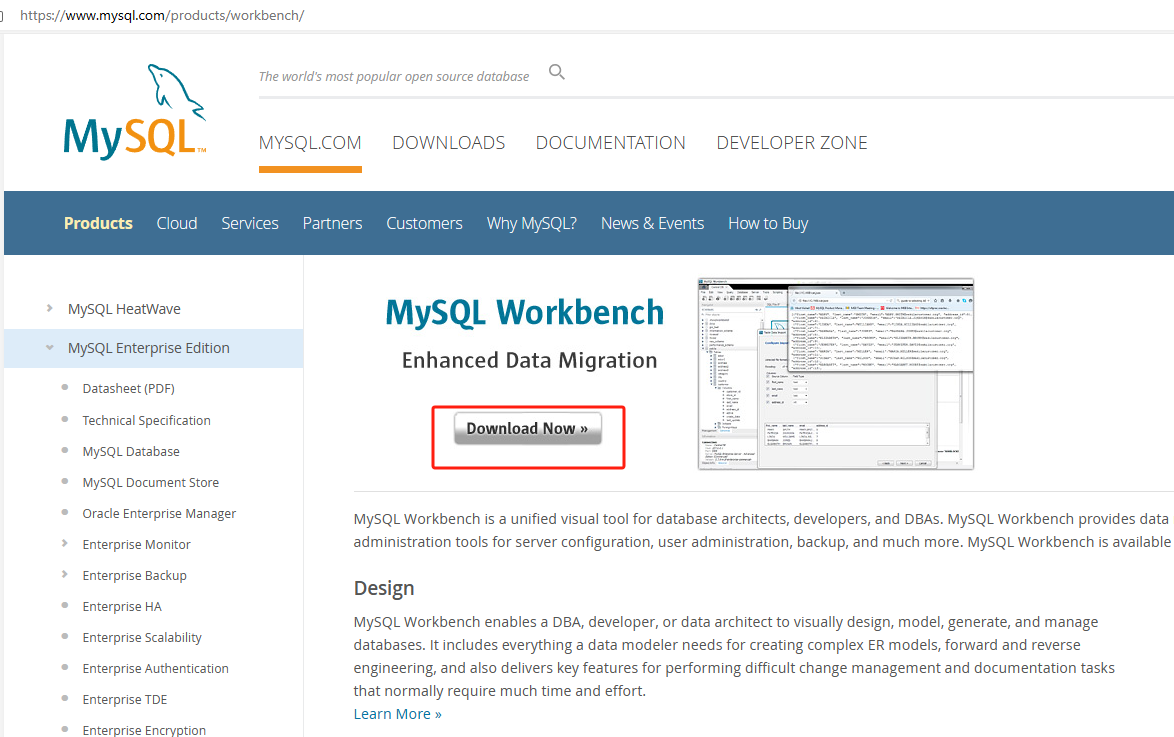
I have chosen the Windows system version here. You can choose other versions according to your needs and click to download.
4.2 Use MySQL Workbench connection test
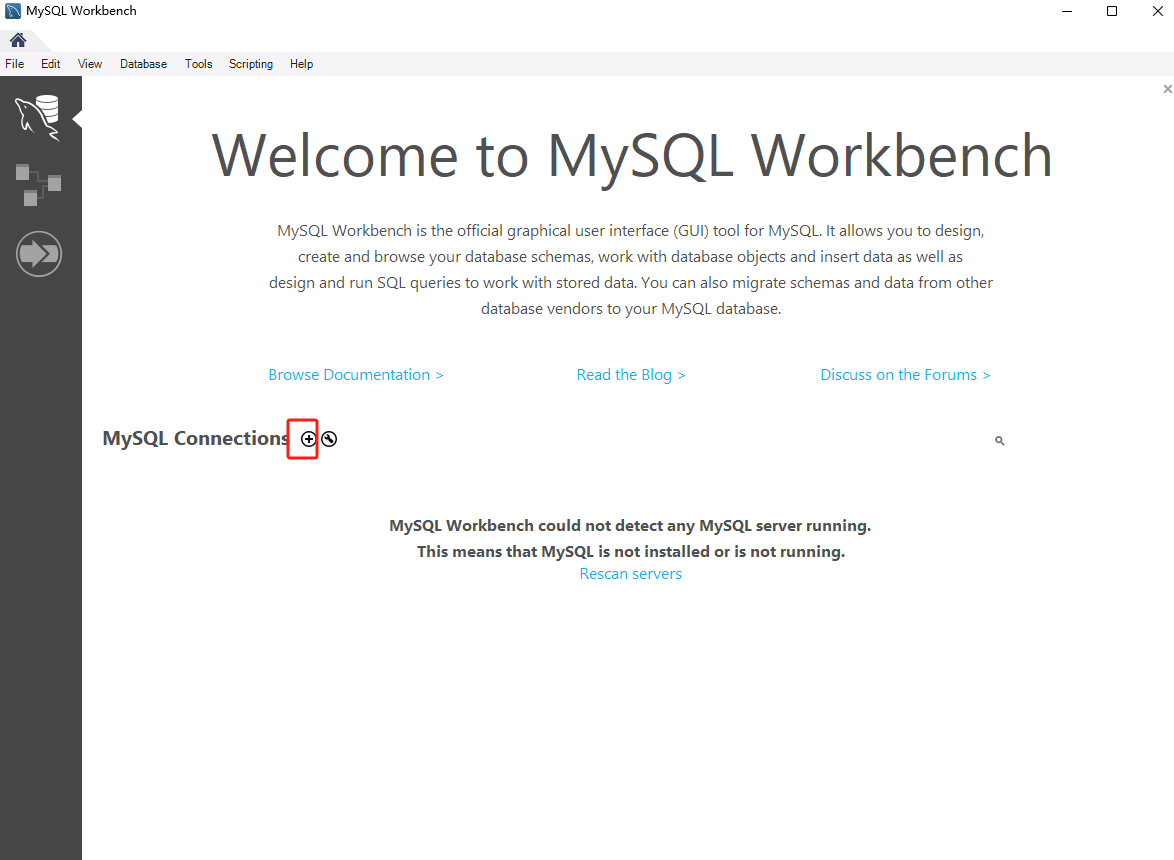
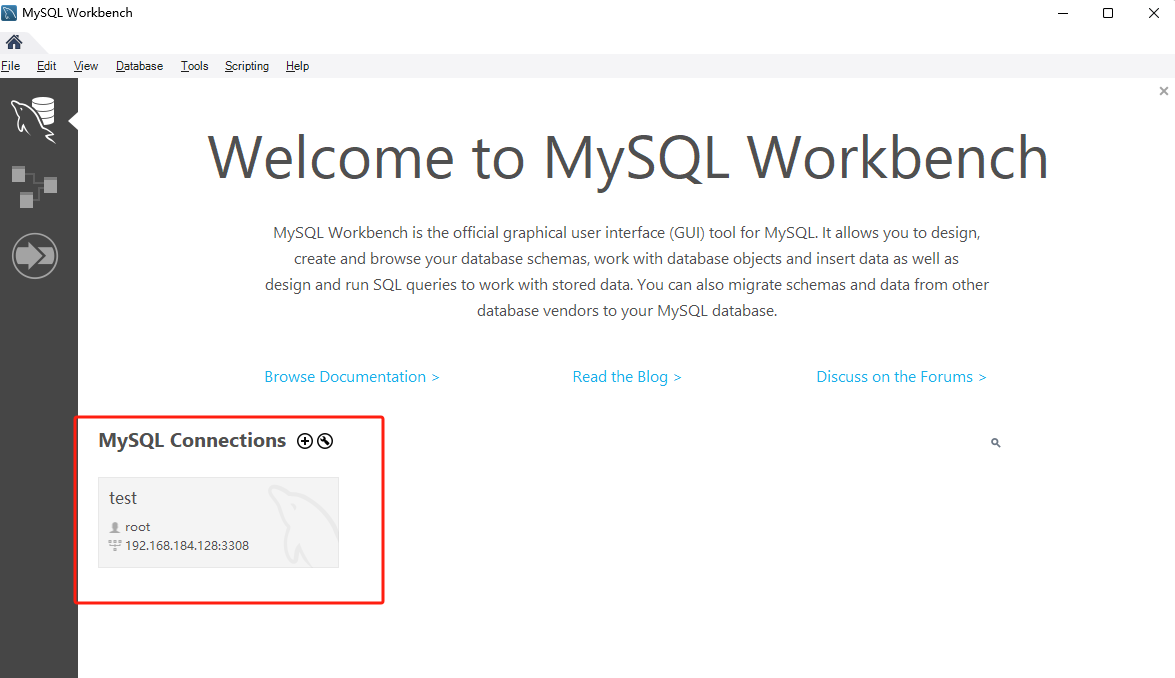
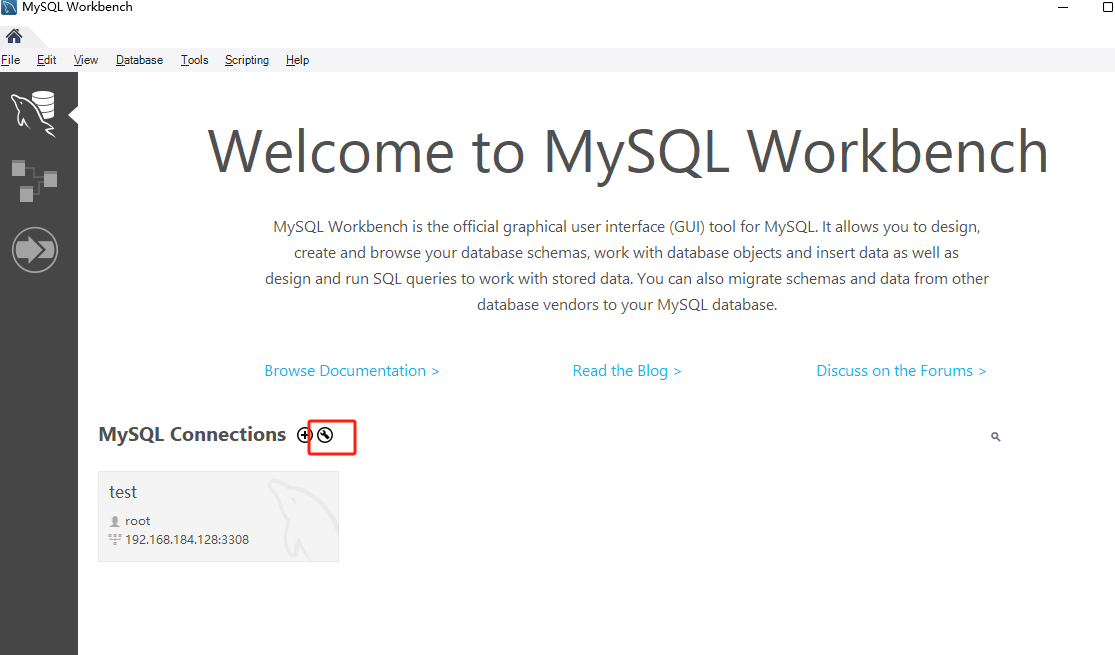
After downloading and installing, click the plus sign and add information about the MySQL database you want to connect to in the pop-up window:
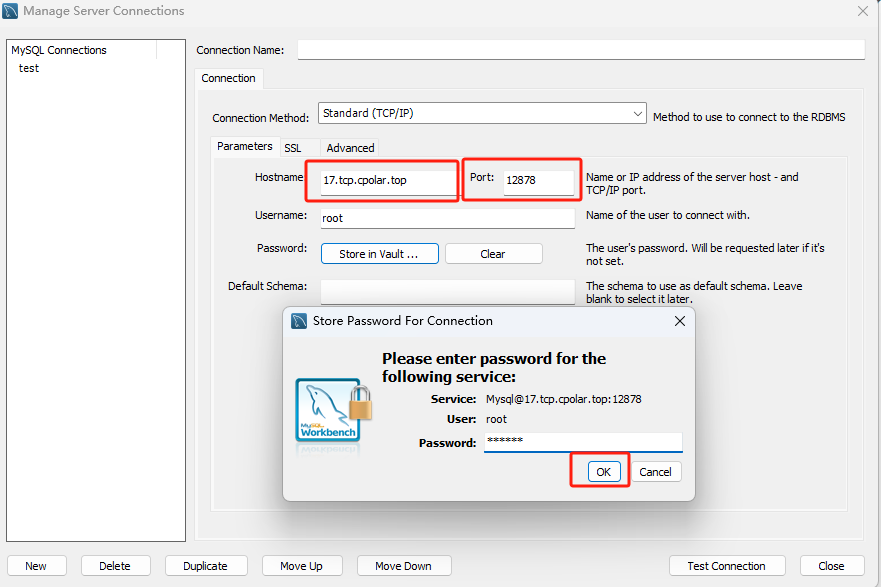
The hostname needs to be filled in with your local IP address (192.168.184.128), and the port is the local port (3308). In actual operation, you need to refer to the IP address and port of your own host. Then log in as the root user, enter the password 123456, and click OK.
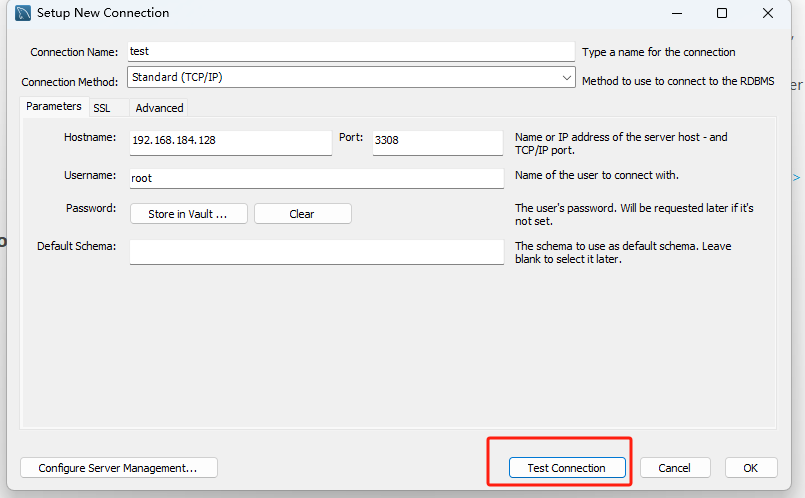
After entering the information, click the connection test button on the lower right.
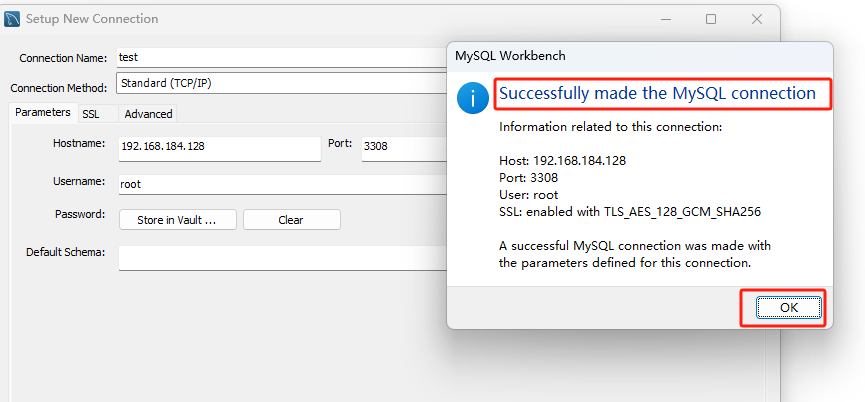
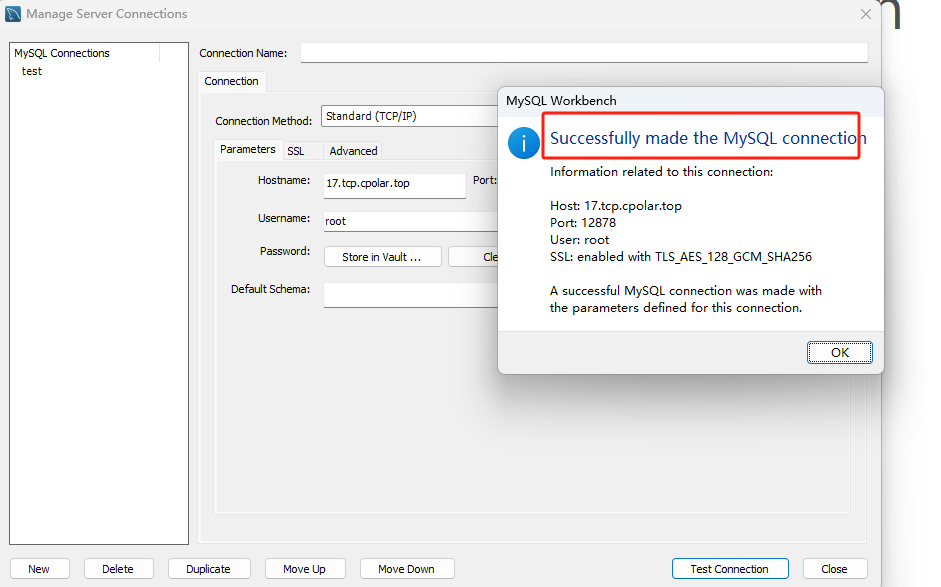
If you see the successful made the MySQL connection prompt box, the connection is successful. Click OK to close the prompt box, and then click the OK button at the bottom right of the information box to officially connect to the local MySQL database.
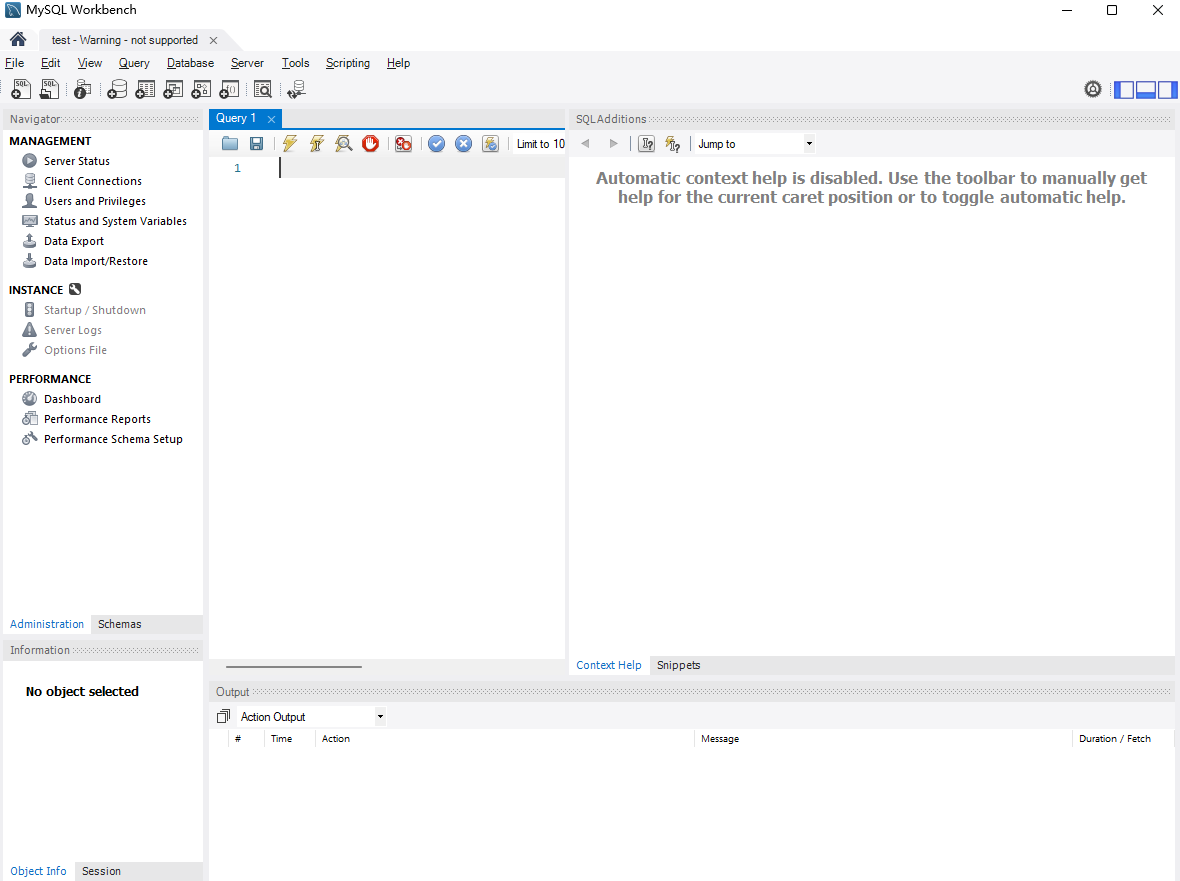
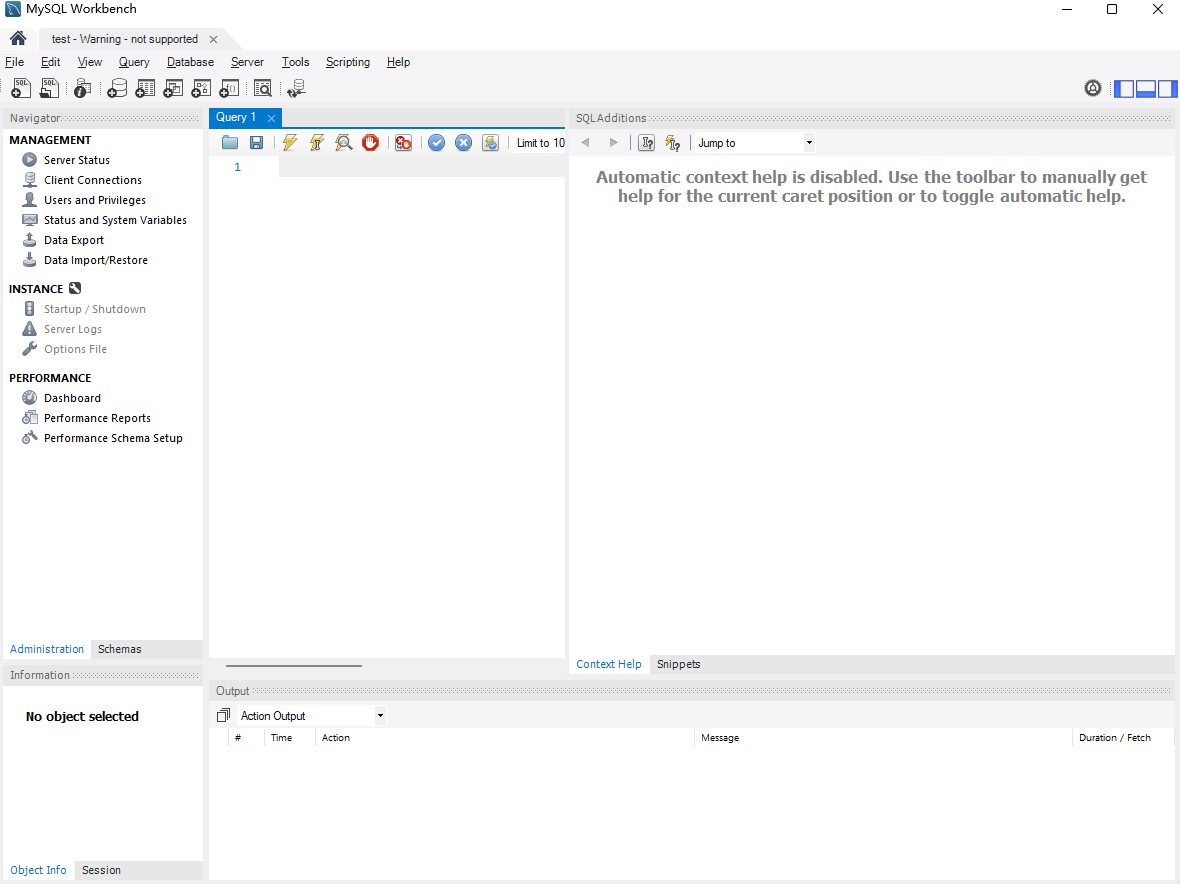
Click the connection method generated here to successfully enter the database interface:
5. Remotely access local MySQL from the public network
However, we can currently only connect locally to the MySQL database we just deployed in docker. What if we are in a different place and want to remotely access the locally deployed MySQL container but do not have a public IP?
We can use the cpolar intranet penetration tool to achieve remote access requirements in an environment without public network IP.
5.1 Installation of intranet penetration tools
The following are the steps to install cpolar:
cpolar official website address: https://www.cpolar.com
- Use one-click script installation command
curl -L https://www.cpolar.com/static/downloads/install-release-cpolar.sh | sudo bash
- Add services to the system
sudo systemctl enable cpolar
- Start cpolar service
sudo systemctl start cpolar
After cpolar is installed successfully, access the 9200 port of Linux on an external browser: [http://server's LAN IP:9200]. Log in using the cpolar account. After logging in, you can see the cpolar web configuration interface. The result is on the web Just configure the management interface.
5.2 Create a public network address for remote connection
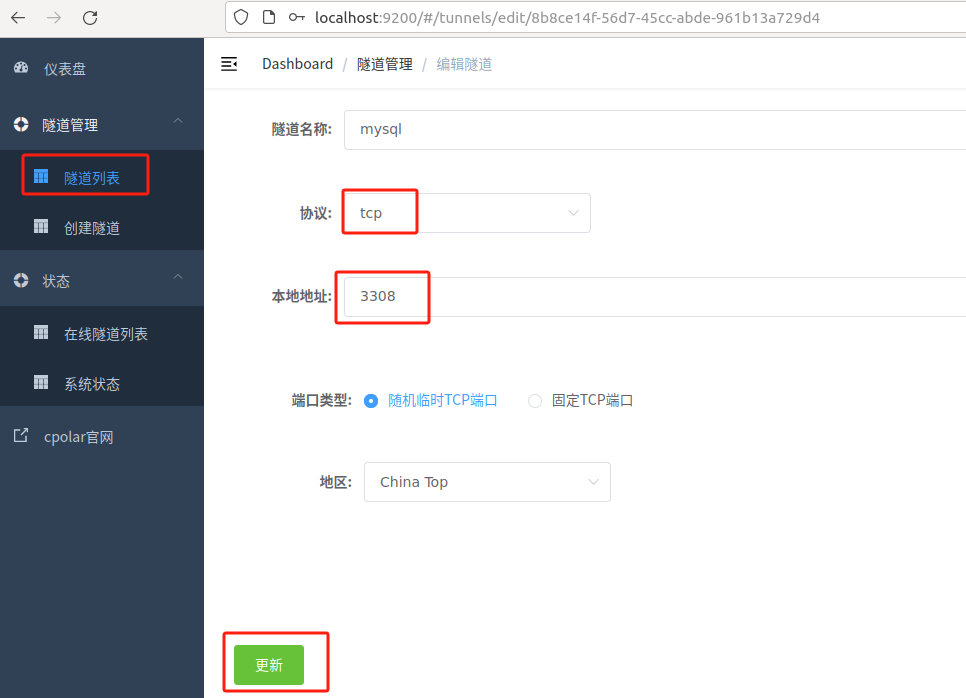
After logging in to the cpolar web UI management interface, click Tunnel Management - Create Tunnel on the left dashboard:
- Tunnel name: It can be customized. Be careful not to duplicate the existing tunnel name. This example uses: mysql
- Protocol:TCP
- Local address: 3308
- Port type: Random temporary TCP port
- Region: Select China Top
Click创建
After the creation is successful, open the online tunnel list on the left. You can see that the public network address has just been generated by creating the tunnel. Next, you can copy the address and port number to MySQL Workbench on another computer (offsite) to connect. Can.
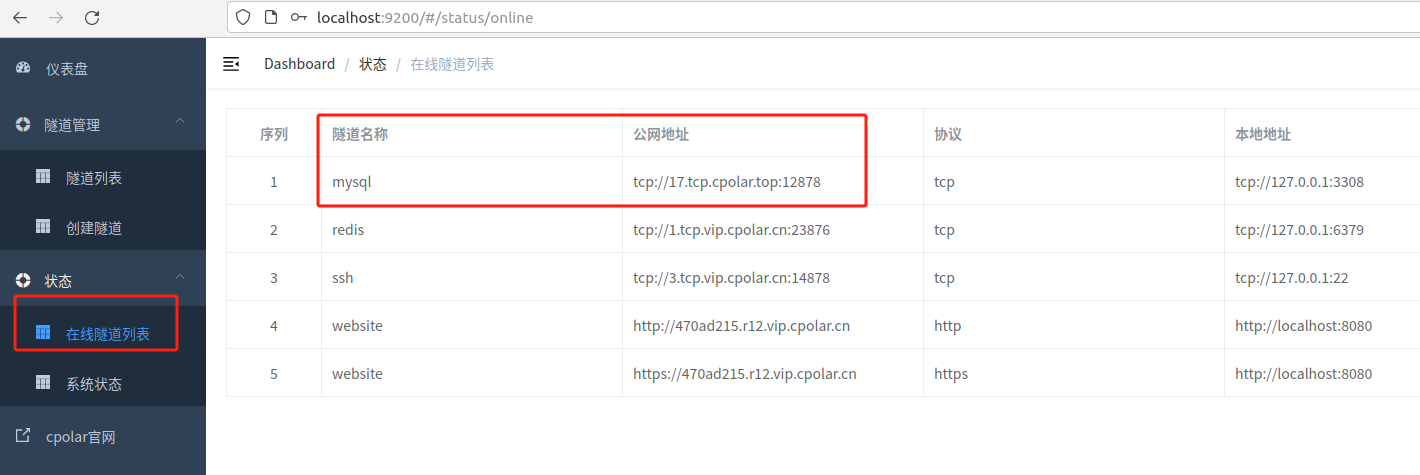
As shown in the figure below, fill in the IP address location: 17.tcp.cpolar.top, fill in the port number: 12878, click the link to test:
You can see that the test connection is successful:
Successfully achieved remote access to the local MySQL database interface using the public network address:
summary
For the convenience of demonstration, we used the TCP public network address tunnel generated by cpolar in the above operation process, and its public network address was randomly generated.
The advantage of this random address is that it is established quickly and can be used immediately. However, its disadvantage is that the URL is randomly generated and this address will change randomly within 24 hours, making it more suitable for temporary use.
If you have a need for long-term remote access to local MySQL, but you don’t want to reconfigure the public network address every day, and you also want the address to be nice and easy to remember, then I recommend that you choose to use a fixed TCP address for remote access.
5.3 Remote access using fixed TCP address
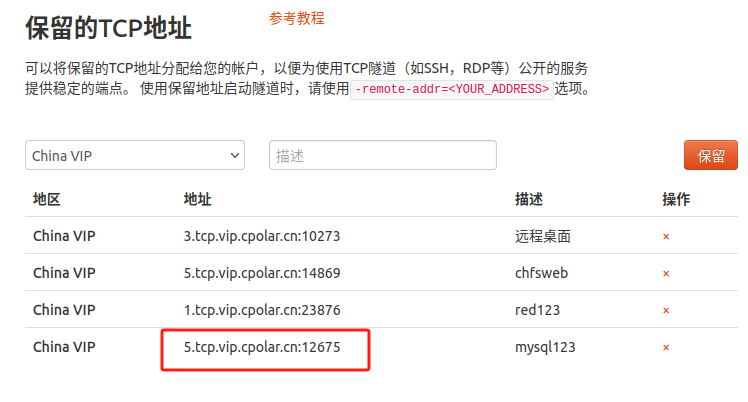
Next, reserve a fixed TCP address. Log in to the cpolar official website , click Reserve on the left, find the reserved TCP address, and reserve a fixed address for remote server connection:
- Region: Select China VIP
- Description: Remarks, which can be customized. In this example, mysql123 is used.
Click保留

You can see that a fixed TCP public network address is generated:
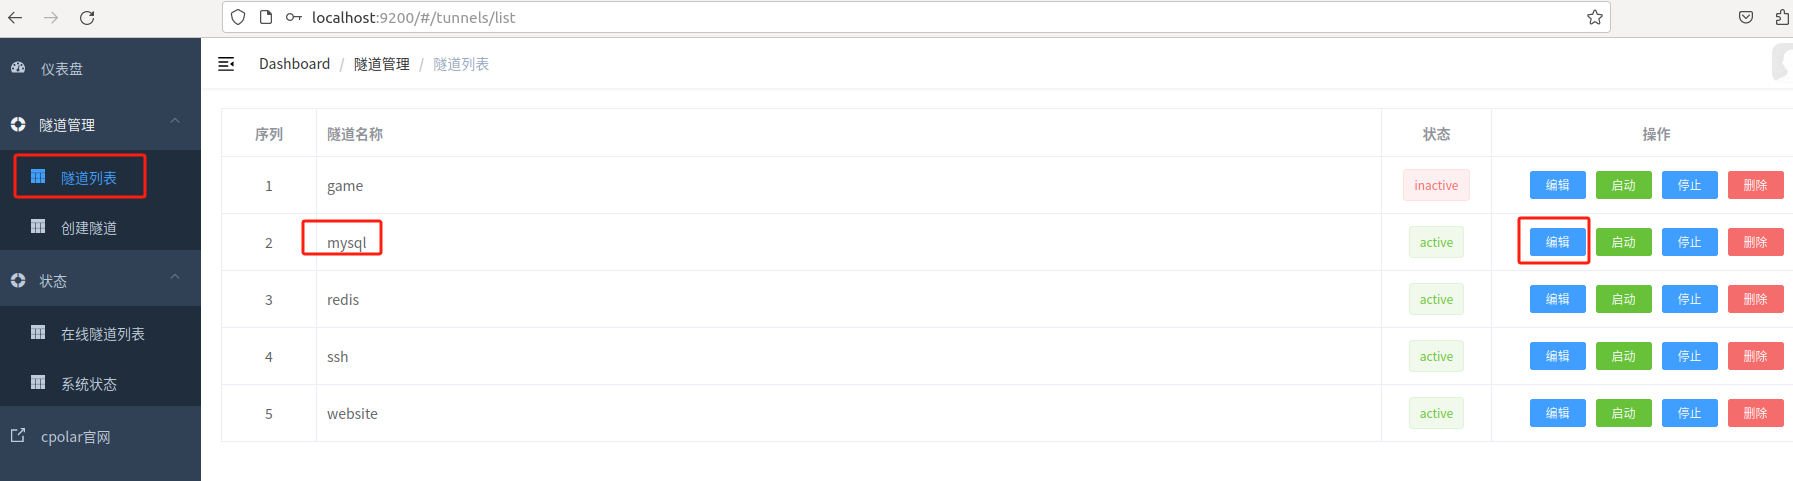
After the address is successfully reserved, copy the generated public network address, open the cpolar web ui management interface, click Tunnel Management - Tunnel List on the left dashboard, find the random public network address tunnel mysql we just created , and click编辑
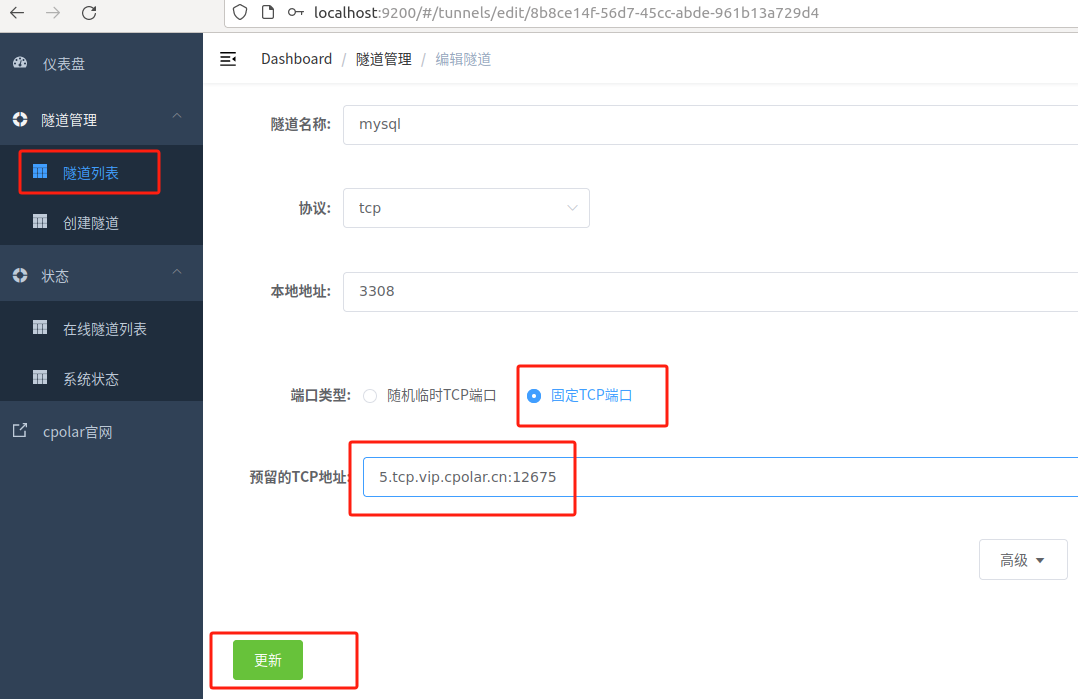
Modify the tunnel information and configure the fixed TCP address that was successfully reserved just now into the tunnel.
- Port type: Select fixed TCP port
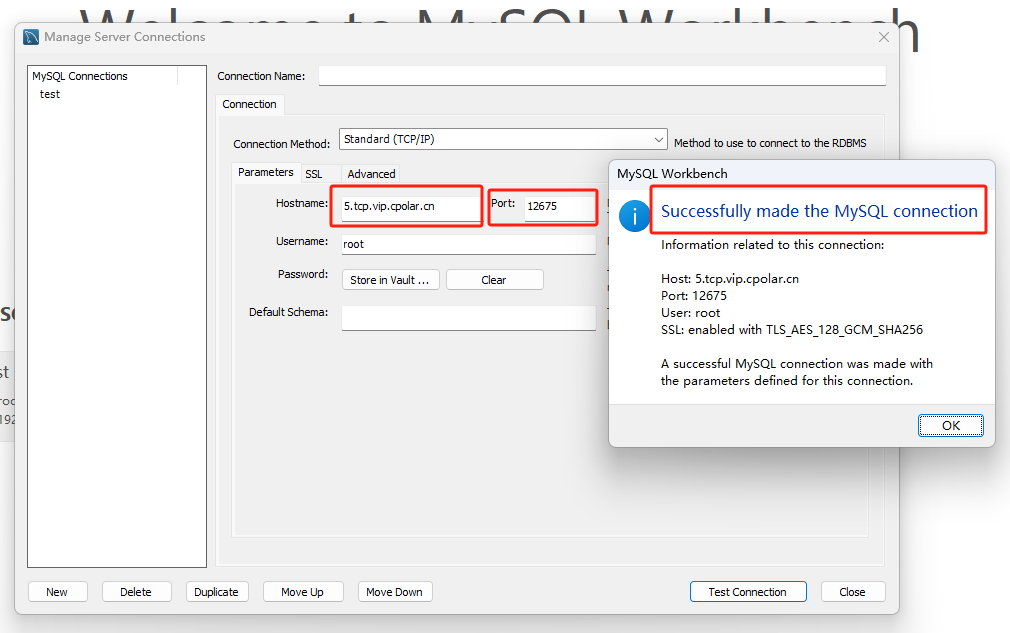
- Reserved TCP address: Copy and paste the successfully reserved address from the official website, in this case: 5.tcp.vip.cpolar.cn:12675
Click更新
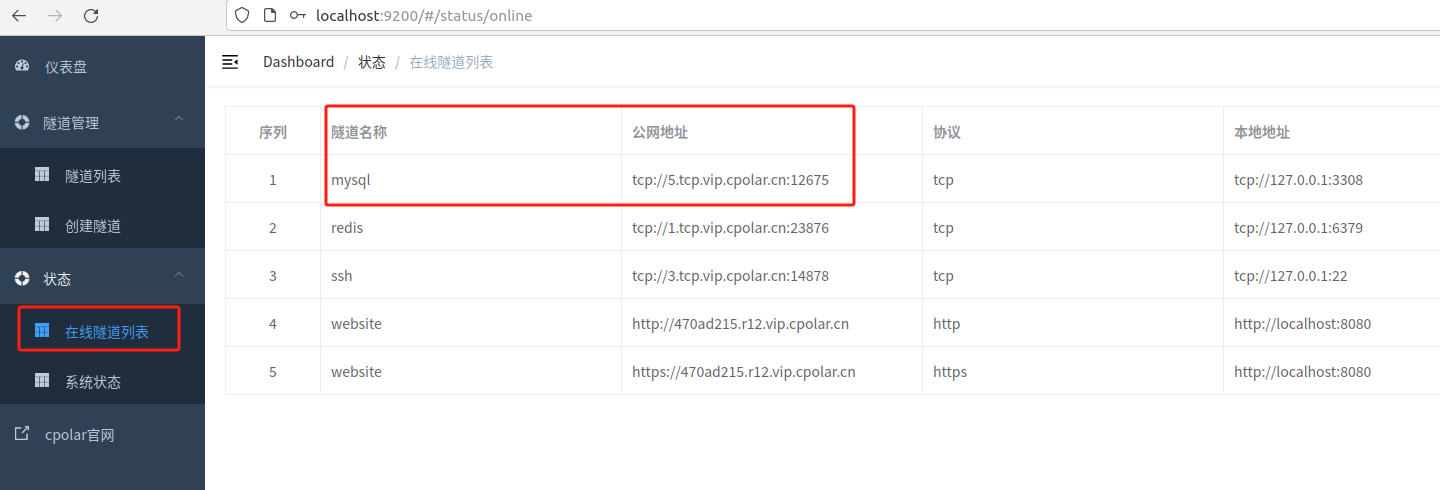
After the tunnel is successfully updated, click the status on the left dashboard - Online Tunnel List, and you can see that the public network address has been updated to a fixed TCP address.
Next, just like the previous operation, you can use this fixed TCP address to access MySQL Workbench on another computer (offsite).
Click the Modify connection information button:
Fill in the IP address location: 5.tcp.vip.cpolar.cn, fill in the port number: 12675, click the link to test, you can see that the test connection is successful:
Successfully implemented the cpolar intranet penetration tool to remotely access the local MySQL database interface with a fixed TCP public network address: