Preface
Flutter is Google's open source user interface (UI) toolkit that
supports building consistent UI effects on different platforms.
However, in actual business, the entire APP is generally not developed with pure Flutter
, especially some old projects, which will use Flutter. approach to hybrid development
. So today I will mainly talk about how to build a Flutter hybrid project.
Mixed project implementation methods
Currently, the official provides two ways to add dependencies. Their introductions are as follows:
Method 1: Module code dependency mode
This method introduces the flutter code into the android project, and the flutter code is natively visible.
The advantage is that it ensures that the compilation of the Android project and the Flutter module is completed in one step.
It’s convenient for working with both parts at the same time and iterating quickly,
but it requires every member of the team to install the Flutter SDK to ensure smooth compilation of the hybrid app.
Method 2: AAR dependency mode
This method is to package the flutter code into aar and introduce it into the android project. The advantage of the flutter code for the native invisible AAR mode is that other members of the team do not need to install the Flutter SDK.
At least one person only needs to output the AAR.
Due to space limitations, today’s blog mainly talks about the implementation of method one.
I wrote a separate blog for method two:
Getting started with Flutter basics: teaching you step by step how to build a Flutter hybrid project: AAR method integration
Module code dependency pattern implementation
Manually create Flutter modules
First, we create a simple Android project
, then go to the project directory,
open the cmd window, and enter the following command:
flutter create -t module --org com.xiongyp flutterxiongmodule
This creates a Flutter module with the package name com.xiongyp.flutterxiongmodule.
Note here that the Flutter module can be created in other directories
as long as the address is configured later and can be linked to this directory.
Introduce Flutter module
Introduce the Flutter module as a subproject into settings.gradle of the Android project
and write this:
rootProject.name = "FlutterHybridProject"
include ':app'
setBinding(new Binding([gradle: this]))                                           // 新增
evaluate(new File(                                                                // 新增
        settingsDir.parentFile,                                                   // 新增
        "${

      rootProject.name}/flutterxiongmodule/.android/include_flutter.groovy"  // 新增
))                                                                                // 新增
include ':flutterxiongmodule'
Note here: If your Flutter module is placed in another directory,
remember to configure the path of the include_flutter.groovy file accurately
, which is this line:
"${

      rootProject.name}/flutterxiongmodule/.android/include_flutter.groovy"
After configuring settings.gradle
dependencyResolutionManagement {


    repositoriesMode.set(RepositoriesMode.FAIL_ON_PROJECT_REPOS)
    repositories {


        google()
        mavenCentral()
        jcenter() // Warning: this repository is going to shut down soon
    }
}
Change to:
dependencyResolutionManagement {


    repositoriesMode.set(RepositoriesMode.PREFER_PROJECT)
    repositories {


        google()
        mavenCentral()
        jcenter() // Warning: this repository is going to shut down soon
    }
}
The main difference is: RepositoriesMode.PREFER_PROJECT
is specifically explained as:
FAIL_ON_PROJECT_REPOS :在项目的子 module 中配置仓库信息会导致编译失败。
PREFER_PROJECT:使用子 module 中配置仓库信息,忽略根目录中 settings 配置的仓库信息
PREFER_SETTINGS:使用根目录中 settings 配置的仓库信息,忽略子 module 中配置仓库信息
After completing the above operation, in the project's build.gradle
task clean(type: Delete) {


    delete rootProject.buildDir
}
Add above:
allprojects {


    repositories {


        google()
        mavenCentral()
        maven {

     url 'https://jitpack.io' }
    }
}
The complete build.gradle file is as follows:
// Top-level build file where you can add configuration options common to all sub-projects/modules.
buildscript {


    ext.kotlin_version = '1.7.10'
    repositories {


        google()
        mavenCentral()
        maven {

     url 'https://jitpack.io' }
    }

    dependencies {


        classpath 'com.android.tools.build:gradle:7.2.0'
        classpath "org.jetbrains.kotlin:kotlin-gradle-plugin:$kotlin_version"
    }
}

allprojects {


    repositories {


        google()
        mavenCentral()
        maven {

     url 'https://jitpack.io' }
    }
}

task clean(type: Delete) {


    delete rootProject.buildDir
}
At this point, the preliminary construction of a mixed Android native + Flutter project is basically completed.
The next step is to jump to the page.
Page jump
The default jump method when opening the Flutter page natively on Android
will result in an obvious white screen, which is a very bad experience. Here is the optimized method.
Use FlutterEngine to cache and reuse
1. Register FlutterActivity in the AndroidManifest.xml of the app.
    <activity
      android:name="io.flutter.embedding.android.FlutterActivity"
      android:configChanges="orientation|keyboardHidden|keyboard|screenSize|locale|layoutDirection|fontScale|screenLayout|density|uiMode"
      android:hardwareAccelerated="true"
      android:windowSoftInputMode="adjustResize" >
    </activity>
2. Create an App.kt in the app to inherit Application and configure the name attribute of the application node in AndroidManifest.xml
class App : Application() {


    ···
}
<manifest xmlns:android="http://schemas.android.com/apk/res/android"
    package="com.xiongyp.flutterxiongmodule">

    <application
        android:name=".App"
        ···
</manifest>
3. Prepare FlutterEngine in App.kt
and create a FlutterEngine instance
    private val flutterEngine by lazy {


        FlutterEngine(this).apply {


            dartExecutor.executeDartEntrypoint(DartExecutor.DartEntrypoint.createDefault())
        }
    }
Override onCreate() and store the instance in FlutterEngineCache
override fun onCreate() {


    super.onCreate()

    FlutterEngineCache.getInstance().put("your_engine_id", flutterEngine)
}
Override onTerminate() and destroy the instance
override fun onTerminate() {


    super.onTerminate()

    flutterEngine.destroy()
}
Use Intent instances in FlutterEngine to jump where business needs it
    findViewById<TextView>(R.id.textView).setOnClickListener {


        startActivity(FlutterActivity.withCachedEngine("your_engine_id").build(this))
    }
Select app to run. If you encounter the following Java version problems, please make the following configuration changes.
A problem occurred evaluating project ':flutter'.
> Failed to apply plugin 'com.android.internal.library'.
   > Android Gradle plugin requires Java 11 to run. You are currently using Java 1.8.
     You can try some of the following options:
       - changing the IDE settings.
       - changing the JAVA_HOME environment variable.
       - changing `org.gradle.java.home` in `gradle.properties`.
Select Project Structure > SDK location > Gradle Settings, set Gradle JDK to 11,
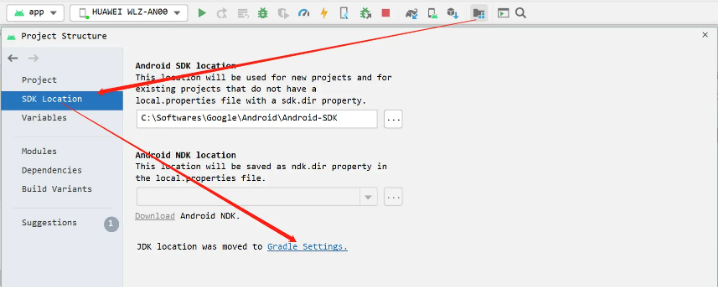
and add the corresponding java.home path mentioned above in ./gradle.properties.
# replace with your own jdk11 or above
org.gradle.java.home=C\:\\Softwares\\Google\\Android\\Android_Studio\\jre
After sync, you should be able to run your project smoothly.
Import Moudle
The above is about using the flutter command to create a FlutterMoudle and then introducing it to the Android project.
In fact, you can also use Android Studio to create a FlutterMoudle.
Here are two methods of using Android Studio to create a FlutterMoudle.
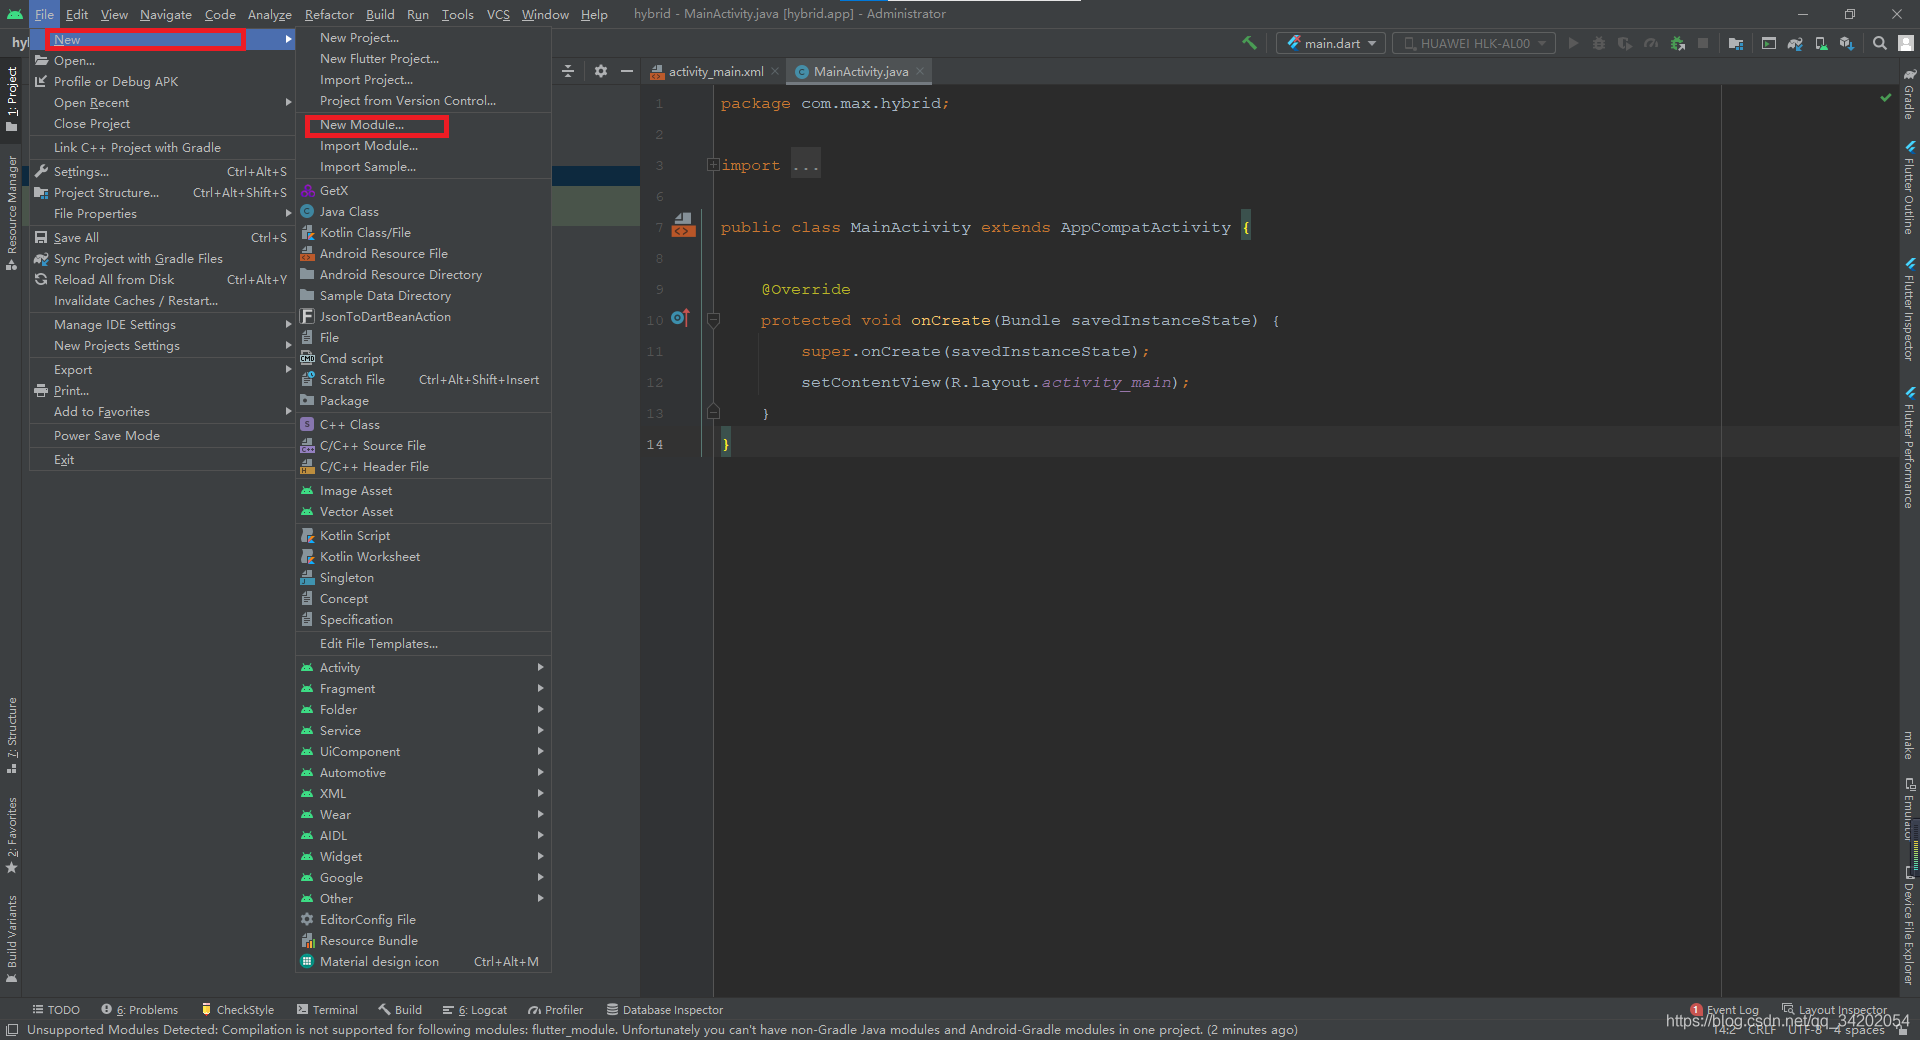
method one
As shown below:
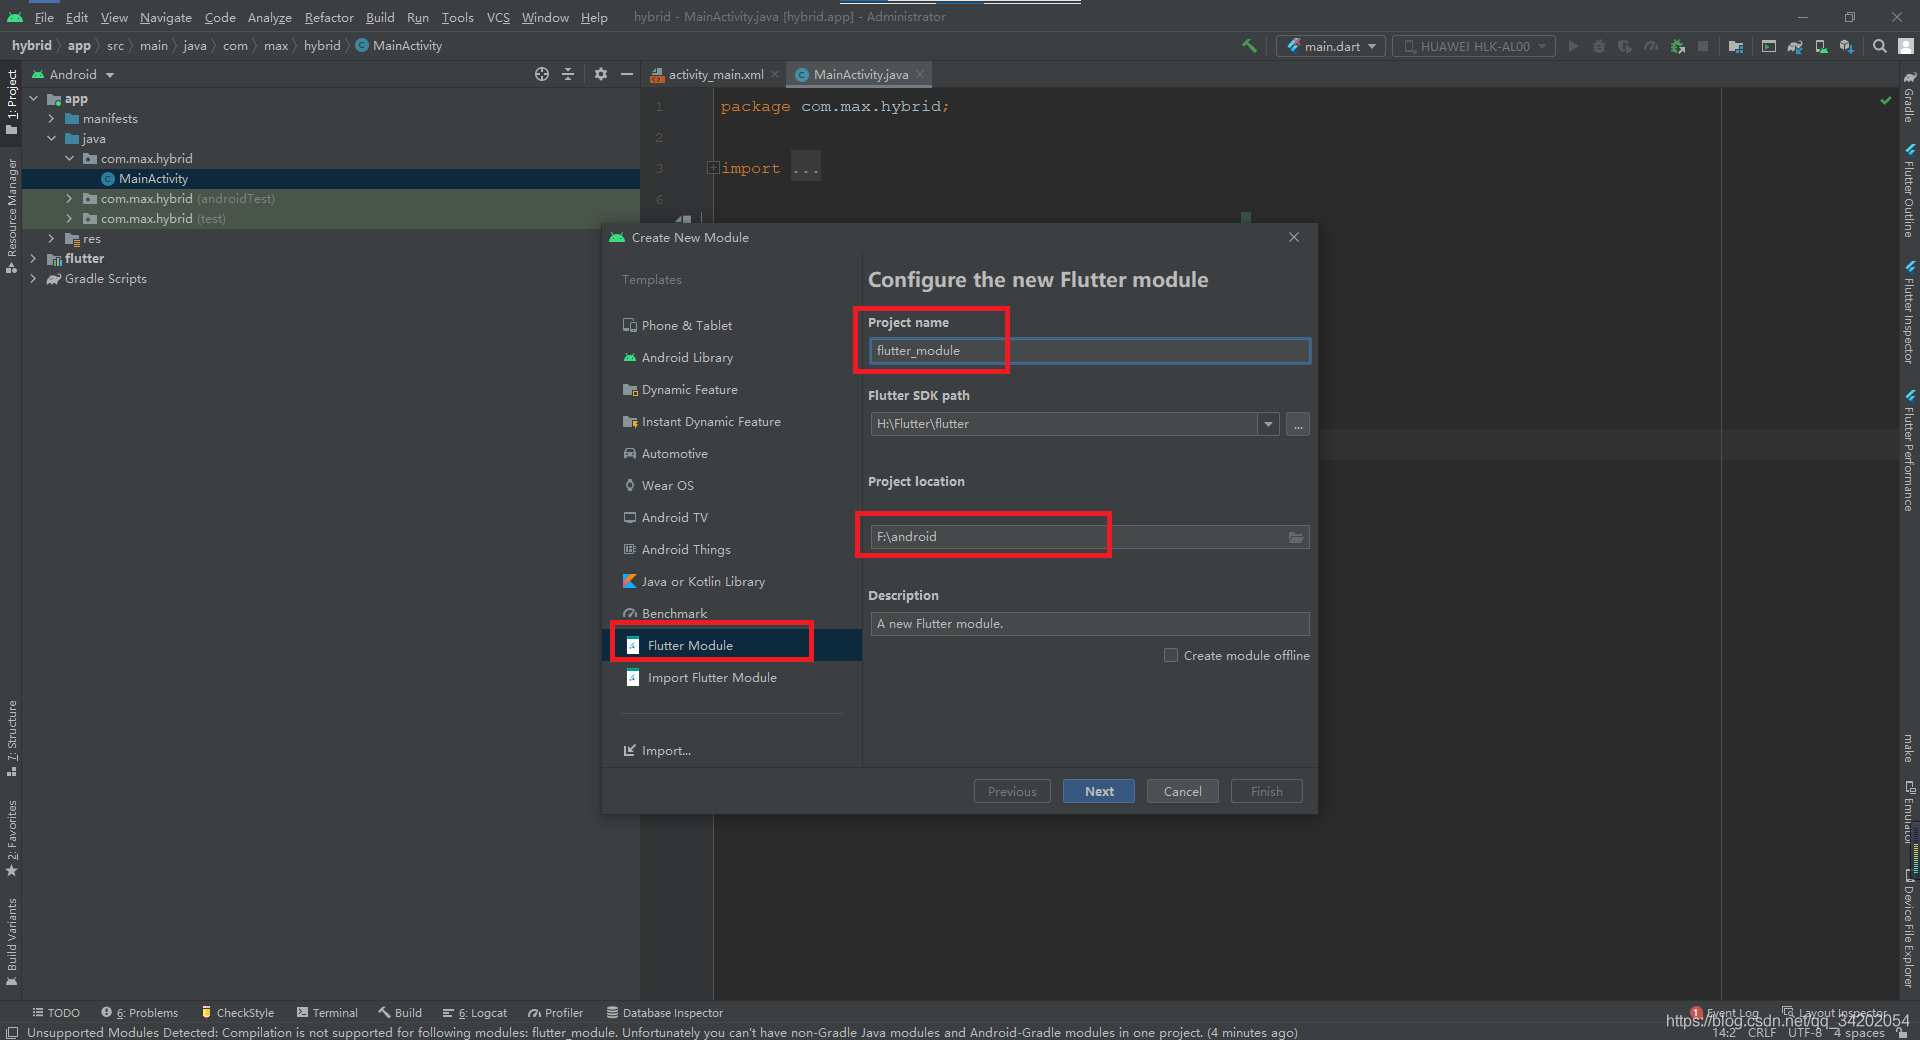
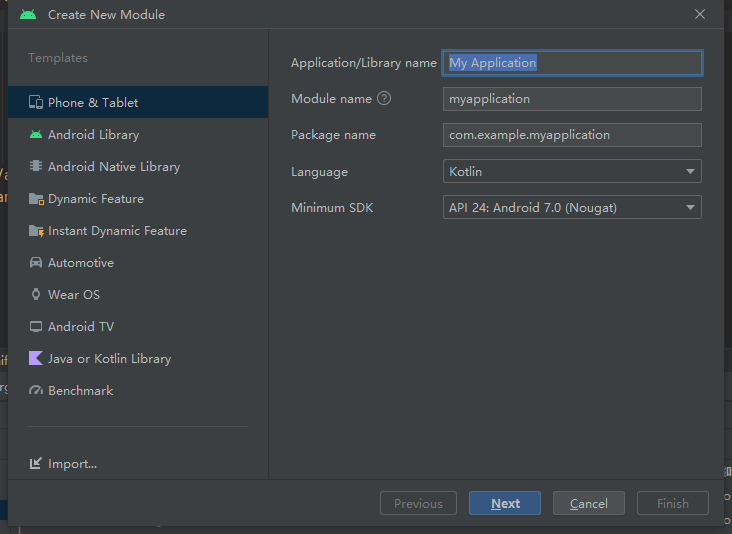
Then enter the Project name of the Flutter module, select the path where the Flutter SDK is located, select the file location of the Flutter module, and finally enter the description of the Flutter module, and then Next. After filling in the
basic information as shown in the figure below, click Next. Enter the package name of the Flutter module in the pop-up panel, as shown in the figure below.
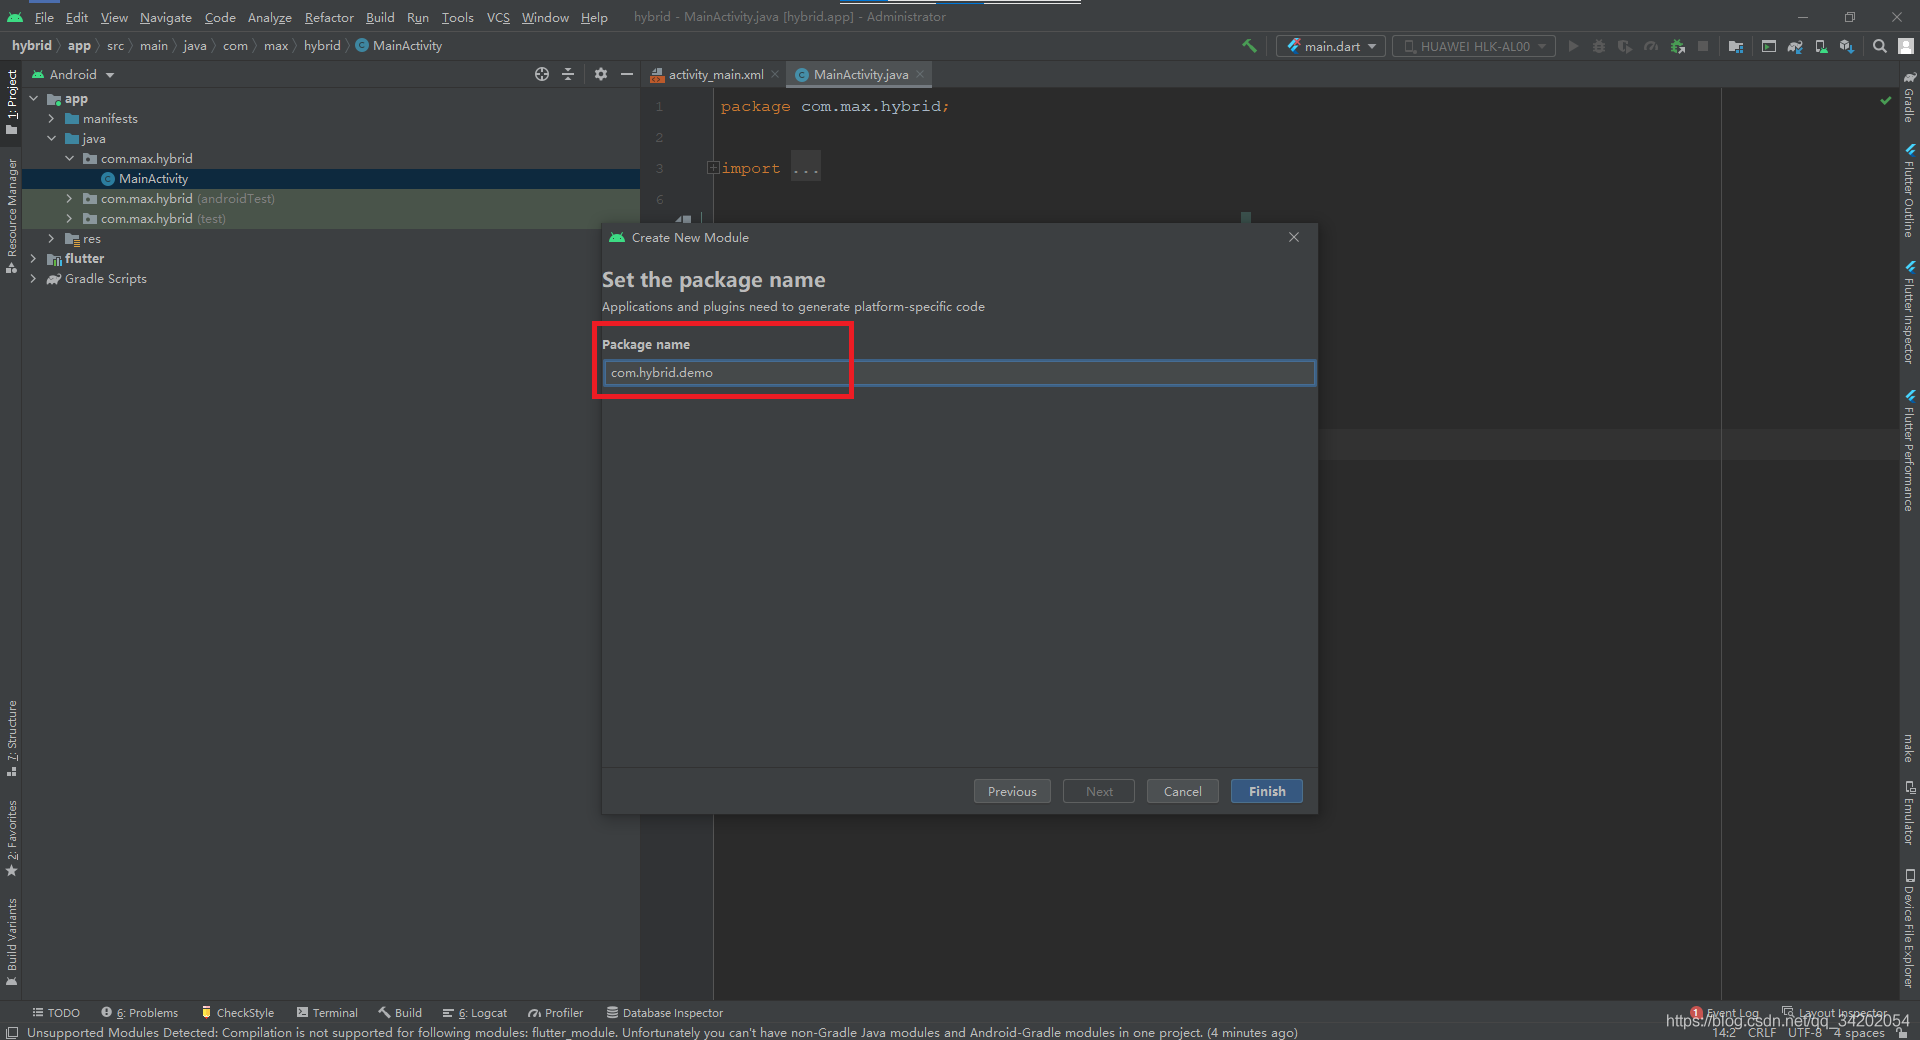
After entering the Package name and clicking Finish, the Flutter module is officially created.
There is basically no difference in content between the created flutter module and the newly created flutter project.
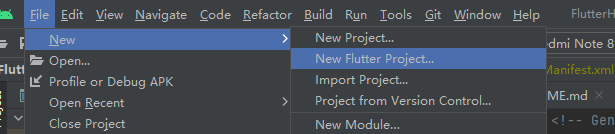
Method 2
Of course, some people will find that their Android Studio does not have the Flutter Moudle option when creating Moudle, as shown below. It
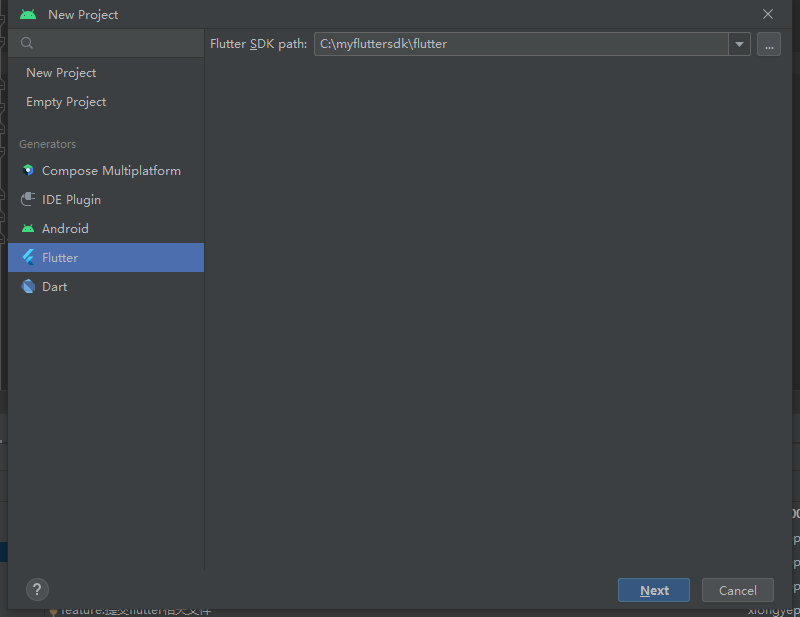
is probably the difference between different versions of AS. At this time, we can choose to create a Flutter Project
and select the next step:
then select Moudle in the drop-down box. Just click create.
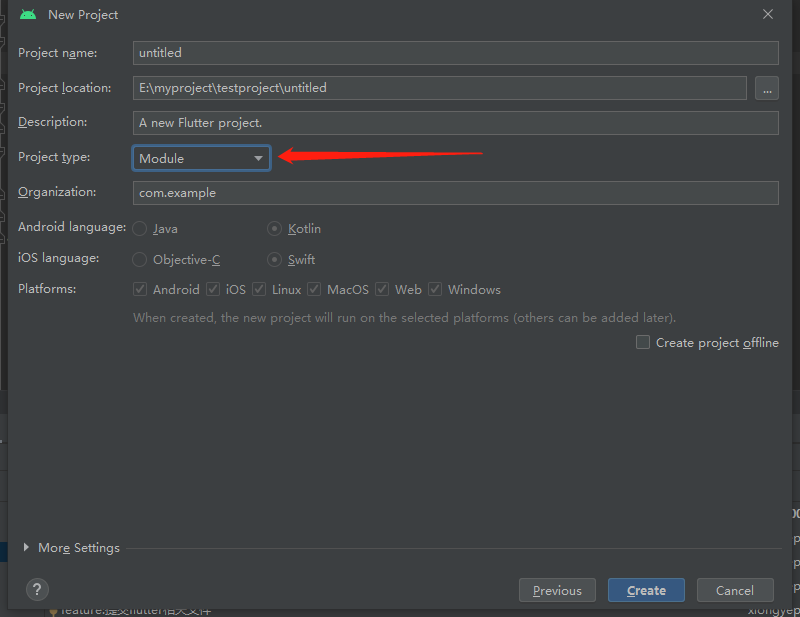
Note, remember to configure the path of the created FlutterMoudle in the settings.gradle of the Android project.
You can also directly put it in the directory of the Android project and then configure the path.
gradle version adaptation
The above is about how Gradle7.X projects integrate FlutterMoudle for hybrid development . For
specific changes in Gradle7
. The Gradle version and writing method
are before 7 .
rootProject.name = "FlutterHybridProject"
include ':app'
setBinding(new Binding([gradle: this]))                                // 新增
evaluate(new File(                                                     // 新增
        settingsDir.parentFile,                                              // 新增
        "${

      rootProject.name}/flutterxiongmodule/.android/include_flutter.groovy"  // 新增
))                                                                     // 新增
include ':flutterxiongmodule'
The major changes are in the build.gradle file, all of which are posted here:
// Top-level build file where you can add configuration options common to all sub-projects/modules.
buildscript {


    ext.kotlin_version = '1.7.10'
    repositories {


        google()
        mavenCentral()
        maven {

     url 'https://jitpack.io' }
    }

    dependencies {


        classpath 'com.android.tools.build:gradle:7.2.0'
        classpath "org.jetbrains.kotlin:kotlin-gradle-plugin:$kotlin_version"
    }
}

allprojects {


    repositories {


        google()
        mavenCentral()
        maven {

     url 'https://jitpack.io' }
    }
}

task clean(type: Delete) {


    delete rootProject.buildDir
}
At this point, the first way to build a Flutter hybrid project is finished.
Source code sharing and use
The relevant codes in the article have been placed on gitee. If you need it, you can get it yourself. Different branches of
FlutterHybridProject are examples of their own integration methods. The differences are as follows:
- master A simple Android Helloworld project
- old_gradlesetting module code dependency mode: Gradle version is lower than Gradle7.X integration
- new_gradlesetting module code dependency mode: Gradle7.X mode integration
- aar_flutter AAR dependency mode: based on Gradle7.X version
When you quote other people's FlutterMoudle or download some FlutterMoudle cases from the Internet,
if you find that temporary files such as .android.ios.idea do not exist in FlutterMoudle,
you can open the cmd console in the FlutterMoudle folder
and enter the following command:
flutter create .
After pressing Enter, the system will automatically generate these corresponding temporary files for you.
At this time, you can run the project normally and develop it!
Reference solution:
Flutter error ( Could not read script 'xxx\flutter_tools\gradle\app_plugin_loader.gradle' )