Preface
The previous blog talked about how to use the "module code dependency model" to build a Flutter hybrid project.
Due to space reasons, the steps and points to note when building a project using the AAR integration method will be discussed in this blog.
If you haven't read it, blog, it is recommended to read the previous one first:
(Original) Introduction to Flutter Basics: Teach you step by step how to build a Flutter hybrid project.
The specific steps are explained below.
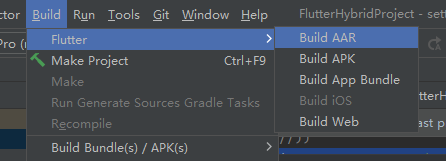
Integration steps
compile aar
First, enter our Flutter Module. I usually introduce the Module into an Android project and
write this in the settings.gradle file:
include ':flutterxiongmodule'
After introduction, enter the module directory of flutter and execute the command:
flutter build aar
Similar to the picture below:

Of course, we can also use Android Studio to build aar like this.
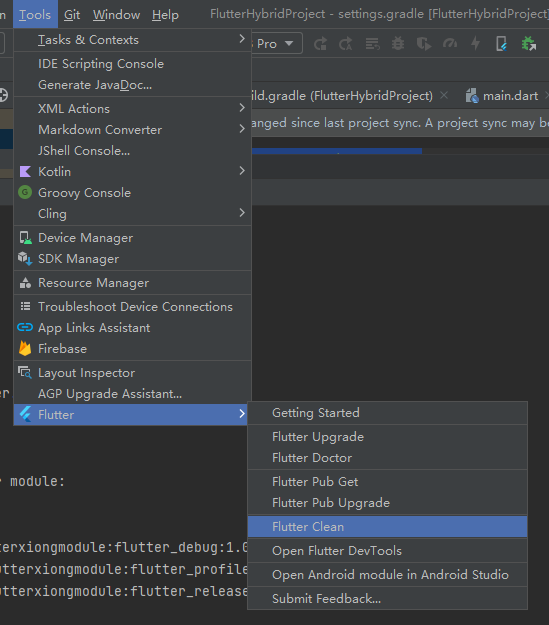
You can also clean it under the Tools menu and remove the previous build cache:
After the build is successful, the printed log actually tells us how to integrate it. Continue reading.
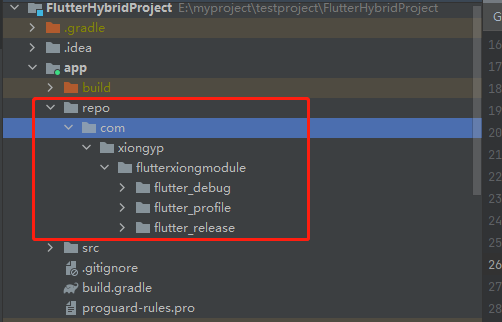
repo folder under build
After the aar is built successfully, there will be these files under our FlutterMoudle:
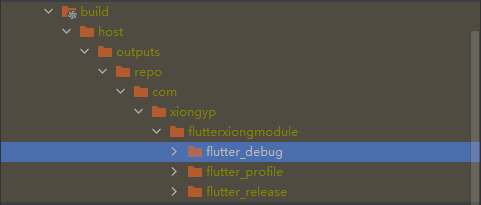
The generated aar files are in the folder of this directory. Three corresponding aar are generated according to different usage situations.
If a colleague needs to access our aar, we Just copy the entire repo folder under build to him
and then continue the integration.
integrated aar
First modify the contents of settings.gradle
repositoriesMode.set(RepositoriesMode.FAIL_ON_PROJECT_REPOS)
Change to
repositoriesMode.set(RepositoriesMode.PREFER_PROJECT)
The specific differences were mentioned in the previous blog.
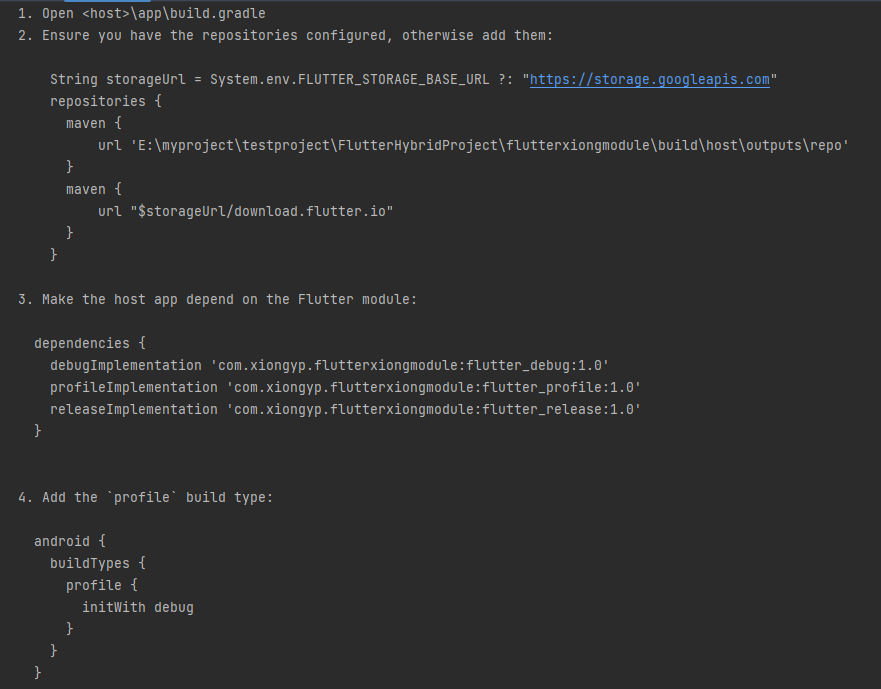
Then follow the steps in the log. First, enter the build.gradle file in the root directory of our project
and add these contents.
      var storageUrl = System.env.FLUTTER_STORAGE_BASE_URL ?: "https://storage.googleapis.com"
      repositories {


        maven {


            url 'E:\myproject\testproject\FlutterHybridProject\flutterxiongmodule\build\host\outputs\repo'
        }
        maven {


            url "$storageUrl/download.flutter.io"
        }
      }
It should be noted here that the first Maven URL is configured with the path of our repo folder.
If your colleagues need to use the aar you generated
, put the repo folder you sent directly under the app project, similar to this
because I FlutterMoudle is introduced directly,
so my path is this
'E:\myproject\testproject\FlutterHybridProject\flutterxiongmodule\build\host\outputs\repo'
If you put it in the app directory like the picture above, it will look like this:
'E:\myproject\testproject\FlutterHybridProject\app\repo'
The entire content of the build.gradle file in the root directory is as follows:
// Top-level build file where you can add configuration options common to all sub-projects/modules.
plugins {


    id 'com.android.application' version '7.4.2' apply false
    id 'com.android.library' version '7.4.2' apply false
    id 'org.jetbrains.kotlin.android' version '1.8.0' apply false
}

allprojects {


    var storageUrl = System.env.FLUTTER_STORAGE_BASE_URL ?: "https://storage.googleapis.com"
    repositories {


        google()
        mavenCentral()
        maven {

     url 'https://jitpack.io' }
        maven {


            url 'E:/myproject/testproject/FlutterHybridProject/flutterxiongmodule/build/host/outputs/repo'
        }
        maven {


            url "$storageUrl/download.flutter.io"
        }
    }
}

task clean(type: Delete) {


    delete rootProject.buildDir
}
Then go to our app’s build.gradle file and add these:
    dependencies {


      debugImplementation 'com.xiongyp.flutterxiongmodule:flutter_debug:1.0'
      profileImplementation 'com.xiongyp.flutterxiongmodule:flutter_profile:1.0'
      releaseImplementation 'com.xiongyp.flutterxiongmodule:flutter_release:1.0'
    }
If it is just for testing, you don’t need to introduce all three aar, just introduce the first one. The specific differences will be introduced below.
Then add under the android buildTypes of the app’s build.gradle file:
        profile {


            initWith debug
        }
The overall structure is as follows:
android {


    buildTypes {


        release {


            minifyEnabled false
            proguardFiles getDefaultProguardFile('proguard-android-optimize.txt'), 'proguard-rules.pro'
        }
        profile {


            initWith debug
        }
    }
}
In this way, our aar is integrated
Page jump
This is the same as the previous blog. Just follow the steps in the previous article. After
running the project, you can jump to the Flutter page normally.
important point
Four operating modes
When we type aar, we will find that several types are generated:
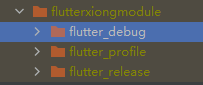
This is because Flutter has four operating modes: Debug, Release, Profile and Test. These
four modes are completely independent during build.
The specific differences are:
-
Debug
Debug mode can run on both the real machine and the simulator at the same time: all assertions will be turned on, including debugging information, debugger aids (such as observatory) and service extensions. Optimized for fast develop/run loops, but not for execution speed, binary size, and deployment. The command flutter run is run in this mode, and is built through sky/tools/gn --android or sky/tools/gn --ios. Sometimes also called "checked mode" or "slow mode". -
Release
Release mode can only be run on a real machine, not an emulator: all assertions and debugging information will be turned off, and all debugger tools will be turned off. Optimized for fast startup, fast execution and reduced package size. Disable all debugging aids and service extensions. This mode is intended for deployment to end users. The command flutter run --release is run in this mode. Build via sky/tools/gn --android --runtime-mode=release or sky/tools/gn --ios --runtime-mode=release. -
Profile
Profile mode can only run on a real machine, not an emulator: it is basically the same as the Release mode, except that service extensions and tracing are enabled, as well as some things to minimally support tracing operations (such as the ability to connect the observatory to the process). The command flutter run --profile is run in this mode, through sky/tools/gn --android --runtime-mode=profile or sky/tools/gn --ios --runtime-mode=profile``` build. Because the simulator does not represent the real scenario, it cannot be run on the simulator. -
test
headless test mode can only be run on the desktop: basically the same as Debug mode, except it is headless and you can run it on the desktop. The command flutter test is run in this mode and built through sky/tools/gn.
In our actual development, the four modes mentioned above should be used and divided into two types: one is the unoptimized mode for developers to use for debugging; the other is the optimized mode for the final developers. use. The default is unoptimized mode. If you want to enable optimized mode, add the –unoptimized parameter after the command line when building.
Solve the problem that the third-party library of the aar package cannot be referenced
When your Flutter references a third-party plug-in or aar package, after typing Flutter's aar,
you will find that the third-party plug-in or aar package cannot be found,
which means that these plug-ins and aar packages cannot be indirectly referenced.
In fact, this problem Not only does Flutter have it, but
we also encounter it in the process of encapsulating SDK.
For example, the android project packages the module into an aar file for others to use,
which references other people's aar.
However, when the module forms an aar, it will not automatically package the aar package it relied on before,
and some referenced third-party libraries will not be packaged, so they need to be referenced repeatedly when using them.
In order to solve this problem, in addition to repeating references yourself,
here is another solution:
first add in build.gradle in the root directory of the root project:
 dependencies {


        classpath 'com.kezong:fat-aar:1.2.8'
        // NOTE: Do not place your application dependencies here; they belong
        // in the individual module build.gradle files
    }
Add in the module project that needs to be packaged into an aar package (equivalent to introducing this plug-in):
apply plugin: 'com.kezong.fat-aar'
The arr package and third-party library packages are referenced as follows:
dependencies {


    implementation fileTree(include: ['*.jar'], dir: 'libs')
    implementation 'androidx.appcompat:appcompat:1.0.2'
    testImplementation 'junit:junit:4.12'
    androidTestImplementation 'androidx.test.ext:junit:1.1.0'
    androidTestImplementation 'androidx.test.espresso:espresso-core:3.1.1'
    embed(name: 'aar包名称', ext: 'aar'){

     transitive = true}

    embed ('com.squareup.okio:okio:1.14.1'){

     transitive = true}
    embed ('com.squareup.okhttp3:okhttp:3.8.0'){

     transitive = true}
    embed ('com.google.code.gson:gson:2.8.0'){

     transitive = true}

}
Flutter build android aar version
When we use flutter build aar, it always builds version 1.0, for example: flutter_release-1.0.aar.
So how to modify the version of aar?
At first, I thought of modifying the version in the pubspec.yaml file: 1.0.0+1.
Finally, I found that it was invalid. In fact, you should enter this on your command line:
flutter build aar --build-number=2.0
After the number is your version number.
If you just want to generate a release aar, you can try this:
flutter build aar --no-debug --no-profile --build-number=2.0
For more information about this command, try this:
flutter build aar -h
Source code sharing
The relevant codes in the article have been placed on gitee. If you need it, you can get it yourself. Different branches of
FlutterHybridProject are examples of their own integration methods. The differences are as follows:
- master A simple Android Helloworld project
- old_gradlesetting module code dependency mode: Gradle version is lower than Gradle7.X integration
- new_gradlesetting module code dependency mode: Gradle7.X mode integration
- aar_flutter AAR dependency mode: based on Gradle7.X version