1. Overview of Unity Shader
1. Materials and Unity Shader
- In Unity , materials and Unity Shader need to be used together to achieve the desired effect.
- Common processes:
-
- Create a material
- Create a Unity Shader and assign it to the material created in the previous step
- Assign the material to the object to be rendered
- Adjust the properties of Unity Shader in the material panel
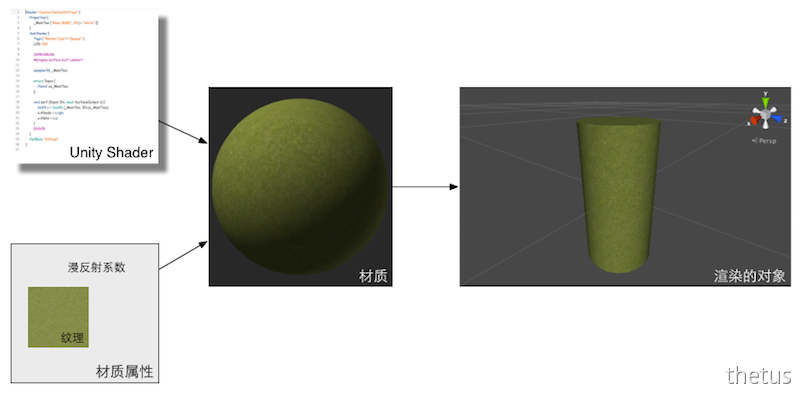
Unity Shaders and Materials. First create the required Unity Shader and material, then assign the Unity Shader to the material, and adjust the properties (such as texture used, diffuse reflection coefficient, etc.) on the material panel. Finally, assign the material to the corresponding model to view the final rendering effect.
- Unity Shader defines the various codes (such as vertex shaders and fragment shaders), properties (such as which textures to use, etc.) and instructions (rendering and label settings, etc.) required for rendering, and materials allow us to adjust these properties. And finally assign it to the corresponding model.
- Materials in Unity determine what our game objects look like (with Unity Shader)
2. Materials in Unity
Materials in Unity need to be combined with a GameObject's Mesh or Particle Systems component to work. It determines what our game objects look like (of course this also requires the cooperation of Unity Shader).
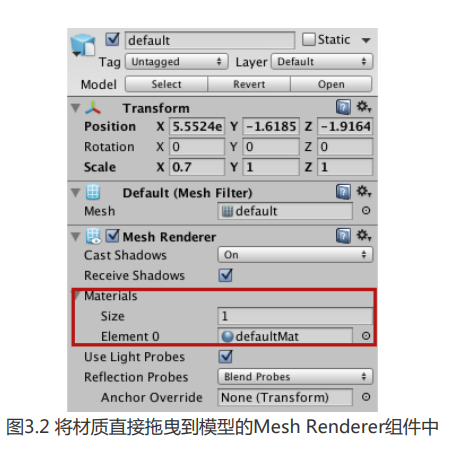
In order to create a new material, we can select Assets -> Create -> Material in Unity's menu bar, or we can right-click -> Create -> Material directly in the Project view. Once a material is created, it can be assigned to an object. This can be achieved by dragging the material directly onto the object in the Scene view, or assigning it directly to the Mesh Renderer component of the object, as shown in Figure 3.2.
In Unity 5.
For artists, materials are something they are very familiar with. Unity's materials have similar functions to those provided in many modeling software (such as Cinema4D, Maya, etc.). They all provide a panel to adjust various parameters of the material. This visual method eliminates the need for developers to set and change various parameters required for rendering in the code, as shown in Figure 3.3.

3. Shader in Unity
- Unity Shader
Shader, Unity Shader can do more than traditional Shader
- Unity Shader template:
-
- Standard Surface Shader: Standard lighting model
- Unlit Shader: Basic vertex/fragment shader without lighting (but with fog)
- Image Effect Shader: Screen post-processing effect
- Compute Shader: Use the parallelism of the GPU to perform some calculations unrelated to the regular rendering pipeline
2. The basis of Unity Shader: ShaderLab
1. ShaderLab language
Unity provides a language specifically for Unity Shader - ShaderLab. In Unity, all Unity SHaders are written using ShaderLab. ShaderLab is a declarative language provided by Unity for writing Unity Shader.
It uses some semantics (syntax) nested inside curly braces to describe the structure of a Unity Shader file.
These structures contain a lot of data required for rendering. For example, the Properties statement block defines various properties required by the shader, and these properties will appear in the material panel.
ShaderLab is similar to the CgFX and Direct3D Effects (.FX) languages in that they both define everything needed to display a material, not just the shader code .

Unity Shader provides a layer of abstraction for controlling the rendering process. Without Unity Shader (left picture), developers need to deal with a lot of files and settings to get the desired effect; with the help of Unity Shader (right picture), developers only need to use ShaderLab to write Unity Shader files can do all the work
2. Basic structure of Unity Shader
The basic structure of a Unity Shader is as follows:
Shader "ShaderName"{
	Properties{
		// 属性
	}
	SubShader{
		// 显卡A使用的子着色器
	}
	SubShader{
		// 显卡B使用的子着色器
	}
	Fallback "VertexLit"
}
Behind the scenes, Unity will compile these structures into real code and Shader files according to the platform used, and developers only need to deal with Unity Shader.
3. Structure of Unity Shader
1. Give the Shader a name
The first line of each Unity Shader file needs to specify the name of the Unity Shader through Shader semantics. The name is defined by a string, such as "MyShader". These names will appear in the drop-down list of the material panel when selecting the Unity Shader to use for the material. By adding a slash ("/") to the string, you can control where the UnityShader appears in the material panel. For example:
Shader "path/display name"Then the location of this Unity Shader in the material panel is: Shader -> Custom -> MyShader, as shown in Figure 3.7.

Custom/MyShader: Use slashes in the name definition of Unity Shader to organize its position in the material panel
2. Properties: the bridge between materials and Shader
The Properties semantic block contains a series of properties that will appear in the material panel.
Properties block is usually defined as follows:
Properties{
	Name("display name", PropertyType) = DefaultValue
	Name("display name", PropertyType) = DefaultValue
	// 更多属性
}- Name : The name of the attribute, usually starting with an underscore. Identifier accessed in Shader.
- display name : the name that appears on the material panel
- PropertyType : type of property
- DefaultValue: Default value. When a material is assigned for the first time, the value that appears on the panel is the default value.
Property types supported by the Properties semantic block

Int, Float, Range numeric type attributes: their default value is a single number;
Color, Vector properties: The default value is a four-dimensional vector surrounded by parentheses;
There are three texture types: 2D, Cube, and 3D: their default values are specified by a string followed by a curly brace, where the string is either empty or a built-in texture name, such as "white" "black" """gray" or "bump". The use of curly braces was originally used to specify some texture attributes. For example, in versions before Unity 5.0, we can control the texture coordinates of the fixed pipeline through options such as TexGenCubeReflect and TexGen CubeNormal. Generate. But in versions after Unity 5.0, these options are removed. If we need similar functions, we need to write the code to calculate the corresponding texture coordinates in the vertex shader ourselves.
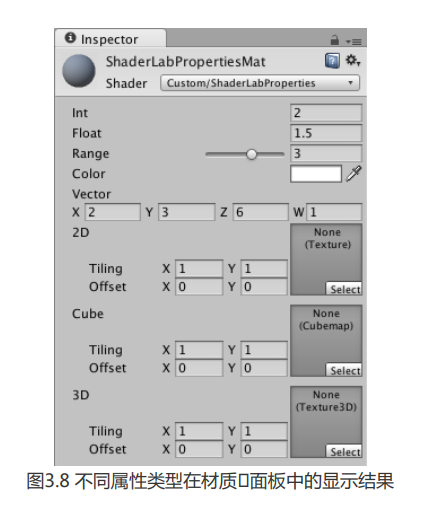
The following code gives an example showing all attribute types:
Shader "Custom/ShaderLabProperties" {
    Properties {
        // Numbers and Sliders
        _int ("Int",Int) = 2;
        _Float ("Float",Float) = 1.5
        _Range("Range",Range(0.0, 5.0) = 3.0
        // Colors and Vectors
        _Color ("Color", Color) = (1,1,1,1)
        _Vector ("Vector",Vector) = (2,3,6,1)
        // Textures
        _2D ("2D". 2D) = "" {}
        _Cube ("Cube", Cube) == "White" {}
        _3D ("3D", 3D) = "black" {}
    }

    FallBack "Diffuse"
}
The above code displays the results in the material panel as follows:
Sometimes, we want to display more types of variables on the material panel, such as using Boolean variables to control which calculations are used in the Shader. Unity allows us to override the default material editing panel to provide more custom data types. We provide such a simple example in the material Assets -> Materials -> Chapter3 - RedifyMat of this book's resources. This example refers to the code in the Custom Shader GUI article of the official manual ( Unity - Manual: ShaderLab: assigning a custom editor .
In order to access these properties in the Shader, we need to define variables that match the types of these properties in the CG code piece. It should be noted that even if we do not declare these properties in the Properties semantic block, we can also define variables directly in the CG code piece. At this point, we can pass these properties to the Shader through scripts. Therefore, the purpose of the Properties block is simply to allow these properties to appear in the material panel.
3. Heavyweight member: SubShader
3.1. Structure of SubShader
Each UnityShader file can contain multiple SubShader semantic blocks, but there must be at least one. Unity will scan all SubShader semantic blocks and select the first one that can run on the target platform. If neither is supported, the Unity Shader specified by Fallback semantics will be used.
The reason Unity provides this semantics is that different graphics cards have different capabilities. For example, some old graphics cards can only support a certain number of operation instructions, and some more advanced graphics cards can support more instructions. Then we hope to use shaders with lower computational complexity on the old graphics cards, while on the advanced graphics cards Use more computationally complex shaders on your graphics card to provide better graphics.
SubShader{
	// 可选的
	[Tags]

	// 可选的
	[RenderSetup]

	Pass{

	}
	// Other Passes
}- A series of Passes and optional state ([RenderSetup]) and tag ([Tags]) settings are defined in SubShader.
- Each Pass defines a complete rendering process , but if the number of Passes is too large, it will often cause a decrease in rendering performance.
- Position of status and label:
-
- SubShader: global scope
- Pass: Pass local scope (only for this rendering)
3.2. SubShader status setting
ShaderLab provides a series of rendering state setting instructions, which can set various states of the graphics card, such as whether to enable blending/depth testing, etc. Table 3.2 gives the common rendering state setting options in ShaderLab.
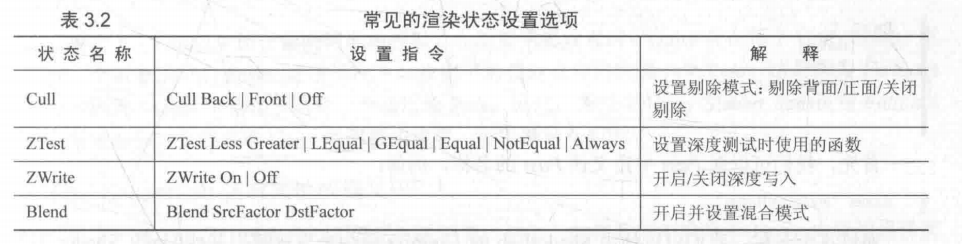
When we set the above rendering state in SubShader, it will be applied to all Passes. If we want different rendering effects in different Passes, we can declare them separately in SubShader and Pass.
3.3. SubShader label
SubShader's label is a Key /Value Pair, and its keys and values are both string types. These
key-value pairs are the communication bridge between SubShader and the rendering engine. They are used to tell Unity's rendering engine how and when I want this object to be rendered.
The structure of the tag is as follows:
Tags{"TagName1"="Value1" "TagName2"="Value2"}Label types supported by SubShader's label block

It should be noted that the above tags can only be declared in SubShader, not in Pass. Tags can also be defined in Pass, but these tags are different from the tag types of SubShader.
3.4. Pass semantic block
The semantics contained in the Pass semantic block are as follows:
Pass{
	[Name]
	[Tags]
	[RenderSetup]
	// Other code
}- First define the name of the Pass:
Name "MyPassName"-
- We can use the UsePass command in ShaderLab to directly use Passes in other Shaders.
UsePass "MyShader/MYPASSNAME"Note that Unity internally converts all Pass names to uppercase.
We can also set the rendering state for the Pass and use fixed pipeline shader commands.
Pass can also set labels
- The Pass tag tells the rendering engine how we want to render the object.
Pass tag type
In addition to the ordinary Pass definitions above, Unity Shader also supports some special Passes to facilitate code reuse or achieve more complex effects.
- UsePass: As we mentioned before, you can use this command to reuse Passes in other Unity Shaders
- GrabPass: This Pass is responsible for grabbing the screen and storing the results in a texture for subsequent Pass processing.
3.5. Leave a way out: Fallback
The Fallback instruction will tell Unity that if all the above SubShaders cannot run on this graphics card, then use this lowest level Shader.
Fallback semantics are as follows:
Fallback "name"
// 或者
Fallback Off
As mentioned above, we can tell Unity who this "lowest Unity Shader" is through a string. We can also turn off the Fallback` function arbitrarily, but once you do this, what you probably mean is: "If a graphics card cannot run all the SubShaders on it, then forget about it!"
An example of using the Fallback statement is given below:
Fallback "VertexLit"In fact, Fallback also affects shadow casting.
When rendering shadow textures, Unity will look for a shadow casting Pass in each Unity Shader. Normally, we don't need to implement a Pass ourselves, because the built-in Shader used by Fallback contains such a universal Pass. Therefore, it is very important to set the Fallback correctly for each Unity Shader.
4. Form of Unity Shader
1. Three shader code forms in Unity Shader
- Surface shader: Shader code is written in SubShader semantic block
- Vertex/fragment shaders and fixed shaders: shader code is written in Pass semantic block
In Unity, we can use the following 3 forms to write Unity Shader. No matter which form is used, the real Shader code needs to be contained in the ShaderLab semantic block, as shown below:
Shader "MyShader"{
	Properties{
		// 所需的各种属性
	}
	SubShader{
		// 真正意义上的Shader代码会出现在这里
		// 表面着色(Surface Shader)或者
		// 顶点/片元着色器(Vertex/Pragment Shader)或者
		// 固定函数着色器(Finxed Function Shader)
	}
	SubShader{
		// 和上一个SubShader类似
	}
}
2. Surface Shader
Surface shaders are a higher level abstraction of vertex/fragment shaders. It is expensive to render because Unity essentially converts the vertex shader into the corresponding vertex/fragment shader. Its value is that Unity will handle a lot of lighting details for us, so we don’t have to worry about these lighting details.
Here is example code for a very simple surface shader:
Shader "Custom/Simple Surface SHader"{
	SubShader{
		Tags{"RenderType" = "Opaque"}
		CGPROGRAM
		#pragma surface surf Lambert
		struct Input {
			float4 color : COLOR;
		};
		void surf(Input IN, inout SurfaceOutput o){
			o.Albedo = 1;
		}
		ENDCG
	}
	Fallback "Diffuse"
}CGPROGFRAMSurface shaders can only be defined between and in a SubShader semantic block ENDCG. Because surface shaders do not require developers to worry about how many passes are used and how each pass is rendered, Unity will do these things behind the scenes. All we have to do is tell it: "Hey, use these textures to fill the color, use this normal texture to fill the normals, use the Lambert lighting model, and don't bother me with the rest!".
The code between CGPROGRAM and ENDCG is written using CG/HLSL, that is to say, we need to nest the CG/HLSL language in the ShaderLab language. It is worth noting that the CG/HLSL here is provided by Unity after encapsulation. Its syntax is almost the same as the standard CG/HLSL syntax, but there are still slight differences. For example, some native functions and usages are not supported by Unity. .
3. Vertex/Fragment Shader
In Unity, we can use CG/HlSL language to write vertex/fragment shaders. Vertex/fragment shaders are more complex, but also more flexible.
A very simple vertex/fragment shader example code is as follows:
Shader "Custom/Simple VertexFragment Shader"{
	SubShader{
		Pass{
			CGPROGRAM

			#pragma vertex vert
			#pragma fragment frag

			float4 vert(float4 v : POSITION) : SV_POSITION{
				return mul (UNITY_MATRIX_MPV, v);
			}

			float4 frag() : SV_Target{
				return fixed4(1.0, 0.0, 0.0, 1.0);
			}

			ENDCG
		}
	}
}CGPROGRAMVertex/fragment shaders can only be defined between and in Pass semantic blocks ENDCG.
Similar to the surface shader, the code of the vertex/fragment shader also needs to be defined between CGPROGRAM and ENDCG, but the difference is that the vertex/fragment shader is written in the Pass semantic block rather than in the SubShader. The reason is that we need to define the Shader code that each Pass needs to use. While we may need to write more code, the benefit is flexibility. More importantly, we can control the implementation details of rendering. Similarly, the code between CGPROGRAM and ENDCG here is also written using CG/HLSL.
4. Fixed Function Shader
Both of the above forms of Unity Shader use programmable pipelines. For some older devices (their GPU only supports DirectX 7.0, OpenGL 1.5 or OpenGL ES 1.1), such as iPhone 3, they do not support programmable pipeline shaders, so at this time we need to use fixed function shaders ( Fixed Function Shader) to complete rendering. These shaders can often only accomplish some very simple effects.
A very simple fixed function shader example code is as follows:
Shader "Tutorial/Basic" {
    Properties {
        _Color {"Main Color", Color) = (1,0.5,0.5,1)
    }
    SubShader {
        Pass {
            Material {
                Diffuse [_Color]
            }
            Lighting On
        }
    }
}
It can be seen that the code of the fixed function shader is defined in the Pass semantic block, and these codes are equivalent to some rendering settings in Pass.
For fixed function shaders, we need to write completely using ShaderLab's syntax (that is, using ShaderLab's rendering settings command). Instead of using CG/HLSL.
Since most GPUs now support programmable rendering pipelines, this fixed pipeline programming method has gradually been abandoned. In fact, in Unity 5.2, all fixed function shaders will be compiled into corresponding vertex/fragment shaders by Unity behind the scenes, so the real fixed function shaders no longer exist.
5. Which Unity Shader mode to choose?
So, which one do we choose to write Unity Shader? Here are some suggestions.
Unless you have a very specific need to use fixed-function shaders, such as running them on very old devices
games (very rare on these devices), otherwise use a programmable pipeline shader, i.e. a surface shader or a vertex/fragment shader.
If you want to work with various light sources, you may prefer to use a surface shader, but need to be careful about how it works on mobile platforms
Performance.
If you need to use a very small number of lights, such as only one directional light, then using a vertex/fragment shader is a better choice.
Most importantly, if you have a lot of custom rendering effects, choose a vertex/fragment shader.
5. Unity Shader form used in this book
The purpose of this book is not only to teach readers how to use Unity Shader, but more importantly, to let readers master the principles behind rendering. Although just understanding high-level abstractions may temporarily simplify the work, the long-term impact of "knowing it but not knowing why" will be more profound.
Therefore, in the rest of this book, we will focus on using vertex/fragment shaders to write Unity Shader. For surface shaders, we will analyze them in Chapter 17 of this book, where readers can find more learning content.
6. Answer questions and resolve doubts
1. Unity Shader ≠ real Shader

2. The relationship between Unity Shader, CG and HLSL


3. Can I use GLSL to write?
sure. If you insist: "I just don't want to use CG/HLSL to write! I just want to use GLSL to write!", but this means that the only target platforms you can publish are Mac OS X, OpenGL ES 2.0 or Linux, and for PC , Xbox360 and other platforms that only support DirectX, you give up on them.
Based on your insistence on using GLSL to write Unity Shader, how can you write it? Similar to the need for CG/HLSL to be nested between CGPROGRAM and ENDCG, GLSL code needs to be nested between GLSLPROGRAM and ENDGLSL.
More information about how to write GLSL code in Unity Shader can be found in the GLSL ShaderPrograms article in the Unity official manual ( http://ldocs.unity3d.com/Manual/SL-GLSLShaderPrograms.html) .
7. Extended reading
The documentation on Unity Shader on the official website of Unity is constantly being supplemented. Since Unity encapsulates many functions and details, if readers encounter problems when using Unity Shader, they can go to the official documentation (http:/ldocs.unity3d. com/Manual/SL-Reference.html). In addition, Unity also provides some simple shader writing tutorials (http:/docs.unity3d.com/Manual/ShaderTut1.html, http://docs.unity3d.com/Manual/ShaderTut2.html) . Since most of the shader code of the programmable pipeline in Unity Shader is written in CG language, readers can find more in the CG documentation provided by NVIDIA (http://http.developer.nvidia.com/CG/) Content. NVIDIA also provides a series of tutorials (http://http.developer.nvidia.com/CGTutorialcG_tutorial_chapter01.html) to help beginners master the basic syntax of CG.