Table of contents
1.What is service registration and discovery?
4. Obtain cluster information through http api
1.Install Gliderlabs/Registrator
2. Test whether the service discovery function is normal
3. Verify whether the http and nginx services are registered to consul
1. Prepare template nginx template file
4. Configure and start template
6. Add an nginx container node
①Add an nginx container node to test the service discovery and configuration update functions.
②View the contents of the /usr/local/nginx/conf/vhost/ly.conf file
③ Check the logs of three nginx containers and request normal polling to each container node.
1. Overview of Consul
1.What is service registration and discovery?
Service registration and discovery are indispensable and important components in the microservice architecture. At first, services were all single-node, which did not guarantee high availability and did not consider the pressure bearing of the service. Calls between services were simply accessed through interfaces.
Until the emergence of a distributed architecture with multiple nodes, the initial solution was to load balance the service front-end. In this way, the front-end must know the network locations of all back-end services and configure them in the configuration file. There will be several questions here:
If you need to call backend services A-N, you need to configure the network locations of N services. The configuration is very troublesome
If the network location of the backend service changes, each caller needs to be changed. Configuration
Since there are these problems, service registration and discovery are the solutions to these problems. Backend services A-N can register their current network location to the service discovery module, and service discovery is recorded in the form of K-V. K is generally the service name, and V is IP:PORT.
The service discovery module performs health checks regularly and polls to see whether these backend services can be accessed. When the front-end calls back-end services A-N, it goes to the service discovery module to ask for their network location, and then calls their services. This method can solve the above problem. The front end does not need to record the network location of these back-end services at all. The front-end and back-end are completely decoupled!
2.What is consul?
consul is a Google open source service management software developed using the Go language. Supports multi-data centers, distributed high availability, service discovery and configuration sharing. The Raft algorithm is used to ensure high availability of services.
It has built-in service registration and discovery framework, distribution consistency protocol implementation, health check, Key/Value storage, and multi-data center solution, and no longer needs to rely on other tools (such as ZooKeeper, etc.).
Service deployment is simple, with only one runnable binary package. Each node needs to run an agent, which has two operating modes: server and client. It is officially recommended that each data center needs 3 or 5 server nodes (an odd number greater than or equal to 3) to ensure data security and ensure that the server-leader election can be carried out correctly.
In client mode, all services registered to the current node will be forwarded to the server node, and this information will not be persisted.
In server mode, the function is similar to client mode. The only difference is that it will persist all information locally, so that in the event of a failure, the information can be retained.
Server-leader is the boss of all server nodes. It is different from other server nodes in that it needs to be responsible for synchronizing registered information to other server nodes. It is also responsible for the health monitoring of each node. .
Some key features provided by consul:
Service registration and discovery: Consul makes service registration and service discovery easy through DNS or HTTP interfaces. Some external services, such as those provided by saas, can also be registered in the same way.
Health check: Health check allows consul to quickly alert on operations in the cluster. Integration with service discovery can prevent services from being forwarded to failed services.
Key/Value storage: A system used to store dynamic configuration. Provides a simple HTTP interface that can be operated anywhere.
Multiple data centers: Support any number of regions without complex configuration.
Installing consul is for service registration, that is, some information about the container itself is registered in consul, and other programs can obtain the registered service information through consul. This is service registration and discovery.
2. consul deployment
1.Environment preparation
systemctl stop firewalld.service
setenforce 0
consul server 192.168.40.10 runs consul service, nginx service, and consul-template daemon process
registrator server 192.168.40.20 runs the registrator container and nginx container
2. Create Consul service
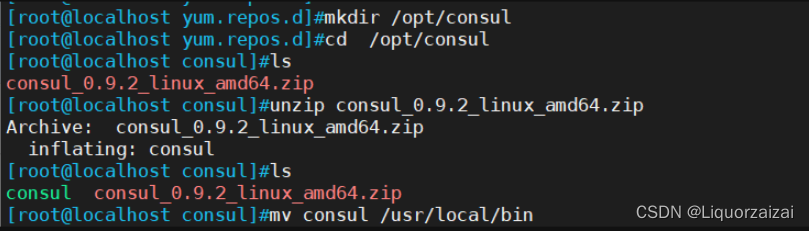
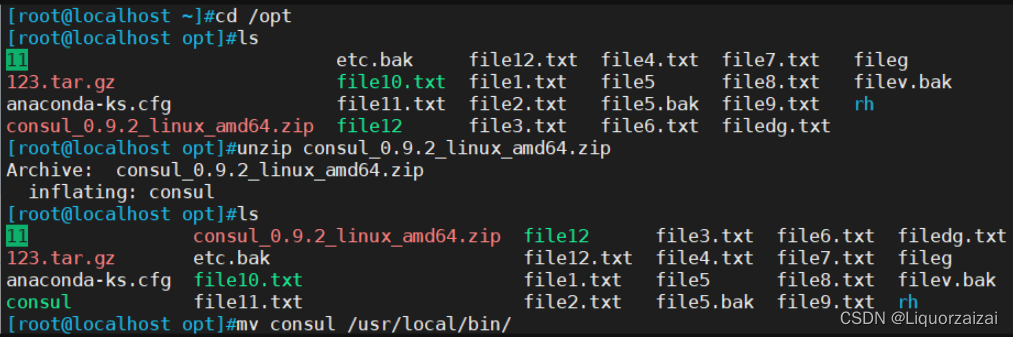
mkdir /opt/consul
cp consul_0.9.2_linux_amd64.zip /opt/consul
cd /opt/consul
unzip consul_0.9.2_linux_amd64.zip
mv consul /usr/local/bin/
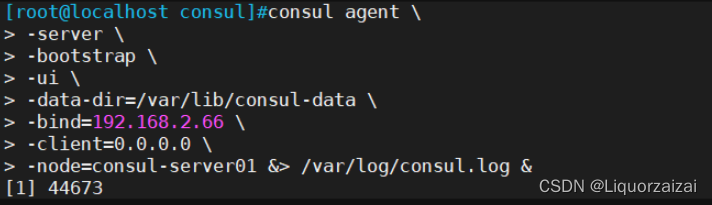
 //Set the proxy and start the consul server in the background
consul agent \
-server \
-bootstrap \
-ui \
-data-dir=/var/lib/consul-data \
-bind=192.168.229.90 \
-client=0.0.0.0 \
-node=consul-server01 &> /var/log/consul.log &
------------------------------------------------ -------------------------------------------------- -----------
-server: Start as server. The default is client.
-bootstrap: Used to control whether a server is in bootstrap mode. There can only be one server in bootstrap mode in a data center. When a server is in bootstrap mode, it can be elected as the server- leader.
-bootstrap-expect=2: The minimum number of servers required by the cluster. When it is lower than this number, the cluster will fail.
-ui: Specifies to open the UI interface, so that the web UI interface that comes with consul can be accessed through an address such as http://localhost:8500/ui.
-data-dir: Specify the data storage directory.
-bind: Specify the communication address used within the cluster. All nodes in the cluster must be reachable to this address. The default is 0.0.0.0.
-client: Specify which client address consul is bound to. This address provides HTTP, DNS, RPC and other services. The default is 127.0.0.1.
-node: The name of the node in the cluster. It must be unique in a cluster. The default is the host name of the node.
-datacenter: Specify the data center name, the default is dc1.
----------------------------------------- -------------------------------------------------- ---------------
netstat -natp | seized the consul
After starting consul, it will listen to 5 ports by default:
8300: The port for replication and farleaderwarding
8301: The port for lan cossip 8600: The port for viewing node information using the dns protocol 8500: The port for the web ui interface
8302: The port for wan gossip
![]()
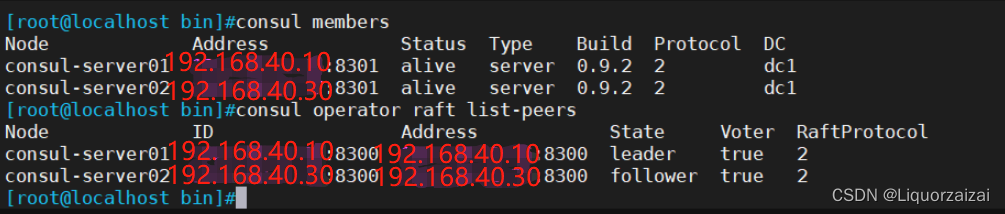
3. View cluster information
#View members status
consul members
#View cluster status
consul operator raft list-peers
consul info | grep leader
4. Obtain cluster information through http api
curl 127.0.0.1:8500/v1/status/peers #View cluster server members
curl 127.0.0.1:8500/v1/status/leader #Cluster server-leader curl 127.0.0.1:8500/v1/catalog/nodes #Cluster node details curl 127.0.0.1:8500/v1/catalog/nginx #View nginx service information
curl 127.0.0.1:8500/v1/catalog/services #All registered services
3. registrator server
//The container service automatically joins the Nginx cluster
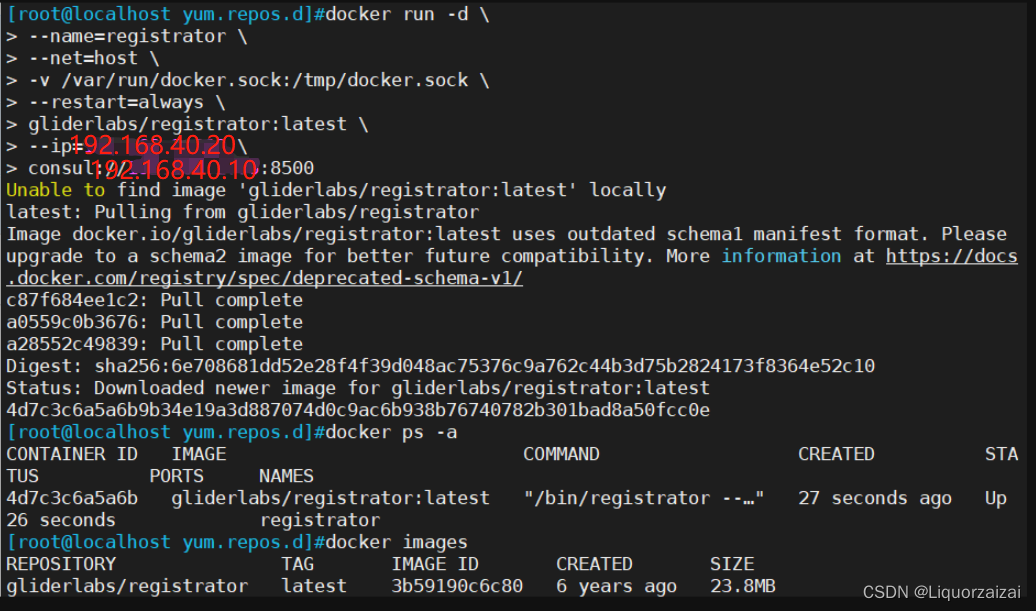
1.Install Gliderlabs/Registrator
Gliderlabs/Registrator can check the running status of the container and automatically register it, and can also log out the service of the docker container to the service configuration center. Currently supports Consul, Etcd and SkyDNS2.
docker run -d \
--name=registrator \
--net=host \
-v /var/run/docker.sock:/tmp/docker.sock \
--restart=always \
gliderlabs/registrator:latest \
--ip=192.168.2.200 \
consul://192.168.2.66:8500
------------------------------------------------ -------------------------------------------------- -----------
--net=host: Set the running docker container to host network mode.
-v /var/run/docker.sock:/tmp/docker.sock: Mount the Unix domain socket that the host's Docker daemon listens to by default into the container.
--restart=always: Set to always restart the container when it exits.
--ip: The network has just been designated as host mode, so we specify the ip as the host's ip.
consul: Specify the IP and port of the consul server.
----------------------------------------- -------------------------------------------------- ---------------
2. Test whether the service discovery function is normal
On the monitored node server, after the service of the nginx container is started and port mapping is done, the mapping information will be written to the docker.sock file of the host machine.
The registrator automatic discovery module will monitor the host's docker.sock and discover the nginx service.
The registrator will write the information to the automatic registration module of consul and display it through 8500 web ui
docker run -itd -p:83:80 --name test-01 -h test01 nginx
docker run -itd -p:84:80 --name test-02 -h test02 nginx
docker run -itd -p:88:80 --name test-03 -h test03 httpd
docker run -itd -p:89:80 --name test-04 -h test04 httpd #-h:设置容器主机名


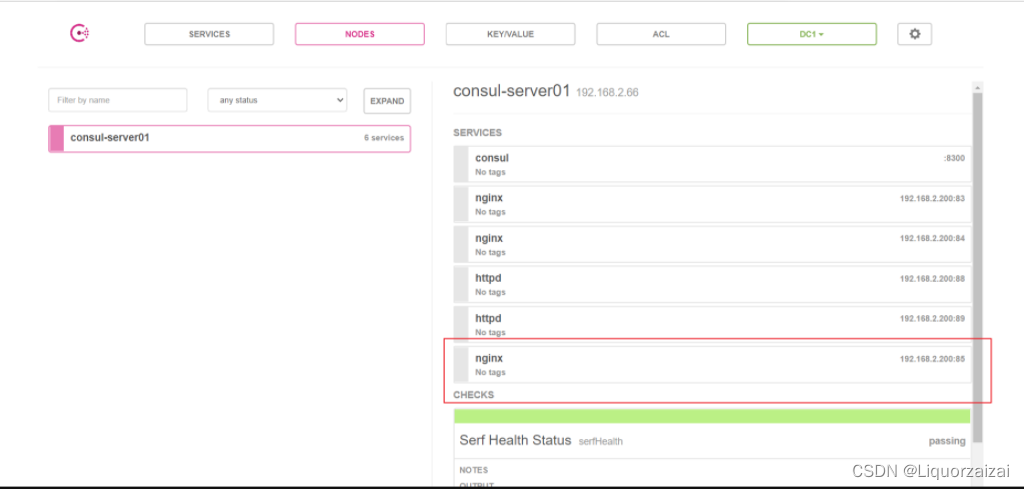
3. Verify whether the http and nginx services are registered to consul
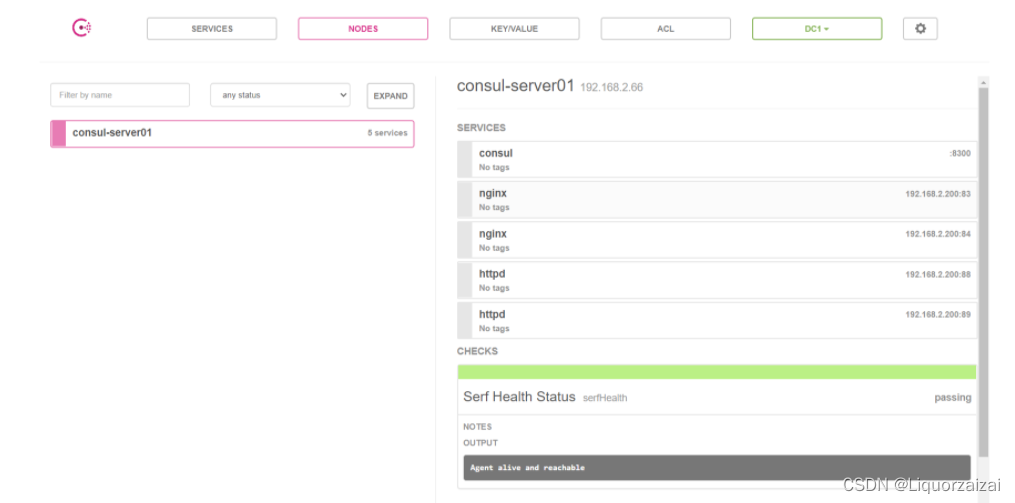
In the browser, enter http://192.168.40.10:8500, "Click NODES" on the Web page, and then click Click "consurl-server01", 6 services will appear.
//Use curl on the consul server to test the connection to the server
curl 127.0.0.1:8500/v1/catalog/services
{"consul":[],"httpd":[],"nginx":[]}
4、consul-template
Consul-Template is an application that automatically replaces configuration files based on Consul. Consul-Template is a daemon process used to query Consul cluster information in real time, update any number of specified templates on the file system, and generate configuration files. After the update is completed, you can choose to run a shell command to perform the update operation and reload Nginx.
Consul-Template can query the service directory, Key, Key-values, etc. in Consul. This powerful abstraction and query language template makes Consul-Template particularly suitable for dynamically creating configuration files. For example: Create Apache/Nginx Proxy Balancers, Haproxy Backends, etc.
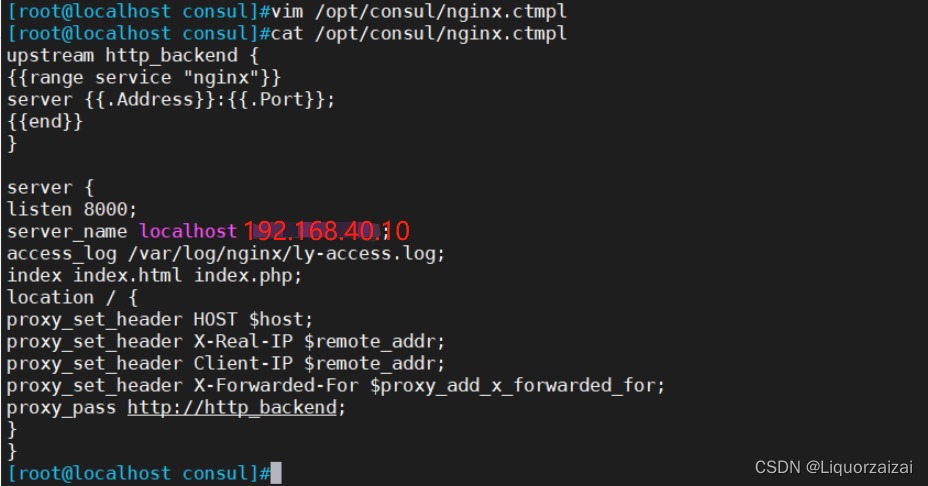
1. Prepare template nginx template file
//Operate on the consul server
vim /opt/consul/nginx.ctmpl
#定义nginx upstream一个简单模板
upstream http_backend {
{ {range service "nginx"}}
server { {.Address}}:{ {.Port}};
{ {end}}
}
#定义一个server,监听8000端口,反向代理到upstream
server {
listen 8000;
server_name localhost 192.168.2.66;
access_log /var/log/nginx/ly-access.log; #修改日志路径
index index.html index.php;
location / {
proxy_set_header HOST $host;
proxy_set_header X-Real-IP $remote_addr;
proxy_set_header Client-IP $remote_addr;
proxy_set_header X-Forwarded-For $proxy_add_x_forwarded_for;
proxy_pass http://http_backend;
}
}
2. Compile and install nginx
yum -y install pcre-devel zlib-devel gcc gcc-c++ make
useradd -M -s /sbin/nologin nginx
tar zxvf nginx-1.12.0.tar.gz -C /opt/
cd /opt/nginx-1.12.0/
./configure --prefix=/usr/local/nginx --user=nginx --group=nginx && make && make install
ln -s /usr/local/nginx/sbin/nginx /usr/local/sbin/


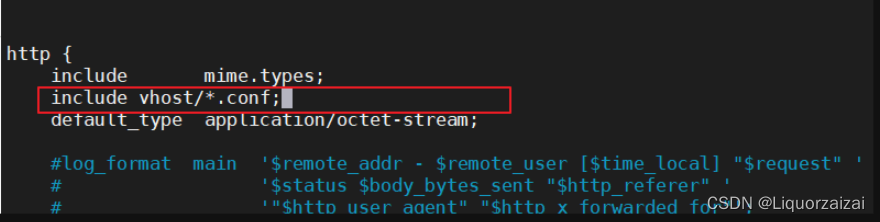
3. Configure nginx
vim /usr/local/nginx/conf/nginx.conf
......
http { include mime.types; include vhost/*.conf; #Add virtual host directory default_type application/octet-stream ;
![]()
mkdir /usr/local/nginx/conf/vhost #Create virtual host directory
mkdir /var/log/nginx #Create data directory

mkdir /usr/local/nginx/conf/vhost #Create virtual host directory
mkdir /var/log/nginx #Create data directory

//Start nginx

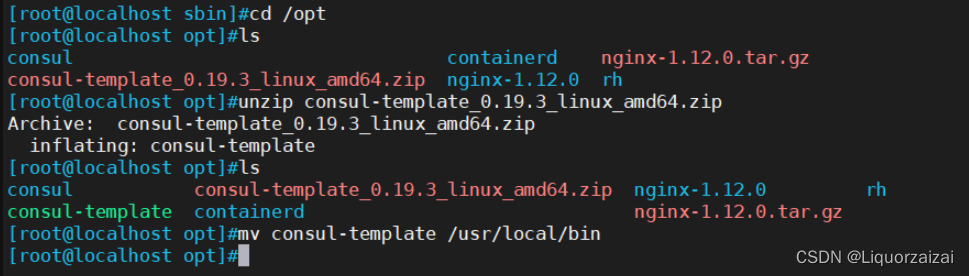
4. Configure and start template
unzip consul-template_0.19.3_linux_amd64.zip -d /opt/
cd /opt/
mv consul-template /usr/local/bin/
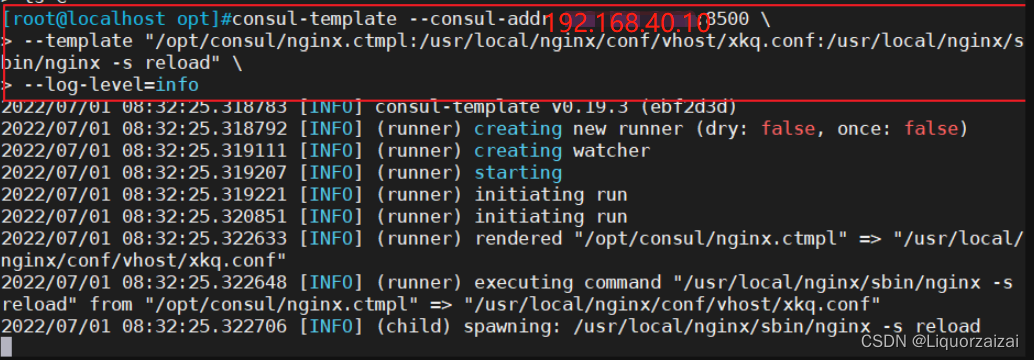
//Start the template service in the foreground. Do not press ctrl+c after starting to terminate the consul-template process.
consul-template --consul-addr 192.168.2.66:8500 \
--template "/opt/consul/nginx.ctmpl:/usr/local/nginx/conf/vhost/xkq.conf:/usr/local/nginx/sbin/nginx -s reload" \
--log-level=info
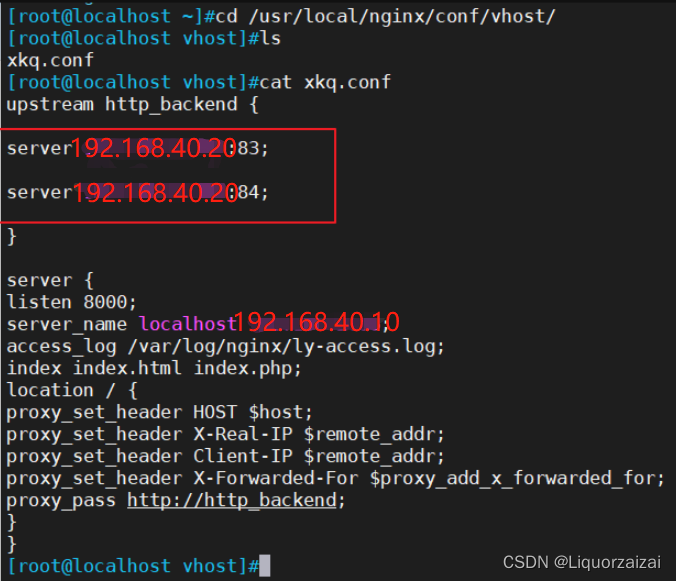
//Open another terminal to view the generated configuration file
[root@localhost ~]#cd /usr/local/nginx/conf/vhost/
[root@localhost vhost]#ls
xkq.conf
[root@localhost vhost]#cat xkq.conf
5. Visit template-nginx
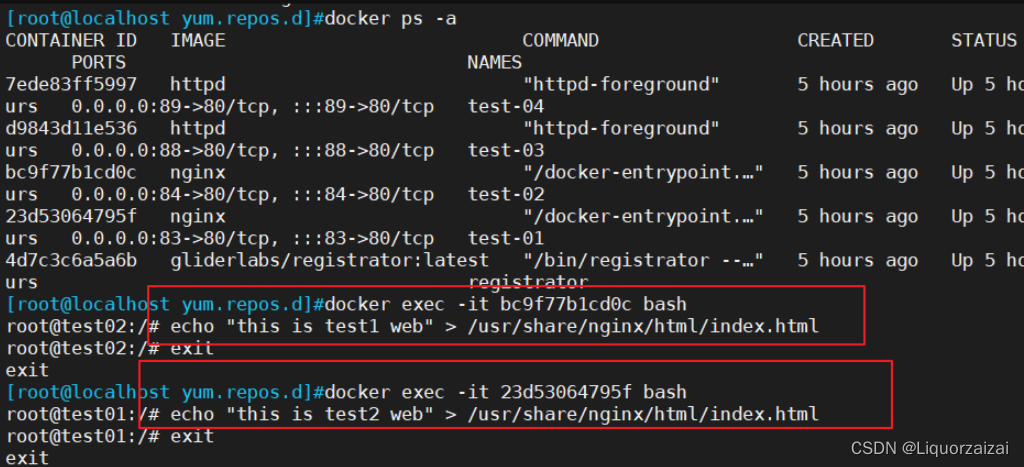
Operate on the registrator server and add web page test files
docker ps -a
docker exec -it 4f74d2c38844 bash
echo "this is test1 web" > /usr/share/nginx/html/index.html
docker exec -it b73106db285b bash
echo "this is test2 web" > /usr/share/nginx/html/index.html
Browser access:http://192.168.40.10:8000/ and refresh continuously. (Port 8000 is the listening port set in the Nginx template created previously)
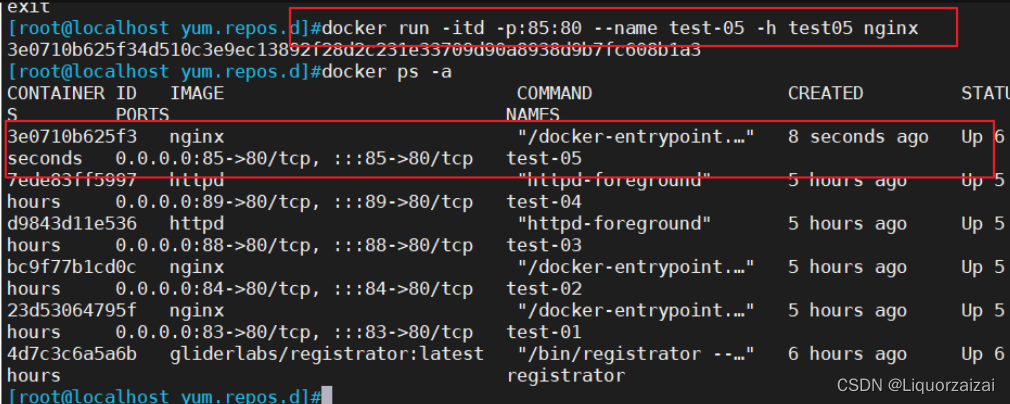
6. Add an nginx container node
①Add an nginx container node to test the service discovery and configuration update functions.
docker run -itd -p:85:80 --name test-05 -h test05 nginx
//Observe the template service, the contents of the /usr/local/nginx/conf/vhost/ly.conf file will be updated from the template, and the nginx service will be reloaded.
②View the contents of the /usr/local/nginx/conf/vhost/ly.conf file
cat /usr/local/nginx/conf/vhost/xkq.conf
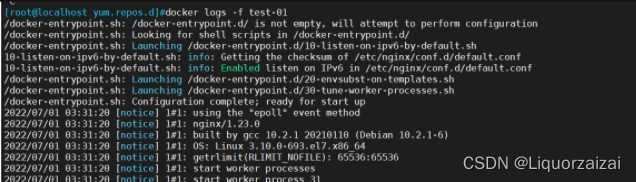
③ Check the logs of three nginx containers and request normal polling to each container node.
docker logs -f test-01
docker logs -f test-02
docker logs -f test-05
5. consul multi-node
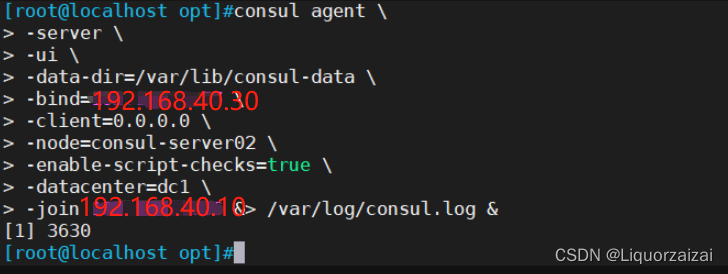
//Add a server 192.168.40.30/24 with an existing docker environment to join the existing cluster
consul agent \
-server \
-ui \
-data-dir=/var/lib/consul-data \
-bind=192.168.40.30\
-client=0.0.0.0 \
-node=consul-server02 \
-enable-script-checks=true \
-datacenter=dc1 \
-join 192.168.2.66 &> /var/log/consul.log &
------------------------------------------------ --------------------------
-enable-script-checks=true: Set the check service to be available
-datacenter: Data center name
-join: Join an existing cluster
------- -------------------------------------------------- ---------------
View cluster members and status