Python crawler technology series-04Usage of Selenium library
- 1 Basic use of Selenium library
- 2 Use of Selenium library
1 Basic use of Selenium library
1.1 Selenium library installation
- Install Selenium:
pip install selenium==3.141.0 -i https://pypi.tuna.tsinghua.edu.cn/simple
- After installing the selenium library, you also need to install a browser. Generally, it has been installed locally. This book uses the Chrome browser. Open the browser and enter Chrome://version in the address bar. You can view the browser version, as shown in the figure below. Show:
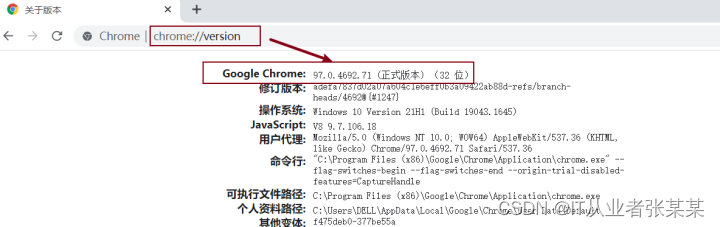
- After confirming the version, you can download the corresponding driver.
Selenium supports multiple browser drivers, including Chrome, Opera, Safari, and Firefox. To correspond to the chrome browser, this example uses the chrome driver,
View the chrome driver:
In the address bar of the browser, enter chrome://version/ and press Enter to view the corresponding version.
chrome://version/
The version on my computer is:
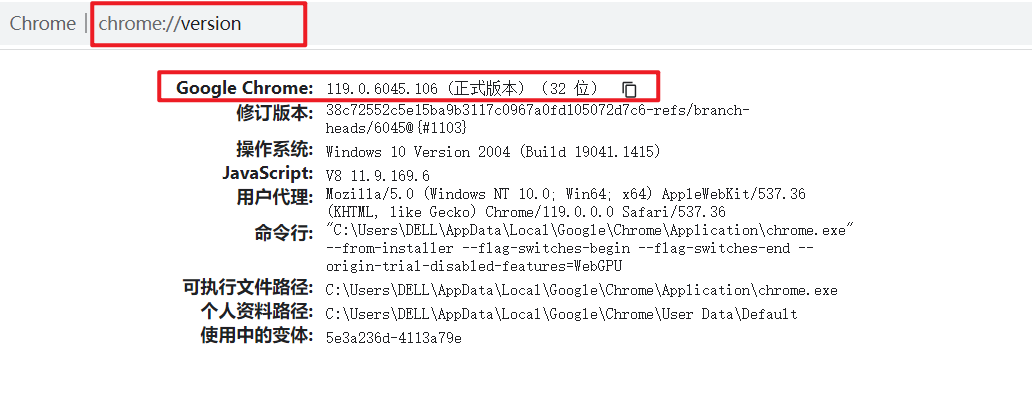
The download address of the driver is
1.浏览器驱动官网:
http://chromedriver.storage.googleapis.com/index.html
2.淘宝镜像网站(推荐):
http://npm.taobao.org/mirrors/chromedriver/
Drivers before version 114 can be obtained directly from the above address.
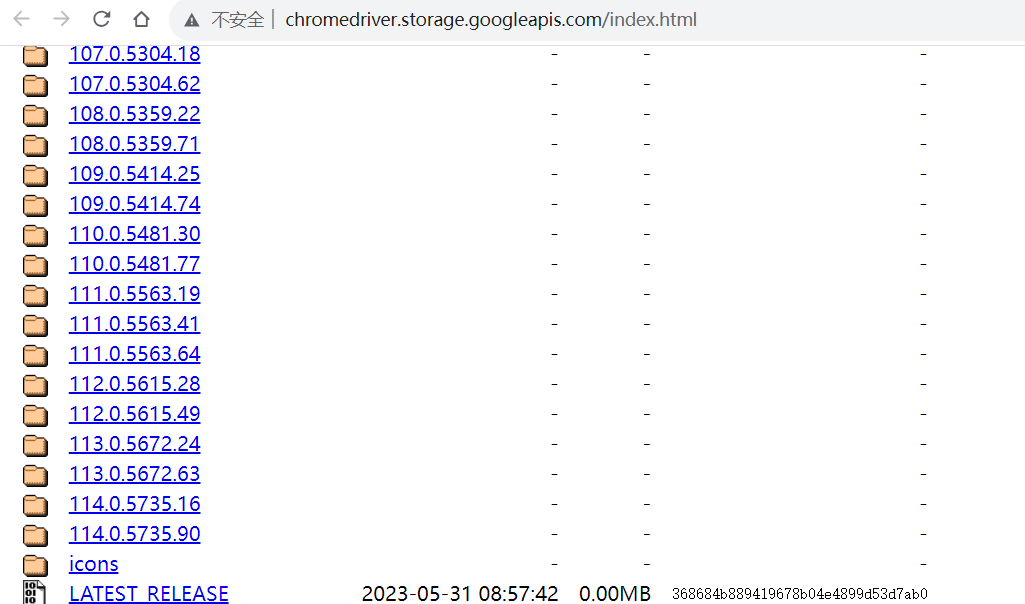
The version driver for 119.0.x needs to be downloaded from
https://googlechromelabs.github.io/chrome-for-testing/
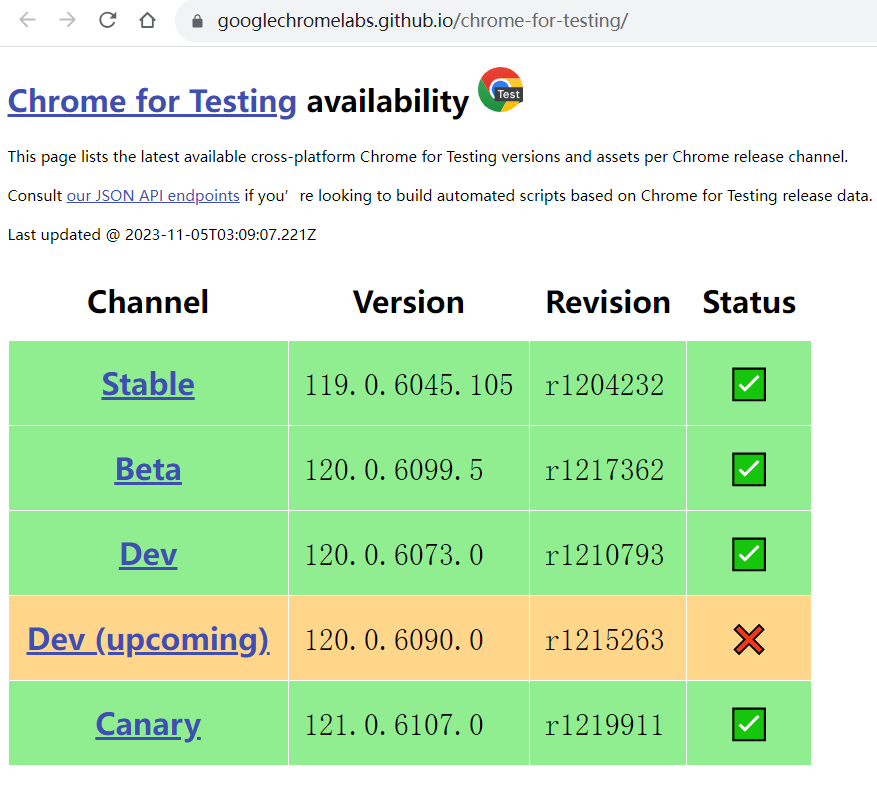

Select the corresponding version of the driver chromedriver.exe, download it locally, and put it in the project path.
1.2 Introduction to Selenium library
Selenium includes a collection of tools and libraries that support web browser automation. The Selenium library was originally used for automated testing, but can also be used for data scraping scenarios.
The information in some web pages requires the execution of js to be displayed. In dynamic web pages, only partial Html elements are usually updated. Webdriver will help users quickly locate these elements. The ultimate goal is to provide a well-designed object-oriented API to solve the problem. Testing challenges in modern advanced web pages. The existence of dynamic web pages causes the source code crawled by the requests library to be inconsistent with the data seen on the browser side. This situation can be crawled through selenium. Selenium will simulate the browser and crawl the web page data after executing js to achieve " What you see is what you get”. Although Selenium is much less efficient at crawling data, it has miraculous effects on some web pages that are difficult to crawl.
2 Use of Selenium library
2.1 Differences between versions
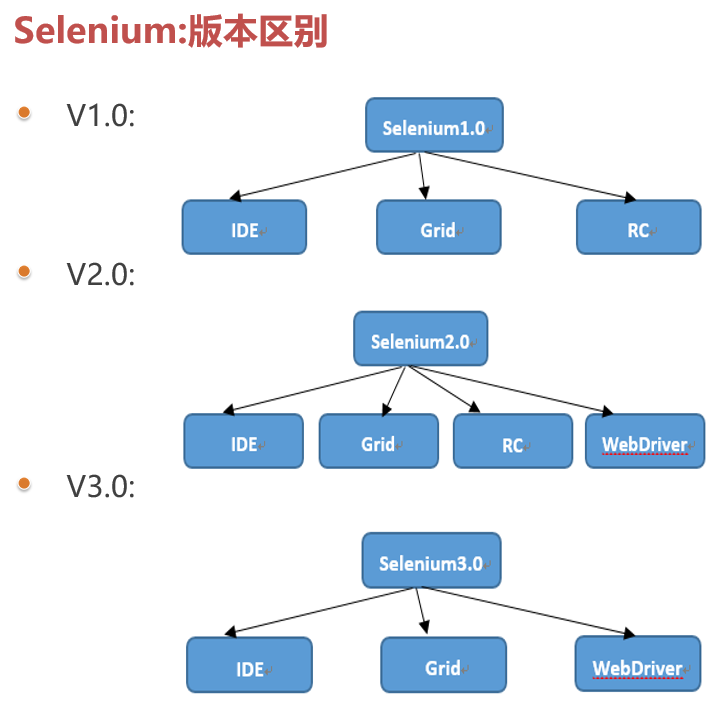
Selenium 1.0 = Selenium IDE + Selenium Grid + Selenium RC
Selenium 2.0 = Selenium 1.0 + WebDriver
Selenium 3.0 = Selenium 2.0 - Selenium RC(Remote Control)
2.1.1 Introduction and use of Selenium IDE
Selenium IDE is a plug-in for Selenium in the browsers Firefox and Chrome. It is used to record and replay test scripts, and the scripts can also be exported to programming languages such as C#, Java, Ruby or Python. github address:https://github.com/SeleniumHQ/selenium-ide
Selenium IDE is responsible for recording and playing back scripts to simulate the user's actual operations on the page.
General process of use:
1. Press and hold the extension in firefox or chrome
Take the firefox browser as an example
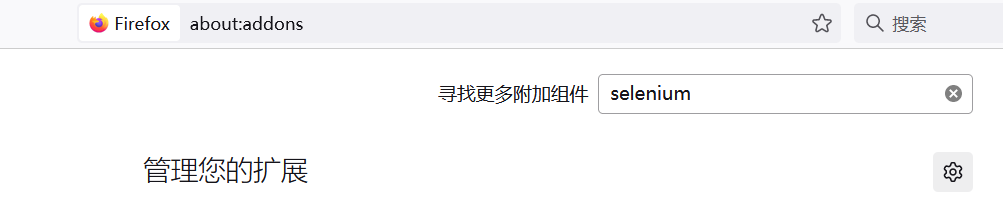
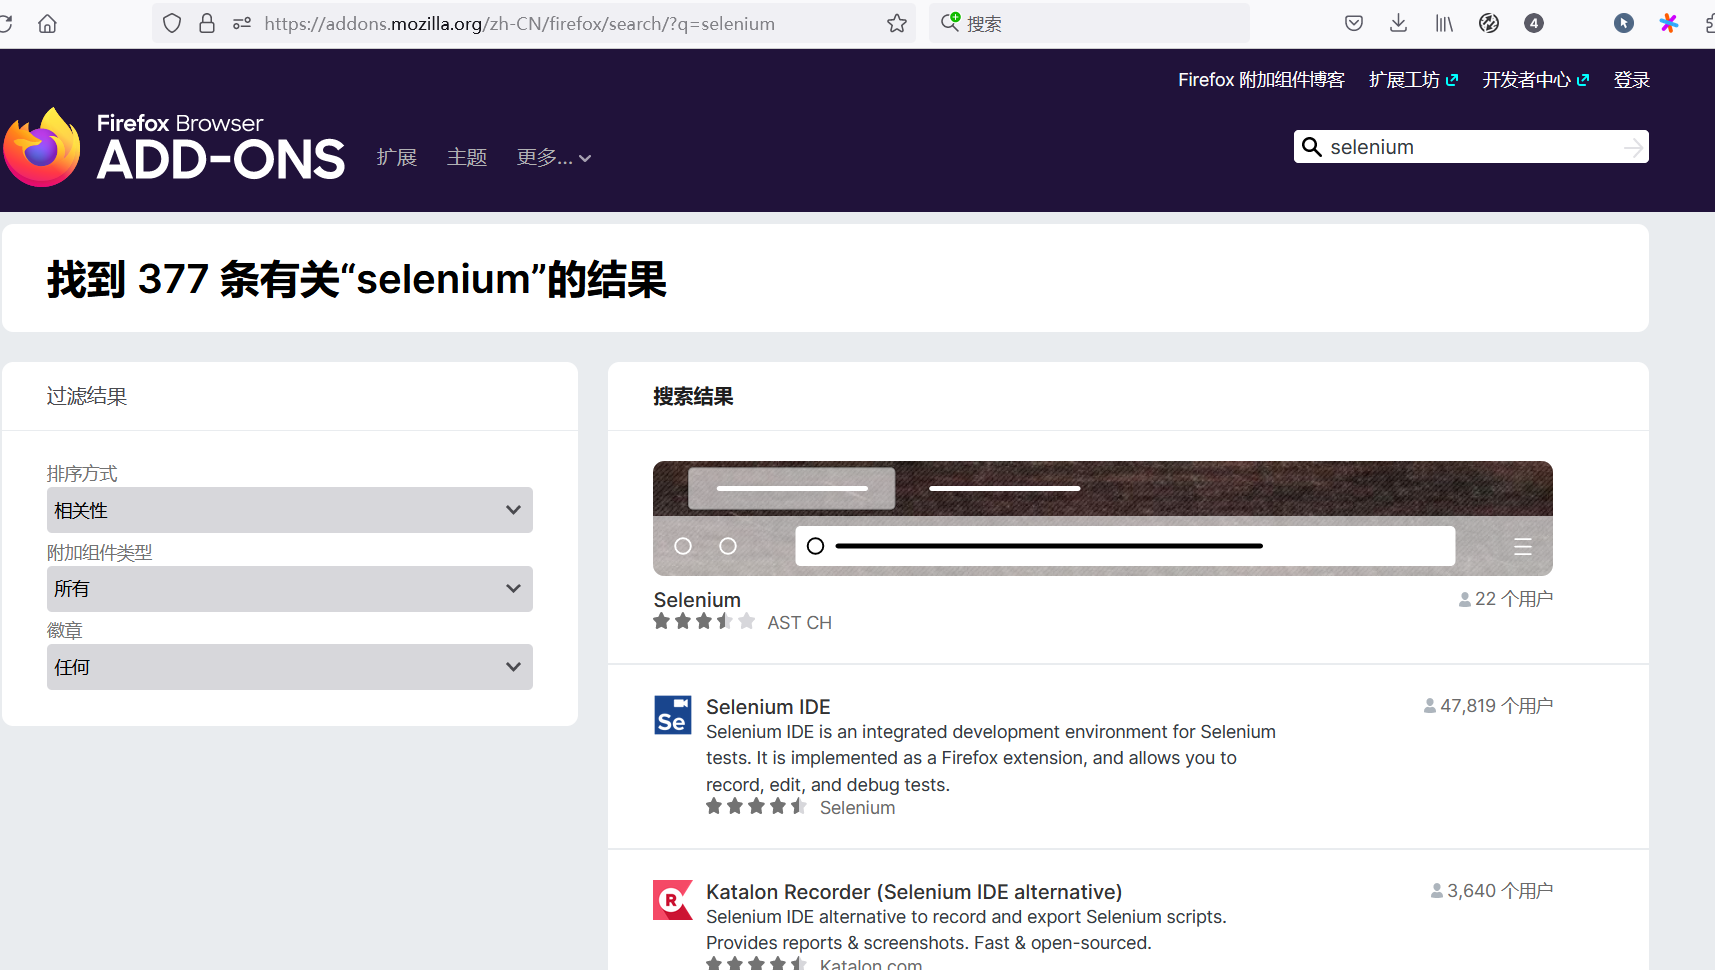
After adding, you can use Selenium IDE
Specific reference:Browser Automation Tool Selenium IDE User Guide
2.1.2 Introduction and use of Selenium Grid
Selenium Grid is used for distributed automated testing. It controls multiple machines and multiple browsers to execute test cases in parallel. It is more practical when there are many test cases.
① Selenium Grid is part of the Selenium suite, which is specially used to run multiple test cases in parallel in different browsers on the server, operating system, and machine.
② Selenium Grid Mainly uses the master-slaves or hub-nodes concept: one master/hub and multiple registered based on master/hub Child nodes slaves/nodes.
When we run test cases on the master based on different browsers/systems, the master will distribute the test cases to the appropriate nodes for execution. (Of course, it can also be used as a compatibility testing tool to run test cases on different web browsers)
③
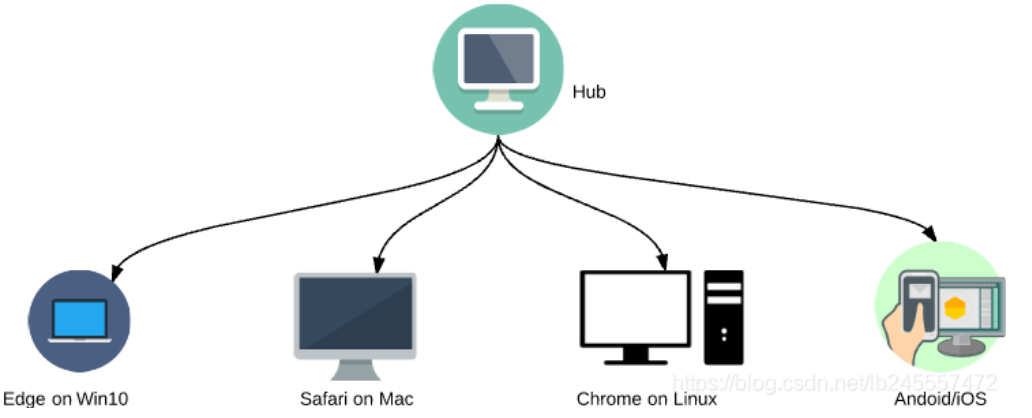
④ selenium Grid Main function: Implement distributed execution testing, solve browser compatibility issues. [ThroughSelenium Grid, multiple machines and multiple browsers can be controlled to execute test cases. The distributed execution environment is called node node in Selenium Grid . 】
⑤Example:
When the number of automated test cases reaches a certain number, such as tens of thousands, it takes 5 hours for one machine to execute all the test cases (just an example, the real time consumption The time needs to be determined according to the complexity of the test case scenario), and if you need to cover mainstream browsers such as Chrome and Firefox, the total time is 10 hours; at this time, the leader will tell you what methods can be used to solve this execution speed? Of course, the stupidest way is to get another machine, deploy the environment, execute the test cases separately and then merge the results. Selenium has also thought of this, so with the emergence of Selenium Grid, it solves the pain points of distributed execution testing.
⑥ Summary:
Slenium Grid distributed test consists of hub master node and node node.
Hub node is used to manage node node registration information.
Script——》Hub node——”node node——”Browser
Specific reference:
Detailed explanation of selenium Grid
Selenium Grid distributed | Introduction and practice
2.1.3 Introduction and use of Selenium RC
Early Selenium used Javascript injection technology to deal with browsers, which required Selenium RC to start a Server to operate the API of Web elements The call is converted into a piece of Javascript, which is injected after the Selenium kernel starts the browser.
Javascript can obtain and call any element of the page for operation, realizing the purpose of Selenium's automated web operations. The disadvantage of this Javascript injection technology is that the speed is not ideal, and the stability greatly depends on the quality of the Javascript translated by the Selenium core from the API.
2.1.4 Introduction and use of WebDriver
After Selenium2.x proposed the concept of WebDriver, it provides a completely different way to interact with the browser. That isUsing the browser's native API, encapsulating it into a more object-oriented Selenium WebDriver API, directly operating the elements in the browser page, and even operating the browser itself (screenshot, window size, startup , close, install plug-ins, configure certificates, etc.). Since the browser's native API is used, the speed is greatly improved, and the stability of the call is left to the browser manufacturer itself, which is obviously more scientific. However, some side effects are that different browser manufacturers have some differences in the operation and presentation of Web elements. This directly leads to Selenium WebDriver providing different implementations for different browser manufacturers. For example, Firefox has a dedicated FirefoxDriver, Chrome has a dedicated ChromeDriver, and so on. (Even including AndroidDriver and iOS WebDriver)

2.2 WebDriver common APIs
2.2.1 Browser operation
Import dependencies
# #1.webdriver的使用
import time
from selenium import webdriver
from selenium.webdriver.support.select import Select
2.2.1.1 Load driver
#使用方式1:放置环境变量路径
#例如将驱动文件直接放置到已配置好的python环境变量根路径。
dr = webdriver.Chrome()
dr = webdriver.Firefox()
dr = webdriver.Ie()
#使用方式2:指定绝对路径
dr = webdriver.Chrome(executable_path="C:\driver\chromedriver.exe")
dr = webdriver.Firefox(executable_path="C:\driver\geckodriver.exe")
dr = webdriver.Ie(executable_path="C:\driver\IEDriverServer.exe")
#注:可用于浏览器兼容性测试。
Case:
# firefox
wd = webdriver.Firefox(firefox_binary=r'C:\Program Files (x86)\Mozilla Firefox\firefox.exe',executable_path=r'F:\桌面文件\工具\geckodriver.exe')
# chrome
wd = webdriver.Chrome(executable_path='./chromedriver.exe')
2.2.1.2 Open, close browser, browser window settings
import time
from selenium import webdriver
from selenium.webdriver.support.ui import WebDriverWait
from selenium.webdriver.support.select import Select


wd = webdriver.Chrome(executable_path='./chromedriver.exe')
# 最大化窗口
wd.maximize_window()
# 设置窗口宽度和高度
wd.set_window_size(1400,1500)
# 设置窗口位置
wd.set_window_position(100,100)
wd.get('https://www.baidu.com/')

time.sleep(4)

# 关闭窗口
# wd.close()
wd.quit()
2.2.1.3 Forward and backward refresh
import time
from selenium import webdriver
from selenium.webdriver.support.ui import WebDriverWait
from selenium.webdriver.support.select import Select


driver = webdriver.Chrome(executable_path='./chromedriver.exe')
# 最大化窗口
driver.maximize_window()
# 设置窗口宽度和高度
driver.set_window_size(1400,1500)
# 设置窗口位置
driver.set_window_position(100,100)
driver.get('https://www.baidu.com/')
driver.get('https://www.zhihu.com/')
time.sleep(3)
driver.back() #后退
time.sleep(3)
driver.refresh() # 刷新
time.sleep(3)
driver.forward() # 前进

# 等待
time.sleep(4)

# 关闭窗口
# driver.close()
driver.quit()
2.2.2 Positioning of elements
2.2.2.1 API for positioning elements
Target one or more:
driver.find_element_by_
driver.find_elements_by_
details as follows:
dr.find_element_by_id()
dr.find_element_by_name()
dr.find_element_by_tag_name()#标签名
dr.find_element_by_link_text()#完全匹配链接文本
dr.find_element_by_partial_link_text()# 模糊匹配链接文本
dr.find_element_by_class_name()
dr.find_element_by_css_selector()
dr.find_element_by_xpath()
Note:
1. When ensuring unique attributes, it is recommended to use the sequence id-name-xpath-other for positioning;
2. Positioning one Group elements with the same attributes, for example: dr.find_elements_by_name();
3. Sometimes even if there is an id, it cannot be located by id, because it may be a dynamic id;
4. Since selenium traverses the page when using xpath positioning, it is better to use CSS selector in terms of performance. Although xpath has poor performance indicators, it has relatively good plug-in support in the browser, and it is more convenient to locate elements. For scenarios with strict performance requirements, you can consider replacing it by rewriting css with xpath.
2.2.2.2 Positioning of drop-down list
Drop-down list formed by div+li:
Case
import time
from selenium import webdriver
from selenium.webdriver.support.ui import WebDriverWait
from selenium.webdriver.support.select import Select


driver = webdriver.Chrome(executable_path='./chromedriver.exe')
# 最大化窗口
driver.maximize_window()
driver.get('https://www.lagou.com/zhaopin/')

# 等待
time.sleep(4)
# 选择排序方式
driver.find_element_by_xpath('//*[@id="order"]/li/div[1]/a[1]').click()
time.sleep(4)
# 单击工作性质后的下拉框
driver.find_element_by_xpath('//*[@id="order"]/li/div[3]/div').click()
time.sleep(4)
# 单击兼职选项
driver.find_element_by_link_text("兼职").click()
time.sleep(4)

# 关闭窗口
# driver.close()
driver.quit()
drop-down list of select elements
# 通过索引选择
Select(driver.find_element_by_xpath('//*[@id="order"]/li/div[3]/div')).select_by_index(2)
# 通过内容选择选项
Select(driver.find_element_by_xpath('//*[@id="order"]/li/div[3]/div')).select_by_visible_text('兼职')
# 通过value属性选择选项
Select(driver.find_element_by_xpath('//*[@id="order"]/li/div[3]/div')).select_by_value('兼职')
# 需要注意如果被选择的元素不是select元素,会抛出错误 Select only works on <select> elements, not on <div>
2.2.2.3 Positioning of hierarchical elements
Case
import time
from selenium import webdriver

driver = webdriver.Chrome(executable_path='./chromedriver.exe')
# 最大化窗口
driver.maximize_window()
driver.get('https://www.baidu.com/')

# 等待
time.sleep(4)
# 获取左上角百度新闻的链接
str1 = driver.find_element_by_id("s-top-left").find_elements_by_tag_name("a")[0].get_attribute("href")
print(str1)
time.sleep(4)


# 关闭窗口
# driver.close()
driver.quit()
2.2.2.4 Operations on positioned elements
driver.find_element_by_name(“tj_trnews”).text#获取文本
driver.find_element_by_id(“kw”).click()#单击
driver.find_element_by_id(“kw”).send_keys(“selenium”)#输入内容
driver.find_element_by_id(“kw”).clear()#清空输入内容
driver.find_element_by_id(“kw”).get_attribute(“name”)#获取属性值
driver.find_element_by_id(“kw”).is_displayed()#是否显示
driver.find_element_by_id(“kw”).is_enabled()#是否可用
driver.find_element_by_id(“kw”).is_selected()#复选框是否被选中
2.3 Waiting time
method
import time
from selenium import webdriver
from selenium.webdriver.support.ui import WebDriverWait

driver = webdriver.Chrome(executable_path='./chromedriver.exe')
driver.get('https://www.baidu.com/')

time.sleep(4) # 强制等待
driver.implicitly_wait(4) # 隐式等待 如果元素原先就存在会导致读取不到更新后的数据,可以先强制等待后再隐式等待
WebDriverWait(driver, 5, 0.5).until(lambda wd:wd.find_element_by_id('su').get_attribute("value")) # 显式等待
2.4 File upload
pass
driver.find_element_by_id('kw').send_keys("刘德华")
# send_keys中可以设置文件的路径,即可完成对应的文件上传
#方式1:通过send_keys()
driver.find_element_by_id("batchfile").send_keys('D:\\woniu\\秦超\\教学\\UI自动化\\PiCiDaoRu.xls')
driver.find_element_by_xpath("//input[@value='确认导入本批次商品信息']").click()
#方式2:通过PyKeyboar,需要依次安装pyHook和PyUserInput
from pykeyboard import PyKeyboard
try:
    driver.find_element_by_id("batchfile").click()#用firefox不行,chrome可以
except Exception as e:
    driver.find_element_by_xpath("//*[@class='col-lg-5 col-md-5 col-sm-5 col-xs-5'][2]").click()
sleep(3)
k = PyKeyboard()
k.type_string("E:\\study\\PycharmProjects\\python_3issue\\GUI\\PiCiDaoRu.xls")#不支持中文
k.press_keys([k.alt_key,'o'])#alt+o组合键点击确定
sleep(1)
driver.find_element_by_xpath("//input[@value='确认导入本批次商品信息']").click()
#方式3:使用sikulix的jar包
#方式4:其它,比如AutoIt
2.5 Window switching
In WebDriver, focus switching is mainly divided into the following three categories:
Focus switching of warning form
Focus switching of embedded page
Focus switching of gradual opening window or label
Focus switching is implemented using driver.switch_to.
2.5.1 Confirmation dialog box
When the dialog box appears, you cannot use find_element_by to capture elements. In this case, you can use WebDriver's built-in method.
driver.switch_to.alert.dismiss() # 点击取消按钮
driver.switch_to.alert.accept() # 点击确认按钮
driver.switch_to.alert.text # 获取对话框的提示信息文本内容
driver.switch_to.alert.send_keys() # 向对话框中输入内容 如果没有文本框 则抛出异常
2.5.2 Switching between new windows
import time
from selenium import webdriver
from selenium.webdriver.support.ui import WebDriverWait
from selenium.webdriver.support.select import Select


driver = webdriver.Chrome(executable_path='./chromedriver.exe')
# 最大化窗口
driver.maximize_window()
# 设置窗口宽度和高度
driver.set_window_size(1400, 1500)
# 设置窗口位置
driver.set_window_position(100, 100)
driver.get('https://www.baidu.com/')
# 等待
time.sleep(4)
driver.find_element_by_id('kw').send_keys("刘德华")
driver.implicitly_wait(4) # 隐式等待
# time.sleep(4) # 可以和隐式等待对比区别
driver.find_element_by_id('su').click()
# 显式加载 并获取属性
ele = WebDriverWait(driver, 5, 0.5).until(lambda wd:wd.find_element_by_id('su').get_attribute("value"))
print("ele-->",ele)

# 会切换到新的窗口
driver.find_element_by_partial_link_text("刘德华").click()
# 当前的窗口句柄
s_before = driver.current_window_handle
print("s_before-->",s_before)
# 获取所有窗口句柄
s_behind = driver.window_handles
print("s_behind-->",s_behind)


time.sleep(4)
# 可以通过非遍历的方式,用索引来切换
driver.switch_to.window(s_behind[-1])

time.sleep(4)
# 可以通过遍历的方式切换
for i in s_behind:
    # 切换到原有的窗口
    if i != s_before:
        driver.switch_to.window(i)


# 关闭窗口
# wd.close()
driver.quit()
The output is:
ele–> Baidu
s_before–> 0D69C66D5E67653C338C9CDE36921B2D
s_behind–> ['0D69C66D5E67653C338C9CDE36921B2D', '6EE 2C14168E6F0137805F71C6401DBF3']
2.5.3 frame switching
# 根据classname切换frame
driver.switch_to.frame(driver.find_element_by_class_name('myFrame'))
driver.switch_to.frame('myFrame') # 根据id转换
time.sleep(1)
driver.find_element_by_xpath('//a[@node="0"]').click()
driver.find_element_by_link_text('确定').click()
# 切换到原始页面
driver.switch_to.default_content()
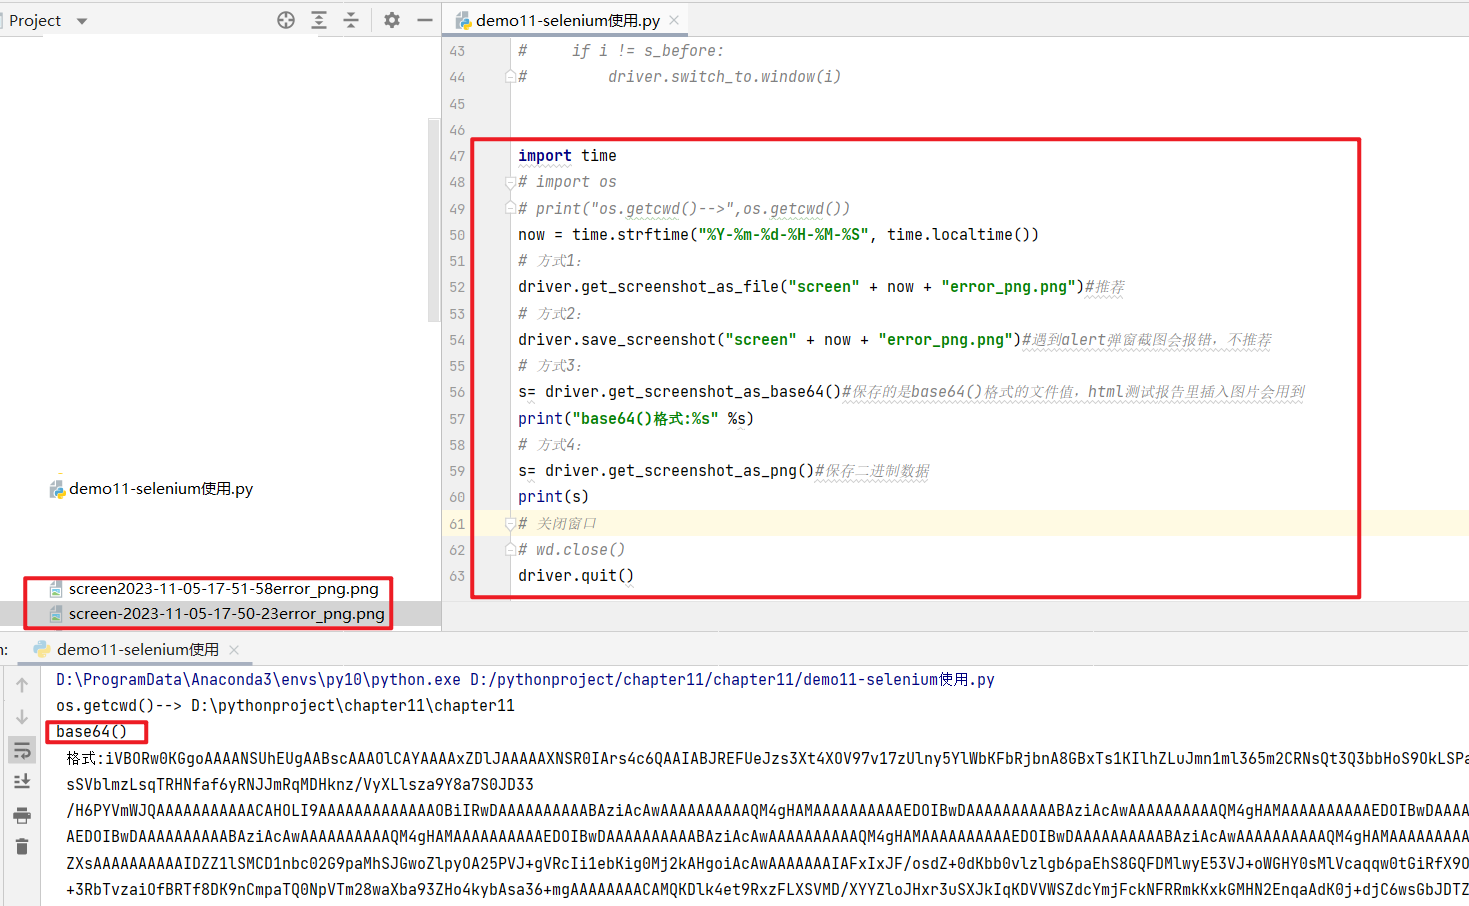
2.6 WebDriver screenshot
import time
# import os
# print("os.getcwd()-->",os.getcwd())
now = time.strftime("%Y-%m-%d-%H-%M-%S", time.localtime())
# 方式1:
driver.get_screenshot_as_file("screen" + now + "error_png.png")#推荐
# 方式2:
driver.save_screenshot("screen" + now + "error_png.png")#遇到alert弹窗截图会报错,不推荐
# 方式3:
s= driver.get_screenshot_as_base64()#保存的是base64()格式的文件值,html测试报告里插入图片会用到
print("base64()格式:%s" %s)
# 方式4:
s= driver.get_screenshot_as_png()#保存二进制数据
print(s)
The output is:
2.7 WebDriver calls JavaScript
#移动滚动条
#方式1:没有ID的滚动条不支持
js="var q=document.documentElement.scrollTop=10000"
# js_="var q=document.documentElement.scrollTop=0"
driver.execute_script(js_)
#方式2:拖动到指定元素
# target1 = driver.find_element_by_xpath("//*[text()='页顶']")
# driver.execute_script("arguments[0].scrollIntoView();", target1)
#修改属性
driver.execute_script("document.getElementById('barcode').readOnly=true;")
driver.execute_script("document.getElementById('barcode').removeAttribute('readonly');")
Case
import time
from selenium import webdriver
from selenium.webdriver.support.ui import WebDriverWait
from selenium.webdriver.support.select import Select


driver = webdriver.Chrome(executable_path='./chromedriver.exe')
# 最大化窗口
driver.maximize_window()
# 设置窗口宽度和高度
driver.set_window_size(1400, 1500)
# 设置窗口位置
driver.set_window_position(100, 100)
# driver.get('https://www.baidu.com/')
driver.get('https://news.baidu.com/')
# 等待
time.sleep(4)

#拖动滚动条
driver.execute_script('window.scrollTo(0,1200)')
#添加标签
driver.execute_script('document.getElementById("headerwrapper").innerHTML+=\"<option>新增加的内容</option>\"')
#修改标签属性
driver.execute_script('document.getElementById("headerwrapper").readOnly=false')

time.sleep(4)
# 关闭窗口
# wd.close()
# driver.quit()
2.8 Mouse and keyboard events
2.8.1 Mouse events
import time
from selenium import webdriver
from selenium.webdriver.support.ui import WebDriverWait
from selenium.webdriver.common.action_chains import ActionChains


driver = webdriver.Chrome(executable_path='./chromedriver.exe')
# 最大化窗口
driver.maximize_window()
# 设置窗口宽度和高度
driver.set_window_size(1400, 1500)
# 设置窗口位置
driver.set_window_position(100, 100)
# driver.get('https://www.baidu.com/')
driver.get('https://news.baidu.com/')
# 等待
time.sleep(4)

right = driver.find_element_by_id("xx") #定位到元素
ActionChains(driver).click(right).perform()#单击
ActionChains(driver).context_click(right).perform()#对定位到的元素执行鼠标右键操作
ActionChains(driver).double_click(right).perform()#双击
ActionChains(driver).move_to_element (right).perform()#鼠标悬停在一个元素上
ActionChains(driver).click_and_hold(right).perform()#按下鼠标左键在一个元素上
element = driver.find_element_by_name("xxx") #定位元素的原位置
target = driver.find_element_by_name("xxx") #定位元素要移动到的目标位置
ActionChains(driver).drag_and_drop(element, target).perform()#拖动
ActionChains(driver).release(right).perform() # 释放鼠标
# ActionChains(dr):dr: wedriver 实例执行用户操作。ActionChains 用于生成用户的行为;所有的行为都存储在 ActionChains 对象。通过 perform()执行存储的行为。
# perform():执行所有 ActionChains 中存储的行为。perfrome()同样也是 ActionChains 类提供的的方法,通常与ActionChains()配对使用。
2.8.2 Keyboard events
import time
from selenium import webdriver
from selenium.webdriver.support.ui import WebDriverWait
from selenium.webdriver.support.select import Select
from selenium.webdriver.common.action_chains import ActionChains
from selenium.webdriver.common.keys import Keys


driver = webdriver.Chrome(executable_path='./chromedriver.exe')
# 最大化窗口
driver.maximize_window()
# 设置窗口宽度和高度
driver.set_window_size(1400, 1500)
# 设置窗口位置
driver.set_window_position(100, 100)
# driver.get('https://www.baidu.com/')
driver.get('https://news.baidu.com/')
# 等待
time.sleep(4)

driver.find_element_by_id("barcode").send_keys("123456")
driver.find_element_by_id("barcode").send_keys(Keys.BACK_SPACE)#单击回删键
driver.find_element_by_id("barcode").send_keys(Keys.SPACE)#单击空格
driver.find_element_by_id("barcode").send_keys(Keys.ENTER) #通过回车键盘来代替点击操作
driver.find_element_by_id("barcode").send_keys(Keys.DOWN) #单击向下键
#。。。。。。
driver.find_element_by_id("barcode").send_keys(Keys.CONTROL,'a') #ctrl+a 全选输入框内容
driver.find_element_by_id("barcode").send_keys(Keys.CONTROL,'c')
driver.find_element_by_id("barcode").send_keys(Keys.CONTROL,'v')
driver.find_element_by_id("barcode").send_keys(Keys.CONTROL,'x')
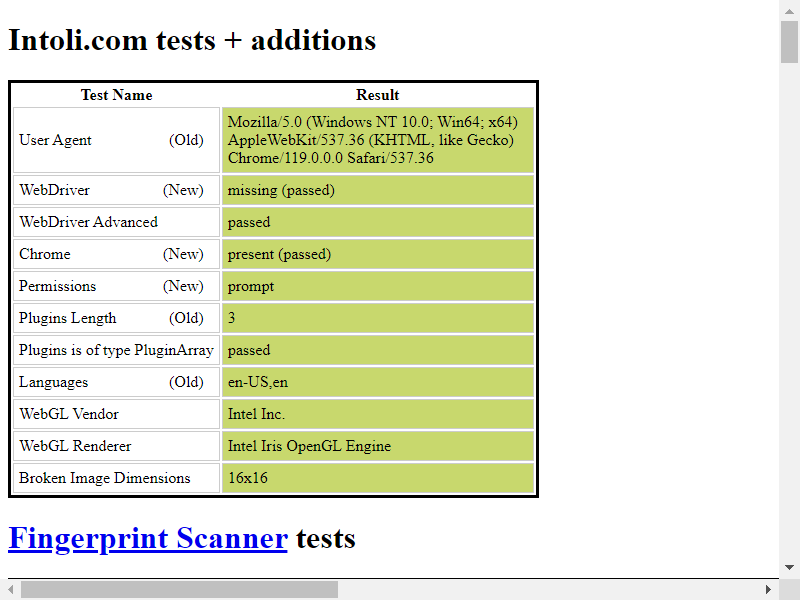
2.9 How selenium prevents detection
Reference:How to completely prevent Selenium from being detected!
Use stealth.min.js to hide selenium features - Python
Access via Google Chrome:
https://bot.sannysoft.com
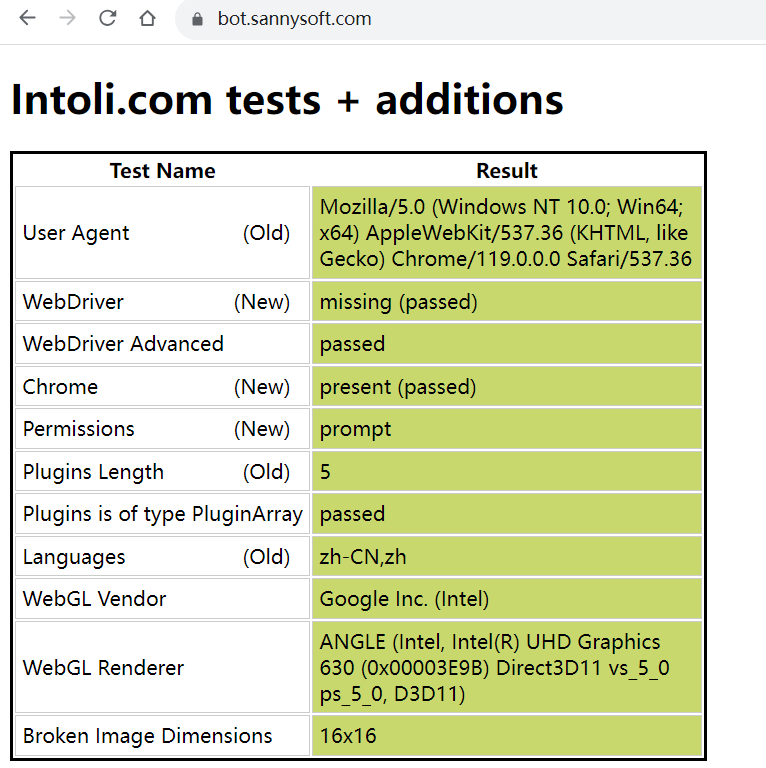
You can see which features will be detected
from selenium.webdriver import Chrome
from selenium.webdriver.chrome.options import Options
chrome_options = Options()
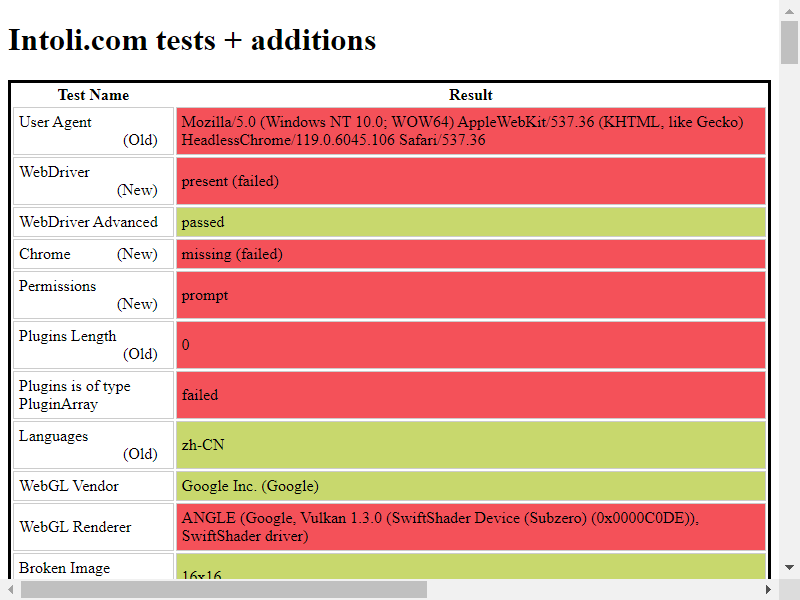
chrome_options.add_argument("--headless")
driver = Chrome(executable_path='./chromedriver', options=chrome_options)
driver.get('https://bot.sannysoft.com/')
driver.save_screenshot('screenshot.png')
Now we load a stealth.min.js file and then visit this website to check the characteristic values:
The download address of stealth.min.js is:
https://gitcode.com/mirrors/requirecool/stealth.min.js/overview?utm_source=csdn_github_accelerator
Place this file in the project directory
Run the following code:
import time
from selenium.webdriver import Chrome
from selenium.webdriver.chrome.options import Options

chrome_options = Options()
chrome_options.add_argument("--headless")
chrome_options.add_argument('user-agent=Mozilla/5.0 (Windows NT 10.0; Win64; x64) AppleWebKit/537.36 (KHTML, like Gecko) Chrome/119.0.0.0 Safari/537.36')

driver = Chrome(executable_path='./chromedriver', options=chrome_options)

with open('./stealth.min.js') as f:
    js = f.read()

driver.execute_cdp_cmd("Page.addScriptToEvaluateOnNewDocument", {


    "source": js
})

driver.get('https://bot.sannysoft.com/')
time.sleep(5)
driver.save_screenshot('walkaround.png')

source = driver.page_source
with open('result.html', 'w') as f:
    f.write(source)