Table of contents
1. Character device driver framework
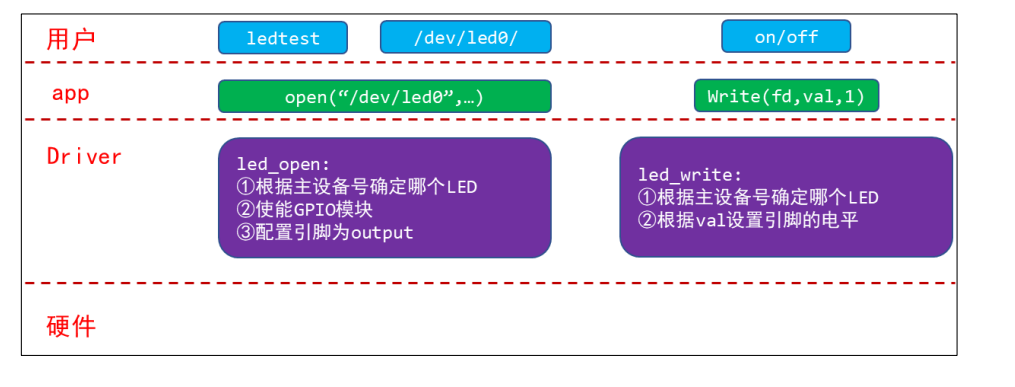
What kind of interface do we want for LED driver?
The basis for LED drivers to support multiple boards: layered thinking
2. How does the Linux driver point to a GPIO?
Operate GPIO directly through registers
Use pin numbers to operate GPIO
3. Linux’s unified interface—GPIO subsystem
Why is a unified interface needed?
4. Introduction to GPIO subsystem functions
1. Character device driver framework
 In Figure 6.1, the driver layer relies on the ioremap function to access the hardware peripheral registers to map to the register address, and then starts to control the register.
Steps to write a driver:
- Determine the major device number, or let the kernel assign it
- Define your own file_operations structure
- Implement the corresponding drv_open/drv read/drv write and other functions and fill in the file operations structure
- Tell the kernel the file_operations structure: register_chrdev
- Who will register the driver? There must be an entry function: when installing the driver, this entry function will be called
- If there is an entry function, there should be an exit function: When uninstalling the driver, the exit function calls unregister_chrdev
- Other improvements: Provide device information and automatically create device nodes: class_create, device_create
What kind of interface do we want for LED driver?
The basis for LED drivers to support multiple boards: layered thinking
Split the driver into a general framework (leddrv.c) and specific hardware operations (board_X.c):
Using object-oriented thinking, improve the code and abstract a structure:

The board_X.c related to each board implements its own led_operations structure, which is called by the upper leddrv.c: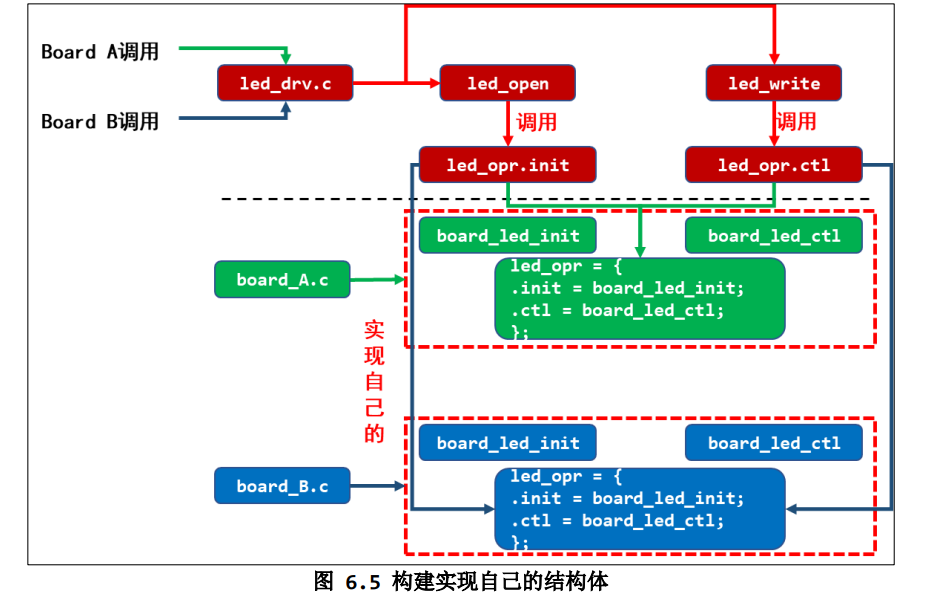
2. How does the Linux driver point to a GPIO?
When writing a driver program, if we need to perform a lighting operation, we must first know which pin is controlled before we can actually operate the LED. We found by searching in the schematic that the LED is controlled by GPIO5_3.
Operate GPIO directly through registers
(1) When we study introductory videos, we often see them using the ioremap() function to map registers and then directly operate the registers. When you no longer need to use this register, call the iounmap() function to release it.
(2) Writing like this is undoubtedly very primitive, just like writing a program for a 51 microcontroller. But the difference is that the 51 microcontroller does not have many registers, so it is not troublesome to directly operate the registers. Chips of the i.max6ull level have a lot of registers, and it is undoubtedly very troublesome to directly operate the registers.
(3) The last blog I wrote was to directly use registers to operate GPIO. The link is as follows: Linux driver introduction - LED lighting driver-CSDN Blog
If you want to learn in depth, you can watch Zhengdian Atom or the driver teaching video of teacher Wei Dongshan.
Use pin numbers to operate GPIO
(1) From the above schematic diagram, after we know that the LED is controlled by GPIO5_3, can we start the operation directly?
(2) No, in Linux, GPIO identification and control are usually carried out through pin numbers, which are used to uniquely identify specific GPIO pins.
(3) If we have bare metal development experience such as stm32 and msp430, we will find that different chips have different definitions of GPIO names. For example, STM32 defines the pins as PA0 and PB4. But if it is an MSP430 microcontroller, its pin definition is P2.3, P1.0. Different manufacturers have different names for their chip GPIOs.
(4) What will be the consequences if the GPIO names are different? This will make driver developers always have to remember the naming rules of different chips, which is obviously very troublesome. Therefore, Linux stipulates that I don’t care what chip manufacturer you are, no matter how you name it, if you want to run Linux, you must change the pin into a number, and this number is called the pin number. Driver developers only need to know the pin number corresponding to this pin to operate. The process of turning this pin into a pin number is done by engineers from the original chip factory.
(5) Regarding obtaining the pin number, the easiest way is to contact the manufacturer directly to inquire. For example, the following is Feiteng's chip and their pin mapping table. 
IMX6ULL pin acquisition
Now my IMX6ULL development board needs to control GPIO5_3, and I can’t find their pin mapping table, so what is its pin number?
If the mapping table cannot be found, we connect to the development board
Input command:cat /sys/kernel/debug/gpio
You can get the GPIO mapping table and its starting address.
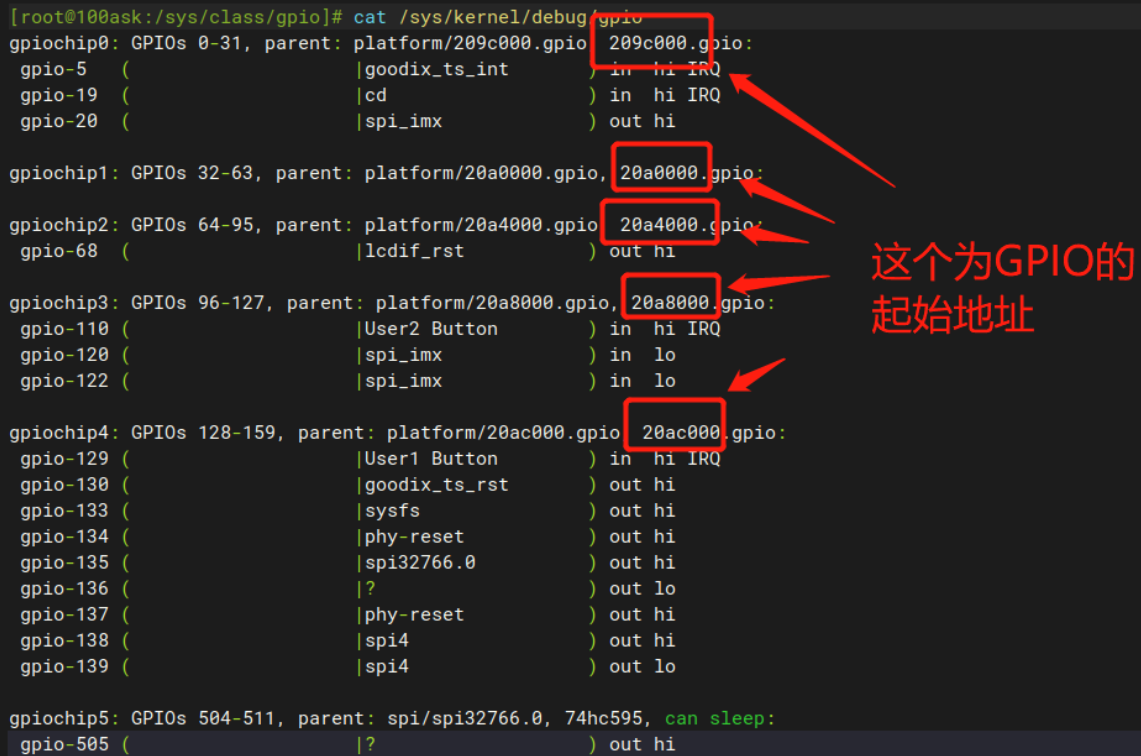
(1) At this time, some people may think that the gpiochip5 searched here is GPIO5. the answer is negative.
(2) Why do you say that? Because as I said above, different manufacturers name GPIOs differently, and their manufacturers' engineers will eventually abstract these GPIOs into a pin number. In this abstraction process, the naming in the driver may be slightly different from the naming on the schematic diagram. For example, the GPIO5 of the imax6ull development board is gpiochip4, because the imax6ull development board starts calculation from GPIO1, while in the driver, it starts from gipo0 started.
(3) How to determine that this is the case? First, let's look at the picture above, which shows that the address of gpio0 is 209c000. Then open the chip manual directly and you can see that the starting address of GPIO1 is 209c000, which corresponds exactly to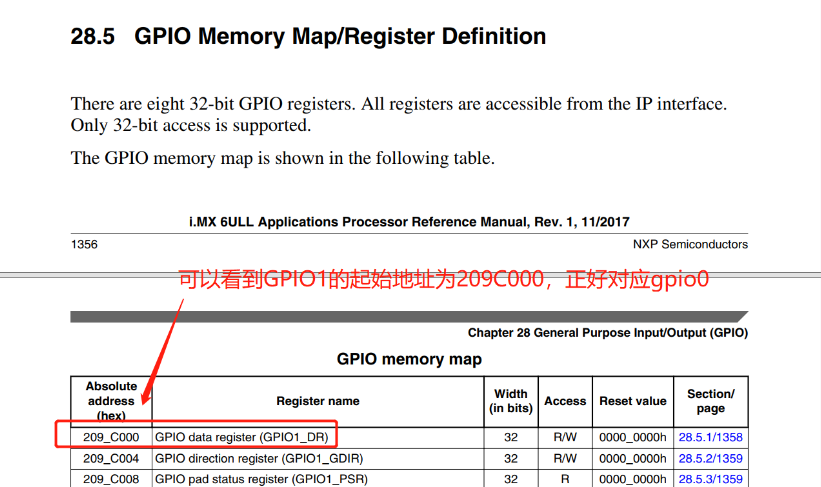
(4) Now that we know that GPIO5 corresponds to gpio4, we can guide you from the terminal. The starting pin number of gpio4 is 128, then the pin number of GPIO5_3 is 128+3=131.
3. Linux’s unified interface—GPIO subsystem
Why is a unified interface needed?
(1) Before explaining the GPIO subsystem of Linux, I will first introduce the development of microcontrollers.
(2) For most people, learning embedded development starts with the 51 microcontroller. STC89C52 is a classic microcontroller of the 51 microcontroller, and everyone is more or less familiar with it.
(3) When writing the program for the STC89C52 microcontroller, we directly operate the registers, such as the following serial port initialization program.
void UartInit(void)		//[email protected]
{
	SCON = 0x50;		//8位数据,可变波特率
	AUXR &= 0xBF;		//定时器1时钟为Fosc/12,即12T
	AUXR &= 0xFE;		//串口1选择定时器1为波特率发生器
	TMOD &= 0x0F;		//设定定时器1为16位自动重装方式
	TL1 = 0xE8;		//设定定时初值
	TH1 = 0xFF;		//设定定时初值
	ET1 = 0;		//禁止定时器1中断
	TR1 = 1;		//启动定时器1
}
(4) After learning the 51 microcontroller, most people start to advance to the STM32F103 chip. Because the STM32F103 chip has a lot of registers, it will be quite troublesome to check the manual when developing directly using registers. So ST Company encapsulated some libraries, the following are the library functions of the GPIO operation part.

(5) We will find that different chips have different library functions. If we write a business program, it will run fine on STM32. If for some reason, I want to change a chip, and the library functions of this chip are different from those of STM32. What will ultimately result? It's obvious that all business procedures need to be rewritten! This is very troublesome!
(6) In order to prevent this situation, Linux stipulates that no matter what chip you have, as long as you want to run Linux, you must give me a unified interface! No matter what manufacturer you are, the function that your chip uses to set GPIO to output must be called int gpio_direction_output()!
(7) What are the benefits of doing this? Obviously, our business code does not need to be changed. If we want to change a chip, we only need to make slight changes to the underlying layer. This is why some people say that if you don’t run Linux, the classes are clear, but if you run Linux, all living beings are equal.
4. Introduction to GPIO subsystem functions
In the Linux GPIO subsystem, GPIO can be configured through the following functions.
int gpio_request(unsigned gpio, const char *label);
void gpio_free(unsigned gpio);
int gpio_direction_input(unsigned gpio);
int gpio_direction_output(unsigned gpio, int value);
int gpio_get_value(unsigned gpio);
void  gpio_set_value(unsigned gpio, int value);
(1)gpio_request()
/****** 函数介绍 ******/
/* 作用 :  向Linux 内核中用于请求申请一个 GPIO 引脚
 * 传入参数 :
     * gpio : 要请求的 GPIO 引脚号
     * label : 给GPIO起一个名字
 * 返回参数 :  如何返回0,表示申请GPIO成功。如果返回负数,表示申请GPIO出现错误
*/
int gpio_request(unsigned gpio, const char *label);
- Function: Used to request a function in the Linux kernel to apply for a GPIO pin. If we want to operate a pin, we need to call the gpio_request() function first.
- gpio: GPIO pin number to request. This pin number can be given directly by yourself, or the specified GPIO attribute information (content of the device tree) can be obtained from the device tree through the of_get_named_gpio function.
- label: Give the GPIO a name. Because it is inconvenient for people to read the pin number directly, you can give the pin number a name. Name it whatever you like, it doesn't matter.
- Return value: How to return 0, indicating that the application for GPIO is successful. If a negative number is returned, it means there is an error in applying for GPIO.
(2)gpio_free()
/****** 函数介绍 ******/
/* 作用 : 如果不使用某个GPIO了,那么就需要调用 gpio_free 函数进行释放
 * 传入参数 :
     * gpio : 要释放的GPIO引脚号
 * 返回参数 :  无
*/
void gpio_free(unsigned gpio);
- Function: If a GPIO is no longer used, you need to call the gpio_free function to release it.
- gpio: GPIO pin number to be released. It is the same thing as the GPIO pin number of gpio_request.
- Return parameters: None
(3)gpio_direction_input()
/****** 函数介绍 ******/
/* 作用 : 设置某个 GPIO 为输入
 * 传入参数 :
     * gpio : 要设置为输入的GPIO 引脚号
 * 返回参数 : 设置成功返回 0; 设置失败返回负值
*/
int gpio_direction_input(unsigned gpio);
- Function: Configure GPIO as input direction. After applying for GPIO, it needs to be configured as input or output according to needs. This function can set GPIO as input.
- gpio: GPIO pin number to be set as input
- Return parameters: Returns 0, indicating that the GPIO pin is successfully set to input mode. Returns a negative number, indicating an error or failure to set the GPIO pin.
(4)gpio_direction_output()
/****** 函数介绍 ******/
/* 作用 : 设置某个 GPIO 为输出,并且设置默认输出值
 * 传入参数 :
     * gpio : 要设置为输出的GPIO 引脚号
     * value : GPIO 默认输出值
 * 返回参数 : 设置成功返回 0; 设置失败返回负值
*/
int gpio_direction_output(unsigned gpio, int value);
- Function: Configure GPIO as output direction and set the default output value. After applying for GPIO, it needs to be configured as input or output according to needs. This function can set GPIO as output.
- gpio: GPIO pin number set as output
- value: GPIO default output value. If the GPIO initialization is successful, the default output voltage will be used.
- Return parameter: Returns 0, indicating that the GPIO pin is successfully set to output mode. Returns a negative number, indicating an error or failure to set the GPIO pin.
(5)gpio_get_value()
/****** 函数介绍 ******/
/* 作用 : 获取指定GPIO的电平值
 * 传入参数 :
     * gpio : 要获取电平值的GPIO标号
 * 返回参数 : 获取电平信息成功,高电平返回1,低电平返回0。GPIO电平获取失败返回负值
*/
int gpio_get_value(unsigned gpio);
- Function: Get the level information of the specified GPIO
- gpio: GPIO label to obtain the level value
- Return parameter: If the level information is obtained successfully, 1 is returned for high level and 0 for low level. GPIO level acquisition fails and returns a negative value.
(6)gpio_set_value()
- Function: Set the level value of the specified GPIO
- gpio: To set the level value of the specified GPIO
- value: The level value to be set. If 0 is passed in, it means setting the GPIO to low level. Passing in a non-zero value means setting the GPIO to high level
- Return parameters: None
/****** 函数介绍 ******/
/* 作用 : 获取指定GPIO的电平值
 * 传入参数 :
     * gpio : 要设置指定GPIO的电平值
     * value : 要获取电平值的GPIO标号
 * 返回参数 : 无
*/
void  gpio_set_value(unsigned gpio, int value);
5. LED driver code
Driver layer code:
Only the code is shown here, for detailed introduction, please refer to the boss's blogLinux driver introduction - LED lighting driver-CSDN blog
led_drv.c
#include "asm-generic/errno-base.h"
#include "asm-generic/gpio.h"
#include "asm/uaccess.h"
#include <linux/module.h>
#include <linux/poll.h>

#include <linux/fs.h>
#include <linux/errno.h>
#include <linux/miscdevice.h>
#include <linux/kernel.h>
#include <linux/major.h>
#include <linux/mutex.h>
#include <linux/proc_fs.h>
#include <linux/seq_file.h>
#include <linux/stat.h>
#include <linux/init.h>
#include <linux/device.h>
#include <linux/tty.h>
#include <linux/kmod.h>
#include <linux/gfp.h>
#include <linux/gpio/consumer.h>
#include <linux/platform_device.h>
#include <linux/of_gpio.h>
#include <linux/of_irq.h>
#include <linux/interrupt.h>
#include <linux/irq.h>
#include <linux/slab.h>
#include <linux/fcntl.h>
#include <linux/timer.h>

// 描述一个引脚
struct gpio_desc{
	int gpio;   // 引脚编号
    char *name; // 名字
};

static struct gpio_desc gpios[] = {
    {131, "led0", },  // 引脚编号,名字
};

/* 1. 确定主设备号                                                                 */
static int major = 0;
static struct class *gpio_class;  // 一个类,用于创建设备节点


/* 3. 实现对应的open/read/write等函数,填入file_operations结构体                     */
static ssize_t gpio_drv_read (struct file *file, char __user *buf, size_t size, loff_t *offset)
{
	char tmp_buf[2];  // 存放驱动层和应用层交互的信息
	int err;   // 没有使用,用于存放copy_from_user和copy_to_user的返回值,消除报错
  int count = sizeof(gpios)/sizeof(gpios[0]); // 记录定义的最大引脚数量

	// 应用程序读的时候,传入的值如果不是两个,那么返回一个错误
	if (size != 2)
		return -EINVAL;

	/* 作用 : 驱动层得到应用层数据
	 * tmp_buf : 驱动层数据
	 * buf : 应用层数据
	 * 1  :数据长度为1个字节(因为我只需要知道他控制的是那一盏灯,所以只需要传入一个字节数据)
	*/
	err = copy_from_user(tmp_buf, buf, 1);

	//第0项表示要操作哪一个LED,如果操作的LED超出,表示失败
	if (tmp_buf[0] >= count)
		return -EINVAL;

	//将引脚电平读取出来
	tmp_buf[1] = gpio_get_value(gpios[(int)tmp_buf[0]].gpio);

	/* 作用 : 驱动层发数据给应用层
	 * buf : 应用层数据
	 * tmp_buf : 驱动层数据
	 * 2  :数据长度为2个字节
	*/
	err = copy_to_user(buf, tmp_buf, 2);

	return 2;
}

static ssize_t gpio_drv_write(struct file *file, const char __user *buf, size_t size, loff_t *offset)
{
    unsigned char ker_buf[2];
    int err;
	// 应用程序读的时候,传入的值如果不是两个,那么返回一个错误
    if (size != 2)
        return -EINVAL;

	/* 作用 : 驱动层得到应用层数据
	 * tmp_buf : 驱动层数据
	 * buf : 应用层数据
	 * size  :数据长度为size个字节
	*/
    err = copy_from_user(ker_buf, buf, size);

	// 如果要操作的GPIO不在规定范围内,返回错误
    if (ker_buf[0] >= sizeof(gpios)/sizeof(gpios[0]))
        return -EINVAL;

	// 设置指定引脚电平
    gpio_set_value(gpios[ker_buf[0]].gpio, ker_buf[1]);
    return 2;
}


/* 2. 定义自己的file_operations结构体                                            */
static struct file_operations gpio_led_drv= {
	.owner	 = THIS_MODULE,
	.read    = gpio_drv_read,
	.write   = gpio_drv_write,
};


/* 4. 把file_operations结构体告诉内核:注册驱动程序                           */
/* 5. 谁来注册驱动程序啊?得有一个入口函数:安装驱动程序时,就会去调用这个入口函数 */
static int __init gpio_drv_init(void)
{
    int err;  //用于保存函数返回值,用于判断函数是否执行成功
    int i;    //因为存在多个GPIO可能要申请,所以建立一个i进行for循环
    int count = sizeof(gpios)/sizeof(gpios[0]);  //统计有多少个GPIO

	/*__FILE__ :表示文件
	 *__FUNCTION__ :当前函数名
	 *__LINE__ :在文件的哪一行
	*/
	printk("%s %s line %d\n", __FILE__, __FUNCTION__, __LINE__);

	for (i = 0; i < count; i++)
	{
		/* 设置为输出引脚 */
		//申请指定GPIO引脚,申请的时候需要用到名字
		err = gpio_request(gpios[i].gpio, gpios[i].name);
		// 如果返回值小于0,表示申请失败
		if (err < 0)
		{
			//如果GPIO申请失败,打印出是哪个GPIO申请出现问题
			printk("can not request gpio %s %d\n", gpios[i].name, gpios[i].gpio);
			return -ENODEV;
		}
		// 如果GPIO申请成功,设置输出高电平
		gpio_direction_output(gpios[i].gpio, 1);
	}

	/* 注册file_operations 	*/
	// 注册字符驱动程序
	major = register_chrdev(0, "100ask_led", &gpio_led_drv);  /* /dev/gpio_desc */

	/******这里相当于命令行输入 mknod  /dev/100ask_gpio c 240 0 创建设备节点*****/

	// 创建类,为THIS_MODULE模块创建一个类,这个类叫做gpio_class
	gpio_class = class_create(THIS_MODULE, "100ask_led_class");
	if (IS_ERR(gpio_class))   //如果返回错误
	{
		/*__FILE__ :表示文件
		 *__FUNCTION__ :当前函数名
		 *__LINE__ :在文件的哪一行
		*/
		printk("%s %s line %d\n", __FILE__, __FUNCTION__, __LINE__);
		// 注销字符驱动程序
		unregister_chrdev(major, "100ask_led_class");
		// 返回错误
		return PTR_ERR(gpio_class);
	}

	/*输入参数是逻辑设备的设备名,即在目录/dev目录下创建的设备名
	 *参数一 : 在gpio_class类下面创建设备
	 *参数二 : 无父设备的指针
	 *参数三 : 主设备号+次设备号
	 *参数四 : 没有私有数据
	*/
	device_create(gpio_class, NULL, MKDEV(major, 0), NULL, "100ask_led"); /* /dev/100ask_gpio */

	// 如果执行到这里了,说明LED驱动装载完成
	printk("LED driver loading is complete\n");
	return err;
}

/* 6. 有入口函数就应该有出口函数:卸载驱动程序时,就会去调用这个出口函数 */
static void __exit gpio_drv_exit(void)
{
    int i;
    int count = sizeof(gpios)/sizeof(gpios[0]);
	/*__FILE__ :表示文件
	 *__FUNCTION__ :当前函数名
	 *__LINE__ :在文件的哪一行
	*/
	printk("%s %s line %d\n", __FILE__, __FUNCTION__, __LINE__);
	// 销毁gpio_class类下面的设备节点
	device_destroy(gpio_class, MKDEV(major, 0));
	// 销毁gpio_class类
	class_destroy(gpio_class);
	// 注销驱动
	unregister_chrdev(major, "100ask_led");

	for (i = 0; i < count; i++)
	{
		// 将GPIO释放
		gpio_free(gpios[i].gpio);
	}

	// 如果执行到这里了,说明LED驱动卸载完成
	printk("The LED driver is uninstalled\n");
}


/* 7. 其他完善:提供设备信息,自动创建设备节点                                     */

module_init(gpio_drv_init);     // 确认入口函数
module_exit(gpio_drv_exit);     // 确认出口函数

/*最后我们需要在驱动中加入 LICENSE 信息和作者信息,其中 LICENSE 是必须添加的,否则的话编译的时候会报错,作者信息可以添加也可以不添加
 *这个协议要求我们代码必须免费开源,Linux遵循GPL协议,他的源代码可以开放使用,那么你写的内核驱动程序也要遵循GPL协议才能使用内核函数
 *因为指定了这个协议,你的代码也需要开放给别人免费使用,同时可以根据这个协议要求很多厂商提供源代码
 *但是很多厂商为了规避这个协议,驱动源代码很简单,复杂的东西放在应用层
*/
MODULE_LICENSE("GPL"); // 指定模块为GPL协议
MODULE_AUTHOR("CSDN:qq_919426896");  // 表明作者,可以不写
Application layer code:
The strtol() function converts characters into numbers.
Because the 1 we entered on the command line is actually the character 1, not the number 1. In order to unify the data type with the driver layer, this function needs to be called here.
joint test.c
#include <stdlib.h>
#include <sys/types.h>
#include <sys/stat.h>
#include <fcntl.h>
#include <unistd.h>
#include <stdio.h>
#include <string.h>
#include <poll.h>
#include <signal.h>

static int fd;

// int led_on(int which);
// int led_off(int which);
// int led_status(int which);

/* 可执行文件名   | 表示要操作哪一盏灯  | 灯状态  |    效果
 * ./led_test    |   <0|1|2|..>        | on     |硬件上开灯
 * ./led_test    |   <0|1|2|..>        | off    |硬件上关灯
 * ./led_test    |   <0|1|2|..>        |        |读取led状态,并且显示在终端
 */
int main(int argc, char **argv)
{
	int ret;     // 存放函数返回值,用于判断函数是否正常执行
	char buf[2]; // 存放命令行的后两个字符(<0|1|2|...> [on | off])


	// 如果传入参数少于两个,打印文件用法
	if (argc < 2)
	{
		printf("Usage: %s <0|1|2|...> [on | off]\n", argv[0]);
		return -1;
	}


	// 打开文件,因为在驱动层中,device_create()函数创建的设备节点名字叫做100ask_led,而设备节点都存放在/dev目录下,所以这里是/dev/100ask_led
	fd = open("/dev/100ask_led", O_RDWR);
	// 如果无法打开,返回错误
	if (fd == -1)
	{
		printf("can not open file /dev/100ask_led\n");
		return -1;
	}
	// 如果传入了三个参数,表示写入
	if (argc == 3)
	{
		/* write */
		/* 作用 : 将字符串转化为一个整数
		 * argv[1] :  要转换为长整数的字符串
		 * NULL :如果提供了 endptr 参数,则将指向解析结束位置的指针存储在 endptr 中。endptr 可以用于进一步处理字符串中的其他内容
		 * 0 : 设置为 0,则会根据字符串的前缀(如 "0x" 表示十六进制,"0" 表示八进制,没有前缀表示十进制)来自动判断进制
		*/
		buf[0] = strtol(argv[1], NULL, 0);

		// 判断是否为打开
		if (strcmp(argv[2], "on") == 0)
			buf[1] = 0;  //因为LED外接3.3V,所以输出低电平才是开灯
		else
			buf[1] = 1;  //因为LED外接3.3V,所以输出高电平才是关灯
		// 向字符驱动程序中写入
		ret = write(fd, buf, 2);
	}
	// 否则表示读取电平信息
	else
	{
		/* read */
		/* 作用 : 将字符串转化为一个整数
		 * argv[1] :  要转换为长整数的字符串
		 * NULL :指向第一个不可转换的字符位置的指针
		 * 0 : 表示默认采用 10 进制转换
		*/
		buf[0] = strtol(argv[1], NULL, 0);
		// 读取电平,从驱动层读取两个数据
		ret = read(fd, buf, 2);
		// 如果返回值为2,表示正常读取到了电平。(为什么是2,看驱动程序的gpio_drv_read)
		if (ret == 2)
		{
			//打印引脚信息
			printf("led %d status is %s\n", buf[0], buf[1] == 0 ? "on" : "off");
		}
	}

	close(fd);

	return 0;
}
Makefile
KERN_DIR = /home/book/100ask_imx6ull-sdk/Linux-4.9.88

all:
	make -C $(KERN_DIR) M=`pwd` modules
	$(CROSS_COMPILE)gcc -o ledtest ledtest.c

clean:
	make -C $(KERN_DIR) M=`pwd` modules clean
	rm -rf modules.order
	rm -f ledtest

obj-m	+= led_drv.o
Computer test:
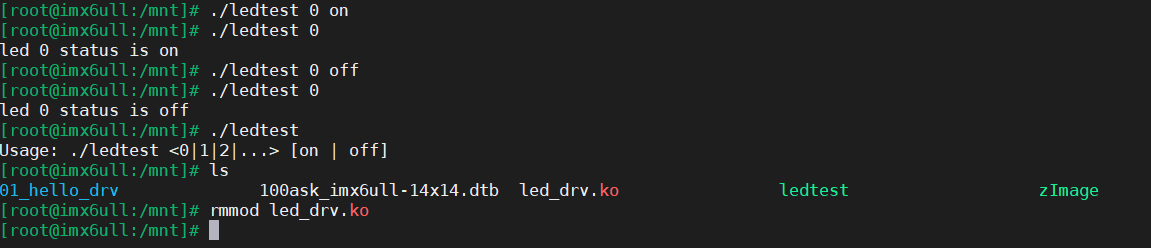
Please refer to the previous blog Linux driver introduction - LED lighting driver-CSDN blog
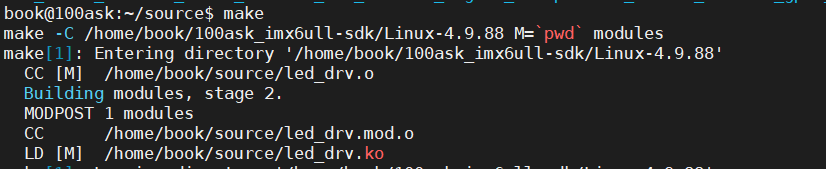
Execute make on ubuntu
Mount NFS directory, refer to Development board mounts Ubuntu NFS directory-CSDN Blog
Open the development board, imx6ull is used here
Execute insmod led_drv.ko

start testing
Execute ./ledtest 0 on to turn on the development board
After the test is completed, execute rmmod led_drv.ko to uninstall the driver.