uniapp develops h5 WeChat authorized login
Article directory
Preface
This is also my first time to do h5 authorized WeChat login. I searched online for a long time and found that the method is basically the same, but it is not suitable for my process.
Official document of the public account: https://developers.weixin.qq.com/doc/offiaccount/Getting_Started/Overview.html
For most of the information, you can refer to the article: https://blog.csdn.net/anjignren/article/details/ 126176449
If you want to know more details, you can read this blogger’s article. I think it is very detailed: https://www.cnblogs.com/0201zcr/p/5131602.html
Implementation steps:
1. Users follow WeChat public accounts.
2. The WeChat public account provides the user request authorization page URL.
3.When the user clicks the authorization page URL, a request will be made to the server.
4.The server asks the user whether he agrees to authorize the WeChat public account (this step is not required when the scope is snsapi_base)
5. User consent (no such step when scope is snsapi_base)
6. The server passes the CODE to the WeChat public account through callback
7.WeChat public account gets CODE
8. WeChat public account requests Access Token from the server through CODE
9. The server returns Access Token and OpenID to the WeChat public account
10.The WeChat public account requests user information from the server through Access Token (this step is not required when the scope is snsapi_base)
11. The server returns the user information to the WeChat public account (this step is not required when the scope is snsapi_base)
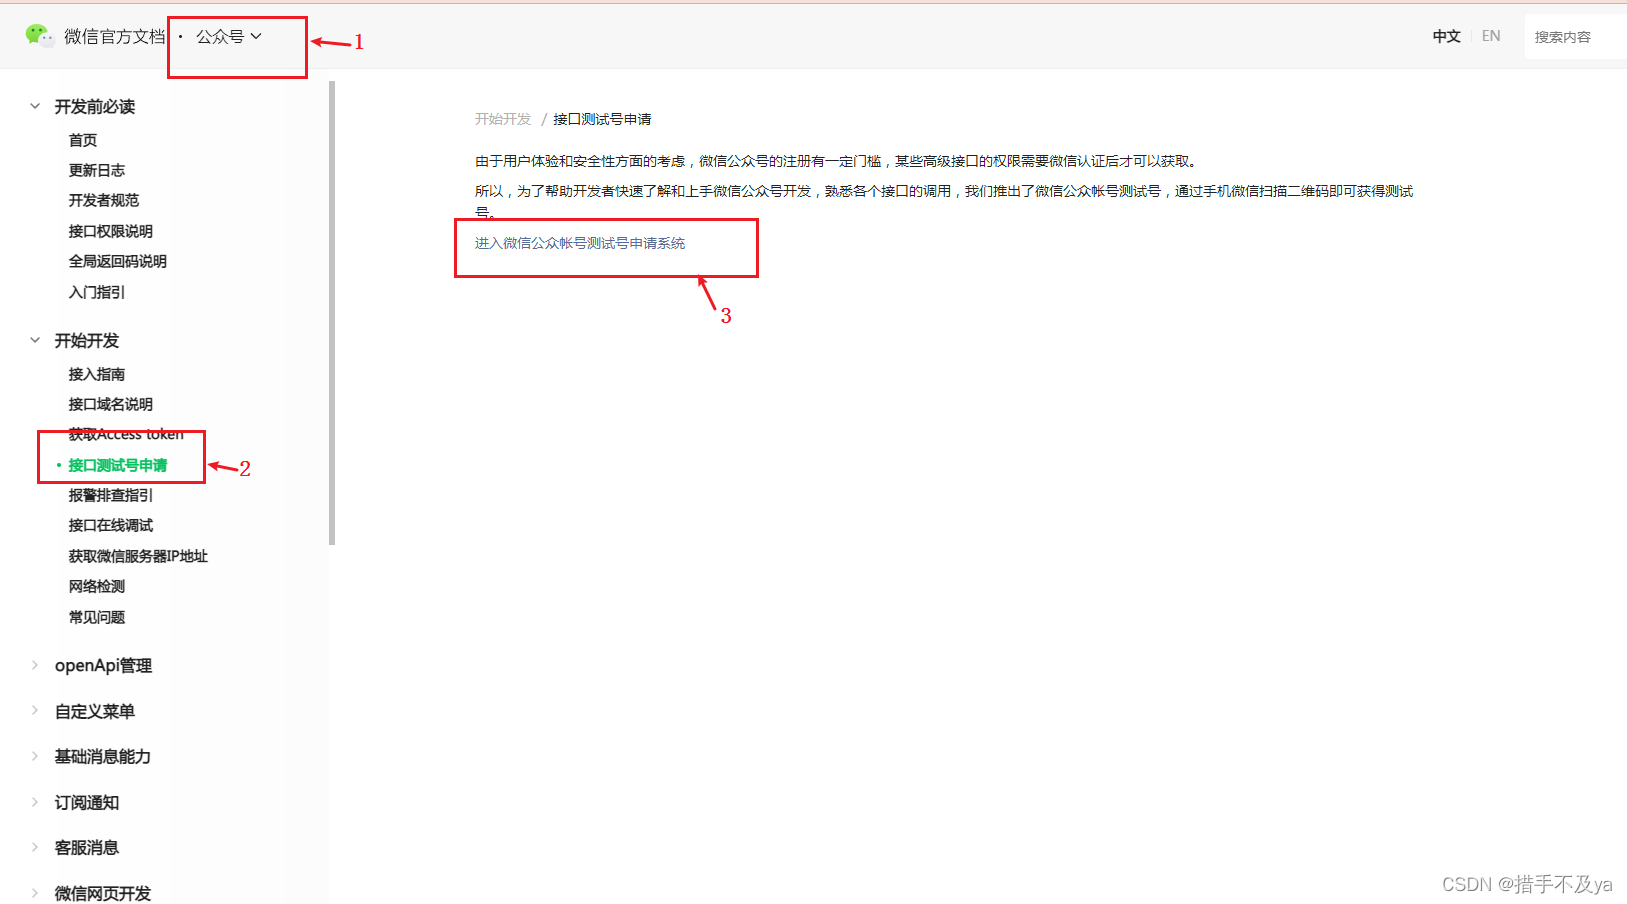
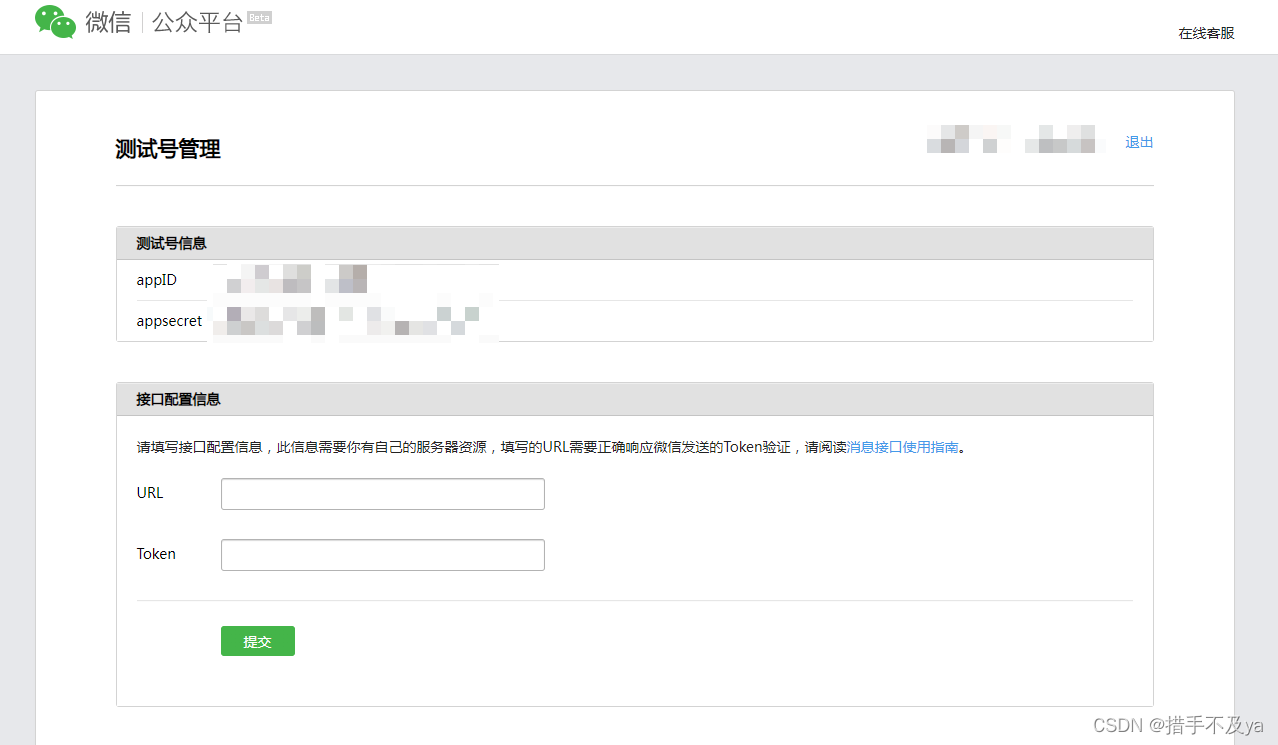
1. Early preparation – apply for a test account
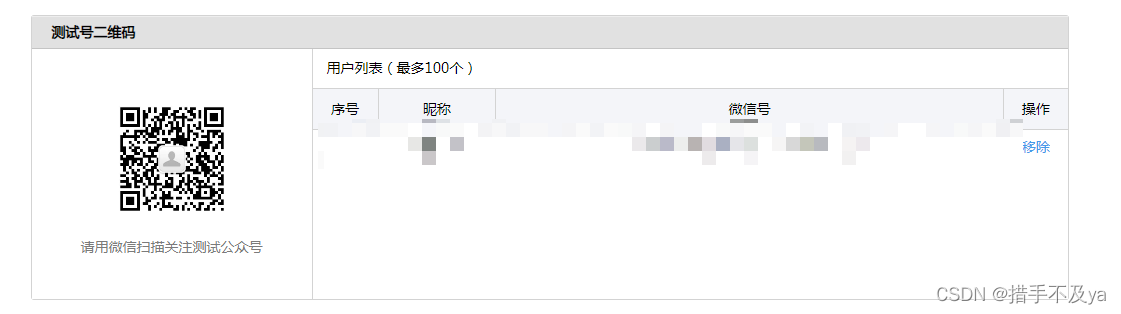
微信扫一扫进去之后的页面,可以把测试账号的信息保存下来,接下来会使用到。
翻到底下,扫码关注
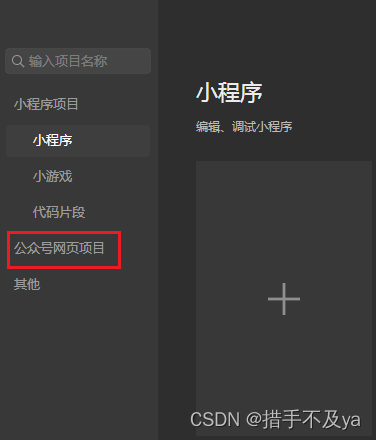
接下来,选择公众号网页项目,
输入地址测试

测试地址 这样获取
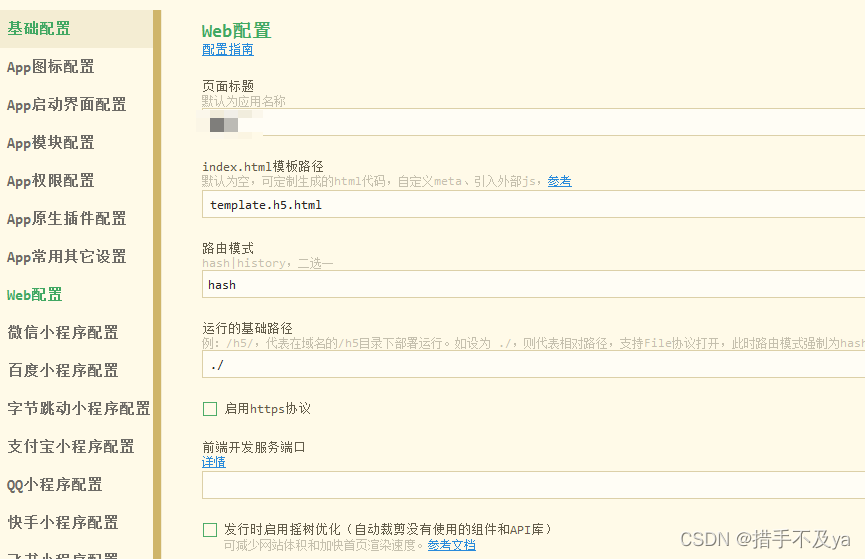
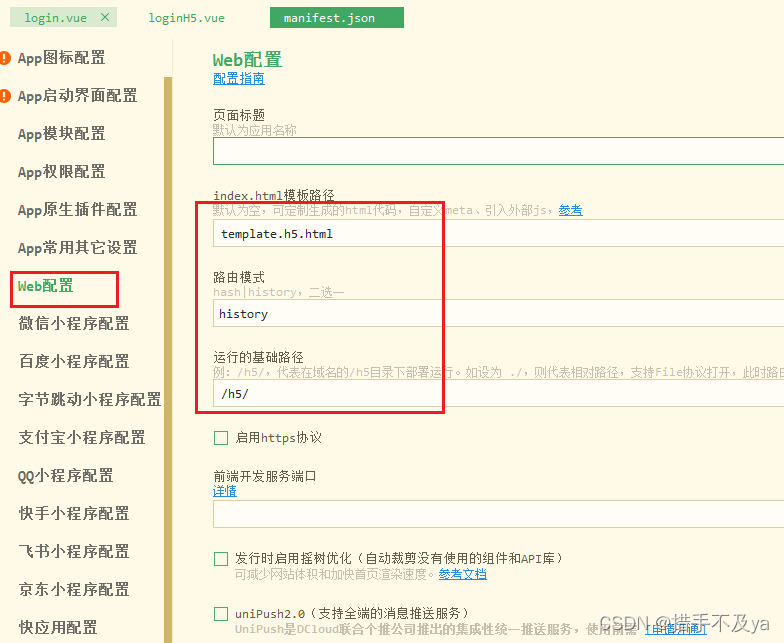
You can check the official website: https://uniapp.dcloud.net.cn/collocation/manifest.html#h5-template
1. Create a new template.h5.html file in the root directory, copy and paste it directly (depending on my personal experience, I don’t have it) used)
<html lang="zh-CN">
	<head>
		<meta charset="utf-8">
		<meta http-equiv="X-UA-Compatible" content="IE=edge">
		<title>
			<%= htmlWebpackPlugin.options.title %>
		</title>
		<!-- Open Graph data -->
		<!-- <meta property="og:title" content="Title Here" /> -->
		<!-- <meta property="og:url" content="http://www.example.com/" /> -->
		<!-- <meta property="og:image" content="http://example.com/image.jpg" /> -->
		<!-- <meta property="og:description" content="Description Here" /> -->
		<script>
			var coverSupport = 'CSS' in window && typeof CSS.supports === 'function' && (CSS.supports('top: env(a)') || CSS.supports('top: constant(a)'))
			document.write('<meta name="viewport" content="width=device-width, user-scalable=no, initial-scale=1.0, maximum-scale=1.0, minimum-scale=1.0' + (coverSupport ? ', viewport-fit=cover' : '') + '" />')
		</script>
		<link rel="stylesheet" href="<%= BASE_URL %>static/index.<%= VUE_APP_INDEX_CSS_HASH %>.css" />
	</head>
	<body>
		<noscript>
			<strong>Please enable JavaScript to continue.</strong>
		</noscript>
		<div id="app"></div>
		<!-- built files will be auto injected -->
	</body>
</html>
2. Configure mainifest.json
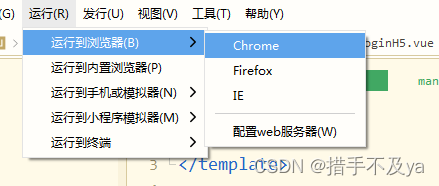
3. After running it in the browser, copy the address and use it in the WeChat developer tools.
You can do this during testing, but you don't need to use these at all when you use them officially. The backend will give us the appID. It depends on the individual company.
2. Formal development – front-end code
Create a new login authorization page in the uniapp project and start writing our code. If your process is the same as mine, the code is as follows, you can take it and use it directly, just change the interface:
需要注意的是code只有使用一次,不能重复使用,在开发的过程中可能会遇到这种问题,导致流程走不通
<template>
    <view></view>
</template>

<script>
// h5 使用控制台打log 得先npm install vconsole
import Vconsole from 'vconsole';
export default {


	data() {


		return {


			code:'',
			state:''
		}
	},
    onLoad() {


	   let vConsole = new Vconsole();
	   this.state = this.getUrlCode('state')
	   this.checkWeChatCode(this.code)
    },
    methods: {


		checkWeChatCode() {


			// 页面一进来先判断是否有code
			this.code = this.getUrlCode('code')
			if (this.code) {


			// 如果有,走登记接口
				this.getLogin(this.code)
			} else {


			// 没有调后端接口获取地址
				let params = {


				    url:window.location.href,//当前页面的详细地址
				    state:this.state,
				    authType:0
				}
				xxxx(params).then(res => {


					if(res.data.code == 0){


						window.location.href = res.data.message
					}else {


						this.$u.toast(res.data.message)
					}
				})
				// 根据需求使用 this.getCode()
			}
		},
		getUrlCode (name) {


			return decodeURIComponent((new RegExp('[?|&]' + name + '=' + '([^&;]+?)(&|#|;|$)').exec(location.href) || [, ''])[1].replace(/\+/g, '%20')) || null
		},
		// 获取code
		// getCode () {


		// 	window.location.href =
		// 	'https://open.weixin.qq.com/connect/oauth2/authorize?appid=' + this.appID +
		// 	'&redirect_uri=' + encodeURIComponent(this.callBack) +
		// 	'&response_type=code&scope=snsapi_userinfo&state=' + this.state + '#wechat_redirect';

		// redirect_uri是授权成功后,跳转的url地址,微信会帮我们跳转到该链接,并且通过?的形式拼接code,这里需要用encodeURIComponent对链接进行处理。
		// 如果配置参数一一对应,那么此时已经通过回调地址刷新页面后,你就会再地址栏中看到code了。
		// https://test.yuruantong.com/pages/loginAndRegister/login/loginH5?code=0312nn200ADR1P1BYh100zp2VL32nn2f&state=1
		// },
	    //登录
		async getLogin(value){


			let params = {


				code:value,
				wechartState:this.state
			}
			const res = await xxxx(params)
			if(res.data.code != 0){


				this.$u.toast(res.data.message)
				return;
			}
			if(res.data.rows[0].code == 1){


				let obj = res.data.rows;
				obj.push({


					wechartState:this.state
				})
				let arr = {


					params:obj,
					isShow:true
				}
				uni.redirectTo({


					url: '/pages/loginAndRegister/login/login?params=' + JSON.stringify(arr)
				})
			}else if(res.data.rows[0].code == 2){

     //res.data.rows 返回的是token 跳转对应的页面
				uni.setStorageSync('userInfo',res.data.rows[0].loginUserVO);
				uni.redirectTo({


					url:'/landlord/home/index/index'
				})
			}else{

    }
		}
     }
}
</script>
<style>
</style>
The above is my detailed usage process. It is effective after personal testing.
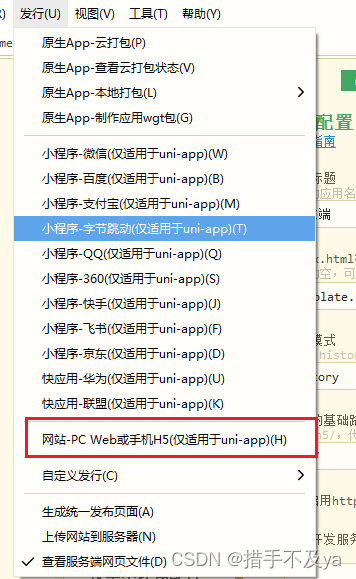
3. Package and release
1. Official website address: https://hellouniapp.dcloud.net.cn
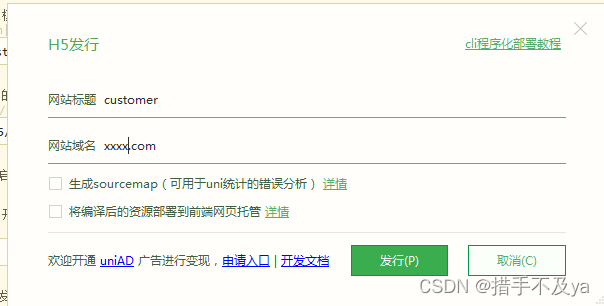
2. Select the one circled in red box
- Then a pop-up box will appear, fill in the website domain name
4. Then the packaging is successful, saved in the unpackage directory, and handed over to the backend for deployment.

Summarize
The first time I did it, I felt very confused. I didn’t know how to start. I went crazy on Baidu and looked at all the similar implementation methods. As a result, the process I got here was wrong, and some of them I didn’t really need. So this time, I feel that because I don’t know how to do it, reading what others have written constrains my thoughts, and I feel that this is what I should do.
You can use it as a reference. I think it is useful and it is effective in personal testing.