Note: This article was originally published on [Microsoft MSDN] (March 2022)
mentioned above
Data is not only an asset to the enterprise, but also the lifeblood of the enterprise. Its importance is self-evident. As more and more companies adopt Power BI as one of their business intelligence solutions, users have increasingly stringent requirements for the security and compliance of data in the Microsoft BI system. Due to the length of the article, the following will excerpt the core data security issues in the Power BI platform from the perspective of PBI and M365 administrators, namely "data storage, data presentation and data export" for graphic explanation.
1. Data storage of PBI data security
When a Power BI data set is published to PBI Service, its data is actually stored in Azure Blob Storage. By default, data encryption is managed by Microsoft, and the value of the key, rotation rules, and encryption method are not subject to the enterprise or organization. control. Although Microsoft uses a strong enough 256-bit AES encryption algorithm, this argument may not be helpful in the face of some companies' strict information security policies and rigorous review work by compliance departments. In order for the organization to control the key and make the data encryption method and rotation rules comply with its policies, implementing BYOK (Bring your own Key) in Power BI becomes the only solution.
Implementing BYOK at PBI
Notice:
- BYOK is currently only available for PBI Premium (including Capacity and Per User)
- BYOK mainly supports Import data sets based on relational database data sources (refer to this document for specific restrictions )
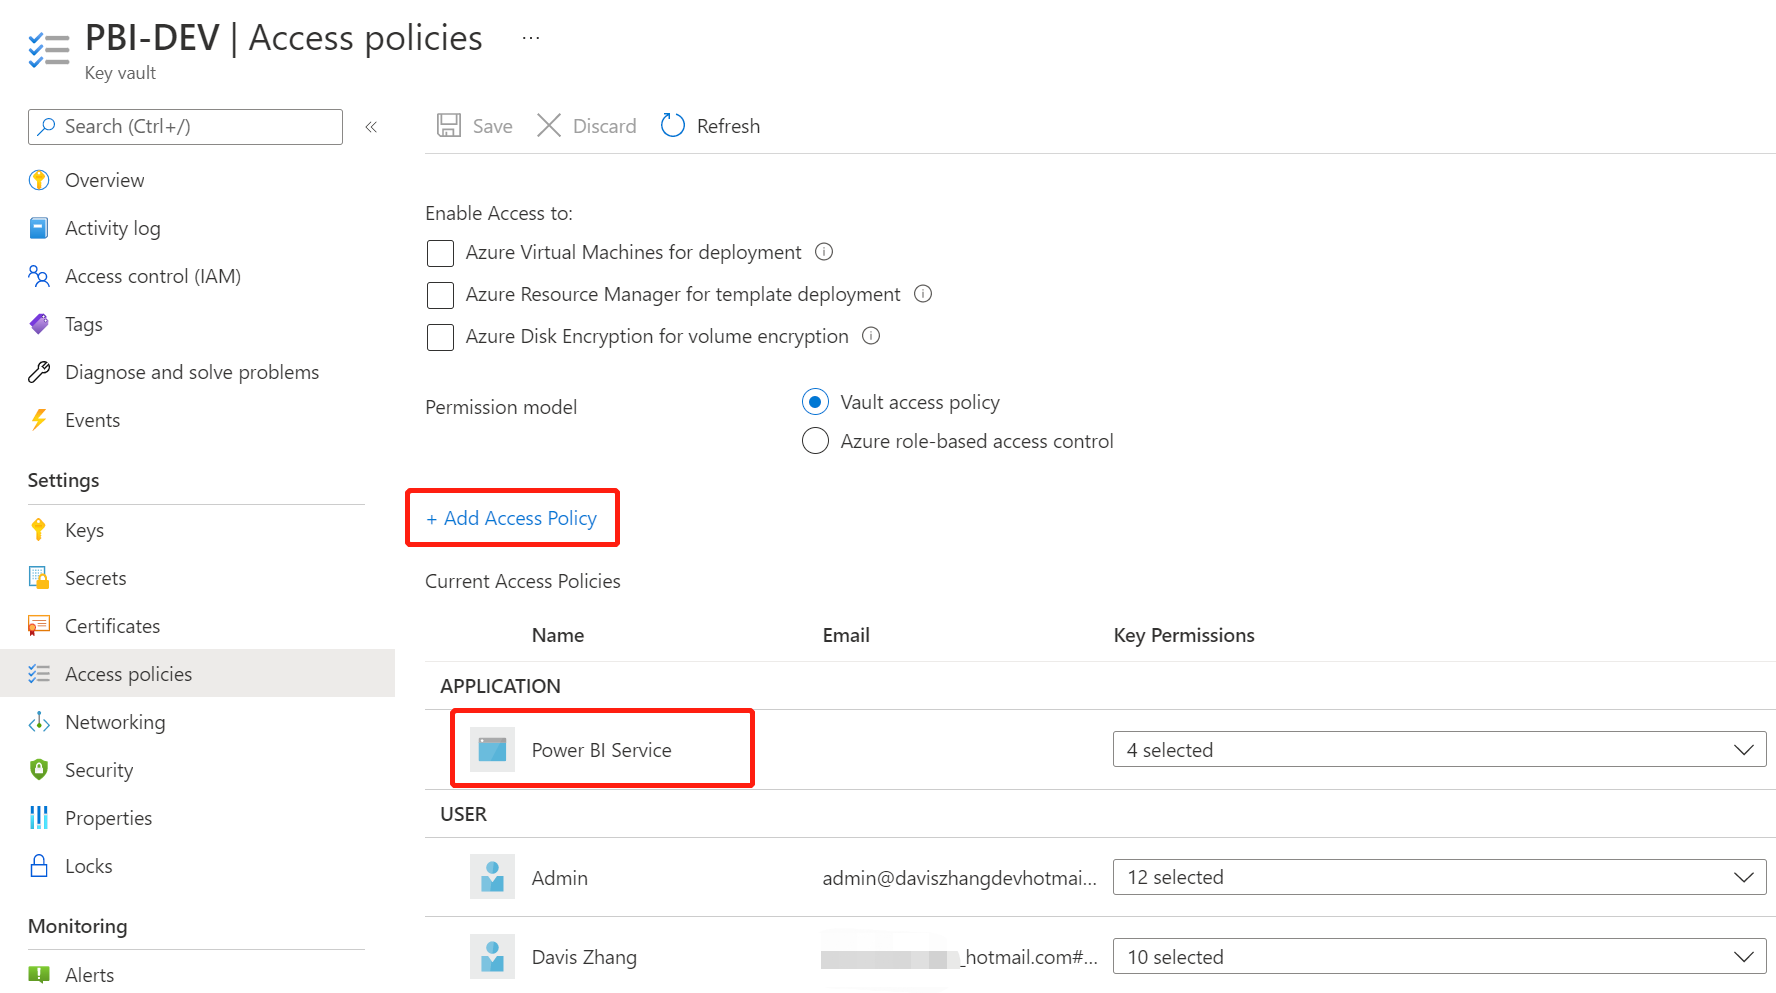
1. Log in to Azure to create Key Vault, and assign Unwrap Key and Wrap Key permissions
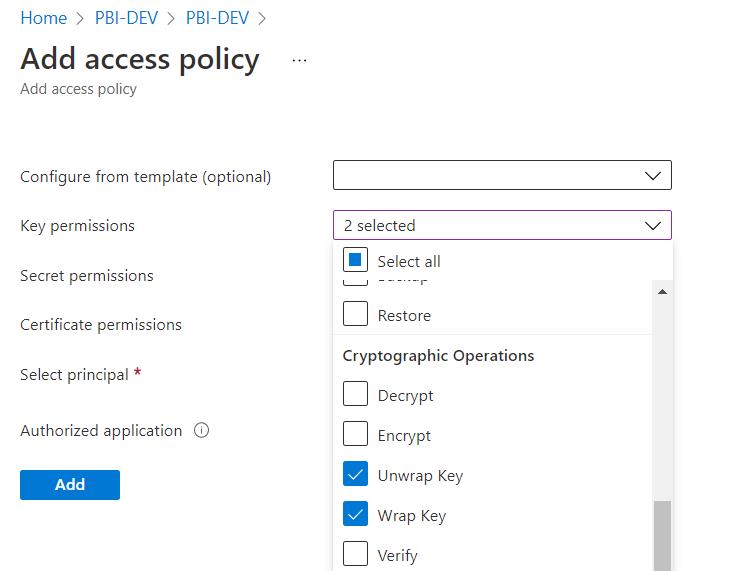
2. Add the Power BI workspace administrator account and Power BI Service service principal you want to use for BYOK in Access Policy
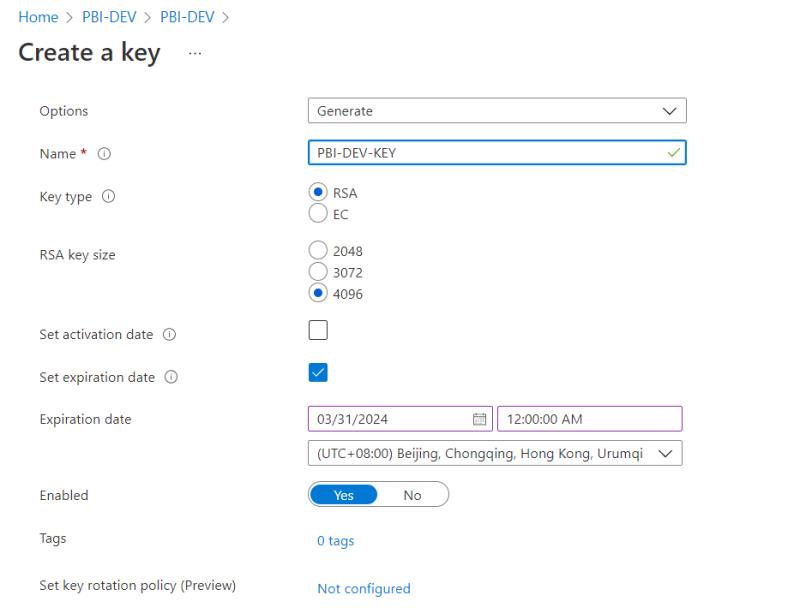
3. Next create the key according to the following configuration
4. Now, apply the key created in the previous step to the PBI capacity. There is currently no interface for setting, and you need to type the command in PowerShell.
--安装Cmdlets(已装跳过)
Install-Module -Name MicrosoftPowerBIMgmt
--登录
Connect-PowerBIServiceAccount
--在整个PBI租户中启用BYOK
Add-PowerBIEncryptionKey -Name '<输入Key名称>' -KeyVaultKeyUri '<输入Key URI>'
--注:其中Key URI可在Azure Key Vault中查询复制
--获取容量ID
Get-PowerBICapacity -Scope Individual
--最后,为该容量设置BYOK
Set-PowerBICapacityEncryptionKey -CapacityId <输入容量ID> -KeyName '<输入Key名称>'
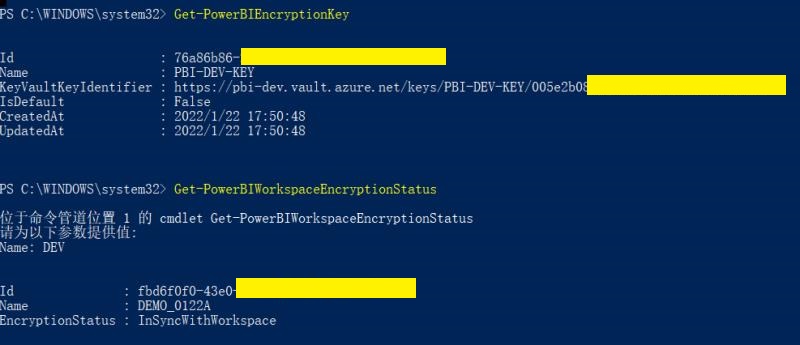
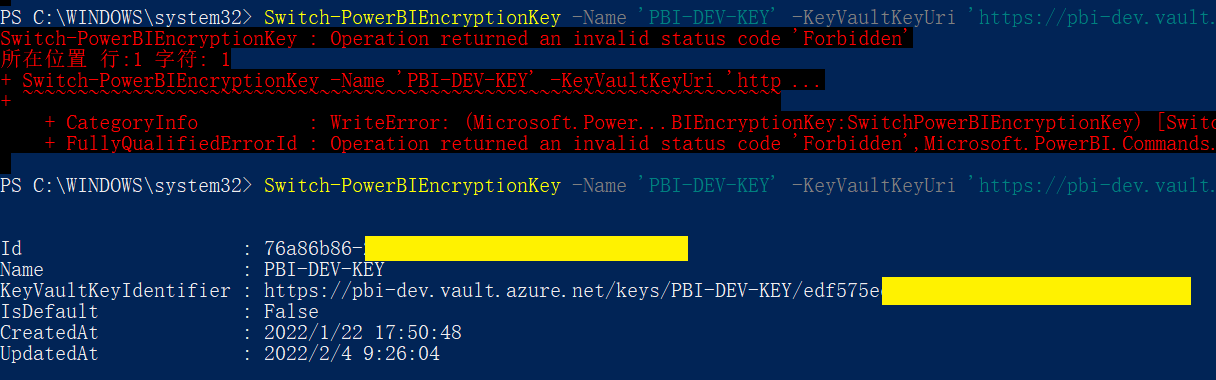
At this point, BYOK is set up. Enter the following command to verify:
Get-PowerBIEncryptionKey
As shown in the figure, the configuration is successful:
What needs to be noted is that the current implementation of BYOK is at the entire capacity level, not at the Workspace level. Once BYOK is set for a capacity, all workspaces in that capacity inherit the capacity's BYOK settings.
6. To rotate the secret key, you can use the following command. To achieve regular rotation, you can configure it to an existing application, or directly use the "Rotation Policy" preview function in Azure Key Vault.
Switch-PowerBIEncryptionKey -Name '<输入Key名称>' -KeyVaultKeyUri '<输入新的Key URI>'
It should be noted here that whether it is a new version of the secret key or the current secret key, it must be enabled, otherwise you will encounter the following error. After ensuring that all keys are enabled, the problem is solved, as shown in the figure:
2. Data presentation of PBI data security
Security in the data presentation phase, as the name suggests, refers to how to give different users or different groups different access permissions to data based on different custom roles when accessing PBI reports. Although we can decide whether to grant permissions to a certain user in the workspace. The Viewer role is granted, but there is no way to control what data the user can and cannot see.
Fortunately, in the Power BI import model, Microsoft provides two data security settings, RLS and OLS. The former is the row-level security that PBI users are familiar with. It can use DAX to define filtering rules for different fields in different tables based on roles. , or can be combined with USERPRINCIPALNAME() to dynamically define visitor permissions (due to the large amount of information, it will not be expanded here); and the latter OLS (Object Level Security) is the security set for the field itself, which can control different fields (including fields) based on roles name) is visible to a specific user, we can vividly understand it as "column level security".
Implementing OLS in PBI
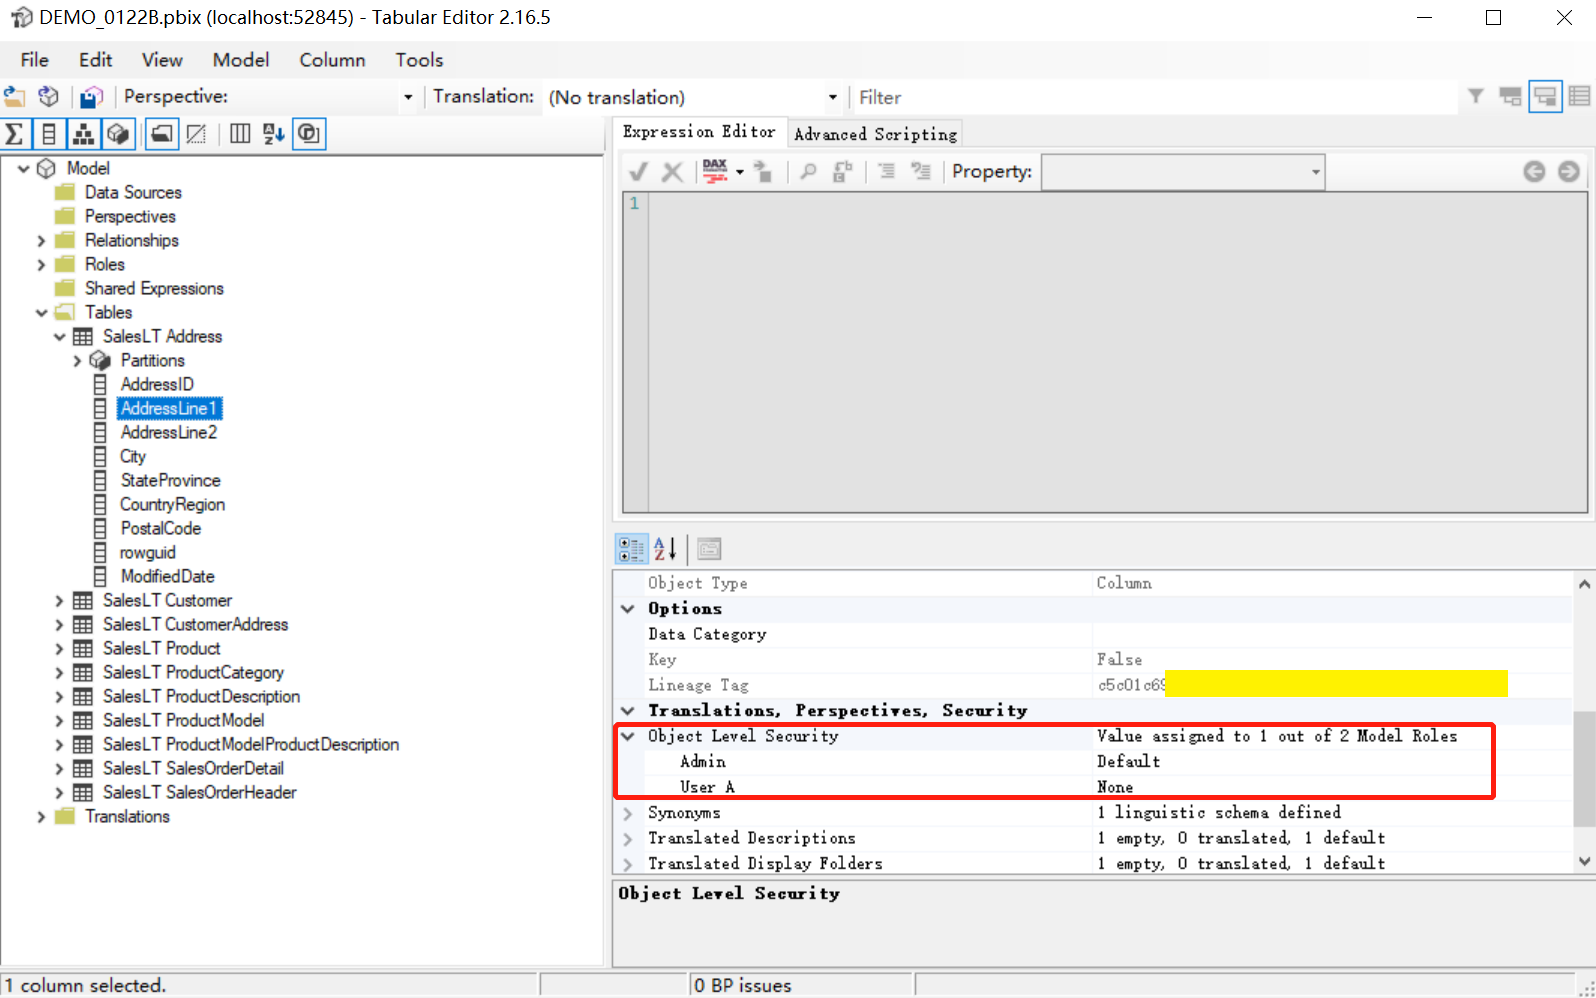
Like RLS, OLS also needs to create roles in PBID first, but the security control of specific table or field visibility needs to be completed in the external tool tabular editor . To hide a field for a specified role, just use this tool to connect to the model, select the table or field that needs to be set, and set the value of the corresponding role in OLS to None, as shown in the figure:
The following are points to note about OLS:
-
If a table or field that is hidden for a role is used in a front-end report, all visualizations related to it will be unavailable when the role views the report.
-
Although OLS cannot be implemented for a specific measure, if the field referenced by the measure contains a hidden field, the measure will still be invisible to the specified role.
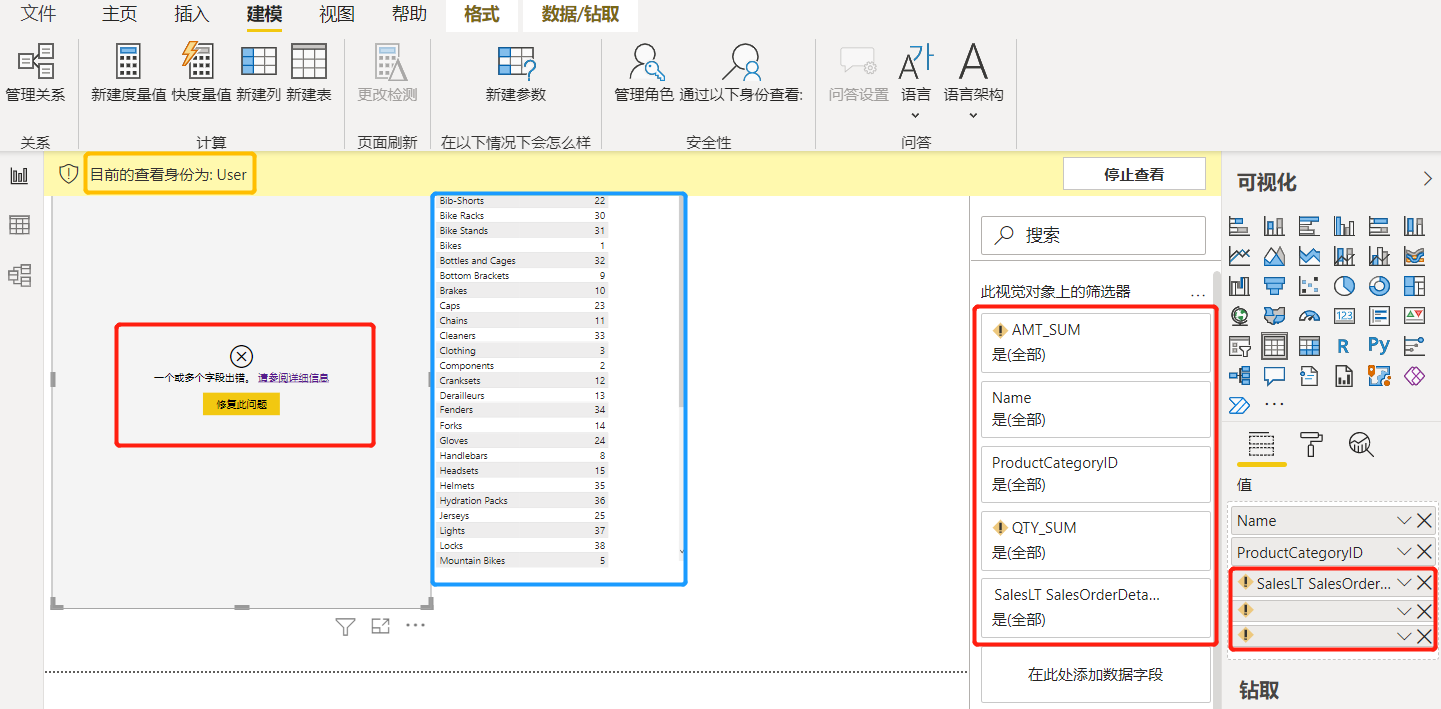
The simple example shown in the figure below reflects the above two points well. Since the OLS value of the field "OrderQty" for the role "User" is set to None, the visualization on the left is completely unavailable. The table on the right is displayed because this field is not used, nor is any measure value that references this field. Not affected.
Due to limitations of the underlying technology, currently PBID cannot hide specific fields or values within the same visualization without affecting the display of other fields or values. Therefore, the application value of OLS is mainly reflected in user self-service analysis.
3. Data protection of PBI data security
By specifying roles in the workspace and working with RLS and OLS, we have achieved permission control over the content of PBI data, but what we cannot control is how to continue to protect the data after it is exported from Power BI, and how to process the PBI data. Monitor so that whenever sensitive data is detected, administrators can be promptly alerted.
The solution to this situation is to implement DLP (Data Loss Prevention) for Power BI. It includes the following two stages:
1. Microsoft 365 administrators can create and define sensitivity labels for Power BI. Different sensitivity labels can be set with different permission definitions. Administrators of each PBI workspace can set settings for different data sets, data flows, and reports according to the situation. Correspond to sensitivity labels to ensure that sensitive data can be protected even if it leaves Power BI. To quote the MS documentation :
When labeled data leaves Power BI, either via export to Excel, PowerPoint, PDF, or .pbix files, or via other supported export scenarios such as Analyze in Excel or live connection PivotTables in Excel, Power BI automatically applies the label to the exported file and protects it according to the label’s file encryption settings. This way your sensitive data can remain protected, even when it leaves Power BI.
2. Microsoft 365 administrators can create DLP policies for Power BI, which can monitor sensitive data based on the sensitivity labels of PBI content (this feature is still in preview).
Note: Implementing DLP requires a Microsoft 365 E5 subscription
Implementing DLP in PBI
Create and publish sensitivity labels
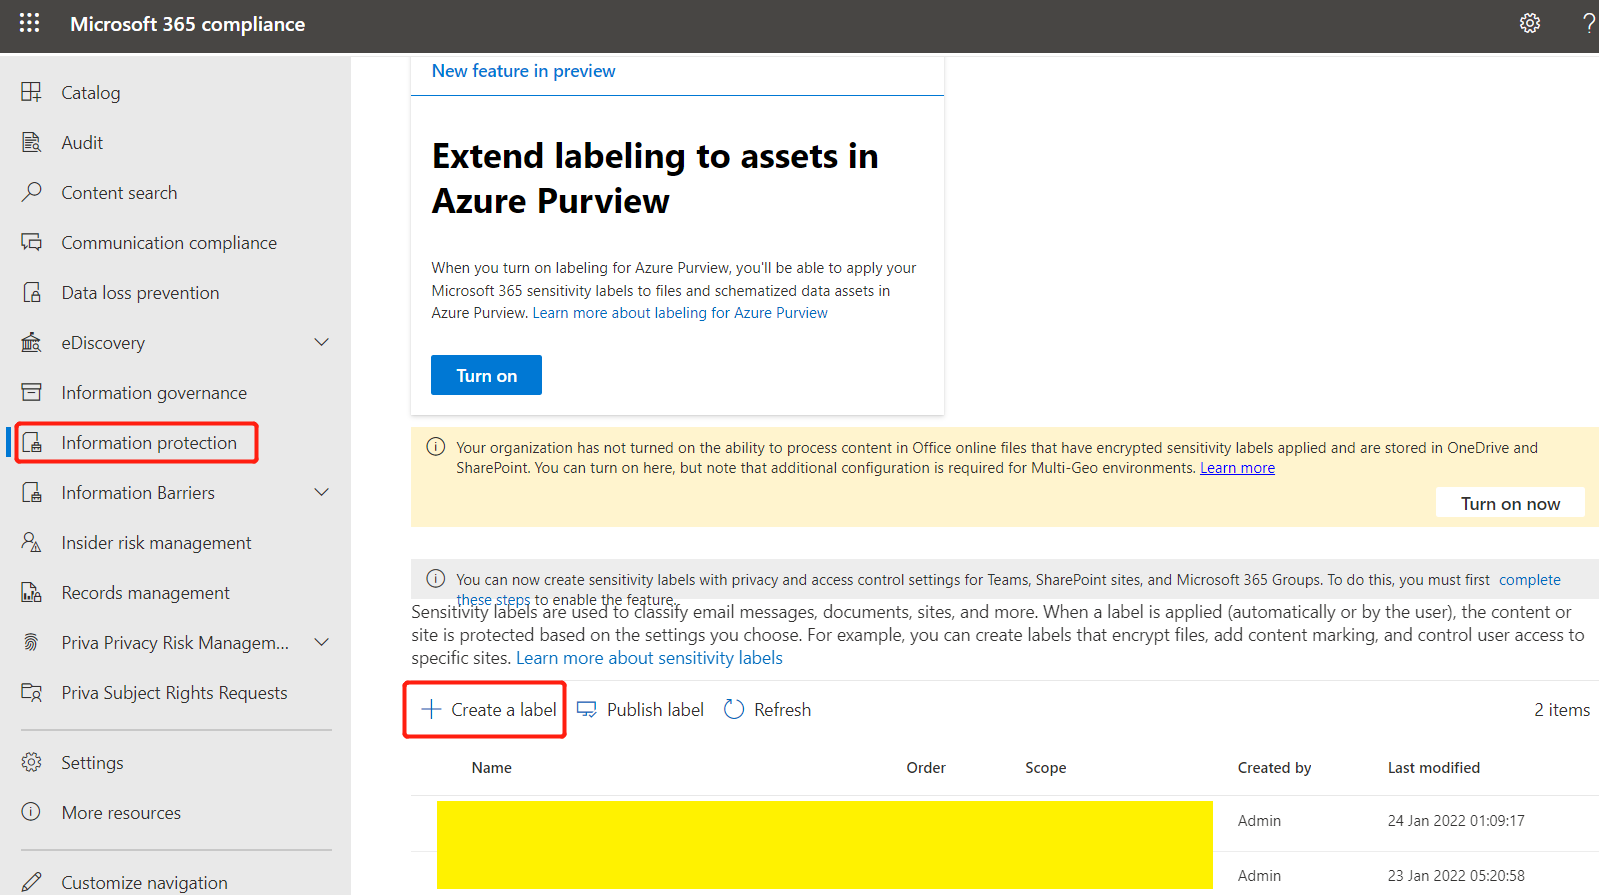
1. Create a label in the M365 Compliance Center as shown below.
Note: If the Information protection tab is not visible, you need to check your account permissions and M365 Lisence
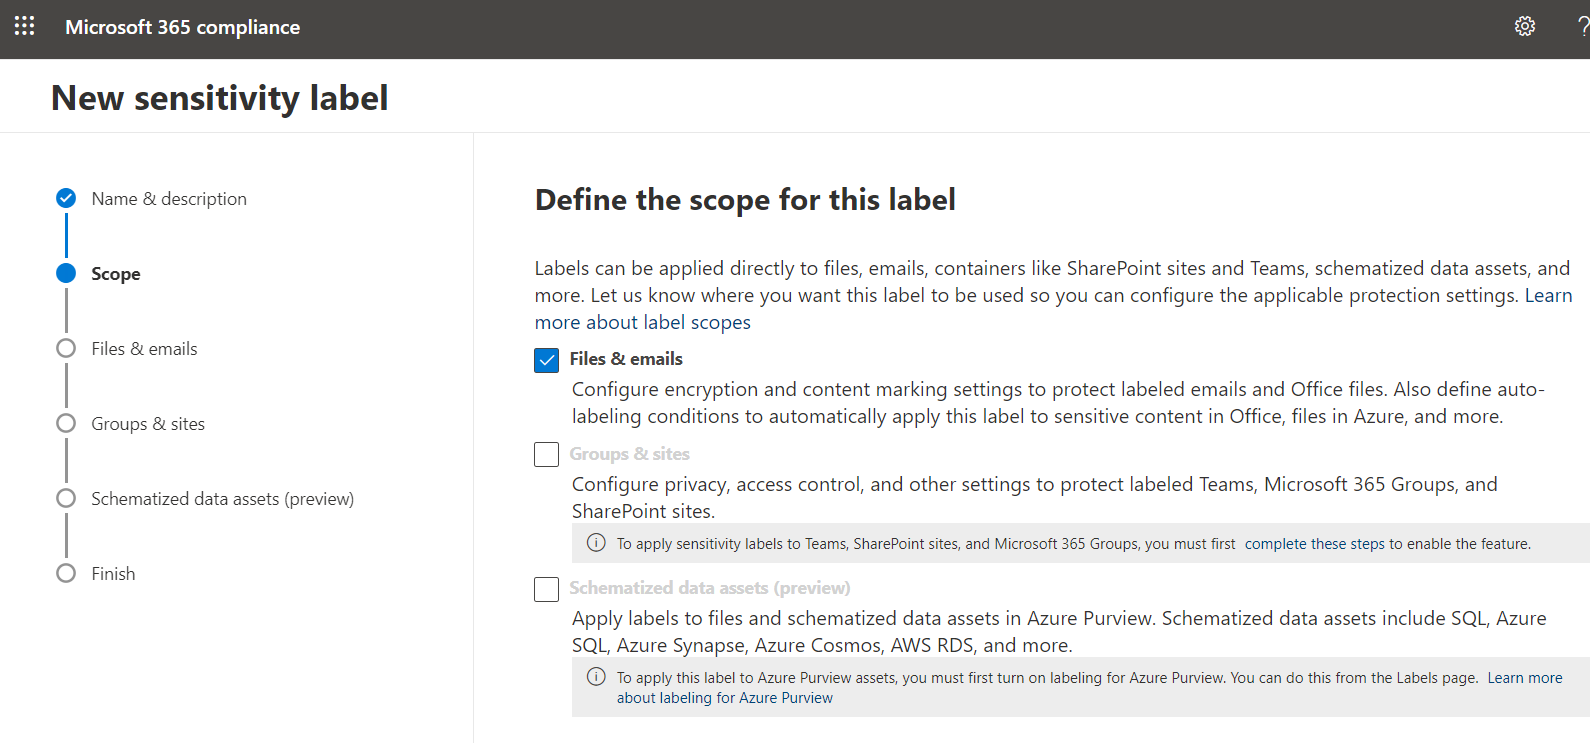
2.Select Files & emails
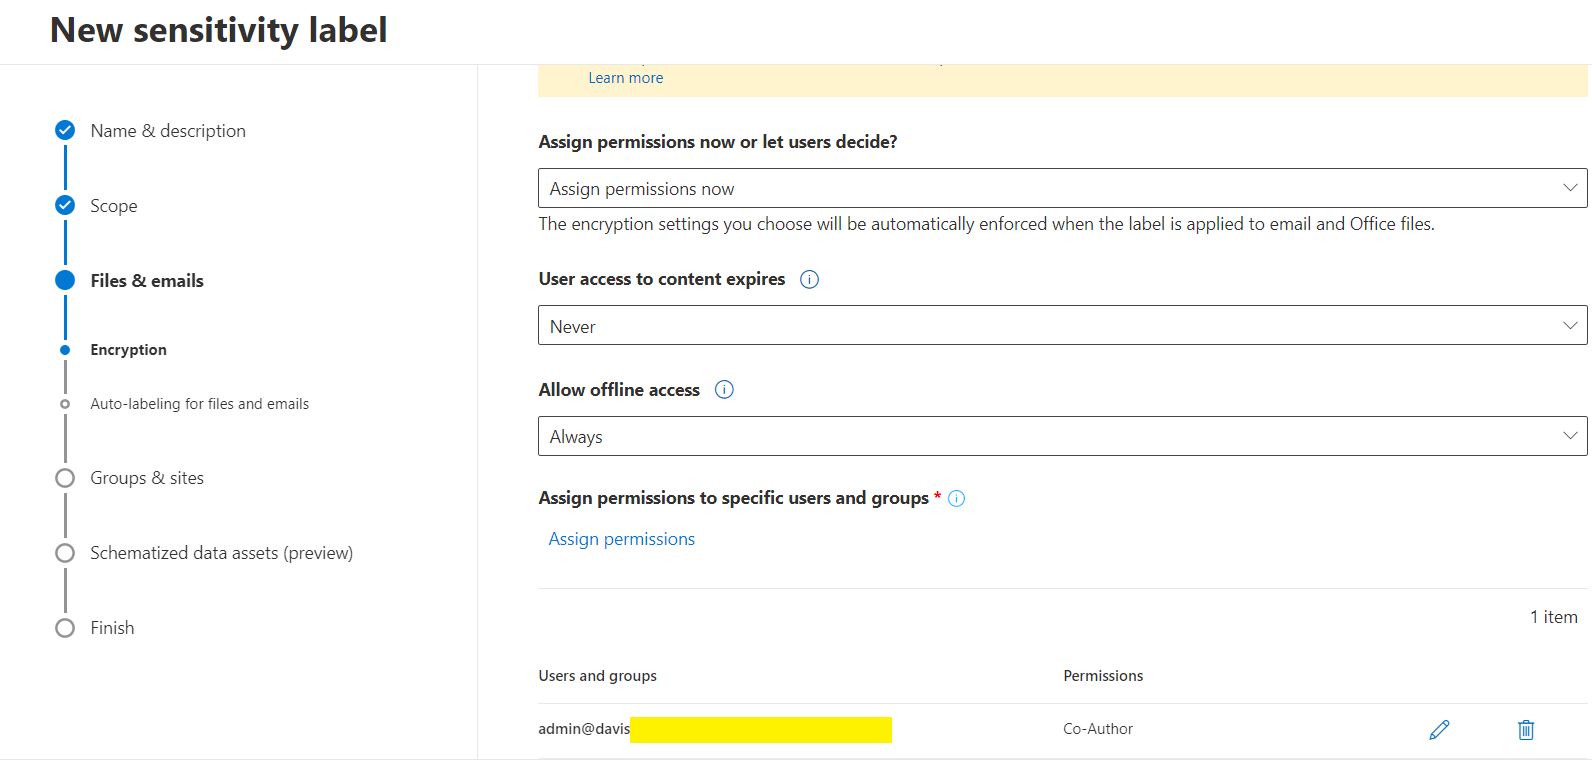
3. This step is to determine the permission settings after the sensitivity label is applied. You can add users, security groups and even domains and assign different roles to them.
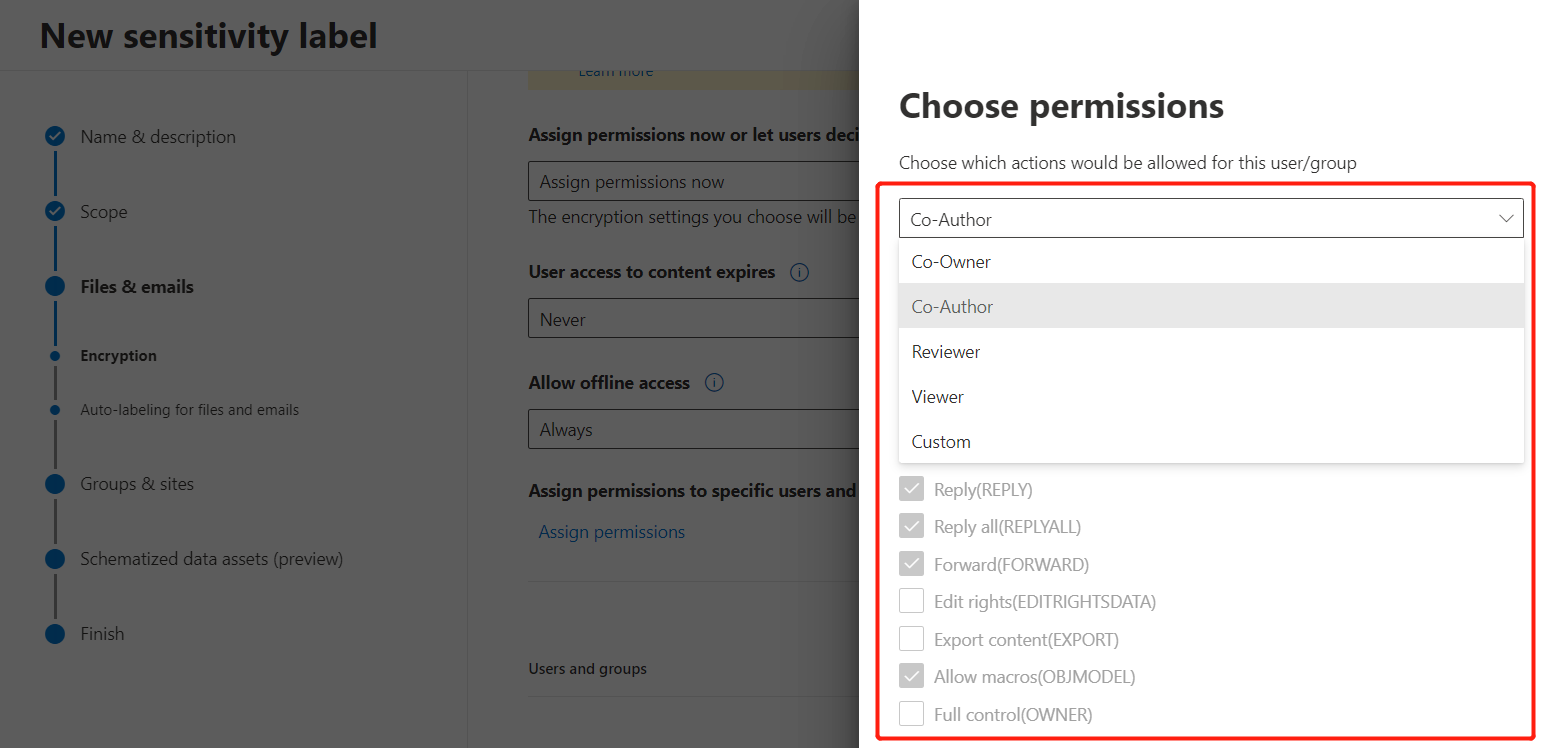
The figure below clarifies the scope of permissions of different roles. You can also customize the permissions of roles by checking specific items.
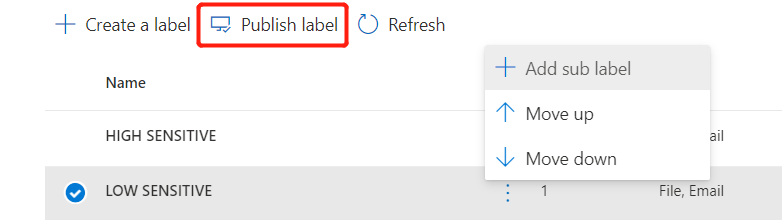
4. After the label is created, publish the label:
Note: You can create sub-labels on existing sensitivity labels. Sub-labels can further define permissions based on inheriting the permission scope of the parent, which will be very useful for large organizations.
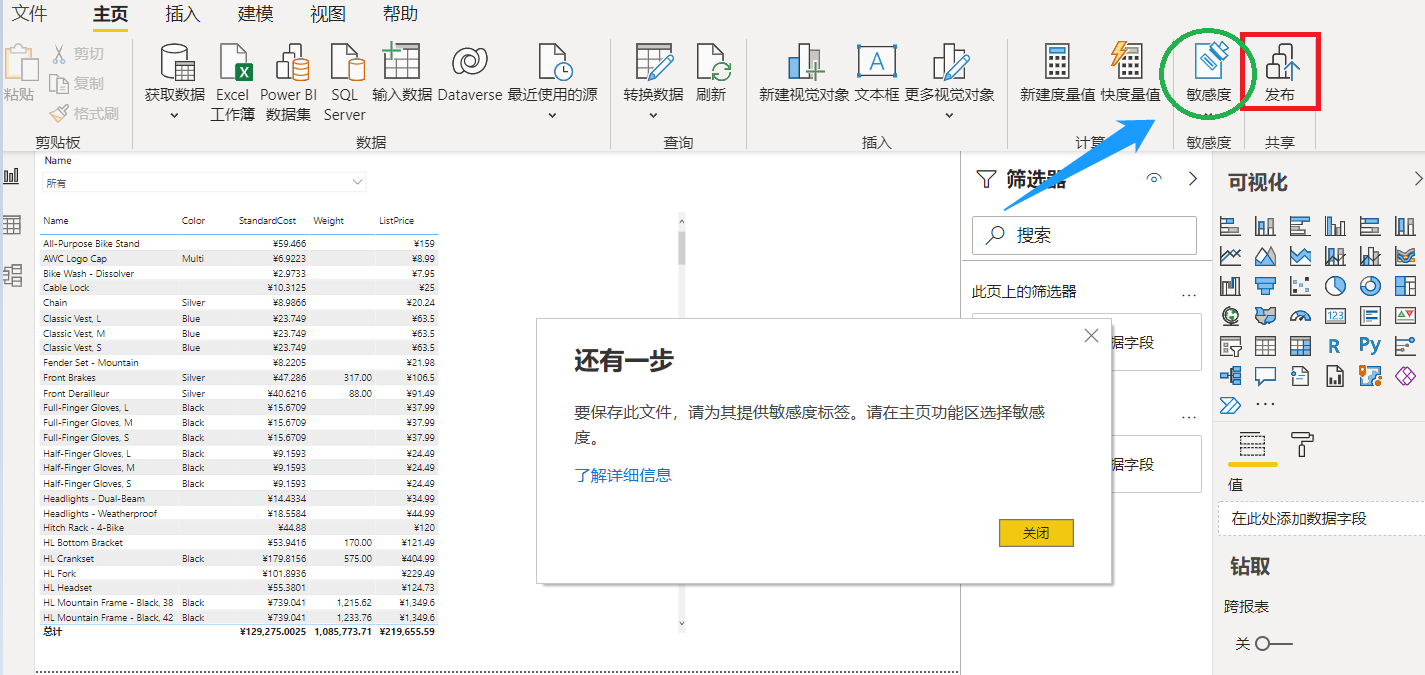
During the label publishing process, you can check this option, which will force Power BI developers to apply sensitivity labels to data sets and reports before publishing them. The following section "PBI Sensitivity Label Enforcement Verification" will show its effect:

Return To the Power BI Service, the published tag is already available:
Notice:
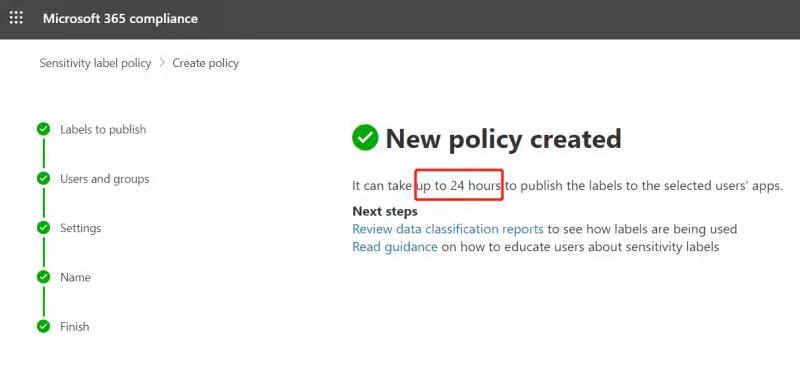
- Once a sensitivity label is published, it usually doesn't appear across apps immediately. As shown in Figure 1 below, "It can take up to 24 hours...", therefore, if you do not see the published label in PBI, it does not necessarily mean that your setting is unsuccessful, just wait patiently.
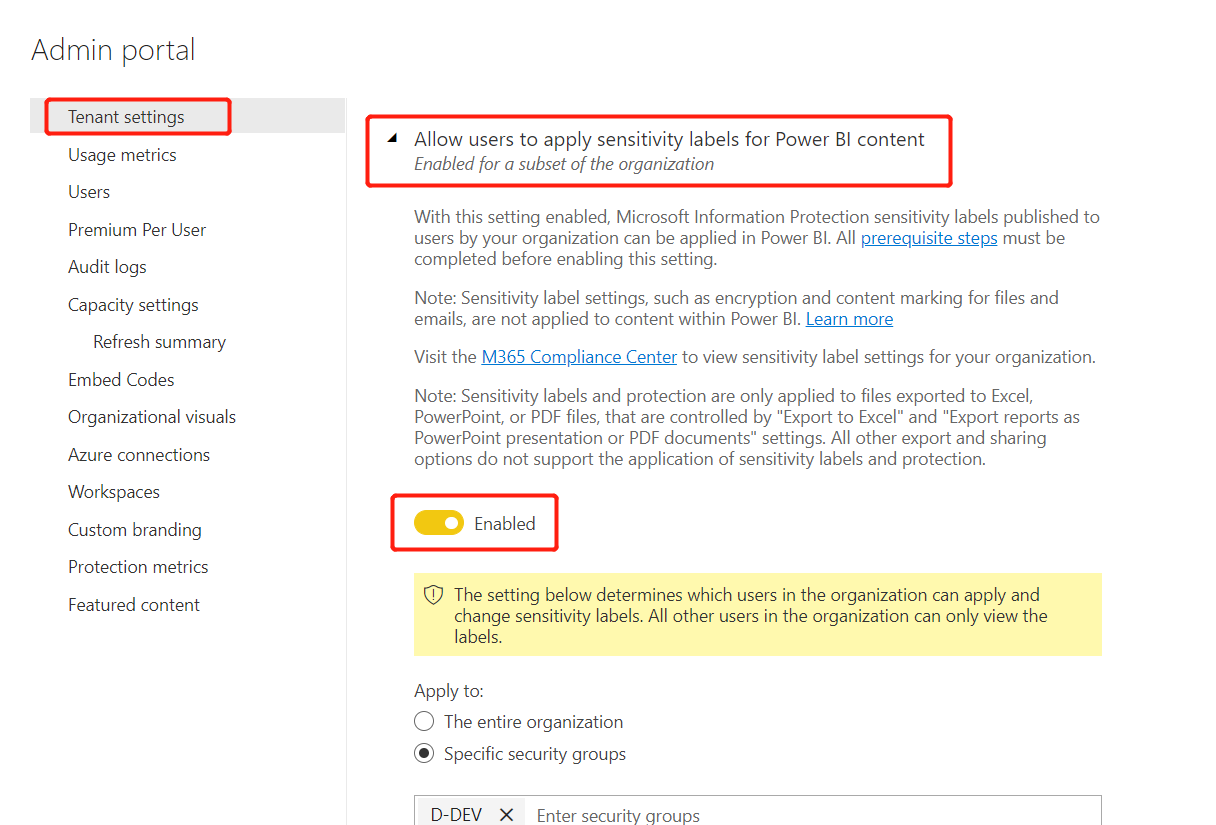
- Power BI administrators need to enable sensitivity labels in the tenant settings (see Figure 2).
verify
-
PBI sensitivity labels enforce verification.
The following users must apply sensitivity labels to PBIX before they can publish reports.
-
Data export protection effect verification
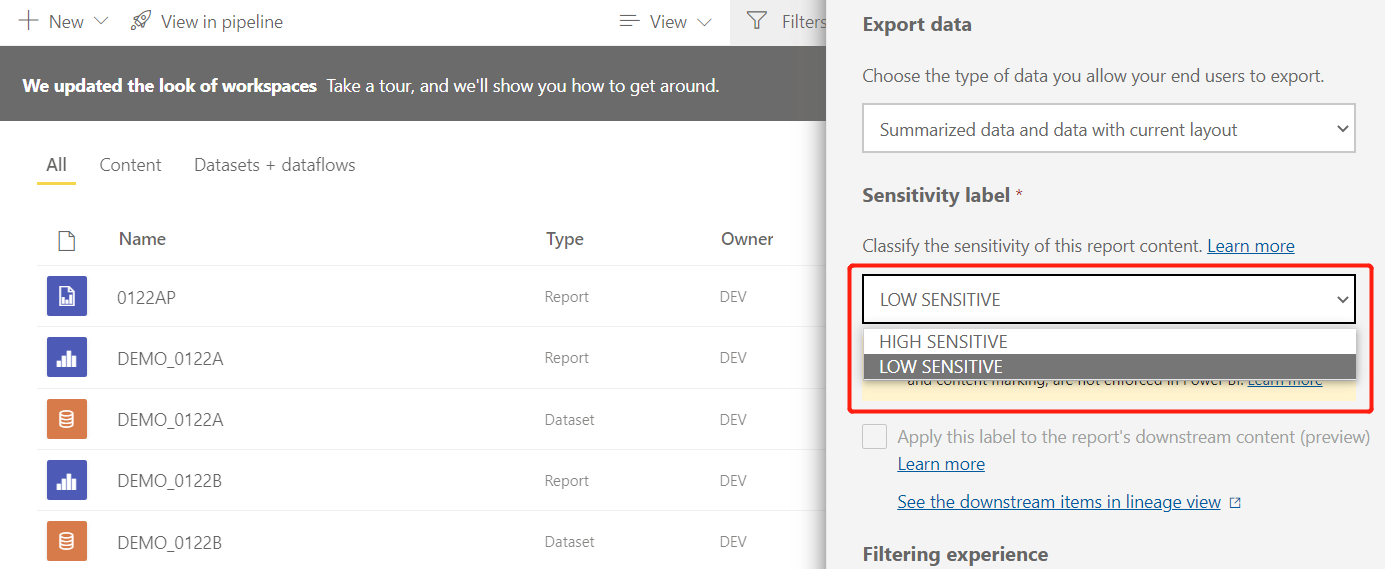
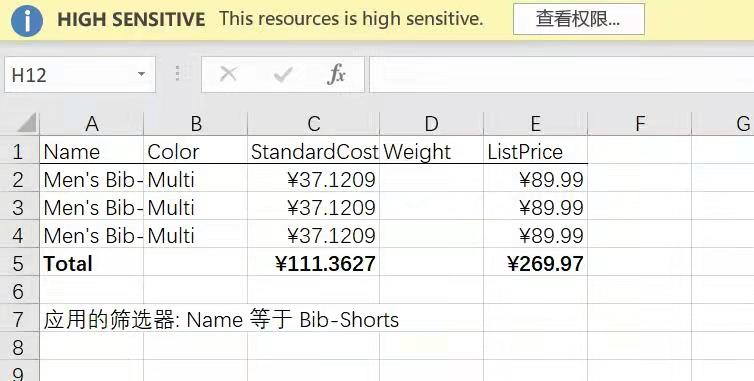
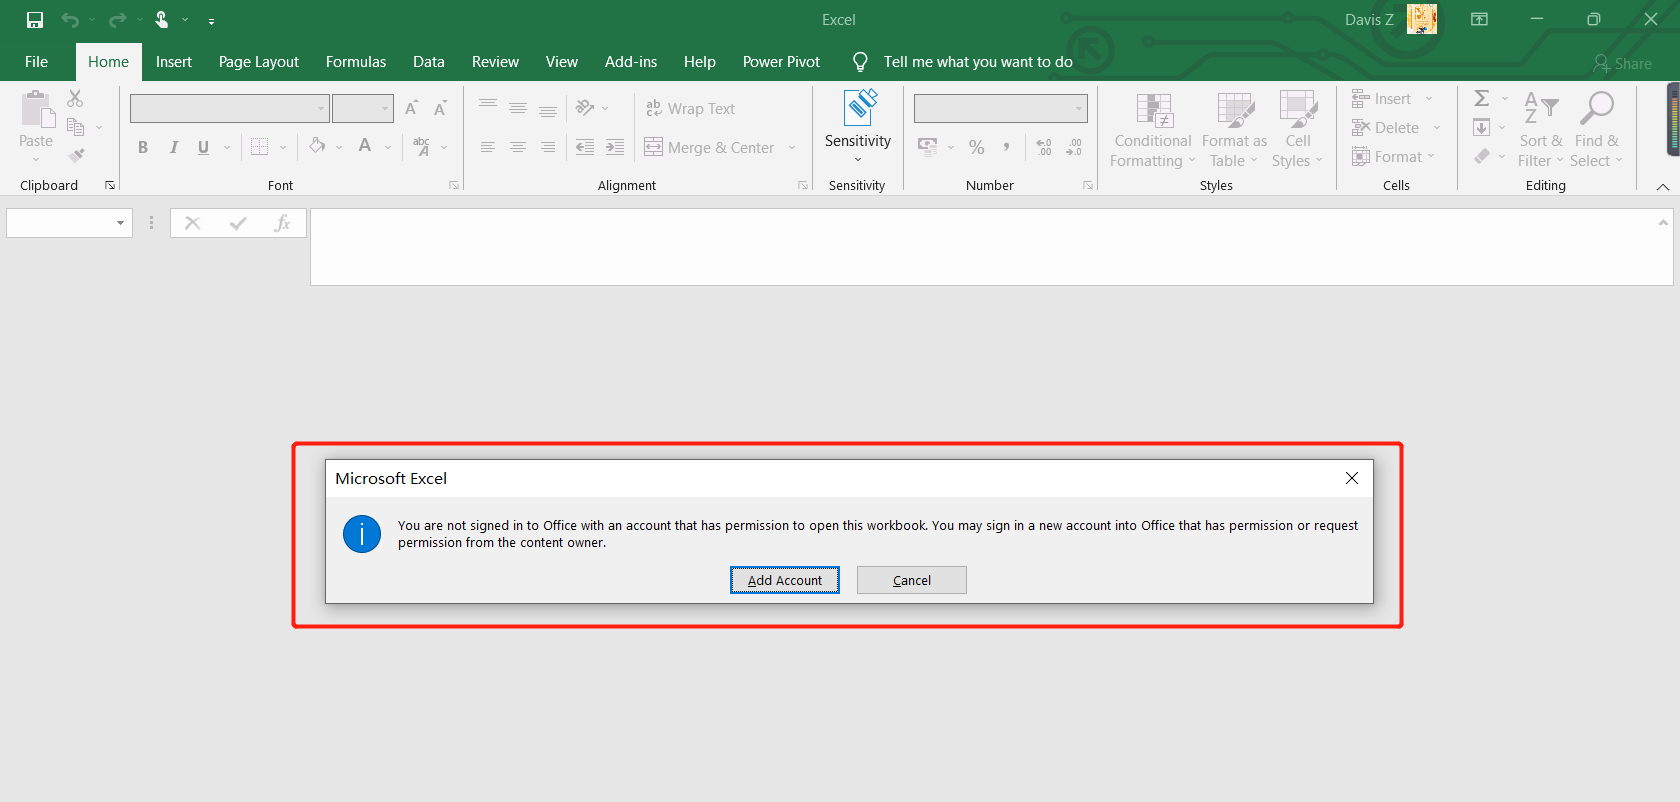
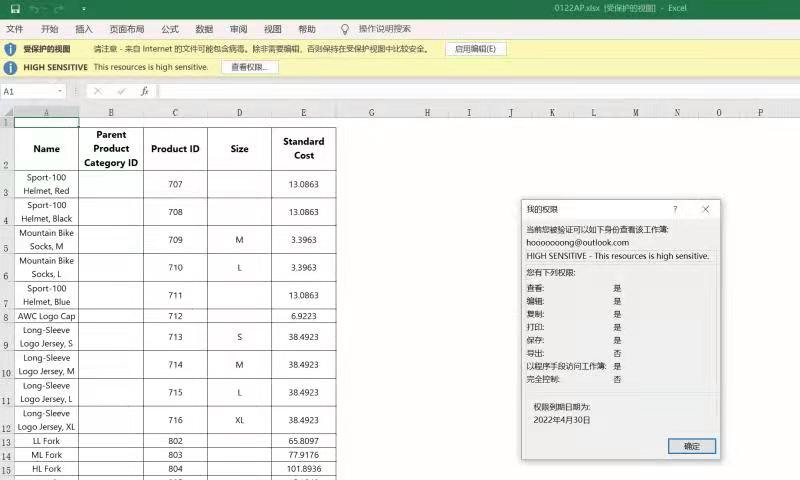
As shown in the figure, I have specified sensitivity labels for data sets, reports and paginated reports. Among them, HIGH SENSITIVE only specific users can view the exported data.

[Example 1-1] Power BI report export verification (using an account with permissions)
[Example 1-2] Power BI report export verification (using an account without permissions)
[Example 2] Power BI Paginated Report export verification
Create a DLP policy
DLP strategy is still a preview function in Power BI, and some features are not supported for the time being. If the public beta is in April this year, then GA may have to push it back. The following is only a partial explanation of the creation part of the strategy.
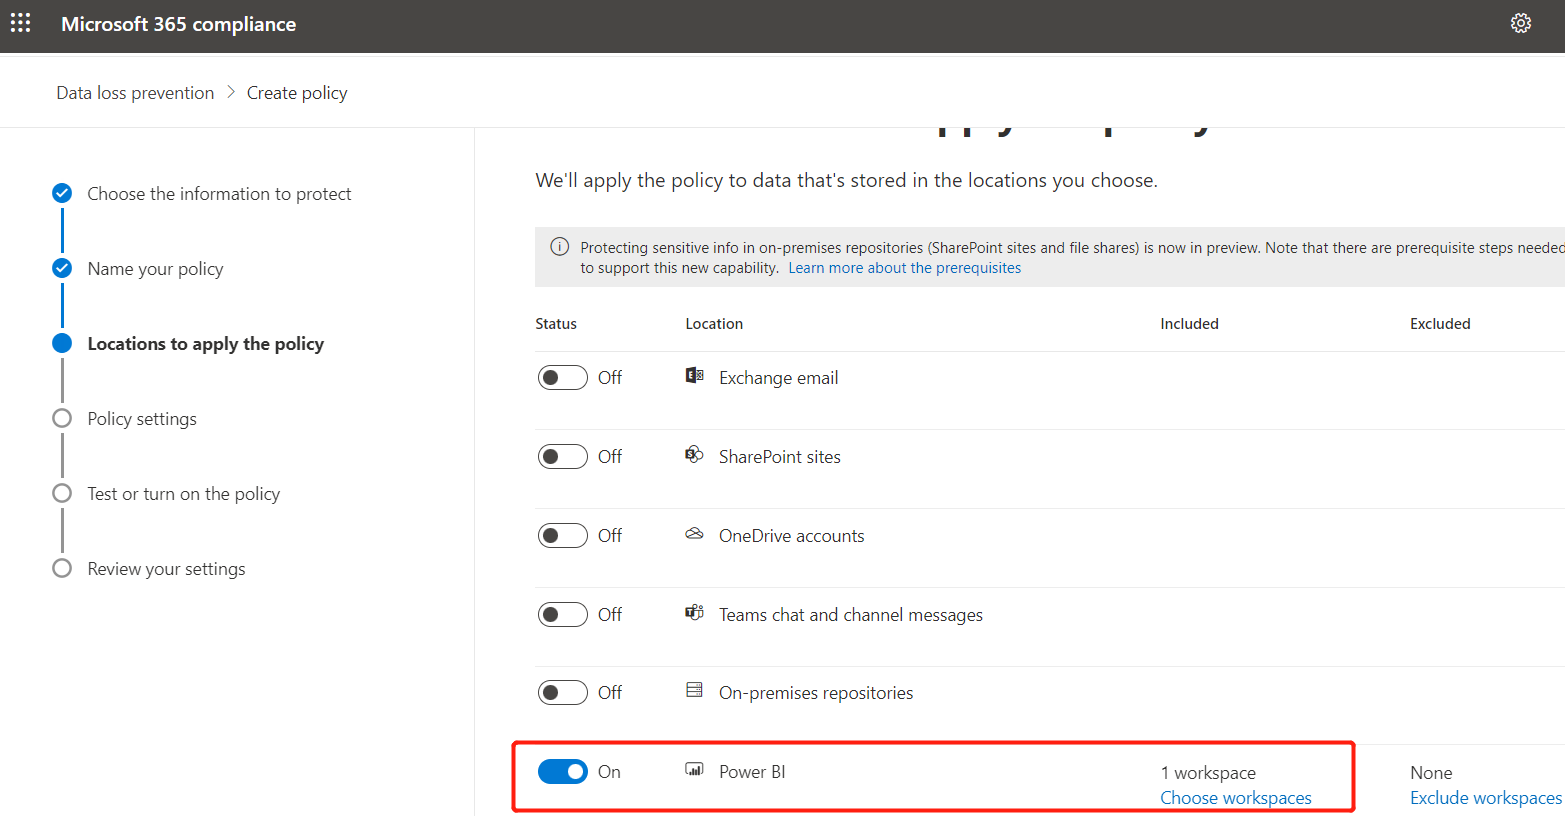
- In the M365 Compliance Center, start with Custom Policy and create:
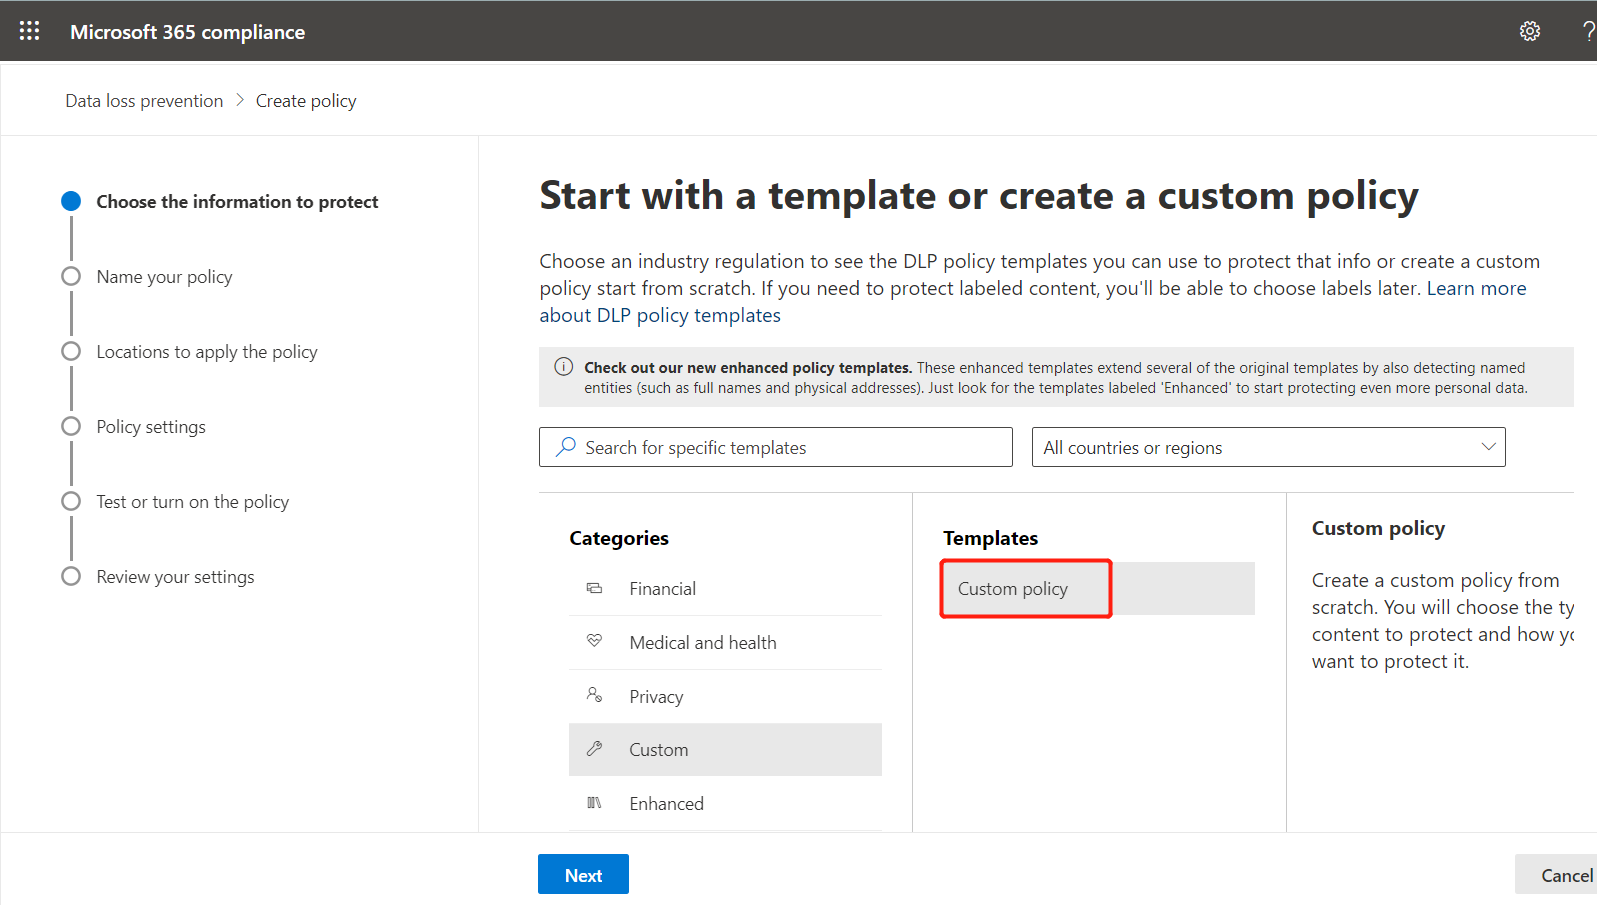
- Select Power BI and DLP is applied to the entire capacity by default. If you only want DLP to be applied to a specific workspace, you can enter the corresponding WorkspaceID:
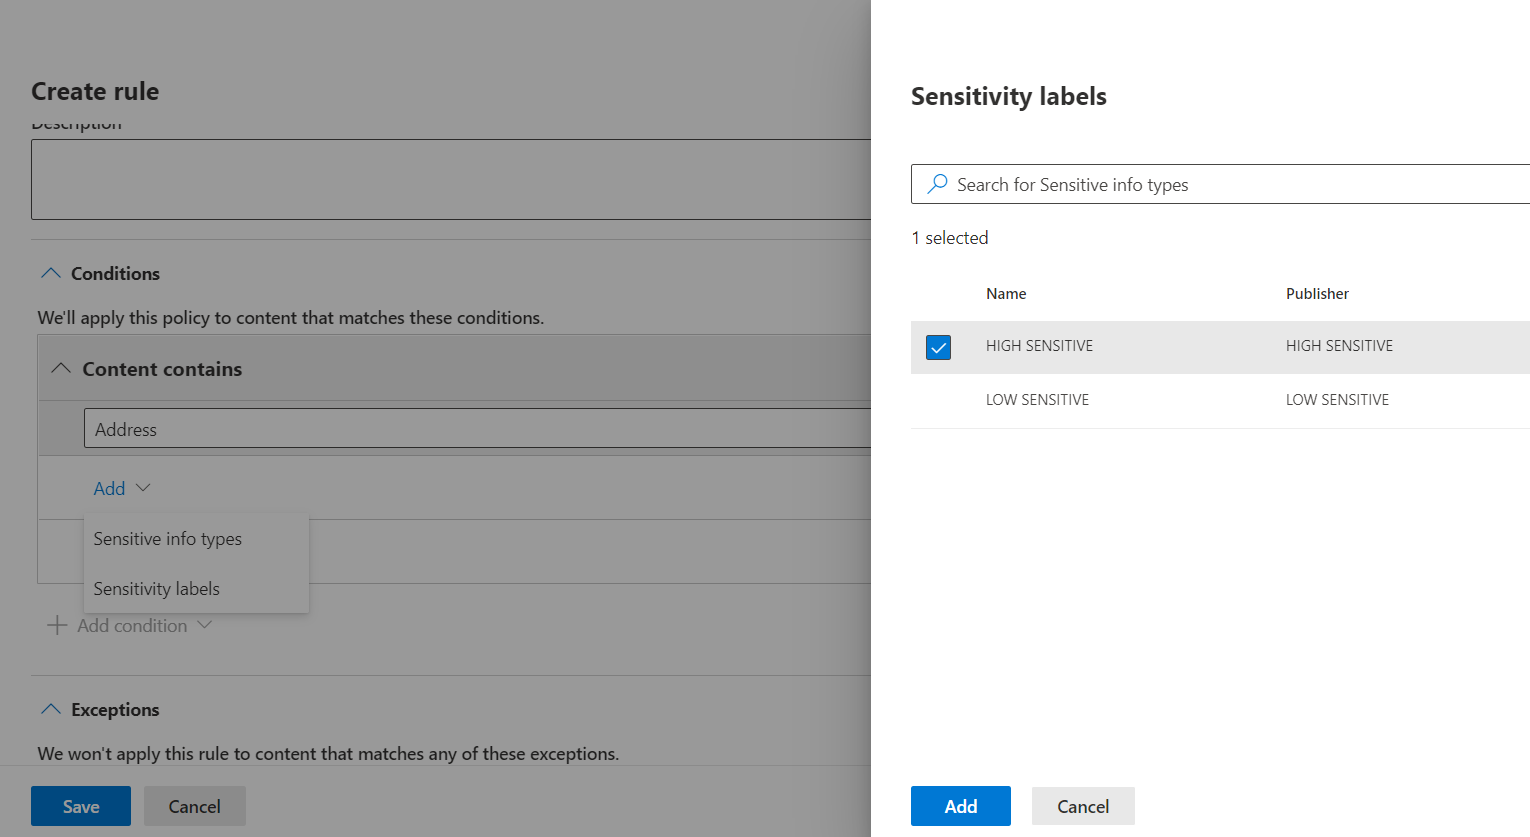
3. Create DLP policy alert triggering rules, which can be implemented only for PBI content marked with a specific sensitivity label:
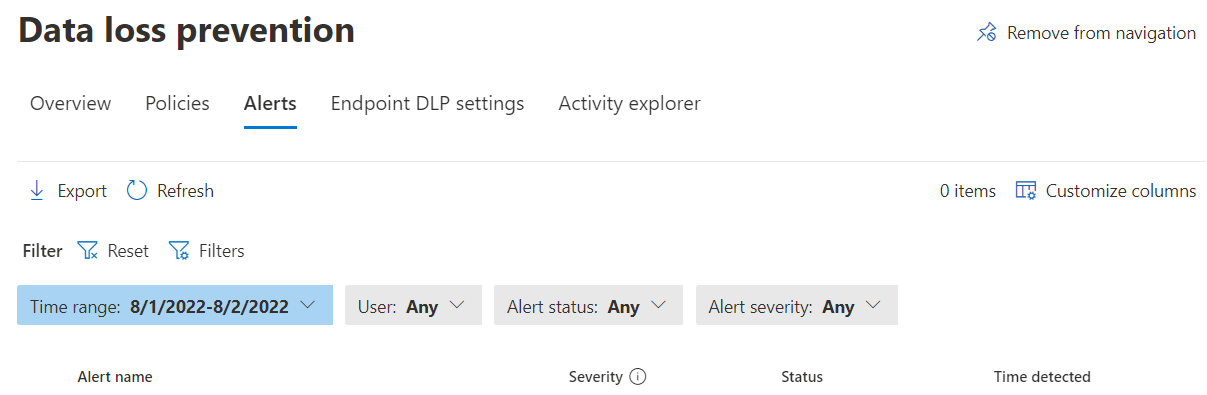
4. Administrators can monitor data here:
other
In addition to the above content, there are many technical points related to Power BI security, such as gateway security, private link integration, Azure Log Analytics integration, etc. It is enough to write a book to explain these contents one by one, and domestic There is very little external research in this field. There are some pitfalls and bugs. Even if you search Google, it is difficult to find a corresponding solution. You still have to rely on the reader's patient exploration and obtain support from Microsoft technical personnel when necessary.