SpringCloud01
1. Understand microservices
With the development of the Internet industry, the requirements for services are becoming higher and higher, and the service architecture has gradually evolved from a monolithic architecture to the now popular microservice architecture. What are the differences between these architectures?
1.0.Learning Objectives
Understand the pros and cons of microservices architecture
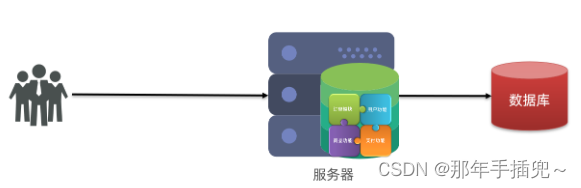
1.1. Monolithic architecture
Monolithic architecture : All business functions are developed in one project and deployed as a package.
The advantages and disadvantages of monolithic architecture are as follows:
advantage:
-
Simple architecture
-
Low deployment cost
shortcoming:
-
High degree of coupling (difficult to maintain and upgrade)
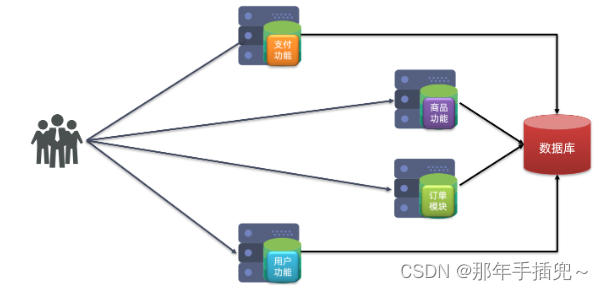
1.2. Distributed architecture
Distributed architecture : The system is split according to business functions. Each business function module is developed as an independent project and is called a service.
Advantages and disadvantages of distributed architecture:
advantage:
-
Reduce service coupling
-
Conducive to service upgrade and expansion
shortcoming:
-
The service calling relationship is complicated
Although the distributed architecture reduces service coupling, there are still many issues to consider when splitting services:
-
How to define the granularity of service splitting?
-
How to call between services?
-
How to manage service calling relationships?
People need to develop a set of effective standards to constrain distributed architectures.
1.3.Microservices
Architectural characteristics of microservices:
-
Single responsibility: Microservices are split into smaller granularities. Each service corresponds to a unique business capability and achieves a single responsibility.
-
Autonomy: independent team, independent technology, independent data, independent deployment and delivery
-
Service-oriented: services provide unified and standard interfaces, independent of language and technology
-
Strong isolation: Service calls must be isolated, fault-tolerant, and downgraded to avoid cascading problems.

The above characteristics of microservices are actually setting a standard for distributed architecture, further reducing the coupling between services and providing service independence and flexibility. Achieve high cohesion and low coupling.
Therefore, it can be considered that microservices are a distributed architecture solution with good architectural design .
But how to implement the plan? What technology stack to choose? Internet companies around the world are actively trying their own microservice implementation solutions.
Among them, the most eye-catching one in the Java field is the solution provided by Spring Cloud.
1.4.SpringCloud
SpringCloud is currently the most widely used microservice framework in China. Official website address: Spring Cloud .
SpringCloud integrates various microservice functional components and implements automatic assembly of these components based on SpringBoot, thus providing a good out-of-the-box experience.
Common components include:

In addition, the bottom layer of SpringCloud depends on SpringBoot and has version compatibility, as follows:

The version we studied in class is Hoxton.SR10, so the corresponding SpringBoot version is version 2.3.x.
1.5. Summary
-
Monolithic architecture: simple and convenient, highly coupled, poor scalability, suitable for small projects. For example: student management system
-
Distributed architecture: loose coupling and good scalability, but the architecture is complex and difficult. Suitable for large-scale Internet projects, such as: JD.com, Taobao
-
Microservices: a good distributed architecture solution
① Advantages: smaller splitting granularity, more independent services, and lower coupling
② Disadvantages: The architecture is very complex, making operation, maintenance, monitoring, and deployment more difficult.
-
SpringCloud is a one-stop solution for microservice architecture, integrating various excellent microservice functional components
2. Service splitting and remote calling
Any distributed architecture is inseparable from the split of services, and the same is true for microservices.
2.1. Service splitting principle
Here I summarize several principles when splitting microservices:
-
Do not develop the same business repeatedly for different microservices
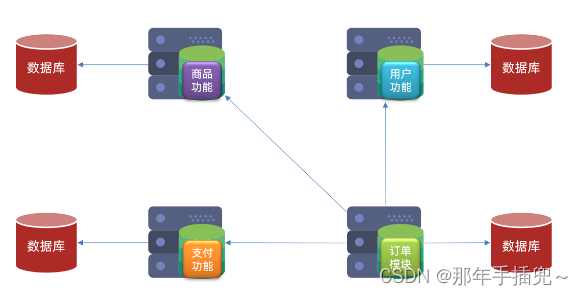
-
Microservice data is independent, do not access the databases of other microservices
-
Microservices can expose their own business as interfaces for other microservices to call
2.2.Example of service splitting
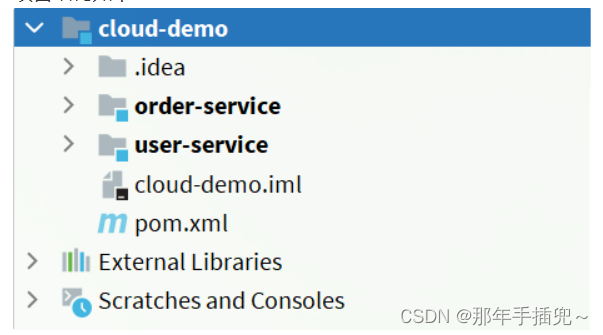
Taking the microservice cloud-demo in the pre-course materials as an example, its structure is as follows:
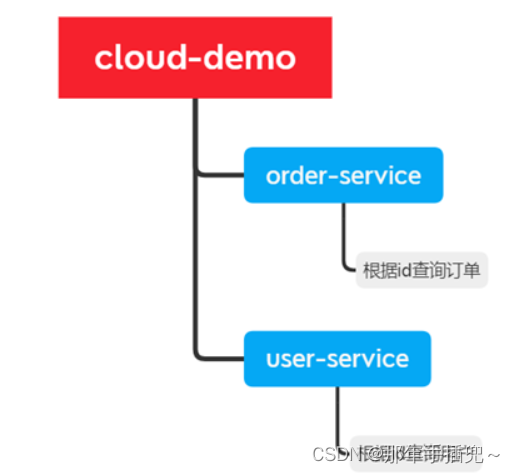
cloud-demo: parent project, management dependencies
-
order-service: order microservice, responsible for order-related business
-
user-service: User microservice, responsible for user-related business
Require:
-
Both the order microservice and the user microservice must have their own databases and are independent of each other.
-
Both the order service and the user service expose Restful interfaces to the outside world.
-
If the order service needs to query user information, it can only call the Restful interface of the user service and cannot query the user database.
2.2.1. Import Sql statement
cloud-order.sqlFirst, import the sum provided by the pre-class materials cloud-user.sqlinto mysql:

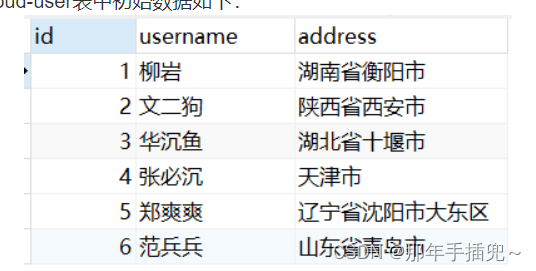
The initial data in the cloud-user table is as follows:
The initial data in the cloud-order table is as follows:
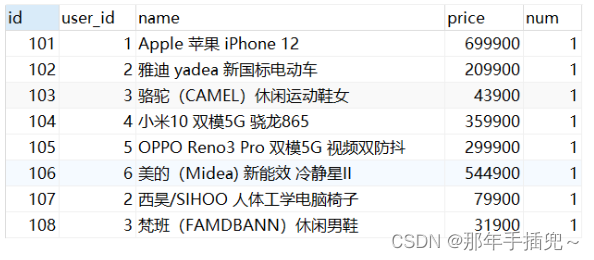
The cloud-order table holds the id field in the cloud-user table.
2.2.2. Import demo project
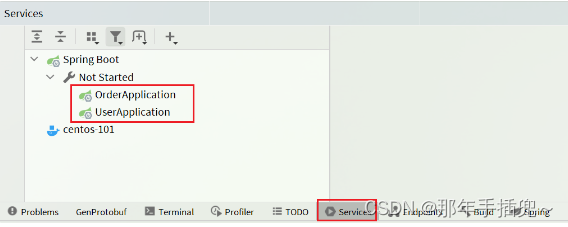
Use IDEA to import the demo provided by the pre-course materials:

The project structure is as follows:
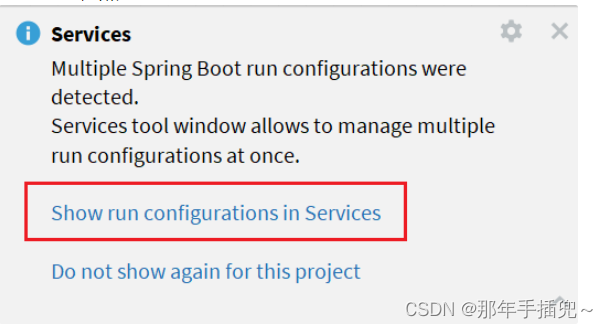
After importing, a pop-up window will appear in the lower right corner of IDEA:

Click on the pop-up window and select as shown below:
A menu like this will appear:
Configure the JDK used by the project:

2.3. Implement remote calling cases
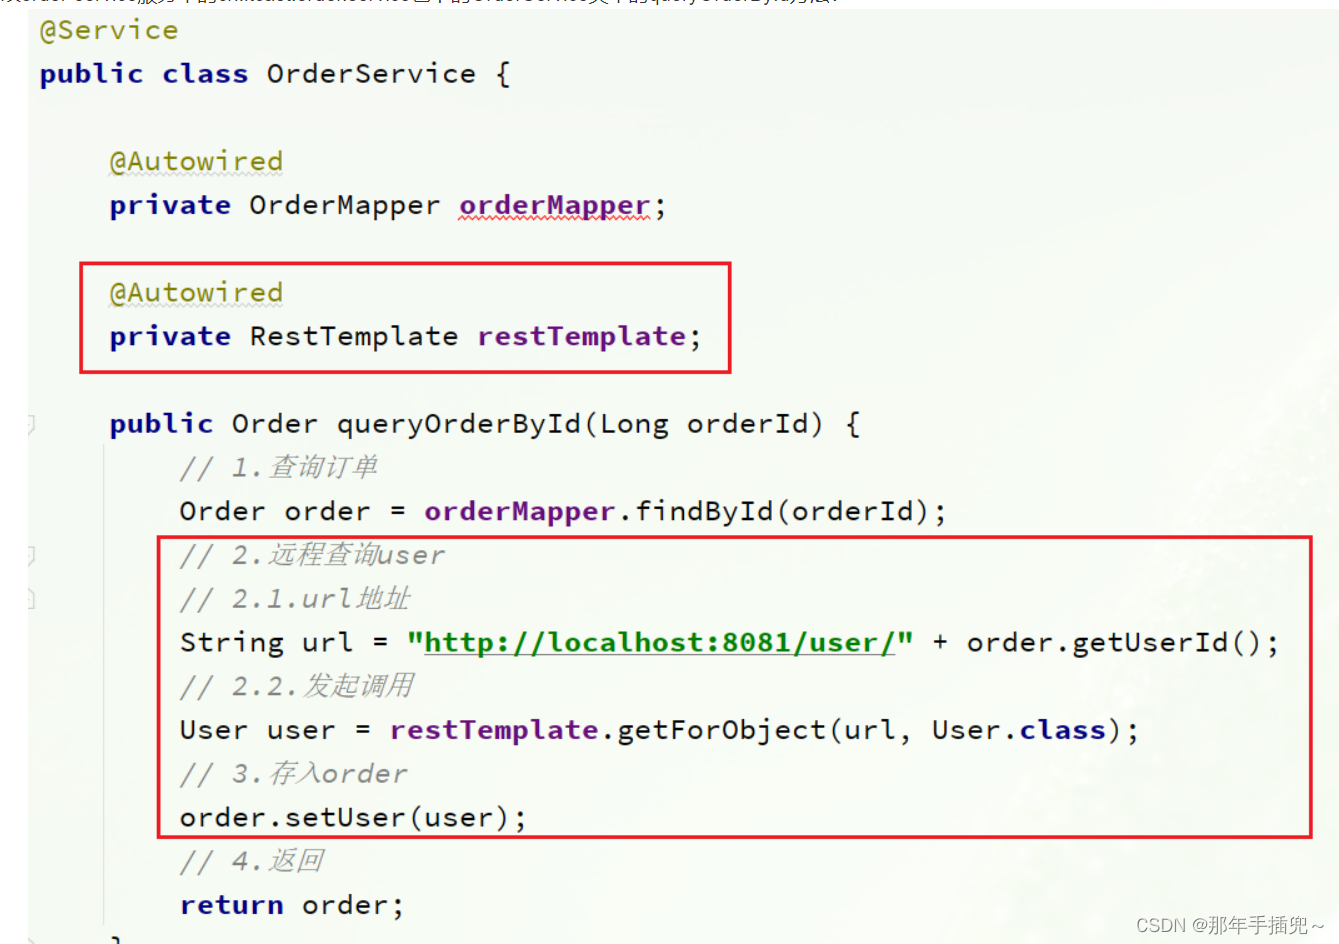
In the order-service service, there is an interface for querying orders based on ID:

Query the order based on the id, and the return value is the Order object, as shown in the figure:
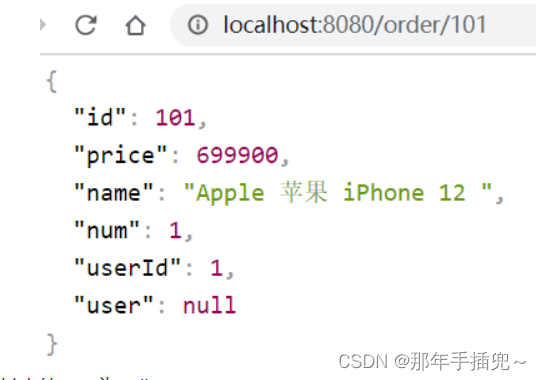
where user is null
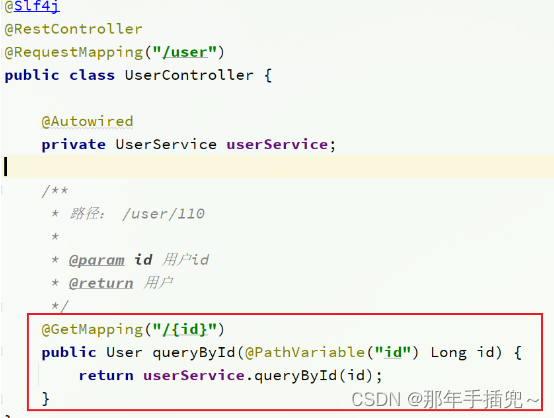
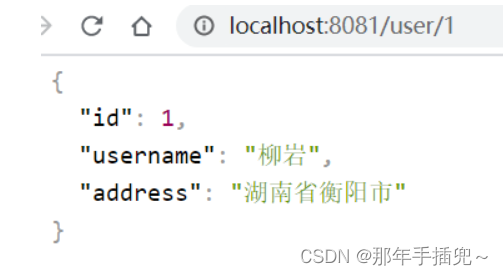
In user-service, there is an interface for querying users based on id:
The query results are as shown in the figure:
2.3.1. Case requirements:
Modify the order query business based on ID in order-service. It is required to query the user information based on the userId contained in the order while querying the order, and return it together.
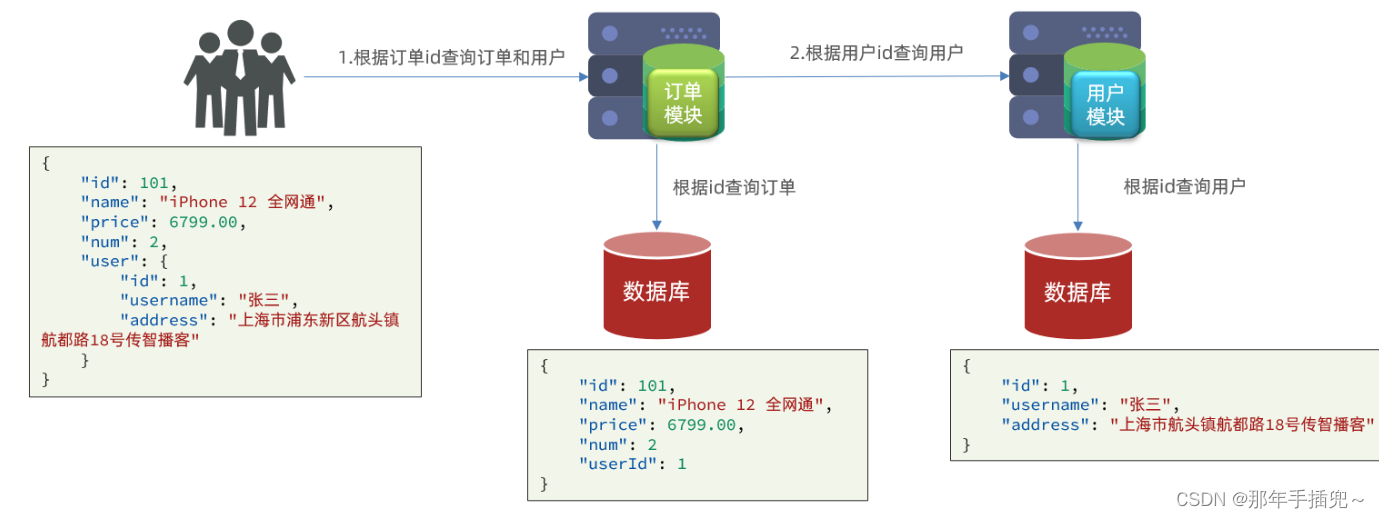
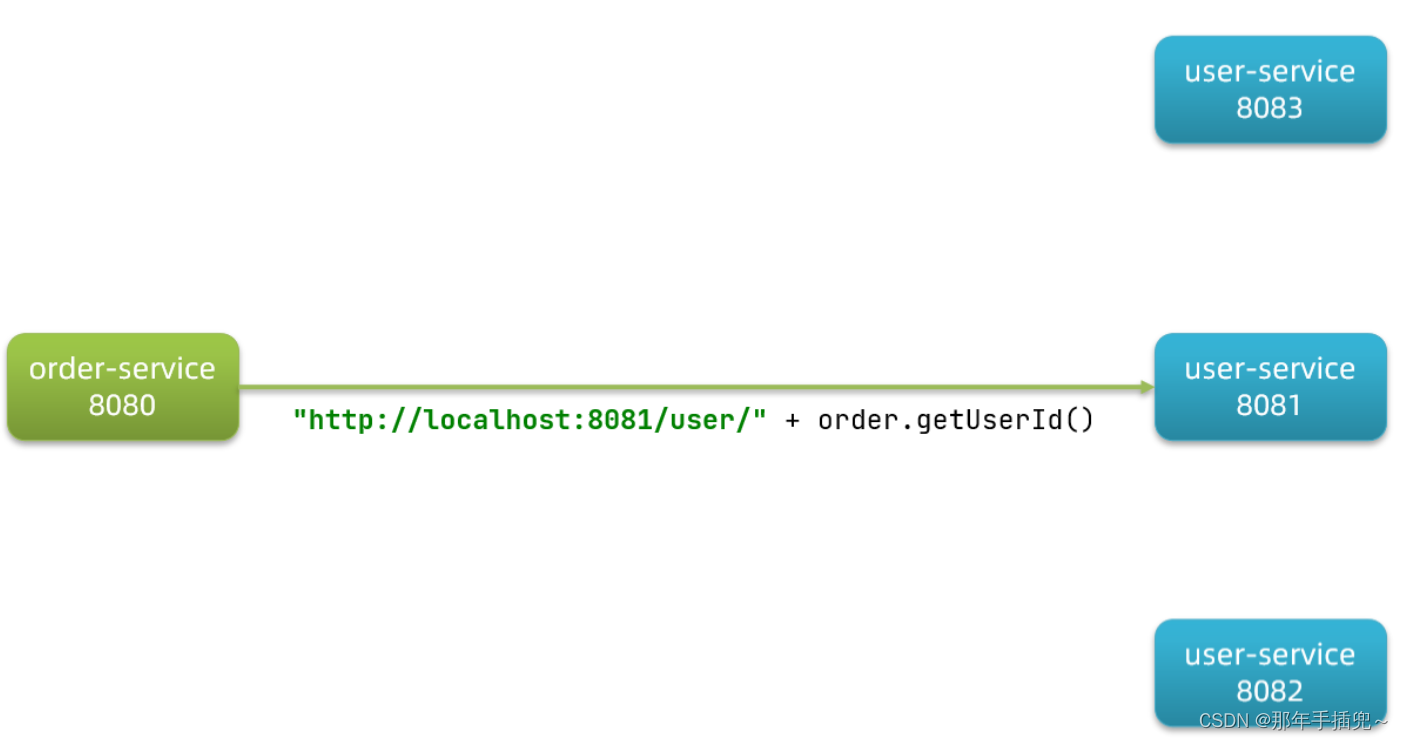
Therefore, we need to initiate an http request to user-service in order-service and call the http://localhost:8081/user/ {userId} interface.
The general steps are as follows:
-
Register an instance of RestTemplate to the Spring container
-
Modify the queryOrderById method in the OrderService class in the order-service service to query the User based on the userId in the Order object.
-
Fill the queried User into the Order object and return it together
2.3.2. Register RestTemplate
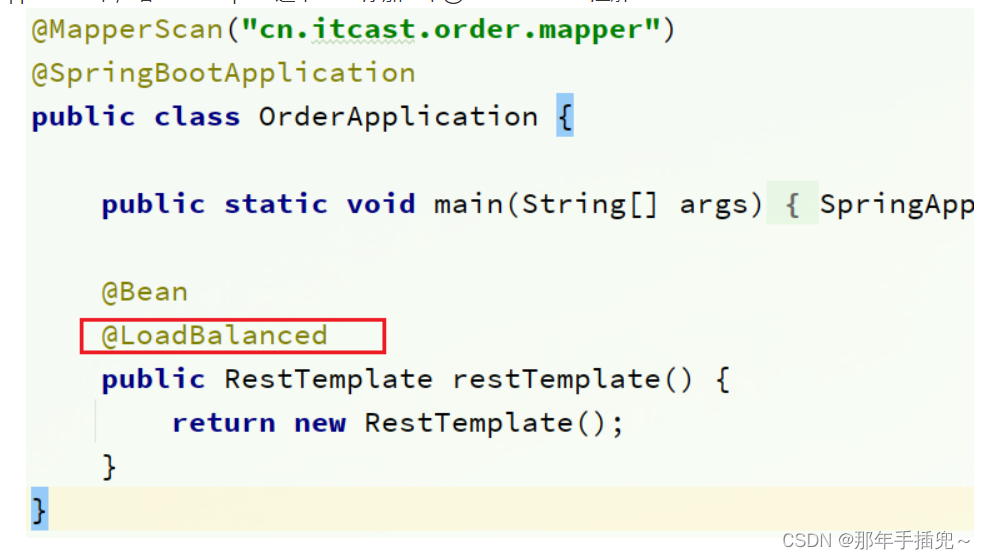
First, we register the RestTemplate instance in the OrderApplication startup class in the order-service service:
package cn.itcast.order;
import org.mybatis.spring.annotation.MapperScan;
import org.springframework.boot.SpringApplication;
import org.springframework.boot.autoconfigure.SpringBootApplication;
import org.springframework.context.annotation.Bean;
import org.springframework.web.client.RestTemplate;
@MapperScan("cn.itcast.order.mapper")
@SpringBootApplication
public class OrderApplication {
public static void main(String[] args) {
SpringApplication.run(OrderApplication.class, args);
}
@Bean
public RestTemplate restTemplate() {
return new RestTemplate();
}
}
2.3.3. Implement remote calling
Modify the queryOrderById method in the OrderService class under the cn.itcast.order.service package in the order-service service:
2.4. Provider and consumer
In the service call relationship, there are two different roles:
Service provider : A service called by other microservices in a business. (Provide interfaces to other microservices)
Service consumer : A service that calls other microservices in a business. (Call interfaces provided by other microservices)

However, the roles of service providers and service consumers are not absolute, but relative to the business.
If service A calls service B, and service B calls service C, what is the role of service B?
-
For the business of A calling B: A is a service consumer and B is a service provider
-
For the business of B calling C: B is a service consumer and C is a service provider
Therefore, service B can be both a service provider and a service consumer.
3.Eureka Registration Center
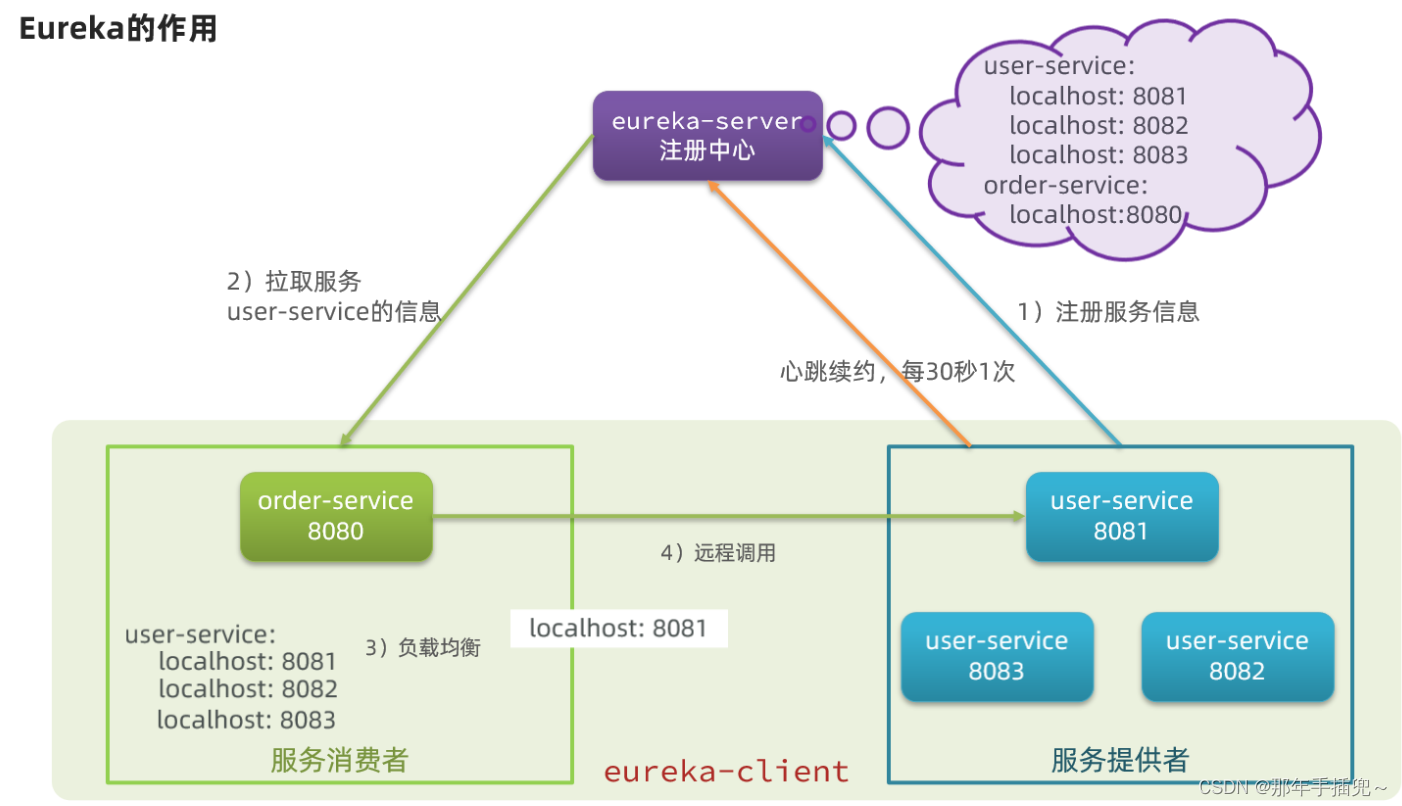
If our service provider user-service deploys multiple instances, as shown in the figure:
Let’s think about a few questions:
-
When order-service initiates a remote call, how does it know the IP address and port of the user-service instance?
-
There are multiple user-service instance addresses, how to choose when calling order-service?
-
How does order-service know whether a user-service instance is still healthy or has gone down?
3.1.The structure and function of Eureka
These problems need to be solved by using the registration center in Spring Cloud. The most well-known registration center is Eureka, whose structure is as follows:
Answer each of the previous questions.
Question 1: How does order-service know the user-service instance address?
The process of obtaining address information is as follows:
-
After the user-service service instance is started, register your information with eureka-server (Eureka server). This is called service registration
-
eureka-server saves the mapping relationship between service names and service instance address lists
-
order-service pulls the instance address list based on the service name. This is called service discovery or service pull
Question 2: How does order-service select a specific instance from multiple user-service instances?
-
order-service selects an instance address from the instance list using the load balancing algorithm
-
Initiate a remote call to the instance address
Question 3: How does order-service know whether a certain user-service instance is still healthy or has been down?
-
The user-service will initiate a request to the eureka-server at regular intervals (default 30 seconds) and report its own status, which is called a heartbeat.
-
When no heartbeat is sent for a certain period of time, eureka-server will consider the microservice instance to be faulty and remove the instance from the service list.
-
When order-service pulls the service, the faulty instance can be eliminated.
Note: A microservice can be both a service provider and a service consumer. Therefore, eureka uniformly encapsulates service registration, service discovery and other functions into the eureka-client.
So, our next hands-on steps include:
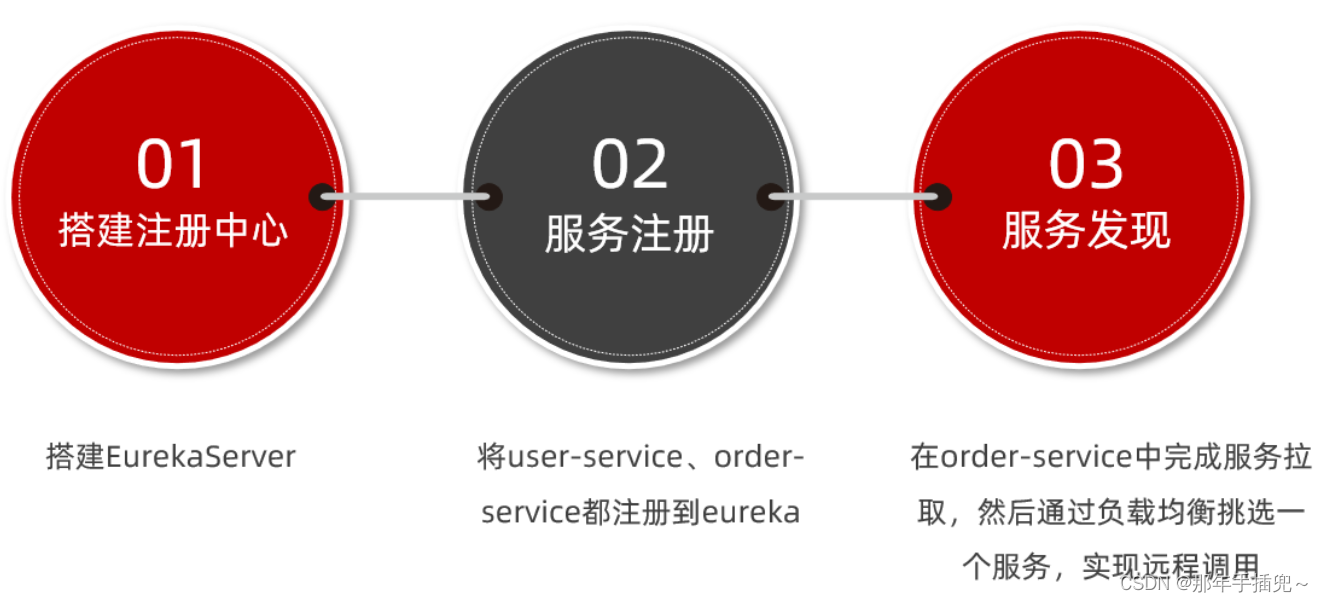
3.2. Build eureka-server
First, everyone registers the central server: eureka-server, which must be an independent microservice.
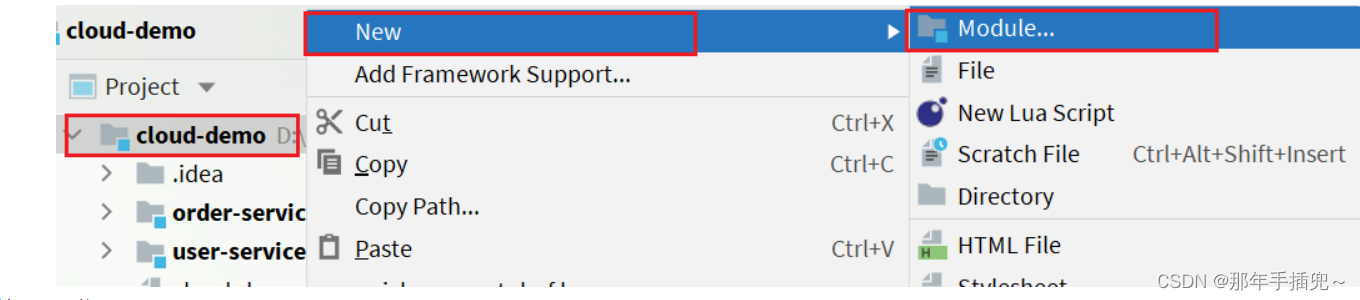
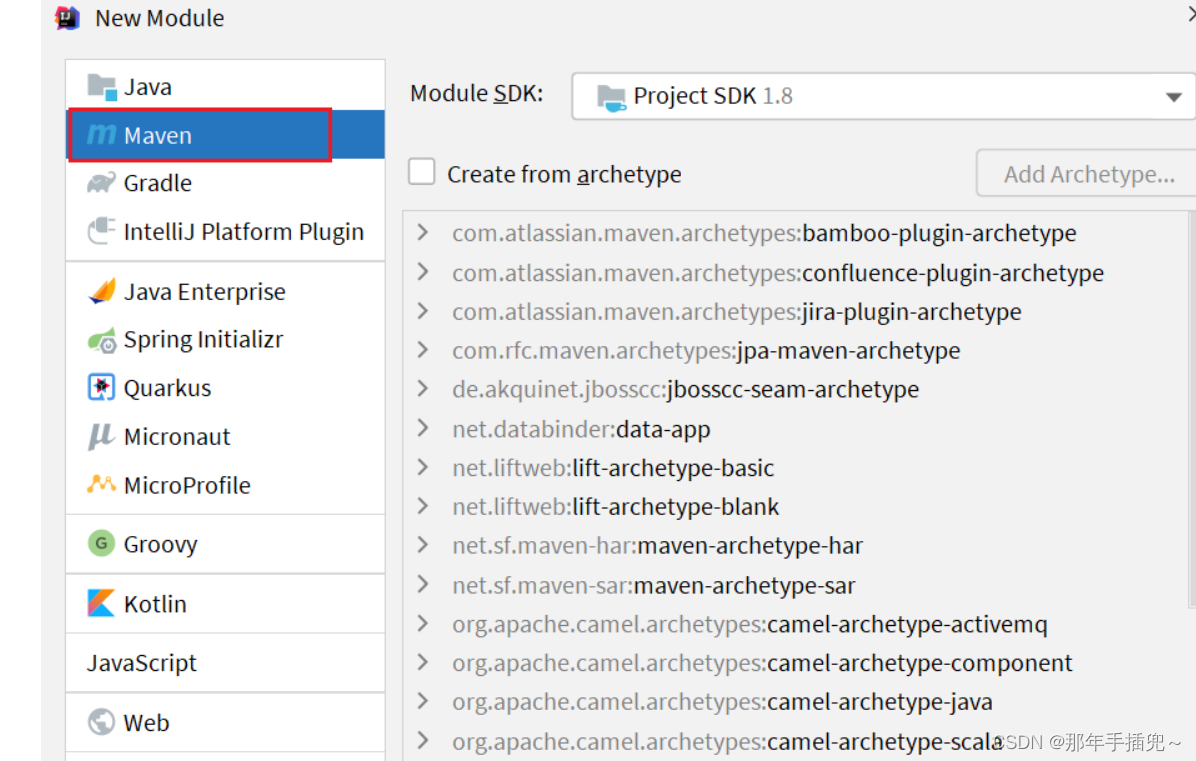
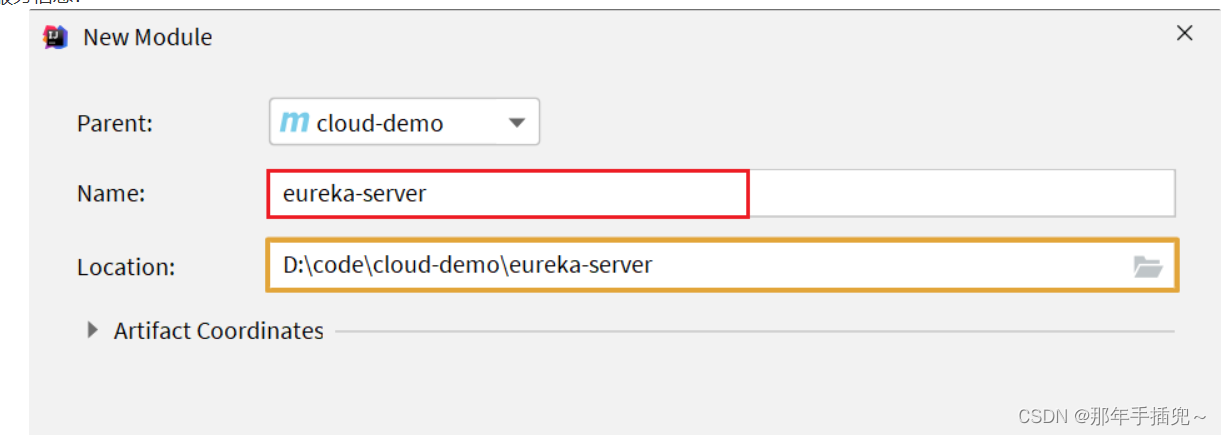
3.2.1. Create eureka-server service
Under the cloud-demo parent project, create a submodule:
Fill in the module information:
Then fill in the service information:
3.2.2.Introducing eureka dependency
Introduce the starter dependency provided by SpringCloud for eureka:
<dependency>
    <groupId>org.springframework.cloud</groupId>
    <artifactId>spring-cloud-starter-netflix-eureka-server</artifactId>
</dependency>
3.2.3.Write startup class
Write a startup class for the eureka-server service. Be sure to add an @EnableEurekaServer annotation to enable eureka's registration center function:
package cn.itcast.eureka;
import org.springframework.boot.SpringApplication;
import org.springframework.boot.autoconfigure.SpringBootApplication;
import org.springframework.cloud.netflix.eureka.server.EnableEurekaServer;
@SpringBootApplication
@EnableEurekaServer
public class EurekaApplication {
public static void main(String[] args) {
SpringApplication.run(EurekaApplication.class, args);
}
}
3.2.4.Writing configuration files
Write an application.yml file with the following content:
server:
  port: 10086
spring:
  application:
    name: eureka-server
eureka:
  client:
    service-url:
      defaultZone: http://127.0.0.1:10086/eureka
3.2.5.Start the service
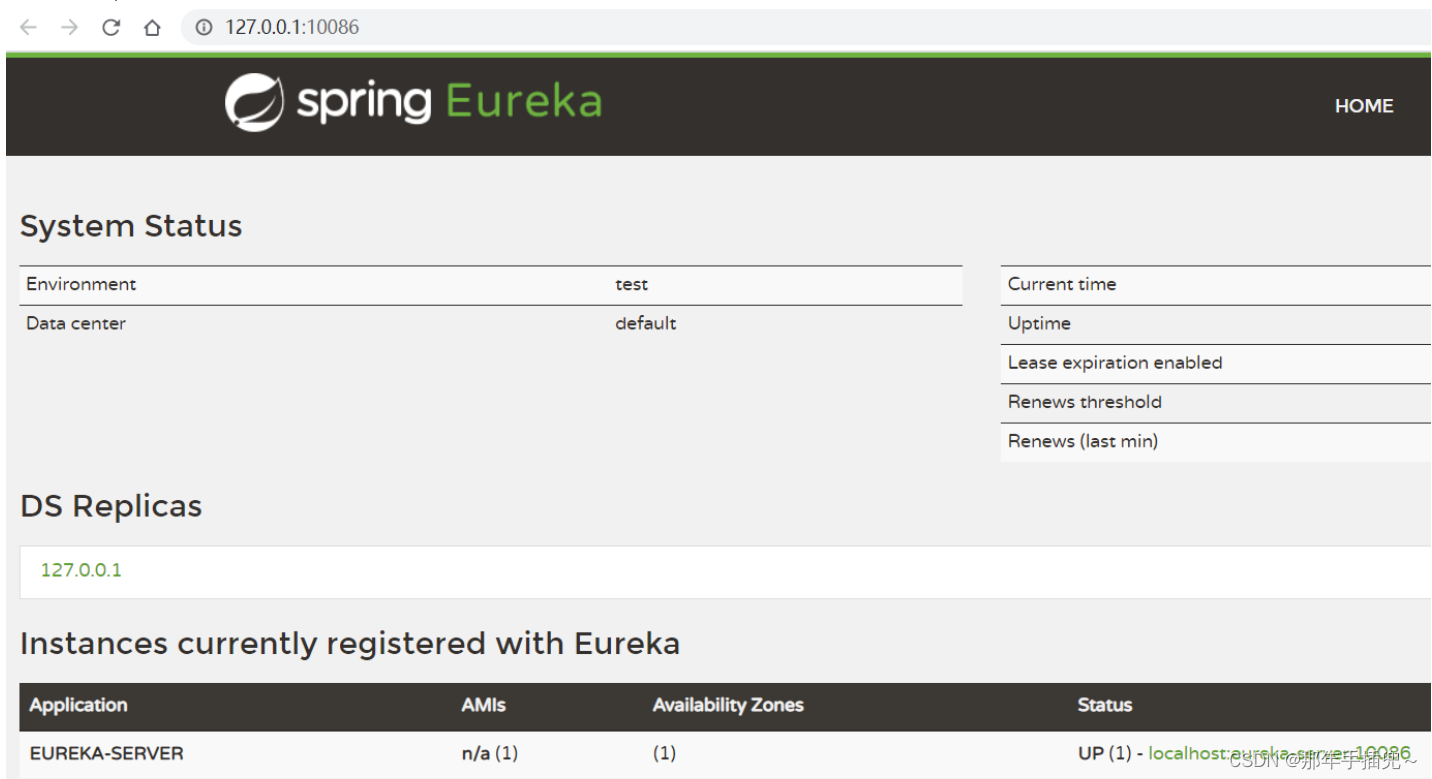
Start the microservice and access it in the browser: http://127.0.0.1:10086
You should see success when you see the following results:
3.3.Service registration
Next, we register user-service to eureka-server.
1) Introduce dependencies
In the pom file of user-service, introduce the following eureka-client dependency:
<dependency>
    <groupId>org.springframework.cloud</groupId>
    <artifactId>spring-cloud-starter-netflix-eureka-client</artifactId>
</dependency>
2) Configuration file
In user-service, modify the application.yml file and add the service name and eureka address:
spring:
  application:
    name: userservice
eureka:
  client:
    service-url:
      defaultZone: http://127.0.0.1:10086/eureka
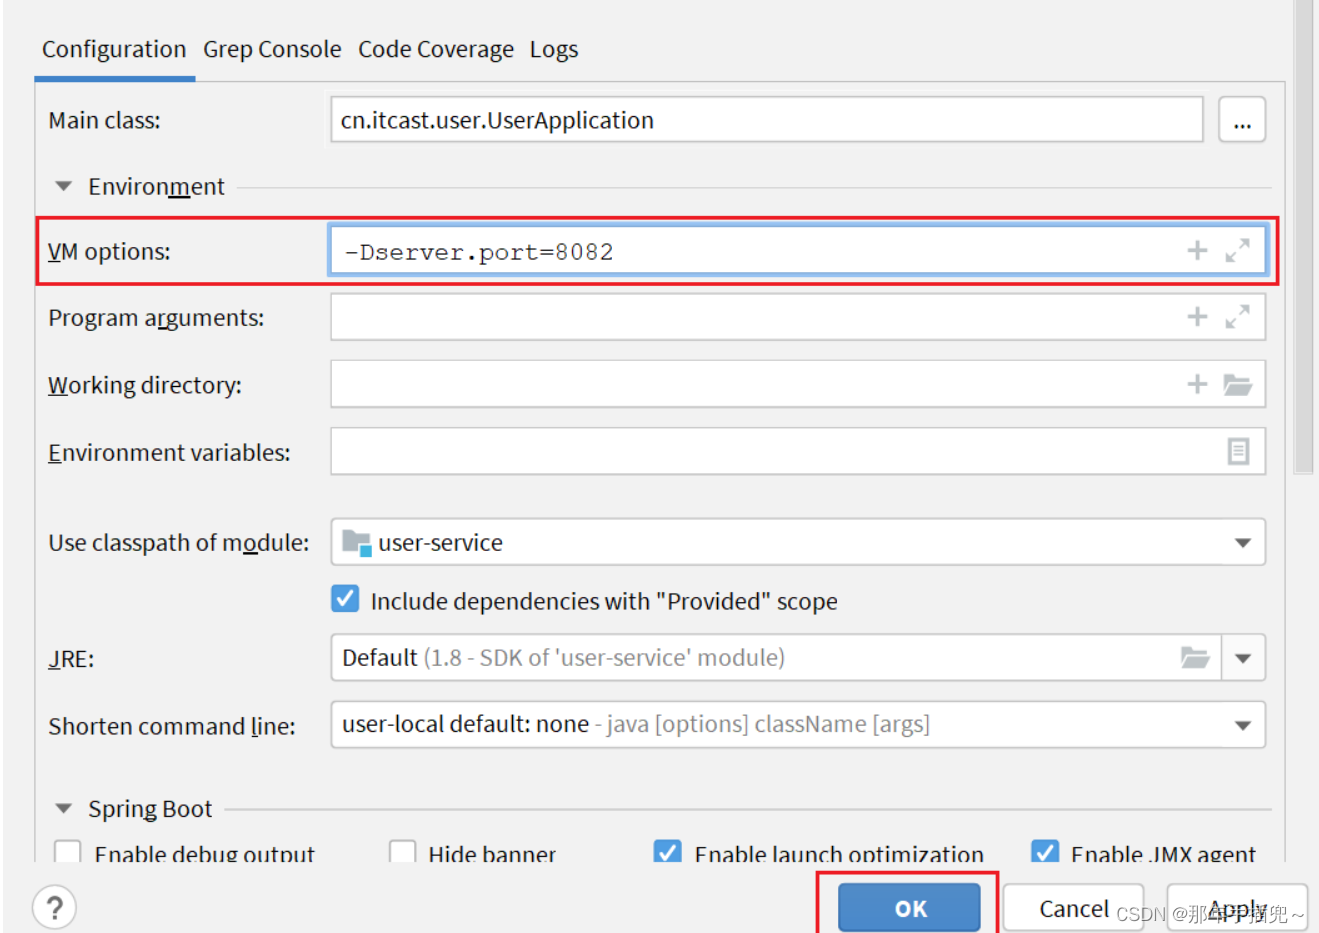
3) Start multiple user-service instances
In order to demonstrate a scenario where a service has multiple instances, we add a SpringBoot startup configuration and start a user-service.
First, copy the original user-service startup configuration:

Then, in the pop-up window, fill in the information:
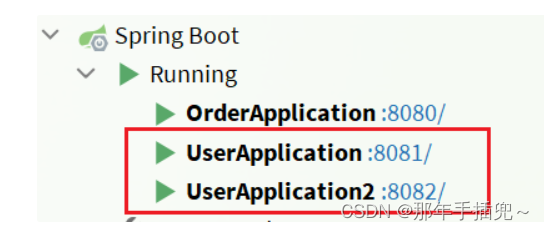
Now, two user-service startup configurations will appear in the SpringBoot window:
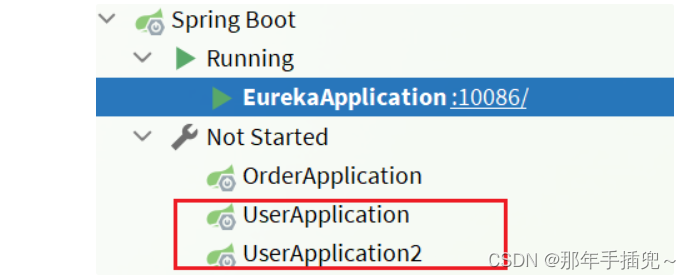
However, the first one is port 8081 and the second one is port 8082.
Start two user-service instances:
View the eureka-server management page:

3.4.Service discovery
Next, we modify the logic of order-service: pull user-service information from eureka-server to realize service discovery.
1) Introduce dependencies
As mentioned before, service discovery and service registration are all encapsulated in the eureka-client dependency, so this step is consistent with service registration.
In the pom file of order-service, introduce the following eureka-client dependency:
<dependency>
    <groupId>org.springframework.cloud</groupId>
    <artifactId>spring-cloud-starter-netflix-eureka-client</artifactId>
</dependency>
2) Configuration file
Service discovery also needs to know the eureka address, so the second step is consistent with service registration, which is to configure eureka information:
In order-service, modify the application.yml file and add the service name and eureka address:
spring:
  application:
    name: orderservice
eureka:
  client:
    service-url:
      defaultZone: http://127.0.0.1:10086/eureka
3) Service pulling and load balancing
Finally, we are going to pull the instance list of user-service service from eureka-server and implement load balancing.
But we don’t need to do these actions, we just need to add some annotations.
In the OrderApplication of order-service, add a @LoadBalanced annotation to the RestTemplate bean:
Modify the queryOrderById method in the OrderService class under the cn.itcast.order.service package in the order-service service. Modify the accessed URL path and replace the IP and port with the service name:

Spring will automatically help us obtain the instance list from the eureka-server side based on the userservice service name, and then complete the load balancing.
4.Ribbon load balancing
In the previous section, we added the @LoadBalanced annotation to implement the load balancing function. What is the principle of this?
4.1. Load balancing principle
The bottom layer of Spring Cloud actually uses a component called Ribbon to implement the load balancing function.

So the request we sent was obviously http://userservice/user/1 , why did it become http://localhost:8081 ?
4.2. Source code tracking
Why can we access it just by entering the service name? You also need to obtain the IP and port before.
Apparently someone helped us get the IP and port of the service instance based on the service name. That is LoadBalancerInterceptor, this class will intercept the RestTemplate request, then obtain the service list from Eureka based on the service id, and then use the load balancing algorithm to obtain the real service address information and replace the service id.
We conduct source code tracking:
1)LoadBalancerIntercepor
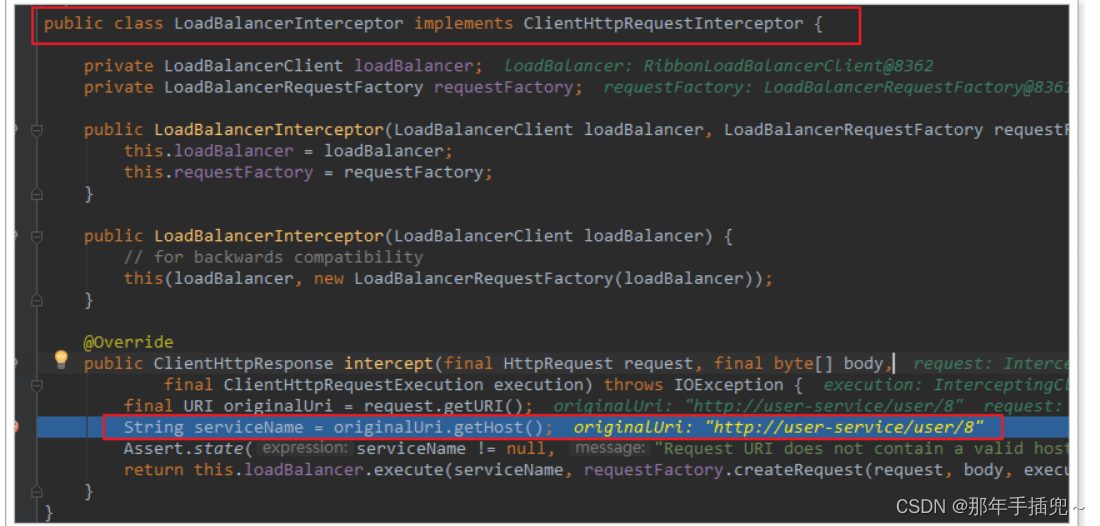
You can see that the intercept method here intercepts the user's HttpRequest request and then does several things:
-
request.getURI(): Get the request uri, in this case http://user-service/user/8 -
originalUri.getHost(): Get the host name of the uri path, which is actually the service id.user-service -
this.loadBalancer.execute(): Process service id and user requests.
Here this.loadBalanceris LoadBalancerClientthe type, let's continue to follow.
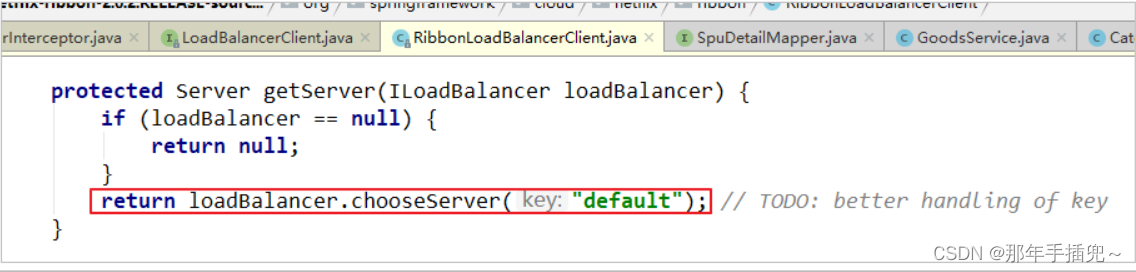
2)LoadBalancerClient
Continue to follow the execute method:

The code is like this:
-
getLoadBalancer(serviceId): Get the ILoadBalancer based on the service id, and the ILoadBalancer will take the service id to get the service list from eureka and save it.
-
getServer(loadBalancer): Use the built-in load balancing algorithm to select one from the service list. In this example, you can see that the service of port 8082 has been obtained
After being released, I visited and tracked it again and found that I got 8081:

Sure enough, load balancing was achieved.
3) Load balancing strategy IRule
In the code just now, you can see that obtaining services uses a getServermethod to perform load balancing:

Let’s continue to follow up:
Continuing to trace the source code chooseServer method, I found this piece of code:

Let’s see who this rule is:
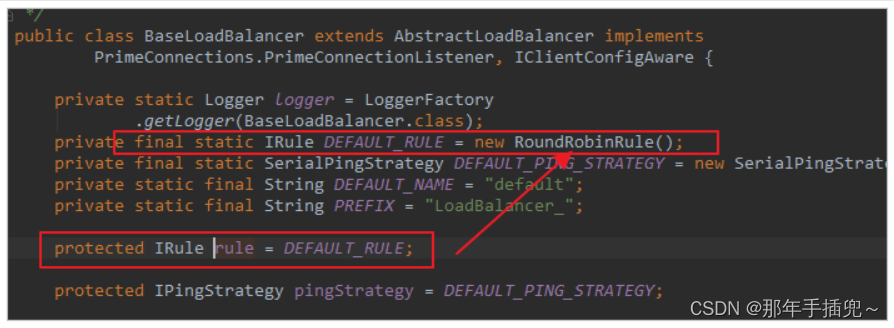
The default value of the rule here is one RoundRobinRule, see the introduction of the class:
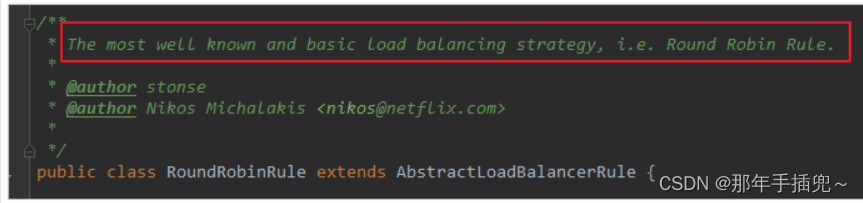
Isn't this what polling means?
At this point, we have a clear understanding of the entire load balancing process.
4) Summary
The bottom layer of SpringCloudRibbon uses an interceptor to intercept the request sent by RestTemplate and modify the address. Let’s sum it up with a picture:
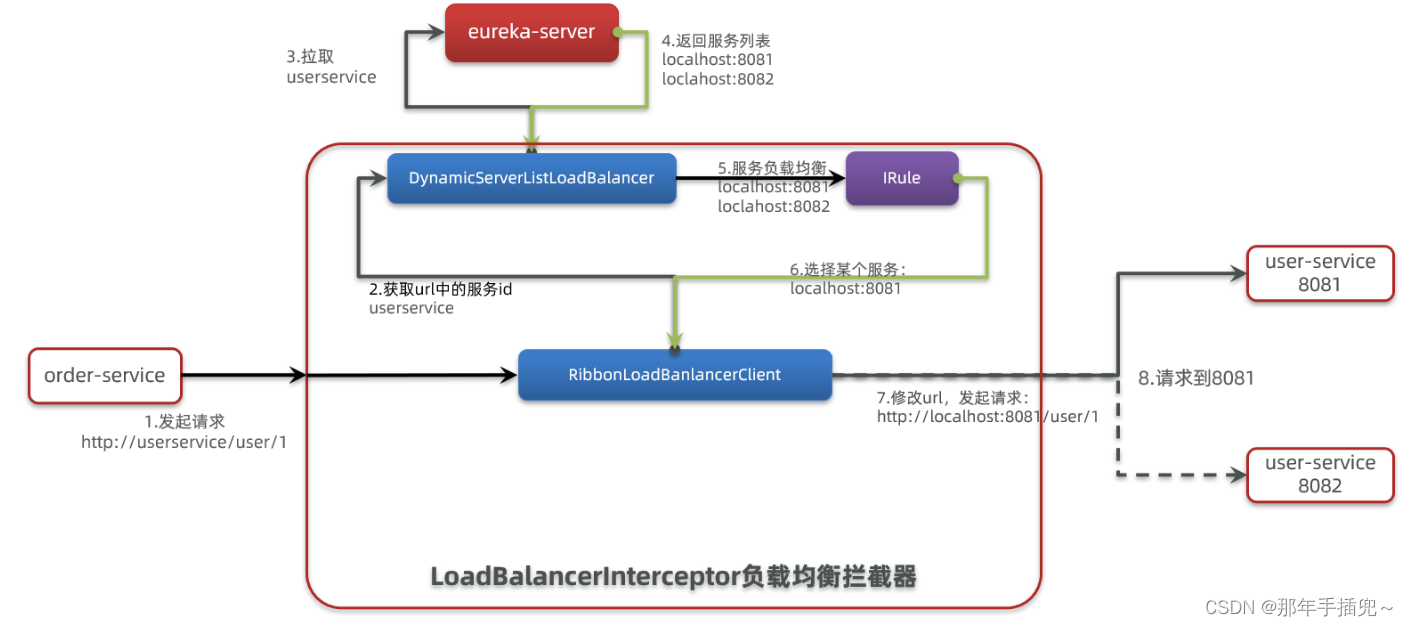
The basic process is as follows:
-
Intercept our RestTemplate request http://userservice/user/1
-
RibbonLoadBalancerClient will get the service name from the request url, which is user-service
-
DynamicServerListLoadBalancer pulls the service list from eureka based on user-service
-
eureka returns the list, localhost:8081, localhost:8082
-
IRule utilizes built-in load balancing rules and selects one from the list, such as localhost:8081
-
RibbonLoadBalancerClient modifies the request address, replaces userservice with localhost:8081, gets http://localhost:8081/user/1 , and initiates a real request
4.3. Load balancing strategy
4.3.1. Load balancing strategy
Load balancing rules are defined in the IRule interface, and IRule has many different implementation classes:

The meanings of the different rules are as follows:
| Built-in load balancing rule class | Rule description |
|---|---|
| RoundRobinRule | Simply poll the service list to select a server. It is Ribbon's default load balancing rule. |
| AvailabilityFilteringRule | Ignore the following two types of servers: (1) By default, if this server fails to connect three times, this server will be set to a "short circuit" state. The short circuit state will last for 30 seconds. If the connection fails again, the duration of the short circuit will increase geometrically. (2) Servers with too high concurrency. If the number of concurrent connections to a server is too high, clients configured with AvailabilityFilteringRule rules will also ignore it. The upper limit of the number of concurrent connections can be configured by the client's <clientName>.<clientConfigNameSpace>.ActiveConnectionsLimit property. |
| WeightedResponseTimeRule | Give each server a weight value. The longer the server response time, the smaller the weight of the server. This rule will randomly select servers, and this weight value will affect server selection. |
| ZoneAvoidanceRule | Server selection is based on servers available in the region. Use Zone to classify servers. This Zone can be understood as a computer room, a rack, etc. Then poll multiple services in the Zone. |
| BestAvailableRule | Ignore those servers that are short-circuited and choose servers with lower concurrency numbers. |
| RandomRule | Randomly select an available server. |
| RetryRule | Selection logic of retry mechanism |
The default implementation is ZoneAvoidanceRule, which is a polling scheme
4.3.2. Customized load balancing strategy
Load balancing rules can be modified by defining IRule implementations in two ways:
-
Code method: In the OrderApplication class in order-service, define a new IRule:
@Bean
public IRule randomRule(){
    return new RandomRule();
}
-
Configuration file method: In the application.yml file of order-service, adding new configuration can also modify the rules:
userservice: # Configure load balancing rules for a certain microservice, here is the userservice service
  ribbon:
    NFLoadBalancerRuleClassName: com.netflix.loadbalancer.RandomRule # Load balancing rule
Note that the default load balancing rules are generally used without modification.
4.4.Hungry loading
Ribbon uses lazy loading by default, that is, the LoadBalanceClient will not be created until the first access, and the request time will be very long.
Hungry loading will be created when the project starts, reducing the time of the first visit. Enable hungry loading through the following configuration:
ribbon:
  eager-load:
    enabled: true
    clients: userservice
5.Nacos Registration Center
Domestic companies generally respect Alibaba's technologies, such as registration centers. Spring Cloud Alibaba also launched a registration center called Nacos.
5.1. Understanding and installing Nacos
Nacos is a product of Alibaba and is now a component in Spring Cloud . Compared with Eureka , it has richer functions and is more popular in China.
For the installation method, please refer to the pre-course material "Nacos Installation Guide.md"
5.2. Service registration to nacos
Nacos is a component of SpringCloudAlibaba, and SpringCloudAlibaba also follows the service registration and service discovery specifications defined in SpringCloud. Therefore, there is not much difference between using Nacos and using Eureka for microservices.
The main differences are:
-
Dependencies are different
-
The service address is different
1) Introduce dependencies
<dependencyManagement>Introduce the SpringCloudAlibaba dependency into the pom file of the cloud-demo parent project :
<dependency>
    <groupId>com.alibaba.cloud</groupId>
    <artifactId>spring-cloud-alibaba-dependencies</artifactId>
    <version>2.2.6.RELEASE</version>
    <type>pom</type>
    <scope>import</scope>
</dependency>
Then introduce the nacos-discovery dependency into the pom files in user-service and order-service:
<dependency>
    <groupId>com.alibaba.cloud</groupId>
    <artifactId>spring-cloud-starter-alibaba-nacos-discovery</artifactId>
</dependency>
Note : Don’t forget to comment out the eureka dependency.
2) Configure nacos address
Add the nacos address in application.yml of user-service and order-service:
spring:
  cloud:
    nacos:
      server-addr: localhost:8848
Note : Don’t forget to comment out the address of eureka
3) Restart
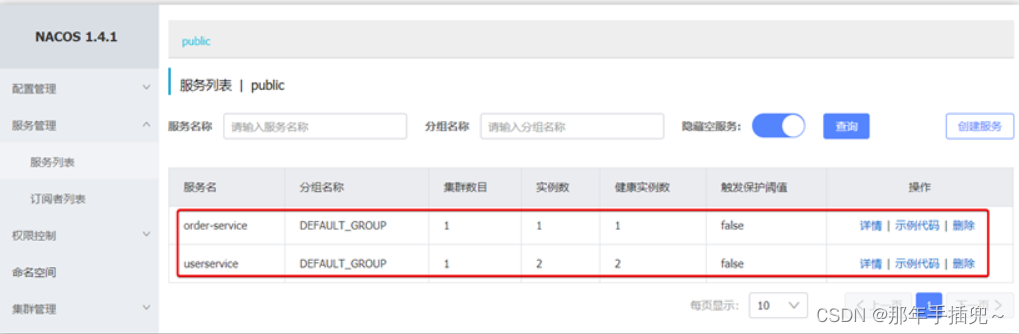
After restarting the microservice, log in to the nacos management page and you can see the microservice information:
5.3. Service hierarchical storage model
A service can have multiple instances . For example, our user-service can have:
-
127.0.0.1:8081
-
127.0.0.1:8082
-
127.0.0.1:8083
If these instances are distributed in different computer rooms across the country, for example:
-
127.0.0.1:8081, in Shanghai computer room
-
127.0.0.1:8082, in Shanghai computer room
-
127.0.0.1:8083, in Hangzhou computer room
Nacos divides the instances in the same computer room into a cluster .
In other words, user-service is a service. A service can contain multiple clusters, such as Hangzhou and Shanghai. Each cluster can have multiple instances, forming a hierarchical model, as shown in the figure:
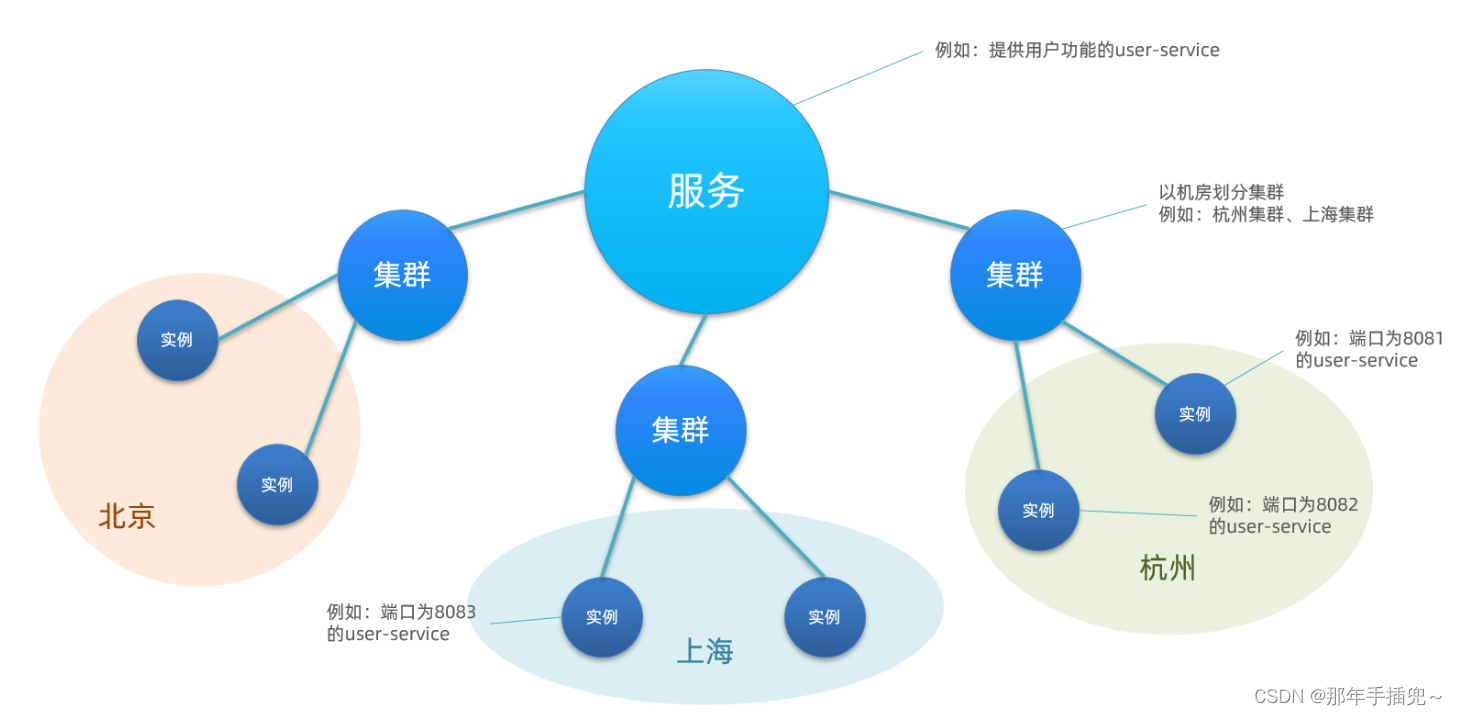
When microservices access each other, they should try to access the same cluster instance because local access is faster. Only when the current cluster is unavailable will other clusters be accessed. For example:

The order-service in the Hangzhou computer room should give priority to the user-service in the same computer room.
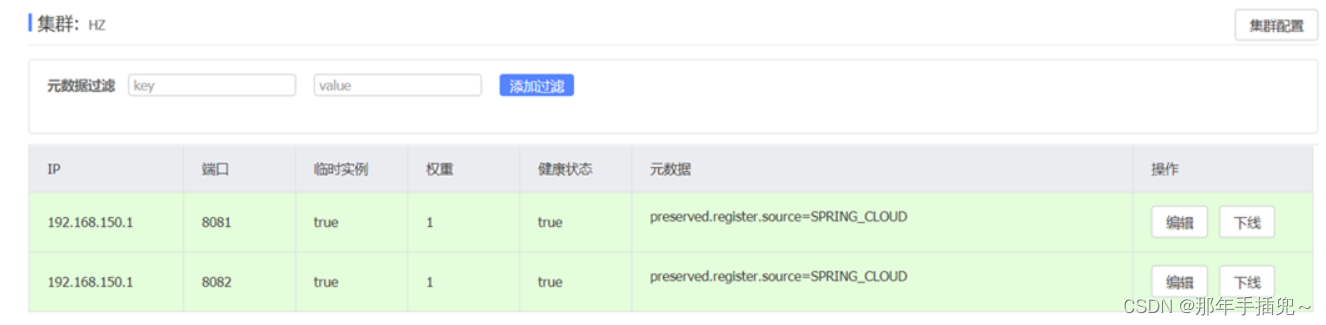
5.3.1. Configure the cluster for user-service
Modify the application.yml file of user-service and add cluster configuration:
spring:
  cloud:
    nacos:
      server-addr: localhost:8848
      discovery:
        cluster-name: HZ # Cluster name
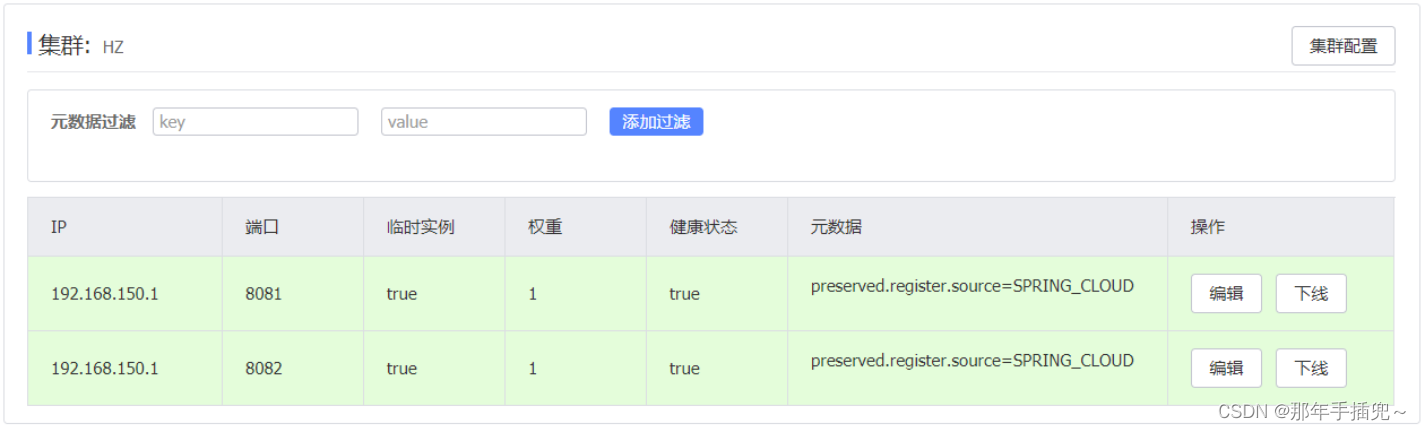
After restarting the two user-service instances, we can see the following results in the nacos console:
We copy a user-service startup configuration again and add properties:
-Dserver.port=8083 -Dspring.cloud.nacos.discovery.cluster-name=SH
The configuration is shown in the figure:
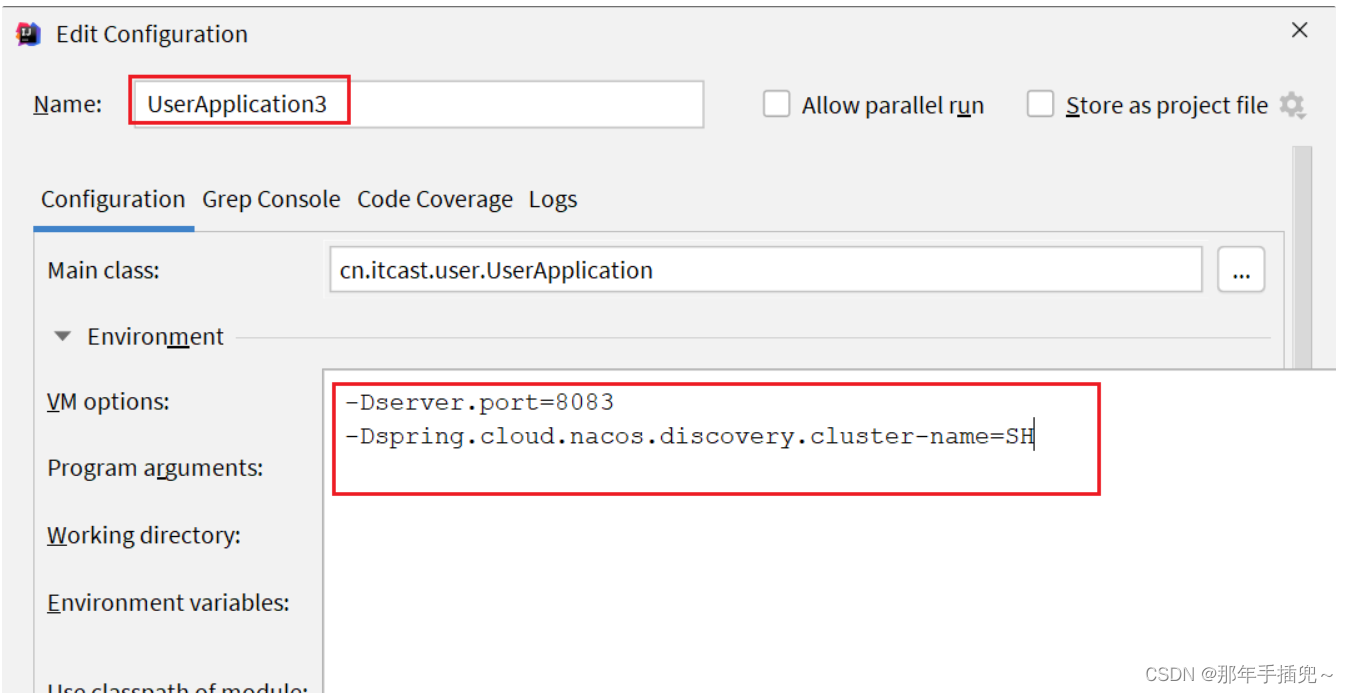
Check the nacos console again after starting UserApplication3:
5.3.2. Load balancing with priority in the same cluster
By default, ZoneAvoidanceRuleload balancing cannot be achieved based on priority within the same cluster.
Therefore, Nacos provides an NacosRuleimplementation that can prioritize instances from the same cluster.
1) Configure cluster information for order-service
Modify the application.yml file of order-service and add cluster configuration:
spring:
  cloud:
    nacos:
      server-addr: localhost:8848
      discovery:
        cluster-name: HZ # Cluster name
2) Modify load balancing rules
Modify the application.yml file of order-service and modify the load balancing rules:
userservice:
  ribbon:
    NFLoadBalancerRuleClassName: com.alibaba.cloud.nacos.ribbon.NacosRule # Load balancing rule
5.4. Weight configuration
In actual deployment, the following scenario will occur:
The performance of server equipment varies. Some machines where instances are located have better performance, while others have worse performance. We hope that machines with good performance will bear more user requests.
But by default, NacosRule is randomly selected within the same cluster and does not consider machine performance issues.
Therefore, Nacos provides weight configuration to control access frequency. The greater the weight, the higher the access frequency.
In the nacos console, find the instance list of user-service and click Edit to modify the weight:
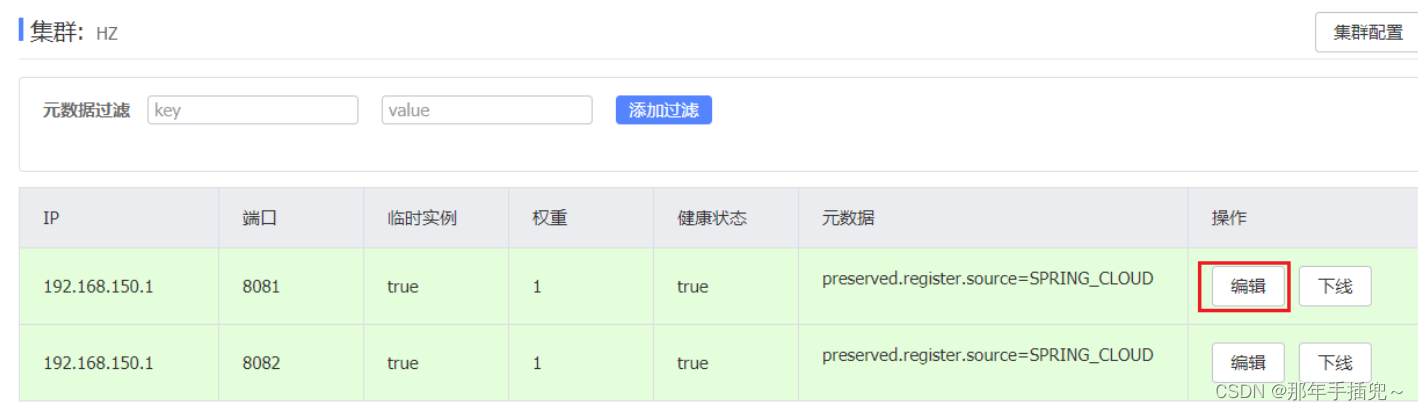
In the pop-up editing window, modify the weight:
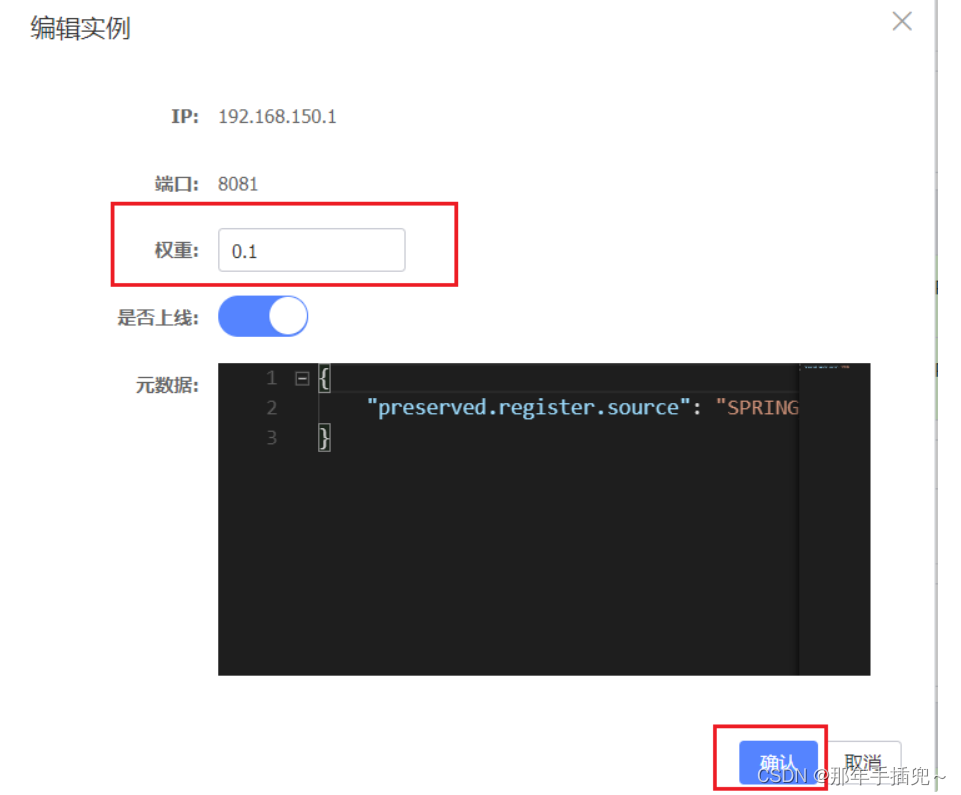
NOTE : If the weight is modified to 0, the instance will never be accessed
5.5. Environmental isolation
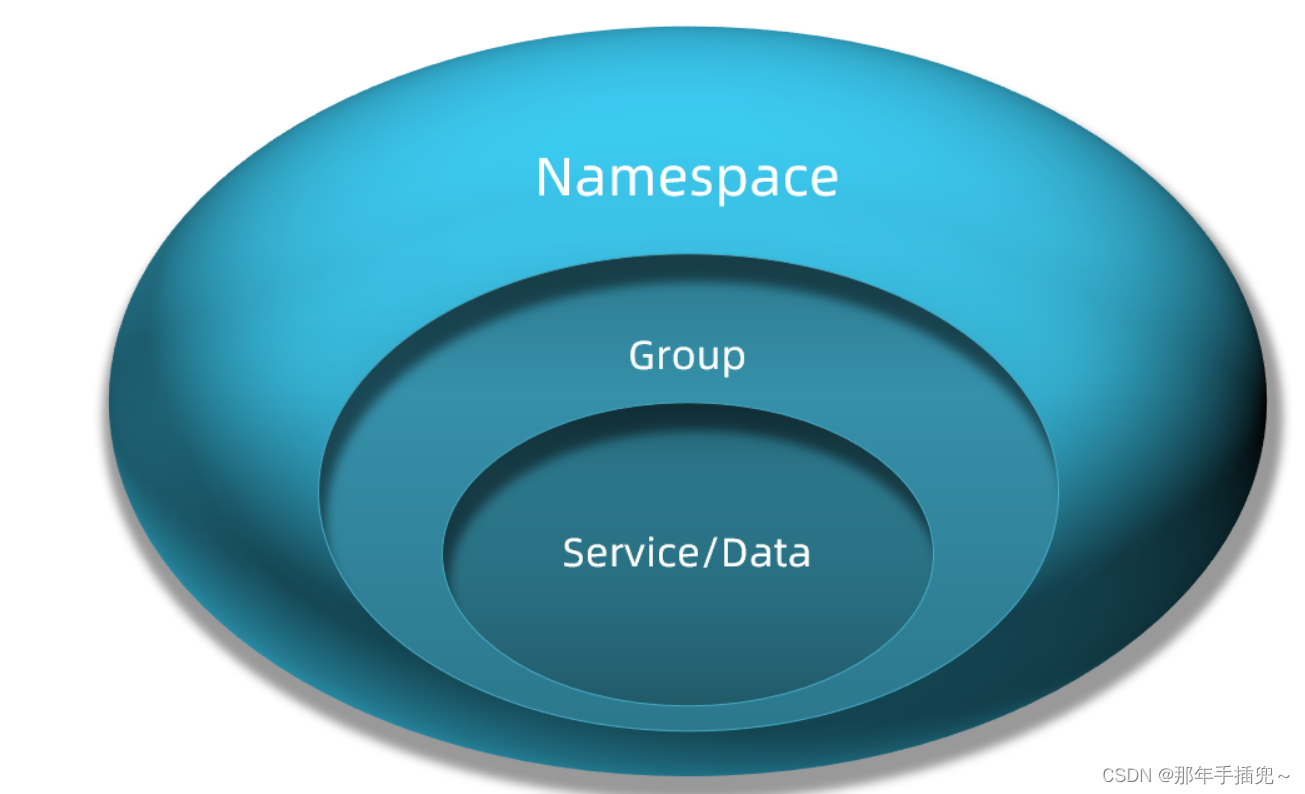
Nacos provides namespace to implement environment isolation function.
-
There can be multiple namespaces in nacos
-
There can be groups, services, etc. under the namespace.
-
Different namespaces are isolated from each other. For example, services in different namespaces are not visible to each other.
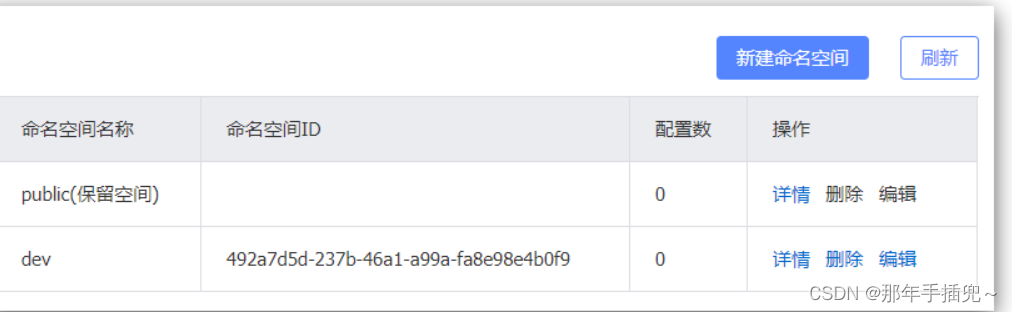
5.5.1.Create namespace
By default, all services, data, and groups are in the same namespace, named public:
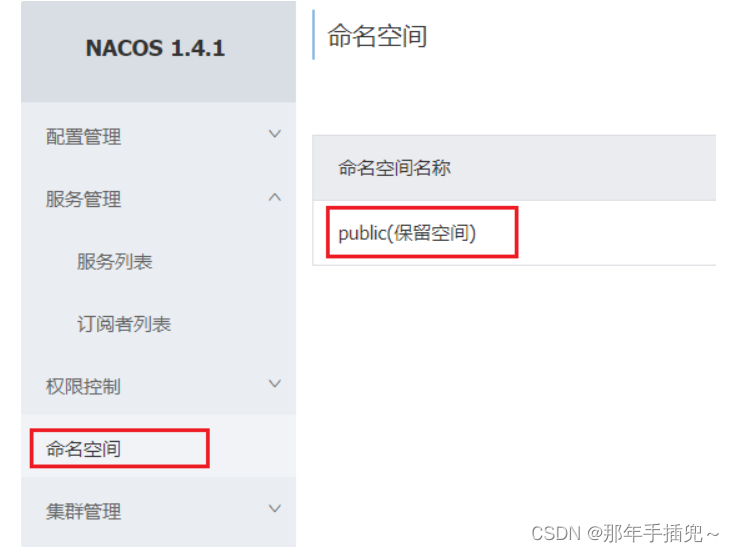
We can click the new button on the page to add a namespace:
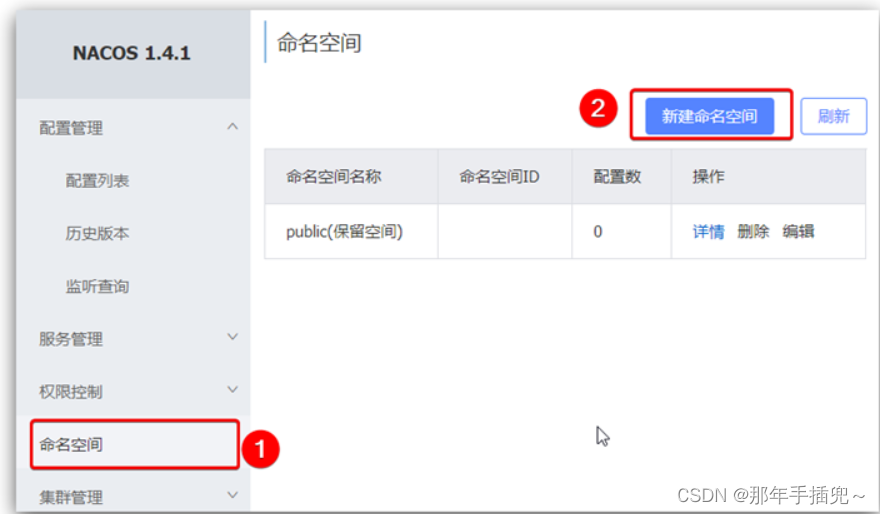
Then, fill out the form:

You will see a new namespace on the page:
5.5.2. Configure namespace for microservices
Configuring namespace for microservices can only be achieved by modifying the configuration.
For example, modify the application.yml file of order-service:
spring:
  cloud:
    nacos:
      server-addr: localhost:8848
      discovery:
        cluster-name: HZ
        namespace: 492a7d5d-237b-46a1-a99a-fa8e98e4b0f9 # Namespace, fill in the ID
After restarting order-service, access the console and you can see the following results:
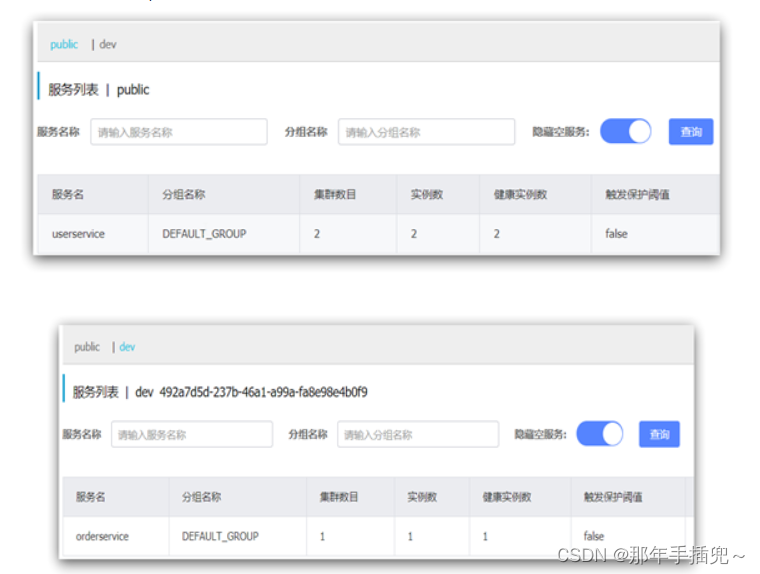
When accessing order-service at this time, because the namespace is different, userservice cannot be found, and the console will report an error:

5.6.The difference between Nacos and Eureka
Nacos service instances are divided into two types:
-
Temporary instance: If the instance is down for more than a certain period of time, it will be removed from the service list. This is the default type.
-
Non-temporary instance: If the instance goes down, it will not be removed from the service list and can also be called a permanent instance.
Configure a service instance as a permanent instance:
spring:
  cloud:
    nacos:
      discovery:
        ephemeral: false # Set to non-temporary instance
The overall structures of Nacos and Eureka are similar, including service registration, service pulling, and heartbeat waiting, but there are also some differences:
-
What Nacos and eureka have in common
-
Both support service registration and service pulling.
-
All support service providers’ heartbeat method for health testing.
-
-
The difference between Nacos and Eureka
-
Nacos supports the server to actively detect the provider status: temporary instances adopt heartbeat mode, and non-temporary instances adopt active detection mode.
-
Temporary instances with abnormal heartbeats will be removed, while non-temporary instances will not be removed.
-
Nacos supports message push mode for service list changes, and the service list is updated in a more timely manner.
-
The Nacos cluster uses AP mode by default. When there are non-temporary instances in the cluster, CP mode is used; Eureka uses AP mode.
-
SpringCloud Practical Chapter 02
0.Learning Objectives
1.Nacos configuration management
In addition to being a registration center, Nacos can also be used for configuration management.
1.1. Unified configuration management
When more and more instances of microservices are deployed, reaching tens or hundreds, modifying the configuration of microservices one by one will be frustrating and error-prone. We need a unified configuration management solution that can centrally manage the configuration of all instances.
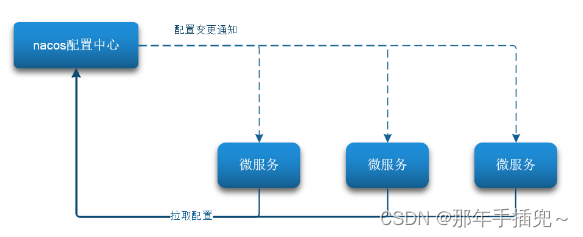
On the one hand, Nacos can centrally manage configurations, and on the other hand, it can promptly notify microservices when configuration changes to achieve hot updates of configurations.
1.1.1. Add configuration file in nacos
How to manage configuration in nacos?
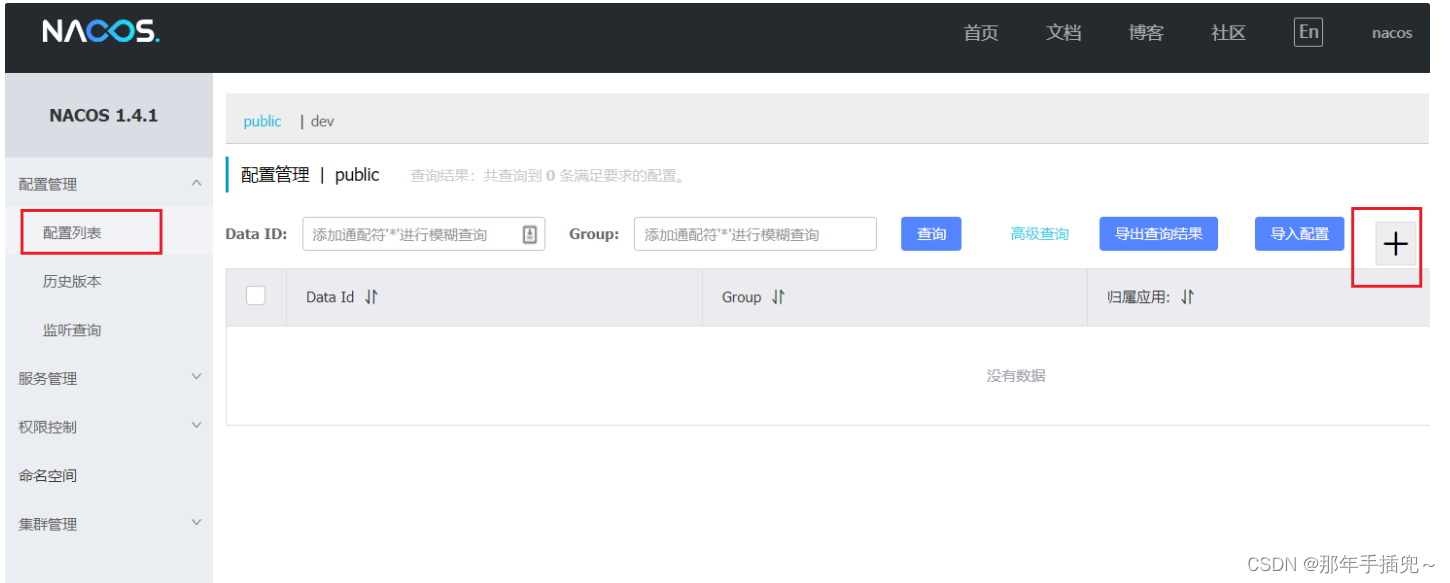
Then fill in the configuration information in the pop-up form:

Note: The core configuration of the project needs to be hot-updated before it is necessary to put it into nacos management. Some configurations that rarely change are better stored locally in the microservice.
1.1.2. Pull configuration from microservices
The microservice must pull the configuration managed in nacos and merge it with the local application.yml configuration to complete the project startup.
But if application.yml has not been read, how to know the nacos address?
Therefore, spring introduces a new configuration file: the bootstrap.yaml file, which will be read before application.yml. The process is as follows:

1) Introduce nacos-config dependency
First, in the user-service service, introduce the client dependency of nacos-config:
<!--nacos configuration management dependencies-->
<dependency>
    <groupId>com.alibaba.cloud</groupId>
    <artifactId>spring-cloud-starter-alibaba-nacos-config</artifactId>
</dependency>
2) Add bootstrap.yaml
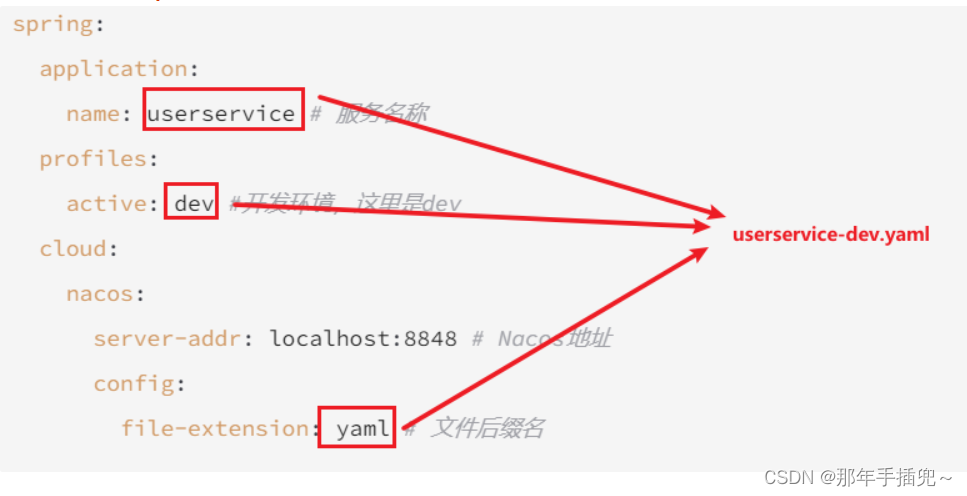
Then, add a bootstrap.yaml file in user-service with the following content:
spring:
  application:
    name: userservice # Service name
  profiles:
    active: dev #Development environment, here is dev
  cloud:
    nacos:
      server-addr: localhost:8848 # Nacos address
      config:
        file-extension: yaml # file suffix name
Here, the nacos address will be obtained based on spring.cloud.nacos.server-addr, and then based on
${spring.application.name}-${spring.profiles.active}.${spring.cloud.nacos.config.file-extension}As the file id, read the configuration.
In this case, it is to read userservice-dev.yaml:
3) Read nacos configuration
Add business logic to UserController in user-service and read the pattern.dateformat configuration:
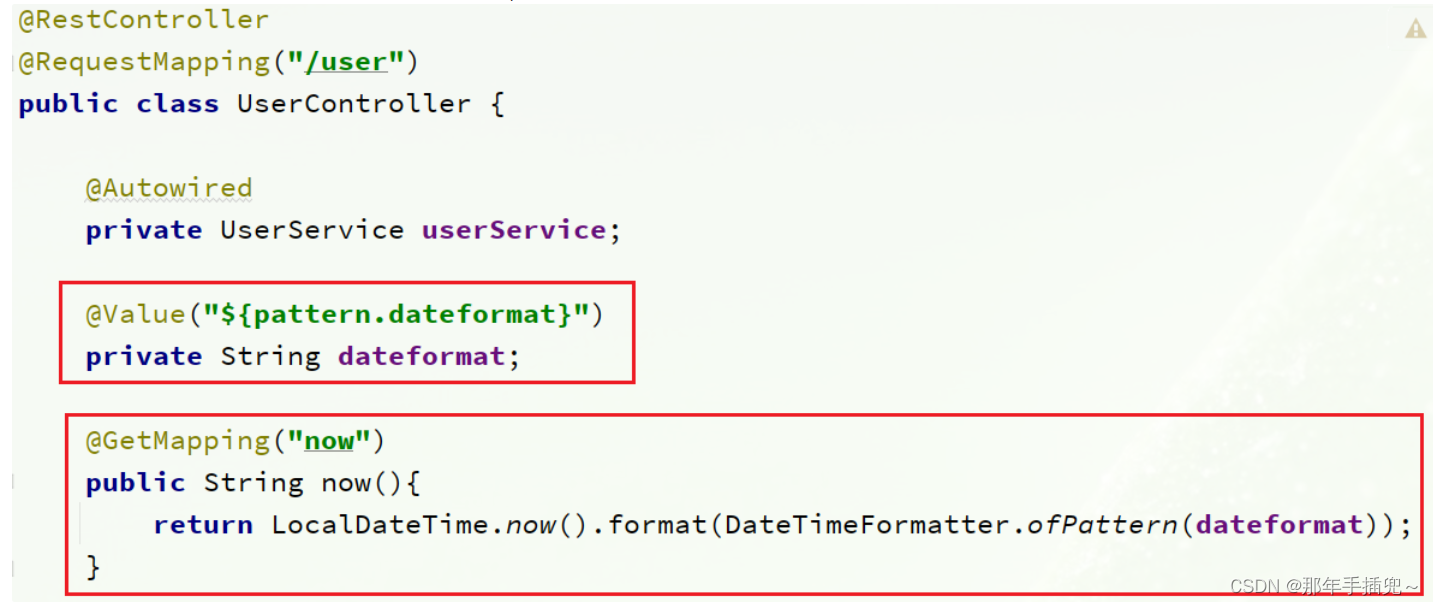
Complete code:
package cn.itcast.user.web;
import cn.itcast.user.pojo.User;
import cn.itcast.user.service.UserService;
import lombok.extern.slf4j.Slf4j;
import org.springframework.beans.factory.annotation.Autowired;
import org.springframework.beans.factory.annotation.Value;
import org.springframework.web.bind.annotation.*;
import java.time.LocalDateTime;
import java.time.format.DateTimeFormatter;
@Slf4j
@RestController
@RequestMapping("/user")
public class UserController {
@Autowired
private UserService userService;
@Value("${pattern.dateformat}")
private String dateformat;
@GetMapping("now")
public String now(){
return LocalDateTime.now().format(DateTimeFormatter.ofPattern(dateformat));
}
// ...slightly
}
When accessing the page, you can see the effect:

1.2. Configure hot update
Our ultimate goal is to modify the configuration in nacos so that the configuration can take effect in the microservice without restarting, that is, configuration hot update .
To implement hot update of configuration, two methods can be used:
1.2.1. Method 1
Add the annotation @RefreshScope to the class where the variable injected by @Value is located:
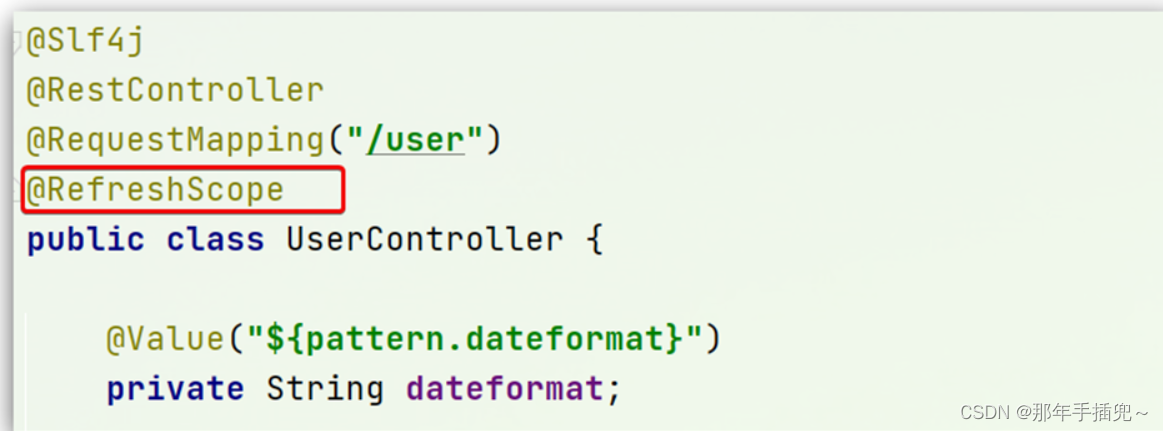
1.2.2. Method 2
Use @ConfigurationProperties annotation instead of @Value annotation.
In the user-service service, add a class and read the pattern.dateformat attribute:
package cn.itcast.user.config;
import lombok.Data;
import org.springframework.boot.context.properties.ConfigurationProperties;
import org.springframework.stereotype.Component;
@Component
@Data
@ConfigurationProperties(prefix = "pattern")
public class PatternProperties {
private String dateformat;
}
Use this class instead of @Value in UserController:
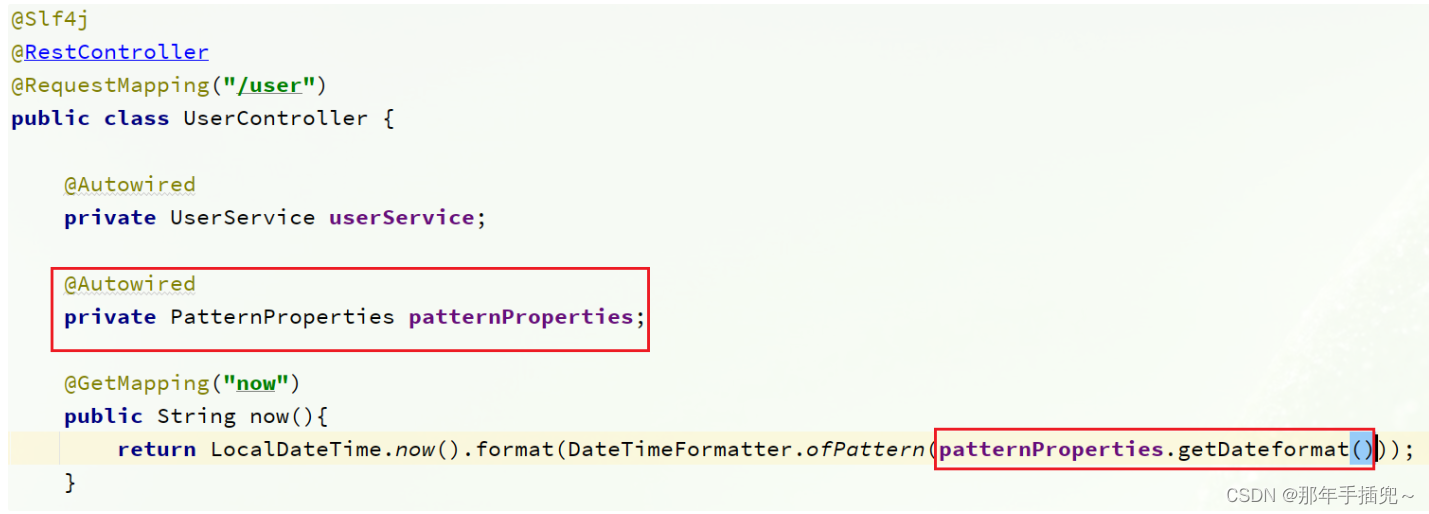
Complete code:
package cn.itcast.user.web;
import cn.itcast.user.config.PatternProperties;
import cn.itcast.user.pojo.User;
import cn.itcast.user.service.UserService;
import lombok.extern.slf4j.Slf4j;
import org.springframework.beans.factory.annotation.Autowired;
import org.springframework.web.bind.annotation.GetMapping;
import org.springframework.web.bind.annotation.PathVariable;
import org.springframework.web.bind.annotation.RequestMapping;
import org.springframework.web.bind.annotation.RestController;
import java.time.LocalDateTime;
import java.time.format.DateTimeFormatter;
@Slf4j
@RestController
@RequestMapping("/user")
public class UserController {
@Autowired
private UserService userService;
@Autowired
private PatternProperties patternProperties;
@GetMapping("now")
public String now(){
return LocalDateTime.now().format(DateTimeFormatter.ofPattern(patternProperties.getDateformat()));
}
// slightly
}
1.3.Configuration sharing
In fact, when the microservice starts, it will go to nacos to read multiple configuration files, for example:
-
[spring.application.name]-[spring.profiles.active].yaml, for example: userservice-dev.yaml -
[spring.application.name].yaml, for example: userservice.yaml
It does not[spring.application.name].yaml contain the environment, so it can be shared by multiple environments.
Below we use a case to test configuration sharing
1) Add an environment shared configuration
We add a userservice.yaml file in nacos:
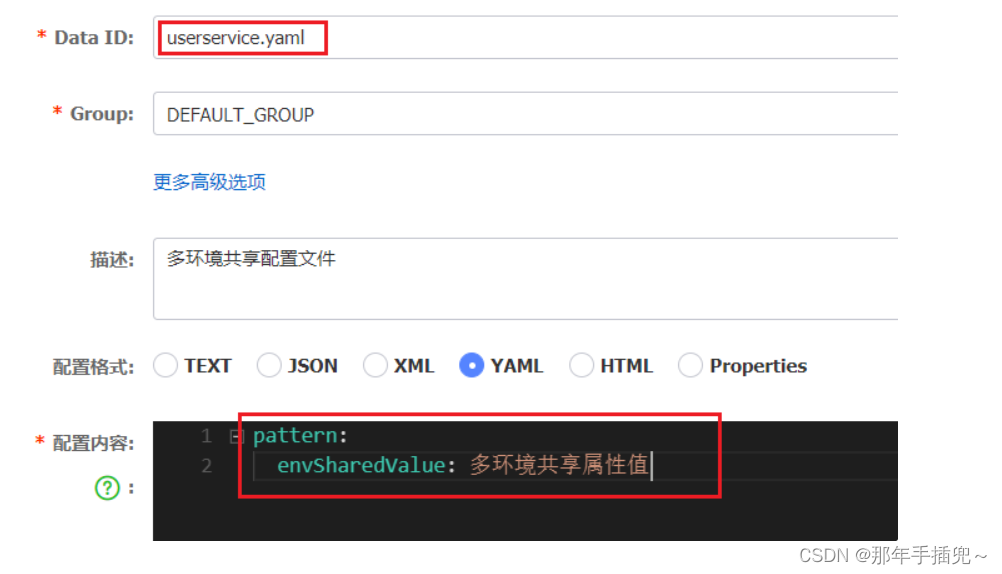
2) Read the shared configuration in user-service
In the user-service service, modify the PatternProperties class and read the newly added properties:

In the user-service service, modify the UserController and add a method:

3) Run two UserApplications, using different profiles
Modify the startup item UserApplication2 and change its profile value:
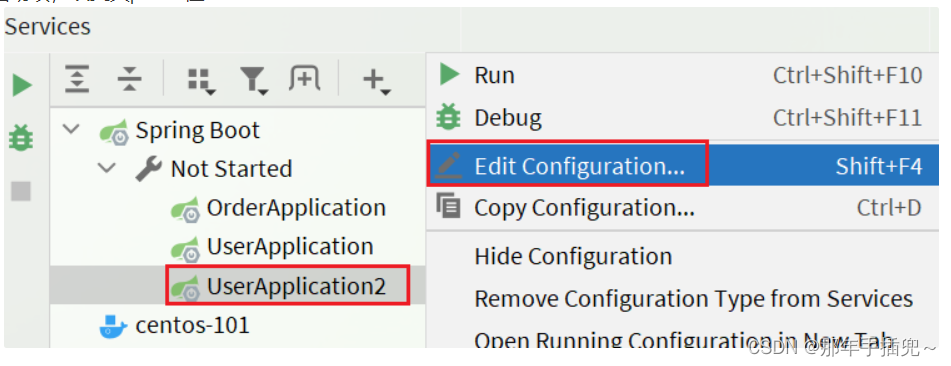

In this way, the profile used by UserApplication (8081) is dev, and the profile used by UserApplication2 (8082) is test.
Start UserApplication and UserApplication2
Visit http://localhost:8081/user/prop , the result is:
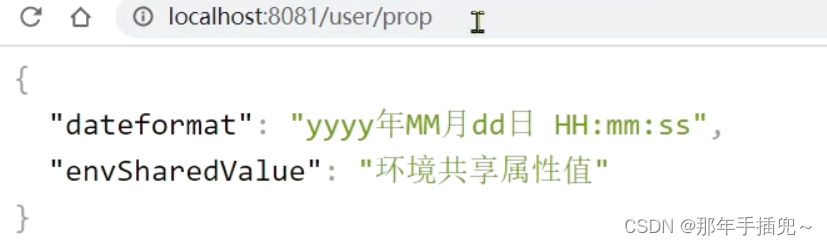
Visit http://localhost:8082/user/prop , the result is:
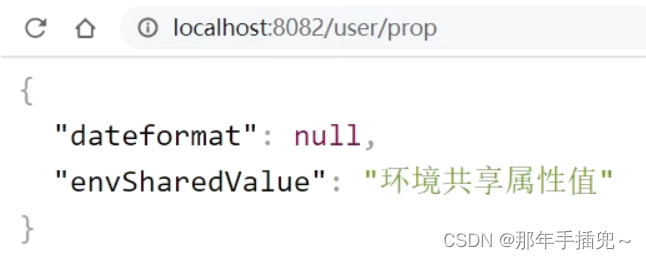
It can be seen that both the dev and test environments have read the value of the envSharedValue attribute.
4) Configure the priority of sharing
When the same attribute appears in nacos and service local at the same time, the priority is divided into high and low:

1.4. Build Nacos cluster
In the Nacos production environment, it must be deployed in a cluster state. For the deployment method, please refer to the documents in the pre-course materials:

2.Feign remote call
Let’s first look at the code we used to use RestTemplate to initiate remote calls:

The following problems exist:
•Poor code readability and inconsistent programming experience
•URLs with complex parameters are difficult to maintain
Feign is a declarative http client, official address: GitHub - OpenFeign/feign: Feign makes writing java http clients easier
Its function is to help us elegantly implement the sending of http requests and solve the problems mentioned above.
2.1.Feign replaces RestTemplate
The steps to use Fegin are as follows:
1) Introduce dependencies
We introduce the feign dependency in the pom file of the order-service service:
<dependency>
    <groupId>org.springframework.cloud</groupId>
    <artifactId>spring-cloud-starter-openfeign</artifactId>
</dependency>
2) Add annotations
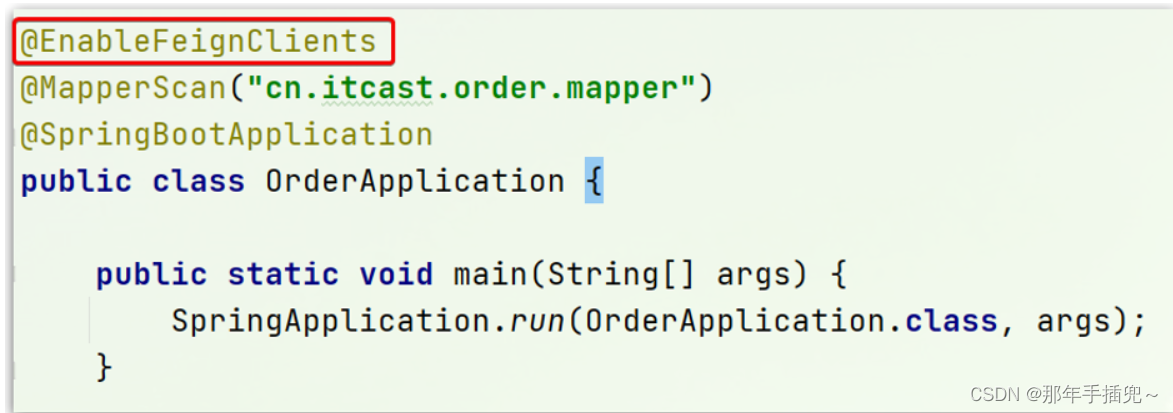
Add annotations to the startup class of order-service to enable Feign's function:
3) Write Feign client
Create a new interface in order-service with the following content:
package cn.itcast.order.client;
import cn.itcast.order.pojo.User;
import org.springframework.cloud.openfeign.FeignClient;
import org.springframework.web.bind.annotation.GetMapping;
import org.springframework.web.bind.annotation.PathVariable;
@FeignClient("userservice")
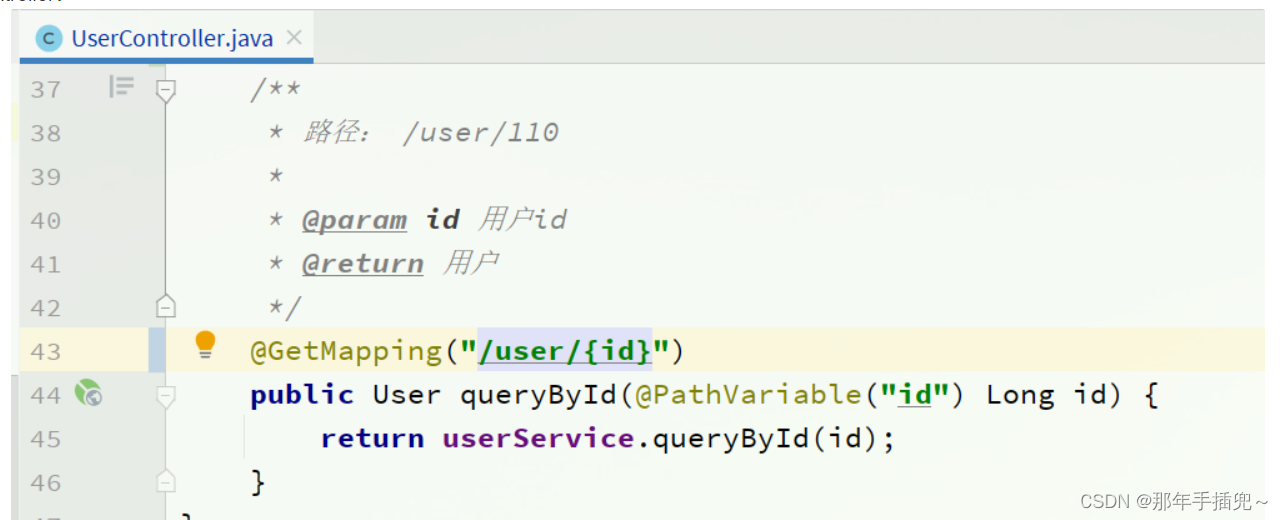
public interface UserClient {
@GetMapping("/user/{id}")
User findById(@PathVariable("id") Long id);
}
This client is mainly based on SpringMVC annotations to declare remote call information, such as:
-
Service name: userservice
-
Request method: GET
-
Request path:/user/{id}
-
Request parameters: Long id
-
Return value type: User
In this way, Feign can help us send http requests without using RestTemplate ourselves.
4) Test
Modify the queryOrderById method in the OrderService class in order-service and use Feign client instead of RestTemplate:
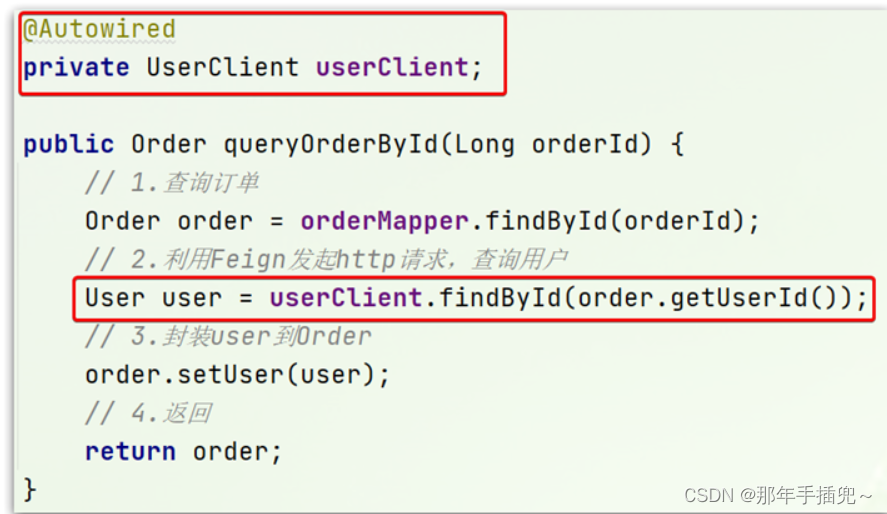
Doesn't it look more elegant?
5) Summary
Steps to use Feign:
①Introduce dependencies
② Add @EnableFeignClients annotation
③ Write FeignClient interface
④ Use the methods defined in FeignClient instead of RestTemplate
2.2. Custom configuration
Feign can support many custom configurations, as shown in the following table:
| type | effect | illustrate |
|---|---|---|
| feign.Logger.Level | Modify log level | Contains four different levels: NONE, BASIC, HEADERS, FULL |
| feign.codec.Decoder | parser for response results | Parse the results of http remote calls, such as parsing json strings into java objects |
| feign.codec.Encoder | Request parameter encoding | Encode request parameters for easy sending via http request |
| feign. Contract | Supported annotation formats | The default is SpringMVC annotation |
| feign. Retryer | Failure retry mechanism | Retry mechanism for failed requests. The default is none, but Ribbon's retry will be used. |
Under normal circumstances, the default value is sufficient for our use. If you want to customize it, you only need to create a custom @Bean to override the default Bean.
The following uses logs as an example to demonstrate how to customize the configuration.
2.2.1.Configuration file method
Modifying the log level of feign based on the configuration file can target a single service:
feign:
  client:
    config:
      userservice: # Configuration for a certain microservice
        loggerLevel: FULL # Log level
Or for all services:
feign:
  client:
    config:
      default: # The default used here is the global configuration. If you write the service name, it is the configuration for a certain microservice.
        loggerLevel: FULL # Log level
There are four levels of logs:
-
NONE: Do not record any log information, this is the default value.
-
BASIC: Only record the requested method, URL, and response status code and execution time
-
HEADERS: Based on BASIC, additional header information of requests and responses is recorded.
-
FULL: Record the details of all requests and responses, including header information, request body, and metadata.
2.2.2.Java code method
You can also modify the log level based on Java code. First declare a class and then declare a Logger.Level object:
public class DefaultFeignConfiguration  {
    @Bean
    public Logger.Level feignLogLevel(){
        return Logger.Level.BASIC; // The log level is BASIC
    }
}
If you want it to take effect globally , put it in the @EnableFeignClients annotation of the startup class:
@EnableFeignClients(defaultConfiguration = DefaultFeignConfiguration .class)
If it takes effect locally , put it in the corresponding @FeignClient annotation:
@FeignClient(value = "userservice", configuration = DefaultFeignConfiguration .class)
2.3.Feign usage optimization
The bottom layer of Feign initiates http requests and relies on other frameworks. Its underlying client implementation includes:
•URLConnection: Default implementation, does not support connection pooling
•Apache HttpClient: supports connection pooling
•OKHttp: supports connection pooling
Therefore, the main way to improve Feign's performance is to use a connection pool instead of the default URLConnection.
Here we use Apache's HttpClient to demonstrate.
1) Introduce dependencies
Introduce Apache's HttpClient dependency into the pom file of order-service:
<!--httpClient dependencies-->
<dependency>
    <groupId>io.github.openfeign</groupId>
    <artifactId>feign-httpclient</artifactId>
</dependency>
2) Configure the connection pool
Add configuration in application.yml of order-service:
feign:
  client:
    config:
      default: #default global configuration
        loggerLevel: BASIC # Log level, BASIC is basic request and response information
  httpclient:
    enabled: true # Enable feign's support for HttpClient
    max-connections: 200 # Maximum number of connections
    max-connections-per-route: 50 # Maximum number of connections per route
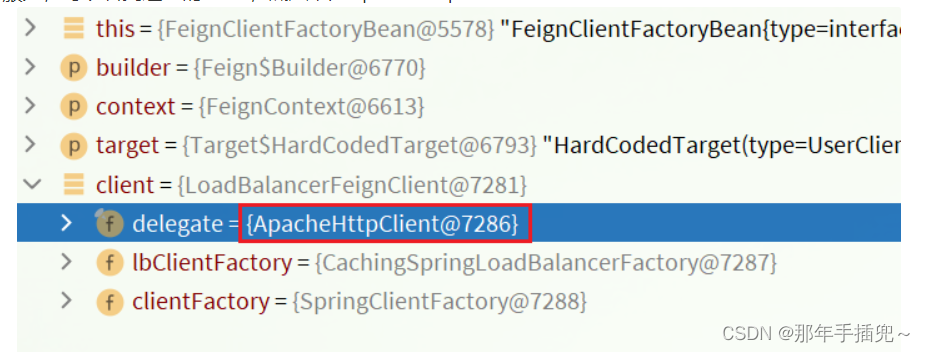
Next, break the point in the loadBalance method in FeignClientFactoryBean:
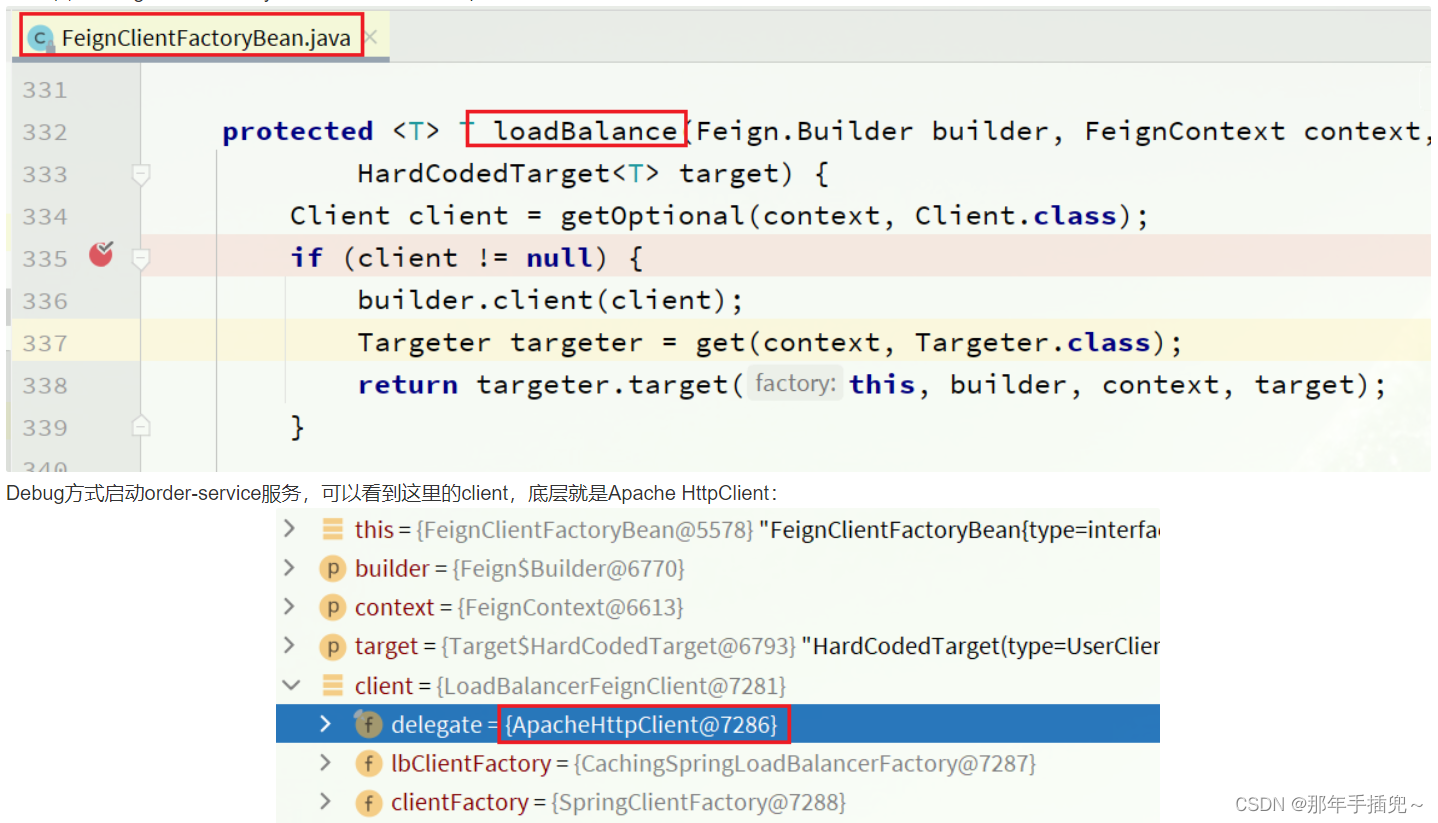
Start the order-service service in Debug mode. You can see the client here. The bottom layer is Apache HttpClient:
Summary, Feign’s optimization:
1. Try to use basic log level
2. Use HttpClient or OKHttp instead of URLConnection
① Introduce feign-httpClient dependency
② Turn on the httpClient function in the configuration file and set the connection pool parameters
2.4. Best Practices
The so-called recent practice refers to the experience summarized during use, which is the best way to use it.
From self-study observation, we can find that Feign's client and service provider's controller code are very similar:
feign client:

UserController:
Is there a way to simplify this repetitive code writing?
2.4.1.Inheritance method
Identical code can be shared through inheritance:
1) Define an API interface, use the definition method, and make declarations based on SpringMVC annotations.
2) Feign client and Controller both integrate modified interfaces
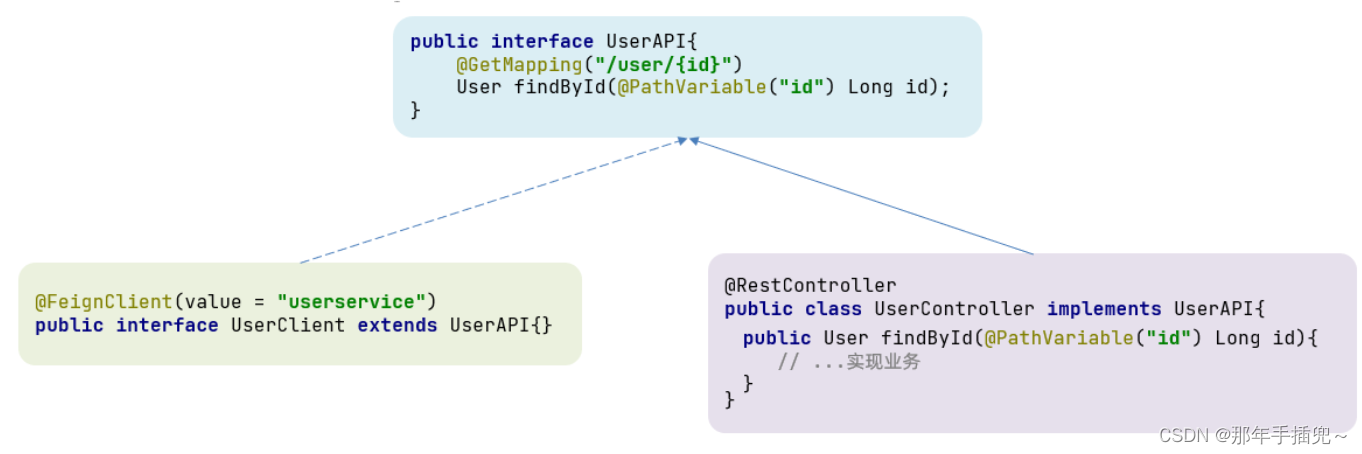
advantage:
-
Simple
-
Enabled code sharing
shortcoming:
-
Service providers and service consumers are tightly coupled
-
The annotation mapping in the parameter list will not be inherited, so the method, parameter list, and annotations must be declared again in the Controller.
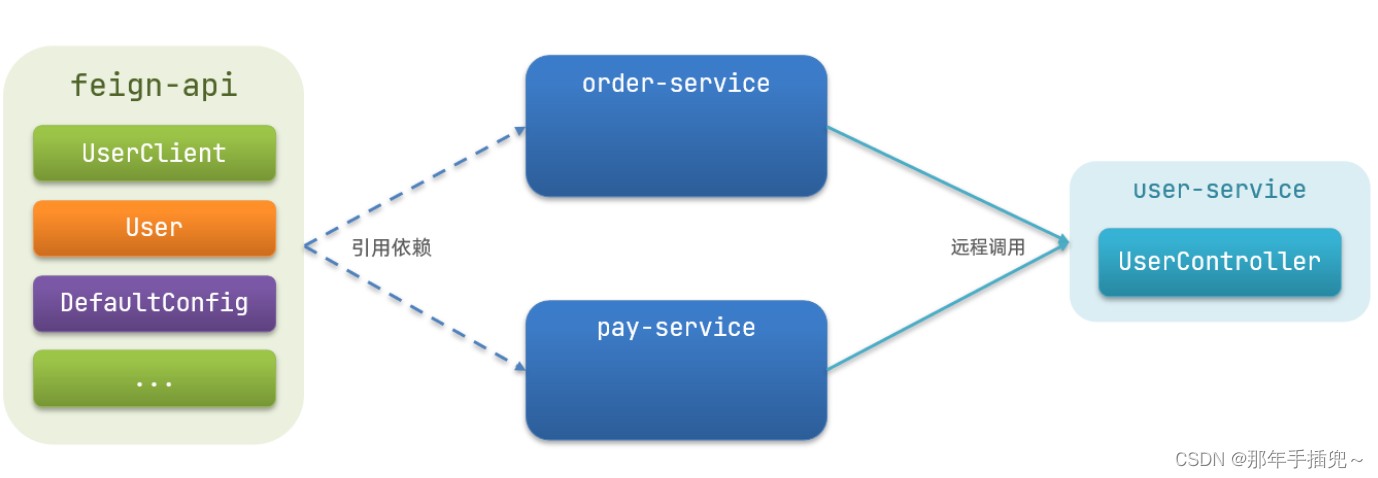
2.4.2. Extraction method
Extract Feign's Client into an independent module, and put the POJO related to the interface and the default Feign configuration into this module for use by all consumers.
For example, the default configurations of UserClient, User, and Feign are extracted into a feign-api package, and all microservices reference this dependency package and can be used directly.
2.4.3. Implement extraction-based best practices
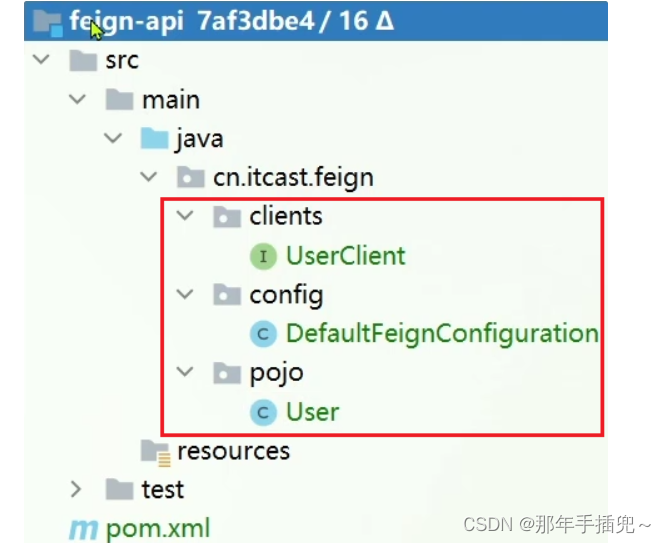
1) Extraction
First create a module named feign-api:
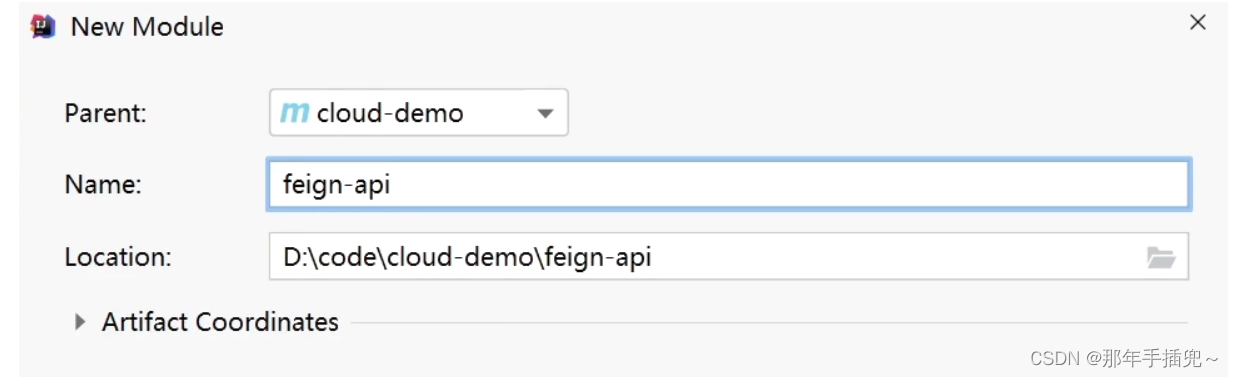
Project structure:
Then introduce feign's starter dependency in feign-api
<dependency>
    <groupId>org.springframework.cloud</groupId>
    <artifactId>spring-cloud-starter-openfeign</artifactId>
</dependency>
Then, the UserClient, User, and DefaultFeignConfiguration written in order-service are copied to the feign-api project.
2) Use feign-api in order-service
First, delete the UserClient, User, DefaultFeignConfiguration and other classes or interfaces in order-service.
Introduce the dependency of feign-api into the pom file of order-service:
<dependency>
    <groupId>cn.itcast.demo</groupId>
    <artifactId>feign-api</artifactId>
    <version>1.0</version>
</dependency>
Modify all the import packages related to the above three components in order-service and change them to import the packages in feign-api.
3) Restart the test
After restarting, I found that the service reported an error:
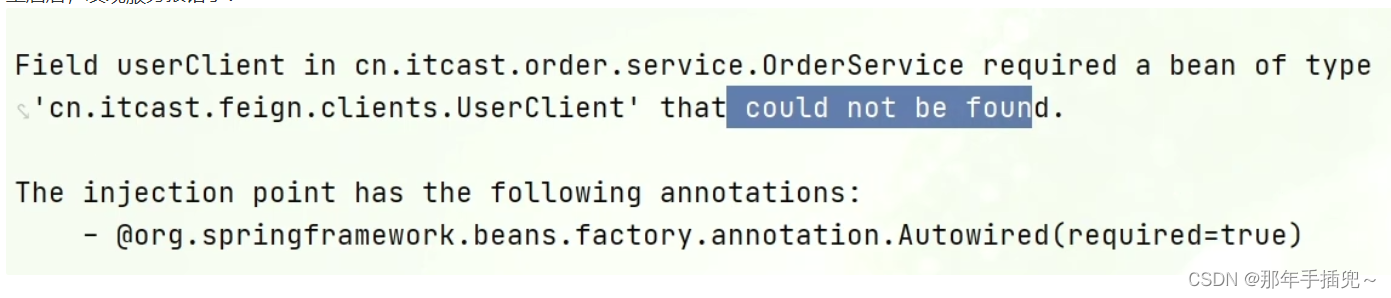
This is because UserClient is now under the cn.itcast.feign.clients package,
The @EnableFeignClients annotation of order-service is under the cn.itcast.order package. It is not in the same package and cannot scan the UserClient.
4) Solve the scanning package problem
method one:
Specify which packages Feign should scan:
@EnableFeignClients(basePackages = "cn.itcast.feign.clients")
Method two:
Specify the Client interface that needs to be loaded:
@EnableFeignClients(clients = {UserClient.class})
3.Gateway service gateway
Spring Cloud Gateway is a new project of Spring Cloud. This project is a gateway developed based on reactive programming and event streaming technologies such as Spring 5.0, Spring Boot 2.0 and Project Reactor. It aims to provide a simple and effective unification for microservice architecture. API routing management method.
3.1. Why do we need a gateway?
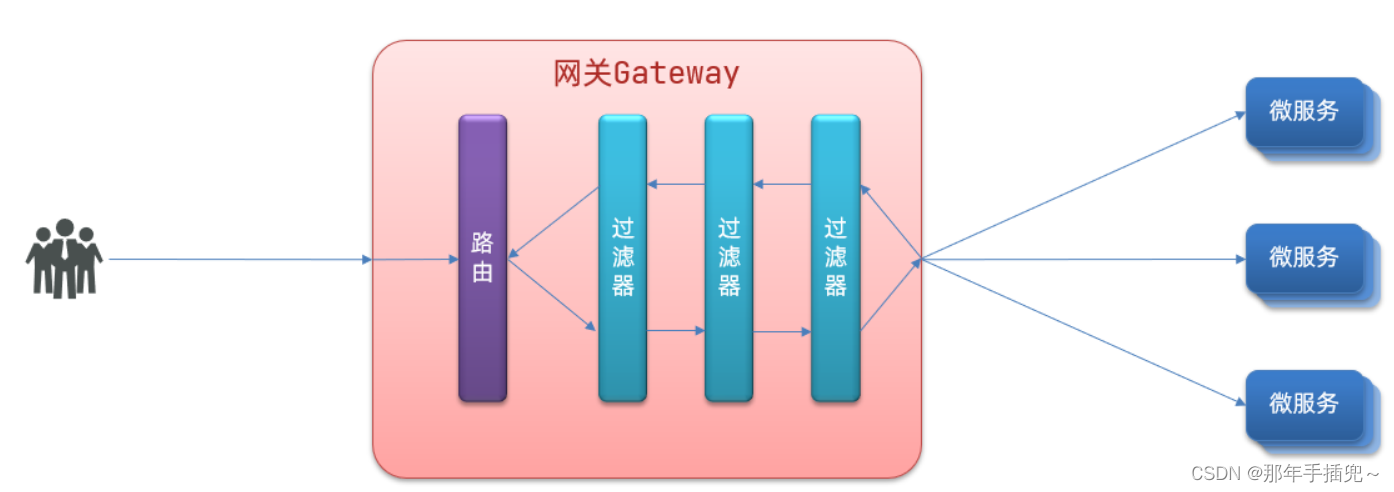
Gateway Gateway is the gatekeeper of our services and the unified entrance for all microservices.
Core functional features of the gateway :
-
Request routing
-
Permission control
-
Limiting
Architecture diagram:

Permission control : As the entrance to microservices, the gateway needs to verify whether the user is qualified to request, and if not, intercept it.
Routing and load balancing : All requests must first go through the gateway, but the gateway does not process business, but forwards the request to a certain microservice according to certain rules. This process is called routing. Of course, when there are multiple target services for routing, load balancing is also required.
Current limiting : When the request traffic is too high, the gateway will release the request at the speed that the downstream microservices can accept to avoid excessive service pressure.
There are two types of gateway implementations in Spring Cloud:
-
gateway
-
zul
Zuul is a Servlet-based implementation and belongs to blocking programming. Spring Cloud Gateway is based on WebFlux provided in Spring 5, which is an implementation of reactive programming and has better performance.
3.2.gateway quick start
Next, we will demonstrate the basic routing function of the gateway. The basic steps are as follows:
-
Create a SpringBoot project gateway and introduce gateway dependencies
-
Write startup class
-
Write basic configuration and routing rules
-
Start the gateway service for testing
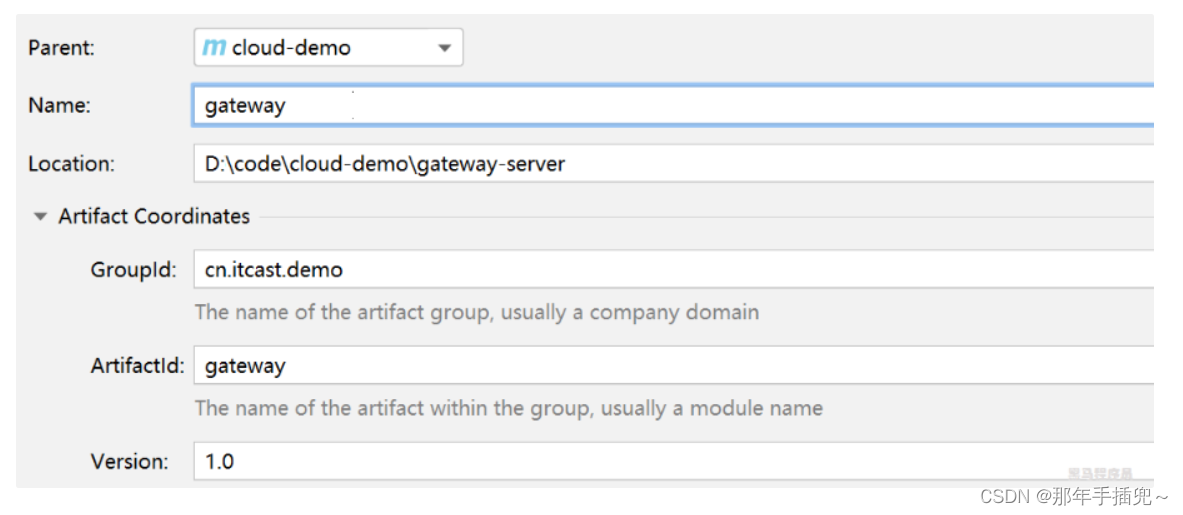
1) Create gateway service and introduce dependencies
Create service:
Introduce dependencies:
<!--Gateway-->
<dependency>
    <groupId>org.springframework.cloud</groupId>
    <artifactId>spring-cloud-starter-gateway</artifactId>
</dependency>
2) Write startup class
package cn.itcast.gateway;

import org.springframework.boot.SpringApplication;
import org.springframework.boot.autoconfigure.SpringBootApplication;

@SpringBootApplication
public class GatewayApplication {

	public static void main(String[] args) {
		SpringApplication.run(GatewayApplication.class, args);
	}
}
3) Write basic configuration and routing rules
Create application.yml file with the following content:
server:
  port: 10010 # Gateway port
spring:
  application:
    name: gateway # Service name
  cloud:
    nacos:
      server-addr: localhost:8848 # nacos address
    gateway:
      routes: # Gateway routing configuration
        - id: user-service # Routing id, customized, as long as it is unique
          # uri: http://127.0.0.1:8081 # The destination address of routing http is a fixed address
          uri: lb://userservice # The destination address of the route lb is load balancing, followed by the service name
          predicates: # Routing assertion, that is, determining whether the request meets the conditions of routing rules
            - Path=/user/** # This is based on path matching. As long as it starts with /user/, it meets the requirements.
We will Pathproxy all requests that meet the rules to urithe address specified by the parameter.
In this example, we proxy /user/**the initial request to lb://userservicelb which is load balancing, and pulls the service list based on the service name to achieve load balancing.
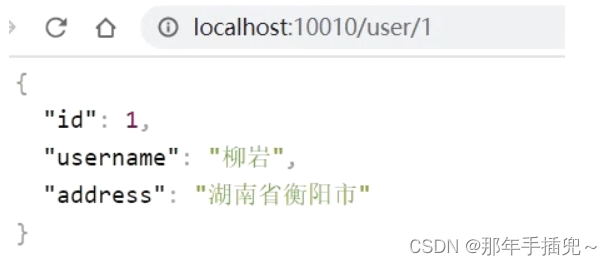
4) Restart the test
Restart the gateway and access http://localhost:10010/user/1 , which complies with /user/**the rules. The request is forwarded to uri: http://userservice/user/1 and the result is obtained:
5) Flow chart of gateway routing
The entire visit process is as follows:
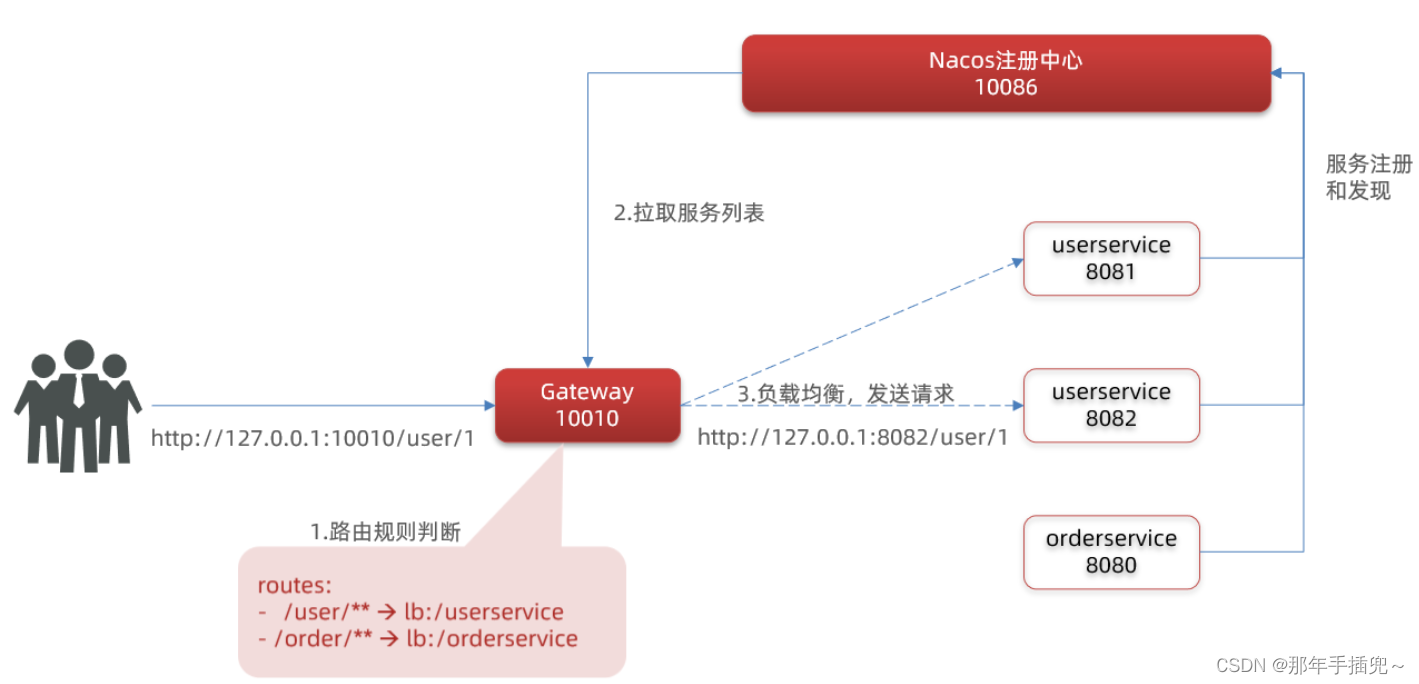
Summarize:
Gateway construction steps:
-
Create a project and introduce nacos service discovery and gateway dependencies
-
Configure application.yml, including basic service information, nacos address, and routing
Routing configuration includes:
-
Route id: the unique identifier of the route
-
Routing target (uri): the target address of the route, http represents a fixed address, and lb represents load balancing based on the service name
-
Routing assertions (predicates): rules for determining routing,
-
Routing filters: Process requests or responses
Next, focus on learning the detailed knowledge of routing assertions and routing filters.
3.3. Assertion factory
The assertion rules we wrote in the configuration file are just strings. These strings will be read and processed by the Predicate Factory and turned into conditions for routing judgments.
For example, Path=/user/** is matched according to the path. This rule is composed of
org.springframework.cloud.gateway.handler.predicate.PathRoutePredicateFactoryClass comes
For processing, there are more than a dozen assertion factories like this one in SpringCloudGateway:
| name | illustrate | Example |
|---|---|---|
| After | It is a request after a certain point in time | - After=2037-01-20T17:42:47.789-07:00[America/Denver] |
| Before | It is a request before a certain point in time | - Before=2031-04-13T15:14:47.433+08:00[Asia/Shanghai] |
| Between | It is a request before a certain two points in time. | - Between=2037-01-20T17:42:47.789-07:00[America/Denver], 2037-01-21T17:42:47.789-07:00[America/Denver] |
| Cookie | The request must contain certain cookies | - Cookie=chocolate, ch.p |
| Header | The request must contain certain headers | - Header=X-Request-Id, \d+ |
| Host | The request must be to access a certain host (domain name) | - Host=.somehost.org,.anotherhost.org |
| Method | The request method must be the specified method | - Method=GET,POST |
| Path | The request path must comply with the specified rules | - Path=/red/{segment},/blue/** |
| Query | The request parameters must contain the specified parameters | - Query=name, Jack or - Query=name |
| RemoteAddr | The requester's IP must be in the specified range | - RemoteAddr=192.168.1.1/24 |
| Weight | Weight processing |
We only need to master the routing engineering of Path.
3.4. Filter factory
GatewayFilter is a filter provided in the gateway, which can process requests entering the gateway and responses returned by microservices:
3.4.1. Types of routing filters
Spring provides 31 different route filter factories. For example:
| name | illustrate |
|---|---|
| AddRequestHeader | Add a request header to the current request |
| RemoveRequestHeader | Remove a request header from the request |
| AddResponseHeader | Add a response header to the response result |
| RemoveResponseHeader | Removes a response header from the response result |
| RequestRateLimiter | Limit requested traffic |
3.4.2. Request header filter
Let's take AddRequestHeader as an example to explain.
Requirement : Add a request header to all requests entering userservice: Truth=itcast is freaking awesome!
You only need to modify the application.yml file of the gateway service and add route filtering:
spring:
  cloud:
    gateway:
      routes:
      - id: user-service
        uri: lb://userservice
        predicates:
        - Path=/user/**
        filters: # filter
        - AddRequestHeader=Truth, Itcast is freaking awesome! # Add request header
当前过滤器写在userservice路由下,因此仅仅对访问userservice的请求有效。
3.4.3.默认过滤器
如果要对所有的路由都生效,则可以将过滤器工厂写到default下。格式如下:
spring:
  cloud:
    gateway:
      routes:
      - id: user-service
        uri: lb://userservice
        predicates:
        - Path=/user/**
      default-filters: # 默认过滤项
      - AddRequestHeader=Truth, Itcast is freaking awesome!
3.4.4.总结
过滤器的作用是什么?
① 对路由的请求或响应做加工处理,比如添加请求头
② 配置在路由下的过滤器只对当前路由的请求生效
defaultFilters的作用是什么?
① 对所有路由都生效的过滤器
3.5.全局过滤器
上一节学习的过滤器,网关提供了31种,但每一种过滤器的作用都是固定的。如果我们希望拦截请求,做自己的业务逻辑则没办法实现。
3.5.1.全局过滤器作用
全局过滤器的作用也是处理一切进入网关的请求和微服务响应,与GatewayFilter的作用一样。区别在于GatewayFilter通过配置定义,处理逻辑是固定的;而GlobalFilter的逻辑需要自己写代码实现。
定义方式是实现GlobalFilter接口。
public interface GlobalFilter {
    /**
     *  处理当前请求,有必要的话通过{@link GatewayFilterChain}将请求交给下一个过滤器处理
     *
     * @param exchange 请求上下文,里面可以获取Request、Response等信息
     * @param chain 用来把请求委托给下一个过滤器
     * @return {@code Mono<Void>} 返回标示当前过滤器业务结束
     */
    Mono<Void> filter(ServerWebExchange exchange, GatewayFilterChain chain);
}
在filter中编写自定义逻辑,可以实现下列功能:
-
登录状态判断
-
权限校验
-
请求限流等
3.5.2.自定义全局过滤器
需求:定义全局过滤器,拦截请求,判断请求的参数是否满足下面条件:
-
参数中是否有authorization,
-
authorization参数值是否为admin
如果同时满足则放行,否则拦截
实现:
在gateway中定义一个过滤器:
package cn.itcast.gateway.filters;

import org.springframework.cloud.gateway.filter.GatewayFilterChain;
import org.springframework.cloud.gateway.filter.GlobalFilter;
import org.springframework.core.annotation.Order;
import org.springframework.http.HttpStatus;
import org.springframework.stereotype.Component;
import org.springframework.web.server.ServerWebExchange;
import reactor.core.publisher.Mono;

@Order(-1)
@Component
public class AuthorizeFilter implements GlobalFilter {
    @Override
    public Mono<Void> filter(ServerWebExchange exchange, GatewayFilterChain chain) {
        // 1.获取请求参数
        MultiValueMap<String, String> params = exchange.getRequest().getQueryParams();
        // 2.获取authorization参数
        String auth = params.getFirst("authorization");
        // 3.校验
        if ("admin".equals(auth)) {
            // 放行
            return chain.filter(exchange);
        }
        // 4.拦截
        // 4.1.禁止访问,设置状态码
        exchange.getResponse().setStatusCode(HttpStatus.FORBIDDEN);
        // 4.2.结束处理
        return exchange.getResponse().setComplete();
    }
}
3.5.3.过滤器执行顺序
请求进入网关会碰到三类过滤器:当前路由的过滤器、DefaultFilter、GlobalFilter
请求路由后,会将当前路由过滤器和DefaultFilter、GlobalFilter,合并到一个过滤器链(集合)中,排序后依次执行每个过滤器:

排序的规则是什么呢?
-
每一个过滤器都必须指定一个int类型的order值,order值越小,优先级越高,执行顺序越靠前。
-
GlobalFilter通过实现Ordered接口,或者添加@Order注解来指定order值,由我们自己指定
-
路由过滤器和defaultFilter的order由Spring指定,默认是按照声明顺序从1递增。
-
当过滤器的order值一样时,会按照 defaultFilter > 路由过滤器 > GlobalFilter的顺序执行。
详细内容,可以查看源码:
org.springframework.cloud.gateway.route.RouteDefinitionRouteLocator#getFilters()方法是先加载defaultFilters,然后再加载某个route的filters,然后合并。
org.springframework.cloud.gateway.handler.FilteringWebHandler#handle()方法会加载全局过滤器,与前面的过滤器合并后根据order排序,组织过滤器链
3.6.跨域问题
3.6.1.什么是跨域问题
跨域:域名不一致就是跨域,主要包括:
-
域名不同: www.taobao.com 和 www.taobao.org 和 www.jd.com 和 miaosha.jd.com
-
域名相同,端口不同:localhost:8080和localhost8081
跨域问题:浏览器禁止请求的发起者与服务端发生跨域ajax请求,请求被浏览器拦截的问题
解决方案:CORS,这个以前应该学习过,这里不再赘述了。不知道的小伙伴可以查看跨域资源共享 CORS 详解 - 阮一峰的网络日志
3.6.2.模拟跨域问题
找到课前资料的页面文件:
放入tomcat或者nginx这样的web服务器中,启动并访问。
从localhost:8090访问localhost:10010,端口不同,显然是跨域的请求。
3.6.3.解决跨域问题
在gateway服务的application.yml文件中,添加下面的配置:
spring:
  cloud:
    gateway:
      # 。。。
      globalcors: # 全局的跨域处理
        add-to-simple-url-handler-mapping: true # Solve the problem of intercepted options requests
        corsConfigurations:
          '[/**]':
            allowedOrigins: # Which websites are allowed cross-domain requests?
              - "http://localhost:8090"
            allowedMethods: # Allowed cross-domain ajax request methods
              - "GET"
              - "POST"
              - "DELETE"
              - "PUT"
              - "OPTIONS"
            allowedHeaders: "*" # Header information allowed to be carried in the request
            allowCredentials: true # Whether to allow cookies to be carried
            maxAge: 360000 # The validity period of this cross-domain detection