As an introduction, this article is translated from https://www.html5rocks.com/en/tutorials/webrtc/basics/ . It is an introduction to WebRTC theory. I feel that it is an article that explains webrtc more clearly and clearly. It will be easier to learn the SDK based on operating system transplantation in the future.
WebRTC is a new front in the long war for an open and unencumbered web.——Brendan Eich, inventor of JavaScript
Real-time messaging without plug-ins
Imagine a world where your phone, TV, and computer can communicate on a common platform. Imagine it becomes easier to add video chat and peer-to-peer data sharing to your web applications. This is the vision of WebRTC.
Want to give it a try? WebRTC is available on desktop and mobile devices in Google Chrome, Safari, Firefox, and Opera. A good place to start is the simple video chat application at appr.tc :
- Open appr.tc in your browser .
- Click Join to join the chat room and let the app use your webcam.
- Open the URL shown at the end of the page in a new tab, or preferably on another computer.
Quick start
- If you haven't used the getUserMedia API yet, take a look at Capture audio and video in HTML5 and simpl.info getUserMedia .
- To understand the RTCPeerConnection API, see this following example and simpl.info RTCPeerConnection .
- To understand how WebRTC uses the server for signaling as well as firewall and NAT traversal, see this example of the control print log in appr.tc .
- Can’t wait to try WebRTC now? Try the 20+ demos that demonstrate the WebRTC JavaScript API.
- Are you having trouble launching WebRTC on your machine? Visit here for the WebRTC Troubleshooter .
Plus, head straight into the WebRTC codelab , a step-by-step guide on how to build a complete video chat application, including a simple signaling server.
A brief history of WebRTC
The last major challenge in networking is enabling human-to-human communication via voice and video: real-time communications, or RTC for short. In web applications, RTC should be as natural as entering text in a text input. Without it, your ability to innovate and develop new ways of interacting with people will be limited. Historically, RTC has been collaborative and complex, requiring expensive audio and video technology to be licensed or developed in-house. Integrating RTC technology with existing content, data and services is difficult and time-consuming, especially on the Web.
Gmail video chat became popular in 2008, and in 2011 Google introduced Hangouts, which used Talk (like Gmail). Google acquired GIPS, a company that develops many of the components needed for RTC, such as codecs and echo cancellation technology. Google open sourced the technology developed by GIPS and worked with relevant standards bodies at the Internet Engineering Task Force (IETF) and World Wide Web Consortium (W3C) to ensure industry consensus. In May 2011, Ericsson built the first implementation of WebRTC.
WebRTC implements an open standard for real-time, plug-in-free video, audio, and data communications. This is what happened in the past:
- Many web services use RTC but require downloads, native applications or plug-ins. These include Skype, Facebook and Hangouts.
- Downloading, installing, and updating plugins is complex, error-prone, and annoying.
- Plugins are difficult to deploy, debug, troubleshoot, test, and maintain, and may require licensing and integration with complex, expensive technology. Convincing people to install a plugin in the first place is often difficult!
The guiding principle of the WebRTC project is that its API should be open source, free, standardized, built into web browsers, and more efficient than existing technologies.
Where are we now?
WebRTC is used in various applications such as Google Meet. WebRTC is also integrated with WebKitGTK+ and Qt native applications.
WebRTC implements the following three sets of APIs:
MediaStream(can also be calledgetUserMedia)RTCPeerConnectionRTCDataChannel
These APIs are defined in the following two specifications:
All three APIs are supported in Chrome, Safari, Firefox, Edge, and Opera on mobile devices and desktops.
getUserMedia: For demos and code, see the WebRTC samples or try Chris Wilson's amazing examples that use getUserMedia as input for Web Audio.
RTCPeerConnection: For a simple demo and a fully functional video chat application, check out the WebRTC samples Peer connection and appr.tc. These examples use adapter.js , a JavaScript shim maintained by Google with help from the WebRTC community , a library needed to abstract the differences between browsers.
RTCDataChannel: To see it in action, check out the WebRTC samples to check out one of the data channel demos.
The WebRTC codelab / WebRTC codelab shows how to use all three APIs to build simple applications for video chat and file sharing.
The first WebRTC
A few things a WebRTC application needs to do:
- Get streaming audio, video or other data.
- Network information, such as IP address and port, is obtained and exchanged with other WebRTC clients (called peers) to enable connections, even through NATs and firewalls.
- Coordinates signaling communications to report errors and start or close sessions.
- Exchange information about media and client capabilities, such as resolution and codecs.
- Exchange audio streams, video streams or data streams.
To obtain and deliver streaming data, WebRTC implements the following APIs:
MediaStreamCan access data streams, such as those from the user's camera and microphone.RTCPeerConnectionEnable audio or video calls with encryption and bandwidth management.RTCDataChannelEnables peer-to-peer communication of common data.
(More on the networking and signaling aspects of WebRTC later.)
MediaStream API (often also called getUserMedia API)
MediaStream The API represents synchronous streaming of media. For example, streams taken from camera and microphone inputs have synchronized video and audio tracks. (Don't confuse MediaStreamTrack with the <track> element, which is an entirely different thing.) Probably the easiest way to understand the MediaStream API is to see it in use:
- In your browser, navigate to WebRTC samples
getUserMedia. - F12 opens the console
- Global scope, check
streamvariables.
Each MediaStream has an input (possibly the MediaStream generated by getUserMedia()) and an output (possibly passed to a video element or RTCPeerConnection). Each MediaStream has a label, such as 'Xk7EuLhsuHKbnjLWkW4yYGNJJ8ONsgwHBvLQ'. The getAudioTracks and getVideoTracks methods return arrays of MediaStreamTracks.
For the getUserMedia example, stream.getAudioTracks returns an empty array (because there is no audio), and assuming a functioning webcam is connected, stream.getVideoTracks returns a MediaStreamTrack array that represents the stream from the webcam. Each MediaStreamTrack has a type ("Video" or "Audio"), a label (such as "FaceTime HD Camera"), and represents one or more audio or video channels. In the current example case, there is only one video track and no audio, but it is easy to think of use cases for multiple tracks, such as chat applications that get video streams from front camera, rear camera, microphone, and share their screen app.
A MediaStream can be attached to a video element by setting the srcObject attribute attribute. This was previously done by setting the src attribute to the object URL created using URL.createObjectURL, but this is no longer recommended.
MediaStreamTrack is actively using the camera, which is consuming resources and keeping the camera open and the camera lit. When you are no longer using the track, make sure to call track.stop so you can turn off the camera.
getUserMedia can also be used as an input node to the Web Audio API :
// Cope with browser differences.
let audioContext;
if (typeof AudioContext === 'function') {
  audioContext = new AudioContext();
} else if (typeof webkitAudioContext === 'function') {
  audioContext = new webkitAudioContext(); // eslint-disable-line new-cap
} else {
  console.log('Sorry! Web Audio not supported.');
}

// Create a filter node.
var filterNode = audioContext.createBiquadFilter();
// See https://dvcs.w3.org/hg/audio/raw-file/tip/webaudio/specification.html#BiquadFilterNode-section
filterNode.type = 'highpass';
// Cutoff frequency. For highpass, audio is attenuated below this frequency.
filterNode.frequency.value = 10000;

// Create a gain node to change audio volume.
var gainNode = audioContext.createGain();
// Default is 1 (no change). Less than 1 means audio is attenuated
// and vice versa.
gainNode.gain.value = 0.5;

navigator.mediaDevices.getUserMedia({audio: true}, (stream) => {
  // Create an AudioNode from the stream.
  const mediaStreamSource =
    audioContext.createMediaStreamSource(stream);
  mediaStreamSource.connect(filterNode);
  filterNode.connect(gainNode);
  // Connect the gain node to the destination. For example, play the sound.
  gainNode.connect(audioContext.destination);
});
Chromium-based apps and extensions can also incorporate getUserMedia. After adding audioCapture and/or videoCapture permissions in the manifest, permissions are requested and granted only once during installation. Thereafter there is no need to ask the user for permission to access the camera or microphone. Only need to grant permission once to getUserMedia(). The first time, an "Allow" button will appear in the browser's information bar. Chrome deprecated HTTP access to getUserMedia() in late 2015 because it was classified as a powerful feature. The purpose may be to enable MediaStream for any streaming data source, not just cameras or microphones. This will enable streaming from stored data or arbitrary data sources such as sensors or other inputs.
getUserMedia() really comes to life when combined with other JavaScript APIs and libraries:
- Webcam Toy is a photo booth application that uses WebGL to add weird and wonderful effects to photos that can be shared or saved locally.
- FaceKat is a face tracking game built using headtrackr.js .
- ASCII Camera uses the Canvas API to generate ASCII images.
Restrictions
Constraints constraints can be used to set the value of the video resolution for getUserMedia. This also allows support for other constraints such as aspect ratio; facing mode (front or rear camera); frame rate, height and width; and applyConstraintsmethods. For an example, see WebRTC examples : select resolution . getUserMedia
Pitfall reminder: getUserMedia constraints may affect the available configuration of shared resources. For example, if you open the camera in 640 x 480 mode via one page tab, another page tab won't be able to use constraints to open it in high-resolution mode because it can only open in one mode. Note that this is an implementation detail. It would be possible to have the second tab reopen the camera in high-resolution mode and use video processing to shrink the first tab's video track to 640 x 480, but this is not yet implemented.
A DOMException or OverconstrainedError will be given if the requested resolution is not available, or if disallowed constraint values are set. To see it in action, see WebRTC samples getUserMedia: select resolution
Screen and tab capture
Chrome apps can also share live video of a single browser tab or the entire desktop via the chrome.tabCapture and chrome.desktopCapture APIs. (For a demo and more information, see Using Screensharing with WebRTC . The article is a few years old, but still interesting.)
Using the experimental chromeMediaSource constraint, it is also possible to use screenshots as a MediaStream source in Chrome. Please note that screen capture requires HTTPS and should only be used for development as it is enabled via the command line flags described in this article.
Signaling: session control, network and media information
WebRTC uses RTCPeerConnection to communicate streaming data between browsers (also called peers), but it also requires a mechanism to coordinate the communication and send control messages, a process called signaling. WebRTC does not specify signaling methods and protocols. Signaling is not part of the RTCPeerConnection API. Instead, WebRTC application developers can choose any messaging protocol they like, such as SIP or XMPP, and any appropriate full-duplex (bidirectional) channel for signaling communications. The appr.tc example uses XHR and Channel API as signaling mechanisms. codelab / codelab uses Socket.io running on a Node server .
Signaling is used to exchange three types of information:
- Session control messages: Initialize or close communication and report errors.
- Network Configuration: What is your computer's IP address and port to the outside world?
- Multimedia feature configuration: What codecs and resolutions can your browser and the browser it is communicating with handle?
Before peer-to-peer streaming can begin, the exchange of information via signaling must complete successfully. For example, suppose Alice wants to communicate with Bob. Here is a code example from the W3C WebRTC spec that shows the signaling process in action. This code assumes that there is some signaling mechanism created in the createSignalingChannel method.
// handles JSON.stringify/parse
const signaling = new SignalingChannel();
const constraints = {audio: true, video: true};
const configuration = {iceServers: [{urls: 'stuns:stun.example.org'}]};
const pc = new RTCPeerConnection(configuration);

// Send any ice candidates to the other peer.
pc.onicecandidate = ({candidate}) => signaling.send({candidate});

// Let the "negotiationneeded" event trigger offer generation.
pc.onnegotiationneeded = async () => {
  try {
    await pc.setLocalDescription(await pc.createOffer());
    // Send the offer to the other peer.
    signaling.send({desc: pc.localDescription});
  } catch (err) {
    console.error(err);
  }
};

// Once remote track media arrives, show it in remote video element.
pc.ontrack = (event) => {
  // Don't set srcObject again if it is already set.
  if (remoteView.srcObject) return;
  remoteView.srcObject = event.streams[0];
};

// Call start() to initiate.
async function start() {
  try {
    // Get local stream, show it in self-view, and add it to be sent.
    const stream =
      await navigator.mediaDevices.getUserMedia(constraints);
    stream.getTracks().forEach((track) =>
      pc.addTrack(track, stream));
    selfView.srcObject = stream;
  } catch (err) {
    console.error(err);
  }
}

signaling.onmessage = async ({desc, candidate}) => {
  try {
    if (desc) {
      // If you get an offer, you need to reply with an answer.
      if (desc.type === 'offer') {
        await pc.setRemoteDescription(desc);
        const stream =
          await navigator.mediaDevices.getUserMedia(constraints);
        stream.getTracks().forEach((track) =>
          pc.addTrack(track, stream));
        await pc.setLocalDescription(await pc.createAnswer());
        signaling.send({desc: pc.localDescription});
      } else if (desc.type === 'answer') {
        await pc.setRemoteDescription(desc);
      } else {
        console.log('Unsupported SDP type.');
      }
    } else if (candidate) {
      await pc.addIceCandidate(candidate);
    }
  } catch (err) {
    console.error(err);
  }
};
First, Alice and Bob exchange network information. ( Finding candidates refers to the process of finding network interfaces and ports using the ICE framework .)
- Alice creates an RTCPeerConnection object and adds an onicecandidate handler that calls back when a network candidate is available.
- Alice sends the serialized candidate data to Bob, via whatever signaling channel was used previously (e.g. WebSocket or some other mechanism)
- When Bob gets the candidate message from Alice, he calls addIceCandidate to add the candidate information to the remote peer description (setRemoteDescription) in his own RTCPeerConnection object.
WebRTC clients (also called peers in this example, or Alice and Bob) also need to determine and exchange local and remote audio and video media information, such as resolution and codec capabilities. The exchange of media configuration information is signaled by exchanging offers and answers using the Session Description Protocol (SDP) :
- Alice Alice executes
RTCPeerConnectioncreateOffer()the method. The object returned by the method is passed to RTCSessionDescription - Alice's local session description. - In the callback, Alice sets the local description using setLocalDescription and then sends this session description to Bob through its signaling channel. Note that RTCPeerConnection does not start collecting candidates until setLocalDescription is called. This is codified in the JSEP IETF draft .
- Bob uses setRemoteDescription to set the description sent to him by Alice as the remote description.
- Bob executes
RTCPeerConnectioncreateAnswer()the method, passing it the remote description he got from Alice (RTCPeerConnection) so that a local session compatible with her can be generated.createAnswer()The callback returnsRTCSessionDescriptionthe object, Bob sets it to the local description and sends it to Alice. - When Alice gets Bob's session description, she sets it to the remote description using setRemoteDescription.
- Ping!
Tip: Make sure to call close() after the RTCPeerConnection is no longer in use to allow the RTCPeerConnection to be garbage collected. Otherwise, the thread and connection will remain active. Possible leak of massive resources in WebRTC!
RTCSessionDescription is an object conforming to the SDP session description protocol. After serialization, the SDP descriptor looks roughly like this:
v=0
o=- 3883943731 1 IN IP4 127.0.0.1
s=
t=0 0
a=group:BUNDLE audio video
m=audio 1 RTP/SAVPF 103 104 0 8 106 105 13 126
// ...
a=ssrc:2223794119 label:H4fjnMzxy3dPIgQ7HxuCTLb4wLLLeRHnFxh810
The acquisition and exchange of network and media information can occur simultaneously, but both processes must be completed before audio and video streaming between peers can begin.
The offer/answer architecture described previously is called the JavaScript Session Establishment Protocol, or JSEP. (There's an excellent animated Ericsson's demo video explaining the signaling and streaming process in this demo video of Ericsson's first WebRTC implementation.)

Once the signaling process has completed successfully, data can be streamed directly point-to-point between the caller and callee - or, failing that, through an intermediate relay server (more on this later). Streaming is the main work of RTCPeerConnection.
RTCPeerConnection
RTCPeerConnection is a WebRTC component used to handle stable and efficient communication of streaming data between peers. Below is the WebRTC architecture diagram showing the role of RTCPeerConnection. You'll notice that the green part is complicated!
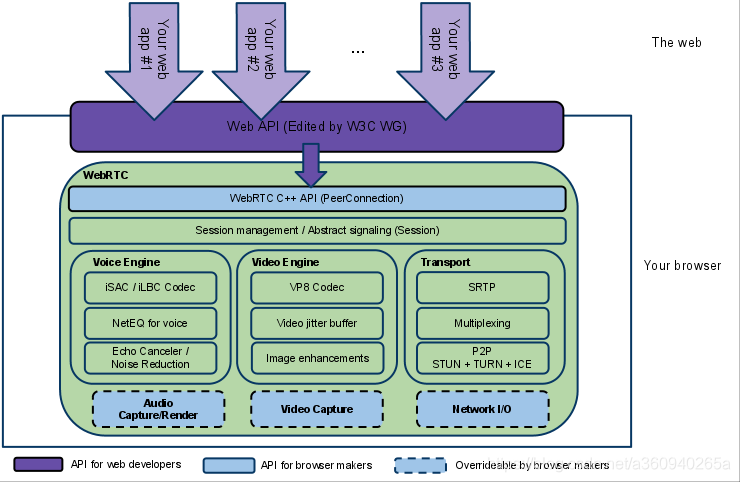
From a JavaScript perspective, the main thing that can be understood from this diagram is that RTCPeerConnection saves web developers from potentially all kinds of complex issues.
A lot of work goes into the codecs and protocols used by WebRTC to enable real-time communication even over unreliable networks:
- Hide packet loss
- echo cancellation
- bandwidth adaptability
- Dynamic jitter buffering
- automatic gain control
- Noise reduction suppression
- Image cleaning
The previous W3C code showed a simplified example of WebRTC from a signaling perspective, and below is a walkthrough of two working WebRTC applications. The first is a simple example demonstrating RTCPeerConnection, the second is a full-featured video chat client.
RTCPeerConnection without servers
The following code is taken from WebRTC samples Peer connection and has local and remote RTCPeerConnection (and local and remote video) on the same web page. This isn't very useful in reality - the caller and callee are on the same page, but it does make it clearer how the RTCPeerConnection API works, since the RTCPeerConnection objects on the page can exchange data and messages directly without having to use an intermediary. Order mechanism. In this example, pc1 represents the local peer (the calling party) and pc2 represents the remote peer (the called party).
1. Create a new one RTCPeerConnection and getUserMedia add multimedia streams from Get
// Servers is an optional configuration file. (See TURN and STUN discussion later.)
pc1 = new RTCPeerConnection(servers);
// ...
localStream.getTracks().forEach((track) => {
  pc1.addTrack(track, localStream);
});
2. Create an offer and set it to the local description of pc1 and the remote description of pc2. This can be done directly in code without using signaling since both caller and callee are on the same page:
pc1.setLocalDescription(desc).then(() => {
      onSetLocalSuccess(pc1);
    },
    onSetSessionDescriptionError
  );
  trace('pc2 setRemoteDescription start');
  pc2.setRemoteDescription(desc).then(() => {
      onSetRemoteSuccess(pc2);
    },
    onSetSessionDescriptionError
  );
3. Create pc2, and after adding the stream from pc1, display it in the video element:
pc2 = new RTCPeerConnection(servers);
pc2.ontrack = gotRemoteStream;
//...
function gotRemoteStream(e){
  vid2.srcObject = e.stream;
}
RTCPeerConnection API plus servers
In the real world, WebRTC requires a server (no matter how simple), so the following can happen:
- Users discover and exchange real-world details with each other, such as names.
- WebRTC client applications (peer-to-peer) exchange network information.
- Peers exchange data about the media, such as video format and resolution.
- WebRTC client applications penetrate NAT gateways and firewalls.
In other words, WebRTC requires four types of server-side functionality:
- User discovery and communication
- Send signal
- NAT / firewall penetration
- Relay servers and forwarding servers for failed attempts when peer-to-peer communication fails
NAT traversal, end-to-end peer-to-peer networking, and the requirements for building server applications for user discovery and signaling are outside the scope of this article. It can be said that the ICE framework uses the STUN protocol and its extension TURN to enable RTCPeerConnection to cope with NAT traversal and other network issues. ICE is a framework for connecting peers, such as two video chat clients. Initially, ICE attempts to connect peers directly via UDP with the shortest possible latency. During this process, the STUN server has only one task: to enable peers behind the NAT to find its public address and port. For more information about STUN and TURN, see Build the backend services needed for a WebRTC app .

If UDP fails, ICE tries to use TCP. If the direct connection fails - especially due to enterprise NAT traversal and firewalls - ICE uses intermediate (relay) TURN servers. In other words, ICE first uses STUN with UDP to connect the peer directly, and then, if that fails, falls back to a TURN relay relay server. Finding candidates refers to the process of finding network interfaces and ports.

WebRTC engineer Justin Uberti provided more information about ICE, STUN, and TURN in the 2013 Google I/O WebRTC presentation . (The presentation slides provide examples of TURN and STUN server implementations.)
The video chat demo on appr.tc is a great place to try out WebRTC (using a STUN server for signaling and NAT/firewall traversal). The application uses adapter.js to isolate application specification changes and prefix differences. The code is deliberately verbose in its documentation. Check the console for the sequence of events. Below is a detailed walkthrough of the code.
If you find this a bit baffling, you might prefer (my translation of) WebRTC codelab /(original link) WebRTC codelab .
This step-by-step guide shows how to build a complete video chat application, including a simple signaling server running on a node server.
Network topology
WebRTC as currently implemented only supports one-to-one communication, but can be used in more complex network scenarios, such as with multiple peers, each communicating directly with each other or via a Multipoint Control Unit for short . MCU – A server that can handle large numbers of participants and perform selective stream forwarding and audio and video mixing or recording.

Many existing WebRTC applications only demonstrate communication between web browsers, but a gateway server enables WebRTC applications running on browsers to interact with devices, such as phones (also known as PSTN) and VOIP systems. In May 2012, Doangbango Telecom open sourced a sipml5 SIP client built using WebRTC and WebSocket, which (among other potential uses) allows video calls between browsers and apps running on iOS and Android. At Google I/O, Tethr and Tropo demonstrated in a briefcase a disaster communications framework that uses OpenBTS units to enable communication between feature phones and computers over WebRTC. No carrier phone communication! (Original text: a framework for disaster communications in a briefcase using an OpenBTS cell to enable communications between feature phones and computers through WebRTC.)
RTCDataChannel API
In addition to audio and video, WebRTC also supports real-time communication of other types of data. The RTCDataChannel API enables low-latency and high-throughput peer-to-peer exchange of arbitrary data. For a single-page demonstration, and to learn how to build a simple file transfer application, see the WebRTC samples and WebRTC codelab respectively . There are many potential use cases for this API, including:
- game
- remote desktop application
- Live text chat
- file transfer
- decentralized network
The API has several features to fully leverage RTCPeerConnection and enable powerful and flexible peer-to-peer communication:
- Using RTCPeerConnection for session settings
- Multiple simultaneous channels with priority
- Reliable and unreliable delivery semantics
- Built-in security (DTLS) and congestion control
- Ability to work with or without audio or video
The syntax is intentionally designed to be similar to WebSocket, with a send method and message events:
const localConnection = new RTCPeerConnection(servers);
const remoteConnection = new RTCPeerConnection(servers);
const sendChannel = localConnection.createDataChannel('sendDataChannel');

remoteConnection.ondatachannel = (event) => {
  receiveChannel = event.channel;
  receiveChannel.onmessage = onReceiveMessage;
  receiveChannel.onopen = onReceiveChannelStateChange;
  receiveChannel.onclose = onReceiveChannelStateChange;
};

function onReceiveMessage(event) {
  document.querySelector("textarea#send").value = event.data;
}

document.querySelector("button#send").onclick = () => {
  var data = document.querySelector("textarea#send").value;
  sendChannel.send(data);
};
Communication is directly between browsers, so RTCDataChannel can be much faster than WebSocket even if a relay (TURN) server is required when hole punching firewalls and NAT fails. RTCDataChannel is available in Chrome, Safari, Firefox, Opera and Samsung Internet. Cube Slam game uses API to communicate game state. Play as a friend or play as a bear! File sharing supported by Sharefest, an innovative platform for sharing via RTCDataChannel and peerCDN, makes it clear at a glance how WebRTC enables peer-to-peer content distribution. For more information about RTCDataChannel, check out the IETF's draft protocol spec
safety
Real-time communication applications or plug-ins can compromise security in several ways. For example:
- Unencrypted media or data can be intercepted between browsers or between browsers and servers.
- Apps may record and distribute video or audio without the user's knowledge.
- Malware or viruses may be installed along with apparently harmless plug-ins or applications.
WebRTC has several features to avoid these problems:
- WebRTC implementation uses secure protocols such as DTLS and SRTP .
- Encryption is required for all WebRTC components, including signaling mechanisms.
- WebRTC is not a plug-in. Its components run within the browser sandbox rather than in separate processes. Components do not need to be installed separately and can be updated simply by updating your browser.
- Access to the camera and microphone must be explicitly granted, and the user interface clearly shows this when the camera or microphone is running.
A complete discussion of streaming security is beyond the scope of this article. For more information, see the IETF's proposed WebRTC Security Architecture .
Developer tools Developer tools
WebRTC statistics for ongoing sessions can be found at (enter the following url in the blank tab):
- chrome://webrtc-internals in Chrome
- opera://webrtc-internals in Opera
- about:webrtc in Firefox
Get more Learn more
- Justin Uberti's WebRTC session at Google I/O 2012
- Alan B. Johnston and Daniel C. Burnett maintain a WebRTC book now in its third edition in print and eBook formats at webrtcbook.com.
- webrtc.org is home to all things WebRTC, including demos, documentation, and discussion.
- discuss-webrtc is a Google Group for technical WebRTC discussion.
- @webrtc
- Google Developers Talk documentation provides more information about NAT traversal, STUN, relay servers, and candidate gathering.
- WebRTC on GitHub
- Stack Overflow is a good place to look for answers and ask questions about WebRTC.
- Native APIs for
RTCPeerConnectionare also available at documentation on webrtc.org.