1. What is the Spring framework and what are its advantages? What is its main function?
Spring framework is an open source Java framework mainly used for developing enterprise-level Java applications. It provides a powerful set of features and tools that make it easier for developers to build efficient, maintainable, and scalable Java applications.
The main advantages of the Spring Framework include:
1. Lightweight : The Spring framework is very lightweight. Its core container only contains a small number of classes and interfaces, and it does not require too many configurations and dependencies. So it's very fast.
2. Dependency injection : The Spring framework manages the relationship between components through dependency injection (DI), reducing the coupling between components.
3. Aspect-oriented programming (AOP) : The Spring framework provides support for aspect-oriented programming, which can separate cross-cutting concerns (such as security, logs, transactions, etc.) from business logic code.
4. Container : The Spring framework provides a container for managing application objects and dependencies, and provides some reusable core components, such as BeanFactory, ApplicationContext, etc. These objects can be Spring Beans, JDBC connections, JMS connections , Servlet, etc.
5. Transaction management : The Spring framework provides support for declarative transaction management, allowing developers to easily manage transactions.
6. Integration : The Spring framework provides integration support with other frameworks, such as integration with Hibernate, MyBatis, Struts and other frameworks.
The main functions of the Spring framework include:
1. Provides a container for managing application objects and dependencies.
2. Provides dependency injection (DI) support for managing dependencies between application components and objects.
3. Provides AOP support to solve cross-cutting concerns in applications.
4. Provides a declarative transaction management mechanism so that developers can manage transactions more easily.
5. Provides MVC framework for building Web applications.
6. Provides a data access framework so that developers can access and operate the database more easily.
7. Provides a caching framework and security framework to improve application performance and security.
2. What are IOC and AOP, and what are their functions?
IOC (Inversion of Control) is one of the core ideas of the Spring framework. It is a design pattern that achieves decoupling and flexibility between objects by handing over object creation and dependency management to the Spring container.
AOP (Aspect Oriented Programming) is an important mechanism provided by the Spring framework. It can separate cross-cutting concerns in applications (such as logs, transactions, security, etc.) from business logic and centrally manage them. .
3. How to use AOP in Spring? What are the commonly used types of sections?
There are two ways to use AOP in Spring: XML configuration and annotation configuration.
When using XML configuration, elements such as aspects, join points, and advice need to be defined.
When using annotation configuration, you need to add corresponding annotations to the class or method.
Such as @Aspect, @Before, @After, @Around, etc.
Commonly used facet types include:
Before: execute notification before method execution
After: execute the notification after the method is executed
AfterReturning: execute the notification after the method returns the result
AfterThrowing: execute the notification after the method throws an exception
Around: Notifications can be executed before and after the method is executed.
4. What is dependency injection (DI) in Spring and what is its role? What are its common injection methods?
Dependency injection (DI) is another core idea of the Spring framework. It is a way of object creation and dependency management through the Spring container.
Through DI, Spring injects dependent objects into another object, thereby achieving decoupling and flexibility between objects.
Commonly used injection methods include:
1. Constructor injection : Inject dependencies through the constructor
2. Setter method injection : Inject dependencies through the Setter method
3. Field injection : Inject dependencies through fields
4. Interface injection : Inject dependencies through interfaces
Among them, constructor injection and Setter method injection are the most commonly used injection methods.
5. What are the core modules in the Spring framework and what do they do?
1. Spring Core : The Spring core module provides IOC (Inversion of Control) and DI (Dependency Injection) support for managing objects and dependencies in applications.
2. Spring AOP : The Spring AOP module provides support for AOP (aspect-oriented programming) to solve cross-cutting concerns in applications.
3. Spring Context : The Spring context module is an extension of the Spring core module, providing BeanFactory functions, and also provides many enterprise-level services, such as JNDI (Java Naming and Directory Interface) access, EJB (Enterprise Java Bean) integration, remote Access and internationalization etc.
4. Spring JDBC : The Spring JDBC module provides support for JDBC (Java Database Connection) and also provides a higher level of abstraction, making it easier for developers to access and operate the database.
5. Spring ORM : The Spring ORM module provides support for ORM (Object Relational Mapping) frameworks, such as Mybatis, Hibernate, JPA (Java Persistence API), etc.
6. Spring Web : The Spring Web module provides various features and tools needed to build Web applications, such as MVC (Model-View-Controller) framework, RESTful Web services, WebSocket and Servlet, etc.
7. Spring Test : The Spring Test module provides support for unit testing and integration testing, such as JUnit and TestNG.
These core modules provide the basic functions and features of the Spring framework, making it easier for developers to build efficient, maintainable and scalable Java applications.
6. Are singleton beans in Spring thread-safe? What are Beans in Spring and how to define Beans?
Yes, singleton beans in Spring are thread-safe.
Because a singleton bean in Spring is created when the application starts and only one instance exists during the entire application life cycle, it is thread-safe.
This is because all threads share the same instance, so there is no chance of multiple threads trying to access or modify different instances at the same time. This makes singleton beans ideal for use in multi-threaded environments.
However, if the singleton Bean contains mutable state, such as instance variables, thread safety issues still need to be considered when used in a multi-threaded environment.
Synchronization mechanisms such as synchronized can be used to ensure the thread safety of the mutable state inside the singleton Bean.
In addition, Spring also provides some thread-safe collection classes, such as ConcurrentMap and ConcurrentHashMap, which can also be used to ensure the thread safety of mutable state in singleton beans.
What are beans?
In Spring, a Bean is an object managed by the Spring container. Bean is one of the most basic components in Spring. It can be any Java object, including POJO (Plain Old Java Object), services, data sources, etc.
How to define Bean?
In Spring, beans can be defined through XML configuration files or Java annotations. Taking the XML configuration file as an example, you can use elements to define a Bean, and you need to specify the id and class attributes of the Bean, for example:
<bean id="userService" class="com.example.UserService"/>
This configuration means creating a Bean with the id userService and the type com.example.UserService.
7. What design patterns are there in Spring?
Singleton mode: Spring's beans are singleton mode by default, that is, a Bean object will only be created once and shared throughout the application. This approach can improve performance and resource utilization.
Factory pattern: Spring uses the factory pattern to create and manage Bean objects, that is, through containers such as BeanFactory or ApplicationContext to create and manage Bean objects. This approach can decouple the creation and management of objects and enable flexible configuration and management of objects.
Proxy pattern : Spring uses the proxy pattern to implement AOP (aspect-oriented programming), which enhances the functionality of the original object through proxy objects. This approach enables reuse of cross-cutting concerns and functional enhancements without modifying the original objects.
Observer pattern : Spring uses the observer pattern to implement event-driven programming, that is, to handle events through the event listening mechanism. This approach can achieve loose coupling and make the interaction between objects more flexible.
Template method pattern : Spring uses the template method pattern to implement template classes such as JdbcTemplate and HibernateTemplate, that is, the same operations are encapsulated in template methods, and different operations are implemented by subclasses. This approach can reduce duplicate code and improve code reusability.
Adapter pattern : Spring uses the adapter pattern to implement adaptation between different interfaces. For example, the HandlerAdapter interface in Spring MVC can adapt different types of Controllers into a unified processor.
Strategy mode : Spring uses the strategy mode to implement different algorithms or behaviors. For example, the AuthenticationStrategy interface in Spring Security can perform authentication according to different authentication strategies.
Decorator pattern : Spring uses the decorator pattern to dynamically increase the functionality of objects, such as the HandlerInterceptor interface in Spring MVC, which can add additional logic before and after the processor is executed.
Combination mode : Spring uses the combination mode to implement complex object structures, such as the HandlerMapping interface in Spring MVC, which can combine multiple HandlerMappings into a HandlerMapping chain.
Iterator pattern : Spring uses the iterator pattern to access elements in collection objects. Containers such as Spring's BeanFactory and ApplicationContext all provide iterators to access the Bean objects in them.
Registry mode : Spring uses the registry mode to manage the registration and search of objects. For example, Spring's BeanDefinitionRegistry interface can be used to register and manage the definition of Bean objects.
Delegation mode : Spring uses the delegation mode to implement message passing between different objects. For example, Spring's ApplicationEventMulticaster interface can delegate events to different listeners for processing.
State mode : Spring uses the state mode to manage the state of objects. For example, Spring's TransactionSynchronizationManager class can process according to different transaction states.
Interpreter mode : Spring uses the interpreter mode to parse and process some complex expressions and rules. For example, the expression language in Spring Security can be used to implement access control.
Bridge mode : Spring uses the bridge mode to separate abstraction and implementation. For example, the DataSource interface in Spring JDBC can bridge with different database implementations.
8. What are the scopes of Bean? How to create beans in Spring?
What are the scopes of Bean?
In Spring, a bean's scope defines the life cycle and visibility of the bean instance.
Spring defines the following five scopes:
1. singleton : Singleton mode, only one instance exists in a Bean container.
2. prototype : A new instance will be created with each request.
3. request : Each HTTP request creates a new instance.
4. session : Each HTTP Session will create a new instance.
5. global-session : Only one instance will be created in the global HTTP Session.
How to create beans in Spring?
In Spring, there are three ways to create beans:
1. Use the constructor to create a Bean.
2. Use static factory methods to create Beans.
3. Use the instance factory method to create the Bean.
Among them, the first way is the most common way to create beans. You can use elements in XML configuration files to define beans, or you can use Java annotations to define beans.
For example, define a UserService bean in the XML configuration file:
<bean id="userService" class="com.example.UserService">
    <property name="userDao" ref="userDao"/>
</bean>
This configuration means creating a Bean with the id userService and type com.example.UserService, and injecting a Bean named userDao.
9. What is Spring’s Bean life cycle? What common callback methods does it have?
What is the life cycle of a Bean?
In Spring, the bean life cycle includes the following stages:
1. Spring instantiates the bean;
2. Spring injects the value and bean reference into the corresponding attribute of the bean;
3. If the bean implements the BeanNameAware interface, Spring passes the bean ID to the setBean-Name() method;
4. If the bean implements the BeanFactoryAware interface, Spring will call the setBeanFactory() method and pass in the BeanFactory container instance;
5. If the bean implements the ApplicationContextAware interface, Spring will call the setApplicationContext() method and pass in the reference to the application context where the bean is located;
6. If the bean implements the BeanPostProcessor interface, Spring will call their post-ProcessBeforeInitialization() method;
7. If the bean implements the InitializingBean interface, Spring will call their after-PropertiesSet() method. Similarly, if the bean declares an initialization method using initmethod, this method will also be called;
8. If the bean implements the BeanPostProcessor interface, Spring will call their post-ProcessAfterInitialization() method;
9. At this point, the beans are ready and can be used by the application. They will reside in the application context until the application context is destroyed;
10. If the bean implements the DisposableBean interface, Spring will call its destroy() interface method. Similarly, if the bean declares a destruction method using destroy-method, this method will also be called.
bean life cycle
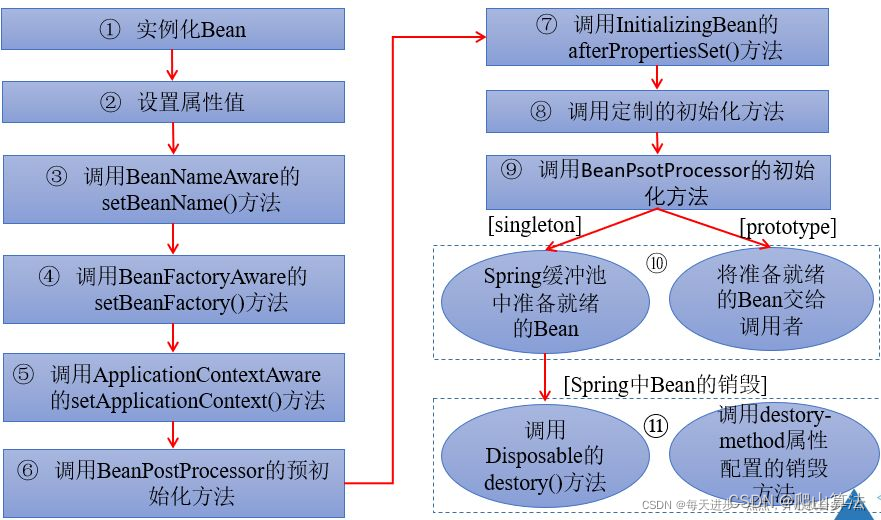
In Spring, commonly used callback methods include:
1. The afterPropertiesSet() method of the InitializingBean interface: After the Bean's property assignment is completed, the Spring container will automatically call this method, and some initialization operations can be performed in this method.
2. The destroy() method of the DisposableBean interface: This method is called when the container destroys the Bean instance, and some resource release operations can be performed in this method.
3. Custom initialization method: You can use the init-method attribute on the Bean configuration file or Bean class to specify the initialization method.
4. Customize the destruction method: You can use the destroy-method attribute on the Bean configuration file or Bean class to specify the destruction method.
10. What is BeanPostProcessor? What does it do?
1. BeanPostProcessor is an interface in the Spring container, used to perform some processing operations on the Bean before and after the Bean is initialized. BeanPostProcessor can process all beans or only specified beans.
Two methods are defined in the BeanPostProcessor interface:
postProcessBeforeInitialization(Object bean, String beanName): This method is called before the Bean's initialization method is executed.
postProcessAfterInitialization(Object bean, String beanName): This method is called after the Bean's initialization method is executed.
2. The functions of BeanPostProcessor include:
Implement custom initialization logic: such as adding a dynamic proxy to the Bean, verifying the Bean's attribute values, etc.
Implement custom destruction logic: such as closing database connections, releasing resources, etc.
Change the default implementation of Bean: for example, implement AOP function, add logging function to Bean, etc.
11. What are circular dependencies in Spring? How to solve it?
Circular dependency in Spring refers to a situation where two or more beans are dependent on each other, forming a circular dependency.
For example, Bean A depends on Bean B, and Bean B also depends on Bean A, which forms a circular dependency.
Circular dependency will cause the creation of the bean to fail or the created bean is not the expected instance. This is because in the process of creating the bean, Spring first creates the bean instance, and then calls the initialization method for initialization after completing the instantiation and attribute assignment. of.
If there is a circular dependency, then there will be a situation where Bean B needs to be instantiated first when instantiating Bean A, and Bean A needs to be instantiated first when instantiating Bean B, which results in waiting for each other to create instances. An infinite loop.
Level 1 cache: Born for "Spring's singleton attributes", it is a singleton pool used to store singleton beans that have been initialized;
Level 2 cache: Born to "solve AOP", it stores semi-finished AOP singleton beans;
Level 3 cache: Born to "break the cycle", it stores factory methods that generate semi-finished singleton beans.
Using third-level cache to solve the problem of circular dependencies will bring certain performance overhead, so in actual development, circular dependencies should be avoided as much as possible.
12. What is FactoryBean in Spring? What does it do?
What is FactoryBean
FactoryBean in Spring is a special Bean that implements the FactoryBean interface and provides the getObject() method to return an object managed by the factory. The object can be an ordinary JavaBean or a complex object.
The function of FactoryBean is to create and manage objects in the Spring container, and also provides a way to extend Spring functionality.
The FactoryBean interface defines the following methods:
1. getObject(): Returns the object managed by the factory. The object returned by this method may be an ordinary JavaBean or a complex object.
2. getObjectType(): Returns the type of object managed by the factory.
3. isSingleton(): Returns whether the object managed by the factory is a singleton. If so, it returns true, otherwise it returns false.
In the Spring container, when a Bean implements the FactoryBean interface, Spring will use the Bean as a factory to generate new objects. Specifically, when Spring initializes FactoryBean, it will first call the getObject() method of the Bean to obtain an object, and then add the object to the Spring container as an instance of the Bean. Therefore, when we need to create a complex object in the Spring container, we can use FactoryBean to achieve it.
The role of FactoryBean:
1. Objects can be created and managed flexibly. For example, different object instances can be returned according to different input parameters.
2. The Bean creation process can be separated from the Bean usage process. Beans created through FactoryBean can undergo some special processing during the creation process, such as dynamically creating Bean instances based on certain conditions, returning different Bean instances, etc. In addition, FactoryBean can also encapsulate some complex Bean creation processes into a Bean, which is convenient for other Beans to use directly.
3. Can be used to implement some framework-level functions, such as AOP, transaction management, etc.
4. The creation process of complex objects can be encapsulated in FactoryBean to simplify the configuration and management of applications.
5. Can be used to create objects in third-party libraries, such as Hibernate's SessionFactory, MyBatis's SqlSessionFactory, etc.
It should be noted that FactoryBean itself is also a Bean, so it can also be depended on by other Beans.
When relying on FactoryBean, the type of dependency should be set to the type of the object created by FactoryBean, not the type of FactoryBean itself.
Another benefit of using FactoryBean is that you can delay the instantiation of the Bean, that is, only when you really need to use the Bean, the getObject() method of FactoryBean will be called to create a Bean instance. This improves system performance and resource utilization.
In Spring, FactoryBean can be used to create any type of Bean, including ordinary beans, collection beans, proxy beans, etc.
For example, the MapperFactoryBean in Spring is a FactoryBean used to create instances of the Mapper interface of MyBatis.
By configuring MapperFactoryBean, the Mapper interface can be defined as a Bean for easy use in Spring.
13. What is the difference between FactoryBean and BeanFactory?
FactoryBean and BeanFactory are two different concepts, with the following differences between them:
1. FactoryBean is a special Bean that implements the FactoryBean interface and is used to create and manage objects. The BeanFactory is the underlying interface of the Spring container and is used to manage the life cycle of the Bean.
2. In the Spring container, when a Bean implements the FactoryBean interface, Spring will use the Bean as a factory to generate new objects. BeanFactory is the top-level interface of the Spring container, which defines the basic behavior and functions of the Spring container, such as initializing the container, destroying the container, obtaining beans, etc.
3. FactoryBean is mainly used to create and manage objects, while BeanFactory is mainly used to manage the life cycle of Beans and provide basic container functions.
4. The object returned by FactoryBean can be an ordinary JavaBean or a complex object. The objects returned by BeanFactory can only be ordinary JavaBeans.
5. When using it, we obtain the Bean instance through BeanFactory, and obtain the objects managed by the factory through FactoryBean.
6. FactoryBean can be used to implement some framework-level functions, such as AOP, transaction management, etc. The BeanFactory is mainly used to provide basic container functions and does not involve business logic.
To sum up, FactoryBean and BeanFactory are both important concepts in Spring, but their functions and usage scenarios are different.
FactoryBean is mainly used to create complex objects, while BeanFactory is the basic interface of the Spring container and is used to manage Bean objects.
14. What is the difference between ApplicationContext and BeanFactory in Spring? What is the internationalization support in Spring? How to achieve internationalization?
ApplicationContext and BeanFactory are two important container interfaces in Spring. The main differences are as follows:
1. The initialization timing is different : BeanFactory will not initialize the Bean when the container starts, but will initialize it when a request is made to obtain the Bean; while ApplicationContext will initialize the Bean when the container starts.
2. Different functional extensions : ApplicationContext is a sub-interface of BeanFactory. Compared to BeanFactory, which is a primary container, ApplicationContext is an advanced container that provides more functions, such as internationalization support, event mechanism, AOP support, etc.
ApplicationContext can identify and handle more Bean components, such as BeanFactoryPostProcessor, BeanPostProcessor, ApplicationListener, etc.
3. The loading methods of configuration files are different : BeanFactory can be configured through XML files, annotations, etc., but needs to be loaded manually; while ApplicationContext can automatically scan configuration files, and can also be configured through XML files, annotations, etc.
Internationalization support in Spring:
Spring provides internationalization (i18n) support, which allows applications to display different text information according to the user's language habits.
Internationalization support in Spring mainly includes the following two parts:
LocaleResolver: used to determine the user's regional information, such as language, region, etc.
MessageSource: used to obtain text information corresponding to the user area.
To achieve internationalization, the following steps are required:
1. Configure the MessageSource Bean in the Spring configuration file and specify the location and file name of the resource file.
2. Write the text information of the corresponding language in the resource file and store it in the form of key-value, where key is the identifier of the message and value is the specific text content.
3. Use MessageSource in the code to obtain text information in the corresponding language, and use placeholders to specify the values of dynamic parameters.
4. In Web applications, LocaleResolver needs to be configured to determine the user's regional information, such as using CookieLocaleResolver.
In short, internationalization support in Spring can allow applications to better adapt to different user language habits and improve user experience.
15. What are the annotations in Spring? What are their specific functions?
There are many annotations in Spring. Here are some commonly used annotations and their functions:
1. @Autowired
The @Autowired annotation is used for automatic wiring, automatically connecting beans of matching types to specified fields, methods or constructors, thereby simplifying the dependency injection process.
@Autowired and @Resource are annotations used for dependency injection in Spring. Their function is to inject one bean into another bean.
But there are the following differences between the two:
1.1. Different injection methods:
@Autowired is automatically assembled according to type. It implements automatic assembly through byType. If there are multiple beans with matching types in the container, an exception will be thrown.
@Resource is assembled by name by default. It implements automatic assembly through byName. If the name attribute is specified, it will be assembled according to the name. If the name attribute is not specified, it will be assembled according to the type.
1.2. Different sources:
@Autowired is an annotation provided by Spring, and @Resource is an annotation defined in the JSR-250 specification. Therefore, @Autowired is a Spring-specific annotation, while @Resource is a JavaEE annotation. Their usage scope is different.
1.3. Different injection methods:
@Autowired can only inject properties of other bean types.
@Resource can inject properties of other bean types as well as properties of ordinary types.
1.4. Different attributes:
@Autowired has no additional attributes.
@Resource has two important attributes, namely name and type. The name attribute is used to specify the name of the bean, and the type attribute is used to specify the type of the bean.
In general, @Autowired and @Resource are both annotations used to implement dependency injection, but the usage and implementation methods are slightly different. Developers can choose which annotation to use according to their needs.
2. @Qualifier
The @Qualifier annotation is used in conjunction with the @Autowired annotation to specify the name of the injected bean. When there are multiple beans of the same type, you can use this annotation to specify the name of the bean to be injected.
3. @Component
The @Component annotation is used to mark a class as a component and tell Spring to put it into a container for management. It is a general annotation that can be used in any class, but is usually used in component classes such as service layer, data access layer and controller.
4. @Controller
The @Controller annotation is used to mark a class as a controller in Spring MVC for processing requests and responses. It is typically used with the @RequestMapping annotation to map requests to controller handling methods.
5. @RequestMapping
The @RequestMapping annotation is used to map requests to controller processing methods. It can be used at the class level and method level to specify the requested URL address, request method, request parameters, request headers and other information.
6. @Service
The @Service annotation is used to mark a class as a component of the service layer, and is usually used to encapsulate business logic methods.
7. @Repository
The @Repository annotation is used to mark a class as a component of the data access layer, and is usually used to encapsulate data access methods.
8. @Configuration
The @Configuration annotation is used to mark a class as a Spring configuration class and is used to define beans. It is usually used with the @Bean annotation to register the object returned by the method as a bean.
9. @Bean
The @Bean annotation is used to register the object returned by the method as a bean. It is usually used together with the @Configuration annotation to define beans.
10. @Value
The @Value annotation is used to inject property values into a bean. It can be used at class level and field level to specify the value of an attribute.
11. @Scope
The @Scope annotation is used to specify the scope of the bean. It can be used at the class level and method level to specify information such as the bean's life cycle, scope and proxy mode.
12. @Transactional
The @Transactional annotation is used to mark a method or class as a transaction processing method. It is usually used to encapsulate database operation methods to ensure the atomicity, consistency and isolation of database operations.
These annotations can help the Spring container automatically complete dependency injection, bean creation and management, request processing, etc., thus simplifying application development.
16. What is the MVC pattern in Spring? What does it do? How does it work?
Spring MVC is a web framework based on the MVC (Model-View-Controller) pattern. It separates business logic, user interaction and request processing by dividing the web application into three parts: model, view and controller.
The main function of Spring MVC is to provide a flexible, efficient, and scalable web application development framework, so that developers can more easily develop high-quality web applications.
The execution principle of Spring MVC is as follows:
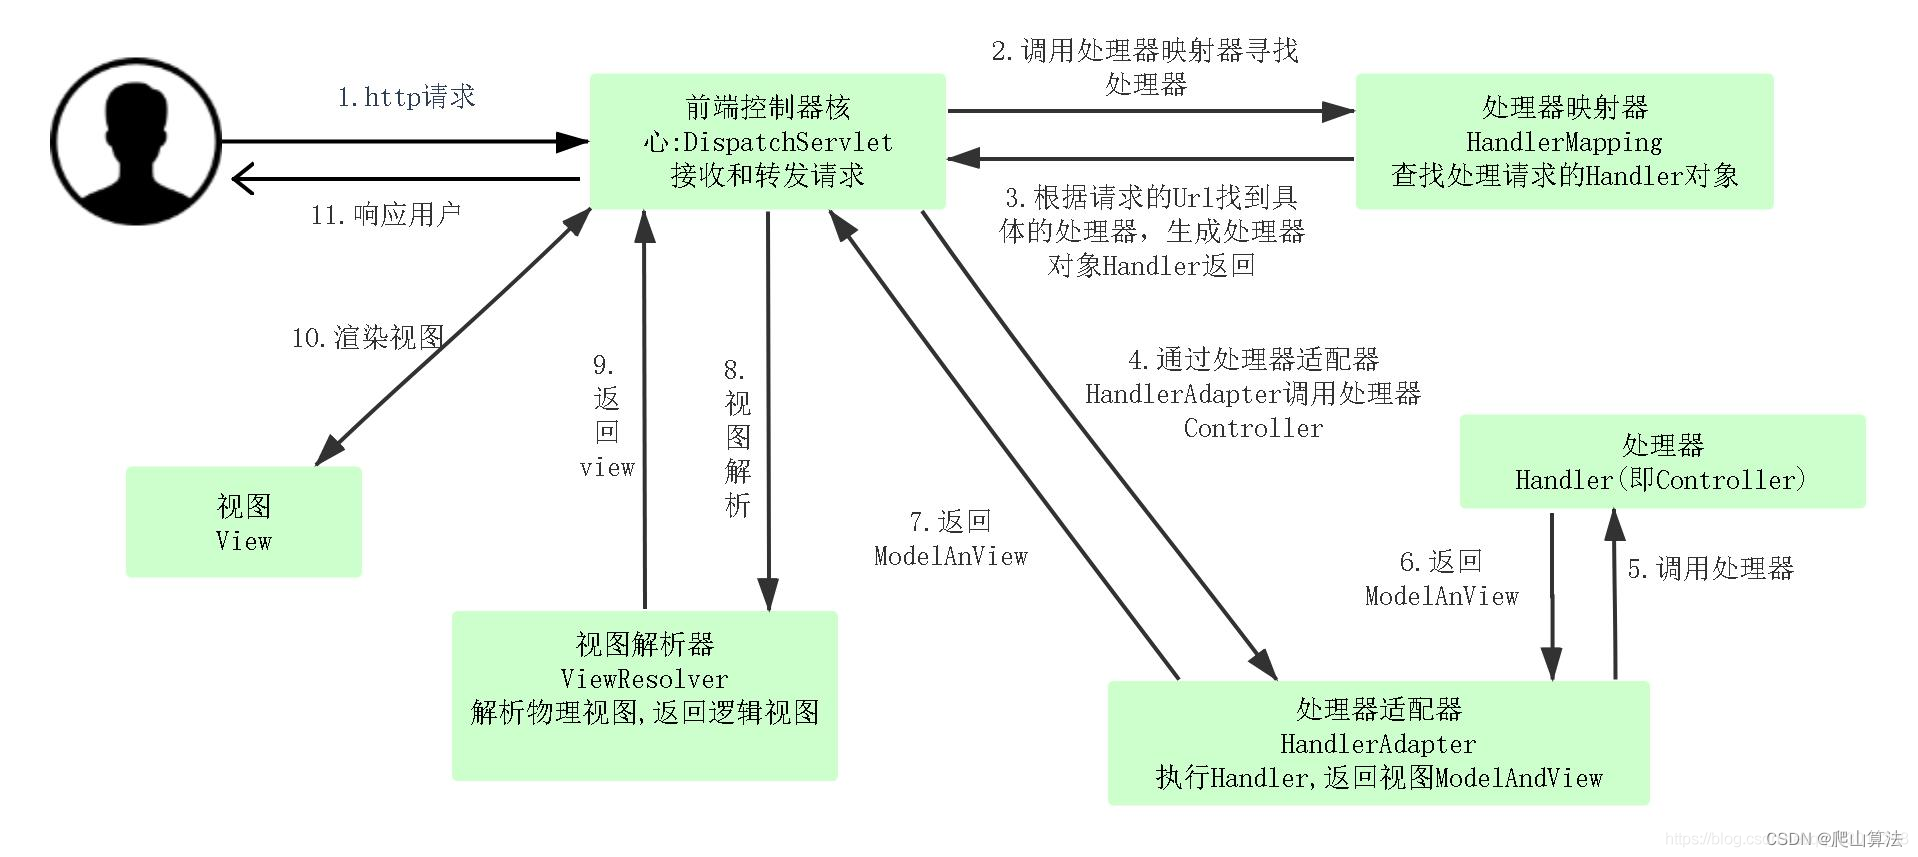
The core components in Spring MVC include:
1. DispatcherServlet : The core component of Spring MVC, responsible for receiving client requests and dispatching the requests to the corresponding handlers.
2. HandlerMapping : Responsible for mapping requests to corresponding handlers.
3. Controller : handles requests and generates model and view information.
4. ViewResolver : Resolve logical view names into actual view objects.
5. View : Responsible for rendering model data and generating responses.
6. Model : used to store and transfer data.
7. ModelAndView : Contains model and view information.
In general, Spring MVC is a Web framework based on the MVC pattern. Its role is to achieve the separation of business logic, user interaction and request processing, and improve the maintainability and scalability of Web applications.
Its execution principle is to process user requests into final response results through the collaboration of components such as front controller, request mapping, business logic processing, view parsing and rendering.
17. What is the event mechanism in Spring? How to use Spring's event mechanism?
The event mechanism in Spring allows publishing and listening for events in applications. When an event is published, all listeners can receive the event and perform corresponding operations.
The event mechanism is a loosely coupled method that allows different components to communicate with each other without directly relying on each other's interface.
Spring's event mechanism includes the following important components:
1. ApplicationEvent : The base class of events. All events need to inherit this class. You can define your own event types by inheriting this class.
2. ApplicationListener : The interface of the listener, used to listen for specific types of events. When an event is published, the class that implements this interface will automatically receive the event and perform corresponding operations.
3. ApplicationEventPublisher : event publisher, used to publish events. Its publishEvent() method can be used to publish events.
Using Spring's event mechanism is very simple, just follow the following steps:
1. Define an event class, inherit ApplicationEvent, and define the data carried by the event in it.
2. Define a listener class, implement the ApplicationListener interface, and define methods for handling events in it.
3. Where the event needs to be published, inject ApplicationEventPublisher and call its publishEvent() method to publish the event.
Using Spring's event mechanism requires the following steps:
1. Create a custom event class, inherit the ApplicationEvent class or its subclass, and pass the event data in the constructor.
2. Create an event publisher class, use the @Autowired annotation to inject the ApplicationEventPublisher object, and call its publishEvent method to publish the event.
3. Create an event listener class, implement the ApplicationListener interface, and handle the event in the onApplicationEvent method.
4. Where events need to be used, use the @Autowired annotation to inject the event publisher and call its method of publishing the event.
Here is a simple example that demonstrates how to use Spring's event mechanism:
// 自定义事件类
public class MyEvent extends ApplicationEvent {


    private String message;
    public MyEvent(Object source, String message) {


        super(source);
        this.message = message;
    }
    public String getMessage() {


        return message;
    }
}
// 事件发布者类
@Service
public class MyEventPublisher {


    @Autowired
    private ApplicationEventPublisher publisher;
    public void publishEvent(String message) {


        MyEvent event = new MyEvent(this, message);
        publisher.publishEvent(event);
    }
}
// 事件监听器类
@Component
public class MyEventListener implements ApplicationListener<MyEvent> {


    @Override
    public void onApplicationEvent(MyEvent event) {


        String message = event.getMessage();
        // 处理事件
    }
}
// 在需要使用事件的地方,注入事件发布者并调用其发布事件的方法
@Service
public class MyService {


    @Autowired
    private MyEventPublisher publisher;
    public void doSomething() {


        // 发布事件
        publisher.publishEvent("something happened");
    }
}
In this example, when the doSomething method of the MyService class is called, it publishes a custom event MyEvent and delivers a message. The MyEventListener class listens for MyEvent events and handles them when they occur.
By using Spring's event mechanism, loosely coupled communication is achieved between the two classes MyService and MyEventListener. There is no direct dependency between them, thus improving the maintainability and scalability of the application.
18. What is a transaction in Spring and how to manage it? What are the commonly used transaction management methods?
A transaction in Spring refers to a series of operations on the database, which can ensure that a group of operations either all succeed or all fail, maintaining data consistency.
Spring provides two transaction management methods: declarative and programmatic.
For transaction management in Spring, you need to use a transaction manager and configure it as a Bean in Spring.
Spring provides multiple transaction managers, such as JDBC transaction manager, Hibernate transaction manager, JTA transaction manager, etc.
When doing transaction management, you can use annotations or XML for configuration.
1. For declarative transactions, Spring AOP needs to be used. Transactions can be defined through @Transactional annotation or XML configuration.
1.1. In the annotation-based method, you only need to add the @Transactional annotation to the method that needs to add a transaction.
1.2. In the XML-based approach, you need to use the tx:advice element and the tx:attributes element to define transaction notifications and transaction attributes respectively.
2. For programmatic transactions, you need to explicitly call the API of the transaction manager in the code to control the transaction. You can use the TransactionTemplate class provided by Spring to simplify programmatic transaction processing.
In general, Spring's transaction management function can help us complete complex database operations and ensure data consistency.
Through declarative transactions and programmatic transactions, we can choose the most appropriate method for transaction management based on actual needs.
Commonly used transaction management methods include the following:
1. JDBC transaction : The most basic transaction management method in Spring, which directly uses JDBC connections to manage transactions. Use JdbcTemplate for database operations and enable transactions in the transaction manager.
2. Hibernate transaction : Use the transaction management method of the Hibernate framework, which uses the Hibernate transaction manager to manage transactions. Use Session for database operations and enable transactions in the transaction manager.
3. JTA transaction : Using the transaction management method of Java transaction API, it can manage transactions of multiple resources. Use the JTA transaction manager to manage transactions and use JNDI to find DataSources and other resources.
4. MyBatis transaction: Use the transaction management method of the MyBatis framework, which uses SqlSession for database operations and enables transactions in the transaction manager.
5. MongoDB transactions : MongoDB 4.0 and above support transactions, and Spring provides MongoTransactionManager to manage MongoDB transactions.
In general, different transaction management methods are suitable for different scenarios and needs. We need to choose the most appropriate transaction management method based on the actual situation.
19. What is the difference between declarative transactions and programmatic transactions in Spring?
Declarative transactions and programmatic transactions are two ways to implement transaction management in Spring.
The main differences between them are as follows:
1. Programmatic transactions require explicit calls to the transaction manager's API in the code to control transactions, while declarative transactions are implemented through configuration without adding transaction management code to the code.
2. Declarative transactions use AOP technology to automatically add transaction control code before and after method calls, while programmatic transactions require manual writing of transaction control code.
3. Declarative transactions separate business logic and transaction management, making the code clearer and easier to understand, while programmatic transactions mix business logic and transaction management, making the code less readable and maintainable.
4. Declarative transactions are only suitable for transaction management of a single database. For transaction management across multiple data sources or resources, programmatic transactions or JTA transactions need to be used.
In general, declarative transactions have higher readability, maintainability, and code clarity than programmatic transactions, and are therefore more commonly used.
But for some complex transaction scenarios, programmatic transactions may be more flexible and can meet more needs. It is necessary to choose the most suitable transaction management method according to the actual situation.
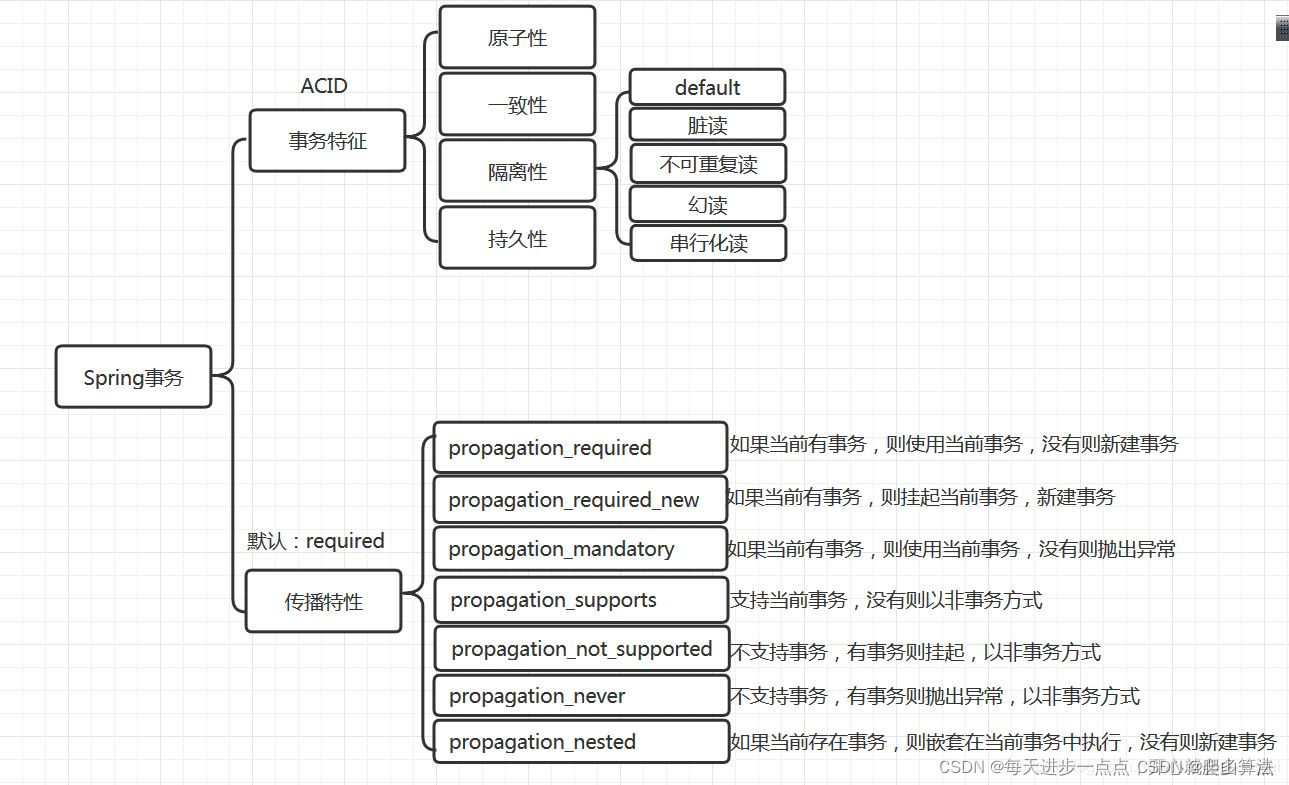
20. What are the transaction propagation behaviors in Spring?
The transaction propagation behavior in Spring refers to the rules for how transactions between different methods propagate and interact when multiple transaction methods call each other.
The Spring framework provides seven different transaction propagation behaviors, namely:
1. PROPAGATION_REQUIRED : If a transaction currently exists, join the transaction; if there is no transaction, create a new transaction. This is the default propagation behavior.
2. PROPAGATION_SUPPORTS : If a transaction currently exists, join the transaction; if there is no transaction, continue execution in a non-transactional manner.
3. PROPAGATION_MANDATORY : If there is currently a transaction, join the transaction; if there is no transaction, throw an exception.
4. PROPAGATION_REQUIRES_NEW : Create a new transaction. If a transaction currently exists, suspend the transaction.
5. PROPAGATION_NOT_SUPPORTED : Perform operations in a non-transactional manner. If a transaction currently exists, the transaction is suspended.
6. PROPAGATION_NEVER : Perform operations in a non-transactional manner. If a transaction currently exists, an exception will be thrown.
7. PROPAGATION_NESTED : If a transaction currently exists, it will be executed within the nested transaction; if there is no transaction, a new transaction will be created.
These propagation behaviors can be specified through constants in the TransactionDefinition interface.
In Spring, transaction propagation behavior is used through declarative transaction management, such as using tx:advice and tx:attributes tags in XML configuration files, or using @Transactional annotations in annotations to set transaction propagation behavior.
Using transaction propagation behavior can better control the behavior and interaction of transactions, thereby improving the reliability and stability of the system.
At the same time, you need to pay attention to the impact of transaction propagation behavior on performance and data consistency to avoid problems such as deadlock and data inconsistency.
21. How to use RESTful API in Spring? What is RestTemplate in Spring? How to use it to make HTTP requests?
In Spring, RESTful APIs can be implemented using the Spring MVC framework.
RESTful API is an API design style based on the HTTP protocol, which can use various HTTP methods (such as GET, POST, PUT, DELETE, etc.) to operate resources.
The RestTemplate class is provided in Spring to facilitate HTTP requests.
RestTemplate is a client template tool class provided by Spring for consuming REST services. It can send HTTP requests and process HTTP responses.
RestTemplate provides a variety of HTTP request methods, such as GET, POST, PUT, DELETE, etc.
Here is sample code for using RestTemplate to make an HTTP request:
//创建RestTemplate对象
RestTemplate restTemplate = new RestTemplate();
//发送GET请求
String result = restTemplate.getForObject(url, String.class);
//发送POST请求
HttpHeaders headers = new HttpHeaders();
headers.setContentType(MediaType.APPLICATION_JSON);
HttpEntity<String> requestEntity = new HttpEntity<>(body, headers);
String result = restTemplate.postForObject(url, requestEntity, String.class);
//发送PUT请求
HttpHeaders headers = new HttpHeaders();
headers.setContentType(MediaType.APPLICATION_JSON);
HttpEntity<String> requestEntity = new HttpEntity<>(body, headers);
restTemplate.put(url, requestEntity);
//发送DELETE请求
restTemplate.delete(url);
In the above sample code, RestTemplate's getForObject method can send a GET request and return response data.
The postForObject method can send a POST request and return response data.
The put method can send PUT requests, and the delete method can send DELETE requests.
Steps to implement RESTful API with Spring MVC:
1. Add Spring Web MVC dependency.
In the Maven project, you can add the following dependencies in the pom.xml file:
<dependency>
  <groupId>org.springframework</groupId>
  <artifactId>spring-webmvc</artifactId>
  <version>5.3.13</version>
</dependency>
2. Create Controller. In Spring Web MVC, Controller is used to handle HTTP requests. You can use annotations on methods of the Controller class to specify the HTTP request method and URI.
For example:
@Controller
@RequestMapping("/users")
public class UserController {


    @GetMapping("/{id}")
    public User getUserById(@PathVariable("id") Long id) {


        // 查询用户信息
    }
    @PostMapping("/")
    public void createUser(@RequestBody User user) {


        // 创建用户信息
    }
    @PutMapping("/{id}")
    public void updateUser(@PathVariable("id") Long id, @RequestBody User user) {


        // 更新用户信息
    }
    @DeleteMapping("/{id}")
    public void deleteUser(@PathVariable("id") Long id) {


        // 删除用户信息
    }
}
3. Configure Spring Web MVC. The Spring Web MVC framework can be configured in the Spring configuration file,
For example, use JavaConfig to configure:
@Configuration
@EnableWebMvc
@ComponentScan(basePackages = "com.example.controller")
public class AppConfig implements WebMvcConfigurer {


    @Override
    public void configureDefaultServletHandling(DefaultServletHandlerConfigurer configurer) {


        configurer.enable();
    }
    @Override
    public void addCorsMappings(CorsRegistry registry) {


        registry.addMapping("/**").allowedOrigins("*").allowedMethods("*");
    }
}
4. Start the application. You can use Spring Boot to quickly start your application.
In a Spring Boot application, a Controller can be defined using the @RestController annotation.
Regarding RestTemplate, it is an HTTP request client tool provided by the Spring framework, which is used to send HTTP requests and process responses.
Use RestTemplate to make HTTP requests conveniently, for example:
RestTemplate restTemplate = new RestTemplate();
// 发送GET请求
String result = restTemplate.getForObject("http://example.com/api/users/{id}", String.class, 1L);
// 发送POST请求
User user = new User("Tom", 20);
User savedUser = restTemplate.postForObject("http://example.com/api/users/", user, User.class);
// 发送PUT请求
restTemplate.put("http://example.com/api/users/{id}", updatedUser, 1L);
// 发送DELETE请求
restTemplate.delete("http://example.com/api/users/{id}", 1L);
When using RestTemplate, you can use different methods to send HTTP requests and specify request parameters, request headers, response types, etc.
HTTP request and response processing can be implemented quickly and easily using RestTemplate.
In short, using RESTful API in Spring can easily implement Web services, and using RestTemplate can easily make HTTP requests, which improves development efficiency.
22. What is JdbcTemplate in Spring? What does it do?
1. JdbcTemplate is a JDBC tool class provided in the Spring framework. It encapsulates JDBC related operations, allowing developers to perform database operations more conveniently.
The main function of JdbcTemplate is to simplify the operation of JDBC, reduce the developer's workload, and improve development efficiency.
2. The main functions of JdbcTemplate include :
2.1. Encapsulates JDBC related operations and simplifies the use of JDBC;
2.2. Provides an exception handling mechanism to simplify exception handling;
2.3. Provides a transaction management mechanism so that developers can manage transactions more conveniently.
23. How to use JDBC and ORM framework for database operations in Spring?
1. The steps for using JDBC to perform database operations in Spring are as follows:
1.1. To configure the data source, you can use Spring's own DriverManagerDataSource or use a third-party data source, such as Apache Commons DBCP, Alibaba Druid, etc.
1.2. Create a JdbcTemplate object, you can use annotations or XML configuration.
1.3. Use the JdbcTemplate object to perform database operations, including query, insert, update, delete and other operations.
Here is a sample code for querying using JdbcTemplate:
@Autowired
private JdbcTemplate jdbcTemplate;
public List<User> getUsers() {


    String sql = "SELECT * FROM users";
    List<User> users = jdbcTemplate.query(sql, new BeanPropertyRowMapper<>(User.class));
    return users;
}
In this sample code, we inject a JdbcTemplate object, and then use the query method of JdbcTemplate to perform a query operation and map the query results to a list of User type objects.
2. The steps for using the ORM framework to perform database operations in Spring are as follows:
2.1. Configure data source, same as above.
2.2. To configure the ORM framework, you can use Spring's own HibernateTemplate or other ORM frameworks, such as MyBatis.
2.3. Use the ORM framework to perform database operations, including query, insert, update, delete and other operations. The ORM framework maps Java objects to table structures in the database, simplifying database operations.
Here is a sample code using Hibernate to query:
@Autowired
private SessionFactory sessionFactory;
public List<User> getUsers() {


    Session session = sessionFactory.getCurrentSession();
    CriteriaBuilder builder = session.getCriteriaBuilder();
    CriteriaQuery<User> query = builder.createQuery(User.class);
    Root<User> root = query.from(User.class);
    query.select(root);
    Query<User> q = session.createQuery(query);
    List<User> users = q.getResultList();
    return users;
}
In this sample code, we inject a SessionFactory object, and then use Hibernate's Criteria API to perform a query operation and map the query results to a list of User type objects.
24. What is Spring Data? What does it do? What persistence technologies does it support?
Spring Data is a subproject in the Spring framework that aims to provide a simplified data access method for Spring-based applications. It provides a set of common, Spring-based data access APIs that can help us more conveniently use various data storage technologies for data access.
The role of Spring Data
The main role of Spring Data is to simplify the development of data access. By providing a set of common, Spring-based data access APIs, it can help us more conveniently use various data storage technologies for data access. Spring Data also provides some advanced features, such as automatically generating data access interfaces, automatically generating query methods, supporting named parameters, etc.
Spring Data supports many different persistence technologies, including:
1. Relational database: JDBC, JPA, Hibernate, MyBatis, Spring JDBC Template, etc.
2. NoSQL database: MongoDB, Couchbase, Redis, Cassandra, Elasticsearch, etc.
3. In-Memory database: H2, HSQLDB, Derby, etc.
4. Other data storage technologies: Apache Solr, Apache Geode, Apache Ignite, etc.
For each different persistence technology, Spring Data provides corresponding modules and APIs to help us access data more conveniently.
At the same time, Spring Data also provides some common APIs, such as CrudRepository, PagingAndSortingRepository, JpaRepository, etc., which can help us quickly create standard-compliant data access interfaces.
25. What are interceptors in Spring? What does it do?
1. What is the interceptor in Spring?
An interceptor in Spring is a component used in the Spring MVC framework that can pre- or post-process requests before or after they reach the controller. The interceptor implements the idea of AOP and can enhance the processing of requests without modifying the original logic.
2. The role of interceptors in Spring
The main function of the interceptor is to pre-process or post-process requests. Common application scenarios include:
2.1. Permission verification: Verify the user's permissions before the request reaches the controller.
2.2. Logging: Record the requested URL, request parameters, response time and other information for subsequent performance analysis and troubleshooting.
2.3. Request redirection: After the request reaches the controller, the request is redirected.
2.4. Cache processing: Before the request reaches the controller, the request is cached to avoid repeated operations such as querying the database.
26. What is the difference between filters and interceptors in Spring?
Both filters and interceptors in Spring can process requests, but they have some differences:
1. Different running locations : filters are processed before the request reaches the Servlet container, while interceptors are processed before or after the request reaches the Spring MVC controller.
2. Different dependencies : The filter depends on the Servlet container, while the interceptor depends on the Spring MVC framework.
3. The action time is different : the filter is executed before the request enters the Servlet container, while the interceptor is executed after the request enters the Spring container.
4. Different functions : Filters are mainly used to filter and process requests, such as encoding conversion, request processing time statistics, etc.; interceptors are mainly used to enhance request processing, such as permission verification, logging, etc.
In general, filters process requests at the Servlet container level, while interceptors process requests at the Spring MVC framework level. Filters are more low-level and can perform some low-level processing on requests. Interceptors are more advanced and can process requests at the business logic level. In actual development, you can choose to use filters or interceptors according to specific needs.
27. What is Spring Data Redis? What does it do? how to use?
1. What is Spring Data Redis?
Spring Data Redis is a module in the Spring Framework ecosystem that simplifies the operation of Redis database.
Redis is an in-memory data structure storage system that can be used as a database, cache, message middleware, etc. It has attracted much attention because of its high performance and rich data structures.
Spring Data Redis provides a simpler and easier-to-use programming interface by encapsulating Redis-related operations to facilitate developers to use the Redis database.
2. What is the role of Spring Data Redis?
The main function of Spring Data Redis is to simplify the operation of Redis database.
It provides a series of APIs for accessing the Redis database, including functions such as reading and writing data, publishing and subscribing messages, and distributed locks.
Using Spring Data Redis, developers can use the Redis database more conveniently, and can also take advantage of other functions provided by the Spring Framework, such as transaction management, caching, AOP, etc.
Spring Data Redis also supports multiple serialization methods, including JDK serialization, JSON serialization, Protobuf serialization, etc., making it easier for developers to choose the appropriate serialization method according to specific needs.
In addition, Spring Data Redis also supports high-availability solutions such as Redis Sentinel and Redis Cluster, providing more robust Redis database cluster support.
3. Use of Spring Data Redis
To use Spring Data Redis, you need to introduce corresponding dependencies, such as:
<dependency>
    <groupId>org.springframework.data</groupId>
    <artifactId>spring-data-redis</artifactId>
    <version>2.5.5</version>
</dependency>
Then, configure the Redis connection information in the Spring configuration file, such as:
<bean id="jedisConnectionFactory" class="org.springframework.data.redis.connection.jedis.JedisConnectionFactory">
    <property name="hostName" value="localhost"/>
    <property name="port" value="6379"/>
    <property name="database" value="0"/>
</bean>
Next, you can use the RedisTemplate object provided by Spring Data Redis to perform Redis operations, such as:
@Autowired
private RedisTemplate<String, Object> redisTemplate;
public void save(String key, Object value, long expire) {


    redisTemplate.opsForValue().set(key, value, expire, TimeUnit.SECONDS);
}
public Object get(String key) {


    return redisTemplate.opsForValue().get(key);
}
In the above code, we can see examples of using the RedisTemplate object to perform Redis operations, including setting key-value pairs and getting the value corresponding to the key.
It should be noted that the generic parameters of RedisTemplate can be set according to specific needs, such as setting the key to String type and the value to Object type.
To sum up, using Spring Data Redis requires introducing corresponding dependencies, configuring Redis connection information, and using RedisTemplate objects to perform Redis operations.
In general, using Spring Data Redis can greatly simplify the operation of the Redis database and improve development efficiency. At the same time, you can also take advantage of other functions provided by the Spring Framework, such as transaction management, caching, AOP, etc.
28. How to use cache in Spring? What are the commonly used caching frameworks?
1. How to use cache in Spring?
In Spring, you can improve application performance and responsiveness by using caching.
Spring provides support for caching, and annotations can be used to simplify the use of caching.
Common cache annotations include @Cacheable, @CachePut, @CacheEvict, etc.
These annotations can be used to easily cache the return value of the method. The next time the method is called, the result can be obtained directly from the cache to avoid repeated calculations.
2. What are the commonly used caching frameworks?
Commonly used caching frameworks include:
2.1. Ehcache : An open source caching framework based on Java, which has the characteristics of high speed, efficiency and ease of use.
2.2. Memcached : A high-performance distributed memory caching system, often used to cache data in web applications.
2.3. Redis : A high-speed Key-Value storage system that supports multiple data structures and advanced functions, such as transactions, publish/subscribe, Lua scripts, etc.
2.4. Caffeine : A Java-based cache library with the characteristics of high speed, efficiency, and scalability.
2.5. Guava Cache : A Java-based local caching framework provided by Google, which has the characteristics of high speed, efficiency, and memory management.
When using the cache framework, you need to pay attention to cache consistency and cache update strategies to ensure the validity and correctness of cached data.
When using a cache framework, you need to choose an appropriate framework based on specific needs. Considerations include cache size, distributed support, performance, ease of use, etc.
29. What is Cache in Spring? What does it do? What caching technologies does it support?
1. Cache in Spring is an abstraction layer that provides a simple and consistent cache abstraction and a common interface for different cache providers.
2. The main function of Spring Cache is to improve the performance and response speed of applications. By caching data, you can avoid operations such as repeated calculations or repeated queries to the database.
3. Spring Cache supports a variety of caching technologies, including:
3.1. ConcurrentMapCache: local cache based on Java concurrent mapping.
3.2. EhcacheCache: local cache based on Ehcache.
3.3. RedisCache: Redis-based distributed cache.
3.4. CaffeineCache: local cache based on Caffeine.
3.5. GuavaCache: local cache based on Guava Cache.
By choosing different Cache implementations, you can easily cache data to different cache providers, thereby improving application performance and response speed.
When using Spring Cache, you need to pay attention to cache consistency and cache update strategies to ensure the validity and correctness of cached data.
30. What is OAuth2 in Spring? What does it do? How is it used?
1. Spring OAuth2 is an open source implementation of the OAuth2 protocol based on the Spring framework. It provides a secure and standardized way to protect Web applications and APIs.
OAuth2 is an authorization protocol that allows users to authorize third-party applications to access protected resources on their behalf without exposing their username and password.
2. The main function of Spring OAuth2 is to provide a secure, scalable, and easy-to-use way to protect Web applications and APIs. Through the OAuth2 protocol, it can ensure that only authorized users can access protected resources.
Spring OAuth2 provides a variety of authorization methods, including authorization code mode, implicit authorization mode, client credential mode, password mode, etc.
3. The steps to use Spring OAuth2 are as follows:
3.1. Introduce Spring Security OAuth2 dependencies: Introduce Spring Security OAuth2 dependencies in Maven or Gradle, for example:
<dependency>
    <groupId>org.springframework.security.oauth</groupId>
    <artifactId>spring-security-oauth2</artifactId>
    <version>2.3.6.RELEASE</version>
</dependency>
3.2. Configure OAuth2 client information: Configure OAuth2 client information in the configuration file of the Spring Boot application, including client ID, client key, authorization server address, etc., for example:
spring:
  security:
    oauth2:
      client:
        registration:
          google:
            clientId: <client-id>
            clientSecret: <client-secret>
            scope:
              - email
              - profile
        provider:
          google:
            authorizationUri: https://accounts.google.com/o/oauth2/auth
            tokenUri: https://accounts.google.com/o/oauth2/token
            userInfoUri: https://www.googleapis.com/oauth2/v3/userinfo
            userNameAttributeName: sub
3.3. Configure Spring Security OAuth2: Configure Spring Security OAuth2, including authorization server, token storage, token endpoint, etc., for example:
@Configuration
@EnableAuthorizationServer
public class AuthorizationServerConfig extends AuthorizationServerConfigurerAdapter {


    @Autowired
    private AuthenticationManager authenticationManager;
    @Autowired
    private UserDetailsService userDetailsService;
    @Autowired
    private DataSource dataSource;
    @Bean
    public TokenStore tokenStore() {


        return new JdbcTokenStore(dataSource);
    }
    @Override
    public void configure(ClientDetailsServiceConfigurer clients) throws Exception {


        clients.jdbc(dataSource);
    }
    @Override
    public void configure(AuthorizationServerEndpointsConfigurer endpoints) throws Exception {


        endpoints.authenticationManager(authenticationManager).tokenStore(tokenStore())
                .userDetailsService(userDetailsService);
    }
}
3.4. Protect resources: Protect resources through Spring Security configuration, including configuring access rules, resource servers, etc., for example:
@Configuration
@EnableResourceServer
public class ResourceServerConfig extends ResourceServerConfigurerAdapter {


    @Override
    public void configure(HttpSecurity http) throws Exception {


        http.authorizeRequests().antMatchers("/api/**").authenticated();
    }
}
3.5. Access protected resources: Use OAuth2 client to access protected resources, including obtaining access tokens, using access tokens to access protected resources, etc., for example:
@RestController
@RequestMapping("/api")
public class ApiController {


    @GetMapping("/user")
    public ResponseEntity<UserInfo> getUserInfo(OAuth2Authentication authentication) {


        UserInfo userInfo = new UserInfo(authentication.getName(), authentication.getAuthorities());
        return ResponseEntity.ok(userInfo);
    }
}
The above are the basic steps for using Spring OAuth2. For specific implementation methods, please refer to Spring official documentation and sample code.
31. What is JWT in Spring? What does it do? How is it used?
1. **JWT (JSON Web Token)** is a lightweight, JSON-based authentication and authorization protocol that can be used to securely transfer various information, including identity information and other metadata.
In the Spring framework, you can use Spring Security JWT to achieve JWT generation and verification, thereby improving the security and scalability of your application.
2. The role of Spring Security JWT is to provide a secure, scalable, and easy-to-use way to protect Web applications and APIs.
With JWT, user identity information and other metadata can be encoded into a secure, transportable JSON object to achieve user authentication and authorization.
Spring Security JWT provides multiple ways to generate and verify JWT, including using symmetric encryption algorithms and asymmetric encryption algorithms.
3. The basic steps for using Spring Security JWT are as follows:
3.1. Introduce Spring Security JWT dependencies: Introduce Spring Security JWT dependencies in Maven or Gradle, for example:
<dependency>
    <groupId>io.jsonwebtoken</groupId>
    <artifactId>jjwt</artifactId>
    <version>0.9.1</version>
</dependency>
3.2. Configure JWT generator: Configure JWT generator, including key, expiration time, etc., for example:
@Configuration
public class JwtConfig {


    @Value("${jwt.secret}")
    private String secret;
    @Value("${jwt.expiration}")
    private long expiration;
    @Bean
    public JwtBuilder jwtBuilder() {


        return Jwts.builder().setExpiration(new Date(System.currentTimeMillis() + expiration * 1000))
                .signWith(SignatureAlgorithm.HS512, secret);
    }
}
3.3. Configure JWT filter: Configure JWT filter to extract JWT from the request and verify it, for example:
public class JwtAuthenticationFilter extends OncePerRequestFilter {


    @Autowired
    private JwtBuilder jwtBuilder;
    @Override
    protected void doFilterInternal(HttpServletRequest request, HttpServletResponse response, FilterChain filterChain)
            throws ServletException, IOException {


        String token = extractToken(request);
        if (StringUtils.isNotBlank(token)) {


            try {


                Jws<Claims> claims = Jwts.parser().setSigningKey(jwtBuilder.getSignature().getBytes())
                        .parseClaimsJws(token);
                String username = claims.getBody().getSubject();
                List<String> roles = (List<String>) claims.getBody().get("roles");
                Authentication authentication = new UsernamePasswordAuthenticationToken(username, null,
                        roles.stream().map(SimpleGrantedAuthority::new).collect(Collectors.toList()));
                SecurityContextHolder.getContext().setAuthentication(authentication);
            } catch (JwtException e) {


                response.sendError(HttpStatus.UNAUTHORIZED.value(), "Invalid token");
                return;
            }
        }
        filterChain.doFilter(request, response);
    }
    private String extractToken(HttpServletRequest request) {


        String bearerToken = request.getHeader("Authorization");
        if (StringUtils.isNotBlank(bearerToken) && bearerToken.startsWith("Bearer ")) {


            return bearerToken.substring(7);
        }
        return null;
    }
}
3.4. Configure Spring Security: Configure Spring Security, including security rules, authentication methods, etc., for example:
@Configuration
@EnableWebSecurity
public class SecurityConfig extends WebSecurityConfigurerAdapter {


    @Autowired
    private UserDetailsService userDetailsService;
    @Autowired
    private JwtAuthenticationFilter jwtAuthenticationFilter;
    @Override
    protected void configure(HttpSecurity http) throws Exception {


        http.authorizeRequests().antMatchers("/api/**").authenticated().and().addFilterBefore(jwtAuthenticationFilter,
                UsernamePasswordAuthenticationFilter.class).csrf().disable().sessionManagement()
                .sessionCreationPolicy(SessionCreationPolicy.STATELESS);
    }
    @Override
    protected void configure(AuthenticationManagerBuilder auth) throws Exception {


        auth.userDetailsService(userDetailsService).passwordEncoder(passwordEncoder());
    }
    @Bean
    public PasswordEncoder passwordEncoder() {


        return new BCryptPasswordEncoder();
    }
}
3.5. Access protected resources: Use JWT to access protected resources, including adding JWT in the request header, for example:
@RestController
@RequestMapping("/api")
public class ApiController {


    @GetMapping("/user")
    public ResponseEntity<UserInfo> getUserInfo(Authentication authentication) {


        UserInfo userInfo = new UserInfo(authentication.getName(), authentication.getAuthorities());
        return ResponseEntity.ok(userInfo);
    }
}
The above are the basic steps and sample code for using Spring Security JWT. For specific implementation methods, please refer to Spring official documentation and sample code.
32. What are the commonly used security frameworks in Spring?
Commonly used security frameworks in Spring include:
1. Spring Security : Spring Security is a security framework based on the Spring framework, which can be used for security control in aspects such as authentication, authorization, and attack prevention. It provides multiple authentication methods and authorization methods that can be flexibly configured and customized. Spring Security also supports integration with other security frameworks, such as OAuth2, LDAP, CAS, etc.
2. Apache Shiro : Apache Shiro is a powerful and easy-to-use Java security framework that can be used for security control in authentication, authorization, password encryption, session management, etc. Its core design philosophy is to keep it simple and easy to use, while providing flexible extensibility and customization.
3. Apache Fortress : Apache Fortress is an open source, role-based access control system that can be used to control access to users and resources, and supports fine-grained permission control and audit tracking.
4. OWASP ESAPI : OWASP ESAPI is an open source, reusable security framework that can be used to implement security control in applications, including input verification, output encoding, access control, password management, etc.
5. JAAS : JAAS (Java Authentication and Authorization Service) is a standard security framework of Java that can be used to implement authentication and authorization, supports multiple authentication methods and authorization methods, and provides flexible scalability and customization.
6. CAS (Central Authentication Service) : CAS is an open source, enterprise-level single sign-on system that can be used for authentication and session management between multiple applications, and supports multiple authentication methods and authorization methods. CAS can also be integrated with other security frameworks such as Spring Security, Shiro, etc.
These security frameworks have different characteristics and applicable scenarios. Choose the appropriate framework for use according to actual needs.
Spring Security and Shiro are both commonly used security frameworks. Spring Security has more comprehensive and powerful functions and is suitable for application scenarios that require comprehensive security control; while Shiro pays more attention to ease of use and flexibility and is suitable for security control. Application scenarios that are not very demanding.
Apache Fortress pays more attention to role access control and is suitable for scenarios that require fine-grained access control for users and resources.
OWASP ESAPI pays more attention to the security control of input and output, and is suitable for scenarios that require comprehensive security control of applications.
JAAS is a Java standard security framework that can be integrated with other frameworks and is suitable for scenarios that require authentication and authorization.
CAS is a single sign-on system suitable for authentication and session management scenarios between multiple applications.
33. What is Spring Security? What does it do? How to configure and use it? How to use Spring Security with Spring Boot?
1. What is Spring Security?
Spring Security is a security framework based on the Spring framework. It provides a complete web application security solution, including authentication, authorization, attack protection and other functions.
2. What is its function?
The main role of Spring Security is to protect web applications from various attacks and threats, so that the security of the application can be improved. Protect the security of web applications and prevent attackers from unauthorized access, operations and theft of sensitive information. Spring Security provides multiple identity authentication methods and multi-layer authorization mechanisms, which can be flexibly configured and expanded according to the needs of the application.
3. How to configure and use it?
Spring Security configuration can be implemented through XML, Java configuration or annotations.
In the XML configuration, you need to introduce the Spring Security namespace and configure the corresponding security elements and related filter chains.
In Java configuration, you need to create a class inherited from WebSecurityConfigurerAdapter and override some of its methods, such as configure(HttpSecurity http), configure(AuthenticationManagerBuilder auth), etc.
In the annotation configuration, you need to use @Secured, @RolesAllowed and other annotations on the corresponding class or method to define access control rules.
4. How to use Spring Security in Spring Boot?
In Spring Boot, Spring Security can be integrated by adding the spring-boot-starter-security dependency, and the related properties of Spring Security can be configured through the application.properties or application.yml file.
The configuration method of using Spring Security in Spring Boot is similar to the Java-based configuration method. You only need to create a class inherited from WebSecurityConfigurerAdapter and override some of its methods, such as configure(HttpSecurity http), configure(AuthenticationManagerBuilder auth), etc.
The following is a simple example of using Spring Security in Spring Boot:
1. Add spring-boot-starter-security dependency
<dependencies>
    <dependency>
        <groupId>org.springframework.boot</groupId>
        <artifactId>spring-boot-starter-security</artifactId>
    </dependency>
</dependencies>
2. Create a configuration class inherited from WebSecurityConfigurerAdapter and rewrite the configure(HttpSecurity http) method to configure access control rules
@Configuration
@EnableWebSecurity
public class SecurityConfig extends WebSecurityConfigurerAdapter {


    @Override
    protected void configure(HttpSecurity http) throws Exception {


        http
            .authorizeRequests()
                .antMatchers("/", "/home").permitAll()
                .anyRequest().authenticated()
                .and()
            .formLogin()
                .loginPage("/login")
                .permitAll()
                .and()
            .logout()
                .permitAll();
    }

    @Autowired
    public void configureGlobal(AuthenticationManagerBuilder auth) throws Exception {


        auth
            .inMemoryAuthentication()
                .withUser("user").password("password").roles("USER");
    }
}
In the above configuration, we defined access control rules, that is, only authenticated users can access protected resources; at the same time, we also configured a simple memory-based authentication mechanism, which provides a user named user, User whose password is password and role is USER.
3. Create a Controller to handle login and logout requests
@Controller
public class LoginController {


    @GetMapping("/login")
    public String login() {


        return "login";
    }

    @GetMapping("/logout")
    public String logout() {


        return "logout";
    }
}
In the above Controller, we defined the processing methods of the two requests /login and /logout. Among them, the /login request returns the login view, which is used to display the login page; the /logout request returns the logout view, which is used to display the logout page.
4. Create login.html and logout.html views
In the above Controller, we defined two views: login and logout. Below are code examples for login.html and logout.html:
<!-- login.html -->
<!DOCTYPE html>
<html>
<head>
    <title>Login Page</title>
</head>
<body>

<h3>Login with Username and Password</h3>

<form method="post" action="/login">
    <label for="username">Username</label>
    <input type="text" id="username" name="username" required autofocus />
    <br />
    <label for="password">Password</label>
    <input type="password" id="password" name="password" required />
    <br />
    <button type="submit">Login</button>
</form>

</body>
</html>
<!-- logout.html -->
<!DOCTYPE html>
<html>
<head>
    <title>Logout Page</title>
</head>
<body>

<h3>You have been logged out.</h3>

<a href="/">Home</a>

</body>
</html>
In the above view, we have defined a form for login and a simple page for logout.
5. Run the application and test
After completing the above steps, we can run the application and test the login and logout functionality.
Enter http://localhost:8080/ in the browser. It should jump to the login page. Enter your username and password to log in. After successful login, we can access protected resources such as http://localhost:8080/home or http://localhost:8080/admin.
When we access protected resources, the system automatically jumps to the login page. At the same time, we can also log out the current user by accessing http://localhost:8080/logout. After successful logout, we will jump to the logout page.
34. What is the difference between authentication and authorization in Spring Security?
Authentication and authorization in Spring Security are two different processes with different functions.
Authentication is to verify whether the user's identity is legitimate and usually includes the following steps:
1. The user provides identity information such as user name and password;
2. The application searches for user information based on identity information;
3. The application compares the password provided by the user with the stored password to see if it is consistent;
4. If the verification passes, the application identifies the user as an authenticated user.
The purpose of authentication is to ensure the legitimacy of user identities and prevent attackers from unauthorized access and operations.
Authorization is to verify whether a user has the permission to access a resource, which usually includes the following steps:
1. The application determines the resources requested by the user based on the user's identity information and requested resource information;
2. The application queries the user's permission information and determines whether the user has permission to access the resource;
3. If the user has permission to access the resource, the application allows the user to access the resource.
The purpose of authorization is to ensure that users only access the resources they are authorized to access and to prevent attackers from performing unauthorized access and operations.
Therefore, authentication and authorization are two different processes. Authentication verifies the user's identity, and authorization verifies whether the user has the permission to access a resource.
In Spring Security, both authentication and authorization are necessary and can be flexibly configured and expanded according to the needs of the application.
35. What is the filter chain in Spring Security? How to configure it?
The filter chain in Spring Security refers to a collection of filters used to intercept and process requests from web applications.
这些过滤器按照一定的顺序依次执行,对请求进行认证、授权、攻击防护等处理,最终将处理结果返回给客户端。
Spring Security中的过滤器链包括以下几个过滤器:
1、SecurityContextPersistenceFilter:用于从Session中获取SecurityContext,并将其存储在线程局部变量中,以便后续处理使用。
2、LogoutFilter:用于处理用户注销请求。
3、UsernamePasswordAuthenticationFilter:用于处理基于用户名和密码的认证请求。
4、AnonymousAuthenticationFilter:用于为没有认证的用户创建一个匿名身份。
5、ExceptionTranslationFilter:用于处理异常情况,例如没有认证或没有权限访问资源等。
6、FilterSecurityInterceptor:用于进行访问控制和授权操作。
在Spring Security中,可以通过配置来自定义过滤器链。可以通过Java配置或XML配置来定义过滤器链,例如:
Java配置
@Configuration
@EnableWebSecurity
public class SecurityConfig extends WebSecurityConfigurerAdapter {


    @Override
    protected void configure(HttpSecurity http) throws Exception {


        http.authorizeRequests()
            .antMatchers("/admin/**").hasRole("ADMIN")
            .antMatchers("/user/**").hasRole("USER")
            .anyRequest().authenticated()
            .and()
            .formLogin()
            .and()
            .logout()
            .and()
            .csrf().disable();
    }

    @Override
    protected void configure(AuthenticationManagerBuilder auth) throws Exception {


        auth.inMemoryAuthentication()
            .withUser("admin").password("{noop}admin").roles("ADMIN")
            .and()
            .withUser("user").password("{noop}user").roles("USER");
    }
}
XML配置
<http>
    <intercept-url pattern="/admin/**" access="ROLE_ADMIN"/>
    <intercept-url pattern="/user/**" access="ROLE_USER"/>
    <intercept-url pattern="/**" access="authenticated"/>
    <form-login/>
    <logout/>
    <csrf disabled="true"/>
</http>
<authentication-manager>
    <authentication-provider>
        <user-service>
            <user name="admin" password="{noop}admin" authorities="ROLE_ADMIN"/>
            <user name="user" password="{noop}user" authorities="ROLE_USER"/>
        </user-service>
    </authentication-provider>
</authentication-manager>
以上代码中,都定义了相应的过滤器链,包括认证、授权、攻击防护等过滤器。
在Java配置中,可以通过configure方法来配置过滤器链;在XML配置中,可以通过和元素来配置过滤器链。
36、Spring Security 中的 CSRF 攻击是什么?如何防止它?
CSRF(Cross-Site Request Forgery)攻击是一种常见的Web应用程序安全漏洞,攻击者利用用户已经认证的身份,在用户不知情的情况下,通过构造恶意请求,让用户执行某些非预期的操作,比如在用户不知情的情况下向银行转账。
Spring Security提供了一些机制来防止CSRF攻击,包括:
启用CSRF防护:Spring Security默认启用CSRF防护,可以通过在WebSecurityConfigurerAdapter中调用csrf()方法来启用CSRF防护。
例如:
@Configuration
@EnableWebSecurity
public class SecurityConfig extends WebSecurityConfigurerAdapter {


    @Override
    protected void configure(HttpSecurity http) throws Exception {


        http.csrf().disable();
    }
}
添加CSRF令牌:Spring Security还提供了在表单中添加CSRF令牌的机制。
在表单中添加CSRF令牌后,Spring Security会验证表单中的CSRF令牌是否与用户会话中的CSRF令牌一致,如果不一致,则拒绝该请求。
可以通过在JSP页面中添加以下代码来生成CSRF令牌:
<input type="hidden" name="${_csrf.parameterName}" value="${_csrf.token}"/>
关闭CSRF防护:在某些情况下,可能需要关闭CSRF防护。
可以通过在WebSecurityConfigurerAdapter中调用csrf().disable()方法来关闭CSRF防护。
但是,关闭CSRF防护会使应用程序暴露于CSRF攻击的风险,应谨慎使用。
@Configuration
@EnableWebSecurity
public class SecurityConfig extends WebSecurityConfigurerAdapter {


    @Override
    protected void configure(HttpSecurity http) throws Exception {


        http.csrf().disable();
    }
}
在以上机制中,启用CSRF防护和添加CSRF令牌是比较常用的防范CSRF攻击的方法。
但是,在实际应用中,还需要注意一些细节,比如:
1、在实现CSRF令牌时,需要避免将CSRF令牌存储在Cookie中,因为Cookie可能会受到XSS攻击的影响,导致CSRF令牌泄漏。
2、在使用AJAX请求时,需要注意跨域请求的安全性,避免跨域请求被攻击者利用来发起CSRF攻击。可以通过设置Access-Control-Allow-Origin等HTTP头来限制跨域请求。
3、在使用Spring Security时,需要及时升级到最新版本,以避免已知的安全漏洞。
37、Spring 中的定时任务是什么?常用的定时任务框架有哪些?它们的优缺点?如何在 Spring Boot 中使用定时任务?
1、Spring 中的定时任务是什么?
Spring中的定时任务是指在特定时间间隔或特定时间点执行指定的任务。
Spring提供了一套完整的定时任务框架,可以方便地实现定时任务的调度和管理。
2、常用的定时任务框架有哪些?它们的优缺点?
常用的定时任务框架包括Spring自带的定时任务框架、Quartz定时任务框架、Elastic Job分布式定时任务框架等。
2.1、Spring自带的定时任务框架是基于Java的Timer和TimerTask类实现的,它提供了简单易用的定时任务调度功能,适用于简单的定时任务场景。
但是,它不能支持分布式定时任务的调度和管理,也不能灵活地配置任务的执行策略。
2.2、Quartz定时任务框架则是一个功能强大、灵活性高的定时任务框架,它支持分布式定时任务调度、任务持久化、任务依赖关系、任务组等功能,可以满足大多数定时任务的需求。
但是,它需要引入额外的依赖,配置相对比较复杂。
2.3、Elastic Job分布式定时任务框架是一个轻量级的分布式定时任务框架,它基于Zookeeper实现分布式任务调度和管理,具有简单易用、性能优异、高可靠性等特点,适用于分布式定时任务的场景。
3、如何在 Spring Boot 中使用定时任务?
在Spring Boot中,可以很方便地使用定时任务。只需要在定时任务类上添加@Scheduled注解,并配置相关属性即可。例如:
@Component
public class MyTask {


    @Scheduled(fixedRate = 5000)
    public void run() {


        // 定时执行的任务
    }
}
以上代码中,@Scheduled注解表示该方法是一个定时任务,fixedRate属性表示每隔5秒执行一次该任务。
除了fixedRate属性外,@Scheduled注解还支持其他一些属性,比如cron属性、fixedDelay属性等,可以根据实际需求进行设置。另外,在使用定时任务时,还需要注意一些细节,比如:
3.1、定时任务的执行时间不应过长,以避免影响其他任务的执行。
3.2、定时任务的执行应尽可能保证幂等性,以避免重复执行任务产生的副作用。
3.3、定时任务的异常应当及时捕获和处理,以避免影响系统的稳定性。
总之,在使用定时任务时,需要根据具体的需求选择合适的定时任务框架,并注意配置和使用细节,以保证定时任务的可靠性和稳定性。
38、Spring 中的 Log4j 是什么?它的作用是什么?Spring 中的 SLF4J 是什么?它的作用是什么?
1、Log4j是一个开源的日志框架,它可以帮助我们在应用程序中生成日志信息,并将日志信息输出到控制台或文件中。Log4j具有高度的可配置性和灵活性,可以根据不同的需求进行不同的配置,比如输出不同级别的日志、定制日志格式、输出日志到不同的目标等。
在Spring框架中,Log4j常用于记录应用程序的运行日志和调试信息,以方便开发人员进行问题排查和性能优化。
2、SLF4J(Simple Logging Facade for Java)是一个Java日志门面框架,它提供了简单易用的API,可以方便地记录应用程序的运行日志。
与Log4j不同的是,SLF4J并不是一个具体的日志实现,而是一个抽象层,它可以与多种日志框架进行集成,包括Log4j、Logback、java.util.logging等。
在Spring中,SLF4J可以通过配置文件和代码进行集成和使用。
它的作用主要是提供一个统一的日志API,方便开发人员进行日志记录,同时可以灵活地切换不同的日志实现,以适应不同的开发环境和需求。
另外,SLF4J还可以提高日志记录的性能和可靠性,以提升系统的稳定性和可维护性。
39、Log4j 、SLF4J 两者有什么区别?
Log4j和SLF4J都是Java日志框架,它们之间有以下区别和优缺点:
1、日志门面和日志实现
Log4j是一个具体的日志实现,而SLF4J是一个日志门面,它并不是具体的日志实现。SLF4J提供了一套通用的API,可以与多个日志实现进行集成,包括Log4j、Logback、java.util.logging等。
2、API的简洁性和灵活性
SLF4J的API比Log4j更简洁、更灵活。它的API只包含了记录日志的核心方法,而Log4j的API则包含了大量的配置方法和日志级别方法。SLF4J的API设计更为灵活,可以根据需要自由组合不同的API,以实现不同的日志记录功能。
3、性能和兼容性
SLF4J相对于Log4j有更好的性能和兼容性。SLF4J的API设计比Log4j更为简洁,因此在调用时会更快。另外,由于SLF4J可以与多种日志实现进行集成,因此在切换日志实现时也更加方便。
4、生态和社区支持
Log4j拥有更为丰富的生态和社区支持。由于Log4j是一个具体的日志实现,因此在使用时可以直接引入相应的依赖,不需要额外的配置。同时,由于Log4j拥有更为广泛的用户和社区,因此在使用和维护上也更加便利。
相同点:
1、都是Java日志框架,用于记录应用程序的运行日志。
2、都提供了简单易用的API,可以方便地记录应用程序的运行日志。
3、都可以通过配置文件和代码进行集成和使用。
不同点:
1、Log4j是一个具体的日志实现,而SLF4J是一个日志门面框架。
2、Log4j的配置相对复杂,容易出现性能和安全问题,SLF4J相对简单易用,可扩展性强。
3、Log4j的优点是成熟稳定、功能丰富、使用广泛,SLF4J的优点是灵活性高、易于使用、可扩展性强。
4、Log4j只能使用Log4j实现,而SLF4J可以与多种日志框架进行集成,包括Log4j、Logback、java.util.logging等。
5、Log4j的缺点是不太容易灵活地切换不同的日志实现,而SLF4J的优点是可以方便地切换不同的日志实现,以适应不同的开发环境和需求。
综上所述,Log4j和SLF4J各有优缺点,需要根据具体的需求和场景选择合适的日志框架。
如果只需要简单的日志记录功能,可以选择Log4j;
如果需要更灵活、更高性能、更好的兼容性和更丰富的生态和社区支持,则可以选择SLF4J。
40、Spring 中的异常处理机制是什么?如何定义全局的异常处理器?
Spring中的异常处理机制是基于AOP(面向切面编程)的。Spring提供了一个统一的异常处理器接口–HandlerExceptionResolver,通过实现该接口可以定义全局的异常处理器。
定义全局的异常处理器有以下两种方式:
1、实现HandlerExceptionResolver接口:实现该接口中的resolveException方法,在该方法中对异常进行处理,并返回一个ModelAndView对象,该对象包含了异常处理的结果(例如:异常信息、跳转页面等)。然后把该异常处理器Bean注册到Spring容器中,它就会自动被Spring框架识别为全局的异常处理器。
public class GlobalExceptionHandler implements HandlerExceptionResolver {


    @Override
    public ModelAndView resolveException(HttpServletRequest request, HttpServletResponse response, Object handler, Exception ex) {


        ModelAndView modelAndView = new ModelAndView();
        modelAndView.addObject("exception", ex.getMessage());
        modelAndView.setViewName("error");
        return modelAndView;
    }
}
2、使用@ControllerAdvice注解:在Spring MVC中,可以使用@ControllerAdvice注解定义一个全局的异常处理器。该注解可以标注在一个类上,该类中的方法可以用来处理所有Controller中抛出的异常。
@ControllerAdvice
public class GlobalExceptionHandler {


    @ExceptionHandler(value = Exception.class)
    public ModelAndView handleException(Exception e) {


        ModelAndView modelAndView = new ModelAndView();
        modelAndView.addObject("exception", e.getMessage());
        modelAndView.setViewName("error");
        return modelAndView;
    }
}
以上两种方式都可以定义全局的异常处理器,具体使用哪种方式需要根据实际业务需求和开发习惯进行选择。
定义全局的异常处理器可以通过以下步骤实现:
1、创建一个异常处理类,使用@ControllerAdvice注解标注该类,将它声明为全局的异常处理器。
2、在异常处理类中定义相应的异常处理方法,使用@ExceptionHandler注解标注该方法,指定要处理的异常类型。
3、在异常处理方法中编写具体的异常处理逻辑,比如记录日志、返回错误信息等。
下面是一个简单的示例代码:
@ControllerAdvice
public class GlobalExceptionHandler {


    @ExceptionHandler(Exception.class)
    public ResponseEntity handleException(Exception ex) {


        // 记录日志
        logger.error("Exception:", ex);
        // 返回错误信息
        return ResponseEntity.status(HttpStatus.INTERNAL_SERVER_ERROR).body("Internal server error");
    }
}
上述代码定义了一个全局的异常处理器,它会处理所有的Exception类型的异常。
当发生异常时,会记录日志,并返回一个500 Internal server error的错误信息给客户端。
需要注意的是,需要在Spring配置文件中开启注解驱动异常处理机制,才能使全局的异常处理器生效。
可以在配置文件中添加以下配置:
<mvc:annotation-driven>
    <mvc:message-converters>
        <bean class="org.springframework.http.converter.StringHttpMessageConverter"/>
        <bean class="org.springframework.http.converter.json.MappingJackson2HttpMessageConverter"/>
    </mvc:message-converters>
</mvc:annotation-driven>
41、Spring 中如何处理异常?常用的异常处理方式有哪些?
Spring中处理异常的方式有多种,常用的异常处理方式如下:
1、使用try-catch语句处理异常:在方法中使用try-catch语句捕获异常,然后进行相应的处理。这种方式适合处理局部异常,比如数据库操作或者IO操作等。
2、使用@ControllerAdvice注解处理全局异常:通过在类上使用@ControllerAdvice注解,可以定义一个全局的异常处理类,用于处理所有Controller层抛出的异常。在该类中使用@ExceptionHandler注解定义需要处理的异常类型和处理逻辑。
示例代码:
@ControllerAdvice
public class GlobalExceptionHandler {


    @ExceptionHandler(Exception.class)
    public ResponseEntity handleException(Exception ex) {


        // 记录日志
        logger.error("Exception:", ex);
        // 返回错误信息
        return ResponseEntity.status(HttpStatus.INTERNAL_SERVER_ERROR).body("Internal server error");
    }
}
3、使用@ResponseBody和@ExceptionHandler注解处理ajax请求异常:通过在Controller层中使用@ResponseBody注解和@ExceptionHandler注解,可以处理ajax请求抛出的异常,并返回json格式的错误信息。
示例代码:
@Controller
public class UserController {


    @ExceptionHandler(Exception.class)
    public ResponseEntity handleException(Exception ex) {


        // 记录日志
        logger.error("Exception:", ex);
        // 返回错误信息
        return ResponseEntity.status(HttpStatus.INTERNAL_SERVER_ERROR).body("Internal server error");
    }
}
4、使用HandlerExceptionResolver接口处理异常
实现HandlerExceptionResolver接口,然后在resolveException方法中根据异常类型做出相应的处理。使用这种方式可以处理全局的异常。
示例代码:
@Component
public class GlobalExceptionHandler implements HandlerExceptionResolver {


    @Override
    public ModelAndView resolveException(HttpServletRequest request, HttpServletResponse response, Object handler, Exception ex) {


        // 记录日志
        logger.error("Exception:", ex);
        // 返回错误信息
        ModelAndView modelAndView = new ModelAndView();
        modelAndView.addObject("errorMsg", "Internal server error");
        modelAndView.setViewName("error");
        return modelAndView;
    }
}
5、自定义异常类:通过自定义异常类,可以更好地区分不同类型的异常,并根据异常类型进行相应的处理。可以继承Exception或RuntimeException类,自定义异常类的构造方法可以传入错误信息等参数。
6、使用Spring的AOP机制处理异常:通过使用Spring的AOP机制,在目标方法抛出异常时,执行相应的异常处理逻辑。可以通过在配置文件中定义一个切面,使用@AfterThrowing注解定义需要处理的异常类型和处理逻辑。
综上所述,Spring中处理异常的方式有多种,可以根据具体的需求和场景选择适合的异常处理方式。
42、Spring 中的文件上传是什么? Spring 中如何处理文件上传和下载?如何在 Spring Boot 中实现文件上传和下载?
Spring中的文件上传是指将客户端上传的文件保存到服务器端的操作。在Spring中,可以使用MultipartFile类来处理文件上传和下载。
下面是Spring中处理文件上传和下载的步骤:
1、配置文件上传解析器
在Spring配置文件中配置文件上传解析器,例如使用CommonsMultipartResolver类。
配置示例:
<bean id="multipartResolver" class="org.springframework.web.multipart.commons.CommonsMultipartResolver">
    <property name="maxUploadSize" value="10485760"/> <!-- 10MB -->
</bean>
2、处理文件上传
在Controller中定义一个处理文件上传的方法,使用@RequestParam注解将上传的文件绑定到MultipartFile类型的参数中。然后使用MultipartFile的方法保存文件到服务器端。
示例代码:
@PostMapping("/upload")
public String handleFileUpload(@RequestParam("file") MultipartFile file) {


    if (!file.isEmpty()) {


        try {


            // 获取文件名和保存路径
            String filename = file.getOriginalFilename();
            String filepath = "/path/to/save/file";
            // 创建文件并保存到服务器
            File dest = new File(filepath + filename);
            file.transferTo(dest);
            // 处理上传成功逻辑
            return "Upload success";
        } catch (IOException e) {


            // 处理上传失败逻辑
            return "Upload failed";
        }
    } else {


        // 处理文件为空的逻辑
        return "File is empty";
    }
}
3、处理文件下载
在Controller中定义一个处理文件下载的方法,使用HttpServletResponse类将文件写入到响应输出流中。
示例代码:
@GetMapping("/download")
public void handleFileDownload(HttpServletResponse response) {


    try {


        // 获取文件名和路径
        String filename = "file.txt";
        String filepath = "/path/to/download/file";
        // 设置响应头
        response.setContentType("application/octet-stream");
        response.setHeader("Content-Disposition", "attachment; filename=\"" + filename + "\"");
        // 读取文件并写入响应输出流
        InputStream is = new FileInputStream(filepath + filename);
        IOUtils.copy(is, response.getOutputStream());
        response.flushBuffer();
    } catch (IOException ex) {


        // 处理下载失败逻辑
        ex.printStackTrace();
    }
}
以上是Spring中处理文件上传和下载的基本步骤,可以根据具体的需求进行调整。
在Spring Boot中实现文件上传和下载非常简单,下面是实现文件上传和下载的步骤:
1.添加依赖
在pom.xml文件中添加以下依赖:
<dependency>
    <groupId>org.springframework.boot</groupId>
    <artifactId>spring-boot-starter-web</artifactId>
</dependency>
<dependency>
    <groupId>commons-io</groupId>
    <artifactId>commons-io</artifactId>
    <version>2.6</version>
</dependency>
第一个依赖是Spring Boot Web Starter,第二个依赖是Apache Commons IO,用于文件读写操作。
2.配置文件上传解析器
在Spring Boot中,我们可以很方便地使用application.properties或application.yml配置文件来配置文件上传解析器。
示例:
# 设置文件上传解析器
spring.servlet.multipart.enabled=true
spring.servlet.multipart.max-file-size=10MB
spring.servlet.multipart.max-request-size=10MB
spring.servlet.multipart.file-size-threshold=0
上述配置设置了最大上传文件大小为10MB,同时还可以配置文件上传时的阈值大小、临时文件存放路径等。
- 处理文件上传
在Controller中定义一个处理文件上传的方法,使用@RequestParam注解将上传的文件绑定到MultipartFile类型的参数中。然后使用MultipartFile的方法保存文件到服务器端。
示例代码:
@PostMapping("/upload")
public String handleFileUpload(@RequestParam("file") MultipartFile file) {


    if (!file.isEmpty()) {


        try {


            // 获取文件名和保存路径
            String filename = file.getOriginalFilename();
            String filepath = "/path/to/save/file";
            // 创建文件并保存到服务器
            File dest = new File(filepath + filename);
            file.transferTo(dest);
            // 处理上传成功逻辑
            return "Upload success";
        } catch (IOException e) {


            // 处理上传失败逻辑
            return "Upload failed";
        }
    } else {


        // 处理文件为空的逻辑
        return "File is empty";
    }
}
4.处理文件下载
在Controller中定义一个处理文件下载的方法,使用HttpServletResponse类将文件写入到响应输出流中。
示例代码:
@GetMapping("/download")
public void handleFileDownload(HttpServletResponse response) {


    try {


        // 获取文件名和路径
        String filename = "file.txt";
        String filepath = "/path/to/download/file";
        // 设置响应头
        response.setContentType("application/octet-stream");
        response.setHeader("Content-Disposition", "attachment; filename=\"" + filename + "\"");
        // 读取文件并写入响应输出流
        InputStream is = new FileInputStream(filepath + filename);
        IOUtils.copy(is, response.getOutputStream());
        response.flushBuffer();
    } catch (IOException ex) {


        // 处理下载失败逻辑
        ex.printStackTrace();
    }
}
以上是在Spring Boot中实现文件上传和下载的基本步骤,使用起来非常简单。
43、Spring 中的 WebSocket 是什么?
WebSocket 是一种在单个 TCP 连接上进行全双工通信的通信协议。
Spring 中的 WebSocket 是一个基于 WebSocket 协议实现的双向通信的 API,用于实现客户端和服务器之间的实时通信。
在传统的 HTTP 协议中,客户端向服务器发送请求,服务器返回响应,这种通信方式是单向的。
而 WebSocket 协议允许客户端和服务器之间建立一个持久的连接,双方可以通过这个连接进行双向通信,而不必每次都发起新的请求。
Spring 中的 WebSocket API 提供了一些类和接口,使得开发者可以很方便地实现 WebSocket 通信。
开发者可以通过实现 WebSocketHandler 接口来处理 WebSocket 连接和消息,通过实现 HandshakeInterceptor 接口来拦截 WebSocket 握手请求,以及通过使用注解来处理客户端的消息和事件。
Spring 的 WebSocket 实现具有以下特点:
1.支持基于注解的消息处理方式,简化了开发流程。
2.支持广播消息,可以将消息发送给所有连接的客户端。
3.支持通过拦截器实现身份验证等功能。
4.支持 STOMP(Simple Text Oriented Messaging Protocol)协议,这是一种用于处理消息的协议,可以提供更高级的消息处理能力。
总的来说,Spring 的 WebSocket API 使得开发者可以更加便捷地实现实时通信功能,这对于需要实现实时数据更新的应用场景非常有用。
44、Spring 中如何使用 WebSocket?如何在 Spring Boot 中实现 WebSocket?
在 Spring 中使用 WebSocket 需要以下步骤:
1.添加依赖
在 pom.xml 文件中添加以下依赖:
<dependency>
    <groupId>org.springframework.boot</groupId>
    <artifactId>spring-boot-starter-websocket</artifactId>
</dependency>
2.实现 WebSocketHandler 接口
在 Spring 中实现 WebSocket 功能需要实现 WebSocketHandler 接口,该接口定义了处理 WebSocket 连接、消息发送、连接关闭等方法。
示例代码:
@Component
public class MyWebSocketHandler implements WebSocketHandler {


    @Override
    public void afterConnectionEstablished(WebSocketSession session) throws Exception {


        // 处理 WebSocket 连接建立逻辑
    }
    @Override
    public void handleMessage(WebSocketSession session, WebSocketMessage<?> message) throws Exception {


        // 处理 WebSocket 消息逻辑
    }
    @Override
    public void handleTransportError(WebSocketSession session, Throwable exception) throws Exception {


        // 处理 WebSocket 传输错误逻辑
    }
    @Override
    public void afterConnectionClosed(WebSocketSession session, CloseStatus closeStatus) throws Exception {


        // 处理 WebSocket 连接关闭逻辑
    }
    @Override
    public boolean supportsPartialMessages() {


        return false;
    }
}
3.配置 WebSocket
在 Spring 中配置 WebSocket 需要使用 WebSocketConfigurer 接口,该接口定义了配置 WebSocket 的方法。
示例代码:
@Configuration
@EnableWebSocket
public class WebSocketConfig implements WebSocketConfigurer {


    @Autowired
    private MyWebSocketHandler myWebSocketHandler;
    @Override
    public void registerWebSocketHandlers(WebSocketHandlerRegistry registry) {


        registry.addHandler(myWebSocketHandler, "/ws").setAllowedOrigins("*");
    }
}
上述代码中,我们将 MyWebSocketHandler 注册为 WebSocket 处理器,并指定 WebSocket 的访问路径为 /ws,同时允许所有域名的客户端进行连接。
- 使用 WebSocket API 进行通信
在客户端中使用 WebSocket API 可以进行连接、发送消息、关闭连接等操作。示例代码:
var socket = new WebSocket("ws://localhost:8080/ws");
socket.onopen = function() {


    // 处理 WebSocket 连接建立逻辑
};
socket.onmessage = function(event) {


    // 处理 WebSocket 消息逻辑
};
socket.onclose = function(event) {


    // 处理 WebSocket 连接关闭逻辑
};
socket.onerror = function(event) {


    // 处理 WebSocket 连接错误逻辑
};
以上是使用 Spring 实现 WebSocket 的基本步骤。使用 WebSocket 可以方便地实现实时通信功能,如在线聊天、实时数据推送等。
在 Spring Boot 中实现 WebSocket 可以更加方便,Spring Boot 提供了自动配置功能,无需手动进行配置。
只需要在 pom.xml 文件中添加以下依赖即可:
<dependency>
    <groupId>org.springframework.boot</groupId>
    <artifactId>spring-boot-starter-websocket</artifactId>
</dependency>
然后在应用程序中实现 WebSocketHandler 接口即可。Spring Boot 会自动扫描并注册 WebSocket 处理器。
具体步骤如下:
实现 WebSocketHandler 接口
在 Spring Boot 中实现 WebSocket 功能需要实现 WebSocketHandler 接口,该接口定义了处理 WebSocket 连接、消息发送、连接关闭等方法。
示例代码:
@Component
public class MyWebSocketHandler implements WebSocketHandler {


    @Override
    public void afterConnectionEstablished(WebSocketSession session) throws Exception {


        // 处理 WebSocket 连接建立逻辑
    }
    @Override
    public void handleMessage(WebSocketSession session, WebSocketMessage<?> message) throws Exception {


        // 处理 WebSocket 消息逻辑
    }
    @Override
    public void handleTransportError(WebSocketSession session, Throwable exception) throws Exception {


        // 处理 WebSocket 传输错误逻辑
    }
    @Override
    public void afterConnectionClosed(WebSocketSession session, CloseStatus closeStatus) throws Exception {


        // 处理 WebSocket 连接关闭逻辑
    }
    @Override
    public boolean supportsPartialMessages() {


        return false;
    }
}
配置 WebSocket
Spring Boot 提供了自动配置功能,无需手动进行配置。只需要在应用程序启动类上添加 @EnableWebSocket 注解即可启用 WebSocket 功能:
@SpringBootApplication
@EnableWebSocket
public class MyApplication {


    public static void main(String[] args) {


        SpringApplication.run(MyApplication.class, args);
    }
}
在 MyWebSocketHandler 类上使用 @Component 注解,使其成为 Spring 容器中的 Bean。
使用 WebSocket API 进行通信
在客户端中使用 WebSocket API 可以进行连接、发送消息、关闭连接等操作。
示例代码:
var socket = new WebSocket("ws://localhost:8080/ws");
socket.onopen = function() {


    // 处理 WebSocket 连接建立逻辑
};
socket.onmessage = function(event) {


    // 处理 WebSocket 消息逻辑
};
socket.onclose = function(event) {


    // 处理 WebSocket 连接关闭逻辑
};
socket.onerror = function(event) {


    // 处理 WebSocket 连接错误逻辑
};
这里的 ws://localhost:8080/ws 指定了 WebSocket 的访问路径为 /ws,与 MyWebSocketHandler 中的配置保持一致。
在上述代码中,可以通过 WebSocket.send() 方法发送消息,
例如:
socket.send("Hello, WebSocket!");
配置 WebSocket 拦截器
如果需要在 WebSocket 连接建立或消息处理之前进行一些处理,可以使用 WebSocket 拦截器。
示例代码:
@Configuration
public class WebSocketConfig implements WebSocketConfigurer {


    @Autowired
    private MyWebSocketHandler myWebSocketHandler;
    @Override
    public void registerWebSocketHandlers(WebSocketHandlerRegistry registry) {


        registry.addHandler(myWebSocketHandler, "/ws").addInterceptors(new MyWebSocketInterceptor()).setAllowedOrigins("*");
    }
}
这里的 MyWebSocketInterceptor 是自定义的 WebSocket 拦截器,需要实现 HandshakeInterceptor 接口。在 registerWebSocketHandlers() 方法中使用 addInterceptors() 方法添加拦截器。
public class MyWebSocketInterceptor implements HandshakeInterceptor {


    @Override
    public boolean beforeHandshake(ServerHttpRequest request, ServerHttpResponse response, WebSocketHandler wsHandler,
            Map<String, Object> attributes) throws Exception {


        // WebSocket 连接建立之前的处理逻辑
        return true;
    }
    @Override
    public void afterHandshake(ServerHttpRequest request, ServerHttpResponse response, WebSocketHandler wsHandler,
            Exception exception) {


        // WebSocket 连接建立之后的处理逻辑
    }
}
在 beforeHandshake() 方法中可以进行一些准备工作,例如将用户信息存储到 attributes 中,在 MyWebSocketHandler 中可以通过 WebSocketSession.getAttributes() 方法获取到这些信息。在 afterHandshake() 方法中可以进行一些清理工作。
配置 WebSocket 消息转换器
WebSocket 消息可以是文本消息或二进制消息,Spring Boot 使用 WebSocketMessage 类表示 WebSocket 消息。默认情况下,Spring Boot 只支持文本消息。如果需要支持二进制消息,可以注册消息转换器。
示例代码:
@Configuration
public class WebSocketConfig implements WebSocketConfigurer {


    @Autowired
    private MyWebSocketHandler myWebSocketHandler;
    @Override
    public void registerWebSocketHandlers(WebSocketHandlerRegistry registry) {


        registry.addHandler(myWebSocketHandler, "/ws").setMessageConverters(new ByteArrayMessageConverter()).setAllowedOrigins("*");
    }
}
这里使用了 ByteArrayMessageConverter,可以将二进制消息转换为 byte[] 类型。如果需要将二进制消息转换为其他类型,可以自定义消息转换器。
45、Spring 中的 SpEL 是什么?它的作用是什么?怎么使用的?
SpEL(Spring Expression Language)是 Spring 框架中的表达式语言,它是一种简单而强大的表达式语言,支持在运行时进行查询和操作对象图。
SpEL 可以用于在 Spring 配置文件中指定属性值、注解中指定属性值、在代码中进行数据操作等。
SpEL 的作用主要有以下几点:
1.在 Spring 配置文件中指定属性值,从而实现配置的动态化。
2.在注解中指定属性值,从而实现注解的动态化。
3.在代码中进行数据操作,从而实现数据的动态化。
SpEL 的语法与大部分编程语言的表达式语言类似,支持运算符、函数调用、属性访问等基本语法。
下面是一些示例:
1.访问对象的属性
<bean id="person" class="com.example.Person">
    <property name="name" value="张三" />
    <property name="age" value="25" />
</bean>
<bean id="personService" class="com.example.PersonService">
    <property name="person" value="#{person}" />
</bean>
在上述代码中,使用 #{person} 表达式访问 person 对象的属性,从而将 person 对象注入到 personService 中。
- 运算符
<bean id="person" class="com.example.Person">
    <property name="name" value="张三" />
    <property name="age" value="25" />
</bean>
<bean id="personService" class="com.example.PersonService">
    <property name="isAdult" value="#{person.age ge 18}" />
</bean>
在上述代码中,使用 ge 运算符比较 person 对象的 age 属性与 18 的大小关系,从而将比较结果注入到 personService 的 isAdult 属性中。
- 函数调用
<bean id="person" class="com.example.Person">
    <property name="name" value="张三" />
    <property name="age" value="25" />
</bean>
<bean id="personService" class="com.example.PersonService">
    <property name="nameLength" value="#{fn:length(person.name)}" />
    <!-- 或者 -->
    <property name="nameLength" value="#{person.name.length()}" />
</bean>
在上述代码中,使用 #{fn:length(person.name)} 或者 #{person.name.length()} 表达式调用 SpEL 中的 length() 函数获取 person 对象的 name 属性的长度,并将长度值注入到 personService 的 nameLength 属性中。
4.SpEL 还支持集合、数组、Map 等数据类型的访问和操作,具体语法可以参考 Spring 的官方文档。
在使用 SpEL 时,需要在 Spring 配置文件中使用 context:component-scan 或 context:annotation-config 元素开启 SpEL 的支持。
下面是 SpEL 的一些使用示例:
1.引用 Bean 的属性值:#{person.name}
2.调用方法:#{person.getName()}
3.进行算术运算:#{1 + 2 * 3}
4.进行逻辑运算:#{person.age > 18 and person.age < 60}
5.使用条件运算符:#{person.age > 18 ? ‘成年人’ : ‘未成年人’}
6.使用正则表达式:#{person.name matches ‘Tom.*’}
7.访问数组元素:#{numbers[0]}
8.访问 List 元素:#{list[0]}
9.访问 Map 元素:#{map[‘key’]}
在实际使用中,SpEL 可以用于动态地配置 Bean 属性值、条件判断、异常处理、数据校验等场景。
SpEL 的使用可以提高代码的灵活性和可重用性,使应用程序更易于维护和扩展。
46、Spring 中的 Profile 是什么?它的作用是什么?如何使用?
Spring 中的 Profile 是一种用于配置应用程序的机制,可以根据不同的环境(如开发、测试、生产)来加载不同的配置文件。
通过 Profile,可以方便地管理不同环境下的配置信息,从而提高应用程序的可移植性和可配置性。
Profile 的作用主要有以下几个方面:
1.根据不同的环境加载不同的配置文件,实现环境隔离。
2.可以通过命令行参数、环境变量等方式指定当前使用的 Profile。
3.提高应用程序的可移植性和可配置性,降低应用程序的维护成本。
在 Spring 中,可以通过 @Profile 注解来标识哪些 Bean 属于哪个 Profile。同时,可以在配置文件中通过 spring.profiles.active 属性来指定当前使用的 Profile。
下面是 Profile 的一些使用示例:
1.在类上标注 Profile 注解:
@Profile("dev")
@Configuration
public class DevConfig {


    //...
}
2.在 XML 配置文件中指定 Profile:
<beans profile="dev">
    <!-- dev 环境下的 Bean 配置 -->
</beans>
<beans profile="prod">
    <!-- prod 环境下的 Bean 配置 -->
</beans>
3.在 application.properties 配置文件中指定当前使用的 Profile:
spring.profiles.active=dev
- 运行时指定 Profile
可以通过启动参数或环境变量来指定 Profile。
例如,在启动应用程序时使用以下命令:
java -jar myApp.jar --spring.profiles.active=prod
上述命令表示使用 prod Profile 运行应用程序。
Profile 可以用于不同环境中的配置文件、Bean、数据源、日志等方面。使用 Profile 可以使应用程序的配置更加灵活和可移植,便于在不同环境中进行开发和调试。
通过使用 Profile,可以将应用程序的配置信息与环境隔离开来,避免了在不同环境下频繁修改配置文件的麻烦。
同时,可以方便地切换不同的 Profile,使得应用程序更加灵活和可配置。
47、Spring 中的 WebFlux 是什么?它的作用是什么?如何使用 WebFlux?
WebFlux 是 Spring Framework 5 中新增的 Web 模块,用于支持响应式编程。
WebFlux 的作用是提供一种非阻塞的 Web 编程模型,使应用程序能够更加高效地处理大量的并发请求。
WebFlux 基于 Reactor 框架实现,支持响应式流式处理,并提供了函数式编程的风格。
WebFlux 的主要特点和作用如下:
1.非阻塞和异步处理:WebFlux 基于 Netty 服务器实现,使用非阻塞和异步处理方式,可以在单个线程上处理大量的并发请求。
2.响应式流式处理:WebFlux 支持响应式流式处理,能够更加高效地处理数据流,提高应用程序的吞吐量和性能。
3.函数式编程风格:WebFlux 采用函数式编程风格,可以使代码更加简洁、易于理解和维护。
4.支持多种编程模型:WebFlux 支持传统的基于 Servlet 的编程模型,也支持基于 Reactive Streams 的编程模型,可以根据实际需求选择合适的编程模型。
使用 WebFlux 的步骤如下:
1.引入 WebFlux 依赖
在 Maven 或 Gradle 中引入 WebFlux 依赖,
例如:
<dependency>
    <groupId>org.springframework.boot</groupId>
    <artifactId>spring-boot-starter-webflux</artifactId>
</dependency>
2.创建路由
使用 RouterFunctions 或者注解方式创建路由。
例如,使用 RouterFunctions 创建路由:
@Configuration
public class RouterConfig {


    @Bean
    public RouterFunction<ServerResponse> route(UserHandler userHandler) {


        return RouterFunctions.route(RequestPredicates.GET("/users"), userHandler::listUsers)
            .andRoute(RequestPredicates.GET("/users/{id}"), userHandler::getUserById);
    }
}
3.创建 Handler
创建处理器类,实现业务逻辑。
例如:
@Component
public class UserHandler {


    public Mono<ServerResponse> listUsers(ServerRequest request) {


        Flux<User> users = userService.listUsers();
        return ServerResponse.ok().body(users, User.class);
    }

    public Mono<ServerResponse> getUserById(ServerRequest request) {


        Long id = Long.valueOf(request.pathVariable("id"));
        Mono<User> user = userService.getUserById(id);
        return ServerResponse.ok().body(user, User.class);
    }
}
4.创建控制器
使用 @RestController 注解创建控制器,并编写相应的请求处理方法,
例如:
@RestController
public class HelloController {


    @GetMapping("/hello")
    public Mono<String> hello() {


        return Mono.just("Hello, World!");
    }
}
上述代码表示创建一个响应式的控制器,处理 GET 请求 /hello,并返回一个 Mono 对象,表示一个异步非阻塞的处理结果。
- 启动 WebFlux 服务器
使用 WebFluxConfigurer 配置类配置 WebFlux 服务器,
例如:
@Configuration
public class WebConfig implements WebFluxConfigurer {


    @Override
    public void configureHttpMessageCodecs(ServerCodecConfigurer configurer) {


        configurer.defaultCodecs().jackson2JsonEncoder(new Jackson2JsonEncoder());
        configurer.defaultCodecs().jackson2JsonDecoder(new Jackson2JsonDecoder());
    }
}
上述代码表示配置 Jackson 序列化和反序列化器,用于处理 JSON 数据。
- 运行应用程序
启动应用程序,访问定义的路由即可。
总之,WebFlux 是 Spring Framework 5 中新增的 Web 模块,用于支持响应式编程。
WebFlux 可以提供非阻塞和异步的 Web 编程模型,支持响应式流式处理,并提供了函数式编程的风格。
WebFlux 可以用于构建高并发、高吞吐量的 Web 应用程序,适用于需要处理大量并发请求的场景。
WebFlux 提供了一种基于反应式流的编程模型,可以减少线程的开销,提高应用程序的性能和可扩展性。
48、Spring 中如何进行单元测试?常用的测试框架有哪些?
Spring 中进行单元测试可以使用 Spring 的测试框架,常用的测试框架有 JUnit、Mockito、AssertJ 等。下面分别介绍它们的使用方法:
1.JUnit
JUnit 是 Java 中最常用的单元测试框架,可以使用 JUnit 进行 Spring 的单元测试。使用方法如下:
引入 JUnit 和 Spring 的测试框架依赖
<dependency>
    <groupId>org.springframework</groupId>
    <artifactId>spring-test</artifactId>
    <version>${spring.version}</version>
    <scope>test</scope>
</dependency>
<dependency>
    <groupId>junit</groupId>
    <artifactId>junit</artifactId>
    <version>${junit.version}</version>
    <scope>test</scope>
</dependency>
使用 @RunWith 注解指定运行器为 SpringJUnit4ClassRunner
@RunWith(SpringJUnit4ClassRunner.class)
@SpringBootTest
public class UserServiceTest {


    //...
}
使用 @Autowired 注解注入需要测试的 Bean
@Autowired
private UserService userService;
使用 JUnit 的断言进行测试
@Test
public void testGetUserById() {


    User user = userService.getUserById(1L);
    assertNotNull(user);
    assertEquals(user.getId(), 1L);
    assertEquals(user.getName(), "张三");
}
2.Mockito
Mockito 是一种流行的 Java 单元测试框架,可以用于模拟和测试对象之间的交互。使用方法如下:
引入 Mockito 依赖
<dependency>
    <groupId>org.mockito</groupId>
    <artifactId>mockito-core</artifactId>
    <version>${mockito.version}</version>
    <scope>test</scope>
</dependency>
使用 @Mock 注解创建需要模拟的对象
@Mock
private UserRepository userRepository;
使用 @InjectMocks 注解注入需要测试的对象,并初始化
@InjectMocks
private UserService userService = new UserServiceImpl();

@Before
public void setUp() {


    MockitoAnnotations.openMocks(this);
}
使用 Mockito 的方法进行测试
@Test
public void testGetUserById() {


    when(userRepository.getUserById(1L)).thenReturn(new User(1L, "张三"));

    User user = userService.getUserById(1L);
    assertNotNull(user);
    assertEquals(user.getId(), 1L);
    assertEquals(user.getName(), "张三");
}
3.AssertJ
AssertJ 是一种流行的 Java 单元测试框架,可以提供更加易读和易用的断言。使用方法如下:
引入 AssertJ 依赖
<dependency>
    <groupId>org.assertj</groupId>
    <artifactId>assertj-core</artifactId>
    <version>${assertj.version}</version>
    <scope>test</scope>
</dependency>
使用 AssertJ 的方法进行测试
@Test
public void testGetUserById() {


    User user = userService.getUserById(1L);
    assertThat(user).isNotNull()
                     .hasFieldOrPropertyWithValue("id", 1L)
                     .hasFieldOrPropertyWithValue("name", "张三");
}
以上是 Spring 中常用的单元测试框架,可以根据实际情况选择使用。在进行单元测试时,需要保证测试覆盖率和测试质量,以确保代码的可靠性和稳定性。
49、Spring 中的集成测试是什么?如何在 Spring Boot 中进行集成测试?
Spring 中的集成测试是指对整个系统进行测试,测试系统内各个组件之间的交互是否正常。
在 Spring 中进行集成测试需要启动整个应用程序,测试应用程序的行为和结果是否符合预期。
Spring 提供了多种方式进行集成测试,包括使用 Spring 的测试框架、使用 REST 客户端、使用 Selenium 等。
下面以 Spring Boot 中的集成测试为例,介绍如何进行集成测试:
1.引入依赖
在 pom.xml 文件中引入 Spring Boot 的测试依赖,如下所示:
<dependency>
    <groupId>org.springframework.boot</groupId>
    <artifactId>spring-boot-starter-test</artifactId>
    <scope>test</scope>
</dependency>
2.创建测试类
创建测试类,并使用 @SpringBootTest 注解指定需要测试的应用程序类,
如下所示:
@RunWith(SpringRunner.class)
@SpringBootTest(classes = Application.class, webEnvironment = SpringBootTest.WebEnvironment.RANDOM_PORT)
public class UserControllerTest {


    //...
}
其中,classes 属性指定需要测试的应用程序类,webEnvironment 属性指定 Web 应用程序的运行环境,RANDOM_PORT 表示随机端口。
使用 TestRestTemplate 进行测试
使用 TestRestTemplate 可以模拟 HTTP 请求进行测试,
如下所示:
@Autowired
private TestRestTemplate restTemplate;

@Test
public void testGetUserById() {


    ResponseEntity<User> responseEntity = restTemplate.getForEntity("/users/{id}", User.class, 1L);
    User user = responseEntity.getBody();
    assertNotNull(user);
    assertEquals(user.getId(), 1L);
    assertEquals(user.getName(), "张三");
}
使用 MockMvc 进行测试
使用 MockMvc 可以模拟 HTTP 请求进行测试,
如下所示:
@Autowired
private MockMvc mockMvc;

@Test
public void testGetUserById() throws Exception {


    mockMvc.perform(MockMvcRequestBuilders.get("/users/{id}", 1L))
        .andExpect(status().isOk())
        .andExpect(jsonPath("$.id", is(1)))
        .andExpect(jsonPath("$.name", is("张三")));
}
以上是 Spring Boot 中进行集成测试的方法,可以根据实际情况选择使用。在进行集成测试时,需要保证测试覆盖率和测试质量,以确保应用程序的可靠性和稳定性。
50、Spring 中如何使用消息队列?
在 Spring 中,可以使用 Spring Integration 或者 Spring AMQP 框架来使用消息队列。
1、Spring Integration
Spring Integration 是一个集成框架,可以将不同的系统和组件集成在一起。它提供了一些组件来实现消息队列的功能,包括:
MessageChannel:消息通道,用于发送和接收消息。
Message:消息对象,包括消息头和消息体。
MessageHandler:消息处理器,用于处理接收到的消息。
MessageProducer:消息生产者,用于发送消息。
MessageConsumer:消息消费者,用于接收消息。
Spring Integration 支持多种消息队列协议,包括 JMS、AMQP、Kafka 等。
2、Spring AMQP
Spring AMQP 是一个 AMQP(Advanced Message Queuing Protocol)客户端库,用于实现基于 AMQP 协议的消息队列。它提供了一些组件来实现消息队列的功能,包括:
ConnectionFactory:连接工厂,用于创建和管理 AMQP 连接。
AmqpTemplate:AMQP 模板,用于发送和接收消息。
MessageConverter:消息转换器,用于将消息对象转换为 AMQP 消息和将 AMQP 消息转换为消息对象。
SimpleMessageListenerContainer:简单消息监听容器,用于监听并处理接收到的消息。
Spring AMQP 支持 RabbitMQ 和 ActiveMQ 等 AMQP 实现。
使用 Spring AMQP:
@Configuration
public class AmqpConfig {


    @Bean
    public ConnectionFactory connectionFactory() {


        CachingConnectionFactory connectionFactory = new CachingConnectionFactory();
        connectionFactory.setAddresses("localhost:5672");
        connectionFactory.setUsername("guest");
        connectionFactory.setPassword("guest");
        return connectionFactory;
    }
    @Bean
    public RabbitTemplate rabbitTemplate() {


        RabbitTemplate rabbitTemplate = new RabbitTemplate(connectionFactory());
        rabbitTemplate.setExchange("exchange-name");
        rabbitTemplate.setRoutingKey("routing-key");
        return rabbitTemplate;
    }
    @Bean
    public SimpleMessageListenerContainer messageListenerContainer() {


        SimpleMessageListenerContainer container = new SimpleMessageListenerContainer();
        container.setConnectionFactory(connectionFactory());
        container.setQueueNames("queue-name");
        container.setMessageListener(new MessageListenerAdapter(new AmqpMessageListener()));
        return container;
    }
    @Bean
    public AmqpAdmin amqpAdmin() {


        return new RabbitAdmin(connectionFactory());
    }
}
@Service
public class AmqpService {


    @Autowired
    private RabbitTemplate rabbitTemplate;
    public void sendMessage(String message) {


        rabbitTemplate.convertAndSend(message);
    }
    public String receiveMessage() {


        Message message = rabbitTemplate.receive();
        if (message == null) {


            return null;
        }
        return new String(message.getBody());
    }
}
public class AmqpMessageListener {


    public void handleMessage(String message) {


        System.out.println("Received message: " + message);
    }
}
3.Spring JMS
使用 Spring JMS(Java Messaging Service):Spring 提供了对 JMS 的支持,可以使用 Spring 的 JMS 模板来发送和接收消息。
以下是使用 Spring JMS 的步骤:
1、添加 JMS 依赖项:
<dependency>
    <groupId>org.springframework.boot</groupId>
    <artifactId>spring-boot-starter-activemq</artifactId>
</dependency>
2、配置 JMS 连接工厂和目的地:
@Bean
public ConnectionFactory connectionFactory() {


    ActiveMQConnectionFactory connectionFactory = new ActiveMQConnectionFactory();
    connectionFactory.setBrokerURL("tcp://localhost:61616");
    connectionFactory.setUserName("admin");
    connectionFactory.setPassword("admin");
    return connectionFactory;
}
@Bean
public Destination destination() {


    return new ActiveMQQueue("myqueue");
}
3、创建 JmsTemplate:
@Bean
public JmsTemplate jmsTemplate() {


    JmsTemplate jmsTemplate = new JmsTemplate();
    jmsTemplate.setDefaultDestination(destination());
    jmsTemplate.setConnectionFactory(connectionFactory());
    return jmsTemplate;
}
4、发送消息:
jmsTemplate.convertAndSend("Hello, world!");
5、接收消息:
String message = (String) jmsTemplate.receiveAndConvert();
System.out.println("Received message: " + message);
51、Spring 中如何使用微服务架构?常用的微服务框架有哪些?
在 Spring 中,可以使用 Spring Cloud 来构建微服务架构。
Spring Cloud 是一个基于 Spring Boot 的微服务框架,它提供了一系列的工具和组件,用于实现服务发现、配置管理、负载均衡、断路器等功能,简化了微服务架构的开发和部署。
常用的微服务框架包括:
1、Spring Cloud Netflix:Netflix 是一个提供云计算和流媒体服务的公司,Spring Cloud Netflix 基于 Netflix 的开源项目构建,包括 Eureka(服务注册与发现)、Ribbon(负载均衡)、Hystrix(断路器)、Zuul(API 网关)等组件。
2、Spring Cloud Alibaba:阿里巴巴基于 Spring Cloud 提供了一套微服务框架,包括 Nacos(服务注册与发现)、Sentinel(流量控制和熔断降级)、Dubbo(远程调用)等组件。
3、Spring Cloud Kubernetes:针对 Kubernetes 环境的微服务框架,提供了 Kubernetes Native 的应用开发方式,包括 Kubernetes 服务发现、配置管理、负载均衡等功能。
4、Spring Cloud Consul:Consul 是一个分布式服务发现和配置管理系统,Spring Cloud Consul 提供了 Consul 的集成,可以实现服务注册与发现、配置管理等功能。
除了上述框架,还有许多其他的微服务框架可供选择,开发者可以根据自己的需求和技术栈选择合适的框架。
使用 Spring Cloud 构建微服务应用的步骤大致如下:
1、创建服务注册中心:使用 Eureka、Consul 等服务注册中心来管理微服务的注册与发现。
2、创建服务提供者:将业务代码封装为微服务,并将其注册到服务注册中心,提供服务。
3、创建服务消费者:从服务注册中心获取服务提供者的信息,并调用其提供的服务。
4、创建 API 网关:将微服务暴露给外部客户端,提供统一的入口和鉴权、限流等功能。
5、集成配置中心:使用 Spring Cloud Config 或 Consul 等配置中心来管理微服务的配置。
6、集成断路器:使用 Hystrix 或 Resilience4j 等断路器来处理微服务的容错和降级。
7、集成链路追踪:使用 Zipkin 或 SkyWalking 等链路追踪工具来监控微服务的调用链路。
需要注意的是,微服务架构并不是适用于所有场景的,需要根据具体的业务场景来选择是否使用微服务架构。
同时,微服务架构也会带来一些挑战,如服务间通信的复杂性、分布式事务的处理、数据一致性等问题,需要根据实际情况来解决。
52、Spring 中如何使用分布式锁?
在 Spring 中,可以使用分布式锁来解决分布式环境下的资源竞争问题。
常用的分布式锁有基于 Redis 的实现和基于 ZooKeeper 的实现。
可以使用 Redisson 来实现分布式锁。
Redisson 是一个基于 Redis 的 Java 库,提供了分布式锁、分布式集合、分布式对象等功能。
一、以下是使用 Redisson 实现分布式锁的步骤:
1、添加 Redisson 依赖项:
<dependency>
    <groupId>org.redisson</groupId>
    <artifactId>redisson</artifactId>
    <version>3.16.1</version>
</dependency>
2、创建 Redisson 客户端:
Config config = new Config();
config.useSingleServer().setAddress("redis://127.0.0.1:6379");
RedissonClient redisson = Redisson.create(config);
3、获取锁:
RLock lock = redisson.getLock("mylock");
lock.lock();
try {


    // 执行业务逻辑
} finally {


    lock.unlock();
}
4、设置锁的超时时间:
RLock lock = redisson.getLock("mylock");
lock.lock(10, TimeUnit.SECONDS);
try {


    // 执行业务逻辑
} finally {


    lock.unlock();
}
5、尝试获取锁:
RLock lock = redisson.getLock("mylock");
if (lock.tryLock()) {


    try {


        // 执行业务逻辑
    } finally {


        lock.unlock();
    }
} else {


    // 获取锁失败
}
二、以下是基于 Redis 的分布式锁的实现步骤:
1、添加 Redis 依赖项:
<dependency>
    <groupId>org.springframework.boot</groupId>
    <artifactId>spring-boot-starter-data-redis</artifactId>
</dependency>
2、配置 Redis 连接:
spring:
  redis:
    host: localhost
    port: 6379
3、创建 RedisTemplate:
@Bean
public RedisTemplate<String, String> redisTemplate() {


    RedisTemplate<String, String> redisTemplate = new RedisTemplate<>();
    redisTemplate.setConnectionFactory(redisConnectionFactory());
    redisTemplate.setDefaultSerializer(new StringRedisSerializer());
    return redisTemplate;
}
4、创建分布式锁:
@Component
public class DistributedLock {


    private static final long DEFAULT_EXPIRE_TIME = 30000L; // 默认锁过期时间
    private static final long DEFAULT_WAIT_TIME = 5000L; // 默认获取锁等待时间
    private RedisTemplate<String, String> redisTemplate;
    private StringRedisSerializer serializer = new StringRedisSerializer();
    public DistributedLock(RedisTemplate<String, String> redisTemplate) {


        this.redisTemplate = redisTemplate;
    }
    public boolean lock(String key, String value) {


        return lock(key, value, DEFAULT_EXPIRE_TIME, DEFAULT_WAIT_TIME);
    }
    public boolean lock(String key, String value, long expireTime, long waitTime) {


        long start = System.currentTimeMillis();
        while (true) {


            if (redisTemplate.opsForValue().setIfAbsent(key, value)) {


                redisTemplate.expire(key, expireTime, TimeUnit.MILLISECONDS);
                return true;
            }
            if (System.currentTimeMillis() - start > waitTime) {


                return false;
            }
            try {


                Thread.sleep(100);
            } catch (InterruptedException e) {


                Thread.currentThread().interrupt();
            }
        }
    }
    public void unlock(String key, String value) {


        if (value.equals(redisTemplate.opsForValue().get(key))) {


            redisTemplate.delete(key);
        }
    }
}
5、使用分布式锁:
@Autowired
private DistributedLock distributedLock;
public void doSomething() {


    String key = "lock_key";
    String value = UUID.randomUUID().toString();
    try {


        if (distributedLock.lock(key, value)) {


            // 获取到锁,执行业务逻辑
        }
    } finally {


        distributedLock.unlock(key, value);
    }
}
三、以下是使用 ZooKeeper 实现分布式锁的实现步骤:
1、添加 ZooKeeper 依赖项:
<dependency>
    <groupId>org.apache.zookeeper</groupId>
    <artifactId>zookeeper</artifactId>
    <version>3.6.3</version>
</dependency>
2、创建 ZooKeeper 客户端:
@Component
public class ZooKeeperClient {


    private static final String CONNECT_STRING = "localhost:2181";
    private static final int SESSION_TIMEOUT = 5000;
    private ZooKeeper zooKeeper;
    public ZooKeeperClient() throws IOException {


        this.zooKeeper = new ZooKeeper(CONNECT_STRING, SESSION_TIMEOUT, null);
    }
    public ZooKeeper getZooKeeper() {


        return zooKeeper;
    }
}
3、创建分布式锁:
@Component
public class DistributedLock {


    private static final String ROOT_PATH = "/locks";
    private static final Charset CHARSET = Charset.forName("UTF-8");
    private ZooKeeperClient zooKeeperClient;
    public DistributedLock(ZooKeeperClient zooKeeperClient) {


        this.zooKeeperClient = zooKeeperClient;
    }
    public boolean lock(String key) throws KeeperException, InterruptedException {


        String path = zooKeeperClient.getZooKeeper().create(ROOT_PATH + "/" + key, new byte[0], ZooDefs.Ids.OPEN_ACL_UNSAFE, CreateMode.EPHEMERAL_SEQUENTIAL);
        List<String> children = zooKeeperClient.getZooKeeper().getChildren(ROOT_PATH, false);
        Collections.sort(children);
        if (path.equals(ROOT_PATH + "/" + children.get(0))) {


            return true;
        } else {


            String prevChild = children.get(Collections.binarySearch(children, path.substring(ROOT_PATH.length() + 1)) - 1);
            CountDownLatch latch = new CountDownLatch(1);
            zooKeeperClient.getZooKeeper().exists(ROOT_PATH + "/" + prevChild, event -> {


                if (event.getType() == EventType.NodeDeleted) {


                    latch.countDown();
                }
            });
            latch.await();
            return true;
        }
    }
    public void unlock(String key) throws KeeperException, InterruptedException {


        zooKeeperClient.getZooKeeper().delete(ROOT_PATH + "/" + key, -1);
    }
}
4、使用分布式锁:
@Autowired
private DistributedLock distributedLock;
public void doSomething() throws KeeperException, InterruptedException {


    String key = "lock_key";
    try {


        if (distributedLock.lock(key)) {


            // 获取到锁,执行业务逻辑
        }
    } finally {


        distributedLock.unlock(key);
    }
}
需要注意的是,使用 ZooKeeper 实现分布式锁也有一定的限制和缺陷,如性能和可靠性等问题。
因此,在使用 ZooKeeper 实现分布式锁时需要谨慎,根据实际情况来选择合适的实现方式,并进行充分的测试和验证。
需要注意的是,虽然分布式锁可以解决分布式环境下的资源竞争问题,但也会带来一些问题,如死锁、误解锁等问题。
因此,在使用分布式锁时需要谨慎,需要考虑锁的粒度、超时时间、死锁等问题,根据实际情况选择合适的锁策略,并进行充分的测试和验证。
53、Spring 中如何使用分布式事务?
在 Spring 中,可以使用 Spring Cloud 为分布式事务提供的解决方案,如 Spring Cloud Netflix、Spring Cloud Alibaba 等。
常用的分布式事务解决方案包括两阶段提交、补偿事务和消息驱动等。
一、以下是使用 Spring Cloud Alibaba 的分布式事务的实现步骤:
1.添加 Spring Cloud Alibaba 依赖项:
<dependency>
    <groupId>com.alibaba.cloud</groupId>
    <artifactId>spring-cloud-starter-alibaba-seata</artifactId>
    <version>1.4.1</version>
</dependency>
2.配置 Seata Server:
spring:
  cloud:
    alibaba:
      seata:
        tx-service-group: my_tx_group # 事务组名称
seata:
  enabled: true
  application-id: ${

    spring.application.name}
  tx-service-group: ${

    spring.cloud.alibaba.seata.tx-service-group}
  config:
    type: nacos # 配置中心类型
    nacos:
      server-addr: localhost:8848 # Nacos 服务器地址
      group: SEATA_GROUP
      namespace: seata
  registry:
    type: nacos # 注册中心类型
    nacos:
      server-addr: localhost:8848 # Nacos 服务器地址
      group: SEATA_GROUP
      namespace: seata
3.配置数据源及 Seata 的代理数据源:
spring:
  datasource:
    url: jdbc:mysql://localhost:3306/demo?useUnicode=true&characterEncoding=utf8&useSSL=false
    username: root
    password: root
    driver-class-name: com.mysql.cj.jdbc.Driver
    type: com.alibaba.druid.pool.DruidDataSource
    druid:
      initial-size: 5
      min-idle: 5
      max-active: 20
      max-wait: 60000
seata:
  datasource:
    driver-class-name: com.mysql.cj.jdbc.Driver
    url: jdbc:mysql://localhost:3306/seata?useUnicode=true&characterEncoding=utf8&useSSL=false
    username: root
    password: root
    type: com.alibaba.druid.pool.DruidDataSource
4.配置 Seata 的事务管理器:
@Configuration
public class SeataConfiguration {


    @Bean
    public GlobalTransactionScanner globalTransactionScanner() {


        return new GlobalTransactionScanner("my_app", "my_tx_group");
    }
}
5.配置业务方法并添加 @GlobalTransactional 注解:
@Service
public class UserService {


    @Autowired
    private UserMapper userMapper;
    @Autowired
    private AccountService accountService;
    @Autowired
    private OrderService orderService;
    @GlobalTransactional // 声明全局事务
    public void createUser(User user) {


        userMapper.insert(user);
        accountService.createAccount(user.getId());
        orderService.createOrder(user.getId());
    }
}
在 Spring 中,可以使用分布式事务来保证多个事务操作的一致性。常用的分布式事务有两种实现方式:基于 XA 协议和基于 TCC 模式。
以下是基于 XA 协议的分布式事务的实现步骤:
1、配置数据源:
spring:
  datasource:
    url: jdbc:mysql://localhost:3306/test
    username: root
    password: root
    driver-class-name: com.mysql.cj.jdbc.Driver
2、添加依赖项:
<dependency>
    <groupId>org.springframework.boot</groupId>
    <artifactId>spring-boot-starter-jta-atomikos</artifactId>
</dependency>
3、配置 Atomikos 事务管理器:
@Configuration
public class AtomikosConfig {


    @Bean(initMethod = "init", destroyMethod = "close")
    public UserTransactionManager userTransactionManager() throws SystemException {


        UserTransactionManager userTransactionManager = new UserTransactionManager();
        userTransactionManager.setForceShutdown(false);
        return userTransactionManager;
    }
    @Bean
    public UserTransaction userTransaction() throws SystemException {


        return new UserTransactionImp();
    }
    @Bean
    public TransactionManager transactionManager(UserTransactionManager userTransactionManager,
                                                 UserTransaction userTransaction) throws SystemException {


        AtomikosJtaPlatform.transactionManager = userTransactionManager;
        AtomikosJtaPlatform.transaction = userTransaction;
        return new JtaTransactionManager(userTransaction, userTransactionManager);
    }
}
4、配置事务管理器:
@Configuration
@EnableTransactionManagement
public class TransactionConfig {


    @Bean
    public PlatformTransactionManager transactionManager() throws SystemException {


        return new JtaTransactionManager();
    }
}
5、编写业务代码:
@Service
@Transactional
public class UserServiceImpl implements UserService {


    @Autowired
    private UserRepository userRepository;
    @Override
    public void transfer(long fromUserId, long toUserId, double amount) {


        User fromUser = userRepository.findById(fromUserId).orElseThrow(RuntimeException::new);
        User toUser = userRepository.findById(toUserId).orElseThrow(RuntimeException::new);
        fromUser.setBalance(fromUser.getBalance() - amount);
        toUser.setBalance(toUser.getBalance() + amount);
        userRepository.save(fromUser);
        userRepository.save(toUser);
    }
}
需要注意的是,在使用基于 XA 协议的分布式事务时,需要注意以下几点:
1、数据源必须支持 XA 协议。如果使用的是 MySQL 数据库,则需要使用支持 XA 协议的 MySQL 数据库。
2、分布式事务的性能通常比本地事务要差,因此,在选择使用分布式事务时需要进行充分的测试和评估。
3、在使用分布式事务时,需要对代码的可靠性和充分性进行充分的保障,以确保分布式事务的正确性和一致性。
TCC(Try-Confirm-Cancel)是一种补偿型分布式事务方案,它将一个分布式事务拆分成三个阶段:尝试阶段(Try)、确认阶段(Confirm)和撤销阶段(Cancel)。
以下是基于 TCC 模式的补偿型分布式事务的实现步骤:
创建 TCC 接口:
public interface OrderService {


    @Compensable
    void create(Order order);
    boolean confirmCreate(Order order);
    boolean cancelCreate(Order order);
}
2、实现 TCC 接口:
@Service
public class OrderServiceImpl implements OrderService {


    @Autowired
    private OrderMapper orderMapper;
    @Autowired
    private ProductService productService;
    @Compensable(confirmMethod = "confirmCreate", cancelMethod = "cancelCreate")
    @Override
    public void create(Order order) {


        orderMapper.insert(order);
        productService.reduceStock(order.getProductId(), order.getQuantity());
    }
    @Override
    public boolean confirmCreate(Order order) {


        orderMapper.updateStatus(order.getId(), OrderStatus.CONFIRMED);
        return true;
    }
    @Override
    public boolean cancelCreate(Order order) {


        orderMapper.delete(order.getId());
        productService.increaseStock(order.getProductId(), order.getQuantity());
        return true;
    }
}
3、配置 TCC 事务管理器:
@Configuration
public class TccConfiguration {


    @Bean
    public TccTransactionManager tccTransactionManager() {


        return new TccTransactionManager();
    }
}
4、使用 TCC 接口:
@Autowired
private OrderService orderService;
public void placeOrder(Order order) {


    orderService.create(order);
}
在 TCC 模式中,Try 阶段通过 @Compensable 注解来标识,Confirm 和 Cancel 阶段则通过 TCC 接口的方法来实现。
当 Try 阶段执行成功后,如果 Confirm 阶段执行成功,则事务提交;
如果 Confirm 阶段执行失败,则执行 Cancel 阶段来回滚事务。
TCC模式实现的步骤:
1、定义“尝试”操作:尝试操作会尝试执行分布式事务的业务操作,如果执行成功,会返回true。否则,会返回false或抛出异常。此时,需要实现一个try方法,用于实现尝试操作。
2、定义“确认”操作:确认操作会确认执行分布式事务的业务操作,如果执行成功,则分布式事务提交。否则,分布式事务需要回滚。此时,需要实现一个confirm方法,用于实现确认操作。
3、定义“取消”操作:取消操作会取消执行分布式事务的业务操作,如果执行成功,则分布式事务回滚。否则,分布式事务无法回滚。此时,需要实现一个cancel方法,用于实现取消操作。
4、实现分布式事务:在实现分布式事务时,需要根据业务逻辑,将业务操作拆分成多个try、confirm和cancel方法。在执行分布式事务时,需要先执行所有的try方法,然后根据try方法的返回值,执行confirm或cancel方法。
5、实现幂等性:由于分布式事务的执行可能会出现重试,因此需要保证每个操作的幂等性,即多次执行同一个操作,结果应该是一致的。
6、实现补偿机制:如果分布式事务的执行出现异常或者超时,需要实现补偿机制,即执行cancel方法,回滚已经执行的业务操作。
总之,TCC模式的实现需要根据具体业务场景进行设计和实现,同时需要考虑并发性、幂等性、异常情况处理等问题。
TCC 模式相比于 XA 协议的两阶段提交,具有更细粒度的事务控制和更好的性能,但也引入了更多的复杂性和实现难度。
因此,在实际应用中,需要根据实际情况来选择合适的分布式事务方案。
需要注意的是,分布式事务虽然可以解决分布式环境下的数据一致性问题,但也会带来一些问题,如性能损失、复杂度增加等问题。
因此,在使用分布式事务时需要谨慎,根据实际情况来选择合适的解决方案,并进行充分的测试和验证。
54、Spring 和 Spring Boot 是什么关系?有何区别?
Spring是一个Java开源框架,它提供了一系列的API和工具,用于创建企业级Java应用程序。
Spring是一个开源的Java应用程序框架,旨在帮助开发人员构建企业级应用程序,它提供了很多组件,例如IoC容器、AOP、JDBC等,可以让开发人员更加方便地开发应用程序。
Spring Boot是Spring框架的一个扩展,它简化了Spring应用程序的开发和部署过程,提供了一些默认配置和开箱即用的功能,可以帮助开发人员更快地构建应用程序。
Spring Boot可以看作是Spring的一种快速开发框架,它使得开发人员可以更加关注业务逻辑,而不是框架配置。
Spring Boot是Spring框架的一部分,它提供了一种更加便利的方式来配置和部署Spring应用程序。
Spring Boot使用了许多自动配置的特性,可以快速构建简单的应用程序,而无需手动配置大量的组件和依赖项。
与传统的Spring应用程序相比,Spring Boot可以更快地启动,更加轻量级,并且更容易部署和维护。
Spring Boot内置了许多常用的依赖项和组件,比如Tomcat、Jackson、Spring Data等,可以让开发者快速构建Web应用程序、RESTful服务等。
同时,Spring Boot与Spring框架兼容,并且可以与Spring框架的许多组件无缝集成,比如Spring MVC、Spring Data等。
总之,Spring Boot是基于Spring框架的一种快速开发框架,它可以更加快速、简单、轻量级地构建Spring应用程序,而Spring框架则是一个更加全面的框架,提供了丰富的API和工具,用于创建企业级Java应用程序。
55. What are the environment variables in Spring? How to configure them?
Environment variables in Spring are a set of key-value pairs that can be used in an application to dynamically configure the behavior of the application based on the environment (such as development, testing, production).
In Spring, environment variables can be configured in the following ways:
1. Configure in the application.properties or application.yml file.
For example:
server.port=8080
spring.datasource.url=jdbc:mysql://localhost:3306/mydb
spring.datasource.username=root
spring.datasource.password=password
These configurations will be automatically loaded by Spring and used in the application.
2. When starting the application, configure it through command line parameters.
For example:
java -jar myapp.jar --server.port=8080 --spring.datasource.url=jdbc:mysql://localhost:3306/mydb --spring.datasource.username=root --spring.datasource.password=password
These configurations will override the configurations in application.properties or application.yml files.
3. In the code, configure through Spring's Environment object.
For example:
@Autowired
private Environment env;
public void someMethod() {


    String port = env.getProperty("server.port");
    String url = env.getProperty("spring.datasource.url");
    String username = env.getProperty("spring.datasource.username");
    String password = env.getProperty("spring.datasource.password");
}
These configurations will be used in the code.
Configuring environment variables in the above way can make the application more flexible and can be configured differently according to different environments.