Cloud services, APIs, SDKs, debugging, viewing, I can do it all
You can learn by reading the short article: artificial intelligence AI image recognition image recognition, celebrity recognition
1 Introduction to the API plug-in of IntelliJ IDEA
The API plug-in supports VS Code IDE, IntelliJ IDEA and other platforms, as well as Huawei Cloud's self-developed CodeArts IDE. Based on the capabilities provided by Huawei Cloud services, it helps developers build applications more efficiently and conveniently. The API plug-in is associated with API Explorer, DevStar, CodeLabs, SDK Center, and CLI Center products under Huawei Cloud Services, and is committed to providing developers with a more stable, faster, and safer programming experience.
In this plug-in, we provide but are not limited to the following functions:
Connected to the Huawei Cloud API open platform, it supports users to retrieve APIs, view API documents, debug APIs, and provide SDK sample codes for users to learn how to use APIs.
Provides Huawei Cloud SDK code snippet completion function, and SDK dependency packages are automatically introduced to accelerate users' integration of Huawei Cloud APIs.
Connected to Huawei Cloud Development Experience Center Codelabs, it provides 500+ cloud service code examples and guided tutorials to help users learn quickly.
illustrate:
On a series of platforms such as IntelliJ IDEA and VS Code IDE, the name of the Huawei Cloud API plug-in is Huawei Cloud API. In CodeArts IDE, the API plug-in is natively built into the IDE, and its name is Huawei Cloud API Development Kit.
The use of API plug-ins on series platforms such as IntelliJ IDEA and VS Code IDE depends on the base plug-in. Please install the base plug-in in advance.
2 API plug-in installation--IntelliJ IDEA
2.1 IntelliJ IDEA and other platforms
Installation preparation: Download and install JDK1.8 or higher. Download and install IntelliJ IDEA 2020.2 or higher.
Note: The IntellIj platform also supports IDEs including Goland, Pycharm, etc. If you develop on other related IDEs, please download and configure the compiler or interpreter of the corresponding language. Here we take IDEA as an example to introduce the installation process of the IntelliJ platform plug-in. For other IntelliJ series IDEs, please refer to IDEA. https://developer.huaweicloud.com/develop/toolkit.html
start installation:
You can download and install the offline package directly from the IDE plug-in market or directly from the JetBrains plug-in market.
IDE installation
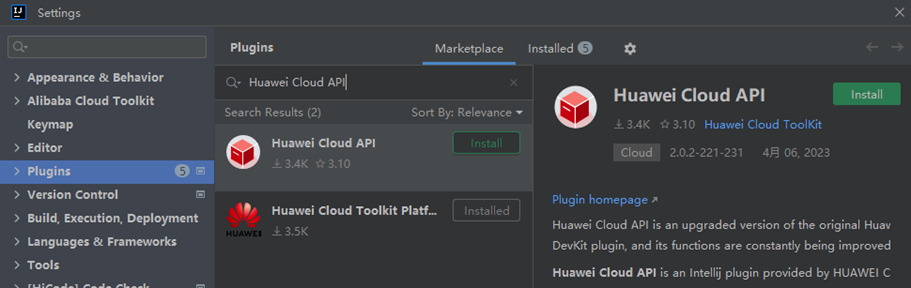
- Select File > Settings in the top menu bar of IntelliJ IDEA, and click Plugins in the left navigation bar of the Settings dialog box.
- Click Marketplace in the Plugins area and enter Huawei Cloud API in the search bar.
- Huawei Cloud API will appear in the Search Results area, click Install, and restart the IDE after completion.
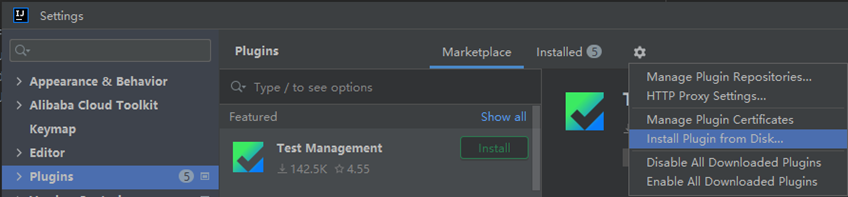
Offline package installation:
- Enter the plug-in market and search for Huawei Cloud API, enter the plug-in details page, select the desired version of the API plug-in under the Versions tab, and click Download to download the offline plug-in compressed package and save it locally. .
- Select File > Settings in the top menu bar of IntelliJ IDEA, and click Plugins in the left navigation bar of the Settings dialog box.
- Click in the Plugins area, and then click Install Plugin from Disk....
- Select the offline installation package (no need to decompress it) in the Choose Plugin File dialog box, and follow the prompts on the IntelliJ IDEA installation page to complete the subsequent installation steps.
Note: If the IntelliJ IDE you want to install the plug-in for is already open on the desktop, enter the plug-in market and search for Huawei Cloud API. Enter the plug-in details page. In the upper right corner, the locally opened IDE will be identified. Click the corresponding button. In the pop-up Click OK in the IDE window, and the IDE background will start to install the corresponding version of the API plug-in.
Installation verification: After successfully installing the plug-in on the IntelliJ series platform, you can see the Huawei Cloud Toolkit icon in the left navigation bar. Click on the back panel and the words Huawei Cloud API will appear, indicating that the installation is successful.
2.2 API list

The API list is displayed on the left, and all APIs can be queried. Currently, there are 206 cloud services and APIs 9213.

Account preparation:
To use Huawei Cloud Java SDK, you need to have a Huawei Cloud account and the Access Key (AK) and Secret Access Key (SK) corresponding to the account. Please create and view your AKSK on the "My Credentials-Access Key" page of the Huawei Cloud Console. See Access Keys for more information.
Huawei Cloud Java SDK supports Java JDK 1.8 and above.
Subscribe to a service:
To apply for image recognition service, you can follow the following steps:
1. Log in to Huawei Cloud, apply for a Huawei Cloud account, and complete real-name authentication
2. Select "EI Enterprise Intelligence>AI Service>Image Recognition Image" at the top of the Huawei Cloud page.
3. Enter the product page, click Use Now, enter your registered username and password, and enter the image recognition management console.
4. Users can apply for service activation on the "Service List" or "Service Management" page of the image recognition management console.
Take activating the "Image Recognition-Image Label" service on the "Service Management" page as an example. Select "Image Label" in the "Commercial Services" column and click "Activate Service" to activate it.
Note: The service only needs to be activated once, and there is no need to apply again when using it later.
5. After the commercial service application is successful, the services that have been successfully applied for are displayed in "My Services" on the "Service Management" page. At this time, you can use the image recognition service by calling the API interface.
3 Examples of Celebrity Recognition
Environment configuration:
Requires jdk environment
SDK acquisition and installation
Install dependencies through Maven
<dependencies>
    <dependency>
        <groupId>com.huaweicloud.sdk</groupId>
        <artifactId>huaweicloud-sdk-core</artifactId>
        <version>3.0.7-beta</version>
    </dependency>
    <dependency>
        <groupId>com.huaweicloud.sdk</groupId>
        <artifactId>huaweicloud-sdk-image</artifactId>
        <version>3.0.7-beta</version>
    </dependency>
</dependencies>
code example
This celebrity recognition Demo example corresponds to the URI: POST /v1.0/image/celebrity-recognition. After replacing AK/SK and other information, you can run the demo.
Configure user AK/SK in the com.huawei.codelabs.image.ImageTagging.java file. The sample code is as follows:
//Basic information of the celebrity recognition service and generate a corresponding client connection object
BasicCredentials credential = new BasicCredentials()
        .withAk(ak)                          // your ak
        .withSk(sk)                          // your sk
        .withProjectId(projectId);           // projectId
illustrate:
ak Huawei Cloud Account Access Key.
sk Huawei Cloud account Secret Access Key. Please refer to the access key for details.
projectId The project ID where the cloud service is located. Please refer to the API certificate for details.
Initialize client
ImageClient client = ImageClient.newBuilder()
        .withCredential(credential)
        .withHttpConfig(config)
        .withEndpoint(endpoint)
        .build();
illustrate:
endpoint refers to the application areas of Huawei Cloud services and the terminal nodes of each service. For details, please view the regions and terminal nodes.
For example: As shown below, if you want to use the image recognition service of Beijing 4, the endpoint should be filled in https://image.cn-north-4.myhuaweicloud.com

Select a portrait picture of a celebrity or Internet celebrity (url or local picture)
// url form
CelebrityRecognitionReq image = new CelebrityRecognitionReq();
image.setUrl(url);
//base64 form
byte[] fileData = FileUtils.readFileToByteArray(new File("./resource/celebrity-recognition.jpg"));
String fileBase64Str = Base64.encodeBase64String(fileData);
CelebrityRecognitionReq image = new CelebrityRecognitionReq();
image.setImage(fileBase64Str);
illustrate:
Choose one of url and base64 for assignment
Build send request
RunCelebrityRecognitionRequest req = new RunCelebrityRecognitionRequest();
req.setBody(image);
client.runCelebrityRecognition(req);
operation result
[main] INFO HuaweiCloud-SDK-Access - "POST https://image.cn-north-4.myhuaweicloud.com/v1.0/image/celebrity-recognition" 200 125 e4b023aeea93393afe9dd9d78c09630c
[class CelebrityRecognitionResultBody {
    confidence: 0.9897535374803481
    faceDetail: {w=365, h=514, x=260, y=198}
    label: 迈克尔·杰克逊
}]
4 Image tag recognition example diagram

Environment configuration
Requires jdk environment
SDK acquisition and installation
Install dependencies through Maven
<dependencies>
    <dependency>
        <groupId>com.huaweicloud.sdk</groupId>
        <artifactId>huaweicloud-sdk-core</artifactId>
        <version>3.0.7-beta</version>
    </dependency>
    <dependency>
        <groupId>com.huaweicloud.sdk</groupId>
        <artifactId>huaweicloud-sdk-image</artifactId>
        <version>3.0.7-beta</version>
    </dependency>
</dependencies>
code example
The image tag Demo example corresponds to the URI: POST /v1.0/image/tagging. After replacing the AK/SK information, you can run the demo to experience
Configure user AK/SK in ImageTagging.java file. The sample code is as follows:
//Basic information about the image tag service and generate a corresponding client connection object
BasicCredentials credential = new BasicCredentials()
        .withAk(ak)                          // your ak
        .withSk(sk)                          // your sk
        .withProjectId(projectId);           // projectId
illustrate:
ak Huawei Cloud Account Access Key.
sk Huawei Cloud account Secret Access Key. Please refer to the access key for details.
projectId The project ID where the cloud service is located. Please refer to the API certificate for details.
Initialize client
ImageClient client = ImageClient.newBuilder()
        .withCredential(credential)
        .withHttpConfig(config)
        .withEndpoint(endpoint)
        .build();
illustrate:
endpoint refers to the application areas of Huawei Cloud services and the terminal nodes of each service. For details, please view the regions and terminal nodes.
For example: As shown below, if you want to use the image recognition service of Beijing 4, the endpoint should be filled in https://image.cn-north-4.myhuaweicloud.com

Construct the parameters required to access the image tag service (select local images or image URLs)
// url form
ImageTaggingReq image = new ImageTaggingReq();
 image.setUrl(url);
//base64 form
byte[] fileData = FileUtils.readFileToByteArray(new File("./resource/image-tagging.jpg"));
 String fileBase64Str = Base64.encodeBase64String(fileData);
 ImageTaggingReq imageOfBase64 = new ImageTaggingReq();
 imageOfBase64.setImage(fileBase64Str.getBytes());
illustrate:
Choose one of url and base64 to call, and cannot choose both at the same time.
Build send request
RunImageTaggingRequest req = new RunImageTaggingRequest();
req.setBody(image);
client.runImageTagging(req);
operation result
 [main] INFO HuaweiCloud-SDK-Access - "POST https://image.cn-north-4.myhuaweicloud.com/v1.0/image/tagging" 200 3285 09e7bf33492c01f7a5ef1f2bb05a168d
 class ImageTaggingBody {
     tags: [class ImageTaggingItemBody {
         confidence: 95.9
         type: object
         tag: 树
         i18nTag: class ImageTaggingI18nTag {
             zh: 树
             en: Tree
         }
     }, class ImageTaggingItemBody {
         confidence: 91.97
         type: object
         tag: 植物
         i18nTag: class ImageTaggingI18nTag {
             zh: 植物
             en: Plant
         }
     }, class ImageTaggingItemBody {
         confidence: 91.53
         type: object
         tag: 夕阳
         i18nTag: class ImageTaggingI18nTag {
             zh: 夕阳
             en: Setting sun
         }
     }]
 }

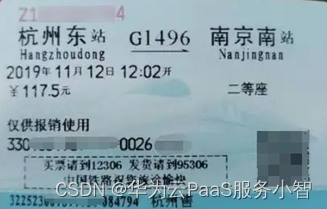
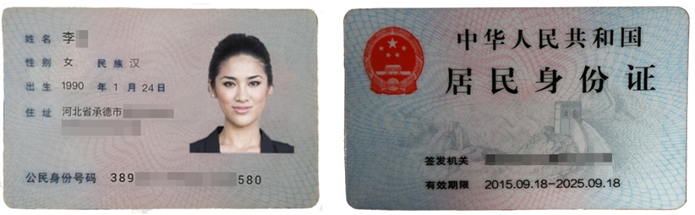
5 Train ticket ID card consistency verification/ID card consistency verification
ID card recognition API:
Sample code
 from HWOcrClientAKSK import HWOcrClientAKSK
    from HWOcrClientToken import HWOcrClientToken
    import json

    AK = "{your ak string}"  # AK from authentication.
    SK = "{your sk string}"  # SK from authentication.
    region = "cn-north-4"  # http region information.

    def aksk_request(req_uri,img_path):
        ##AK/SK认证方式
        option = {}
        # option["side"]="front"
        try:
            ocr_client = HWOcrClientAKSK(AK, SK, region)  # Initialize the ocr_client.
            response = ocr_client.request_ocr_service_base64(req_uri, img_path, option)  # Call the OCR API to recognize image.
            print("Status code:" + str(response.status_code) + "\ncontent:" + response.text)
        except ValueError as e:
            print(e)
        if response.status_code==200:
            return json.loads(response.text)
        else:
            return None

    def get_info(trainImg,cardImg):
        req_uri = "/v1.0/ocr/train-ticket"
        train_data=aksk_request(req_uri,trainImg)
        if train_data==None:
            print('获取车票信息失败!请重新验证。')
            return False
        req_uri = "/v1.0/ocr/id-card"
        card_data=aksk_request(req_uri,cardImg)
        if card_data==None:
            print('获取身份证信息失败!请重新验证。')
            return False
        if len(card_data['result']['number'])!=18:
            #这里仅处理18位的身份证号
            print('您的身份证号非18位,校验信息失败,请联系工作人员!')
            return False
        number=train_data['result']['id_number']
        # number = number[:6] + '*' * 8 + number[-4:]
        number = number[:10] + '*' * 4 + number[-4:]
        if(train_data['result']['name']==card_data['result']['name'] and train_data['result']['id_number']==number):
            print('身份证和火车票信息一致,您可以来开火车了!')
            return True
        else:
            print('身份证和火车票信息不一致,请重新验证!')
            return False

    if __name__ == '__main__':

        trainImg = "./data/1.jpg"
        cardImg = "./data/id-card-demo0.jpg"

        get_info(trainImg,cardImg)
Run the example
Replace the following variables {AK}, {SK}, {region}, {trainImg}, {cardImg} according to the actual situation
Execute the OCRDemo.py file
operation result
After executing the file, viewing the log on the console prints "ID card and train ticket information are consistent, you can drive the train!".
6 Experience the charm of plug-ins
Huawei Cloud devkit is online: experience link: Toolkit-Huawei Cloud