/***********************************************
Description: A complete set of STM32 serial port sending and receiving configurations based on the CubeMX+HAL library. For details, please view the catalog below.
Function: A collection of various commonly used configurations, making it easy to select the appropriate configuration for rapid development.
Platform: STM32F723-DISCO. Except for the unique adaptive baud rate of F7, the other configurations are applicable to various STM32 microcontrollers with serial ports.
Author: Miss_Ruoxing
Time: 2019/10/20
Project: The blog does not contain code projects, and the changes made are based on the previous steps.
Note: Due to the limited level of the author, 100% accuracy cannot be guaranteed. The following content is for your reference only. Please point out any inappropriateness.
**************************************************/
Table of contents
1.1.2. Interrupt configuration:
1.1.4. Compile and download, open the serial port debugging assistant, and reset:
1.2. Use custom printf function
1.2.1. Write a function to send a string
1.2.2. Call in the main function:
1.3. Use the standard printf function
1.3.1. Include the header file in the usart.h file:
1.3.2. Add output redirection code in the user code area:
1.3.3. Called in the main function:
1.3.4. The test results can also be used
1.4. Semi-hosting mode and C library
1.4.3. Standard library, disable semi-hosting mode, and add redirection
1.4.4. Other debugging methods
1.5.1. Configure the serial port to send DMA
1.5.2. Configure its interrupt priority to 5 and 6 under the NVIC menu
1.5.3. Generate code, open the project, and add code in the main function:
1.5.4. Compile and download, reset:
1.6. Use printf function in DMA mode
1.6.1. Include the header file in the usart.c file:
1.6.2. Define a new function DMA_printf in the user code area:
1.6.3. Declare the function in the header file and call it in the main function.
2.2.1. Turn on the global interrupt of the serial port:
2.2.2. Modify its priority in the NVIC options:
2.2.5. Transmitting and receiving speed test
2.3.1. Configure CubeMX for DMA reception and select Normal as the mode.
2.3.3. The interrupt callback function configuration is as follows:
2.3.4. There is no data loss when testing 10 data:
2.3.5. Modify the interrupt callback function to only save and not send.
2.3.6. It can be found that the final effect is still very ideal.
2.3.7. Modify DMA to continuous working mode
2.3.9. The test file transfer results are as follows, there is no data loss:
3.1.1. Configure automatic baud rate on CubeMX
3.1.2. Add a program to display the current baud rate in the main function:
3.1.4. Use serial port assistant to test
3.1.5. Press the button to see that the data is returned successfully:
3.1.6. The same method is also applicable to other baud rates.
1. Serial port sending
1.1. Normal sending mode
1.1.1. Mode configuration:

- Data length: It is the data length including the parity bit. The above figure is set to 8, and the parity bit is 0. So the data bit width is 8.
- Oversampling: see picture below
- Single sampling point: see figure below


1.1.2. Interrupt configuration:

1.1.3. Generate code, open the project, add a test statement in front of the loop of the main function, and output the string:
HAL_UART_Transmit( &huart6 , (uint8_t *)"hello DISCO\r\n" , sizeof("hello DISCO\r\n"), 0xFFFF);1.1.4. Compile and download, open the serial port debugging assistant, and reset:

1.2. Use custom printf function
1.2.1. Write a function to send a string
/* used for a string send by usart */ void My_String_Printf( uint8_t* String ) { while( *String != '\0' ){ HAL_UART_Transmit( &huart6 , (uint8_t *)(String++), 1, 0xFFFF); } }1.2.2. Call in the main function:
My_String_Printf("hello DISCO\r\n");1.2.3. Test results:

1.3. Use the standard printf function
1.3.1. Include the header file in the usart.h file:
#include "stdio.h"1.3.2. Add output redirection code in the user code area:
#ifdef __GNUC__
  /* With GCC/RAISONANCE, small printf (option LD Linker->Libraries->Small printf
     set to 'Yes') calls __io_putchar() */
  #define PUTCHAR_PROTOTYPE int __io_putchar(int ch)
#else
  #define PUTCHAR_PROTOTYPE int fputc(int ch, FILE *f)
#endif /* __GNUC__ */
/**
  * @brief  Retargets the C library printf function to the USART.
  * @param  None
  * @retval None
  */
PUTCHAR_PROTOTYPE
{
  /* Place your implementation of fputc here */
  /* e.g. write a character to the EVAL_COM1 and Loop until the end of transmission */
	HAL_UART_Transmit( &huart6 , (uint8_t *)&ch, 1, 0xFFFF);
  return ch;
}
1.3.3. Called in the main function:
printf("hello DISCO\r\n");1.3.4. The test results can also be used

1.4. Semi-hosting mode and C library
In embedded systems, printing logs through the serial port is a very important debugging method, but it is very inconvenient to directly call the underlying driver to print information. In the C language, printf is generally used to print basic display information, and by default the results of printf will not be printed through the serial port. Send, there are two main solutions:
1.4.1. Semi-hosting mode
Semihosting is a mechanism for ARM targets that delivers input/output requests from application code to the host machine running the debugger. For example, you can use this mechanism to enable functions in the C library, such as printf() and scanf(), to use the host's screen and keyboard instead of having a screen and keyboard on the target system.
To put it simply, semi-host mode is to realize the input and output of the development board on the computer through the emulator. The same function as the semi-host mode is the ITM debugging mechanism. ITM is a new generation debugging mechanism launched by ARM after the launch of semihosting. The operation of both mechanisms requires an emulator, otherwise it will not work.
1.4.2. Micro library
If you use a micro library, you will not use semi-hosting mode.
microlib is an alternative to the default C library. It is used for deeply embedded applications that must run on very small amounts of memory. These applications do not run within the operating system.
1.4.3. Standard library, disable semi-hosting mode, and add redirection
#pragma import(__use_no_semihosting)    	//不使用半主机模式

//标准库需要的支持函数
struct __FILE
{
	int handle;
};

FILE __stdout;
//定义_sys_exit()以避免使用半主机模式
_sys_exit(int x)
{
	x = x;
}
//重定义fputc函数
int fputc(int ch, FILE *f)
{
	USART_SendData(USART1,ch);
	while(USART_GetFlagStatus(USART1,USART_FLAG_TXE)==RESET);
	return ch;
}
1.4.4. Other debugging methods
- Jlink's own RTT: faster and does not rely on compilation tools, as long as JLink is available.
- JScope: Graphically display data debugging.
1.5. DMA sending mode
1.5.1. Configure the serial port to send DMA

Mode selection:
- Each DMA data stream has an independent 4-word FIFO, and the threshold level can be configured by software to 1/4, 1/2, 3/4 or full. Can be used for conversion between words, half words, and bytes. As shown below:

- After opening the DMA channel, an interrupt of the DMA will be automatically enabled. The serial port global interrupt should also be enabled here:

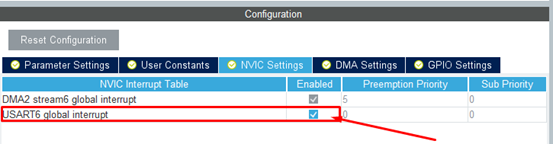
1.5.2. Configure its interrupt priority to 5 and 6 under the NVIC menu
NOTE: The priority grouping I use is 4:

1.5.3. Generate code, open the project, and add code in the main function:
HAL_UART_Transmit_DMA( &huart6, (uint8_t *)"hello DISCO by DMA\r\n", sizeof("hello DISCO by DMA\r\n") );1.5.4. Compile and download, reset:

However, if the serial port interrupt is not turned on, the program can only send data once, and then the serial port data cannot be sent out. Debugging shows that the gState bit in husart has not been reset and is not in the READY state:

1.6. Use printf function in DMA mode
In embedded systems, printf is a relatively resource-intensive function. Excessive use of printf during debugging may even affect the original results of the program.
stm32 has DMA, which can print out debugging information during program running through DMA, which undoubtedly improves the efficiency of program running. To format and print the contents of the serial port through DMA, redirection is impossible. The only way is to implement a printf function yourself.
1.6.1. Include the header file in the usart.c file:
#include "stdarg.h"1.6.2. Define a new function DMA_printf in the user code area:
The C language standard library function <stdarg.h> is used, reference materials:
https://www.runoob.com/cprogramming/c-standard-library-stdarg-h.html
uint8_t DMA_PRINTF_BUFF[100];
void DMA_printf(const char *format, ...)
{
	uint32_t length;
    va_list args;

    va_start(args, format);
    length = vsnprintf((char *)DMA_PRINTF_BUFF, sizeof(DMA_PRINTF_BUFF), (char *)format, args);
    va_end(args);

    HAL_UART_Transmit_DMA(&huart6, (uint8_t *)DMA_PRINTF_BUFF, length);
}
1.6.3. Declare the function in the header file and call it in the main function.
The usage method is the same as the printf function of the standard library.
void DMA_printf(const char *format, ...);

DMA_printf("hello DISCO by DMA\r\n");
1.6.4. Download verification:

2. Serial port reception
2.1. Polling reception mode
2.1.1. Configure in CubeMX

2.1.2. Generate code
Add test code in the main loop of the main function. The last input parameter 1 is the timeout time, the unit is ms, which means 1
If no data is received within ms, the function will exit and return a timeout.
if( HAL_OK == HAL_UART_Receive( &huart6, &pData, 1, 1) )
	DMA_printf("Receive Data:%c\r\n",pData);
This polling method consumes a lot of CPU and is generally not used.
2.2. Interrupt reception mode
2.2.1. Turn on the global interrupt of the serial port:
2.2.2. Modify its priority in the NVIC options:
2.2.3. Generate code
Add the reception completion callback function in usart.c:
uint8_t pData = 0;
void HAL_UART_RxCpltCallback(UART_HandleTypeDef *huart)
{
	if( huart == &huart6 )
	{
		DMA_printf("Receive Data:%c\r\n",pData);
		HAL_UART_Receive_IT( &huart6, &pData, 1);
	}
}
Declare external variables in the header file:
extern uint8_t pData;Set initialization at the beginning of the main function:
HAL_UART_Receive_IT( &huart6, &pData, 1);2.2.4. Compile and download

2.2.5. Transmitting and receiving speed test
void HAL_UART_RxCpltCallback(UART_HandleTypeDef *huart)
{
	if( huart == &huart6 )
	{
		HAL_UART_Transmit( &huart6, &pData, 1, 20);
		HAL_UART_Receive_IT( &huart6, &pData, 1);
	}
}- Set the serial port assistant to send 10 bytes at a time. You can see that the data returned by the serial port is also 10 bytes. There is no data loss. Set the automatic sending time to 200ms and the data is also not lost.


- It is considered that the reason for this problem may be that the receiving speed is not enough, or the serial port is not sending data quickly enough, so the code is modified as follows to test whether it is because the serial port is sending data too slowly, which limits the transceiver performance. Set the receiving callback function to only send data Save without sending. In the main function, determine whether the button is pressed. If pressed, the received data will be sent.
void HAL_UART_RxCpltCallback(UART_HandleTypeDef *huart)
{
	if( huart == &huart6 )
	{
		UART6_RXD_BUFF[UART6_RXD_COUNT] = pData;
		UART6_RXD_COUNT++;
		HAL_UART_Receive_IT( &huart6, &pData, 1);
	}
}if( BSP_PB_GetState( BUTTON_USER ) == GPIO_PIN_SET )
{
HAL_Delay(500);
BSP_LED_Toggle(LED_RED);
for(i=0;i<UART6_RXD_COUNT;i++)
{
HAL_UART_Transmit( &huart6 , (uint8_t *)&UART6_RXD_BUFF[i] , 1, 0xFFFF);
UART6_RXD_BUFF[i] = UART6_RXD_BUFF[i];
}
UART6_RXD_COUNT=0;
}- From the test, it can be seen that the amount of data sent and received is consistent, indicating that the speed of receiving serial port data using interrupt mode is very fast. As long as too much code is not run in the callback function, complete data transmission can be guaranteed.

- Attached is a file transfer test, taking the main.c of this program as an example and sending it to the microcontroller. It can be seen that the sending and receiving data are consistent.

2.3. DMA receiving mode
2.3.1. Configure CubeMX for DMA reception and select Normal as the mode.
(Step 2.3.7 is loop mode):

2.3.2. Set the DMA receive interrupt priority to 4 and open the serial port to receive global interrupt:

2.3.3. The interrupt callback function configuration is as follows:
void HAL_UART_RxCpltCallback(UART_HandleTypeDef *huart)
{
	if( huart == &huart6 )
	{
		HAL_UART_Transmit( &huart6 , (uint8_t *)&pData , 1, 0xFFFF);
		HAL_UART_Receive_DMA( &huart6, &pData, 1);
	}
}
2.3.4. There is no data loss when testing 10 data:

But when 50 data were sent at a time, serious data loss occurred:

2.3.5. Modify the interrupt callback function to only save and not send.
void HAL_UART_RxCpltCallback(UART_HandleTypeDef *huart)
{
	if( huart == &huart6 )
	{
		UART6_RXD_BUFF[UART6_RXD_COUNT] = pData;
		UART6_RXD_COUNT++;
		//HAL_UART_Transmit( &huart6 , (uint8_t *)&pData , 1, 0xFFFF);
		HAL_UART_Receive_DMA( &huart6, &pData, 1);
	}
}
2.3.6. It can be found that the final effect is still very ideal.

Receiving file data is also possible:

2.3.7. Modify DMA to continuous working mode

2.3.8, the receiving callback function can be written as follows, and there is no need to reopen DMA every time.
void HAL_UART_RxCpltCallback(UART_HandleTypeDef *huart)
{
	if( huart == &huart6 )
	{
		UART6_RXD_BUFF[UART6_RXD_COUNT] = TEMP_BUFF;
		UART6_RXD_COUNT++;
	}
}
2.3.9. The test file transfer results are as follows, there is no data loss:

3. Automatic baud rate
3.1.1. Configure automatic baud rate on CubeMX
Using mode three, 0x55 frame determines the current communication baud rate.

After generating the code, it was found that the baud rate in the initialization function has a preset value: 115200

3.1.2. Add a program to display the current baud rate in the main function:
GUI_DispDecAt ( 108000000/(huart6.Instance->BRR) , 0, 20, 7);Because USART6 is mounted on the APB2 bus, its working clock is 108MHz

It can be learned from the official reference manual: USARTDIV is an unsigned fixed-point number stored in the USARTx_BRR register. That is the frequency division value. According to the given formula, the current baud rate can be calculated.

3.1.3. Compile and download
You can see that 115138 is displayed on the screen, which is very close to the default baud rate of 115200.

3.1.4. Use serial port assistant to test
At a baud rate of 256000, send a string starting with the letter U, and you can see that the number on the display changes to 257142.

3.1.5. Press the button to see that the data is returned successfully:

3.1.6. The same method is also applicable to other baud rates.
Disadvantages: Configured in mode 3, after each power-on, the other party needs to send a 0x55 character before the baud rate can be determined. The baud rate will remain unchanged thereafter, otherwise the serial port will not work properly.