Table of contents
4 Script to modify docker image
1 docker image download
You can see image-related information on dockerhub
https://hub.docker.com/r/sophgo/tpuc_dev/tags
 Download with the following command
docker pull sophgo/tpuc_dev:latestIf the above command is too slow, then download another version of the docker image from the official website.
After downloading it is:

Then execute the following command to load the image
docker load -i sophgo-tpuc_dev-v2.1-82d75f5c633d.tar
475a54c2a93d: Loading layer [==================================================>]  65.52MB/65.52MB
c5cf9c6d3cf4: Loading layer [==================================================>]  5.647GB/5.647GB
0cdbfbd3d3f4: Loading layer [==================================================>]  739.4MB/739.4MB
7d7b0448f25b: Loading layer [==================================================>]  1.536kB/1.536kB
Loaded image: sophgo/tpuc_dev:v2.1
Pay attention to sophgo/tpuc_dev:v2.1 here , which will be used in the script later.
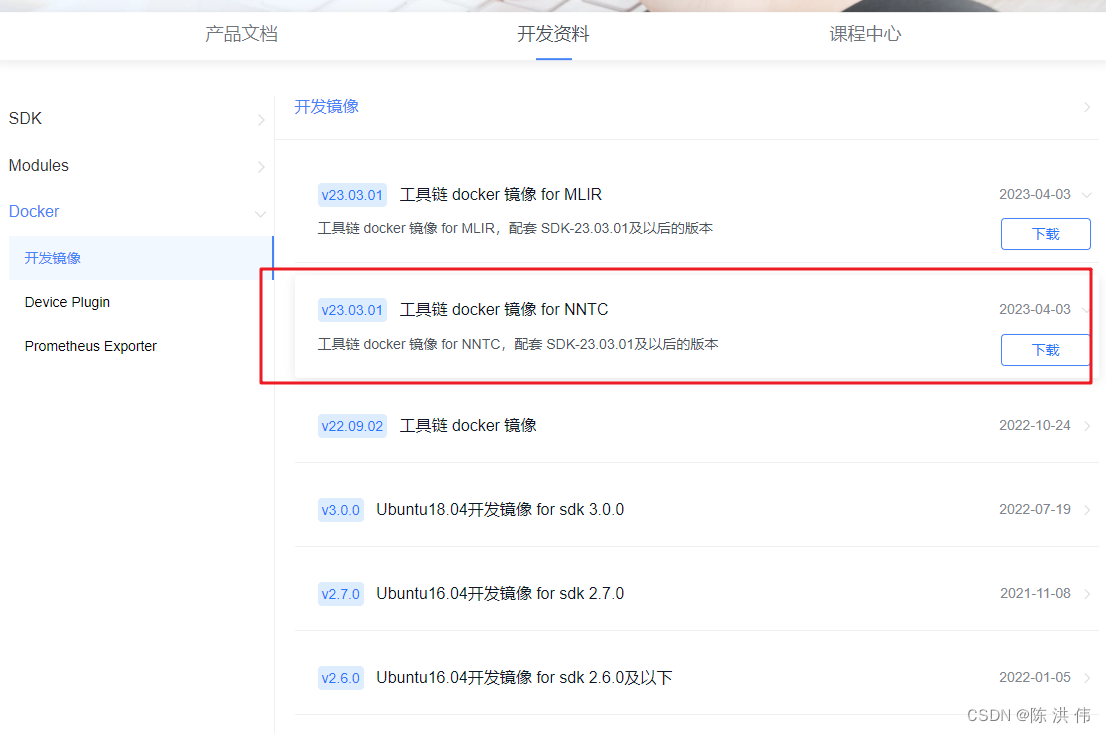
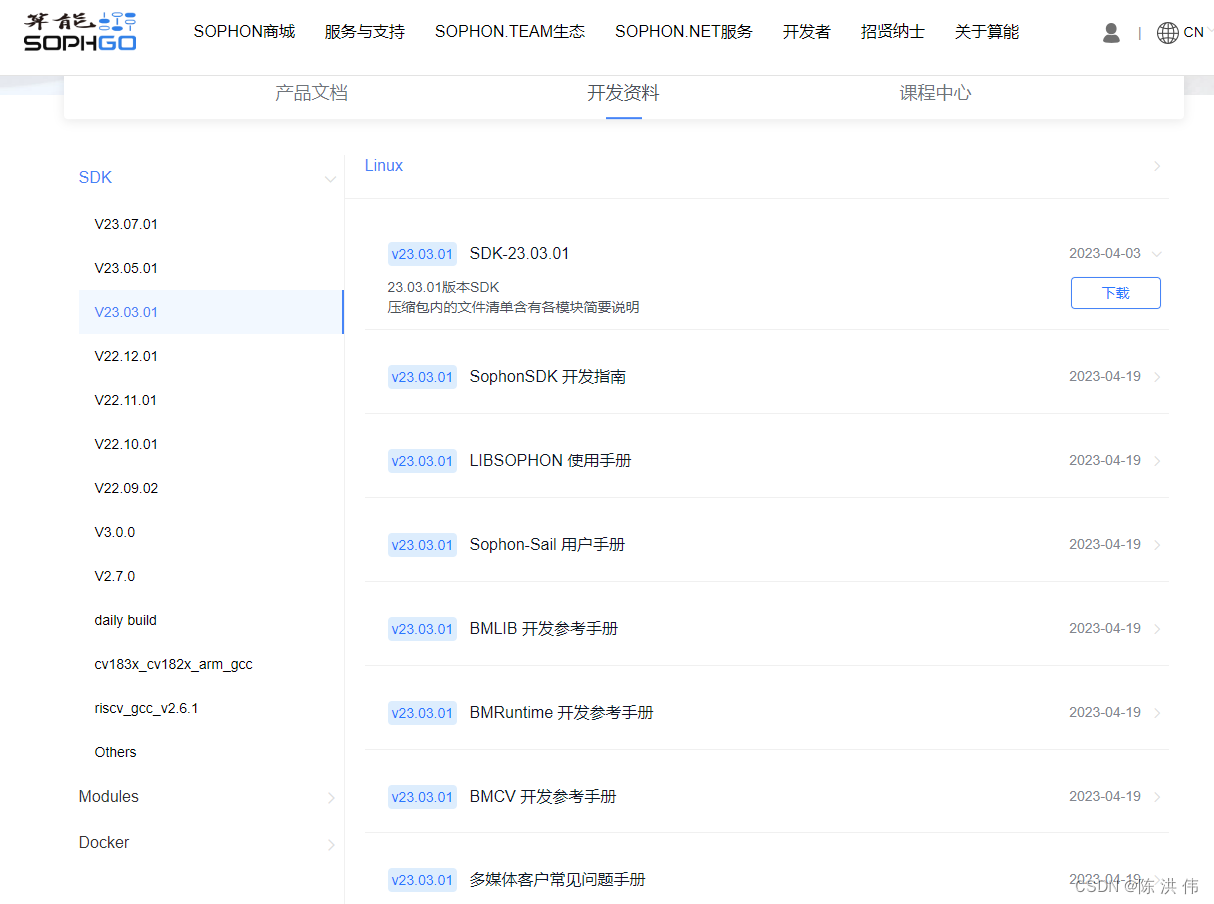
2 SDK download
Go to download 23.03.01. Model conversion does not require SDK, but it requires nntc inside.
3 Download sophon-demo
https://github.com/sophgo/sophon-demo
Go to the above URL to download sophon-demo, which contains a conversion script.
4 Script to modify docker image
docker_run_sophonsdk.sh,
#!/bin/bash

arch=$(uname -m)
x86="x86"
arm="aarch64"

REPO="sophgo"
IMAGE="sophonsdk3"
TAG=${1:-ubuntu18.04-py37-dev-22.06}

if [ x$(echo ${arch} | grep ${x86}) != x"" ]; then
  echo "running on: ${arch}"
elif [[ $(echo ${arch} | grep ${arm}) != "" ]]; then
  echo "${arch} not support yet"
else
  echo "${arch} not support yet"
  exit 1
fi

DIR="$( cd "$( dirname "${BASH_SOURCE[0]}" )" && pwd )"
WORKSPACE=$PWD
echo "Current   Directory: $DIR"
echo "Workspace Directory: $WORKSPACE"
echo "Docker             : $REPO/$IMAGE:$TAG"

if [ -c "/dev/bm-sophon0" ]; then
  for dev in $(ls /dev/bm-sophon*);
  do
    mount_options+="--device="$dev:$dev" "
  done
  CMD="docker run \
      --network=host \
      --workdir=/workspace \
      --privileged=true \
      ${mount_options} \
      --device=/dev/bmdev-ctl:/dev/bmdev-ctl \
      -v /dev/shm --tmpfs /dev/shm:exec \
      -v $WORKSPACE:/workspace \
      -v /dev:/dev \
      -v /etc/localtime:/etc/localtime \
      -e LOCAL_USER_ID=`id -u` \
      -itd $REPO/$IMAGE:$TAG \
      bash
  "
else
  CMD="docker run \
      --network=host \
      --workdir=/workspace \
      --privileged=true \
      -v $WORKSPACE:/workspace \
      -v /dev/shm --tmpfs /dev/shm:exec \
      -v /etc/localtime:/etc/localtime \
      -e LOCAL_USER_ID=`id -u` \
      -itd $REPO/$IMAGE:$TAG \
      bash
  "
fi

echo "creating docker container from image: $REPO/$IMAGE:$TAG"
echo $CMD
container_sha=`eval $CMD`
container_id=${container_sha:0:12}
CMD="docker exec -it ${container_id} bash"

echo "container_id: $container_id"
[[ ! -z "$container_id" ]] && eval $CMD || echo "failed to create container!"
Since we changed to a new image, we modified the REPO, IMAGE, and TAG of the docker image inside to the following form, and the other contents will not be modified for the time being.
REPO="sophgo"
IMAGE="tpuc_dev"
TAG="v2.1"
5 Create a folder
Here I created a convert_model folder and put demo and nntc in it, as shown in the figure below
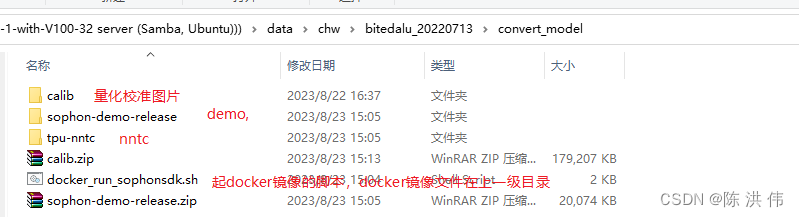
docker_run_sophonsdk.sh has been modified previously, and then I ran the script directly to mirror it.
./docker_run_sophonsdk.sh6.source
Environment variables under source
There is an envsetup.sh script in /workspace/tpu-nntc/tpu-nntc_v3.1.7-b267d3cd-230327/scripts
source envsetup.sh7.Transfer model
Then the specific conversion model script is available in sophon-demo-release/sample/YOLOv5/scripts.
The model must use the model after JIT. The specific method is in the old method: https://github.com/sophon-ai-algo/examples/tree/3.0.0/simple/yolov5
Let's modify the gen_int8bmodel_nntc.sh script, modify the path of the calibration image and the path and name of the model file. Modified as follows
#!/bin/bash
model_dir=$(dirname $(readlink -f "$0"))

if [ ! $1 ]; then
    echo "Please set the target chip. Option: BM1684 and BM1684X"
    exit
else
    target=$1
fi

outdir=../models/$target

function auto_cali()
{
    python3 -m ufw.cali.cali_model  \
            --net_name=yolov5s  \
            --model=../build/640_edge_compute_best_20230821.torch.pt  \
            --cali_image_path=../calib  \
            --cali_iterations=128   \
            --cali_image_preprocess='resize_h=640,resize_w=640;scale=0.003921569,bgr2rgb=True'   \
            --input_shapes="[1,3,640,640]"  \
            --target=$target   \
            --convert_bmodel_cmd_opt="-opt=1"   \
            --try_cali_accuracy_opt="-fpfwd_outputs=< 24 >86,< 24 >55,< 24 >18;-th_method=MAX"
    mv ../models/torch/yolov5s_batch1/compilation.bmodel $outdir/yolov5s_v6.1_3output_int8_1b.bmodel
}

function gen_int8bmodel()
{
    bmnetu --model=../models/torch/yolov5s_bmnetp_deploy_int8_unique_top.prototxt  \
           --weight=../models/torch/yolov5s_bmnetp.int8umodel \
           -net_name=yolov5s \
           --shapes=[$1,3,640,640] \
           -target=$target \
           -opt=1
    mv compilation/compilation.bmodel $outdir/yolov5s_v6.1_3output_int8_$1b.bmodel
}

pushd $model_dir
if [ ! -d $outdir ]; then
    mkdir -p $outdir
fi
# batch_size=1
auto_cali
# batch_size=4
gen_int8bmodel 4

popd
and then execute
./gen_int8bmodel_nntc.sh BM1684Error reported:
bad layer name: < 24 >55 !!!
*** Check failure stack trace: ***
./gen_int8bmodel_nntc.sh: line 14:  2971 Aborted                 (core dumped) python3 -m ufw.cali.cali_model --net_name=yolov5s --model=../build/640_edge_compute_best_20230821.torch.pt --cali_image_path=../calib --cali_iterations=128 --cali_image_preprocess='resize_h=640,resize_w=640;scale=0.003921569,bgr2rgb=True' --input_shapes="[1,3,640,640]" --target=$target --convert_bmodel_cmd_opt="-opt=1" --try_cali_accuracy_opt="-fpfwd_outputs=< 24 >86,< 24 >55,< 24 >18;-th_method=MAX"
mv: cannot stat '../models/torch/yolov5s_batch1/compilation.bmodel': No such file or directory
Then you can see the names of the outputs on line 24 in the script,
This is because the name of the layer is wrong, I look at my own onnx model,

Then change the layer name in the script. The modified script is as follows. The gen_int8bmodel function is not called and is not needed.
#!/bin/bash
model_dir=$(dirname $(readlink -f "$0"))

if [ ! $1 ]; then
    echo "Please set the target chip. Option: BM1684 and BM1684X"
    exit
else
    target=$1
fi

outdir=../models/$target

function auto_cali()
{
    python3 -m ufw.cali.cali_model  \
            --net_name=yolov5s  \
            --model=../build/edge_compute_best_20230821.onnx  \
            --cali_image_path=../calib  \
            --cali_iterations=150   \
            --cali_image_preprocess='resize_h=640,resize_w=640;scale=0.003921569,bgr2rgb=True'   \
            --input_shapes="[1,3,640,640]"  \
            --target=$target   \
            --convert_bmodel_cmd_opt="-opt=1"   \
            --try_cali_accuracy_opt="-fpfwd_outputs=326,378,430;-th_method=MAX"
    #mv ../models/torch/yolov5s_batch1/compilation.bmodel $outdir/yolov5s_v6.1_3output_int8_1b.bmodel
}

function gen_int8bmodel()
{
    bmnetu --model=../models/torch/yolov5s_bmnetp_deploy_int8_unique_top.prototxt  \
           --weight=../models/torch/yolov5s_bmnetp.int8umodel \
           -net_name=yolov5s \
           --shapes=[$1,3,640,640] \
           -target=$target \
           -opt=1
    mv compilation/compilation.bmodel $outdir/yolov5s_v6.1_3output_int8_$1b.bmodel
}

pushd $model_dir
if [ ! -d $outdir ]; then
    mkdir -p $outdir
fi
# batch_size=1
auto_cali
# batch_size=4
#gen_int8bmodel 4

popd
Then the model will be generated
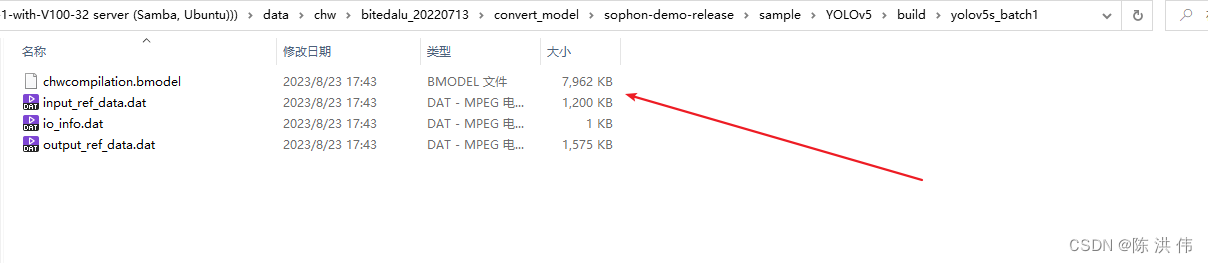
================================================== ====================
In the future, the new method introduced above will be used to convert the model. The following method is the old method before. The new method tutorial is now: https:// github.com/sophgo/sophon-demo
And download the new docker image, then the SDK can first use the 3.0 used before, then only replace the nntc in the SDK with the new one, and then convert the demo to use the new URL.
The following URLs are deprecated.
Follow the instructions on the above URL to convert the algorithm model.
1. First download the SDK package and image package
SDK software package download :
-
Develop docker base image: Click to go to the official website to download the Ubuntu development image . Please select the docker image that matches the SDK version. -
SDK software package: Click to go to the official website to download the SDK software package . Please select the SDK version corresponding to the warehouse code branch.
2 Create a docker development environment
-
Installation toolssudo apt update sudo apt install unzip -
Load docker image:unzip <docker_image_file>.zip cd <docker_image_file> docker load -i <docker_image> -
Unzip the SDK:unzip <sdk_zip_file>.zip cd <sdk_zip_file>/ tar zxvf <sdk_file>.tar.gz -
Create a docker container, and the SDK will be mounted and mapped to the container for use:cd <sdk_path>/ # 若您没有执行前述关于docker命令免root执行的配置操作,需在命令前添加sudo ./docker_run_<***>sdk.sh -
Enter the docker container to install the library:# 进入容器中执行 cd /workspace/scripts/ ./install_lib.sh nntc -
Set environment variables - [No PCIe accelerator card]:# 配置环境变量,这一步会安装一些依赖库,并导出环境变量到当前终端 # 导出的环境变量只对当前终端有效,每次进入容器都需要重新执行一遍,或者可以将这些环境变量写入~/.bashrc,这样每次登录将会自动设置环境变量 source envsetup_cmodel.sh -
Set environment variables-[with PCIe accelerator card]:# 配置环境变量,这一步会安装一些依赖库,并导出环境变量到当前终端 # 导出的环境变量只对当前终端有效,每次进入容器都需要重新执行一遍,或者可以将这些环境变量写入~/.bashrc,这样每次登录将会自动设置环境变量 source envsetup_pcie.sh -
Install the sail package corresponding to the python version# the wheel package is in the SophonSDK: pip3 uninstall -y sophon # get your python version python3 -V # choose the same verion of sophon wheel to install # the following py3x maybe py35, py36, py37 or py38 # for x86 pip3 install ../lib/sail/python3/pcie/py3x/sophon-?.?.?-py3-none-any.whl --user
3 Model preparation
What needs to be noted is that when we export the algorithm model, we need to add relevant trace code
The PyTorch model compilation tool BMNETP in SophonSDK only accepts PyTorch's JIT model (TorchScript model).
JIT (Just-In-Time) is a set of compilation tools designed to bridge the gap between research and production in PyTorch. It allows the creation of models that can be run without relying on the Python interpreter and can be optimized more aggressively. In the case where there is a Python model of PyTorch (the base class is torch.nn.Module), the JIT model can be obtained through torch.jit.trace, such astorch.jit.trace(python_model, torch.rand(input_shape)).save('jit_model'). BMNETP does not currently support JIT models with control flow operations (such as if statements or loops), so torch.jit.script cannot be used. Instead, torch.jit.trace is used, which only tracks and logs operations on tensors, not Any control flow operations are logged. Yolov5 has already written this part of the operation for us. Just run the following command to export the JIT model that meets the requirements:
4 Model conversion
This can be done by running the script directly for conversion. There are different scripts for the 32-bit model and the int8 model.
8. Transfer each frame model to ONNX reference — TPU-MLIR 1.1 document