1. Specifications for using files and commands
1. Linux file naming rules
- Everything in Linux is a file
- Except for /, all characters are legal, but some characters are best not used, such as spaces and characters @ # $ & ( ) - etc.
- Avoid using . as the first character of a file name (files starting with . in Linux are hidden files)
- Case sensitive, strictly case sensitive (including file naming, commands, command options, user names, etc.)
- Length cannot be greater than 255 characters
2. Linux command format
Format: command-option parameter (operation object)
Example: ls -la /etc
- When there are multiple options, they can be written together (except in special circumstances)
- Two special directories. and..., representing the current directory and the parent directory of the current directory respectively.
- Some commands do not follow this format
3. Linux command prompt
[root@localhost /]#
[Current login user@the last directory of the current directory where the current host name is located]# # User identity with table (root)
2. File management commands
1. ls command
- Function description: Used to display a list of files in the specified directory (the detail level and color highlighting of the displayed content can be controlled through options)
- Location:/bin/ls
- Command format: ls [-options] [parameters]
- Common options:
-
- -a: Display all contents in the specified directory (including hidden files and special directories)
- -l: Display detailed information of each file (permissions, owner, group, modification time, etc.), which can be abbreviated to ll
- -h: The file size is displayed in common units, often in the form -lh
- -d: View directory attributes without displaying the file list in the directory, often appearing in the form of -ld
- -i: Display the file index node number (inode), each file has a unique inode number
- -R recursively display directories and their subdirectories
- -n displays the UID and GID of the file
Index node number (inode number):
In addition to the data in the file, each file also needs to save some data of the file itself, such as: the creator of the file, creation time, file size, etc. We collectively call this kind of information "metadata". Each file creates a separate area to store the metadata of the file, and assigns a unique ID number (ie inode number) to each file in the same partition
[root@localhost ~]# ls -l
总用量 44
-rw-------. 1 root root  1245 1月   1 2020 anaconda-ks.cfg
-rw-r--r--. 1 root root 28250 1月   1 2020 install.log
-rw-r--r--. 1 root root  7572 1月   1 2020 install.log.syslog
First column: type and file permissions
The second column: reference count, the value of the text file represents that the file has n-1 hard links; the value of the directory file represents the number of subdirectories under the directory
The third column: File owner (owner), which user the file belongs to. By default, whoever created the file belongs to him.
The fourth column: the group to which the file belongs (group). Generally, this group is the group to which the file creator belongs.
The fifth column: file size, displayed in bytes by default, can be displayed in the most appropriate unit using the -h option
Column Six: The last modification time of the file (content modification time)
Column 7: File name
The ending .: This point represents the file marked by SELinux, usually the file created when SELinux is turned on
2. cd command
- Function description: switch to the specified directory
- Path: Belongs to shell built-in command, no path
- Command format: cd [-option] [parameter]
- Syntax: cd directory
cd ~ enter the current user's home directory
cd - Go to the last directory
cd … returns to the previous directory
cd …/… Return to the previous two directories
cd . Enter the current directory
| special directory | effect |
|---|---|
| ~ | Switch to the home directory of the current user |
| - | Switch to the directory where you were just now |
| . | Current directory |
| … | Switch to the upper level directory (parent directory) |
3. pwd command
- Function description: display the current path
- Location:/bin/pwd
[root@localhost network-scripts]# pwd

/etc/sysconfig/network-scripts
4. mkdir command
- Function description: create directory
- Location:/bin/mkdir
- Command format: mkdir [-options] [parameters]
- Common options:
-
- -p: recursively create multi-level directories
- -v show creation process
[root@localhost ~]# mkdir /data/text/
mkdir: 无法创建目录"/data/text/": 没有那个文件或目录
[root@localhost ~]#
[root@localhost ~]# mkdir -p /data/text/
5. rm command
- Function description: delete the specified file or directory
- Path: /bin/rm
- Command format: rm [-option] [parameter]
- Common options:
-
- -i: Ask the user before deleting existing files or directories
- -f: Do not ask, force delete
- -r: Recursive processing, processing all files and subdirectories in the specified directory together
- Synonym command: rmdir deletes the specified empty directory
-
- -p delete empty directories recursively
- -v displays the command execution process
6. touch command
- Function description: First, it is used to update the time tags of existing files to the current system time (default mode), and their data will be retained intact; second, it is used to create new empty files.
- Location:/bin/touch
- Command format: touch [file name]
- Commonly used options: Related options all modify the file time and will not be explained here.
Linux file naming rules: see front
7. stat command
- Function description: Used to display file status information. The output information of the stat command is more detailed than the output information of the ls command
- Location:/usr/bin/stat
- Command format: stat [options] [file name]
- Common options:
-
- -f: No longer displays the detailed information of the specified file, but displays the information of the file system where the file is located (file system type, number of Blocks, number of Inodes, etc.)
[root@localhost ~]# ls -l
总用量 44
-rw-------. 1 root root  1245 1月   1 2020 anaconda-ks.cfg
-rw-r--r--. 1 root root 28250 1月   1 2020 install.log
-rw-r--r--. 1 root root  7572 1月   1 2020 install.log.syslog
---------------------------------------------------------------------------------

[root@localhost ~]# stat install.log
File: "install.log"
Size: 28250     Blocks: 64         IO Block: 4096   普通文件
Device: 803h/2051d Inode: 262148     Links: 1
Access: (0644/-rw-r--r--) Uid: (    0/   root)   Gid: (    0/   root)
Access: 2020-01-01 22:52:00.643999989 +0800       #访问时间
Modify: 2020-01-01 23:00:00.507999787 +0800       #内容修改时间
Change: 2020-01-01 23:00:34.067999794 +0800       #属性修改时间(权限和归属)
---------------------------------------------------------------------------------

[root@localhost ~]# stat -f install.log
File: "install.log"
  ID: d2925608e3c65ff3 Namelen: 255     Type: ext2/ext3
Block size: 4096       Fundamental block size: 4096
Blocks: Total: 4573121   Free: 4038984   Available: 3805013
Inodes: Total: 1171456   Free: 1103020
Note: Free and Available both mean available, but there is a difference. Part of Free needs to be used as cache space. Although it is not used now, it has been reserved, so Available is the truly available amount for the program.
8. cat command
- Function description: Connect files and print to the standard output device. Cat is often used to display the contents of the file (only the last page will be displayed if the content is greater than 1 page: automatic scrolling)
- Location:/bin/cat
- Command format: cat [options] filename
- Common options:
-
- -n: number each line (starting from 1)
- -b: Similar to -n, blank lines will be actively ignored (displayed but not numbered)
cat displays the contents of multiple files
cat merges multiple files (in order of files)
(For example, after checking the content of one page, only the content of the last page can be displayed)
9. more command
- Function description: A text filter that displays text content in full-screen paging mode. You can use the built-in keys to control the displayed content.
- Location:/bin/more
- Command format: more [file name]
-
- Space: page down
- Enter: scroll down
- b: Page up
- q: exit text
10. less command
- Function description: The function is similar to more, both are used to browse text content.
- Location:/usr/bin/less
- Command format: less [options] [filename]
- Common options:
-
- -N: Display text content and display line numbers
- Command comparison: more and less are very similar. They are both used to display text content in split screens/pages. However, less has more interactive buttons than more. The following are some interactive button functions in less mode (supported when displaying file content) Keyword search.)
| interactive button | Function |
|---|---|
| PageUp(PaUp) & b | Page up |
| PageDown(PaDn) & space | Page down |
| Enter | Wrap downwards (only one new line will be displayed at a time) |
| /Key words | Used to perform keyword searches in less mode and highlight keywords. Use n and N to quickly locate each keyword downwards and upwards. |
| q | Exit less mode |
11. head command
- Function description: Display the beginning of the specified file (the first 10 lines are displayed by default)
- Location:/usr/bin/head
- Command format: head [options] [file name]
- Common options:
-
- -n: Display the first n lines of the specified file (n is replaced by a number)
12. tail command
- Function description: Display the end content of the specified file (the last 10 lines are displayed by default)
- Location:/usr/bin/tail
- Command format: tail [options] [file name]
- Common options:
-
- -n: Display the last n lines of the specified file
- -f: Display the last 10 lines of the file, and monitor the file, update and notify changes in the tail of the file in real time (tailf = tail -f)
13. cp command
- Function description: Copy one or more source files to the specified location. The source file name is retained by default, and can also be renamed.
- Location:/bin/cp
- Command format: cp [option] source file or directory target directory
- Common options:
-
- -d: When copying a symbolic link, create the target file or directory as a symbolic link and point to the original file or directory connected to the source file or directory.
- -p: When copying a file, retain the attributes of the source file
- -r: Recursive processing, when copying, all files and subdirectories in the specified directory will be copied to the specified location.
- -a: Equivalent to a set of -dpr, with all the functions of the three options
14. mv command
- Function description: Move (cut) the specified file to the specified target location. The source file name is retained by default and can also be renamed.
- Location:/bin/mv
- Command format: mv [option] source file or directory target directory
- Common options:
-
- -b: When moving files, if a file with the same name exists in the target location, the file with the same name will be backed up (the backup file name has a ~ mark at the end)
You can answer directly with y, and it will prompt that although it is overwriting, a backup file will be automatically created.
Extension: same options for rm, cp, mv commands
-i: This option is used to ask the user whether to perform file operations.
-f: The function of this option is to directly skip the step of asking the user when operating files.
15. tree command
- Function description: Display directory tree
- Command format: tree directory
- Commonly used options:
-d only displays directories
(can only be used after installation under centos7.x)
16.pstree
-
Function description: view the relationship between process trees
-
Command format: pstree [option]
-A:进程树之间的链接以ASCII码字符链接。

-p:同时列出每个进程的PID。

-u:同时列出每个进程的所属账号名称。
16. ln command
- Function description: Create a soft link (symbolic link) or hard link for the specified file
- Location:/bin/ln
- Command format: ln [OPTION]… SOURCE DEST
- Common options:
-
- -s: Create a symbolic link file (soft link) for the specified source file. If "-s" is not added, a hard link will be created.
Note: When creating links, use absolute paths
[root@localhost ~]# ln -s /etc/sysconfig/network-scripts/ifcfg-ens33 /root/
The difference between symbolic links and hard links:
Symlink (soft link) features:
-
- Source files and soft links each have different Inode numbers and Block numbers.
- The two files can be synchronized regardless of which one is modified.
- Deleting the source file will invalidate the soft link; deleting the soft link will have no effect on the source file.
- The size of the soft link file is not affected by changes in the source file. It only records the location information (Inode) of the source file.
- The soft link file permissions are: rwxrwxrwx, but the final effective permissions are subject to the source file.
- Soft links can link files or directories, and can be created across partitions
Hard link characteristics:
-
- The source file and the hard link file have the same Inode number and Block number (actually the same file)
- The two files can be synchronized regardless of which one is modified.
- No matter which one is deleted, it will not affect each other.
- Hard links cannot be created to directories and cannot be created across partitions
3. Permission management commands
1. The meaning of permissions
We can see the detailed information of the file through the ls -l command. The first column is about the file type and permissions. Let’s analyze it in detail.
-rw-r–r–. 1 root root 28250 1月 1 2020 install.log
First -rw-r–r–this structure can be broken down into four parts: file type, file owner permissions, file group permissions, and file permissions for other people.

file type:
- "-": ordinary files. There are still many subtypes under ordinary file types, such as compressed files, text files, script files, etc. You can use the file command to view
- "d": directory file, all access files in Linux~
- "l": Soft link file, here it means that the file is a soft link. A soft link is an independent file and has its own file type.
- "b": Block device file, the saved file type of storage device in Linux
- "c": Character device file, generally refers to devices used for data transmission, input and output devices, etc.
- "s": Socket file, a file generally used to implement communication between two processes
- "p": Pipe file, generally used to deal with the issue of the order in which multiple processes access the same file.
Note: In the detailed information of the device class file, the file size position does not display the size, but the master and slave device numbers. The major device number represents the device type, and the slave device number represents the number of the device of this type.
The remaining nine digits are permissions:
r w x r w x r w x
Read-write execute read-write execute read-write execute
4 2 1 4 2 1 4 2 1
File owner (u) File group (g) Other users (o) other
Extension : Command to view specific detailed types of files
Command: file
[root@localhost test]# ls -l
总用量 36
-rw-r--r-- 1 root root 28250 3月  14 14:41 install.log
-rw-r--r-- 1 root root  7544 3月  14 14:41 ins.tar.gz
[root@localhost test]#
[root@localhost test]# file install.log
install.log: UTF-8 Unicode text
[root@localhost test]#
[root@localhost test]# file ins.tar.gz
ins.tar.gz: gzip compressed data, from Unix, last modified: Thu Mar 14 14:40:53 2020
Permission type:
- Text file:
-
- r: Content viewing permissions
- w: content writing permissions
- x: execution permission
- Directory class files:
-
- r: file: view the file list permissions in the directory
- w: file: permission to create and delete files in the directory
- x:file:enter directory permission
Note: If there are letters in the specified position, it means that you have the permission. If there is no permission, use - instead. For example: rw-r–r-- {indicates that the owner has read and write permissions, and the group and others have read permissions}
- Represent permission bits numerically:
-
- r:4
- w:2
- x:1
For example: the permissions of rw-r–r-- expressed numerically are 644 {respectively the permissions of the owner, the group to which they belong, and other people}
Expansion: User addition & password setting
- User add: useradd
- Password setting: passwd
2. Permission modification command: chmod
- Function description: Modify the rwx permissions of the specified location of the file
- Location:/bin/chmod
- Common options:
-
- chmod [augo] [±=] [rwx] file
- chmod 644 file
- -R: Recursively apply the set permissions to sub-files in the directory (generally used for directories)
- Example
-
- chmod g+w, o+w file
- chmod u=rwx file
- chmod 644 file
3. Attribution modification command: chown
- Function description: Modify the owner or group of a file
- Location:/bin/chown
- Common options:
-
- chown user:group file
- chown user.group file
- -R: Recurse the settings to sub-files in the directory (generally used for directories)
4. Group modification command: chgrp
- Function description: Change the group to which a file or directory belongs
- Location:/bin/chgrp
- Common options:
-
- chgrp user group file or directory
- -R: Recurse the settings to sub-files in the directory (generally used for directories)
5. Mask value modification command: umask
- Function description: View or set the permission mask value of the file
- Path: shell built-in command
- Common options:
-
- umask: Displays the file’s permission mask value as an octal value.
- umask 002: Overwrite the original mask value according to the given octal value
- Calculation method of file default permissions (bit subtraction)
-
- Catalog class files: 777-mask=default permissions
- File class file:666-mask=default permissions
Summary: Linux is an operating system with very strict rights management. By default, ordinary files are not assigned x execution rights.
Under the default mask of 0022, the default maximum permission of the file is 644, and the default maximum permission of the directory is 755.
4. Query related commands
1. which
- Function description: Display the absolute path of the command
- Location:/usr/bin/which
- Command format: which [commands]
2. whereis
- Function description: Locate the location of the binary file program, source code file, help manual page and other resources of the specified command
- Location:/usr/bin/whereis
- Command format: whereis [-bms] filename
- Common options:
-
- -b: locate the absolute path of the specified command
- -m: Locate the help manual path of the specified command (that is, the location of the man help manual document)
- -s: locate the source file path of the specified command
3. locate
- Function description: Query file location by file name {The locate command does not use traversal to search for files, but creates a database in advance, saves the names and corresponding paths of all files in it, when querying files , only need to query the database, very fast in terms of speed}
- Location:/usr/bin/locate
- Command format: locate keyword
- Common options:
-
- -i: Ignore the case of query objects
- Database file:/var/lib/mlocate/mlocate.db
- Database update: updatedb #It is recommended to update the database before each query
- Update rule file: /etc/updatedb.conf #The configuration file records some file types and directories that are ignored and not updated.
- Examples of using the locate command: # locate /etc/sh Search for all files starting with sh in the etc directory.
#When using the locate command, use absolute path query.
4. find
- Function description: Query files in directory trees
- Location:/bin/find
- Command format: find find directory [option]
- Query based on name: find /etc/ -name "*.txt"
-
- The default query in -name mode is precise. You can use wildcards for fuzzy query: * ? []; when using wildcards to query, the query object must use single and double quotes (see wildcards below)
- Query based on size: find /etc/ -size 10K
-
- In -size mode, precise size query is used by default, you can use - + for range query {Common units: c: byte; w: sub (2 bytes); b: block (512 bytes); k, M, G}
- find ./ -size -10k Find files or directories smaller than 10k
- find ./ -size -10M Find files or directories smaller than 10M
- find ./ -size +10G Find files or directories larger than 10G
- Query according to attribution: find /etc/ -user zhangsan
-
- In -user|-group mode, you can query files belonging to a certain user or a certain group
- -nouser|-nogroup mode can query files without owner or group (abnormal files)
- Query based on permissions: find /etc/ -perm 777
-
- -perm mode can query files with specified permissions, generally used to query ordinary files with excessive permissions
- Query by type: find /etc/ -type f
-
- In -type mode, you can query files of specified types [f: ordinary files; d: directory files; l: link files, etc.]
- Query based on inode: find /etc/ -inum 262149
-
- -inum mode can query all files with the same inode (query hard link files)
- Query based on time:
-
- Access time (-atime/day, -amin/minute): the user's last access time.
- Modification time (-mtime/day, -mmin/minute): The last time the file content was modified.
- Change time (-ctime/day, -cmin/minute): the last modification time of file data elements (permissions, etc.).

-
-
- -5: Files accessed within five days or within five minutes
- 5: Files accessed on exactly the fifth day or fifth minute
- +5: Files accessed five days ago or five minutes ago
-
- Query multiple conditions simultaneously: find /etc/ -name -a -type f
-
- -a: and means to combine two or more query conditions to perform file query (all conditions must be met at the same time)
- -o: or means, after combining multiple conditions, if one of the conditions is met, it will meet the query requirements.
- Query result batch processing: hand over the find query results to the specified command to continue the operation. The following two connectors can be achieved
-
- -exec|-ok: fixed format, slightly complex
-
- find /etc -name “*.txt” -exec rm {} ;
- {}: stores the result set of the find query
- ;: fixed format, \ is an escape character, command aliases are not applicable, the command itself is used directly; as the end symbol
- |xargs: The format is simpler, but files with spaces are not supported
- find /etc/ -name “*.txt” |xargs rm
expand:
Escape character: There is an alias mechanism in Linux. For example, if rm deletes a file, rm -i is executed (use which rm to view the command
Alias) A confirmation message will be prompted before using rm to delete files, because of the rm -i parameter. If you want to use the original meaning of the command, you can add
\escape. For example: \rm tese.txt will not prompt and will be deleted directly.
5. grep
- Function description: Query qualified strings based on certain conditions in the specified file.
- Location:/bin/grep
- Command format: grep [option] "string" file name
- Common options:
-
- -i: Ignore the case of the query object when querying
- -n: When querying, display the row number of the object that meets the conditions.
- -v: When querying, reverse the conditions and perform reverse query
- –color=auto: Highlight objects that meet the conditions
6. The functions of “|” and “|xargs”
Pipe character: |
Function: Use the result of the previous command as the input of the next command (it can be understood as saving the query result as a text)
Example: find /var/log/ -name “*.log” | grep --color=auto da
xargs command: |xargs
Function: Use the result of the previous command as the parameter of the next command (all files that meet the conditions are passed to the following command one by one)
Example: find /var/log/ -name “*.log” |xargs grep --color=auto da
7. Comparison of find, locate and grep
- find and locate are both commands used to query the location of files in the system.
- find searches by traversing all directories. The results are accurate, but it consumes a lot of system resources and time.
- locate is a fast indexing method that creates a database to save file locations and then queries the database. It saves resources quickly but has slightly poor accuracy.
- grep is a command used to search for qualified keywords in a specified file. The operation object is to specify a file.
- find is an exact match by default, you can use wildcards for fuzzy matching
- grep includes matching by default. For exact matching, you need to use regular expressions (discussed later)
8. The meaning of wildcard characters
| wildcard | effect |
|---|---|
| ? | Matches any character |
| * | Matches 0 or more of any characters |
| [ ] | Matches any character within brackets, [aoe] |
| [-] | Matches any character within the string range within brackets, [az] [0-9] |
| [^] | Logical negation, i.e. negation, means matching any character except within brackets |
5. Compression related commands
Compressed files are a common file format in operating systems. The main purpose of compressing files is to facilitate unified management of files, save space, and facilitate transmission and portability. The main principle is to compress the binary code of the file, such as 000000, It can be abbreviated as a60, which means 6 zeros.
Common compression formats in Linux include the following: .zip .gz .bz2 .tar .tar.gz .tar.bz2 etc.
1. zip
- Unzip: unzip filename.zip
- Compression: zip compressed name source file
-
- -r: Compress directory (recursively process subfiles in the directory)
2. gz
- Decompress: gunzip filename.gz or gzip -d filename.gz
- Compression: gzip filename
3. bz2
- Unzip: bunzip2 filename.bz2 or bzip2 -d filename.bz2
- Compression: bzip2 -z filename
4. tar
- Unpack: tar -xvf filename.tar
- Packaging: tar -cvf packaged file source file
5. tar.gz
- Unzip: tar -xvf file.tar.gz
- Compression: tar -zcvf compressed file source file
6. tar.bz2
- Uncompress: tar -xvf file.tar.bz2
- Compression: tar -jcvf compressed file source file
7. Others
In addition to the above formats, there are also some formats that are not particularly common and may be encountered occasionally. We will only talk about the decompression methods of these formats.
Decompression method of ".tar.xz" and ".tgz" compressed packages: tar-xvf filename
6. Help related commands
1. man
- Function description: Display the usage of commands through the help manual
- Command format: man command
- Common options:
-
- -f: Displays the levels of help available for this command (some can display help for corresponding configuration files)
- What the various help levels mean:
| help level | meaning |
|---|---|
| 1 | View help information for commands (commands that most ordinary users can execute) |
| 2 | View help information for functions that can be called by the kernel |
| 3 | View help information for C language related functions |
| 4 | View help information for devices and special files (mainly found in the /dev/ directory) |
| 5 | Configuration file help information |
| 6 | Game help information (mainly available in personal version of Linux) |
| 7 | View other miscellaneous help information |
| 8 | View help for commands that super administrators can execute |
| 9 | Help documentation for kernel information |
- Shortcut keys in interactive mode:
| hot key | Function |
|---|---|
| up arrow | View previous line |
| down arrow | View next line |
| PgUp | Page up |
| PgDn | Page down |
| g | back to the homepage |
| G | Turn to last page |
| q | Exit interactive mode |
| / | Search by specified keyword in interactive mode |
| n | After the query is completed, you can use n to quickly locate the next qualified keyword |
2. help
- Function description: Display help information about Linux built-in commands
- Command format: help command
- Common options:
-
- -m: Display help information in the format of simulated man (tasteless ~)
Extension: –help option
Format: ls --help
Most commands in Linux can use –help as an option to display help information, but the displayed content is not as comprehensive as man and info.
3. info
- 功能描述:查看指定命令的帮助信息等
- 命令格式:info command
- 常用选项:常用快捷键如下
| 快捷键 | 功能 |
|---|---|
| 上箭头 | 查看上一行 |
| 下箭头 | 查看下一行 |
| PgUp | 向上翻页 |
| PgDn | 向下翻页 |
| Tab | 快速切换到下一个以*开头的节点 |
| 回车 | 进入到当前以*开头的节点内,查看详细信息 |
| u | 退出节点,回到帮助首页 |
| n | 当处于某一节点内时,可以直接切换到下一个节点 |
| p | 当处于某一节点内时,可以直接切换到上一个节点 |
| ? | 查看info所提供的的交互命令的帮助信息 |
| q | 退出info模式 |
注意:info是Linux系统中最高级的帮助信息,对于初学者不是很友好,不要求前期掌握。
七、关机与重启命令
1.sync
- 功能描述:强制将缓冲区中的数据写入磁盘中
- 命令格式:sync
- 常用选项:无
Linux操作系统为了提高数据的处理速度会将数据放入到磁盘的缓冲区中(buffer),但是如果数据在缓冲区中时发生突然断电重启之类的操作数据可能就会丢失,为了预防这类事件发生,我们可以在将数据“写入”磁盘后,执行一次sync将数据强制写入到真正的磁盘中。当然,如果没有人为干预,操作系统也会自行执行sync只是时间和周期上不确定也不及时。
2.shutdown
- 功能描述:用来关机或者重启的命令
- 命令格式:shutdown [选项] 参数
- 常用选项:
-
- -h:halt,发送关机信号,后面指定倒计时时长(now,1200)
- -r:reboot,发送重启信号,后面指定倒计时时长(now,1200)
- 举例
shutdown +5 “system will shutdown after 5 minutes”
#设定5分钟后关机,发给所有用户关机提示信息告知登录用户。
此命令执行五分钟后,登录的用户将退出登录,但系统并不会关闭。
需要自行shutdown -h now进行关机(C7此命令直接关闭系统)。
shutdown +2 -h “system will shutdown after 1 minutes”
#如果想要关闭系统并提示用户即将关机信息那么要执行此命令
拓展:halt和poweroff
两个命令和shutdown -h 作用一致,都是用来关机的
halt 停机不关闭电源
poweroff 先关闭系统然后掉电关机
3.reboot
- 功能描述:重启当前操作系统
- 命令格式:reboot
- 常用选项:无
4.init
- 功能描述:临时修改操作系统的运行级别,可用来关机或重启
- 命令格式:init N
- 常用选项:
-
- init 0 : 关机
- init 6 :重启
八、常见网络命令
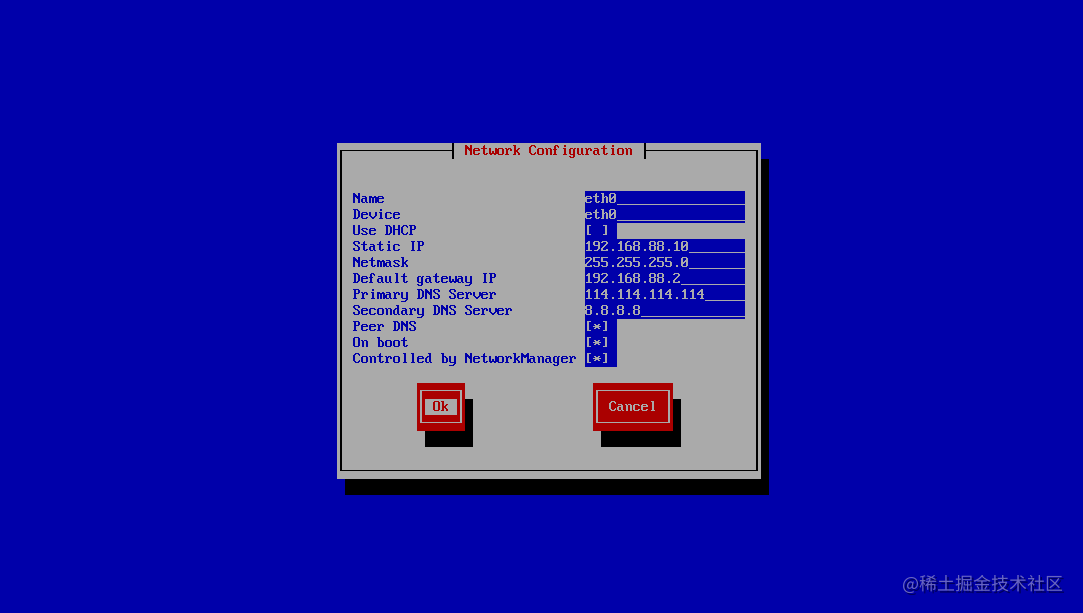
1. 红帽系列网络管理命令
**CentOS 6.x**

    命令:setup
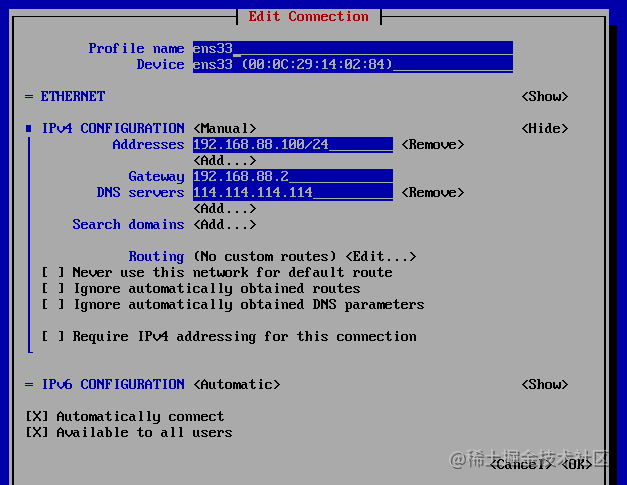
CentOS 7.x
命令:nmtui
2. 命令:ifconfig
2.ifconfig 查询本机网络信息
ifconfig命令使用方法
注意:下面操作使用root用户(动态修改)
命令:ifconfig
作用:用来配置网络或显示当前网络接口的状态
[root@localhost ~]# ifconfig
ens33: flags=4163<UP,BROADCAST,RUNNING,MULTICAST>  mtu 1500
        inet 192.168.12.18  netmask 255.255.255.0  broadcast 192.168.1.255
        inet6 fe80::c09d:975d:89cd:fd3f  prefixlen 64  scopeid 0x20<link>
        ether 00:0c:29:02:83:db  txqueuelen 1000  (Ethernet)
        RX packets 3255  bytes 4458479 (4.2 MiB)        RX errors 0  dropped 26  overruns 0  frame 0
        TX packets 1130  bytes 81645 (79.7 KiB)
        TX errors 0  dropped 0 overruns 0  carrier 0  collisions 0
上图信息大概说明:
第一行:
UP–>网卡开启状态
BROADCAST–>广播
RUNNING–>网线处理连接状态
MULTICAST–>支持组播
mtu 1500–>(Maximum Transmission Unit)最大传输单元大小为1500字节
第二行:该网卡的IP地址,子网掩码,广播地址
第三行:IPV6的配置信息
第四行:网卡的MAC地址
ether表示连接类型为以太网
txqueuelen 1000 --》传输队列的长度
第五六行:网卡接收数据包的统计信息和接收错误的统计信息
第七八行:网卡发送数据包的统计信息和发送错误的统计信息
临时修改IP地址
方法1:临时修改网卡IP地址
ifconfig 网卡名称 IP地址 —直接修改网卡的IP地址,重启失效
[root@localhost Desktop]# ifconfig ens33
ens33: flags=4163<UP,BROADCAST,RUNNING,MULTICAST>  mtu 1500
        inet 192.168.12.18  netmask 255.255.255.0  broadcast 192.168.1.255
[root@localhost Desktop]#ifconfig ens33 192.168.12.110 netmask 255.255.255.0
说明:修改后当前终端会终断,需要重新使用新的IP地址进行连接
[root@localhost Desktop]# ifconfig ens33
ens33: flags=4163<UP,BROADCAST,RUNNING,MULTICAST>  mtu 1500
       inet 192.168.12.110 netmask 255.255.255.0  broadcast 192.168.1.255
        inet6 fe80::20c:29ff:fee8:ac4  prefixlen 64  scopeid 0x20<link>
        ether 00:0c:29:e8:0a:c4  txqueuelen 1000  (Ethernet)
        RX packets 2028  bytes 198715 (194.0 KiB)
        RX errors 0  dropped 0  overruns 0  frame 0
        TX packets 385  bytes 51073 (49.8 KiB)
        TX errors 0  dropped 0 overruns 0  carrier 0  collisions 0
[root@localhost Desktop]# systemctl restart network     //CENTOS7的网卡重启方法
[root@localhost Desktop]# service network restart     //CENTOS6的网卡重启方法[root@localhost Desktop]# ifconfig ens33
ens33: flags=4163<UP,BROADCAST,RUNNING,MULTICAST>  mtu 1500
inet 192.168.12.18  netmask 255.255.255.0  broadcast 192.168.1.255
方法2: 添加多个临时IP地址
ifconfig 网卡名称:0 第一个IP地址 (netmask 子网掩码) —增加一个IP
ifconfig 网卡名称:1 第二个IP地址 (netmask 子网掩码) —增加一个IP
[root@localhost ~]# ifconfig ens33:0 192.168.12.110 netmask 255.255.255.0 up
[root@localhost ~]# ifconfig
ens33: flags=4163<UP,BROADCAST,RUNNING,MULTICAST>  mtu 1500
       inet 192.168.12.18  netmask 255.255.255.0  broadcast 192.168.1.255
ens33:0: flags=4163<UP,BROADCAST,RUNNING,MULTICAST>  mtu 1500
       inet 192.168.12.110 netmask 255.255.255.0  broadcast 192.168.1.255
        ether 00:0c:29:e8:0a:c4  txqueuelen 1000  (Ethernet)
删除临时IP
[root@localhost ~]# ifconfig ens33:0 del 192.168.12.110

[root@localhost ~]# ifconfig

ens33: flags=4163<UP,BROADCAST,RUNNING,MULTICAST>  mtu 1500
        inet 192.168.12.110  netmask 255.255.255.0  broadcast 192.168.1.255
        inet6 fe80::20c:29ff:fee8:ac4  prefixlen 64  scopeid 0x20<link>
        ether 00:0c:29:e8:0a:c4  txqueuelen 1000  (Ethe rnet)
        RX packets 3056  bytes 311813 (304.5 KiB)
        RX errors 0  dropped 0  overruns 0  frame 0
        TX packets 961  bytes 145297 (141.8 KiB)
        TX errors 0  dropped 0 overruns 0  carrier 0  collisions 0
ens33:1: flags=4163<UP,BROADCAST,RUNNING,MULTICAST>  mtu 1500
        inet 192.168.1.111  netmask 255.255.255.0  broadcast 192.168.1.255
        ether 00:0c:29:e8:0a:c4  txqueuelen 1000  (Ethernet)
添加真实网卡:
nmcli connection add con-name 网卡名称 type 接口类型 ifname 网卡名称
nmcli connection add con-name ens37 type ethernet ifname ens37
3. 命令:ip
功能1:查看ip等网络资源信息
[root@localhost ~]# ip address show
1: lo: <LOOPBACK,UP,LOWER_UP> mtu 65536 qdisc noqueue state UNKNOWN group default qlen  1000
    link/loopback 00:00:00:00:00:00 brd 00:00:00:00:00:00
    inet 127.0.0.1/8 scope host lo
       valid_lft forever preferred_lft forever
    inet6 ::1/128 scope host
       valid_lft forever preferred_lft forever
2: ens33: <BROADCAST,MULTICAST,UP,LOWER_UP> mtu 1500 qdisc pfifo_fast state UP group  default qlen 1000
    link/ether 00:0c:29:87:24:7b brd ff:ff:ff:ff:ff:ff
    inet 192.168.88.120/24 brd 192.168.88.255 scope global noprefixroute ens33
       valid_lft forever preferred_lft forever
    inet6 fe80::7599:771:ff61:82a2/64 scope link noprefixroute
       valid_lft forever preferred_lft forever
功能2:临时配置ip等网络参数
[root@localhost ~]# ip address add 192.168.88.121/24 dev ens33
[root@localhost ~]# ip a
1: lo: <LOOPBACK,UP,LOWER_UP> mtu 65536 qdisc noqueue state UNKNOWN group default qlen  1000
    link/loopback 00:00:00:00:00:00 brd 00:00:00:00:00:00
    inet 127.0.0.1/8 scope host lo
       valid_lft forever preferred_lft forever
    inet6 ::1/128 scope host
       valid_lft forever preferred_lft forever
2: ens33: <BROADCAST,MULTICAST,UP,LOWER_UP> mtu 1500 qdisc pfifo_fast state UP group  default qlen 1000
    link/ether 00:0c:29:87:24:7b brd ff:ff:ff:ff:ff:ff
    inet 192.168.88.120/24 brd 192.168.88.255 scope global noprefixroute ens33
       valid_lft forever preferred_lft forever
    inet 192.168.88.121/24 scope global secondary ens33
       valid_lft forever preferred_lft forever
    inet6 fe80::7599:771:ff61:82a2/64 scope link noprefixroute
       valid_lft forever preferred_lft forever
#add 换成 del 可以删除新增的ip信息
功能3:查看当前生效的网关信息
[root@localhost ~]# ip route show
default via 192.168.88.2 dev ens33 proto static metric 100
192.168.88.0/24 dev ens33 proto kernel scope link src 192.168.88.120 metric 100
4. 命令:ifup & ifdown
功能:单独针对某一网卡的启动关闭命令
[root@localhost ~]# ifdown ens33
#关闭指定网卡
[root@localhost ~]# ifup ens33
#启动指定网卡
5. 命令:ping
功能:通过ICMP协议探测网络中的主机是否能正常通信
选项:
-c :用于指定ping的次数

-s :指定探测时使用的数据包大小(最大65507)
[root@localhost ~]# ping -c 4  192.168.88.1
PING 192.168.88.1 (192.168.88.1) 56(84) bytes of data.
64 bytes from 192.168.88.1: icmp_seq=1 ttl=128 time=0.158 ms
64 bytes from 192.168.88.1: icmp_seq=2 ttl=128 time=0.197 ms
64 bytes from 192.168.88.1: icmp_seq=3 ttl=128 time=0.187 ms
64 bytes from 192.168.88.1: icmp_seq=4 ttl=128 time=0.163 ms


--- 192.168.88.1 ping statistics ---

4 packets transmitted, 4 received, 0% packet loss, time 3002ms
#发出的包数、返回的包数、丢包率、往返消耗时间
rtt min/avg/max/mdev = 0.158/0.176/0.197/0.018 ms
#最小、平均、最大、硬件消耗时间
6. 命令:netstat
功能:查看网络连接状态的命令,可以查看本机开启的端口(TCP/UDP),最小化是没有安装的。
选项:
-a:列出所有网络状态

-n:以数字方式显示IP和端口信息

-t:显示TCP协议对应信息

-u:显示UDP协议对应信息

-p:显示进程的进程号和进程名

-l:显示监听状态的连接
组合1:-antp
[root@localhost ~]# netstat -antp
Active Internet connections (servers and established)
Proto Recv-Q Send-Q Local Address           Foreign Address         State       PID/Program  name
tcp        0      0 0.0.0.0:111             0.0.0.0:*               LISTEN      1/systemd
tcp        0      0 0.0.0.0:22              0.0.0.0:*               LISTEN      6670/sshd
tcp        0      0 127.0.0.1:25            0.0.0.0:*               LISTEN      6822/master
tcp        0      0 192.168.88.120:22       192.168.88.1:52506      ESTABLISHED 6980/sshd:  root@pts
tcp6       0      0 :::111                  :::*                    LISTEN      1/systemd
tcp6       0      0 :::22                   :::*                    LISTEN      6670/sshd
tcp6       0      0 ::1:25                  :::*                    LISTEN      6822/master
组合2:-tlunp
[root@localhost ~]# netstat -tlunp
Active Internet connections (only servers)
Proto Recv-Q Send-Q Local Address           Foreign Address         State       PID/Program  name
tcp        0      0 0.0.0.0:111             0.0.0.0:*               LISTEN      1/systemd
tcp        0      0 0.0.0.0:22              0.0.0.0:*               LISTEN      6670/sshd
tcp        0      0 127.0.0.1:25            0.0.0.0:*               LISTEN      6822/master
tcp6       0      0 :::111                  :::*                    LISTEN      1/systemd
tcp6       0      0 :::22                   :::*                    LISTEN      6670/sshd
tcp6       0      0 ::1:25                  :::*                    LISTEN      6822/master
udp        0      0 0.0.0.0:1002            0.0.0.0:*                           6365/rpcbind
udp        0      0 0.0.0.0:111             0.0.0.0:*                           1/systemd
udp        0      0 127.0.0.1:323           0.0.0.0:*                           6364/chronyd
udp6       0      0 :::1002                 :::*                                6365/rpcbind
udp6       0      0 :::111                  :::*                                1/systemd
udp6       0      0 ::1:323                 :::*                                6364/chronyd
拓展
常见端口:
20 21 ftp服务 文件共享
22 ssh服务 安全的远程连接
23 telnet
25 smtp:简单邮件传输协议 发信
110 pop3:邮局协议 收信
80 http超文本传输协议 网页服务
3306 mysql端口
3389 Windows终端端口
/etc/service 所有常见的端口
netstat -tlun 查看本机所有监听的端口
例:
列出所有端口:netstat -a | more
列出所有tcp端口:netstat -at
列出所有udp端口:netstat -au
只显示监听端口:netstat -l
只列出所有监听tcp端口:netstat -lt
只列出所有监听udp端口:netstat -lu
7. 命令:ss
功能:类似于netstat命令
[root@localhost ~]# ss -atu
Netid State      Recv-Q Send-Q                 Local Address:Port                                   Peer Address:Port
udp   UNCONN     0      0                                  *:1002                                              *:*
udp   UNCONN     0      0                                  *:sunrpc                                            *:*
udp   UNCONN     0      0                          127.0.0.1:323                                               *:*
udp   UNCONN     0      0                                 :::1002                                             :::*
udp   UNCONN     0      0                                 :::sunrpc                                           :::*
udp   UNCONN     0      0                                ::1:323                                              :::*
tcp   LISTEN     0      128                                *:sunrpc                                            *:*
tcp   LISTEN     0      128                                *:ssh                                               *:*
tcp   LISTEN     0      100                        127.0.0.1:smtp                                              *:*
tcp   ESTAB      0      52                    192.168.88.120:ssh                                    192.168.88.1:52506
tcp   LISTEN     0      128                               :::sunrpc                                           :::*
tcp   LISTEN     0      128                               :::ssh                                              :::*
tcp   LISTEN     0      100                              ::1:smtp                                             :::*
8. 命令:write
功能:向指定的在线用户发送信息
[root@localhost ~]# write root tty1

“发送内容”

ctrl+d 保存,发送
#将指定内容发送给root用户所在的tty1终端上。也可以不指定终端,即信息发送给所有root用
户。
9. 命令:wall
功能:向所有在线用户发送信息
[root@localhost ~]# wall

hello

ctrl + d  #使用组合键才能发送信息
10. 命令:mail
功能:给指定用户发送邮件信息,以及接收邮件信息
[root@localhost ~]# mail zhangsan

hello

ctrl + d 发送邮件
九、系统资源查看命令
1. 命令:w
功能:查询当前登录服务器的用户
[root@localhost ~]# w
 19:12:16 up 10:54,  1 user,  load average: 0.00, 0.01, 0.05
USER     TTY      FROM             LOGIN@   IDLE   JCPU   PCPU WHAT
root     pts/0    192.168.88.1     16:22    8.00s  0.14s  0.00s w
第一行:当前时间 持续运行时间,登录用户数量,1分钟,5分钟,15分钟 前的平均负载
第二行:用户名 TTY:登录终端 FROM:来源IP 登录时间
IDLE:用户闲置时间
JCPU:所有进程占用cpu时间
PCPU:当前进程占用cpu时间
WHAT:用户正在进行的操作
2. 命令:who
功能:查询登录用户
命令所在路径:/usr/bin/who
执行权限:所有用户
[root@localhost ~]# who
root     pts/0        2020-05-25 16:22 (192.168.88.1)
3. 命令:last
功能:列出所有登录过系统的相关信息
命令所在路径:/usr/bin/last
执行权限:所有用户
[root@localhost ~]# last
root     pts/2        192.168.88.1     Tue May 26 02:52 - 03:00  (00:07)
root     pts/1        192.168.88.1     Tue May 26 02:50 - 02:51  (00:00)
root     pts/0        192.168.88.1     Mon May 25 16:22   still logged in
root     pts/0        192.168.88.1     Mon May 25 16:18 - 16:18  (00:00)
reboot   system boot  3.10.0-957.el7.x Mon May 25 16:17 - 03:13  (10:56)
root     pts/0        192.168.88.1     Mon May 25 16:10 - down   (00:00)
reboot   system boot  3.10.0-957.el7.x Mon May 25 16:10 - 16:11  (00:01)
root     pts/0        192.168.88.1     Mon May 25 16:05 - down   (00:04)
root     tty1                          Mon May 25 15:57 - 16:10  (00:12)
reboot   system boot  3.10.0-957.el7.x Thu May 21 09:07 - 16:10 (4+07:03)

wtmp begins Thu May 21 09:07:10 2020
4. 命令:lastlog
功能:显示所有账户最后一次的登录时间
命令所在路径:/usr/bin/lastlog
执行权限:所有用户
[root@localhost ~]# lastlog
用户名           端口     来自             最后登陆时间
root             pts/2    192.168.88.1     二 5月 24 00:52:18 +0800 2020
bin                                        **从未登录过**
daemon                                     **从未登录过**
adm                                        **从未登录过**
lp                                         **从未登录过**
5. 命令:lastb
功能:查看登录错误的信息(登录失败信息)
[root@localhost ~]# lastb
root     ssh:notty    192.168.88.1     Tue May 24 03:15 - 03:15  (00:00)
root     ssh:notty    192.168.88.1     Tue May 24 03:15 - 03:15  (00:00)
root     ssh:notty    192.168.88.1     Tue May 24 03:15 - 03:15  (00:00)
root     ssh:notty    192.168.88.1     Tue May 24 03:15 - 03:15  (00:00)
root     ssh:notty    192.168.88.1     Tue May 24 03:15 - 03:15  (00:00)
root     ssh:notty    192.168.88.1     Tue May 24 03:15 - 03:15  (00:00)

btmp begins Tue May 24 03:15:10 2020
十、挂载命令
Linux系统一切设备皆文件。比如第一张光盘,会被自动识别为/dev/sr0(设备文件的命名方式是
主设备号加次设备号。主设备号说明设备类型,次设备号说明是第几个设备),但并不能直接对光盘
正常使用。需要先进行挂载而后才能进行正常的安装等步骤。需要指定挂载点并执行挂载命令。(不
同的光盘之间需要重新挂载并指定挂载点才能正常使用)
命令名称:mount
命令所在路径:/bin/mount
1. mount
功能:查询系统中已经挂载的设备
常见的存储设备:
/dev/sda1      第一个scsi硬盘的第一分区

/dev/cdrom     光盘

/dev/sr0       光盘
常用挂载点:
/mnt

/media

/cdrom
挂载格式:
mount [-t 文件系统类型] [-o 特殊选项] 设备文件名 挂载点
选项:
-t 文件系统:加入文件系统类型来指定挂载的类型,可以ext3、ext4、iso9660 等文件系统。
-o 特殊选项:可以指定挂载的额外选项,比如读写权限、同步异步等,如果不指定则默认值生效。

例1:mount 查看挂载信息
/dev/sda1 on /boot type ext4 (rw)
我们查看到/boot分区已经被挂载,而且采用的defaults选项,那么我 们重新挂载分区,并采用
noexec 权限禁止执行文件执行,看看会出现什么 情况(注意不要用/分区做试验,不然系统命令也不
能执行了)
[root@localhost ~]# mount -o remount,noexec /boot
[root@localhost ~]# cd /boot
[root@localhost ~]# vim hello.sh
#!/bin/bash echo “hello world!”
[root@localhost ~]# chmod 755 hello.sh
[root@localhost ~]# ./hello.sh
[root@localhost ~]# -bash: ./hello.sh: 权限不够
[root@localhost ~]# mount -o remount,exec /boot
Example 2: mount hard disk partition, mobile hard disk
[root@localhost ~]# mkdir /mnt/disk1

#创建挂载点

[root@localhost ~]# mount /dev/sdb1 /mnt/disk1

#挂载硬盘分区或者移动硬盘
Example 3: Mount the CD
[root@localhost ~]# mount -t iso9660 /dev/cdrom /mnt/cdrom

#/mnt/cdrom必须是已存在的目录
Example 4: Mount U disk
[root@localhost ~]# fdisk -l

#查看当前系统下的存储设备,确认U盘的设备名称

[root@localhost ~]# mount -t vfat /dev/sdb1 /mnt/usb

#fat32格式的U盘挂载方式

-t vfat fat32

-t fat fat16

注:Linux默认情况不识别NTFS格式
Example 5: Mount .iso file
[root@localhost ~]# mount -o loop /root/CentOS-7-x86_64-DVD-1810.iso /mnt/

加入loop选项让文件以块设备的方式进行挂载。
Example 6: Uninstall
umount device name or mount point
#All mounted devices are uninstalled in the same way
Example 7: Mount NTFS format
[root@localhost ~]# yum -y install epel-release
[root@localhost ~]# yum -y install ntfs-3g
[root@localhost ~]# mount -t ntfs-3g /dev/sdb1 /media/
[root@localhost ~]# ls /media