complete steps
Prepare dataset
DataLoader load dataset
Build network model Create
network model instance
Define loss function
Define optimizer
Set network training parameters
Start training
Verify model
Save model
Visualize training results (completed using tensorboard)
Dataset introduction
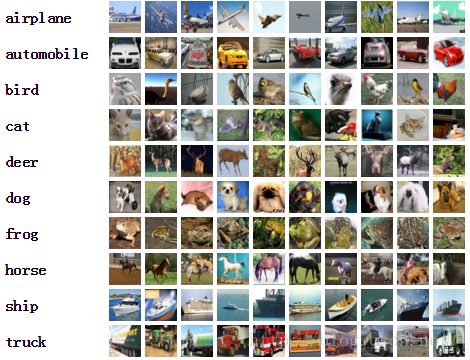
CIFAR10 is a computer vision dataset collected by Hinton's students Alex Krizhevsky and Ilya Sutskever for universal object recognition. It contains 60,000 32 X 32 RGB color pictures, a total of 10 categories. Among them, 50,000 images are used for the training set and 10,000 images are used for the test set.
CIFAR model structure

full code
CIFAR10 network model structure:
# model.py文件

# 搭建CIFAR10神经网络
import torch
from torch import nn


class Tudui(nn.Module):
    def __init__(self):
        super(Tudui, self).__init__()
        self.model = nn.Sequential(
            nn.Conv2d(3, 32, 5, 1, 2),
            nn.MaxPool2d(2),
            nn.Conv2d(32, 32, 5, 1, 2),
            nn.MaxPool2d(2),
            nn.Conv2d(32, 64, 5, 1, 2),
            nn.MaxPool2d(2),
            nn.Flatten(),  # 展平
            nn.Linear(1024, 64),  # 1024=64*4*4
            nn.Linear(64, 10)
        )

    def forward(self, x):
        x = self.model(x)
        return x

# 验证搭建的网络是否正确
if __name__ == '__main__':
    tudui = Tudui()
    input = torch.ones((64, 3, 32, 32))
    output = tudui(input)
    print(output.shape)
CPU version training code
# train.py文件
import torchvision
from torch.utils.data import DataLoader
from torch.utils.tensorboard import SummaryWriter
from model import *


# 准备数据集
# 训练数据集
train_data = torchvision.datasets.CIFAR10(root="./dataset", train=True, download=False,
                                          transform=torchvision.transforms.ToTensor())
# 测试数据集
test_data = torchvision.datasets.CIFAR10(root="./dataset", train=False, download=False,
                                         transform=torchvision.transforms.ToTensor())
# 观察训练数据集、测试数据集中的图像有多少张
train_data_size = len(train_data)
test_data_size = len(test_data)
print("训练数据集的长度为:{}".format(train_data_size)) # 训练数据集的长度为:50000
print("测试数据集的长度为:{}".format(test_data_size)) # 测试数据集的长度为:10000

# 使用dataloader加载数据集
train_dataloader = DataLoader(train_data, batch_size=64) # 训练数据集加载
test_dataloader = DataLoader(test_data, batch_size=64)  # 测试数据集加载

# 创建网络模型
tudui = Tudui()

# 创建损失函数
# 分类问题采用交叉熵损失函数
loss_fn = nn.CrossEntropyLoss()

# 设定优化器
learning_rate = 0.01 # 0.01=1e-2
# learning_rate = 1e-2
optimizer = torch.optim.SGD(params=tudui.parameters(), lr=learning_rate)

# 设置训练网络的一些参数
# 记录训练的次数
total_train_step = 0
# 记录测试的次数
total_test_step = 0
# 训练轮数
epoch = 10

# 添加tensorboard

writer = SummaryWriter("./CIFAR10_train")
for i in range(epoch):
    print("———————第{}轮训练开始——————".format(i+1))

    # 训练步骤开始
    for data in train_dataloader:
        imgs, targets = data
        outputs = tudui(imgs)
        loss = loss_fn(outputs, targets)
        # 优化器优化模型
        optimizer.zero_grad() # 梯度清零
        loss.backward()
        optimizer.step()
        total_train_step = total_train_step + 1
        if total_train_step % 100 == 0:
            print("训练次数:{},Loss:{}".format(total_train_step, loss.item()))
            writer.add_scalar("train_loss", loss.item(), total_train_step)

    # 测试步骤
    total_test_loss = 0
    total_accuracy_num = 0
    with torch.no_grad():
       for data in test_dataloader:
            imgs, targets = data
            outputs = tudui(imgs)
            loss = loss_fn(outputs, targets)
            total_test_loss = total_test_loss + loss
            accuracy = (outputs.argmax(1) == targets).sum()
            total_accuracy_num = total_accuracy_num + accuracy

    print("整体测试集上的Loss:{}".format(total_test_loss))
    print("整体测试集上的正确率:{}".format(total_accuracy_num/test_data_size))
    writer.add_scalar("test_loss", total_test_loss, total_test_step)
    writer.add_scalar(("test_accuracy", (total_accuracy_num/test_data_size), total_test_step))
    total_test_step = total_test_step + 1

    # 保存每轮运行的模型
    torch.save(tudui, "tudui_{}.pth".format(i))
    print("模型已保存!")

writer.close()
GPU_1 version
This method is to import cuda into the network model, data, and loss function in the CPU version.
For example:
For the network model: in the CPU version, we only need to tudui = Tudui() when instantiating the network; in the GPU_1 version, we need to rewrite tudui = Tudui() to tudui = Tudui when instantiating the network .cuda().
For data: In the CPU version, the data we use in training and testing only needs
for data in train_dataloader: # 训练
    imgs, targets = data
    outputs = tudui(imgs)
for data in test_dataloader: # 测试
     imgs, targets = data
     outputs = tudui(imgs)
That's it; while in the GPU_1 version, it is:
for data in train_dataloader: # 训练
    imgs, targets = data
    # 使用GPU
    imgs = imgs.cuda()
    targets = targets.cuda()
    outputs = tudui(imgs)
for data in test_dataloader: # 测试
     imgs, targets = data
     # 使用GPU
     imgs = imgs.cuda()
     targets = targets.cuda()
     outputs = tudui(imgs)
For the loss function: In the CPU version, the loss function we use only needs
#Create Loss Function
# The classification problem uses the cross entropy loss function
loss_fn = nn.CrossEntropyLoss()
That's it; and in the GPU_1 version, there are:
#Create loss function
#Classification problem uses cross entropy loss function
loss_fn = nn.CrossEntropyLoss()
loss_fn = loss_fn.cuda() #Use GPU
GPU_1 version training code
# train_GPU_1.py文件
import torchvision
from torch.utils.data import DataLoader
from torch.utils.tensorboard import SummaryWriter

# 准备数据集
# 训练数据集
train_data = torchvision.datasets.CIFAR10(root="./dataset", train=True, download=False,
                                          transform=torchvision.transforms.ToTensor())
# 测试数据集
test_data = torchvision.datasets.CIFAR10(root="./dataset", train=False, download=False,
                                         transform=torchvision.transforms.ToTensor())
# 观察训练数据集、测试数据集中的图像有多少张
train_data_size = len(train_data)
test_data_size = len(test_data)
print("训练数据集的长度为:{}".format(train_data_size)) # 训练数据集的长度为:50000
print("测试数据集的长度为:{}".format(test_data_size)) # 测试数据集的长度为:10000

# 使用dataloader加载数据集
train_dataloader = DataLoader(train_data, batch_size=64) # 训练数据集加载
test_dataloader = DataLoader(test_data, batch_size=64)  # 测试数据集加载

# 创建网络模型
# 搭建CIFAR10神经网络
import torch
from torch import nn


class Tudui(nn.Module):
    def __init__(self):
        super(Tudui, self).__init__()
        self.model = nn.Sequential(
            nn.Conv2d(3, 32, 5, 1, 2),
            nn.MaxPool2d(2),
            nn.Conv2d(32, 32, 5, 1, 2),
            nn.MaxPool2d(2),
            nn.Conv2d(32, 64, 5, 1, 2),
            nn.MaxPool2d(2),
            nn.Flatten(),  # 展平
            nn.Linear(1024, 64),  # 1024=64*4*4
            nn.Linear(64, 10)
        )

    def forward(self, x):
        x = self.model(x)
        return x


tudui = Tudui()
tudui = tudui.cuda() # 使用GPU

# 创建损失函数
# 分类问题采用交叉熵损失函数
loss_fn = nn.CrossEntropyLoss()
loss_fn = loss_fn.cuda() # 使用GPU
# 设定优化器
learning_rate = 0.01 # 0.01=1e-2
# learning_rate = 1e-2
optimizer = torch.optim.SGD(params=tudui.parameters(), lr=learning_rate)

# 设置训练网络的一些参数
# 记录训练的次数
total_train_step = 0
# 记录测试的次数
total_test_step = 0
# 训练轮数
epoch = 10

# 添加tensorboard

writer = SummaryWriter("./CIFAR10_train")
for i in range(epoch):
    print("———————第{}轮训练开始——————".format(i+1))

    # 训练步骤开始
    for data in train_dataloader:
        imgs, targets = data
        # 使用GPU
        imgs = imgs.cuda()
        targets = targets.cuda()
        outputs = tudui(imgs)
        loss = loss_fn(outputs, targets)
        # 优化器优化模型
        optimizer.zero_grad() # 梯度清零
        loss.backward()
        optimizer.step()
        total_train_step = total_train_step + 1
        if total_train_step % 100 == 0:
            print("训练次数:{},Loss:{}".format(total_train_step, loss.item()))
            writer.add_scalar("train_loss", loss.item(), total_train_step)

    # 测试步骤
    total_test_loss = 0
    total_accuracy_num = 0
    with torch.no_grad():
       for data in test_dataloader:
            imgs, targets = data
            # 使用GPU
            imgs = imgs.cuda()
            targets = targets.cuda()

            outputs = tudui(imgs)
            loss = loss_fn(outputs, targets)
            total_test_loss = total_test_loss + loss
            accuracy = (outputs.argmax(1) == targets).sum()
            total_accuracy_num = total_accuracy_num + accuracy

    print("整体测试集上的Loss:{}".format(total_test_loss))
    test_accuracy = total_accuracy_num/test_data_size # 测试准确率
    print("整体测试集上的正确率:{}".format(test_accuracy))
    writer.add_scalar("test_loss", total_test_loss, total_test_step)
    writer.add_scalar("test_accuracy", test_accuracy, total_test_step)
    total_test_step = total_test_step + 1

    # 保存每轮运行的模型
    torch.save(tudui, "tudui_{}.pth".format(i))
    print("模型已保存!")

writer.close()
GPU_2 version
This method is to use the to.(device) method for the network model, data, and loss function in the CPU version.
For example:
first we need to define the device, that is, device = torch.device("cpu") (cpu version) or device = torch.device("cuda") (GPU version).
For the network model: In the CPU version, we only need to instantiate the network with tudui = Tudui(); while in the GPU_2 version, we need to rewrite tudui = Tudui() when instantiating the network as
tudui = Tudui()
tudui.to(device)# use GPU
For data: In the CPU version, the data we use in training and testing only needs
for data in train_dataloader: # 训练
    imgs, targets = data
    outputs = tudui(imgs)
for data in test_dataloader: # 测试
     imgs, targets = data
     outputs = tudui(imgs)
and in the GPU_ 2 version, it is:
for data in train_dataloader: # 训练
    imgs, targets = data
    # 使用GPU
    imgs = imgs.to(device)
    targets = targets.to(device)
    outputs = tudui(imgs)
for data in test_dataloader: # 测试
     imgs, targets = data
     # 使用GPU
     imgs = imgs.to(device)
     targets = targets.to(device)
     outputs = tudui(imgs)
For the loss function: In the CPU version, the loss function we use only needs
#Create Loss Function
# The classification problem uses the cross entropy loss function
loss_fn = nn.CrossEntropyLoss()
That's it; and in the GPU_2 version, there are:
# Create loss function
# Classification problem uses cross entropy loss function
loss_fn = nn.CrossEntropyLoss()
loss_fn.to(device) # Use GPU
GPU_2 version training code
# train_GPU_2.py文件
import torch
import torchvision
from torch.utils.data import DataLoader
from torch.utils.tensorboard import SummaryWriter

device = torch.device("cuda") # 定义训练设备

# 准备数据集
# 训练数据集
train_data = torchvision.datasets.CIFAR10(root="./dataset", train=True, download=False,
                                          transform=torchvision.transforms.ToTensor())
# 测试数据集
test_data = torchvision.datasets.CIFAR10(root="./dataset", train=False, download=False,
                                         transform=torchvision.transforms.ToTensor())
# 观察训练数据集、测试数据集中的图像有多少张
train_data_size = len(train_data)
test_data_size = len(test_data)
print("训练数据集的长度为:{}".format(train_data_size)) # 训练数据集的长度为:50000
print("测试数据集的长度为:{}".format(test_data_size)) # 测试数据集的长度为:10000

# 使用dataloader加载数据集
train_dataloader = DataLoader(train_data, batch_size=64) # 训练数据集加载
test_dataloader = DataLoader(test_data, batch_size=64)  # 测试数据集加载

# 创建网络模型
# 搭建CIFAR10神经网络
import torch
from torch import nn


class Tudui(nn.Module):
    def __init__(self):
        super(Tudui, self).__init__()
        self.model = nn.Sequential(
            nn.Conv2d(3, 32, 5, 1, 2),
            nn.MaxPool2d(2),
            nn.Conv2d(32, 32, 5, 1, 2),
            nn.MaxPool2d(2),
            nn.Conv2d(32, 64, 5, 1, 2),
            nn.MaxPool2d(2),
            nn.Flatten(),  # 展平
            nn.Linear(1024, 64),  # 1024=64*4*4
            nn.Linear(64, 10)
        )

    def forward(self, x):
        x = self.model(x)
        return x


tudui = Tudui()
tudui.to(device)# 使用GPU

# 创建损失函数
# 分类问题采用交叉熵损失函数
loss_fn = nn.CrossEntropyLoss()
loss_fn.to(device) # 使用GPU
# 设定优化器
learning_rate = 0.01 # 0.01=1e-2
# learning_rate = 1e-2
optimizer = torch.optim.SGD(params=tudui.parameters(), lr=learning_rate)

# 设置训练网络的一些参数
# 记录训练的次数
total_train_step = 0
# 记录测试的次数
total_test_step = 0
# 训练轮数
epoch = 10

# 添加tensorboard

writer = SummaryWriter("./CIFAR10_train")
for i in range(epoch):
    print("———————第{}轮训练开始——————".format(i+1))

    # 训练步骤开始
    for data in train_dataloader:
        imgs, targets = data
        # 使用GPU
        imgs = imgs.to(device)
        targets = targets.to(device)
        outputs = tudui(imgs)
        loss = loss_fn(outputs, targets)
        # 优化器优化模型
        optimizer.zero_grad() # 梯度清零
        loss.backward()
        optimizer.step()
        total_train_step = total_train_step + 1
        if total_train_step % 100 == 0:
            print("训练次数:{},Loss:{}".format(total_train_step, loss.item()))
            writer.add_scalar("train_loss", loss.item(), total_train_step)

    # 测试步骤
    total_test_loss = 0
    total_accuracy_num = 0
    with torch.no_grad():
       for data in test_dataloader:
            imgs, targets = data
            # 使用GPU
            imgs = imgs.to(device)
            targets = targets.to(device)

            outputs = tudui(imgs)
            loss = loss_fn(outputs, targets)
            total_test_loss = total_test_loss + loss
            accuracy = (outputs.argmax(1) == targets).sum()
            total_accuracy_num = total_accuracy_num + accuracy

    print("整体测试集上的Loss:{}".format(total_test_loss))
    test_accuracy = total_accuracy_num/test_data_size # 测试准确率
    print("整体测试集上的正确率:{}".format(test_accuracy))
    writer.add_scalar("test_loss", total_test_loss, total_test_step)
    writer.add_scalar("test_accuracy", test_accuracy, total_test_step)
    total_test_step = total_test_step + 1

    # 保存每轮运行的模型
    torch.save(tudui, "tudui_{}.pth".format(i))
    print("模型已保存!")

writer.close()
Visualization of results based on tensorboard
We use the code of the GPU version (modes 1 and 2 are both available) to complete the tensorboard visualization training process and test results.
Run the code, you will get a CIFAR10_train folder in the project folder.

Credit to this code! ! writer = SummaryWriter("./CIFAR10_train")
Run the command in Terminal: tensorboard --logdir=CIFAR10_train, get the following URL: http://localhost:6006/, open the URL.
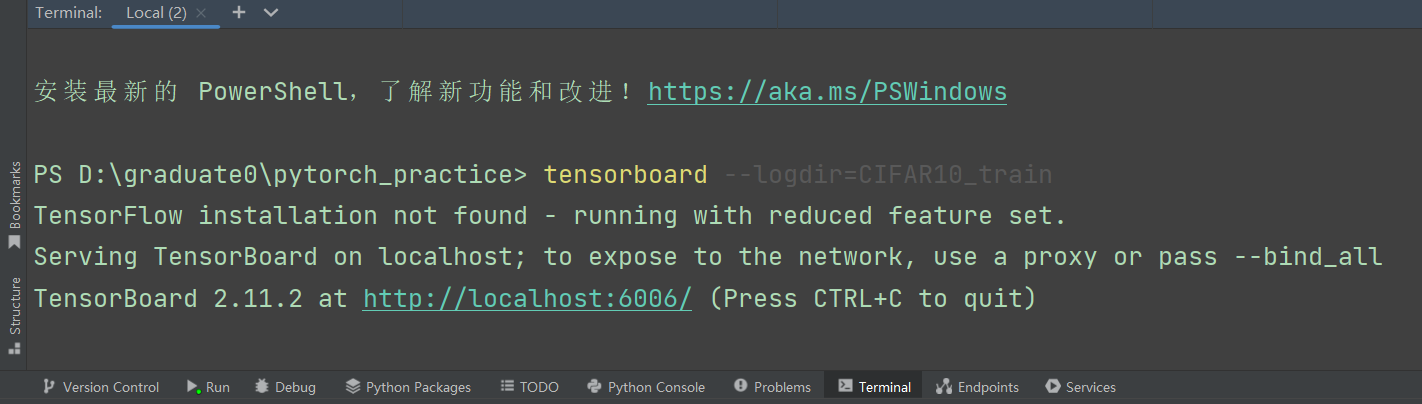
Get the visualization result, as shown in the figure below.

Get the training loss of the network model


The above results are the results of 10 rounds of model training!
Predict actual combat
Let's test the trained model on random images to see how it works.
We trained the network on the training data set for 30 rounds, and found that the model trained in the 30th round was better, and the correct rate of the model on the test set reached 64.56%, so we used the model in the 30th round to verify random pictures.


We randomly select a picture of a dog, a picture of a plane and a picture of a cat from the Internet, as shown in the figure below.


Save these three images in the images folder of the project folder, as shown in the image below.

Show these three pictures in pycharm.


Ten category ground truth labels.

Verify dog's code
import torch
import torchvision.transforms
from PIL import Image
from torch import nn

img_path = "./images/dog.png" # .表示当前目录
image = Image.open(img_path)
# print(image) # <PIL.PngImagePlugin.PngImageFile image mode=RGBA size=405x303 at 0x2834CC62F48>

image = image.convert("RGB") # 该代码的作用:
# 因为png格式的图片是四个通道,除了RGB三通道外,还有一个透明度通道。
# 所以我们调用image = image.convert("RGB"),保留其颜色通道。

# print(image) # <PIL.Image.Image image mode=RGB size=405x303 at 0x2834CD7AB88>

transform = torchvision.transforms.Compose([torchvision.transforms.Resize((32, 32)),
                                            torchvision.transforms.ToTensor()])
image = transform(image)
# print(image.size)

# CIFAR10网络模型结构
class Tudui(nn.Module):
    def __init__(self):
        super(Tudui, self).__init__()
        self.model = nn.Sequential(
            nn.Conv2d(3, 32, 5, 1, 2),
            nn.MaxPool2d(2),
            nn.Conv2d(32, 32, 5, 1, 2),
            nn.MaxPool2d(2),
            nn.Conv2d(32, 64, 5, 1, 2),
            nn.MaxPool2d(2),
            nn.Flatten(),  # 展平
            nn.Linear(1024, 64),  # 1024=64*4*4
            nn.Linear(64, 10)
        )

    def forward(self, x):
        x = self.model(x)
        return x

# 加载网络模型参数
model = torch.load("tudui_29.pth", map_location=torch.device("cpu"))
# map_location=torch.device("cpu") 将GPU版本的模型对应到CPU上
# print(model)
image = torch.reshape(image, (1, 3, 32, 32))
model.eval()
with torch.no_grad():
    output = model(image)
print(output) # tensor([[ -3.3239,  -5.6744,   5.5848,   3.1388,   4.8541,  13.1417,  -3.0066,  4.5897, -14.3501,  -7.2900]])
print(output.argmax(1)) # tensor([5]) 标签5对应的是狗
Verification successful!
Verify the code of the plane
import torch
import torchvision.transforms
from PIL import Image
from torch import nn

img_path = "./images/plane.png" # .表示当前目录
image = Image.open(img_path)
# print(image) # <PIL.PngImagePlugin.PngImageFile image mode=RGBA size=405x303 at 0x2834CC62F48>

image = image.convert("RGB") # 该代码的作用:
# 因为png格式的图片是四个通道,除了RGB三通道外,还有一个透明度通道。
# 所以我们调用image = image.convert("RGB"),保留其颜色通道。

# print(image) # <PIL.Image.Image image mode=RGB size=405x303 at 0x2834CD7AB88>

transform = torchvision.transforms.Compose([torchvision.transforms.Resize((32, 32)),
                                            torchvision.transforms.ToTensor()])
image = transform(image)
# print(image.size)

# CIFAR10网络模型结构
class Tudui(nn.Module):
    def __init__(self):
        super(Tudui, self).__init__()
        self.model = nn.Sequential(
            nn.Conv2d(3, 32, 5, 1, 2),
            nn.MaxPool2d(2),
            nn.Conv2d(32, 32, 5, 1, 2),
            nn.MaxPool2d(2),
            nn.Conv2d(32, 64, 5, 1, 2),
            nn.MaxPool2d(2),
            nn.Flatten(),  # 展平
            nn.Linear(1024, 64),  # 1024=64*4*4
            nn.Linear(64, 10)
        )

    def forward(self, x):
        x = self.model(x)
        return x

# 加载网络模型参数
model = torch.load("tudui_29.pth", map_location=torch.device("cpu"))
# map_location=torch.device("cpu") 将GPU版本的模型对应到CPU上
# print(model)
image = torch.reshape(image, (1, 3, 32, 32))
model.eval()
with torch.no_grad():
    output = model(image)
print(output) # tensor([[10.6781, -2.0109,  4.5609,  1.3858, -1.3748, -1.3599,  3.4883, -7.2311,  -3.5088, -3.3030]])
print(output.argmax(1)) # tensor([0]) 标签0对应的是飞机
Verification successful!
Verify the code of cat
import torch
import torchvision.transforms
from PIL import Image
from torch import nn

img_path = "./images/cat.png" # .表示当前目录
image = Image.open(img_path)
# print(image) # <PIL.PngImagePlugin.PngImageFile image mode=RGBA size=405x303 at 0x2834CC62F48>

image = image.convert("RGB") # 该代码的作用:
# 因为png格式的图片是四个通道,除了RGB三通道外,还有一个透明度通道。
# 所以我们调用image = image.convert("RGB"),保留其颜色通道。

# print(image) # <PIL.Image.Image image mode=RGB size=405x303 at 0x2834CD7AB88>

transform = torchvision.transforms.Compose([torchvision.transforms.Resize((32, 32)),
                                            torchvision.transforms.ToTensor()])
image = transform(image)
# print(image.size)

# CIFAR10网络模型结构
class Tudui(nn.Module):
    def __init__(self):
        super(Tudui, self).__init__()
        self.model = nn.Sequential(
            nn.Conv2d(3, 32, 5, 1, 2),
            nn.MaxPool2d(2),
            nn.Conv2d(32, 32, 5, 1, 2),
            nn.MaxPool2d(2),
            nn.Conv2d(32, 64, 5, 1, 2),
            nn.MaxPool2d(2),
            nn.Flatten(),  # 展平
            nn.Linear(1024, 64),  # 1024=64*4*4
            nn.Linear(64, 10)
        )

    def forward(self, x):
        x = self.model(x)
        return x

# 加载网络模型参数
model = torch.load("tudui_29.pth", map_location=torch.device("cpu"))
# map_location=torch.device("cpu") 将GPU版本的模型对应到CPU上
# print(model)
image = torch.reshape(image, (1, 3, 32, 32))
model.eval()
with torch.no_grad():
    output = model(image)
print(output) # tensor([[-1.4196, -5.0211,  1.2063,  4.8532, -2.0156,  2.7169,  0.4598,  0.5168,  -0.3567, -0.8418]])
print(output.argmax(1)) # tensor([3]) 标签3对应的是猫
Verification successful!
Although the correct rate of the model trained for 30 rounds on the test set is only 64.56%, we can see through random verification that the effect of the model is still very good. We only verified three pictures, of course we can also verify more pictures.