[Training routine]:
Modeling
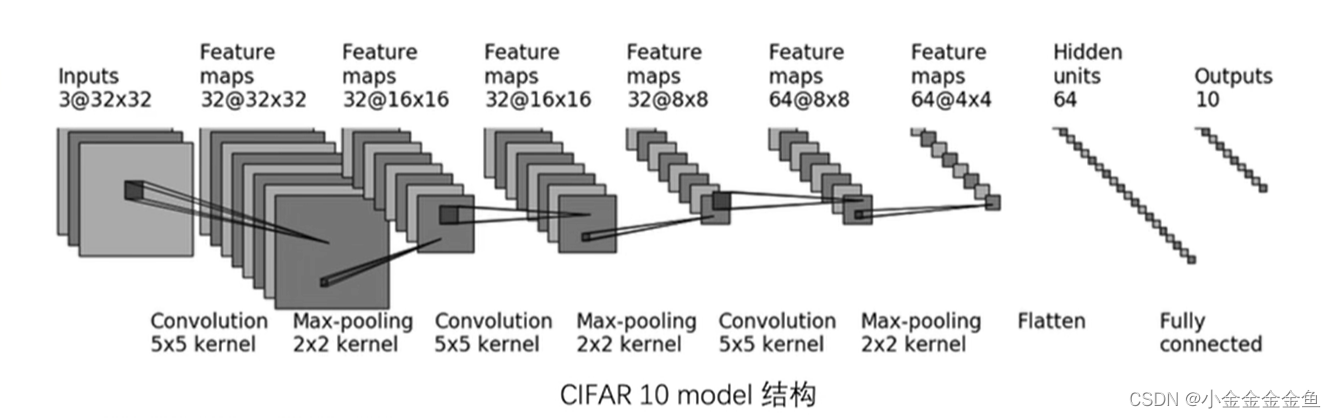
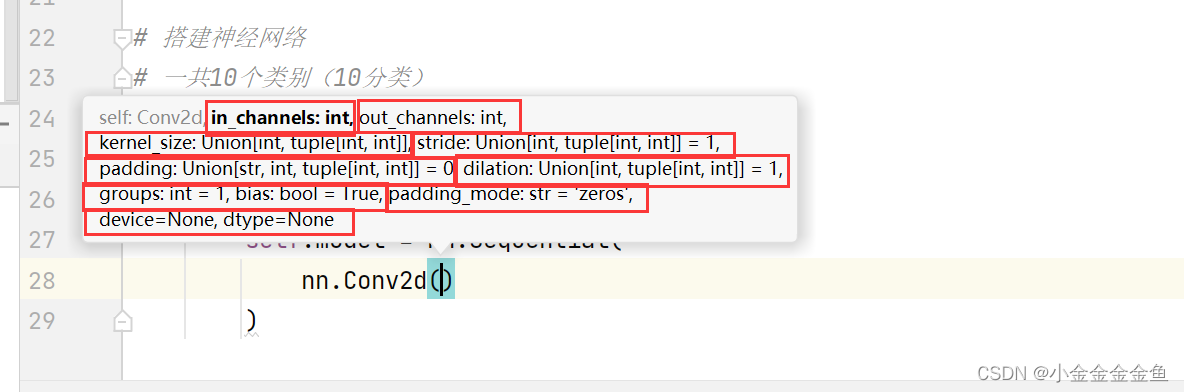
- ConvolutionInputs
→ Feature maps
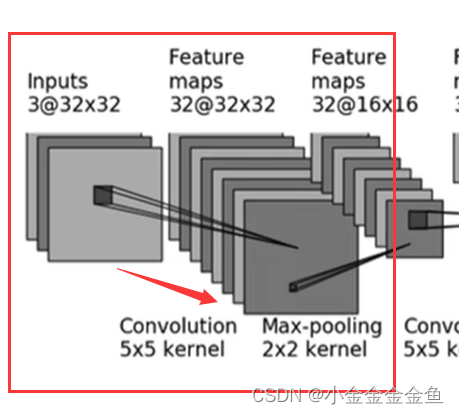
3,32,5,1 (default), (input 32 32, input 32 32, the padding here is calculated to be 2)
-
Maximum pooling
nn.MaxPool2d(2) -
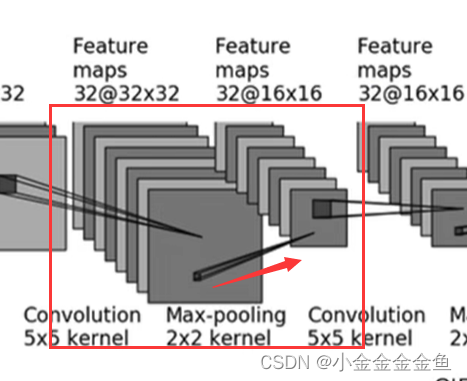
convolution
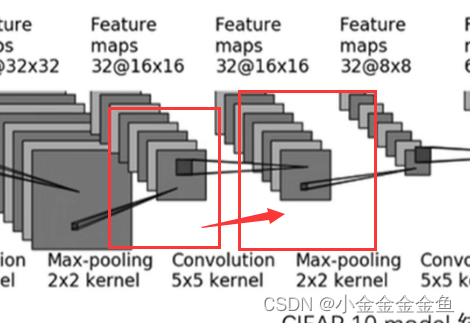
-
max pooling
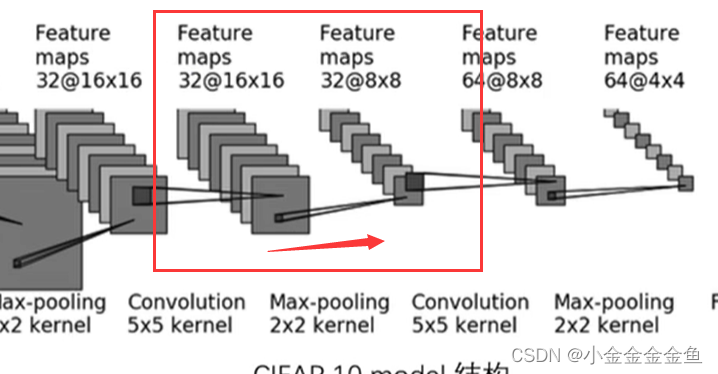
-
Convolution
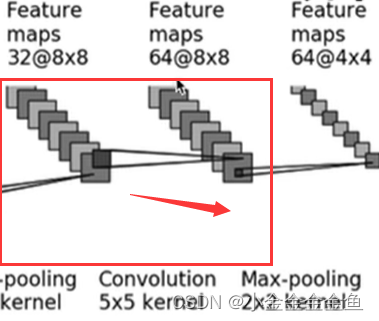
inchannel32, outchannel64, the size has not changed, so padding2 -
max pooling
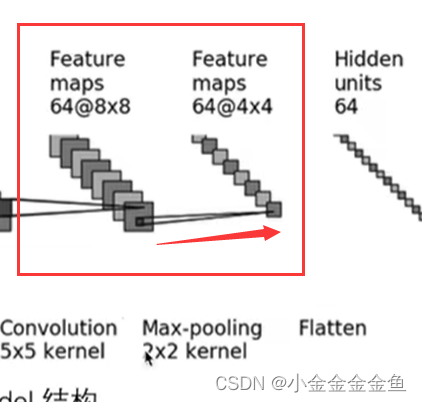
-
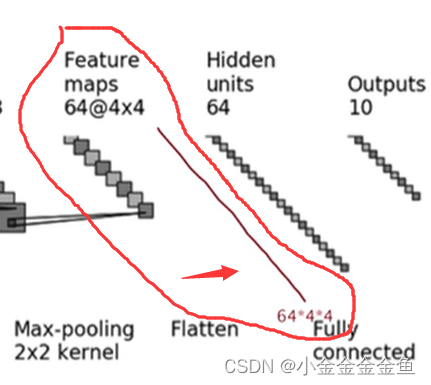
Flatten

flatten 64 4*4 -
linear layer
-
Linear layer

completes model initialization
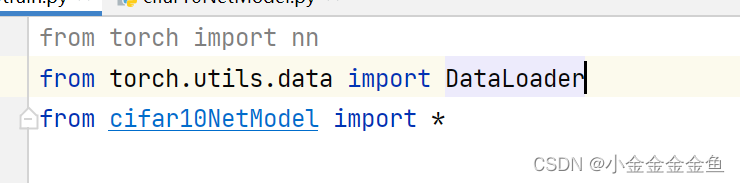
import torchvision
from torch import nn
from torch.utils.data import DataLoader

# 准备训练数据集、测试数据集

train_data = torchvision.datasets.CIFAR10(root="./datasetCIFAR10",train=True,transform=torchvision.transforms.ToTensor(),
                                          download=True)
test_data = torchvision.datasets.CIFAR10(root="./datasetCIFAR10",train=False,transform=torchvision.transforms.ToTensor(),
                                         download=True)

# length 长度
train_data_size = len(train_data)
test_data_size = len(test_data)
print("训练数据集的长度为:{}".format(train_data_size))
print("测试数据集的长度为:{}".format(test_data_size))

# 利用DataLoader加载数据集
train_dataloader = DataLoader(train_data,batch_size=64)
test_dataloader = DataLoader(test_data,batch_size=64)

# 搭建神经网络
# 一共10个类别(10分类)
class cifar10Net(nn.Module):
    def __init__(self):
        super(cifar10Net,self).__init__()
        self.model = nn.Sequential(
            nn.Conv2d(3,32,5,1,2), # 卷积
            nn.MaxPool2d(2), # 最大池化 kernel_size=2
            nn.Conv2d(32,32,5,1,2),
            nn.MaxPool2d(2),
            nn.Conv2d(32,64,5,1,2),
            nn.MaxPool2d(2),
            nn.Flatten(),
            nn.Linear(64*4*4,64),
            nn.Linear(64,10),
        )
    def forward(self,x):
        x = self.model(x)
        return x
Test network correctness
# 把上面 ↑ 搭建的网络模型创造出来
# 考察:一般是给一个输入的尺寸,看输出的尺寸是不是我们想要的
# 64 batch_size ; 3 通道 ; 32*32

if __name__ == '__main__':
    cifar10net = cifar10Net()
    input = torch.ones((64,3,32,32)) # 输入64张图片
    output = cifar10net(input)
    print(output.shape) # torch.Size([64, 10]) 返回64张图,每一行上10个数据,表示属于这十个类别的概率
Introduce the network into the training file
These two files should be under the same folder
, but an error was reported here. I checked online:
https://www.cnblogs.com/xiaohuamao/p/6903030.html
but it didn’t work. It turns out
that the beginning of the file cannot be preceded by a number. So try again. Just create a file
Create network model and train
# 创建网络模型
cifar10net = cifar10Net()

# 损失函数
# 因为分类问题,可以用到“损失函数”课中讲的交叉熵
loss_fn = nn.CrossEntropyLoss()

# 优化器
# learning_rate = 0.01
learning_rate = 1e-2 # 1e-2 = 1x(10)^(-2) = 1/100 = 0.01
# parameters填建立的网络模型
optimizer = torch.optim.SGD(cifar10net.parameters(),lr=learning_rate)

# 设置训练网络的一些参数
# 记录训练的次数
total_train_step = 0
# 记录测试的次数
total_test_step = 0
# 训练的轮数
epoch = 10
# 把for循环里的东西循环了10次
for i in range(epoch):
    print("--------第{}轮训练开始--------".format(i+1))
    # --------------训练步骤开始(优化器调优)--------------- 梯度清零、反向传播、参数优化、变量加一
    # 从训练的 dataloader 中取数据
    for data in train_dataloader:
        imgs,targets = data
        outputs = cifar10net(imgs) # 把训练数据送到网络中,获得相应输出
    # 获得输出后与真实的target进行对比,得到误差
        loss = loss_fn(outputs,targets)
    # 进行优化 【先把梯度清零】
        optimizer.zero_grad()
    # 反向传播,得到每个参数的梯度
        loss.backward()
    # 对参数优化
        optimizer.step()
    # --------------完成了一次优化---------------
        total_train_step = total_train_step + 1
        print("训练次数:{},loss:{}".format(total_train_step,loss)) # 或者loss.item()   .item():把tensor数据类型转化为真实数字
How to know whether the model is trained well and meets the requirements? You
can test it after each round of training, run it on the test set, and use the accuracy of the test set output to measure it.
There will be no tuning here, just use the existing model to
import torchvision
from torch import nn
from torch.utils.data import DataLoader
from cifar10NetModel import *

# 准备训练数据集、测试数据集

train_data = torchvision.datasets.CIFAR10(root="./datasetCIFAR10",train=True,transform=torchvision.transforms.ToTensor(),
                                          download=True)
test_data = torchvision.datasets.CIFAR10(root="./datasetCIFAR10",train=False,transform=torchvision.transforms.ToTensor(),
                                         download=True)

# length 长度
train_data_size = len(train_data)
test_data_size = len(test_data)
print("训练数据集的长度为:{}".format(train_data_size))
print("测试数据集的长度为:{}".format(test_data_size))

# 利用DataLoader加载数据集
train_dataloader = DataLoader(train_data,batch_size=64)
test_dataloader = DataLoader(test_data,batch_size=64)

# 创建网络模型
cifar10net = cifar10Net()

# 损失函数
# 因为分类问题,可以用到“损失函数”课中讲的交叉熵
loss_fn = nn.CrossEntropyLoss()

# 优化器
# learning_rate = 0.01
learning_rate = 1e-2 # 1e-2 = 1x(10)^(-2) = 1/100 = 0.01
# parameters填建立的网络模型
optimizer = torch.optim.SGD(cifar10net.parameters(),lr=learning_rate)

# 设置训练网络的一些参数
# 记录训练的次数
total_train_step = 0
# 记录测试的次数
total_test_step = 0
# 训练的轮数
epoch = 10
# 把for循环里的东西循环了10次
for i in range(epoch):
    print("--------第{}轮训练开始--------".format(i+1))
    # --------------训练步骤开始(优化器调优)--------------- 梯度清零、反向传播、参数优化、变量加一
    # 从训练的 dataloader 中取数据
    for data in train_dataloader:
        imgs,targets = data
        outputs = cifar10net(imgs) # 把训练数据送到网络中,获得相应输出
    # 获得输出后与真实的target进行对比,得到误差
        loss = loss_fn(outputs,targets)
    # 进行优化 【先把梯度清零】
        optimizer.zero_grad()
    # 反向传播,得到每个参数的梯度
        loss.backward()
    # 对参数优化
        optimizer.step()
    # --------------完成了一次优化---------------
        total_train_step = total_train_step + 1
        # if total_train_step % 100 == 0:
        print("训练次数:{},loss:{}".format(total_train_step,loss)) # 或者loss.item()   .item():把tensor数据类型转化为真实数字

# 如何知道这个模型是否训练好、是否达到需求
# 可以在每一轮训练后进行测试,在测试集上跑一边,利用在测试集输出的正确率来衡量。
    # --------------测试步骤开始---------------
# 这里就不调优了,就利用现有的模型来 (with torch.no_grad())
    total_test_loss = 0
    with torch.no_grad():
        for data in test_dataloader:
            imgs,targets = data
            outputs = cifar10net(imgs)
            loss = loss_fn(outputs,targets) # 一部分数据(data),not测试集整体数据的损失
# 把每次求出的loss加上去,最后得到整体loss
            total_test_loss = total_test_loss + loss.item()
    print("整体测试集上的loss:{}".format(total_test_loss))
Add tensorboard
import torchvision
from torch import nn
from torch.utils.data import DataLoader
from torch.utils.tensorboard import SummaryWriter

from cifar10NetModel import *

# 准备训练数据集、测试数据集

train_data = torchvision.datasets.CIFAR10(root="./datasetCIFAR10",train=True,transform=torchvision.transforms.ToTensor(),
                                          download=True)
test_data = torchvision.datasets.CIFAR10(root="./datasetCIFAR10",train=False,transform=torchvision.transforms.ToTensor(),
                                         download=True)

# length 长度
train_data_size = len(train_data)
test_data_size = len(test_data)
print("训练数据集的长度为:{}".format(train_data_size))
print("测试数据集的长度为:{}".format(test_data_size))

# 利用DataLoader加载数据集
train_dataloader = DataLoader(train_data,batch_size=64)
test_dataloader = DataLoader(test_data,batch_size=64)

# 创建网络模型
cifar10net = cifar10Net()

# 损失函数
# 因为分类问题,可以用到“损失函数”课中讲的交叉熵
loss_fn = nn.CrossEntropyLoss()

# 优化器
# learning_rate = 0.01
learning_rate = 1e-2 # 1e-2 = 1x(10)^(-2) = 1/100 = 0.01
# parameters填建立的网络模型
optimizer = torch.optim.SGD(cifar10net.parameters(),lr=learning_rate)

# 设置训练网络的一些参数
# 记录训练的次数
total_train_step = 0
# 记录测试的次数
total_test_step = 0
# 训练的轮数
epoch = 5

# 添加tensorboard
writer = SummaryWriter("logs_train_cifar10")

# 把for循环里的东西循环了5次
for i in range(epoch):
    print("--------第{}轮训练开始--------".format(i+1))
    # --------------训练步骤开始(优化器调优)--------------- 梯度清零、反向传播、参数优化、变量加一
    # 从训练的 dataloader 中取数据
    for data in train_dataloader:
        imgs,targets = data
        outputs = cifar10net(imgs) # 把训练数据送到网络中,获得相应输出
    # 获得输出后与真实的target进行对比,得到误差
        loss = loss_fn(outputs,targets)
    # 进行优化 【先把梯度清零】
        optimizer.zero_grad()
    # 反向传播,得到每个参数的梯度
        loss.backward()
    # 对参数优化
        optimizer.step()
    # --------------完成了一次优化---------------
        total_train_step = total_train_step + 1
        if total_train_step % 100 == 0:
            print("训练次数:{},loss:{}".format(total_train_step,loss.item())) # 或者loss.item()   .item():把tensor数据类型转化为真实数字
            # 逢百记录
            writer.add_scalar("train_loss",loss.item(),total_train_step)

# 如何知道这个模型是否训练好、是否达到需求
# 可以在每一轮训练后进行测试,在测试集上跑一边,利用在测试集输出的正确率来衡量。
    # --------------测试步骤开始---------------
# 这里就不调优了,就利用现有的模型来 (with torch.no_grad())
    total_test_loss = 0
    with torch.no_grad():
        for data in test_dataloader:
            imgs,targets = data
            outputs = cifar10net(imgs)
            loss = loss_fn(outputs,targets) # 一部分数据(data),not测试集整体数据的损失
# 把每次求出的loss加上去,最后得到整体loss
            total_test_loss = total_test_loss + loss.item()
    print("整体测试集上的loss:{}".format(total_test_loss))
    writer.add_scalar("test_loss",total_test_loss,total_test_step)
    total_test_step = total_test_step + 1

writer.close()
#  tensorboard --logdir=logs_train_cifar10 --port=6007
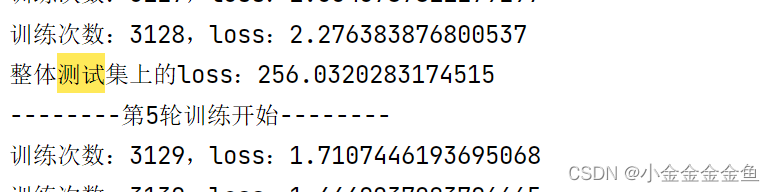
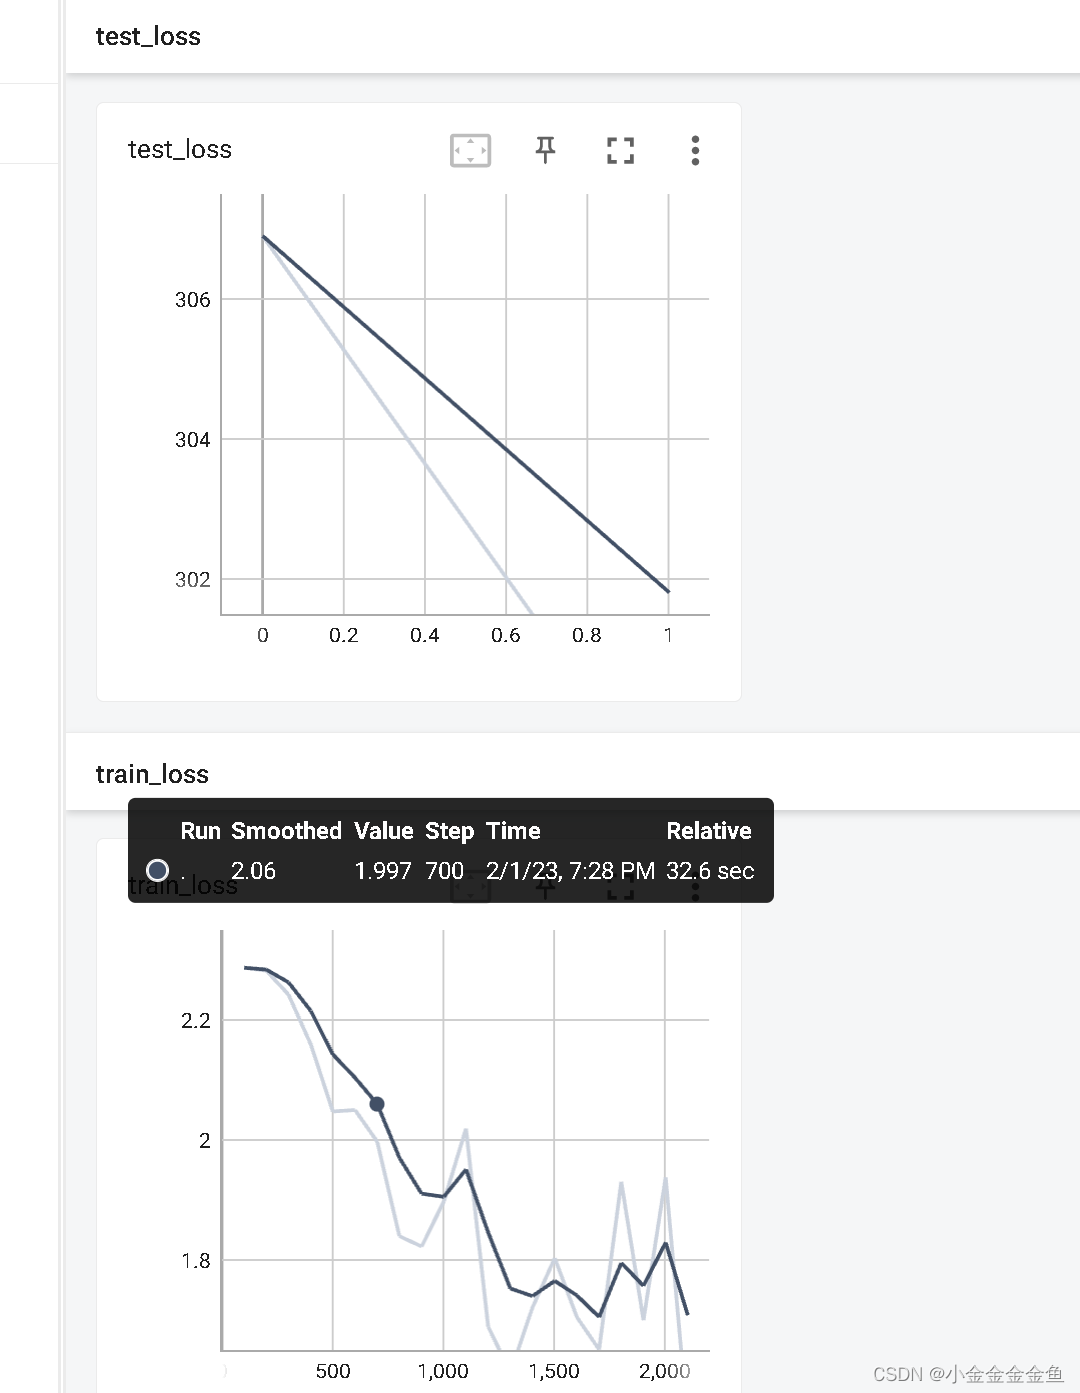
It can be seen that test_loss and train_loss continue to decrease.
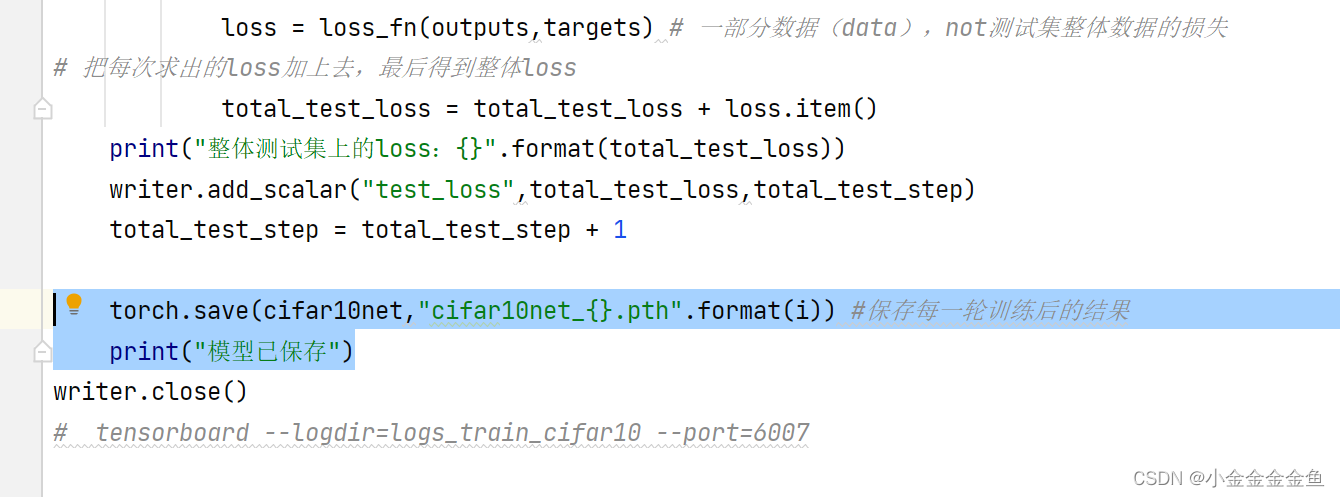
Save the model after each training
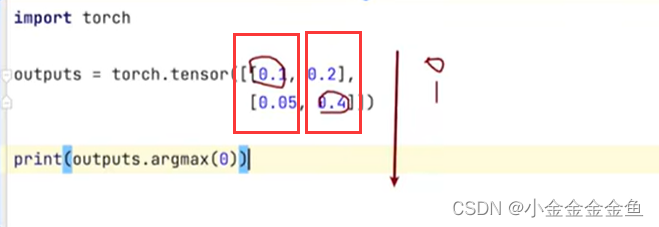
Calculate overall accuracy
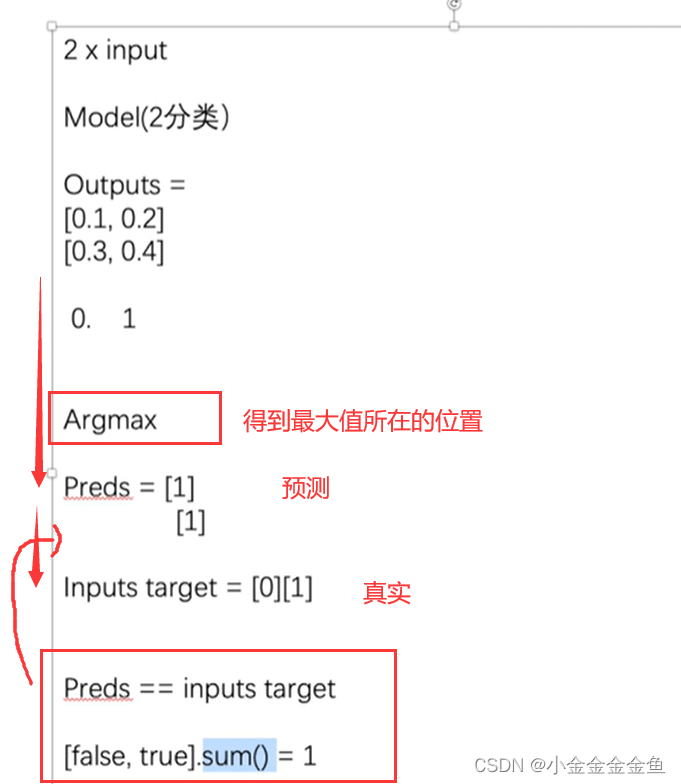
1, look horizontally
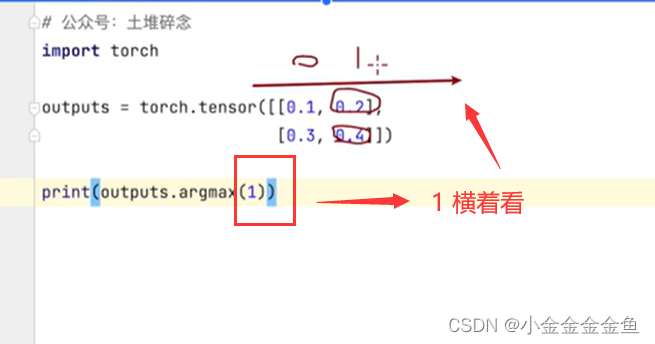
0, look vertically
import torchvision
from torch import nn
from torch.utils.data import DataLoader
from torch.utils.tensorboard import SummaryWriter
from cifar10NetModel import *
# 准备训练数据集、测试数据集
train_data = torchvision.datasets.CIFAR10(root="./datasetCIFAR10",train=True,transform=torchvision.transforms.ToTensor(),
download=True)
test_data = torchvision.datasets.CIFAR10(root="./datasetCIFAR10",train=False,transform=torchvision.transforms.ToTensor(),
download=True)
# length 长度
train_data_size = len(train_data)
test_data_size = len(test_data)
print("训练数据集的长度为:{}".format(train_data_size))
print("测试数据集的长度为:{}".format(test_data_size))
# 利用DataLoader加载数据集
train_dataloader = DataLoader(train_data,batch_size=64)
test_dataloader = DataLoader(test_data,batch_size=64)
# 创建网络模型
cifar10net = cifar10Net()
# 损失函数
# 因为分类问题,可以用到“损失函数”课中讲的交叉熵
loss_fn = nn.CrossEntropyLoss()
# 优化器
# learning_rate = 0.01
learning_rate = 1e-2 # 1e-2 = 1x(10)^(-2) = 1/100 = 0.01
# parameters填建立的网络模型
optimizer = torch.optim.SGD(cifar10net.parameters(),lr=learning_rate)
# 设置训练网络的一些参数
# 记录训练的次数
total_train_step = 0
# 记录测试的次数
total_test_step = 0
# 训练的轮数
epoch = 5
# 添加tensorboard
writer = SummaryWriter("logs_train_cifar10")
# 把for循环里的东西循环了5次
for i in range(epoch):
print("--------第{}轮训练开始--------".format(i+1))
# --------------训练步骤开始(优化器调优)--------------- 梯度清零、反向传播、参数优化、变量加一
# 从训练的 dataloader 中取数据
for data in train_dataloader:
imgs,targets = data
outputs = cifar10net(imgs) # 把训练数据送到网络中,获得相应输出
# 获得输出后与真实的target进行对比,得到误差
loss = loss_fn(outputs,targets)
# 进行优化 【先把梯度清零】
optimizer.zero_grad()
# 反向传播,得到每个参数的梯度
loss.backward()
# 对参数优化
optimizer.step()
# --------------完成了一次优化---------------
total_train_step = total_train_step + 1
if total_train_step % 100 == 0:
print("训练次数:{},loss:{}".format(total_train_step,loss.item())) # 或者loss.item() .item():把tensor数据类型转化为真实数字
# 逢百记录
writer.add_scalar("train_loss",loss.item(),total_train_step)
# 如何知道这个模型是否训练好、是否达到需求
# 可以在每一轮训练后进行测试,在测试集上跑一边,利用在测试集输出的正确率来衡量。
# --------------测试步骤开始---------------
# 这里就不调优了,就利用现有的模型来 (with torch.no_grad())
total_test_loss = 0
total_accuracy = 0
with torch.no_grad():
for data in test_dataloader:
imgs,targets = data
outputs = cifar10net(imgs)
loss = loss_fn(outputs,targets) # 一部分数据(data),not测试集整体数据的损失
# 把每次求出的loss加上去,最后得到整体loss
total_test_loss = total_test_loss + loss.item()
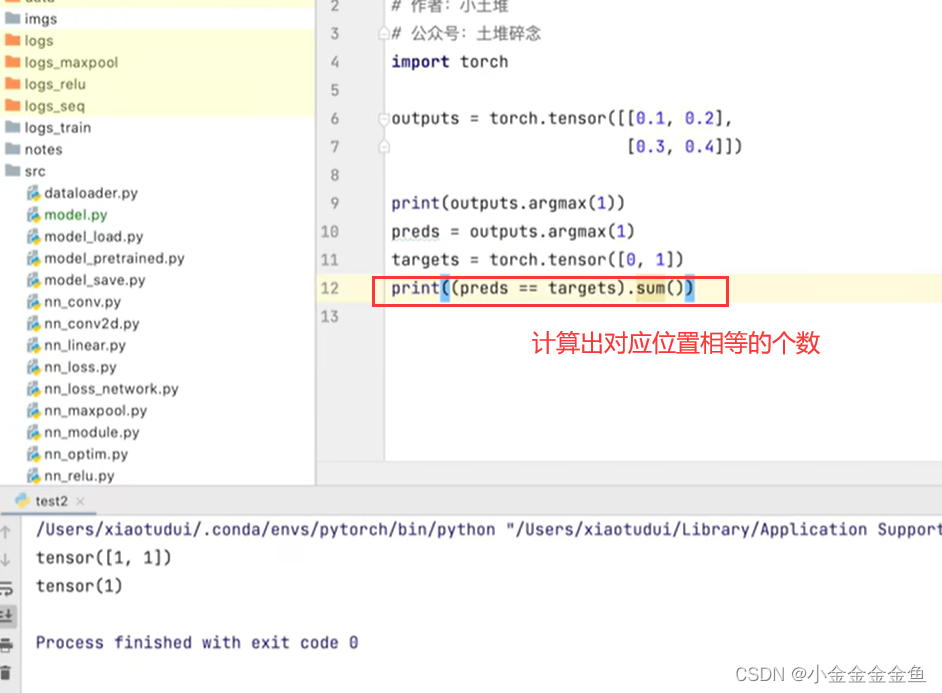
accuracy = (outputs.argmax(1) == targets).sum() # 添加每次这一小部分的正确率
total_accuracy = total_accuracy + accuracy
print("整体测试集上的loss:{}".format(total_test_loss))
print("整体测试集上的正确率:{}".format(total_accuracy/test_data_size))
writer.add_scalar("test_loss",total_test_loss,total_test_step)
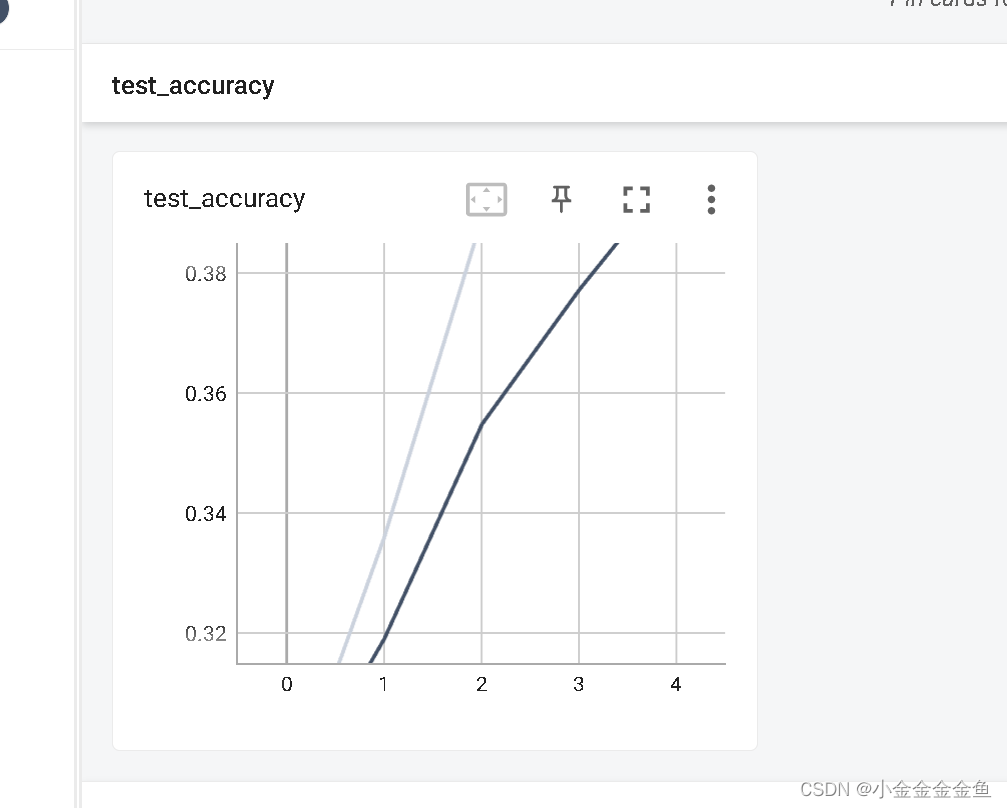
writer.add_scalar("test_accuracy",total_accuracy/test_data_size,total_test_step)
total_test_step = total_test_step + 1
# 保存每一轮训练后的结果
# torch.save(cifar10net,"cifar10net_{}.pth".format(i))
# print("模型已保存")
writer.close()
# tensorboard --logdir=logs_train_cifar10 --port=6007
Model.train() Model.eval()
The model is set to training mode and test mode respectively.
However, the code written before does not use this mode, and it can still be trained and tested.

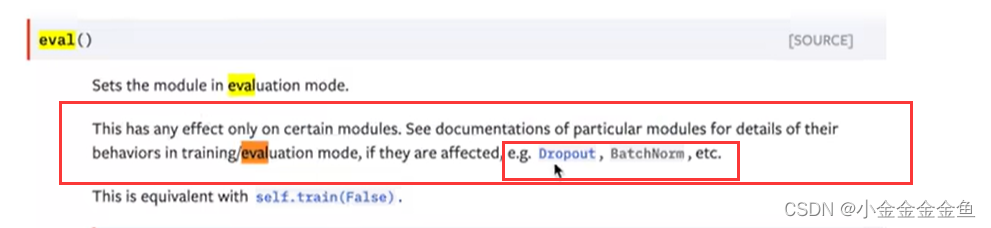
The code written before does not have these two layers.
Now add it, it is more complete.
Nothing has been changed, but some comments have been added
import torchvision
from torch import nn
from torch.utils.data import DataLoader
from torch.utils.tensorboard import SummaryWriter
from cifar10NetModel import *
# 【1】准备训练数据集、测试数据集
train_data = torchvision.datasets.CIFAR10(root="./datasetCIFAR10",train=True,transform=torchvision.transforms.ToTensor(),
download=True)
test_data = torchvision.datasets.CIFAR10(root="./datasetCIFAR10",train=False,transform=torchvision.transforms.ToTensor(),
download=True)
# length 长度
train_data_size = len(train_data)
test_data_size = len(test_data)
print("训练数据集的长度为:{}".format(train_data_size))
print("测试数据集的长度为:{}".format(test_data_size))
# 【2】利用DataLoader加载数据集
train_dataloader = DataLoader(train_data,batch_size=64)
test_dataloader = DataLoader(test_data,batch_size=64)
# 【3】创建网络模型
cifar10net = cifar10Net()
# 【4】损失函数
# 因为分类问题,可以用到“损失函数”课中讲的交叉熵
loss_fn = nn.CrossEntropyLoss()
# 【5】优化器
# learning_rate = 0.01
learning_rate = 1e-2 # 1e-2 = 1x(10)^(-2) = 1/100 = 0.01
# parameters填建立的网络模型
optimizer = torch.optim.SGD(cifar10net.parameters(),lr=learning_rate)
# 【6】设置训练网络的一些参数
# 记录训练的次数
total_train_step = 0
# 记录测试的次数
total_test_step = 0
# 训练的轮数,使之能够多次训练
epoch = 5
# 添加tensorboard
writer = SummaryWriter("logs_train_cifar10")
# 把for循环里的东西循环了5次
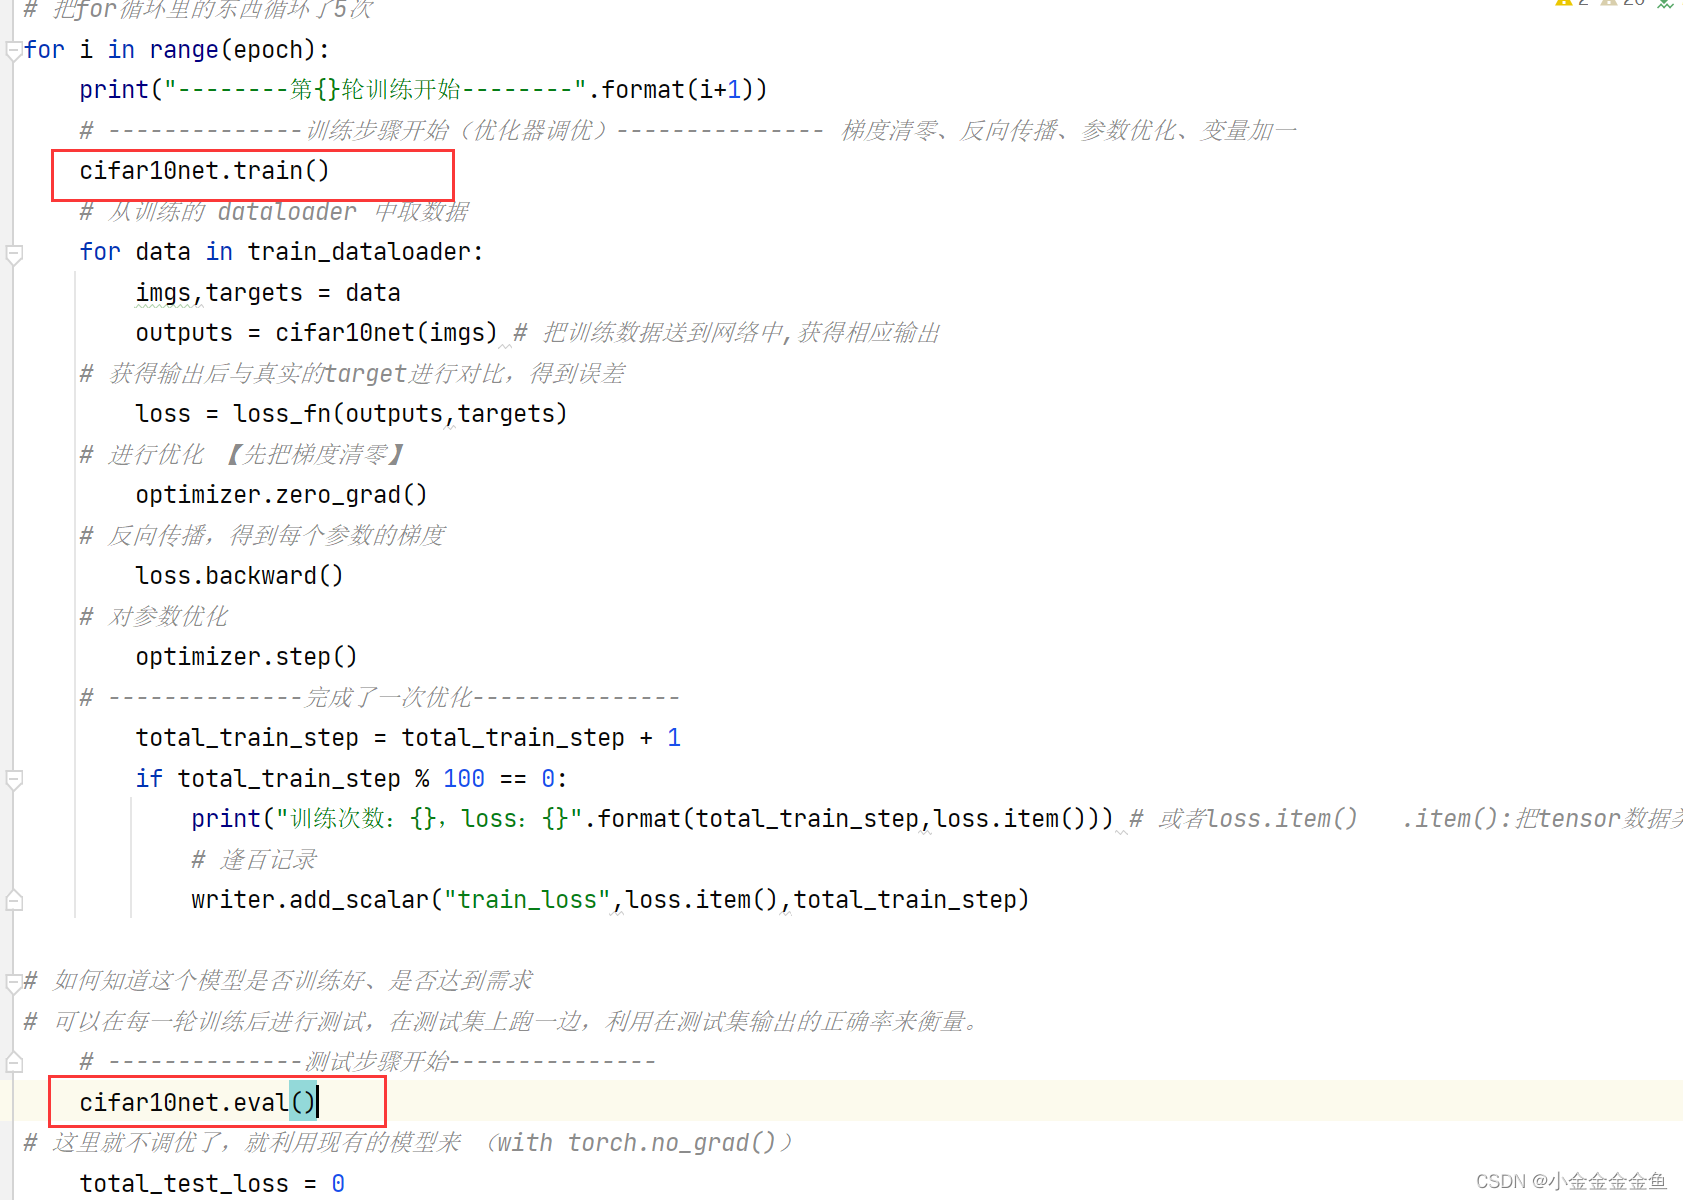
for i in range(epoch):
print("--------第{}轮训练开始--------".format(i+1))
# --------------训练步骤开始(优化器调优)--------------- 梯度清零、反向传播、参数优化、变量加一
# 【7】网络进入训练状态
cifar10net.train()
# 从训练的 dataloader 中【取数据】
for data in train_dataloader:
imgs,targets = data
outputs = cifar10net(imgs) # 把训练数据送到网络中,获得相应输出
# 获得输出后与真实的target进行对比,得到【误差】
loss = loss_fn(outputs,targets)
# 进行优化 【先把梯度清零】
optimizer.zero_grad()
# 反向传播,得到每个参数的梯度
loss.backward()
# 对参数【优化】
optimizer.step()
# --------------完成了一次优化---------------
# 【感知输出】
total_train_step = total_train_step + 1
if total_train_step % 100 == 0:
print("训练次数:{},loss:{}".format(total_train_step,loss.item())) # 或者loss.item() .item():把tensor数据类型转化为真实数字
# 逢百记录
writer.add_scalar("train_loss",loss.item(),total_train_step)
# 如何知道这个模型是否训练好、是否达到需求
# 可以在每一轮训练后进行测试,在测试集上跑一边,利用在测试集输出的正确率来衡量。
# --------------测试步骤开始---------------
# 【8】测试
cifar10net.eval()
# 这里就不调优了,就利用现有的模型来 (with torch.no_grad())
total_test_loss = 0
total_accuracy = 0
# 【with torch.no_grad()】此时只需要测试,不需要对梯度进行调整!重要!
with torch.no_grad():
for data in test_dataloader: #【取数据】
imgs,targets = data
outputs = cifar10net(imgs)
loss = loss_fn(outputs,targets) # 一部分数据(data),not测试集整体数据的损失 【误差】
# 把每次求出的loss加上去,最后得到整体loss
total_test_loss = total_test_loss + loss.item()
# 【显示误差】
accuracy = (outputs.argmax(1) == targets).sum() # 添加每次这一小部分的正确率
total_accuracy = total_accuracy + accuracy
# 展示训练的网络在测试集上的效果
print("整体测试集上的loss:{}".format(total_test_loss))
print("整体测试集上的正确率:{}".format(total_accuracy/test_data_size))
writer.add_scalar("test_loss",total_test_loss,total_test_step)
writer.add_scalar("test_accuracy",total_accuracy/test_data_size,total_test_step)
total_test_step = total_test_step + 1
# 【保存】每一轮训练后的结果
# (方式一)
# torch.save(cifar10net,"cifar10net_{}.pth".format(i))
# (方式二)
# torch.save(cifar10net.state_dict(),"cifar10net_{}.pth".format(i))
# print("模型已保存")
writer.close()
# tensorboard --logdir=logs_train_cifar10 --port=6007
Training with GPU
[Test routine]:
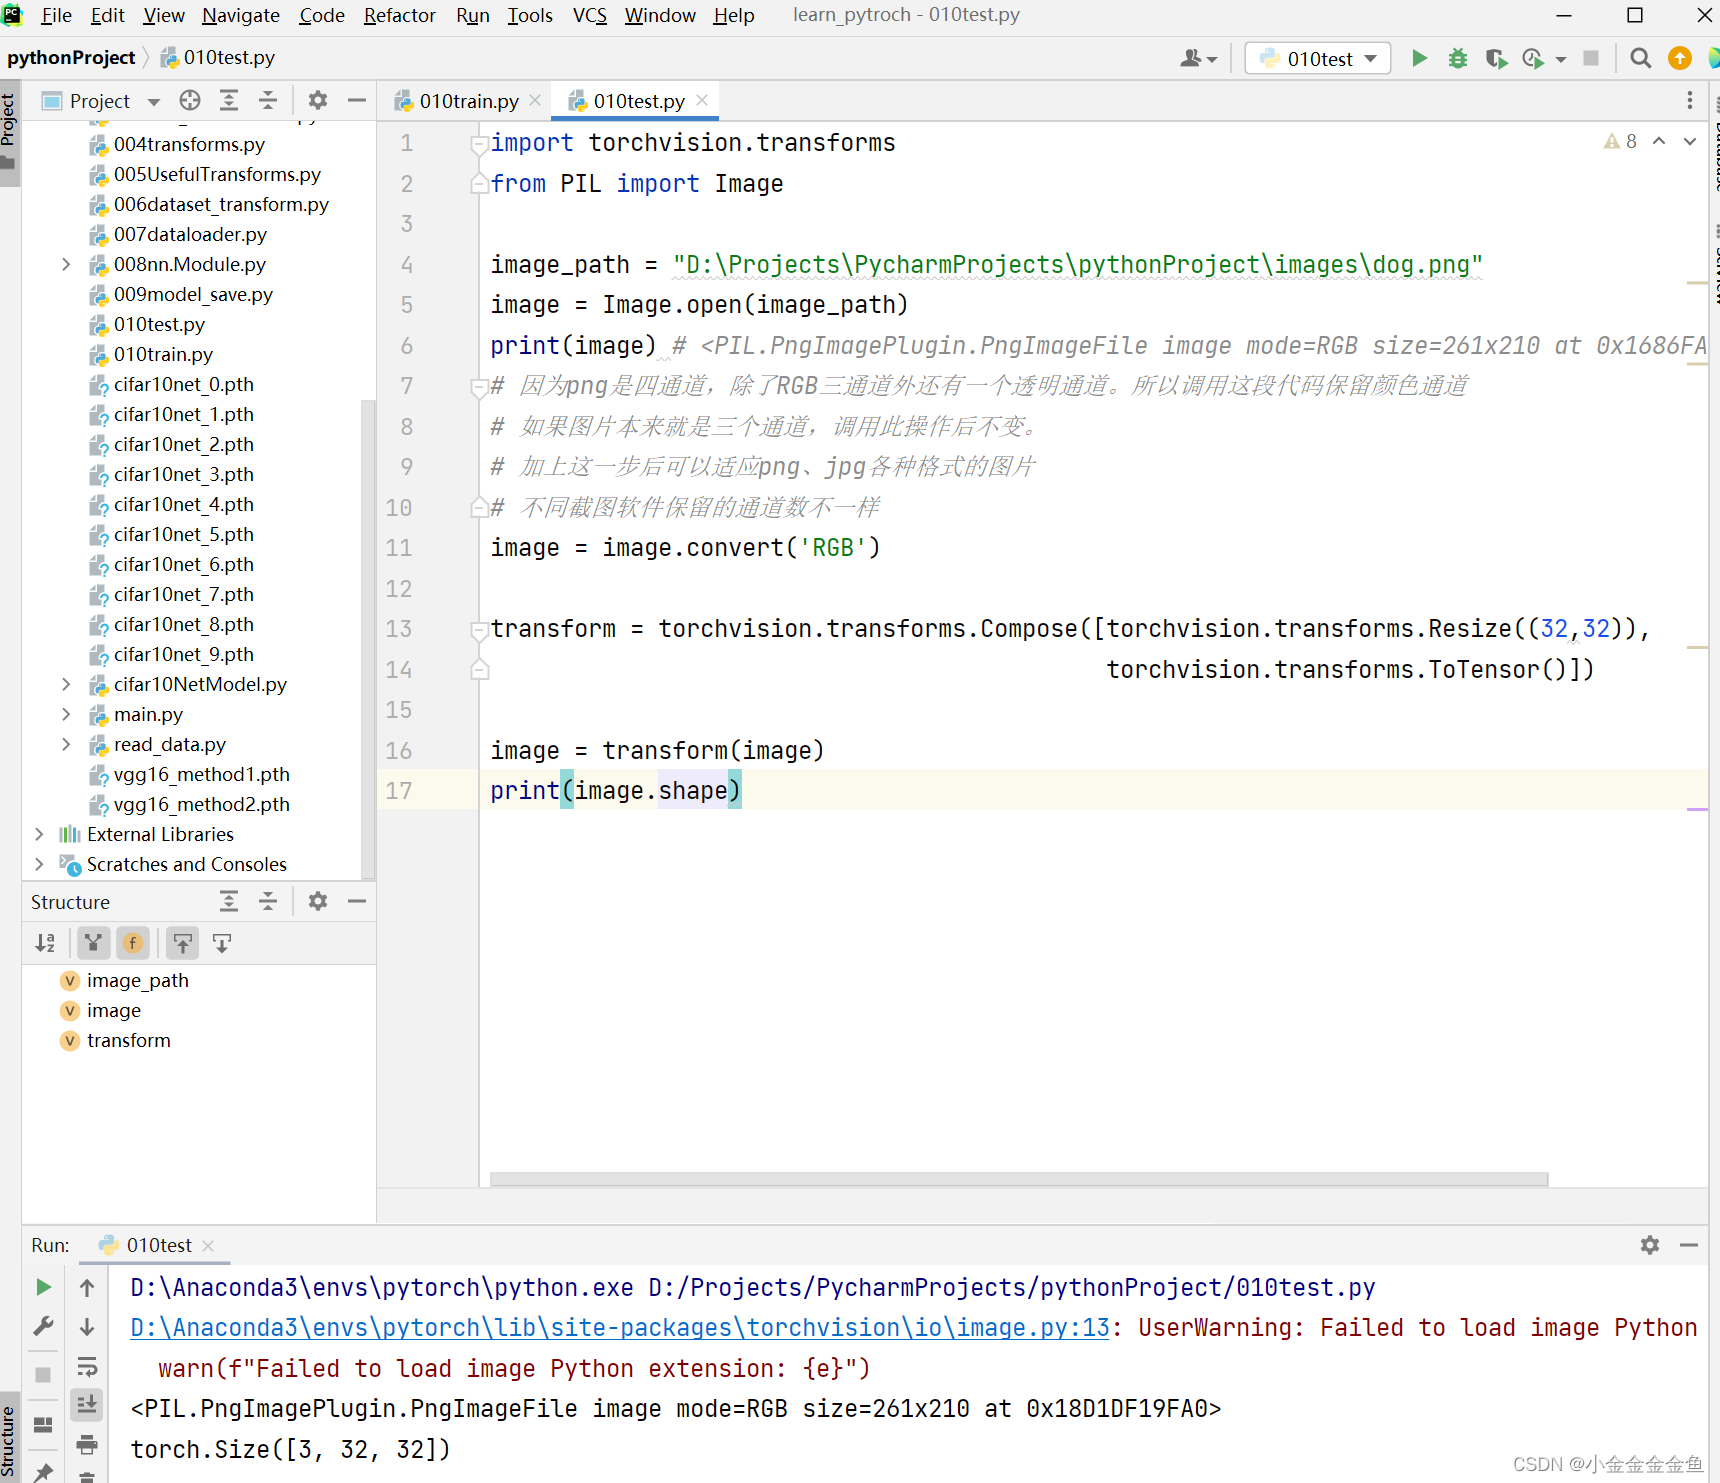
Enter image and dimensions
Relative path: The two points are the previous directory


...

It is found that the size of this image is 261 210, and the input of the above model is 32 32
import torch
import torchvision.transforms
from PIL import Image
from torch import nn
image_path = "D:\Projects\PycharmProjects\pythonProject\images\dog.png"
image = Image.open(image_path)
print(image) # <PIL.PngImagePlugin.PngImageFile image mode=RGB size=261x210 at 0x1686FAAE310>
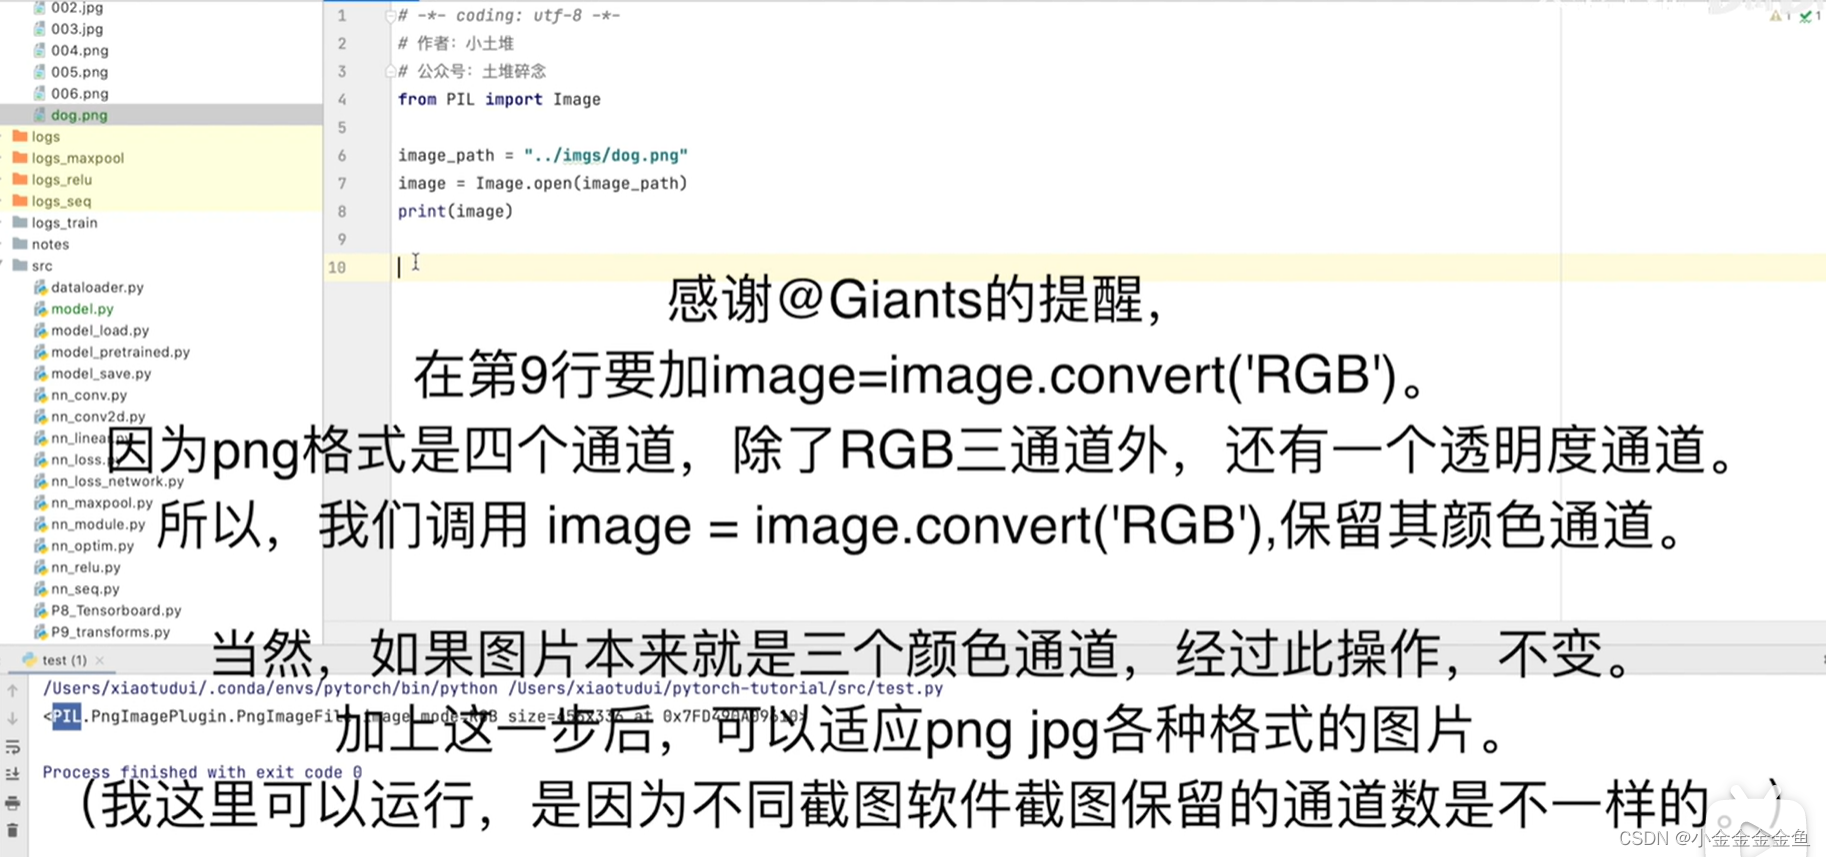
# 因为png是四通道,除了RGB三通道外还有一个透明通道。所以调用这段代码保留颜色通道
# 如果图片本来就是三个通道,调用此操作后不变。
# 加上这一步后可以适应png、jpg各种格式的图片
# 不同截图软件保留的通道数不一样
# image = image.convert('RGB')
transform = torchvision.transforms.Compose([torchvision.transforms.Resize((32,32)),
torchvision.transforms.ToTensor()])
image = transform(image)
print(image.shape)
# 拷贝的网络模型
# 粘贴的是参数,需要把参数放入到网络模型中去,没有模型只放参数是不可能运行的
class cifar10Net(nn.Module):
def __init__(self):
super(cifar10Net,self).__init__()
self.model = nn.Sequential(
nn.Conv2d(3,32,5,1,2), # 卷积
nn.MaxPool2d(2), # 最大池化 kernel_size=2
nn.Conv2d(32,32,5,1,2),
nn.MaxPool2d(2),
nn.Conv2d(32,64,5,1,2),
nn.MaxPool2d(2),
nn.Flatten(),
nn.Linear(64*4*4,64),
nn.Linear(64,10),
)
def forward(self,x):
x = self.model(x)
return x
# 加载模型
model = torch.load("cifar10net_9.pth")
print(model)
# 模型网络的输入要求张量的阶数为4,
# 即(batch_size, Channel,Hight,weight),一般的图片输入为3阶张量,
# 即(Channel:3, Hight:32, Weight:32)。
image = torch.reshape(image,(1,3,32,32))
model.eval()
with torch.no_grad(): # 节约内存、性能
output = model(image)
print(output)
# 预测输出:tensor([[ 2.2722, -1.4881, -0.8504, 1.8632, 0.8308, 1.0495, 0.6538, -1.5160,
# -0.6486, -1.6084]])
# 第0类最大 tensor([0]) 不准确,dog是类5
print(output.argmax(1))
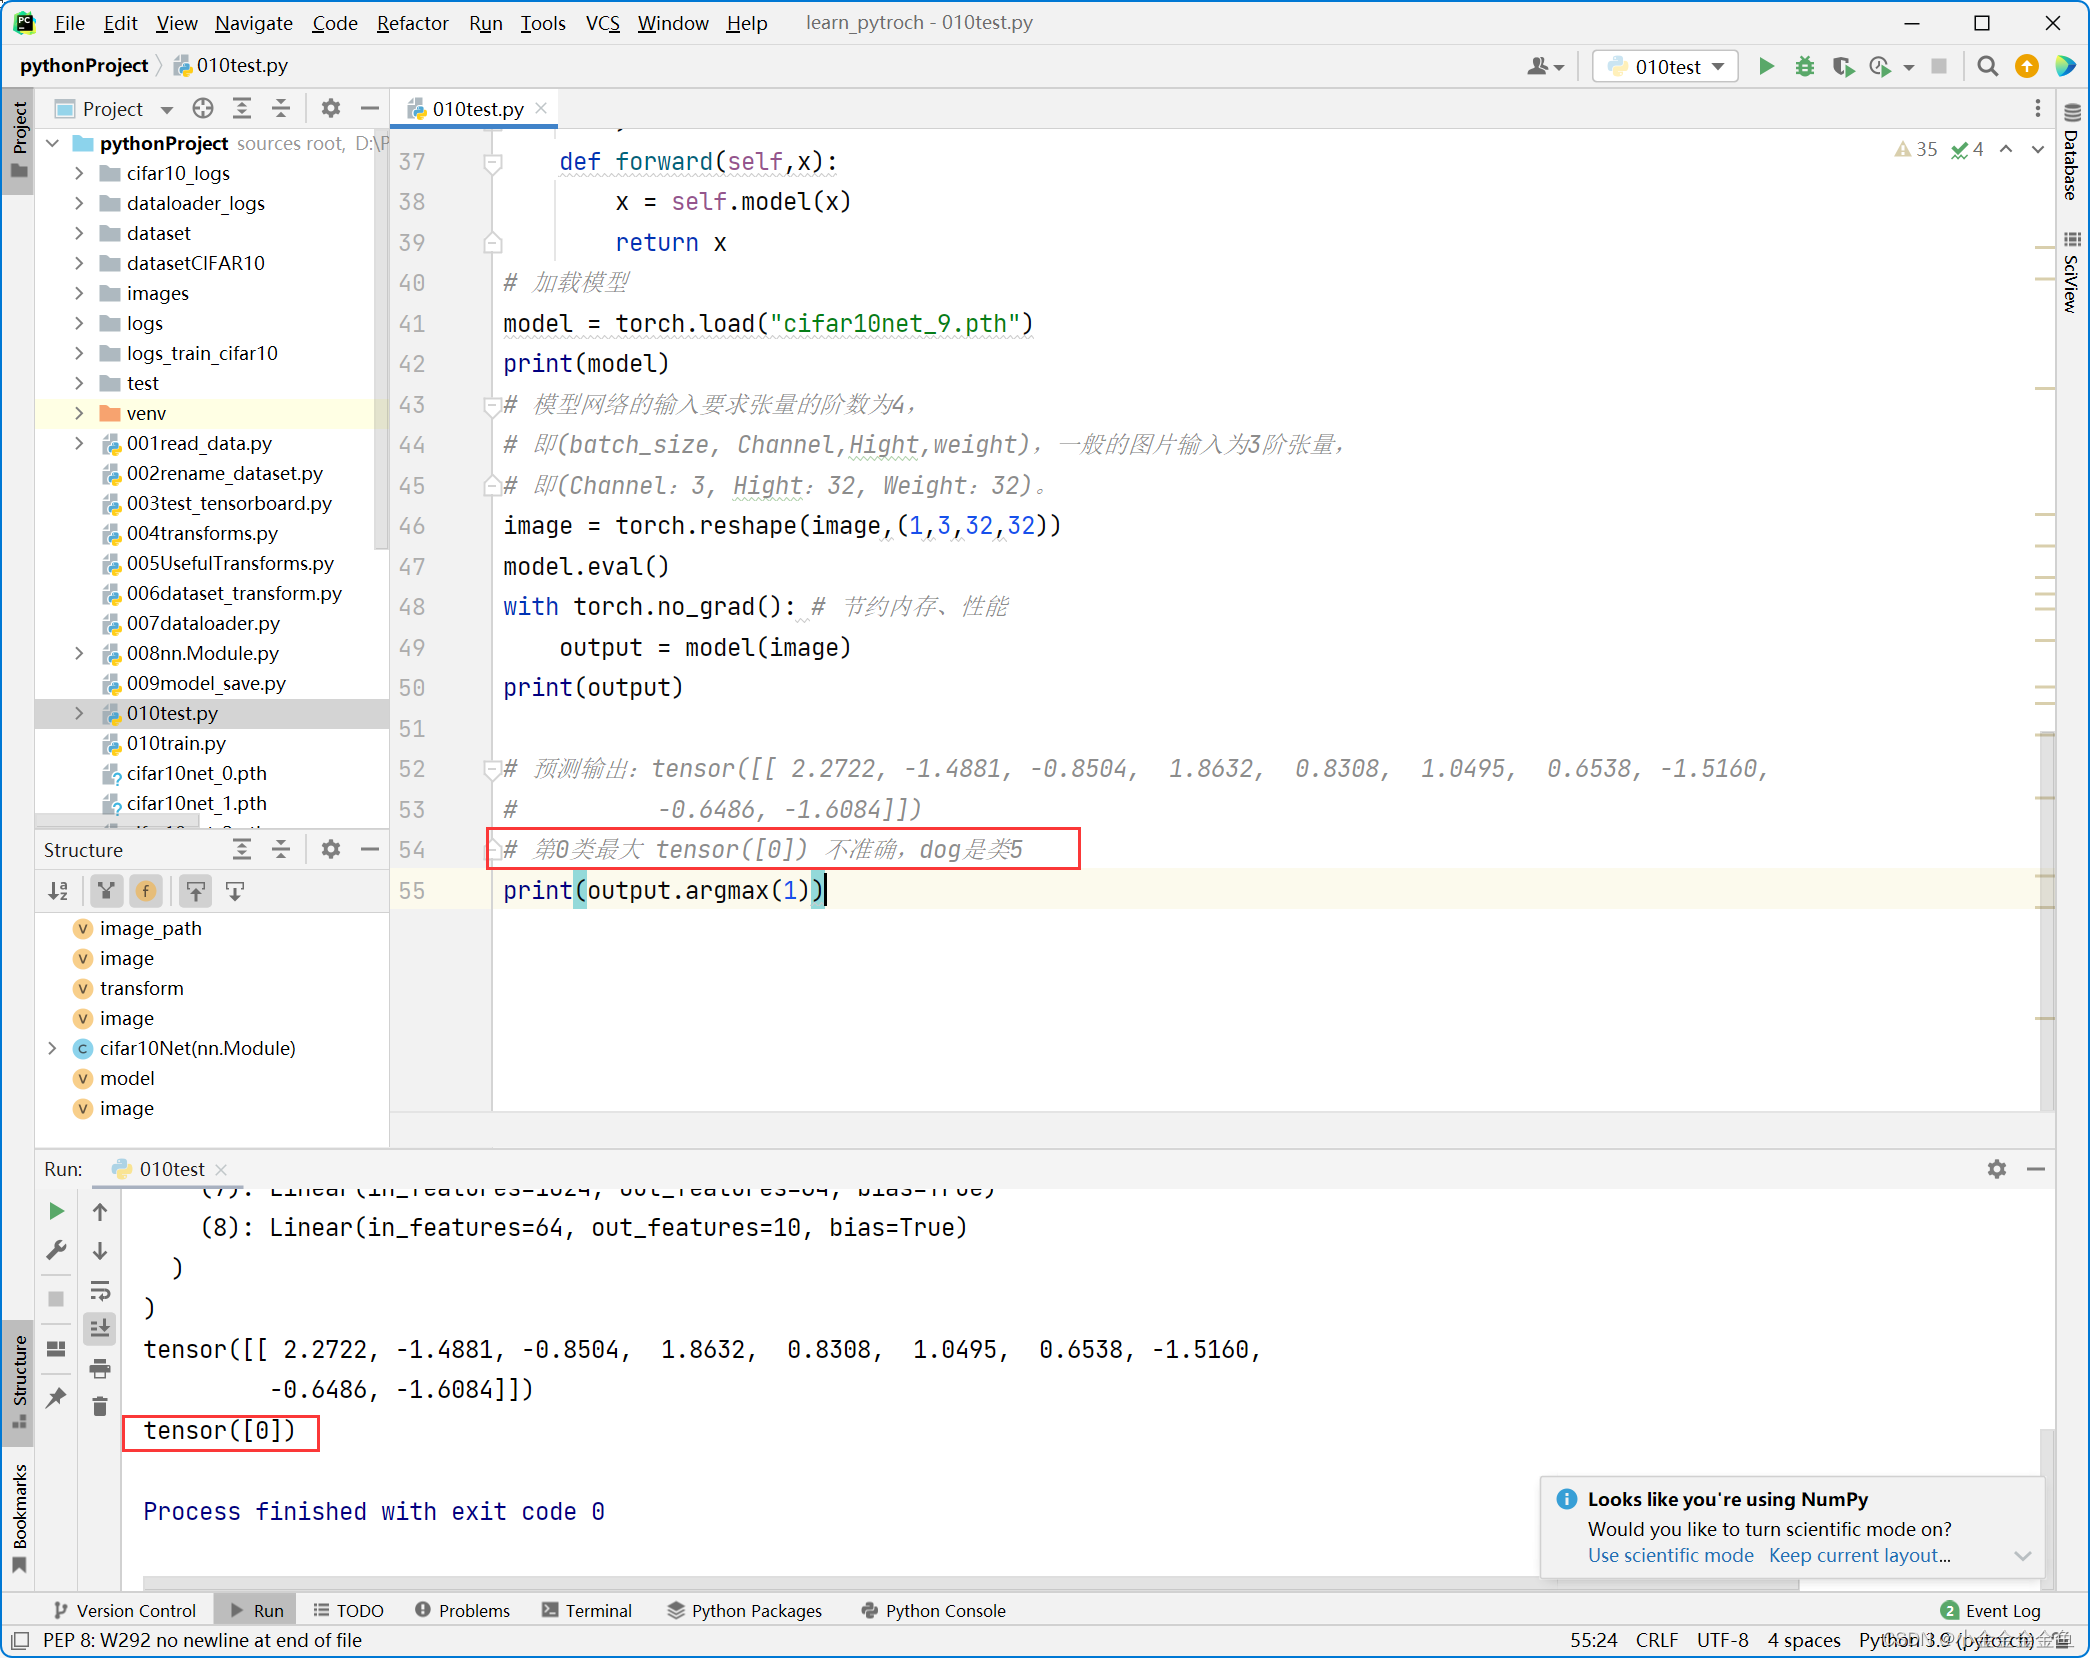
The prediction was wrong, hahahaha, but the general idea is this.