Table of contents
-
- Node.js basics
- core module
-
- core module - path
- Buffer of global variables
- Create buffers
- Buffer instance methods
- Buffer static methods
- Buffer-split implementation
- FS module of the core module
- File Operation API
- md to html
- file opening and closing
- Large file read and write operations
- File copy custom implementation
- Directory Operations API
- Synchronous implementation of directory creation
- Asynchronous implementation of directory creation
- Asynchronous implementation of directory deletion
- Modular History
- Commonjs specification
- Node.js and CommonJS
- Module classification and loading process
- Module loading source code analysis
- The VM module uses
- Module loading simulation implementation
- Event module Events
- publish subscribe
- EventEmitter source code debugging analysis
- EventEmitter mock
- The event loop in the browser
- Event loop in Nodejs
- Nodejs event loop combing
- Difference between Nodejs and browser event loop
- Nodejs Event Ring Frequently Asked Questions
- Core module Stream
- readable stream of stream
- writable stream of stream
- Duplex stream and conversion stream of stream
- File-readable stream creation and consumption
- File-readable stream events and applications
- file writable stream
- write execution process
- Control write speed
- back pressure mechanism
- Simulates a file-readable stream
- linked list structure
- One-way linked list implementation
- Singly linked list implements queue
- File writable stream implementation
- The pipe method uses
- communication
-
- Communication basic principle
- Network communication method
- Network Hierarchy Model
- Data Encapsulation and Decapsulation
- TCP three-way handshake and four-way wave
- Create TCP three-way handshake and four-way handshake
- TCP sticky packet and its solution
- Packet unpacking implementation
- Encapsulation solves sticky packets
- http protocol
- Get http request information
- set http response
- proxy client
- Proxy client solves cross-domain
- Http static service
- lgserver command line configuration
- lgserver start web service
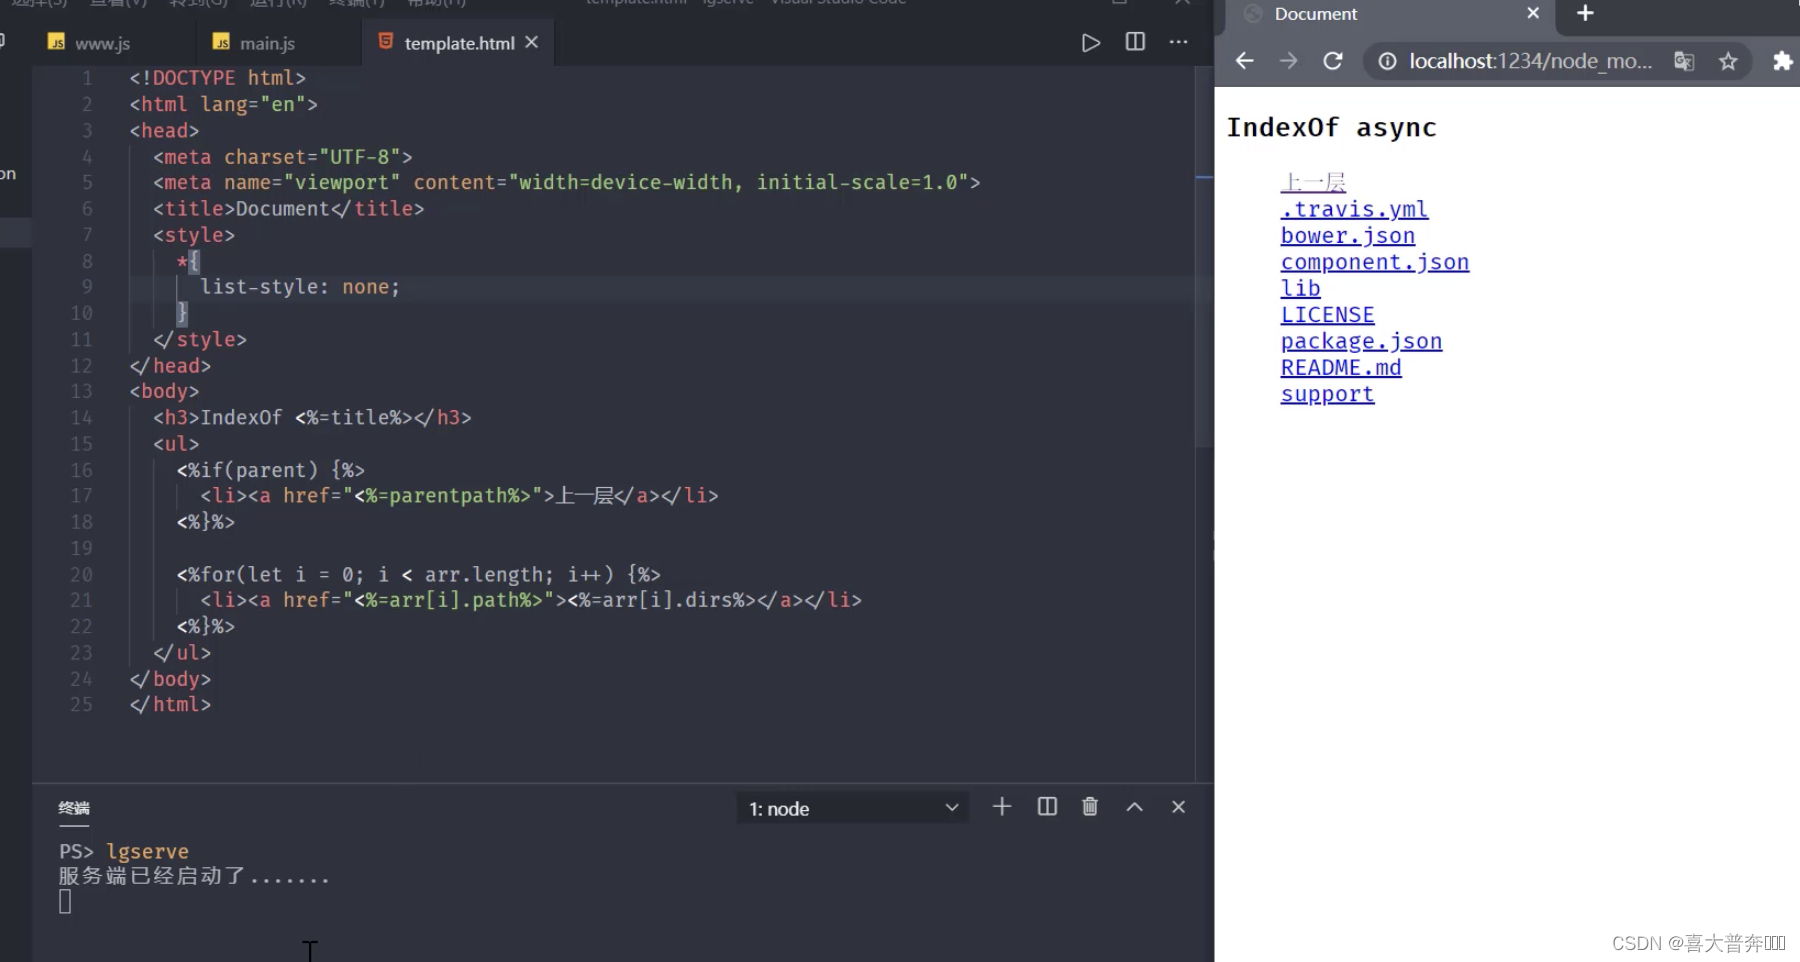
- lgserve handles file resources
- lgserve handles directory resources
- lgserve template data rendering
Node.js basics
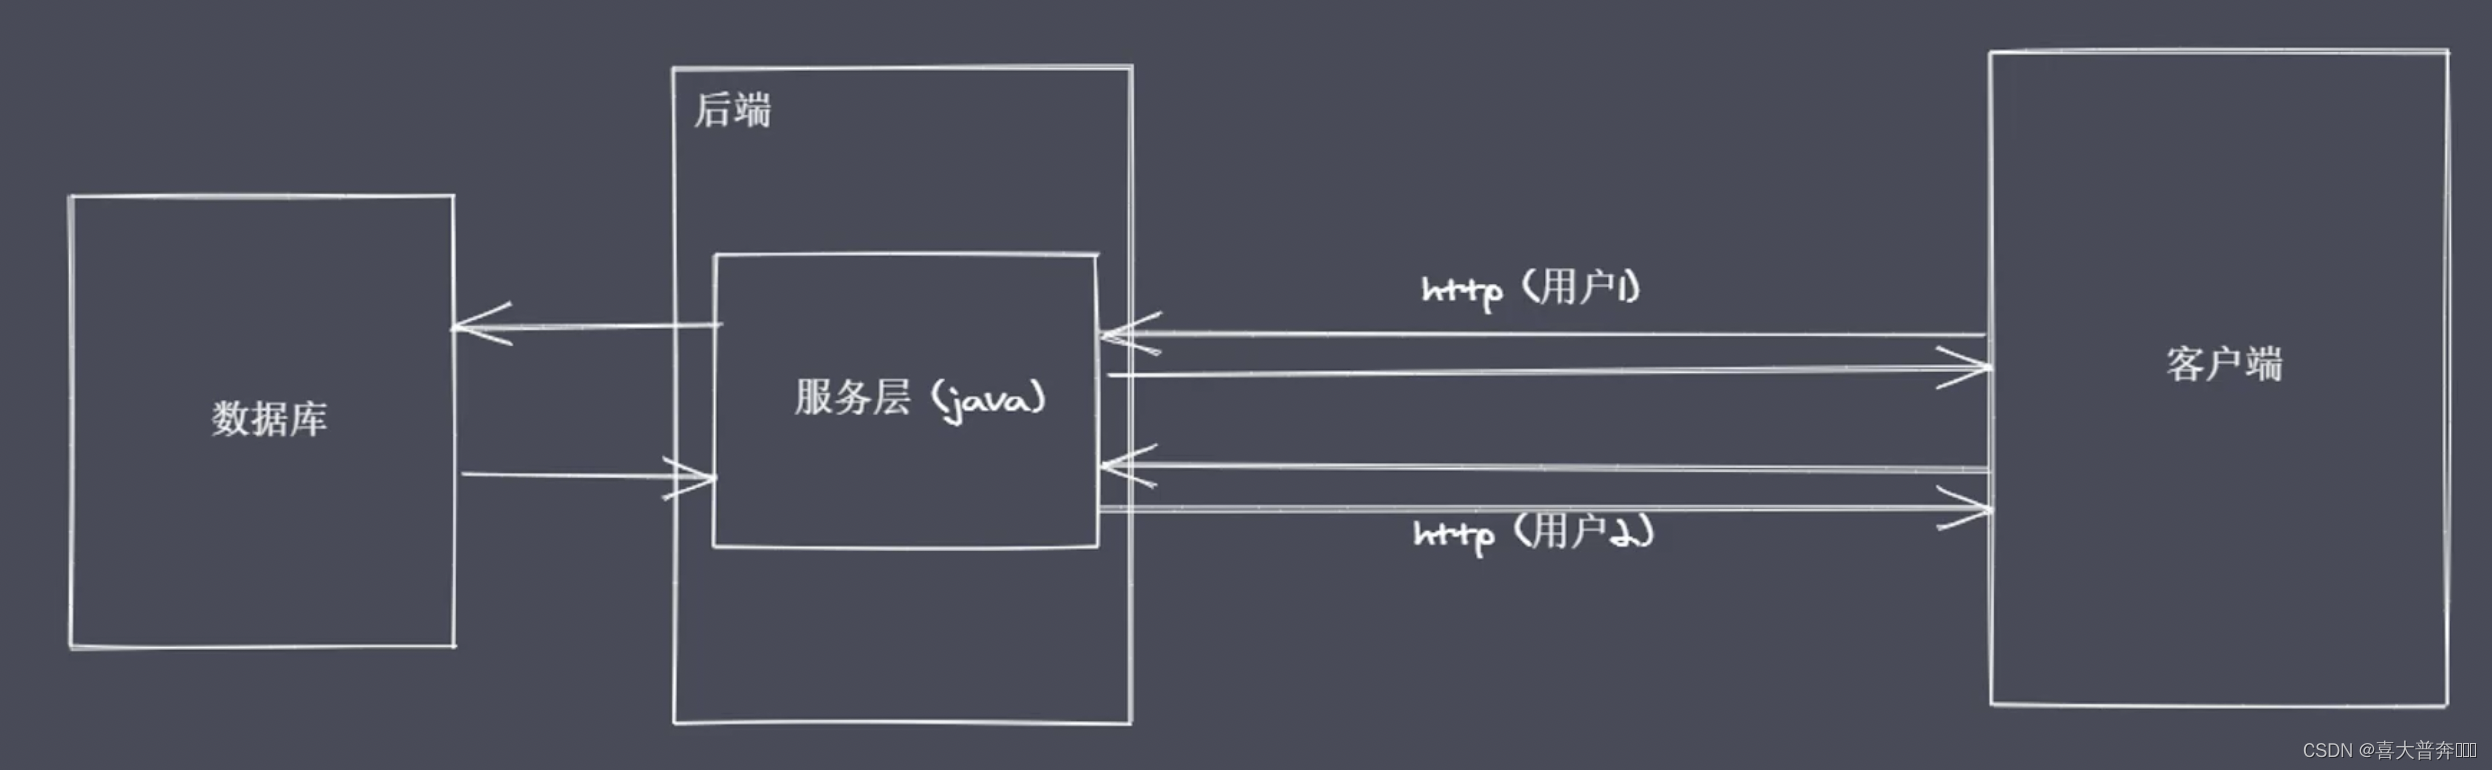
Necessary skills in the process of big front-end development
- Lightweight, high-performance WEB server
- Front-end and back-end JavaScript isomorphic development
- Convenient and efficient front-end engineering
In summary, we can see the importance and necessity of nodejs for front-end development
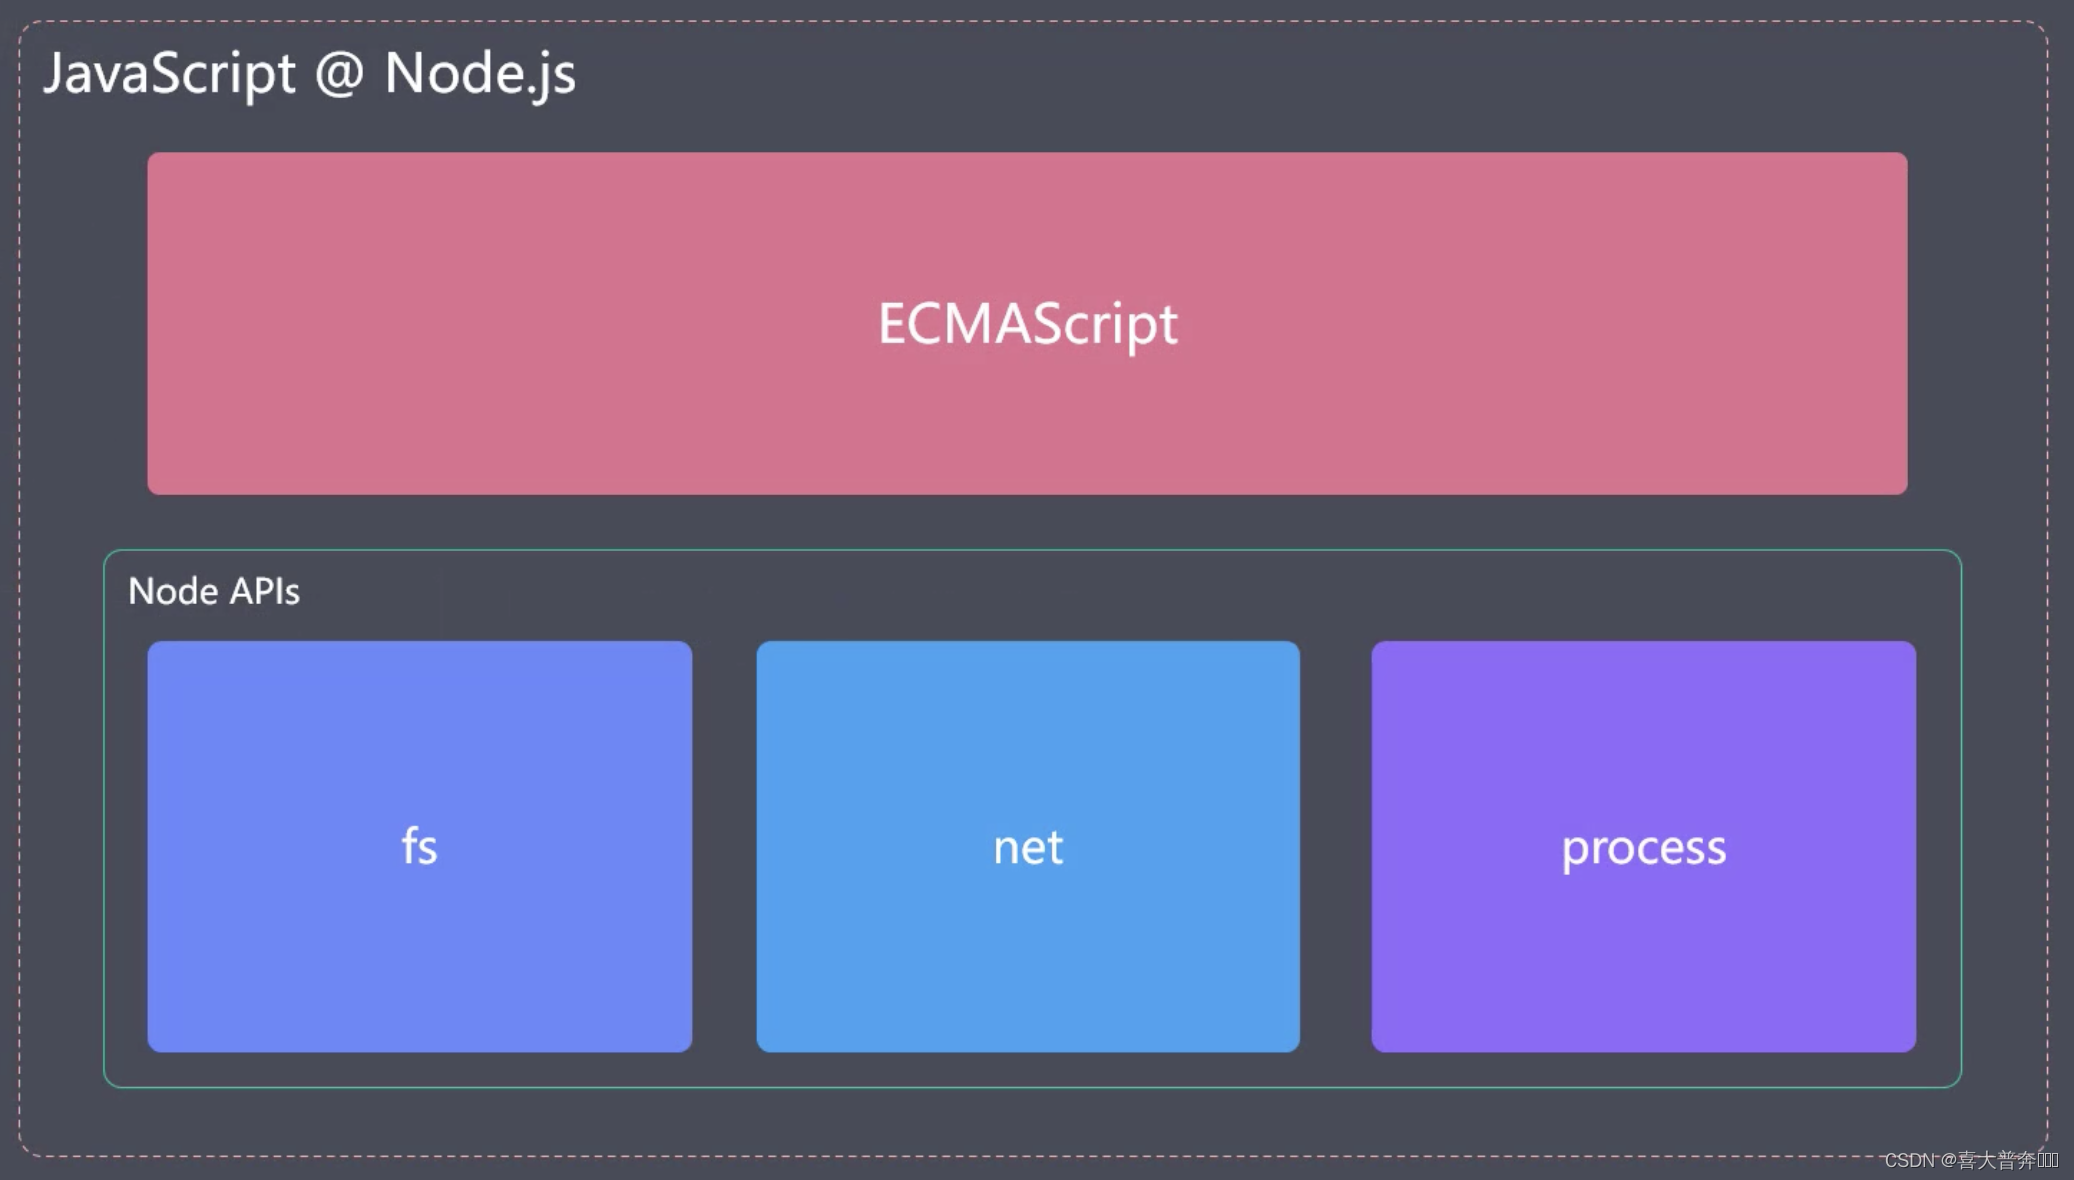
Architecture of nodejs
Natives modules
- The content of the current layer is realized by js
- Provide libraries that applications can call directly, such as: fs, path, http, etc.
- The js language cannot directly operate the underlying hardware to set
the Builtin modules "glue layer" - a bridge, which is mainly written in c++ code. Through
this bridge, the nodejs core module can obtain specific service support to complete lower-level operations

- V8: Execute JS code and provide bridge interface
- Libuv: event loop, event queue, asynchronous IO
- Third-party modules: zlib, http, c-ares, etc.

Why Nodejs

IO is the slowest link in the computer operation process. A classic
example of dining in a restaurant:
one person is paired with one waiter, and one person is paired with a waiter. At this time, the waiter spends most of his time ordering food, and then the reactor is derived. Mode (responder mode), single thread to complete multi-threaded work;
A waiter can call the waiter whoever finishes ordering, but the waiter is serving other guests during the ordering process of the user. This operation avoids context switching between multiple contexts Some issues such as state preservation, time consumption, and state locks that need to be considered
There have been many versions of such a model in history, because nodejs is the best in this aspect, so it is retained
Of course, if customers come up and order food without thinking about it, it is obvious that one waiter is definitely not enough at this time. This corresponds to our program called: CPU-intensive, so the use of Nodejs is more IO-intensive. High concurrent requests rather than a large number of complex business logic processing.
But these do not affect our application of nodejs to isomorphic development and front-end engineering, it is still a cornerstone of our big front-end development.
Nodejs asynchronous IO
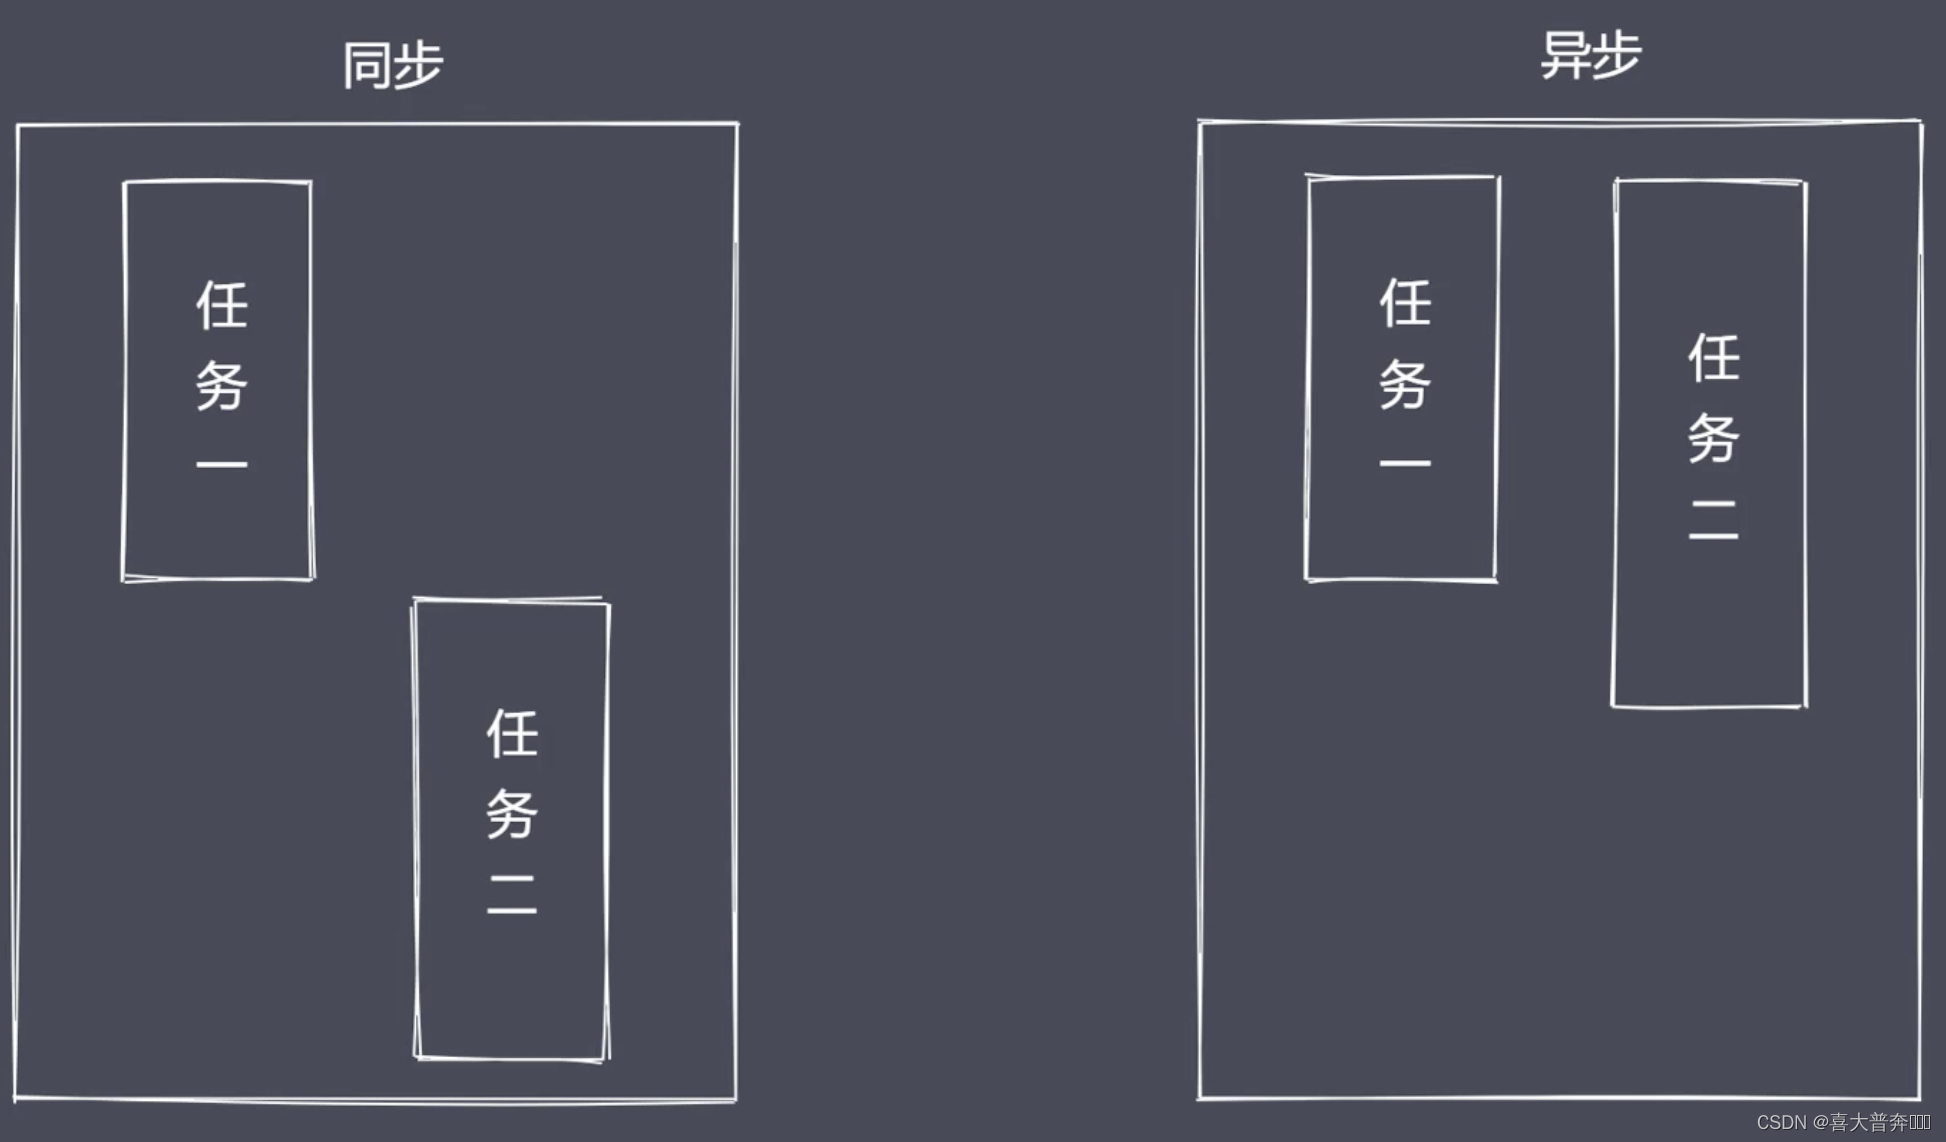
Operating system: blocking IO, non-blocking IO
non-blocking IO: repeatedly call the IO operation to determine whether the IO is over - polling
technology: read, select, poll, kqueue, event ports
Although polling can determine whether the IO is completed, then the acquisition will be completed The subsequent data is returned, but for the code, it is still a synchronous effect, because the program is still waiting for the IO effect during the polling process;
So what we expect is to directly initiate a non-blocking call, but there is no need to traverse or wake up to poll to determine whether the current IO is over. Instead, the next task can be processed directly after the call is initiated, and then After waiting for the IO result to come out, it is enough to pass the data back to the current code through some kind of signal or callback.

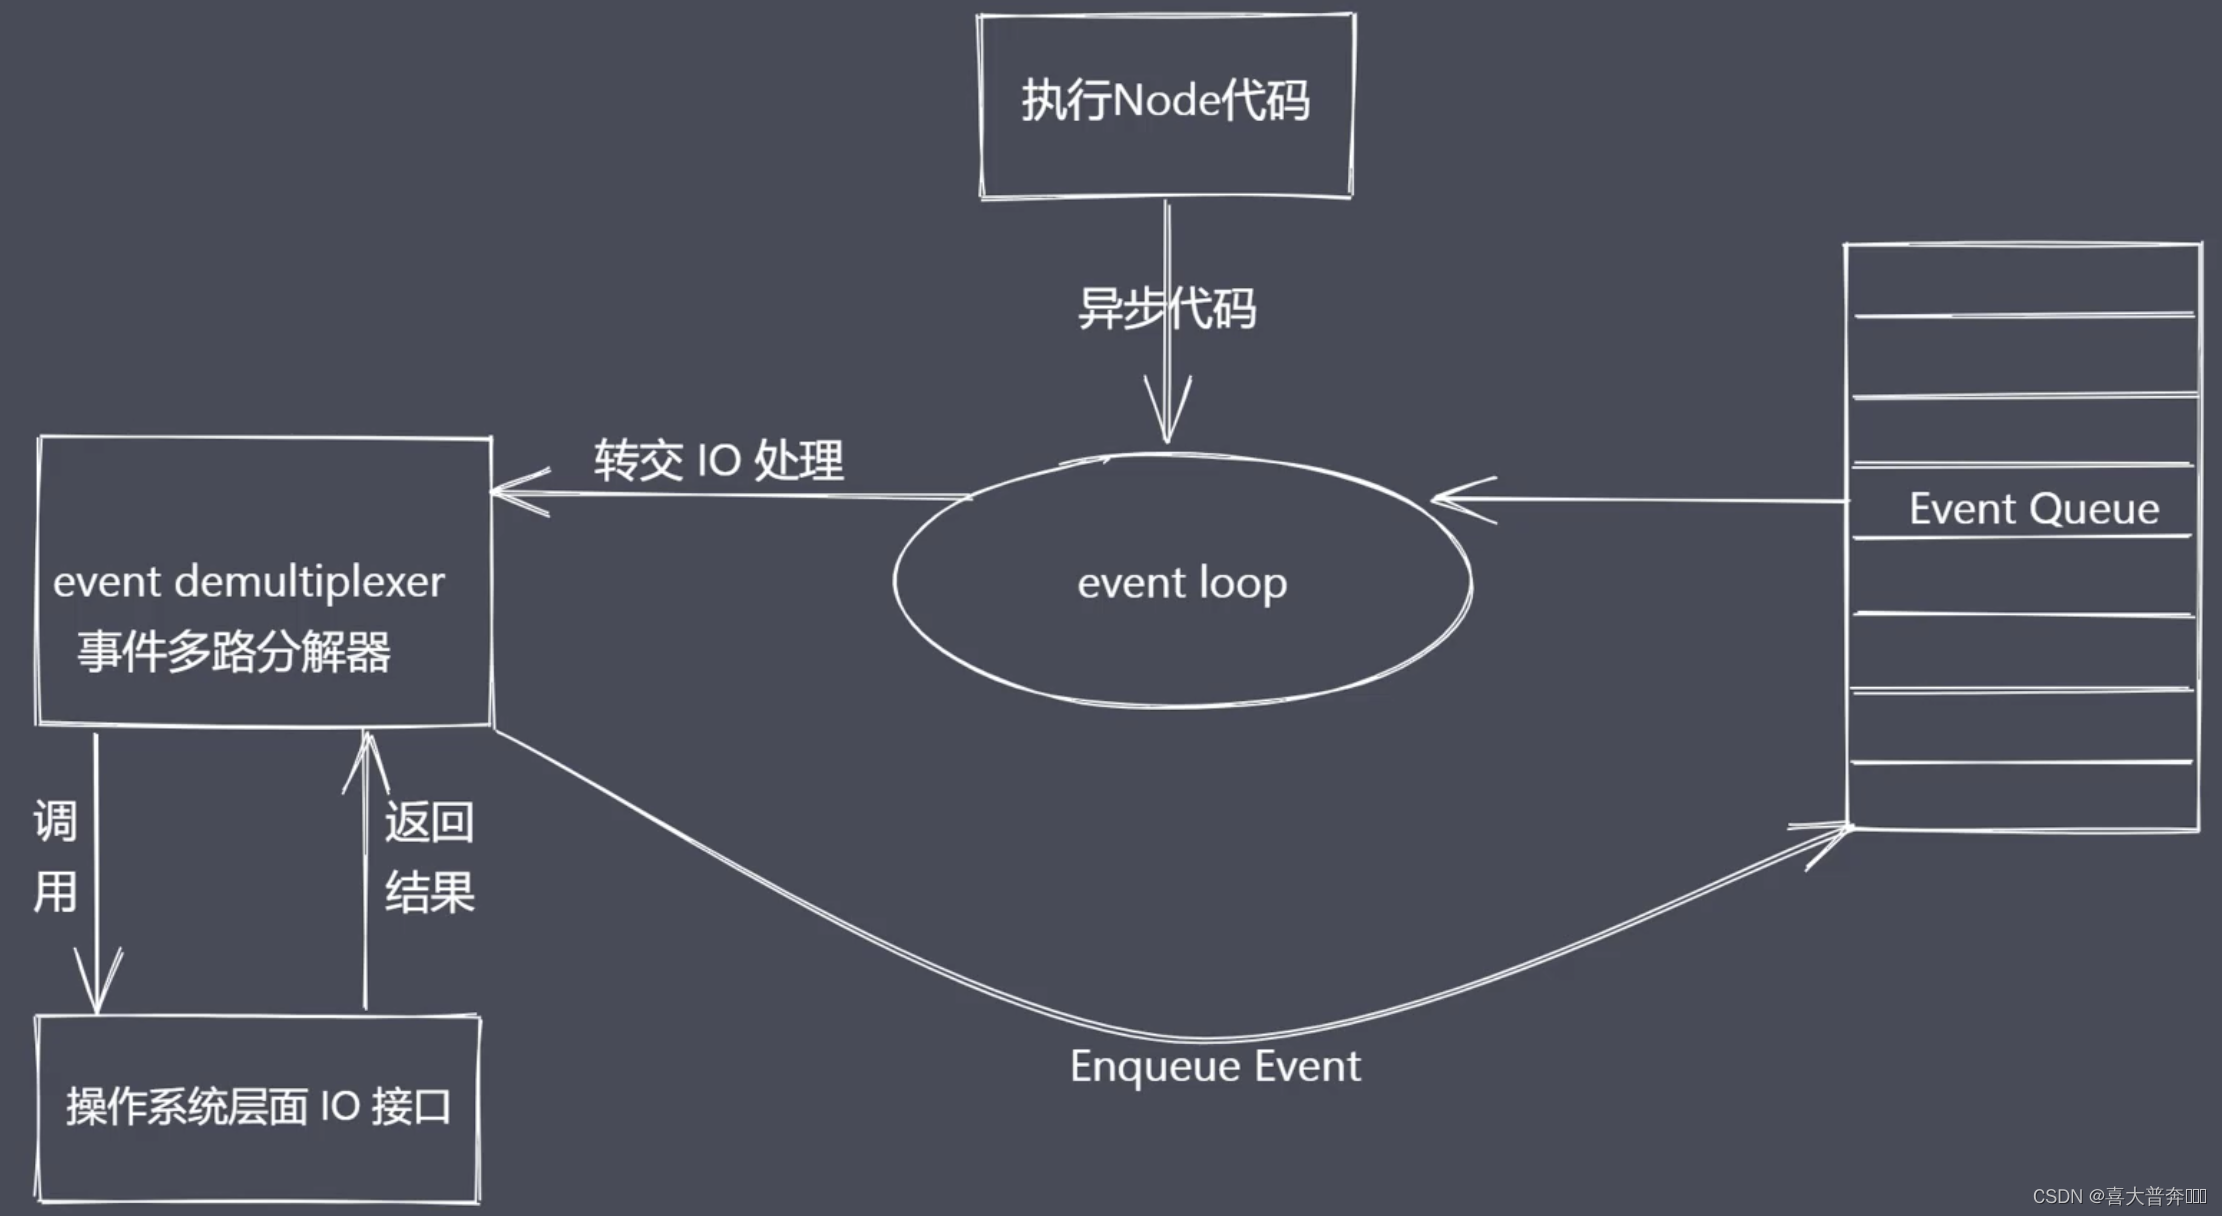
Asynchronous IO summary
- IO is the bottleneck of the application
- Asynchronous IO improves performance without waiting for results to return
- IO operations belong to the operating system level, and the platforms have corresponding implementations
- Nodejs single thread cooperates with event-driven architecture and Libuv to realize asynchronous IO
Nodejs event-driven architecture
Event-driven architecture is a common pattern in software development - see the previous figure
Event-driven, publish-subscribe, observer: the main body publishes messages, other instances receive messages
const EventEmitter = require('events');
const myEvent = new EventEmitter();

myEvent.on('事件1', () => {


  console.log('事件1 执行了')
});

myEvent.on('事件2', () => {


  console.log('事件2 执行了')
});

myEvent.on('事件1', () => {


  console.log('事件1-1 执行了')
});

myEvent.emit('事件1');
global object
- Not exactly the same as the window of the browser platform
- Many properties are mounted on the Nodejs global object.
The global object is a special object in JavaScript because it can be directly accessed anywhere, and there is no need to define it in advance; it is called window in the browser platform, and global in nodejs.
The fundamental function of Global is to be 全局变量the host of: 全局对象可以看作是全局变量的宿主
common global variables
__filename: return the absolute path of the script file being executed
__dirname: return the directory where the script is being executed
timer class function: the relationship between the execution sequence and the event loop
process: provide an interface for interacting with the current process
require: realize the loading of modules
module, exports: process the export of modules
...
By default, this is an empty object, which is different from global. Note here that this is not global in nodejs, because it involves a module, and later besides
Process of global variables
1. Obtain process information
2. Execute process operations
// 1 资源: cpu 内存
console.log(process.memoryUsage())
/*
{
  rss: 27885568, // 常驻内存
  heapTotal: 4964352, // 脚本执行时申请的内存大小
  heapUsed: 4007704, // 脚本执行过程中实际使用的内存大小
  external: 299796, // 扩展内存 - 底层C或者C++所占据的空间大小
  arrayBuffers: 11158 // 缓冲区 - 独立的空间大小,老版本是跟 external 在一起的,新版本独立出来了,后续讲解 Buffer
}
*/
console.log(process.cpuUsage())
/*
{ user: 33754, system: 6882 } // 用户和系统所占用CPU的时间片断
*/
// 2、运行环境:运行目录、node环境、cpu架构、用户环境、系统平台
console.log(process.cwd()) // 运行目录
console.log(process.version) // node版本
console.log(process.versions) // 内部各个运行环境版本
/*
{
  node: '16.15.1',
  v8: '9.4.146.24-node.21',
  uv: '1.43.0',
  zlib: '1.2.11',
  brotli: '1.0.9',
  ares: '1.18.1',
  modules: '93',
  nghttp2: '1.47.0',
  napi: '8',
  llhttp: '6.0.4',
  openssl: '1.1.1o+quic',
  cldr: '40.0',
  icu: '70.1',
  tz: '2021a3',
  unicode: '14.0',
  ngtcp2: '0.1.0-DEV',
  nghttp3: '0.1.0-DEV'
}
*/
console.log(process.arch) // 架构
console.log(process.env.NODE_ENV)
console.log(process.env.PATH)
console.log(process.env.HOME)  // mac平台使用 - HOME win平台使用 - USERPROFILE
console.log(process.platform) // 平台
// 3 运行状态: 启动参数、PID、运行时间
// 运行 node ***.js 1 2
console.log(process.argv)
/*
数组:默认有两个参数:第一个是 node 启动程序对应的路径,第二个是当前脚本/当前进程执行的文件所在绝对路径
从第三项开始,就是自定义追加的参数
*/
console.log(process.argv0)  // execArgv
console.log(process.pid)  // ppid

setTimeout(() => {


  console.log(process.uptime()) // 从运行开始到结束所消耗的时间
}, 3000)
// 4、事件:不是说 process 里有哪些事件,主要是习惯一下事件驱动的编辑/发布订阅的模式,也为后续事件模块做个铺垫
// 4、事件
process.on('exit', (code)=>{


  console.log('触发exit事件',code)
  setTimeout(()=>{

     // 无效,exit事件内部不能执行异步代码
    console.log('退出之后执行')
  }, 1000)
})
process.on('beforeExit', (code)=>{


  console.log('触发beforeExit事件',code)
})
process.exit() // 主动触发退出进程的话不会触发 beforeExit,也不会触发当前代码后方的代码
console.log('当前脚本执行完毕')
// 5、标准输入、输出、错误
// console.log = function(data){ // 重写了 consile.log 函数
// process.stdout.write('---'+data+'\n')
// }
// console.log(11)
// console.log(22)
// 测试管道 同级新建文件 test.txt,随便写点儿内容:测试文件test.txt的内容
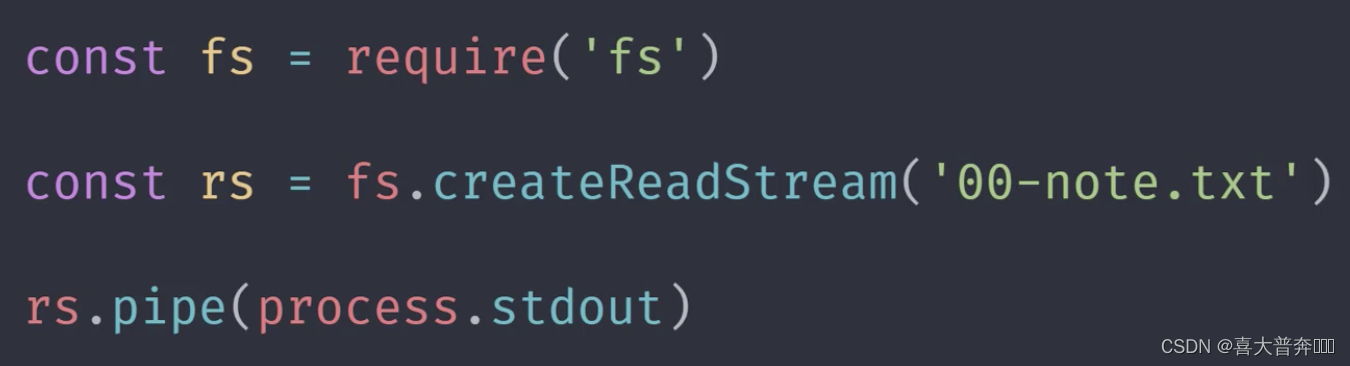
const fs = require('fs')
fs.createReadStream('test.txt') // 创建可读流,读取任意可读文件
.pipe(process.stdout) // pipe-管道,标准的读取流通过pipe管道流给process.stdout,接收到标准的读取流进行标准输出
# 执行脚本文件
node ***.js
output:

process.stdin.pipe(process.stdout); // stdin 获取到用户输入的东西转换成流,通过管道pipe交给stdout进行输出,输入什么它自动输出什么
process.stdin.setEncoding('utf-8') // 设定一下编码
process.stdin.on('readable', ()=>{

     // readable 内置函数
  let chunk = process.stdin.read()
  if(chunk !== null){


    process.stdout.write('data_'+chunk)
  }
})
core module
core module - path
Built-in module: handle the path of files/directories, just master the common APIs, and check for other ones
- basename() Get the base name in the path
- dirname() get directory name
- extname() Get the extension name
- isAbsolute() Whether it is an absolute path
- join() joins multiple path segments
- resolve() returns the absolute path
- parse() parses the path and gets the corresponding information: root path, suffix name, directory, etc.
- format() serializes the path, the opposite of parse
- normalize() normalizes the path
const path = require('path')

console.log(__filename) // 当前脚本完整路径

// 1 获取路径中的基础名称
/**
 * 01 返回的就是接收路径当中的最后一部分
 * 02 第二个参数表示扩展名,如果说没有设置则返回完整的文件名称带后缀
 * 03 第二个参数做为后缀时,如果没有在当前路径中被匹配到,那么就会忽略
 * 04 处理目录路径的时候如果说,结尾处有路径分割符,则也会被忽略掉
 */
console.log(path.basename(__filename)) // 当前脚本文件名称:带后缀
console.log(path.basename(__filename, '.js')) // 当前脚本文件名称:不带后缀
console.log(path.basename(__filename, '.css')) // 当前脚本文件名称,找不到 .css,所以忽略第二个参数
console.log(path.basename('/a/b/c')) // 最后一个目录名 c
console.log(path.basename('/a/b/c/')) // 忽略分隔符,输出最后一个目录名 c


// 2 获取路径目录名 (路径)
/**
 * 01 返回路径中最后一个部分的上一层目录所在路径
 */
console.log(path.dirname(__filename)) // 返回当前脚本的上一层目录的路径
console.log(path.dirname('/a/b/c')) // 返回 /a/b
console.log(path.dirname('/a/b/c/')) // 返回 /a/b

// 3 获取路径的扩展名
/**
 * 01 返回 path路径中相应文件的后缀名
 * 02 如果 path 路径当中存在多个点,它匹配的是最后一个点,到结尾的内容
 */
console.log(path.extname(__filename)) // .js
console.log(path.extname('/a/b')) // ''(空)
console.log(path.extname('/a/b/index.html.js.css')) // .css
console.log(path.extname('/a/b/index.html.js.')) // .

// 4 解析路径
/**
 * 01 接收一个路径,返回一个对象,包含不同的信息
 * 02 root dir base ext name
 */
const obj1 = path.parse('/a/b/c/index.html')
const obj2 = path.parse('/a/b/c/')
const obj3 = path.parse('./a/b/c/')
console.log(obj1)
/*
{
    root: '/',
    dir: '/a/b/c',
    base: 'index.html',
    ext: '.html',
    name: 'index'
}
*/
console.log(obj2)
/*
{
    root: '/',
    dir: '/a/b',
    base: 'c',
    ext: '',
    name: 'c'
}
*/
console.log(obj3)
/*
{
    root: '',
    dir: './a/b',
    base: 'c',
    ext: '',
    name: 'c'
}
*/

// 5 序列化路径
const obj = path.parse('./a/b/c/')
console.log(path.format(obj)) // 将上方解析出来的路径对象再序列化为一个路径

// 6 判断当前路径是否为绝对
console.log(path.isAbsolute('foo')) // false
console.log(path.isAbsolute('/foo')) // true
console.log(path.isAbsolute('///foo')) // true
console.log(path.isAbsolute('')) // false
console.log(path.isAbsolute('.')) // false
console.log(path.isAbsolute('../bar')) // false

// 7 拼接路径
console.log(path.join('a/b', 'c', 'index.html')) // a/b/c/index.html
console.log(path.join('/a/b', 'c', 'index.html')) // /a/b/c/index.html
console.log(path.join('/a/b', 'c', '../', 'index.html')) // /a/b/index.html
console.log(path.join('/a/b', 'c', './', 'index.html')) // /a/b/c/index.html
console.log(path.join('/a/b', 'c', '', 'index.html')) // /a/b/c/index.html
console.log(path.join('')) // .

// 8 规范化路径
console.log(path.normalize('')) // .
console.log(path.normalize('a/b/c/d')) // a/b/c/d
console.log(path.normalize('a///b/c../d')) // a/b/c../d
console.log(path.normalize('a//\\/b/c\\/d')) // a/\/b/c\/d
console.log(path.normalize('a//\b/c\\/d')) // a/c\/d

// 9 绝对路径
console.log(path.resolve()) // 当前脚本所在目录绝对路径 - 不含当前脚本名称
/**
 * resolve([from], to)
 */
console.log(path.resolve('/a', '../b')) // /b
console.log(path.resolve('index.html')) // /**/**.../index.html
Buffer of global variables
Buffer buffer: Buffer allows JavaScript to manipulate binary
binary data, stream operations, Buffer
The JavaScript language originally served the browser platform, and the main operation data type is actually a string; JavaScript under the Nodejs platform can implement IO operations, and Buffer is used here.
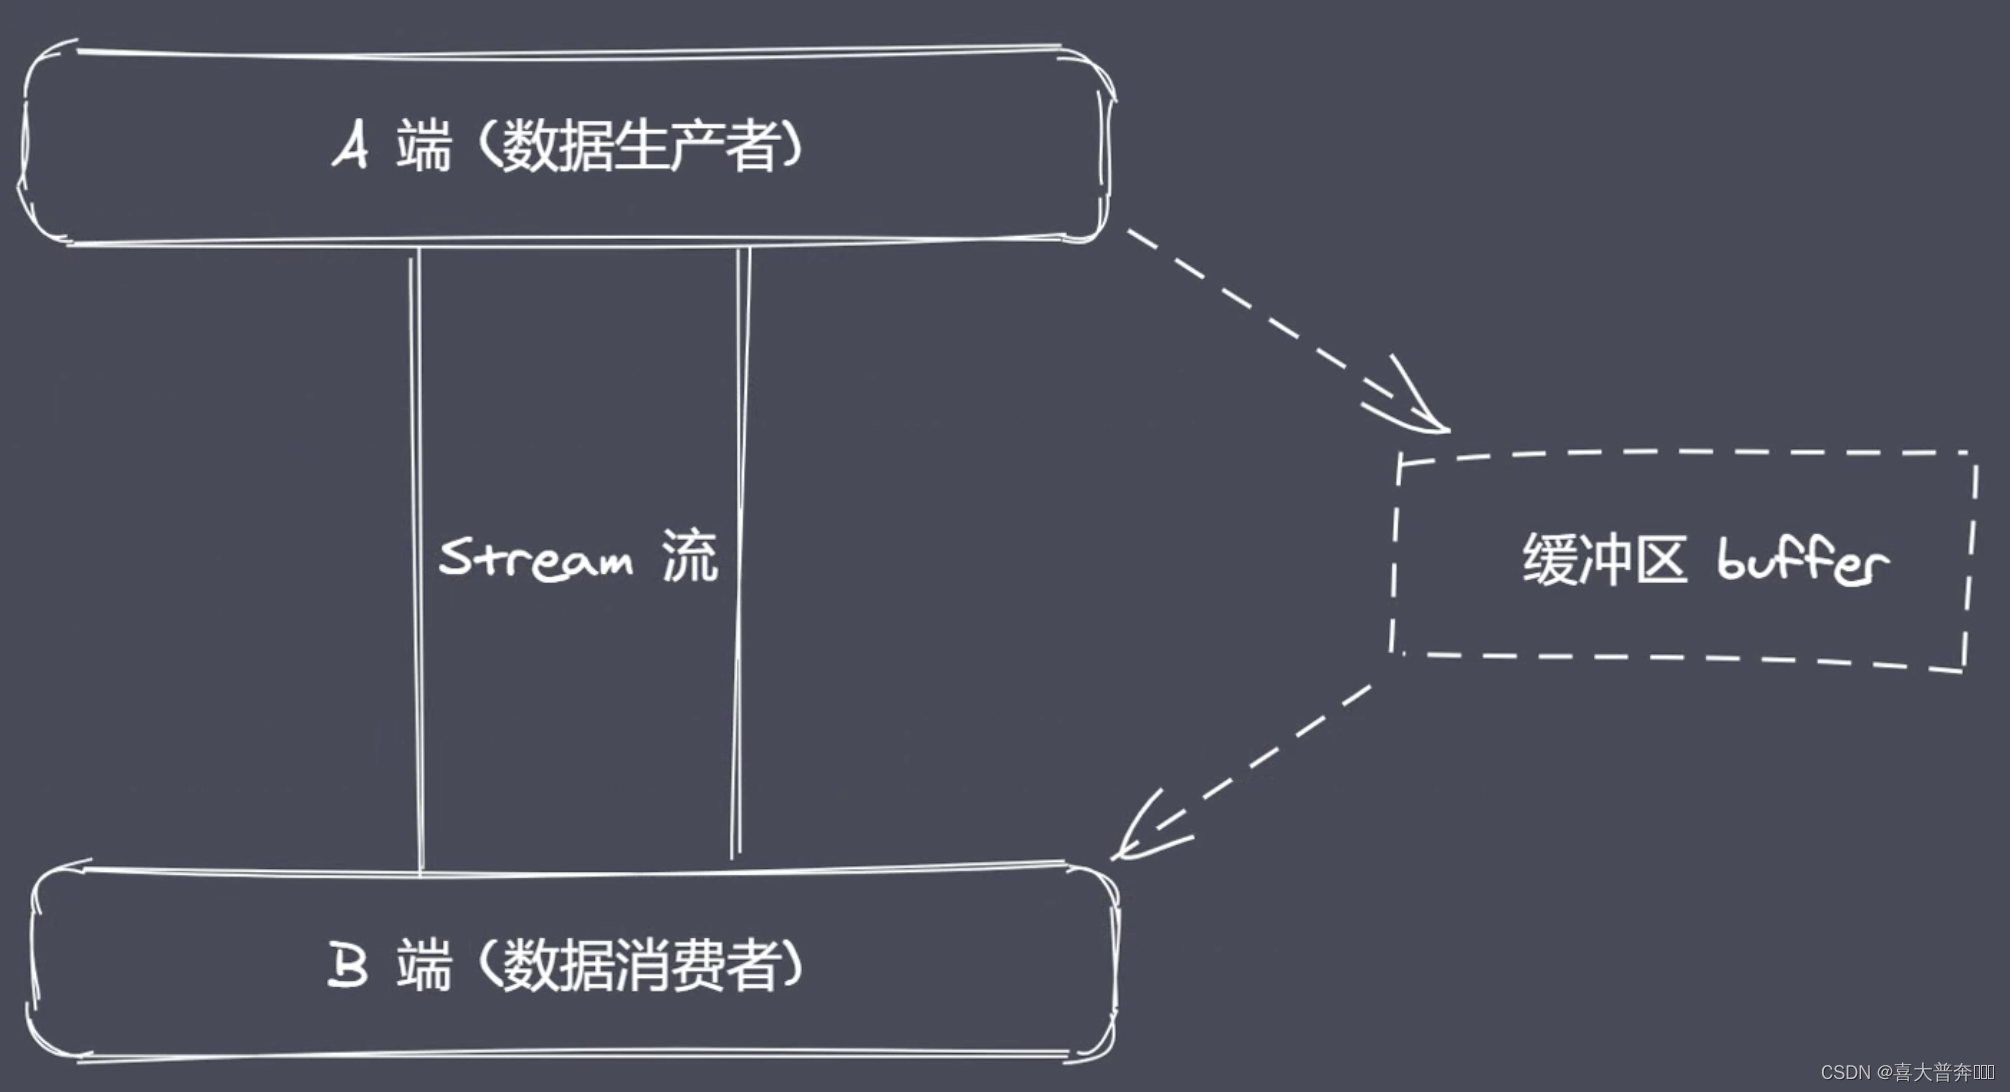
IO behavior operates on binary data
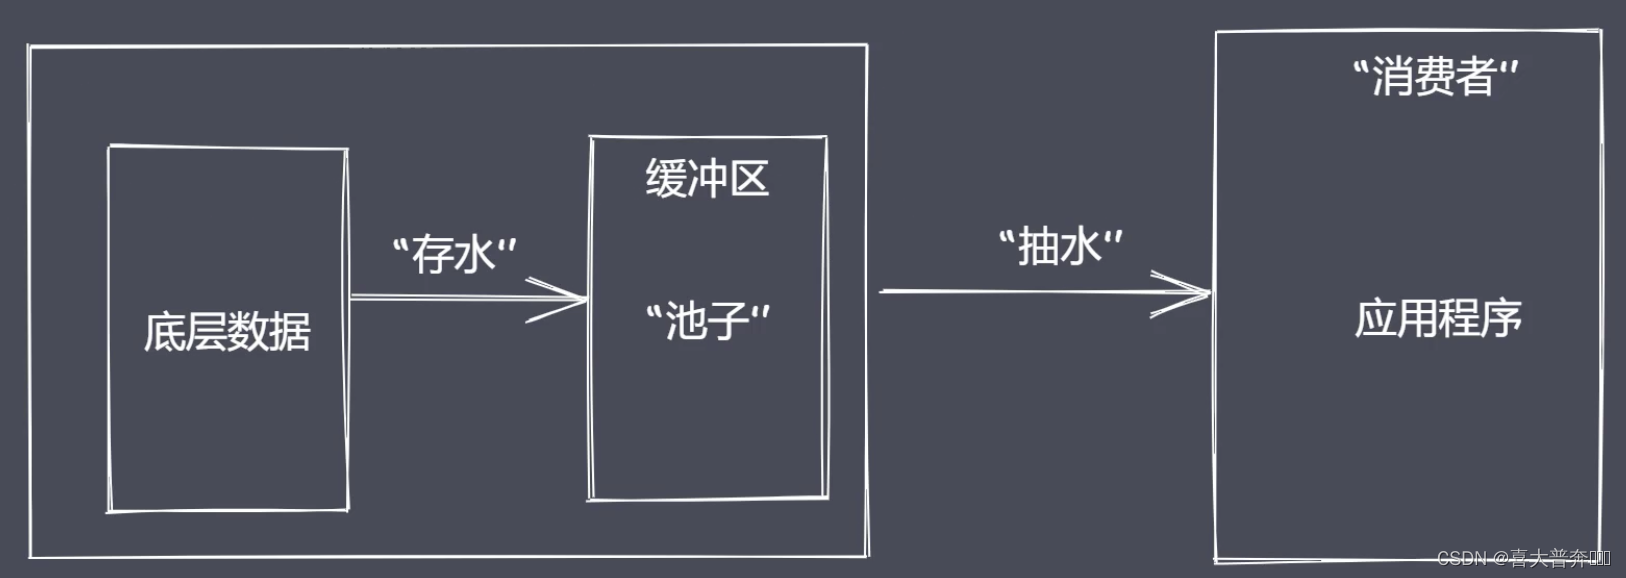
Stream operation is not original to Nodejs. It can be understood as a data type, which is the same data type as string numbers, but it can be segmented. Stream operation cooperates with pipelines to realize segmented data transmission.
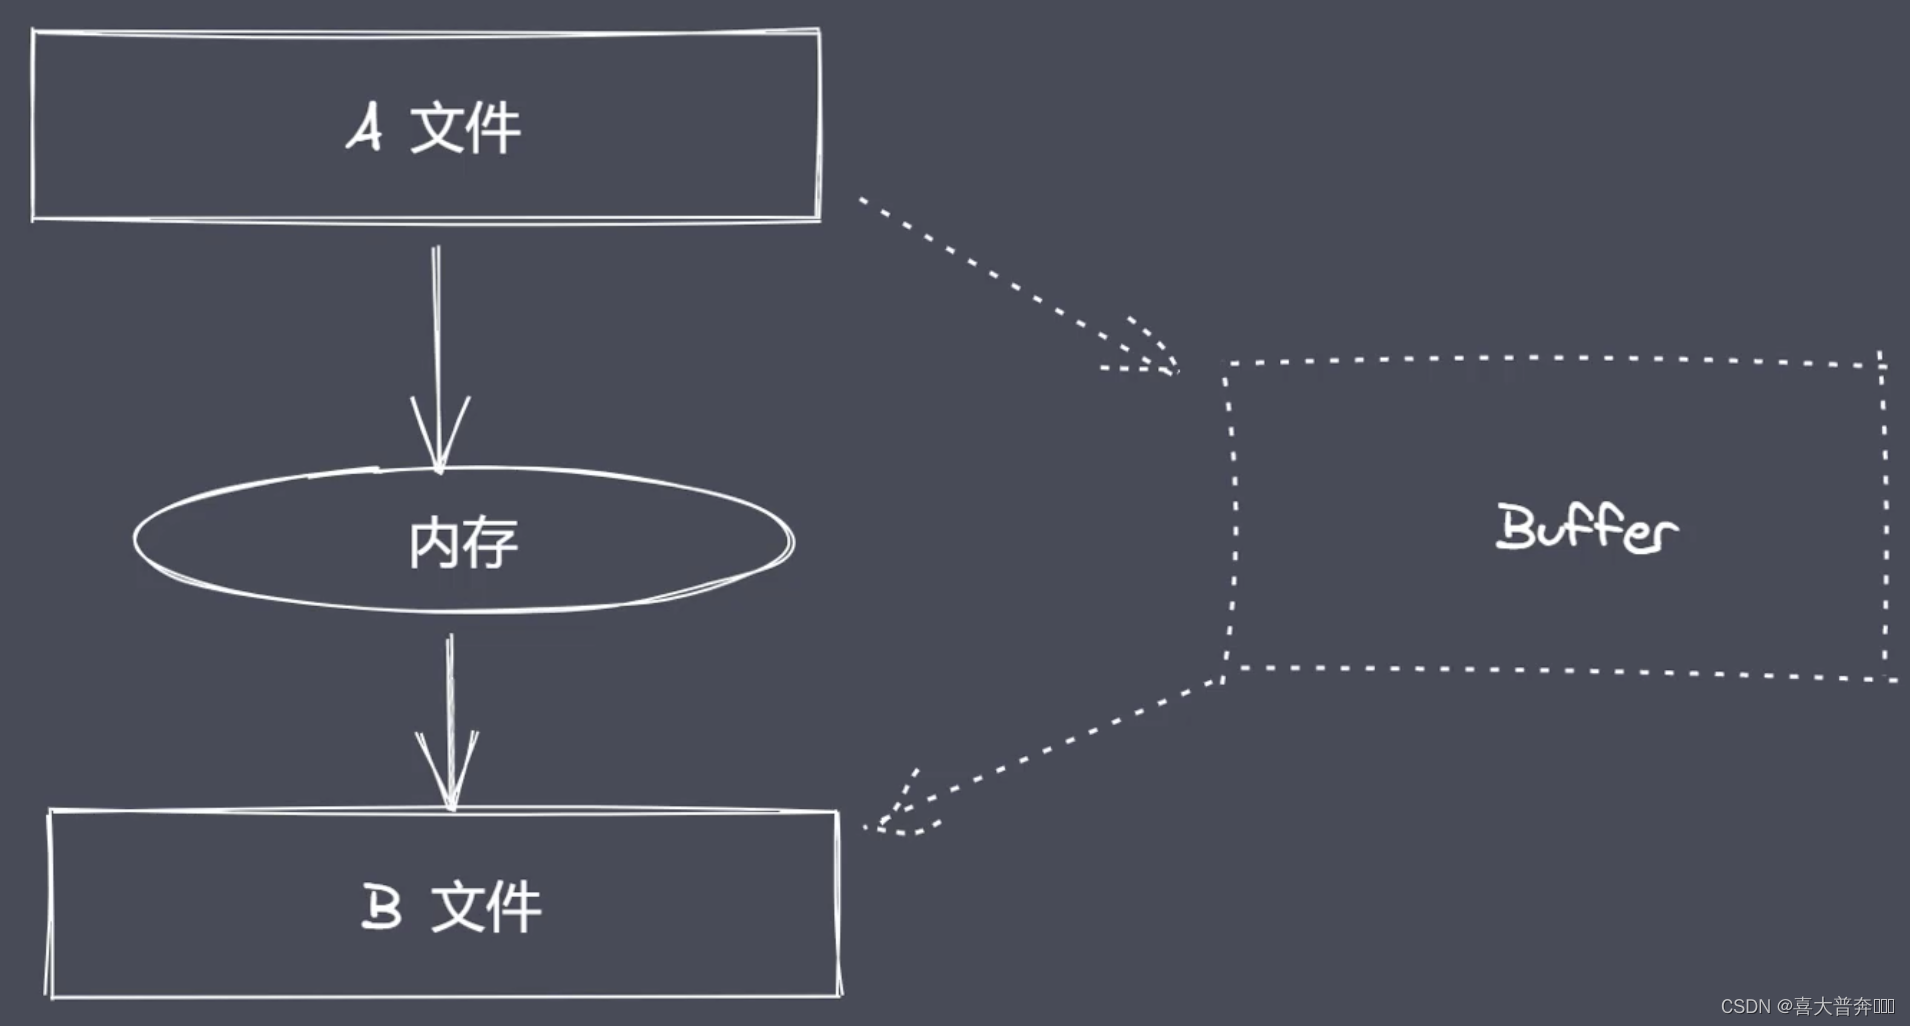
There are producers and consumers in the end-to-end transmission of data. There is often a waiting process in the process of production and consumption. Where is the data stored when waiting? ! ~Buffer buffer
Buffer in Nodejs is a piece of memory space, which belongs to V8 and does not occupy the size of V8 heap memory. The space application of Buffer is not completed by Node, but in use, its space allocation is controlled by the JS code written by us. Therefore, when the space is reclaimed, it is still managed and reclaimed by V8's GC, and we cannot participate in the work.
- Global variables without require
- Realize binary data operation under Nodejs platform
- Does not occupy the memory space of V8 heap memory size
- The use of memory is controlled by Node and reclaimed by V8's GC
- Generally used in conjunction with the Stream stream, acting as a data buffer
Create buffers
- alloc: Create a buffer of the specified byte size
- allocUnsafe: Create a buffer of the specified size (unsafe)
- from: receive data, create buffer
Before the nodejs v6 version, the instance object was created with the new keyword, but the permissions given are too large, so it has been processed in a higher version, so it is not recommended to create a buffer instance object with the new keyword.
const b1 = Buffer.alloc(10)
const b2 = Buffer.allocUnsafe(10)
console.log(b1)
console.log(b2)

// from
const b1 = Buffer.from('中')
console.log(b1)

const b1 = Buffer.from([0xe4, 0xb8, 0xad])
// const b1 = Buffer.from([0x60, 0b1001, 12])
console.log(b1)
console.log(b1.toString())
/* const b1 = Buffer.from('中')
console.log(b1)
console.log(b1.toString()) */

const b1 = Buffer.alloc(3)
const b2 = Buffer.from(b1) // 并不是共享空间,而是拷贝

console.log(b1)
console.log(b2)

b1[0] = 1
console.log(b1)
console.log(b2)
Buffer instance methods
- fill: Use data to fill buffer: fill all the given data into the buffer, if it is not filled, it will be filled from the beginning repeatedly, if it is filled and exceeds, it will be filled at most, and the excess will be discarded
- write: Write data to the buffer: write as many as you want, will not repeat/cycle write, include header and tail, if the buffer length is insufficient, an error will be reported
- toString: extract data from buffer
- slice: intercept buffer: (deprecated, use subarray instead of slice)
- indexOf: Find data in buffer
- copy: copy the data in the buffer
let buf = Buffer.alloc(6)

// fill
buf.fill('1234')
console.log(buf)
console.log(buf.toString())

buf.fill('1234', 1) // 从位置 1 开始
console.log(buf)
console.log(buf.toString())

buf.fill('1234', 1, 3) // 从位置 1 开始,3 结束,含头不含尾
console.log(buf)
console.log(buf.toString())

buf.fill(123)
console.log(buf)
console.log(buf.toString())
/*
<Buffer 7b 7b 7b 7b 7b 7b>  16进制 7b 是 123,7b utf8编码转实体就是 {,因此是 6个 {
{

    {

    {

    {

    {

    {
*/

// write
buf.write('123', 1, 4)
console.log(buf)
console.log(buf.toString())

// toString
buf = Buffer.from('测试数据')
console.log(buf)
console.log(buf.toString('utf-8'))
console.log(buf.toString('utf-8', 3))
console.log(buf.toString('utf-8', 3, 9))

// slice/subarray
buf = Buffer.from('测试数据')
let b1 = buf.subarray()
let b2 = buf.subarray(3)
let b3 = buf.subarray(3,9)
let b4 = buf.subarray(-3)
console.log(b1)
console.log(b1.toString())
console.log(b2)
console.log(b2.toString())
console.log(b3)
console.log(b3.toString())
console.log(b4)
console.log(b4.toString())

// indexOf
buf = Buffer.from('zgp你好啊你好啊你好啊哈哈哈测试数据')
console.log(buf)
console.log(buf.indexOf('你', 1)) // 3
console.log(buf.indexOf('好', 1)) // 6
console.log(buf.indexOf('好', 14)) // 15  第二个参数是偏移量,一个汉字是三个字节,找不到值为 -1

b2.copy(b1)
b2.copy(b3, 3)
b2.copy(b6, 3)
b2.copy(b4, 3, 3)
b2.copy(b5, 0, 3, 9)
// b2-数据源,参数1-目标,参数2-目标写入起始位置,参数3-数据源读取起始位置,参数4-数据源读取结束位置(含头不含尾)
console.log(b1.toString()) // 测试
console.log(b2.toString()) // 测试数据
console.log(b3.toString()) // 测
console.log(b4.toString()) // 试
console.log(b5.toString()) // 试数
console.log(b6.toString())
Buffer static methods
- concat: Concatenate multiple buffers into a new buffer by means of an array
- isBuffer: Determine whether the current data is a buffer
let b1 = Buffer.from('测试')
let b2 = Buffer.from('数据')

let a = Buffer.concat([b1, b2])
let b = Buffer.concat([b1, b2], 9)

console.log(a) // <Buffer e6 b5 8b e8 af 95 e6 95 b0 e6 8d ae>
console.log(a.toString()) // 测试数据
console.log(b) // <Buffer e6 b5 8b e8 af 95 e6 95 b0>
console.log(b.toString()) // 测试数
// isBuffer
let b1 = '123'
console.log(Buffer.isBuffer(b1)) // false
let b2 = Buffer.from('124')
console.log(Buffer.isBuffer(b2)) // true
Buffer-split implementation
- Custom Buffer split
ArrayBuffer.prototype.split = function(separator){


  let len = Buffer.from(separator).length
  let results = []
  let start = 0
  let offset = 0
  while(offset = this.indexOf(separator, start) !== -1){


    results.push(this.slice(start, offset))
    start = offset+len
  }
  results.push(this.slice(start))
  return results
}

let a = '逛吃逛吃逛吃,哈哈哈,逛吃逛吃逛吃'
let arr = a.split('吃')
console.log(arr) // [ '逛', '逛', '逛', ',哈哈哈,逛', '逛', '逛', '' ]
FS module of the core module
Two important concepts in Nodejs: Buffer and Stream, buffer and data flow, what is the relationship with FS?
FS is a built-in core module that provides an API for file system operations.
If we want to operate the binary data in the file system, we need to use the API provided by FS. In this process, Buffer and Stream are inseparable. These will be specifically perceived during subsequent API usage.
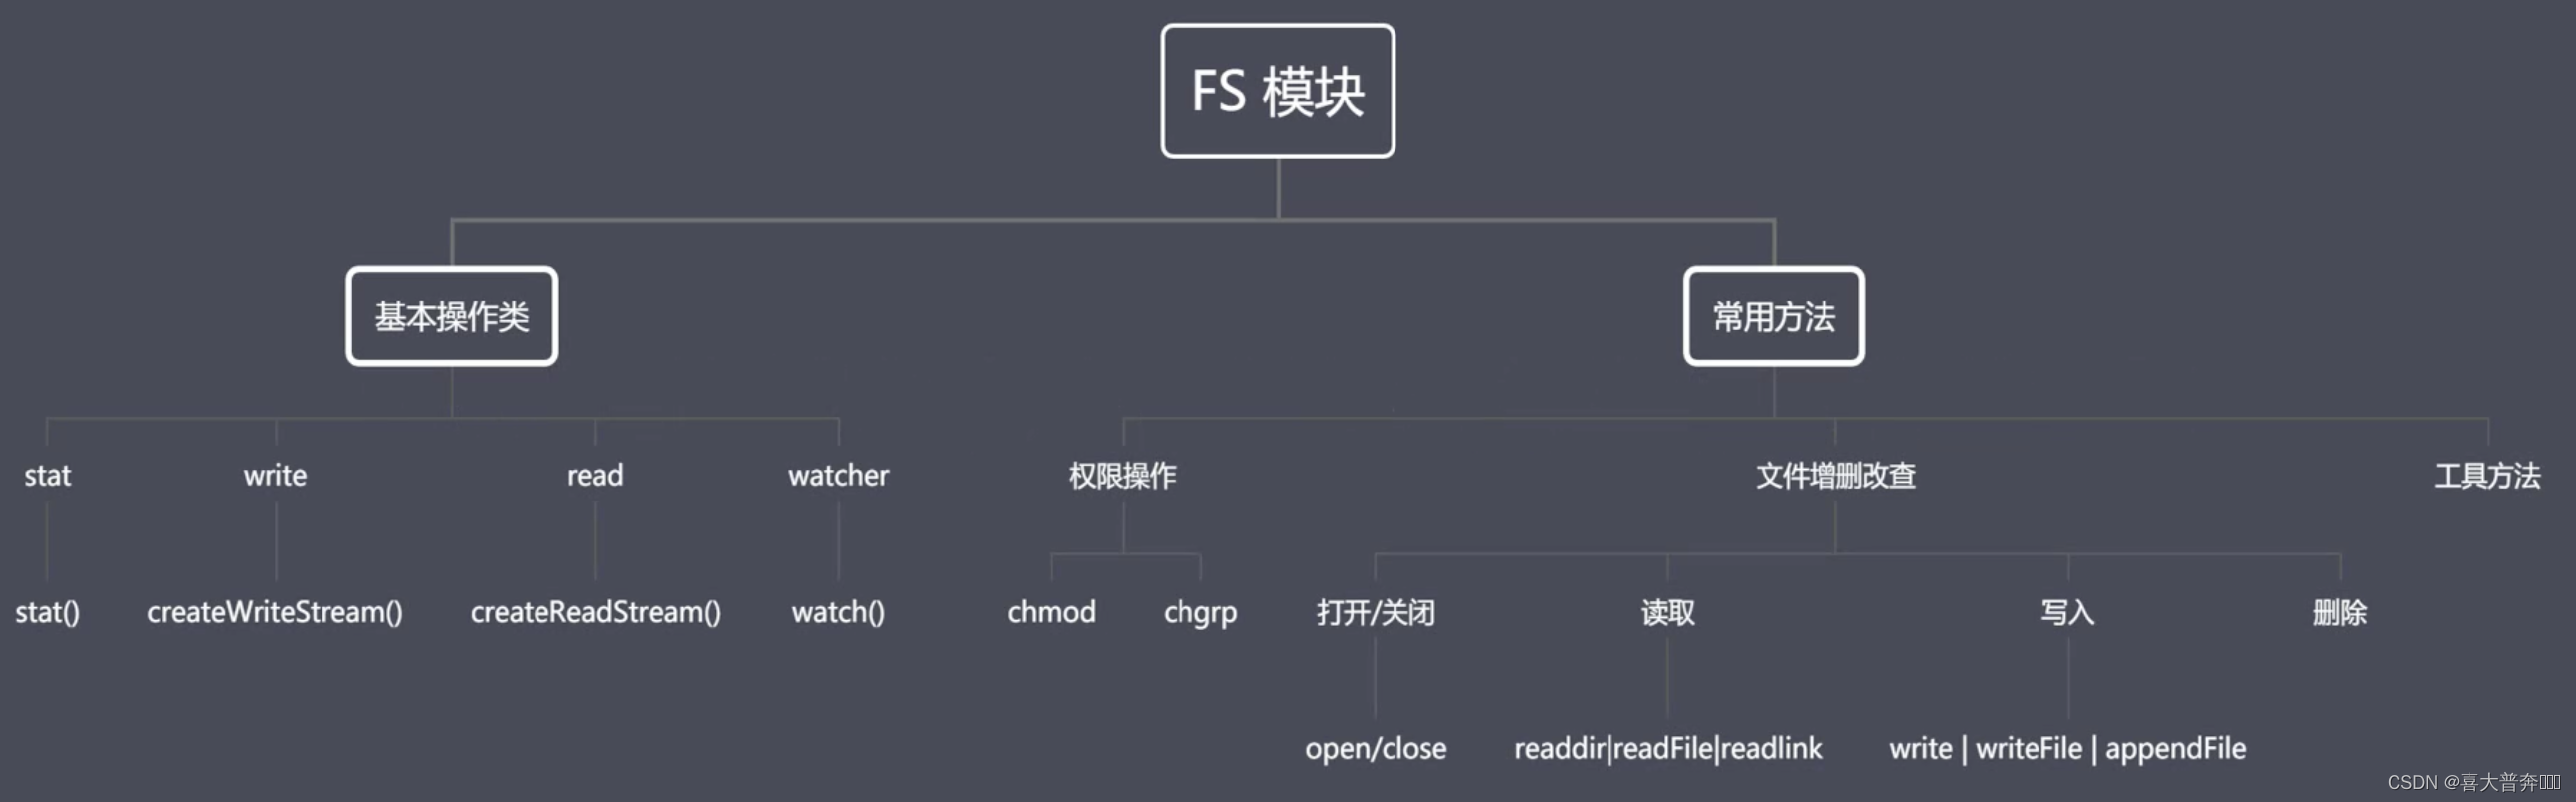
FS module structure
- FS basic operation class
- FS Common APIs
File-related:
permission bit: user’s operation permission on the file (rwx: read, write, execute, octal representation: 4, 2, 1)

identifier: flag in Nodejs indicates the operation mode of the file
- r: means readable
- w: means writable
- s: means synchronous
- +: means to perform the opposite operation
- x: Indicates exclusive operation
- a: indicates an append operation
For example: when it comes to
the target file , if the current behavior is , the file will not be created, and an exception will be thrown directly, but if it is , it will create the file first. If the target file , we will use it again , it will not Clear the current file, but if the operation is adopted, it will automatically clear the existing content in the file, and then perform the write operation. Follow-up application can be checked again不存在r+w+已经存在r+w+
File descriptor/operator: fd is the identifier assigned to the opened file by the operating system, starting from 3
File Operation API
File reading and writing and copy monitoring
Here we only look at asynchronous operations, and check the documents synchronously
- readFile: read data from the specified file
- writeFile: write data to the specified file
- appendFile: append to write data to the specified file
- copyFile: Copy data from one file to another
- watchFile: monitor the specified file
const fs = require('fs')
const path = require('path')

// readFile
fs.readFile(path.resolve('data.txt'), 'utf-8', (err, data) => {


  console.log(err)
  if (!null) {


    console.log(data)
  }
})

// writeFile
// 默认,清空并直接写入覆盖原数据
// fs.writeFile('data.txt', '测试写入数据', (err)=>{


//   if(!err){


//     fs.readFile('data.txt', 'utf-8', (err, data)=>{


//       console.log(data)
//     })
//   }
// })
// 路径不存在则直接创建
// fs.writeFile('data1.txt', '测试写入数据', (err)=>{


//   if(!err){


//     fs.readFile('data.txt', 'utf-8', (err, data)=>{


//       console.log(data)
//     })
//   }
// })
// 传递参数
fs.writeFile('data.txt', '123456', {


  mode: 438,
  // flag: 'r+', // 不做清空操作,做写入操作,从头开始覆盖,
  flag: 'w+', // 做清空操作,然后做写入操作
  encoding: 'utf-8'
}, (err) => {


  if (!err) {


    fs.readFile('data.txt', 'utf-8', (err, data) => {


      console.log(data)
    })
  }
})

// appendFile
fs.appendFile('data.txt', 'hello node.js',{

    },  (err) => {


  console.log('写入成功')
  fs.readFile('data.txt', 'utf-8', (err, data) => {


    console.log(data)
  })
})
// copyFile
fs.copyFile('data.txt', 'test.txt', (err) => {


  console.log('拷贝成功')
  fs.readFile('test.txt', 'utf-8', (err, data) => {


    console.log(data)
  })
})
// watchFile
fs.watchFile('data.txt', {

    interval: 20}, (curr, prev) => {


  console.log(prev, curr)
  if (curr.mtime !== prev.mtime) {


    console.log('文件被修改了')
    fs.unwatchFile('data.txt') // 销毁监听
  }
})
md to html
Use third-party dependencies:
- marked: Convert md format content to html format
- browser-sync: Start browser browsing service
// md2html.js
const fs = require('fs')
const path = require('path')
const marked = require('marked')
const browserSync = require('browser-sync')

/**
 * 1、读取 md 和 css 内容
 * 2、将上述读取出来的内容替换占位符,生成一个最终需要展示的 html 字符串
 * 3、将 html 字符串写入到指定的 html 文件
 * 4、监听 md 文档内容的变化,更新 html 内容
 * 5、使用 browser-sync 实时显示 html 内容
 */

let mdPath = path.join(__dirname, process.argv[2])
let cssPath = path.resolve('github.css')
let htmlPath = mdPath.replace(path.extname(mdPath), '.html')

console.log(mdPath)
console.log(cssPath)
console.log(htmlPath)

// 1、读取 md 和 css 内容
fs.readFile(mdPath, 'utf-8', (err, data)=>{


    // 2、将上述读取出来的内容替换占位符,生成一个最终需要展示的 html 字符串
    let htmlStr = marked(data)
    // 3、读取 css 内容
    fs.readFile(cssPath, 'utf-8', (err, data)=>{


        let retHtml = temp.replace('{

    {content}}', htmlStr).replace('{

    {style}}', data)
        // 3、将 html 字符串写入到指定的 html 文件
        fs.writeFile(htmlPath, retHtml, (err)=>{


            console.log('html 写入成功')
        })
    })
})

fs.watchFile(mdPath, (curr, prev)=>{


    if(curr.mtime !== prev.mtime){


        console.log('文件修改了')
        // 1、读取 md 和 css 内容
        fs.readFile(mdPath, 'utf-8', (err, data)=>{


            // 2、将上述读取出来的内容替换占位符,生成一个最终需要展示的 html 字符串
            let htmlStr = marked(data)
            // 3、读取 css 内容
            fs.readFile(cssPath, 'utf-8', (err, data)=>{


                let retHtml = temp.replace('{

    {content}}', htmlStr).replace('{

    {style}}', data)
                // 3、将 html 字符串写入到指定的 html 文件
                fs.writeFile(htmlPath, retHtml, (err)=>{


                    console.log('html 写入成功')
                })
            })
        })
    }
})

browserSync.init({


    browser: '',
    server: __dirname,
    watch: true,
    index: path.basename(htmlPath)
})

const temp = `
    <!DOCTYPE html>
    <html lang="en">
    <head>
        <meta charset="UTF-8">
        <title></title>
        <style>
            .markdown-body {
                box-sizing: border-box;
                min-width: 200px;
                max-width: 1000px;
                margin: 0 auto;
                padding: 45px;
            }
            @media (max-width: 750px) {
                .markdown-body {
                    padding: 15px;
                }
            }
            {

     {style}}
        </style>
    </head>
    <body>
        <div class="markdown-body">
            {

     {content}}
        </div>
    </body>
    </html>
`
/* github.css 文件内容 */
:root {


  --side-bar-bg-color: #fafafa;
  --control-text-color: #777;
}

@include-when-export url(https://fonts.loli.net/css?family=Open+Sans:400italic,700italic,700,400&subset=latin,latin-ext);

@font-face {


  font-family: 'Open Sans';
  font-style: normal;
  font-weight: normal;
  src: local('Open Sans Regular'),url('./github/400.woff') format('woff');
}

@font-face {


  font-family: 'Open Sans';
  font-style: italic;
  font-weight: normal;
  src: local('Open Sans Italic'),url('./github/400i.woff') format('woff');
}

@font-face {


  font-family: 'Open Sans';
  font-style: normal;
  font-weight: bold;
  src: local('Open Sans Bold'),url('./github/700.woff') format('woff');
}

@font-face {


  font-family: 'Open Sans';
  font-style: italic;
  font-weight: bold;
  src: local('Open Sans Bold Italic'),url('./github/700i.woff') format('woff');
}

html {


  font-size: 16px;
}

body {


  font-family: "Open Sans","Clear Sans","Helvetica Neue",Helvetica,Arial,sans-serif;
  color: rgb(51, 51, 51);
  line-height: 1.6;
}

#write {


  max-width: 860px;
  margin: 0 auto;
  padding: 30px;
  padding-bottom: 100px;
}
#write > ul:first-child,
#write > ol:first-child{


  margin-top: 30px;
}

a {


  color: #4183C4;
}
h1,
h2,
h3,
h4,
h5,
h6 {


  position: relative;
  margin-top: 1rem;
  margin-bottom: 1rem;
  font-weight: bold;
  line-height: 1.4;
  cursor: text;
}
h1:hover a.anchor,
h2:hover a.anchor,
h3:hover a.anchor,
h4:hover a.anchor,
h5:hover a.anchor,
h6:hover a.anchor {


  text-decoration: none;
}
h1 tt,
h1 code {


  font-size: inherit;
}
h2 tt,
h2 code {


  font-size: inherit;
}
h3 tt,
h3 code {


  font-size: inherit;
}
h4 tt,
h4 code {


  font-size: inherit;
}
h5 tt,
h5 code {


  font-size: inherit;
}
h6 tt,
h6 code {


  font-size: inherit;
}
h1 {


  padding-bottom: .3em;
  font-size: 2.25em;
  line-height: 1.2;
  border-bottom: 1px solid #eee;
}
h2 {


 padding-bottom: .3em;
  font-size: 1.75em;
  line-height: 1.225;
  border-bottom: 1px solid #eee;
}
h3 {


  font-size: 1.5em;
  line-height: 1.43;
}
h4 {


  font-size: 1.25em;
}
h5 {


  font-size: 1em;
}
h6 {


 font-size: 1em;
  color: #777;
}
p,
blockquote,
ul,
ol,
dl,
table{


  margin: 0.8em 0;
}
li>ol,
li>ul {


  margin: 0 0;
}
hr {


  height: 2px;
  padding: 0;
  margin: 16px 0;
  background-color: #e7e7e7;
  border: 0 none;
  overflow: hidden;
  box-sizing: content-box;
}

li p.first {


  display: inline-block;
}
ul,
ol {


  padding-left: 30px;
}
ul:first-child,
ol:first-child {


  margin-top: 0;
}
ul:last-child,
ol:last-child {


  margin-bottom: 0;
}
blockquote {


  border-left: 4px solid #dfe2e5;
  padding: 0 15px;
  color: #777777;
}
blockquote blockquote {


  padding-right: 0;
}
table {


  padding: 0;
  word-break: initial;
}
table tr {


  border-top: 1px solid #dfe2e5;
  margin: 0;
  padding: 0;
}
table tr:nth-child(2n),
thead {


  background-color: #f8f8f8;
}
table tr th {


  font-weight: bold;
  border: 1px solid #dfe2e5;
  border-bottom: 0;
  margin: 0;
  padding: 6px 13px;
}
table tr td {


  border: 1px solid #dfe2e5;
  margin: 0;
  padding: 6px 13px;
}
table tr th:first-child,
table tr td:first-child {


  margin-top: 0;
}
table tr th:last-child,
table tr td:last-child {


  margin-bottom: 0;
}

.CodeMirror-lines {


  padding-left: 4px;
}

.code-tooltip {


  box-shadow: 0 1px 1px 0 rgba(0,28,36,.3);
  border-top: 1px solid #eef2f2;
}

.md-fences,
code,
tt {


  border: 1px solid #e7eaed;
  background-color: #f8f8f8;
  border-radius: 3px;
  padding: 0;
  padding: 2px 4px 0px 4px;
  font-size: 0.9em;
}

code {


  background-color: #f3f4f4;
  padding: 0 2px 0 2px;
}

.md-fences {


  margin-bottom: 15px;
  margin-top: 15px;
  padding-top: 8px;
  padding-bottom: 6px;
}


.md-task-list-item > input {


margin-left: -1.3em;
}

@media print {


  html {


      font-size: 13px;
  }
  table,
  pre {


      page-break-inside: avoid;
  }
  pre {


      word-wrap: break-word;
  }
}

.md-fences {


background-color: #f8f8f8;
}
#write pre.md-meta-block {


padding: 1rem;
  font-size: 85%;
  line-height: 1.45;
  background-color: #f7f7f7;
  border: 0;
  border-radius: 3px;
  color: #777777;
  margin-top: 0 !important;
}

.mathjax-block>.code-tooltip {


bottom: .375rem;
}

.md-mathjax-midline {


  background: #fafafa;
}

#write>h3.md-focus:before{


left: -1.5625rem;
top: .375rem;
}
#write>h4.md-focus:before{


left: -1.5625rem;
top: .285714286rem;
}
#write>h5.md-focus:before{


left: -1.5625rem;
top: .285714286rem;
}
#write>h6.md-focus:before{


left: -1.5625rem;
top: .285714286rem;
}
.md-image>.md-meta {


  /*border: 1px solid #ddd;*/
  border-radius: 3px;
  padding: 2px 0px 0px 4px;
  font-size: 0.9em;
  color: inherit;
}

.md-tag {


  color: #a7a7a7;
  opacity: 1;
}

.md-toc {


  margin-top:20px;
  padding-bottom:20px;
}

.sidebar-tabs {


  border-bottom: none;
}

#typora-quick-open {


  border: 1px solid #ddd;
  background-color: #f8f8f8;
}

#typora-quick-open-item {


  background-color: #FAFAFA;
  border-color: #FEFEFE #e5e5e5 #e5e5e5 #eee;
  border-style: solid;
  border-width: 1px;
}

/** focus mode */
.on-focus-mode blockquote {


  border-left-color: rgba(85, 85, 85, 0.12);
}

header, .context-menu, .megamenu-content, footer{


  font-family: "Segoe UI", "Arial", sans-serif;
}

.file-node-content:hover .file-node-icon,
.file-node-content:hover .file-node-open-state{


  visibility: visible;
}

.mac-seamless-mode #typora-sidebar {


  background-color: #fafafa;
  background-color: var(--side-bar-bg-color);
}

.md-lang {


  color: #b4654d;
}

.html-for-mac .context-menu {


  --item-hover-bg-color: #E6F0FE;
}

#md-notification .btn {


  border: 0;
}

.dropdown-menu .divider {


  border-color: #e5e5e5;
}

.ty-preferences .window-content {


  background-color: #fafafa;
}

.ty-preferences .nav-group-item.active {


  color: white;
  background: #999;
}
# 运行指令
node md2html.js index.md
file opening and closing
Why provide open and close operations?
Because read or write reads and writes the content into the memory at one time, it is obviously unreasonable for large files, so a read-while-write or write-while-read operation is required later.
At this time, the opening, reading, writing, and closing of files should be regarded as independent links; so there is open | close
const fs = require('fs')
const path = require('path')

// open
/* fs.open(path.resolve('data.txt'), 'r', (err, fd) => {
  console.log(fd)
}) */

// close
fs.open('data.txt', 'r', (err, fd) => {


  console.log(fd)
  fs.close(fd, err => {


    console.log('关闭成功')
  })
})
Large file read and write operations
readFile and writeFile are suitable for small-volume file operations, and for large-volume files, they are suitable for reading and saving, so there are open, read, write, and close in nodejs.
const fs = require('fs')

// read : 所谓的读操作就是将数据从磁盘文件中写入到 buffer 中
let buf = Buffer.alloc(10)

/**
 * read 参数:
 * fd 定位当前被打开的文件
 * buf 用于表示当前缓冲区
 * offset 表示当前从 buf 的哪个位置开始执行写入
 * length 表示当前次写入的长度
 * position 表示当前从文件的哪个位置开始读取
 */
// fs.open('data.txt', 'r', (err, rfd) => {


//   console.log(rfd)
//   fs.read(rfd, buf, 1, 4, 3, (err, readBytes, data) => {


//     console.log(readBytes)
//     console.log(data)
//     console.log(data.toString())
//   })
// })

/**
 * read 参数:
 * fd 定位当前被打开的文件
 * buf 用于表示当前缓冲区
 * offset 表示当前从 buf 的哪个位置开始执行
 * length 表示当前次写入的长度
 * position 表示当前从文件的哪个位置开始写入,一般不动,都是顶格写
 */
// write 将缓冲区里的内容写入到磁盘文件中
buf = Buffer.from('1234567890')
fs.open('b.txt', 'w', (err, wfd) => {


  fs.write(wfd, buf, 2, 4, 0, (err, written, buffer) => {


    console.log(written)
    // fs.close(wfd)
  })
})
File copy custom implementation
By default, Nodejs itself provides an API such as copyFile, but this is not suitable for large files, so here we use several APIs for reading and writing files provided by node to complete the copying behavior.
const fs = require('fs')

/**
 * 01 打开 a 文件,利用 read 将数据保存到 buffer 暂存起来
 * 02 打开 b 文件,利用 write 将 buffer 中数据写入到 b 文件中
 */
let buf = Buffer.alloc(10)

// 01 打开指定的文件
/* fs.open('a.txt', 'r', (err, rfd) => {
  // 03 打开 b 文件,用于执行数据写入操作
  fs.open('b.txt', 'w', (err, wfd) => {
    // 02 从打开的文件中读取数据
    fs.read(rfd, buf, 0, 10, 0, (err, readBytes) => {
      // 04 将 buffer 中的数据写入到 b.txt 当中
      fs.write(wfd, buf, 0, 10, 0, (err, written) => {
        console.log('写入成功')
      })
    })
  })
}) */

// 02 数据的完全拷贝
/* fs.open('a.txt', 'r', (err, rfd) => {
  fs.open('b.txt', 'a+', (err, wfd) => {
    fs.read(rfd, buf, 0, 10, 0, (err, readBytes) => {
      fs.write(wfd, buf, 0, 10, 0, (err, written) => {
        fs.read(rfd, buf, 0, 5, 10, (err, readBytes) => {
          fs.write(wfd, buf, 0, 5, 10, (err, written) => {
            console.log('写入成功')
          })
        })
      })
    })
  })
}) */

const BUFFER_SIZE = buf.length
let readOffset = 0

fs.open('a.txt', 'r', (err, rfd) => {


  fs.open('b.txt', 'w', (err, wfd) => {


    function next () {


      fs.read(rfd, buf, 0, BUFFER_SIZE, readOffset, (err, readBytes) => {


        if (!readBytes) {


          // 如果条件成立,说明内容已经读取完毕
          fs.close(rfd, ()=> {

    })
          fs.close(wfd, ()=> {

    })
          console.log('拷贝完成')
          return
        }
        readOffset += readBytes
        fs.write(wfd, buf, 0, readBytes, (err, written) => {


          next()
        })
      })
    }
    next()
  })
})
There will be a better way of operation later: stream operation
Directory Operations API
- access: Determine whether a file or directory has operation permissions
- stat: Get directory and file information
- mkdir: create a directory
- rmdir: delete directory
- readdir: read the contents of the directory
- unlink: delete the specified file
const fs = require('fs')

// 一、access
// fs.access('a.txt', (err) => {


//   if (err) {


//     console.log(err)
//   } else {


//     console.log('有操作权限')
//   }
// })

// 二、stat
/* fs.stat('a.txt', (err, statObj) => {
  console.log(statObj.size)
  console.log(statObj.isFile())
  console.log(statObj.isDirectory())
}) */

// 三、mkdir
// fs.mkdir('a/b/c', {recursive: true}, (err) => {


//   if (!err) {


//     fs.closeSync(fs.openSync('a/b/c/a.txt','w'))
//     fs.closeSync(fs.openSync('a/b/c/b.txt','w'))
//     console.log('创建成功')
//   }else{


//     console.log(err)
//   }
// })

// 四、rmdir
fs.rm('a', {

    recursive: true}, (err) => {


  if (!err) {


    console.log('删除成功')
  } else {


    console.log(err)
  }
})

// 五、readdir
// fs.readdir('a/b/c', (err, files) => {


//   console.log(files)
// })

// 六、unlink
// fs.unlink('a/b/c/a.txt', (err) => {


//   if (!err) {


//     console.log('删除成功')
//   } else {


//     console.log(err)
//   }
// })
Synchronous implementation of directory creation
const fs = require('fs')
const path = require('path')

/**
 * 01 将来调用时需要接收类似于 a/b/c ,这样的路径,它们之间是采用 / 去行连接
 * 02 利用 / 分割符将路径进行拆分,将每一项放入一个数组中进行管理  ['a', 'b', 'c']
 * 03 对上述的数组进行遍历,我们需要拿到每一项,然后与前一项进行拼接 /
 * 04 判断一个当前对拼接之后的路径是否具有可操作的权限,如果有则证明存在,否则的话就需要执行创建
 */

function makeDirSync (dirPath) {


  let items = dirPath.split(path.sep)
  for(let i = 1; i <= items.length; i++) {


    let dir = items.slice(0, i).join(path.sep)
    try {


      fs.accessSync(dir)
    } catch (err) {


      fs.mkdirSync(dir)
    }
  }
}

makeDirSync('a\\b\\c')
Asynchronous implementation of directory creation
const fs = require('fs')
const path = require('path')
const {

    promisify} = require('util')

/* function mkDir (dirPath, cb) {
  let parts = dirPath.split('/')
  let index = 1

  function next () {
    if (index > parts.length) return cb && cb()

    let current = parts.slice(0, index++).join('/')

    fs.access(current, (err) => {
      if (err) {
        fs.mkdir(current, next)
      }else{
        next()
      }
    })
  }
  next()
}

mkDir('a/b/c', () => {
  console.log('创建成功')
}) */


// 将 access 与 mkdir 处理成 async... 风格

const access = promisify(fs.access)
const mkdir = promisify(fs.mkdir)

async function myMkdir (dirPath, cb) {


  let parts = dirPath.split('/')
  for(let index = 1; index <= parts.length; index++) {


    let current = parts.slice(0, index).join('/')
    try {


      await access(current)
    } catch (err) {


      await mkdir(current)
    }
  }
  cb && cb()
}

myMkdir('a/b/c', () => {


  console.log('创建成功')
})
Asynchronous implementation of directory deletion
const {

     dir } = require('console')
const fs = require('fs')
const path = require('path')


/**
 * 自定义函数,接收路径,执行删除
 * 1、判断接收路径是否是一个文件,文件直接删除即可
 * 2、如果是一个目录,需要读取目录中的内容,然后再执行删除
 * 3、将删除函数定义成一个函数,通过递归的方式进行复用
 * 4、将当前名称拼接成在删除时可用路径
 */

function myRmDir (dirPath, cb) {


  console.log('当前路径:', dirPath);
  // 判断当前 dirPath 类型
  fs.stat(dirPath, (err, statObj)=>{


    if(err){


      cb('路径不存在')
      return
    }
    if(statObj.isDirectory()){


      // 判断,如果是一个目录
      fs.readdir(dirPath, (err, files)=>{


        console.log('读取出来的 files: ',files)
        let dirs = files.map((item)=>{


          return path.join(dirPath, item)
        })
        console.log('转换之后的 dirs: ',dirs)
        let index = 0
        function next () {


          console.log('下标:index -- dirs.length',index, ' -- ', dirs.length)
          if(index == dirs.length){


            console.log('删除目录:', dirPath)
            return fs.rmdir(dirPath, cb)
          }
          let current = dirs[index ++]
          myRmDir(current, next)
        }
        next()
      })
    } else {


      // 是一个文件,直接删除即可
      console.log('删除文件:', dirPath)
      fs.unlink(dirPath, cb)
    }
  })
}

myRmDir('tmp', (err)=>{


  console.log(err, '删除成功了');
})
Modular History
Why do you need modularity?
Frequently asked questions about traditional development:
- Naming conflicts and pollution
- Redundant code, many invalid requests
- Complicated dependencies between files
Difficult to maintain and inconvenient to reuse
Modules are small, refined and maintainable pieces of code
Using functions, objects, and self-executing functions to implement chunking
Common Modular Specifications
-
Commonjs specification
-
AMD specification
-
CMD specification
-
The ES modules specification
Nodejs uses the Commonjs specification; the module loading in the Commonjs specification is done synchronously, so it is not very suitable for use in browsers. -
Modularity is an important part of front-end engineering
-
There was no modular specification at the early JavaScript language level
-
Commonjs, AMD, CMD, are all modular specifications
-
Incorporating modularity into the standard specification in ES6
-
The current commonly used specifications are Commonjs and ESM
Commonjs specification
Mainly used in Nodejs, it is a specification at the language level;
- module reference require
- Module definition exports
- Specific parameters of module identification require
Nodejs and CommonJS
- Any file is a module with independent scope
- Import other modules using require
- Pass the module ID to require to locate the target module
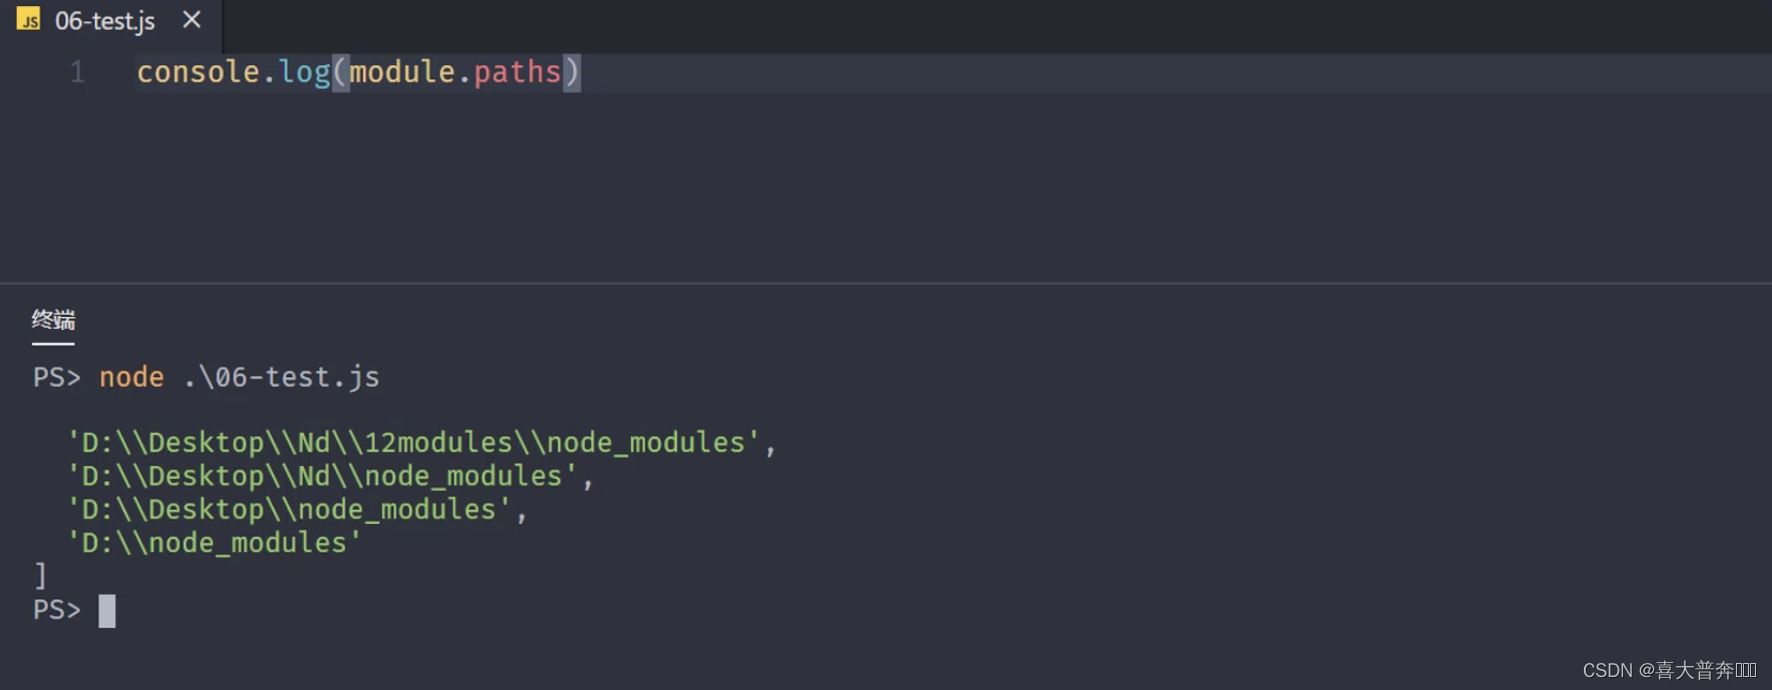
module attribute
- Any js file is a module, you can use the module attribute directly
- id: Returns the module identifier, usually an absolute path
- filename: returns the absolute path of the file module
- loaded: returns a boolean value, indicating whether the module has been loaded
- parent: the returned object stores the module calling the current module
- children: returns an array, storing other modules called by the current module
- exports: returns the content that the current module needs to expose
- paths: returns an array, storing the location of node_modules in different directories
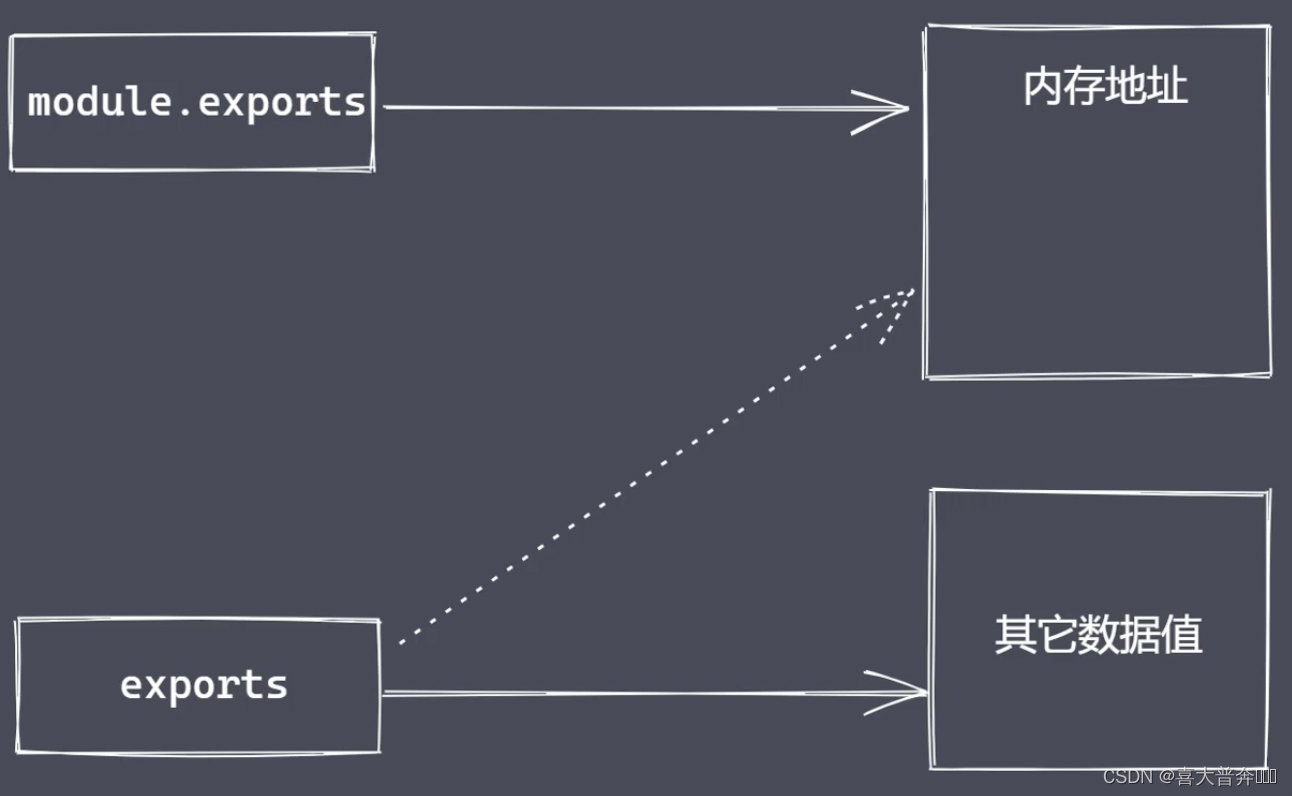
What is the difference between module.exports and exports?
exports is a variable provided by nodejs, which directly points to the memory address corresponding to module.exports.

But you can't directly assign values to exports, because this will cut off the connection between exports and module.exports, so that it becomes a local variable, and can no longer provide data to the outside.
require attribute:
- The basic function is to read and execute a module file
- resolve: return the absolute path of the module file
- extensions: A sentence with different suffixes to perform parsing operations
- main: returns the main module object
CommonJS specification:
- The CommonJS specification was originally designed to make up for the modularization defects of the JS language
- CommonJS is a specification at the language level, currently mainly used for Nodejs
- CommonJS stipulates that modularization is divided into three parts: introduction, definition, and identifier
- Module can be directly used in any module to contain module information
- Require receives an identifier and loads the target module
- Both Exports and module.exports can export module data
- The CommonJS specification defines that loading of modules is done synchronously
Node.js and CommonJS
- Use module.exports and require to implement module import and export
- module attribute and its common information acquisition
- exports export data and its difference from module.exports
- Synchronous module loading under the CommonJS specification
// m.js
// 一、模块的导入与导出
/* const age = 18
const addFn = (x, y) => {
  return x + y
}

module.exports = {
  age: age,
  addFn: addFn
} */

// 二、module
/* module.exports = 1111
console.log(module) */

// 三、exports
// exports.name = 'zce'
/* exports = {
  name: 'syy',
  age: 18
} */

// 四、同步加载
/* let name = 'lg'
let iTime = new Date()

while(new Date() -iTime < 4000) {}

module.exports = name
console.log('m.js被加载导入了') */

/* console.log(require.main == module) */

module.exports = 'lg'
// node-common.js
// 一、导入
/* let obj = require('./m')
console.log(obj) */
// 二、module
// let obj = require('./m')
// 三、exports
/* let obj = require('./m')
console.log(obj) */
// 四、同步加载
/* let obj = require('./m')
console.log('01.js代码执行了') */
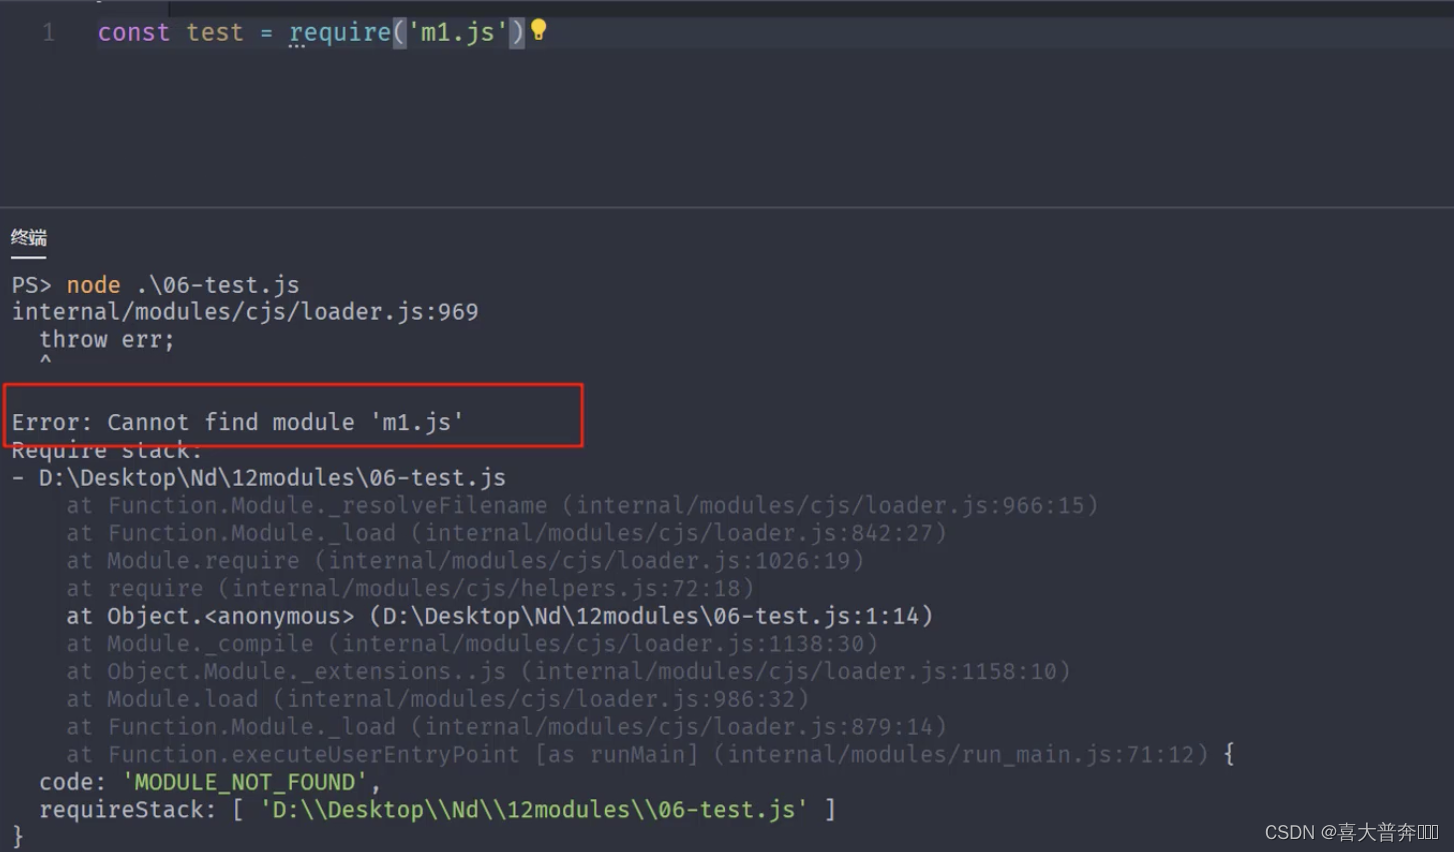
let obj = require('./m')
console.log(require.main == module)
Module classification and loading process
Classification:
- built-in module
- file module
Loading speed:
- Core module: Node is written to the binary file when compiling
- File module: dynamically loaded when the code is running
Loading process:
- Path analysis: a sentence identifier determines the module location
- File location: determine the specific file and file type in the target module
- Compile and execute: use the corresponding method to complete the compile and execute of the file
Path Analysis - Identifier
- path identifier
- Non-path identifiers: common in core modules
Module path
file location:
- m1.js exists under the project, use require('m1') syntax when importing
- m1.js -> m1.json -> m1.node
- Find the package.json file and parse it with JSON.parse()
- main.js -> main.json -> main.node
- Use index as the specific file name in the target module
- In the end, it was still not found, and an exception was thrown
Compile and execute
- Compile and execute a specific type of file in a corresponding way
- Create a new object, load it according to the path, and complete the compilation and execution
Compilation and execution of JS files
- Use the fs module to read the content of the target file synchronously
- Syntactically wrap the content to generate executable JS functions
- Pass in the attribute values of exports, module, and require when calling the function
Compile and execute the JSON file
- Parse the read content through JSON.parse() and return it to the exports object
Cache Priority Principle
- Improve module loading speed
- If the current module does not exist, go through a complete loading process
- After the module is loaded, use the path as the index for caching
Summarize:
- Path analysis: determine the target module location
- File location: determine the specific file in the target module
- Compile and execute: Compile the module content and return the available exports object
Module loading source code analysis
The VM module uses
Role: Create a sandbox environment that runs independently
text.txt file
var age = 18
vm.js file
const fs = require('fs')
const vm = require('vm')

let age = 33
let content = fs.readFileSync('test.txt', 'utf-8')
console.log(content);
// eval
// eval(content)

// new Function
// console.log(age)
// let fn = new Function('age', "return age + 1")
// console.log(fn(age))

// vm.runInThisContext("age += 10")

// console.log(age)
Module loading simulation implementation
Take file module loading as an example
- path analysis
- cache optimization
- file location
- Compile and execute
const exp = require('constants');
const fs = require('fs');
const path = require('path');
const vm = require('vm');

function Module(id){


    this.id = id
    this.exports = {

    }
}

Module._resolveFilename = function(filename){


    // 利用 path 将 filename 转为绝对路径
    let absPath = path.resolve(__dirname, filename)
    console.log(absPath)
    // 判断当前路径对应内容是否存在
    if(fs.existsSync(absPath)){


        return absPath
    } else {


        // 文件定位
        let suffix = Object.keys(Module._extensions)
        for(let i=0; i< suffix.length; i++){


            let newPath = absPath + suffix[i]
            if(fs.existsSync(newPath)){


                return newPath
            }
        }
    }

    throw new Error(`${

      filename} is not exists`)
}

Module._extensions = {


    '.js'(module){


        // 读取
        let content = fs.readFileSync(module.id, 'utf-8')
        // 包装
        content = Module.wrapper[0]+content + Module.wrapper[1]

        // vm
        let compileFn = vm.runInThisContext(content)
        console.log(compileFn)
        // 准备参数的值
        let exports = module.exports
        let dirname = path.dirname(module.id)
        let filename = module.id
        console.log('myRequire',myRequire)
        compileFn.call(exports, exports, myRequire, module, filename, dirname)
    },
    '.json'(module){


        let content = JSON.parse(fs.readFileSync(module.id, 'utf-8'))
        module.exports = content
    }
}

Module.wrapper = [
    "(function (exports, require, module, __filename, __dirname){",
    "})"
]

Module._cache = {

    }

Module.prototype.load = function(){


    let extname = path.extname(this.id)
    Module._extensions[extname](this)
}

function myRequire(filename){


    // 1、绝对路径
    let mPath = Module._resolveFilename(filename)
    // 2、缓存优先
    let cacheModule = Module._cache[mPath]
    if(cacheModule) return cacheModule.exports

    // 3、创建空对象加载目标模块
    let module = new Module(mPath)

    // 4、缓存已加载过的模块
    Module._cache[mPath] = module

    // 5、执行加载/编译执行
    module.load()

    // 6、返回数据
    return module.exports
}


let obj = myRequire('./v')
// 测试缓存优先
let obj2 = myRequire('./v')
console.log(obj);
Event module Events
Unified management of events through the EventEmitter class
events 与 EventEmitter
- node.js is an event-driven asynchronous operation architecture with a built-in events module
- The events module provides the EventEmitter class
- Many built-in core modules in node.js inherit EventEmitter
EventEmitter Common APIs
- on: add a callback function that is called when the event is triggered
- emit: trigger an event, and call each event listener synchronously in the order of registration
- once: add a callback function that is called when the event is fired for the first time after registration
- off: remove specific listener
const EventEmitter = require('events')

const ev = new EventEmitter()

// on
/* ev.on('事件1', () => {
  console.log('事件1执行了---2')
})

ev.on('事件1', () => {
  console.log('事件1执行了')
})

// emit
ev.emit('事件1')
ev.emit('事件1') */

// once
/* ev.once('事件1', () => {
  console.log('事件1执行了')
})
ev.once('事件1', () => {
  console.log('事件1执行了--2')
})

ev.emit('事件1')
ev.emit('事件1') */

// off
/* let cbFn = (...args) => {
  console.log(args)
}
ev.on('事件1', cbFn) */

/* ev.emit('事件1')
ev.off('事件1', cbFn) */
// ev.emit('事件1', 1, 2, 3)

/* ev.on('事件1', function () {
  console.log(this)
})
ev.on('事件1', function () {
  console.log(2222)
})

ev.on('事件2', function () {
  console.log(333)
})

ev.emit('事件1') */

const fs = require('fs')

const crt = fs.createReadStream()
crt.on('data')
publish subscribe
Define one-to-many dependencies between objects, what problem does it solve? Solve the callback problem before there is no promise.

Publish and subscribe elements:
- Cache queue to store subscriber information
- Ability to add and delete subscriptions
- Notify all subscribers to perform monitoring when the state changes
Compared with the observer mode:
1. There is a scheduling center in the publish and subscribe, but there is no observer mode.
2. When the status changes, the publish and subscribe do not need to be actively notified (determined by the dispatch center)
class PubSub{


    constructor(){


        this._events = {

    }
    }

    // 注册
    subscribe(event, callback){


        if (this._events[event]) {


            // 如果当前 event 已存在,只需要往后添加当前次监听操作
            this._events[event].push(callback)
        } else {


            this._events[event] = [callback]
        }
    }

    // 发布
    publish(event, ...args){


        const items = this._events[event]
        if(items && items.length){


            items.forEach(callback => {


                callback.call(this, ...args)
            })
        }
    }
}

let ps = new PubSub()

ps.subscribe('事件1', ()=>{


    console.log('事件1 执行了');
})
ps.subscribe('事件1', ()=>{


    console.log('事件1 执行了 -- 2');
})

ps.publish('事件1')
ps.publish('事件1')
EventEmitter source code debugging analysis
EventEmitter mock
function MyEvent (){


    // 准备一个数据结构缓存订阅者信息
    this._events = Object.create(null)

}

MyEvent.prototype.on = function(type, callback){


    // 判断当前事件是否已经存在,然后再决定如何做缓存
    if(this._events[type]){


        this._events[type].push(callback)
    } else {


        this._events[type] = [callback]
    }
}

MyEvent.prototype.emit = function (type, ...args) {


    // 判断当前值是否存在,如果存在再执行遍历,如果不存在就没必要往下走了
    if(this._events[type] && this._events[type].length){


        this._events[type].forEach(callback => {


            callback.call(this, ...args)
        });
    }
}

MyEvent.prototype.off = function (type, callback) {


    // 判断当前 type 是否存在,如果存在,则取消指定的监听
    if(this._events && this._events[type]){


        this._events[type] = this._events[type].filter(item => {


            return item !== callback && item.link !== callback
        })
    }
}
MyEvent.prototype.once = function (type, callback) {


    let foo = function (...args) {


        callback.call(this, ...args)
        this.off(type, foo)
    }
    foo.link = callback
    // 注册,触发之后能立马注销掉
    this.on(type, foo)
}

let myEv = new MyEvent()

let fn = (...args)=>{


    console.log('事件1触发了', args)
}

// myEv.on('事件1', fn)
// myEv.on('事件1', ()=>{


//     console.log('事件1 触发了 -- 2');
// })
// myEv.emit('事件1', 1,2,3)
// myEv.emit('事件1', 1,2,3)

// myEv.on('事件1', fn)
// myEv.emit('事件1', '前')
// myEv.off('事件1', fn)
// myEv.emit('事件1', '后')

// myEv.once('事件1', fn)

// myEv.emit('事件1',1,2,3)
// myEv.emit('事件1',1,2,3)
// myEv.emit('事件1',1,2,3)
// myEv.once('事件1', fn)

myEv.once('事件1', fn)
myEv.off('事件1', fn)

myEv.emit('事件1',1,2,3)
myEv.emit('事件1',1,2,3)
myEv.emit('事件1',1,2,3)
The event loop in the browser
macro task, micro task
setTimeout(() => {


  console.log('s1')
  Promise.resolve().then(() => {


    console.log('p1')
  })
  Promise.resolve().then(() => {


    console.log('p2')
  })
})

setTimeout(() => {


  console.log('s2')
  Promise.resolve().then(() => {


    console.log('p3')
  })
  Promise.resolve().then(() => {


    console.log('p4')
  })
})
Whenever any macro task in the macro task list is executed, the micro task will be cleared once, and it will switch to the micro task list to see if there are any micro tasks that need to be executed. If there are any, execute the micro task first. The things used here
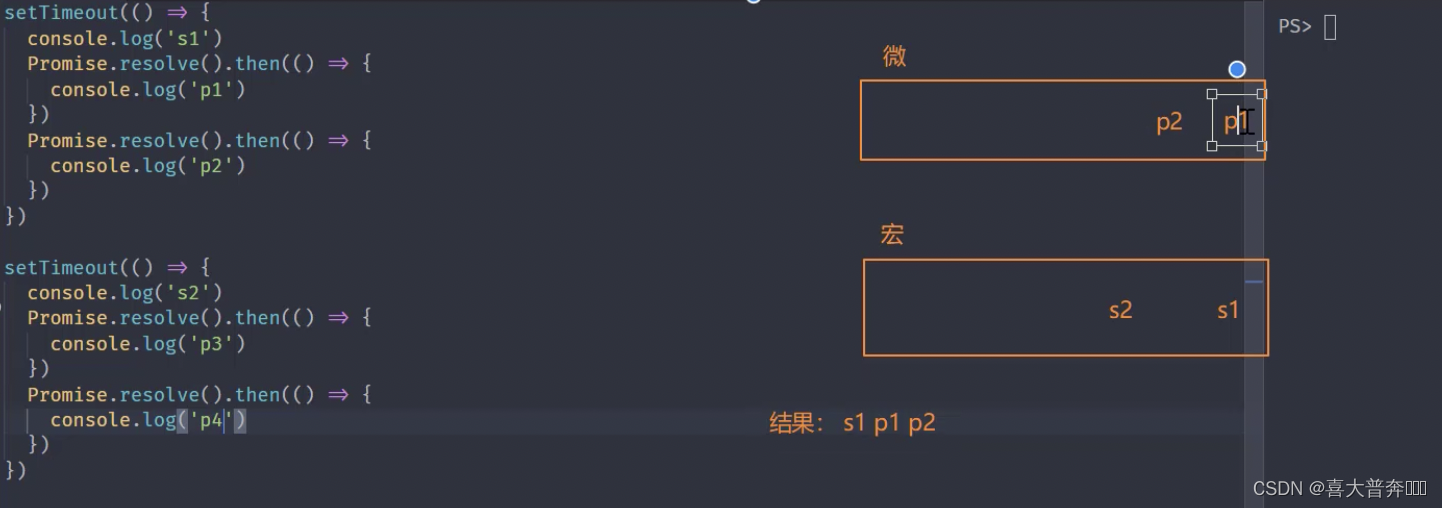

are The execution sequence is the same on the browser side and in the node environment, so just execute the test directly on the terminal
Complete Event Loop Execution Sequence
- Execute all synchronous code from top to bottom
- Add the macrotasks and microtasks encountered during execution to the corresponding queue
- After the synchronous code is executed, execute the microtask callback that meets the conditions
- Execute all macrotask callbacks that meet the requirements after the microtask queue is executed
- Loop Event Loop Operations
- Note: The microtask queue is checked immediately after each macrotask is executed
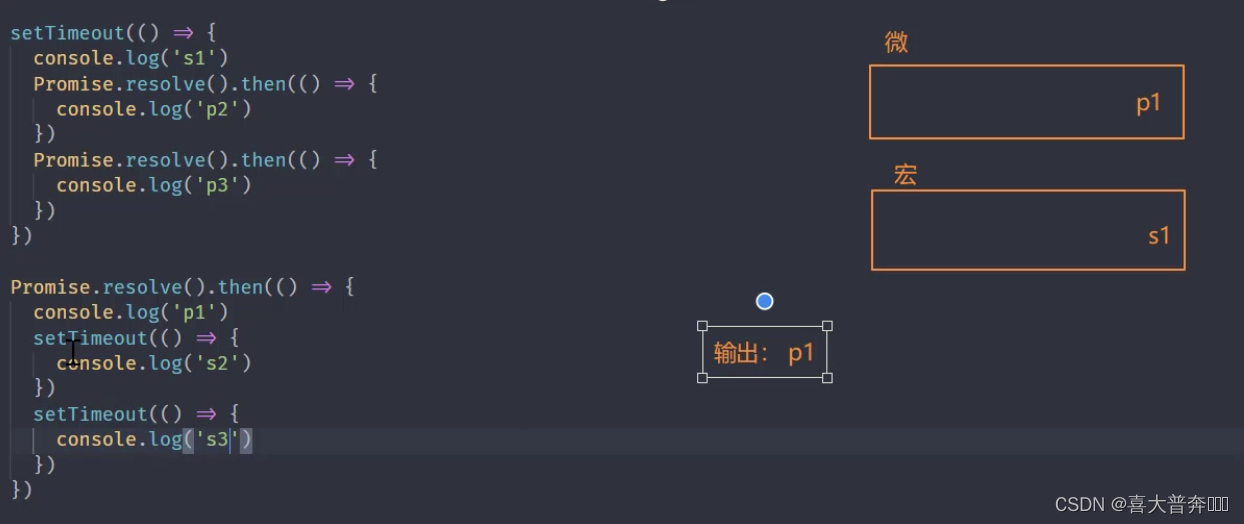
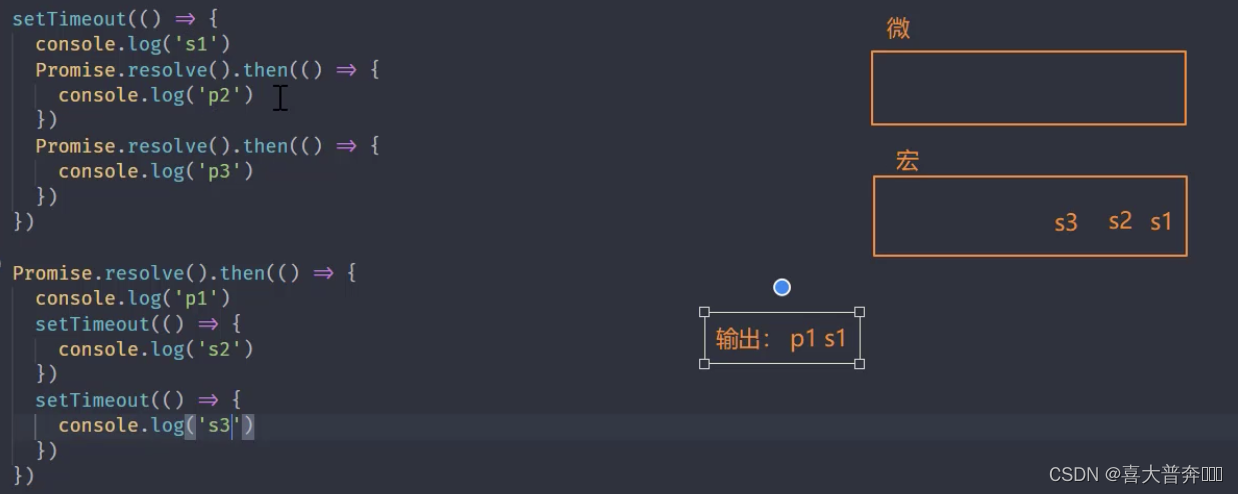
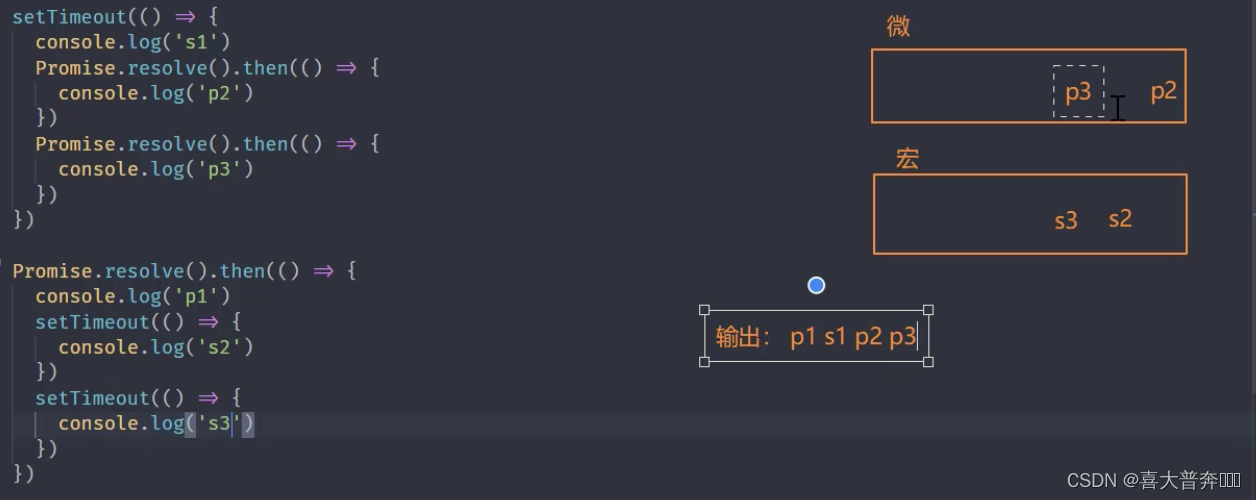
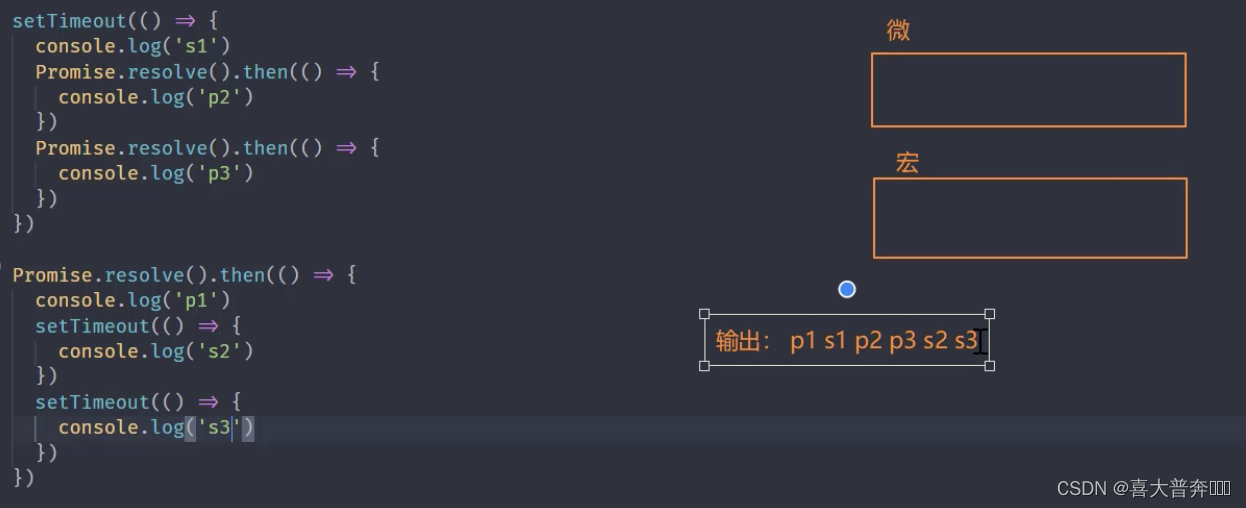
setTimeout(() => {


  console.log('s1')
  Promise.resolve().then(() => {


    console.log('p2')
  })
  Promise.resolve().then(() => {


    console.log('p3')
  })
})

Promise.resolve().then(() => {


  console.log('p1')
  setTimeout(() => {


    console.log('s2')
  })
  setTimeout(() => {


    console.log('s3')
  })
})
Event loop in Nodejs
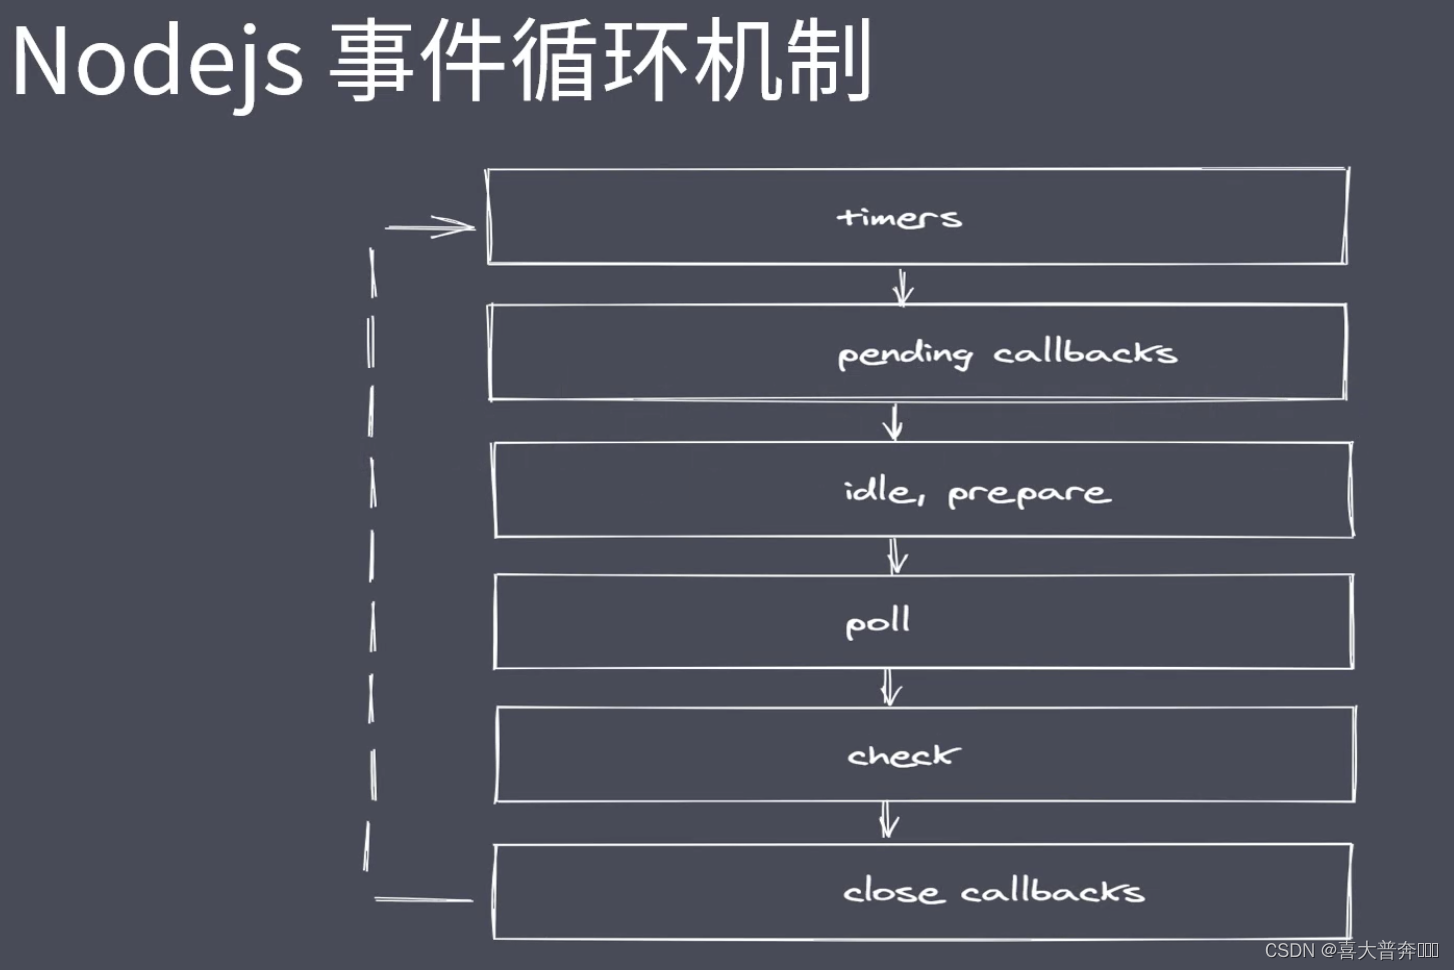
queue description
- timers: execute setTimout and setInterval callbacks
- pending callbacks: callbacks to perform system operations, for example: tcp ydp
- idle, prepare: only used within the system
- poll: Execute callbacks related to I/O
- check: Execute the callback in setImmediate
- close callbacks: execute the callback of the close event
Nodejs complete event loop
- Execute synchronous code and add different tasks to corresponding queues
- After all synchronous codes are executed, they will execute microtasks that meet the conditions
- After all the microtask codes are executed, the satisfied macrotasks in the timer queue will be executed
- After all the macro tasks in the timer are executed, the queues will be switched in turn
- Note: The microtask code will be cleared before the queue switch is completed
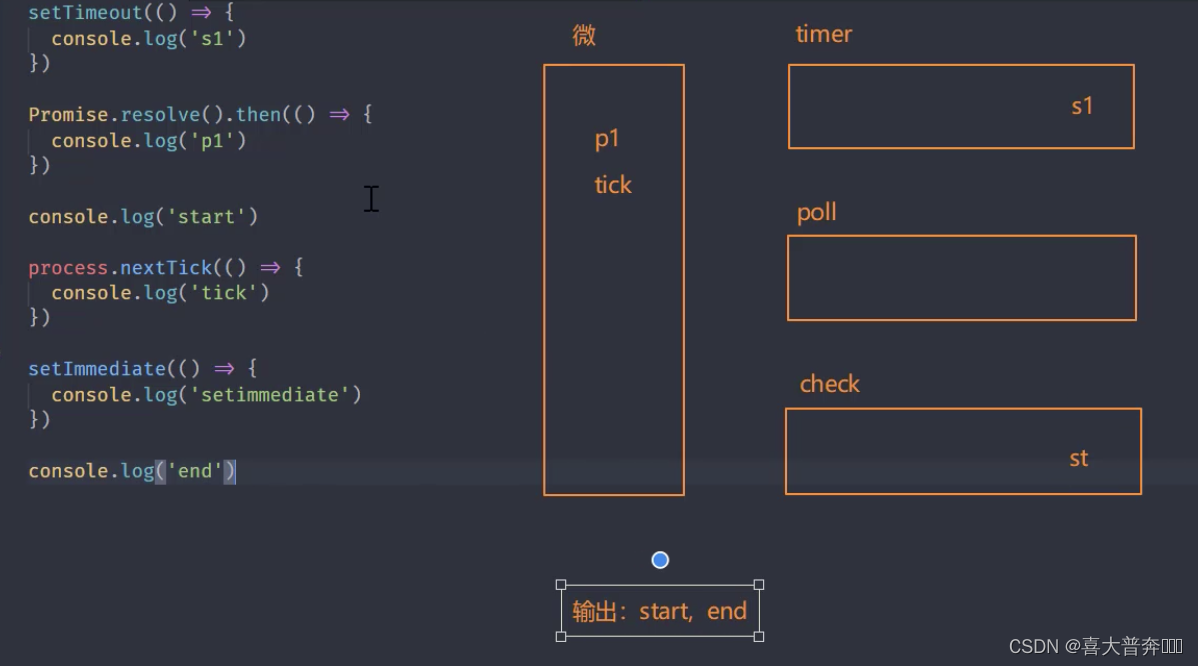
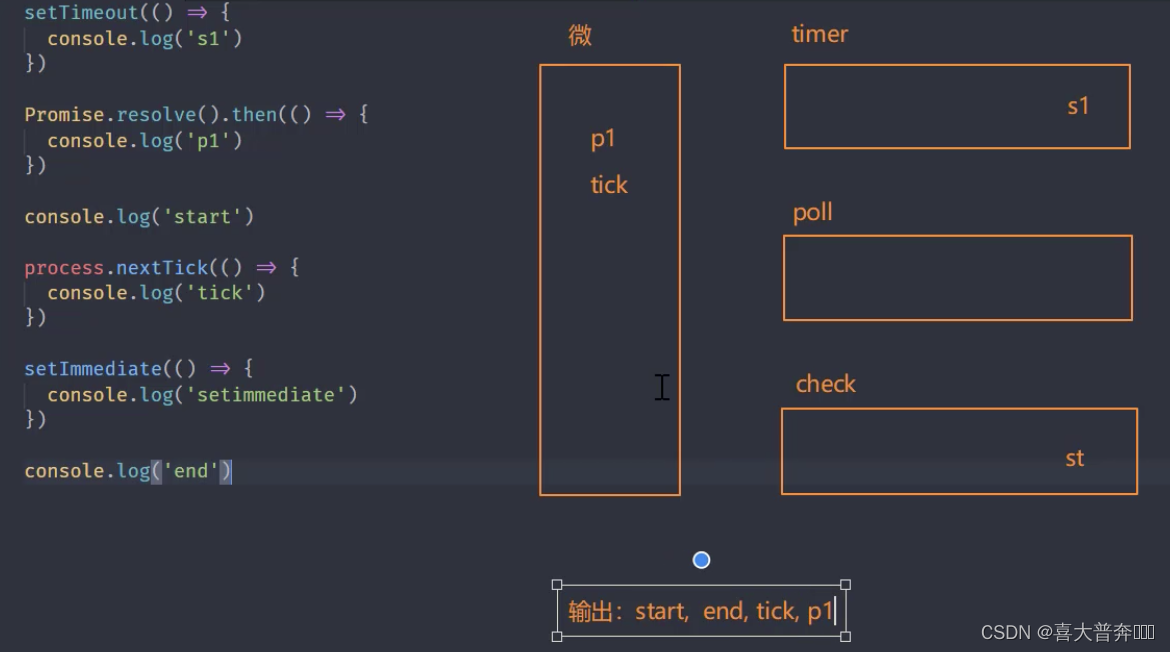
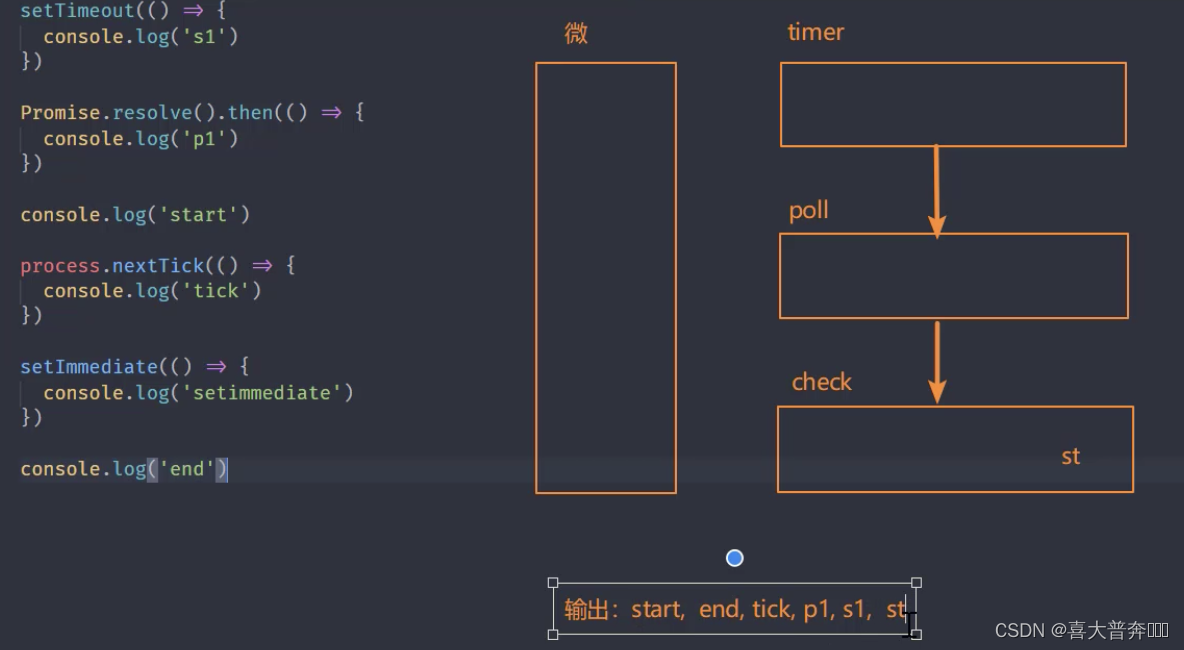
setTimeout(() => {


  console.log('s1')
})

Promise.resolve().then(() => {


  console.log('p1')
})

console.log('start')// 1

// node 平台下的微任务
process.nextTick(() => {


  console.log('tick') // 3
})

setImmediate(() => {


  console.log('setimmediate')
})

console.log('end') // 2

// start,  end, tick, p1, s1,  st
Note: process.nextTick has a higher priority than promise, and it feels like microtasks are divided into two microtask queues

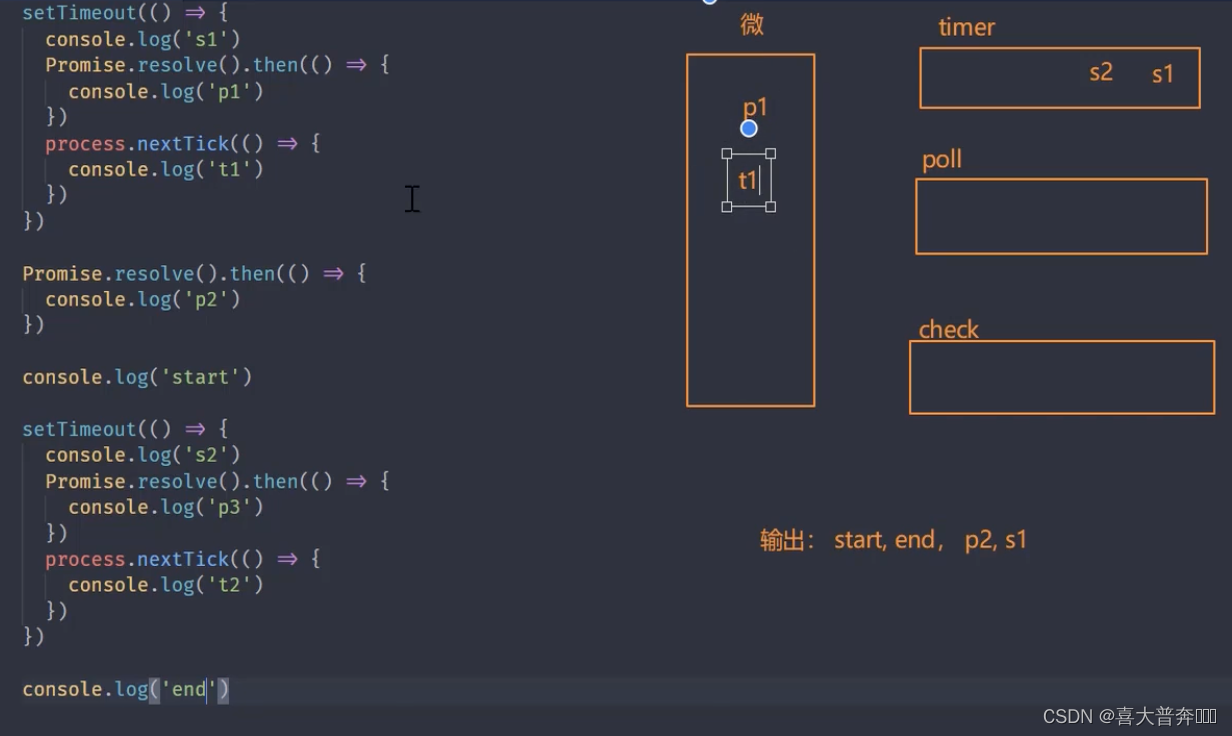
Nodejs event loop combing
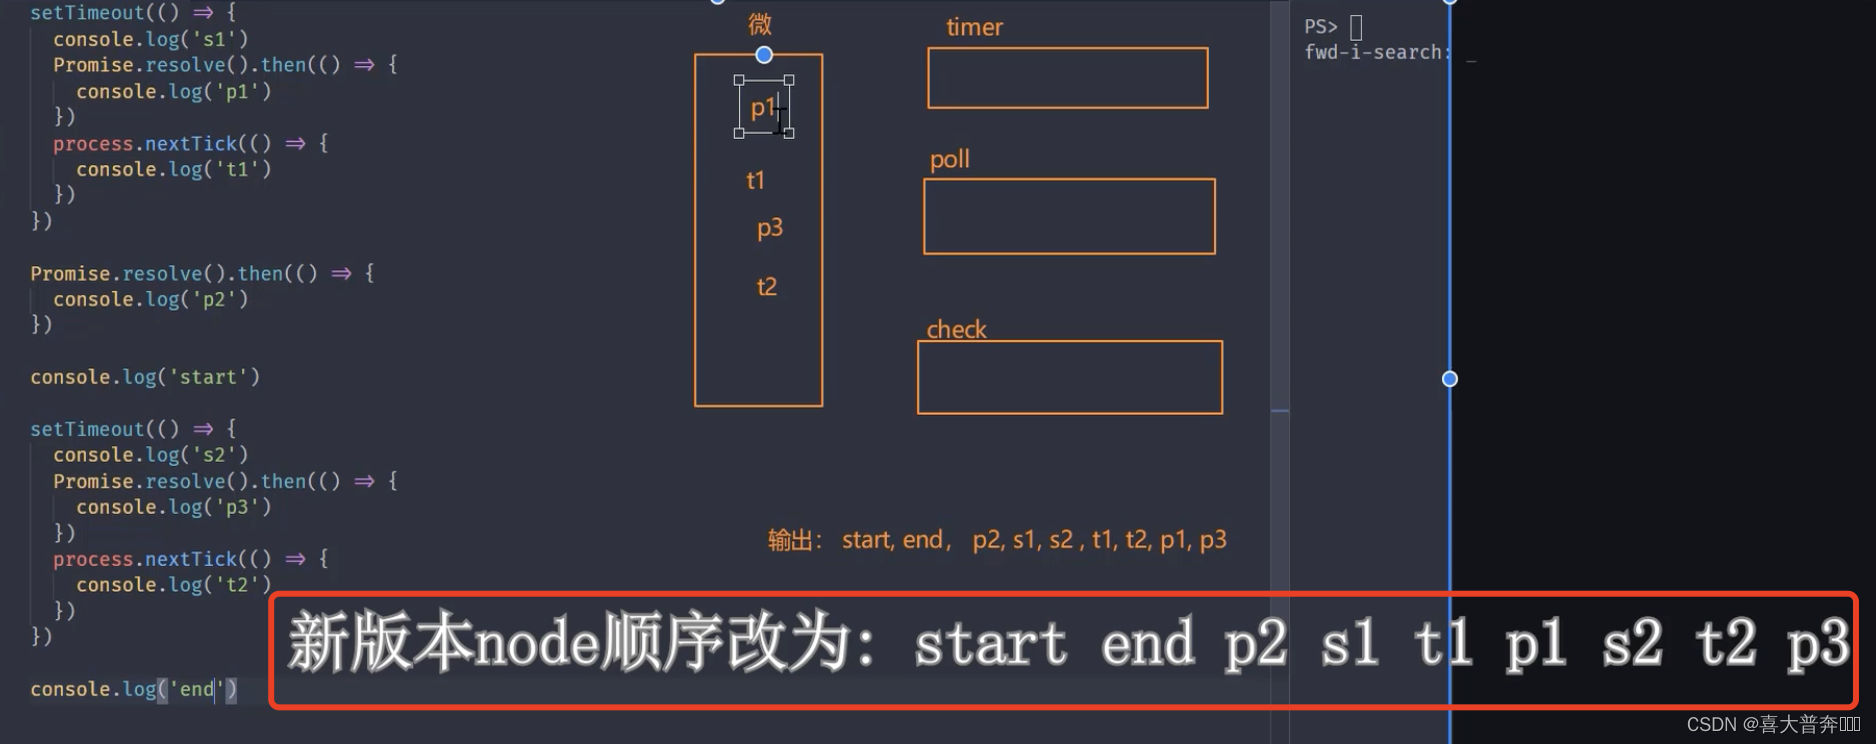
setTimeout(() => {


  console.log('s1')
  Promise.resolve().then(() => {


    console.log('p1')
  })
  process.nextTick(() => {


    console.log('t1')
  })
})

Promise.resolve().then(() => {


  console.log('p2')
})

console.log('start')

setTimeout(() => {


  console.log('s2')
  Promise.resolve().then(() => {


    console.log('p3')
  })
  process.nextTick(() => {


    console.log('t2')
  })
})

console.log('end')

// start, end, p2, s1, s2 , t1, t2, p1, p3
//新版本 node: start, end, p2, s1, t1, p1, s2, t2, p3

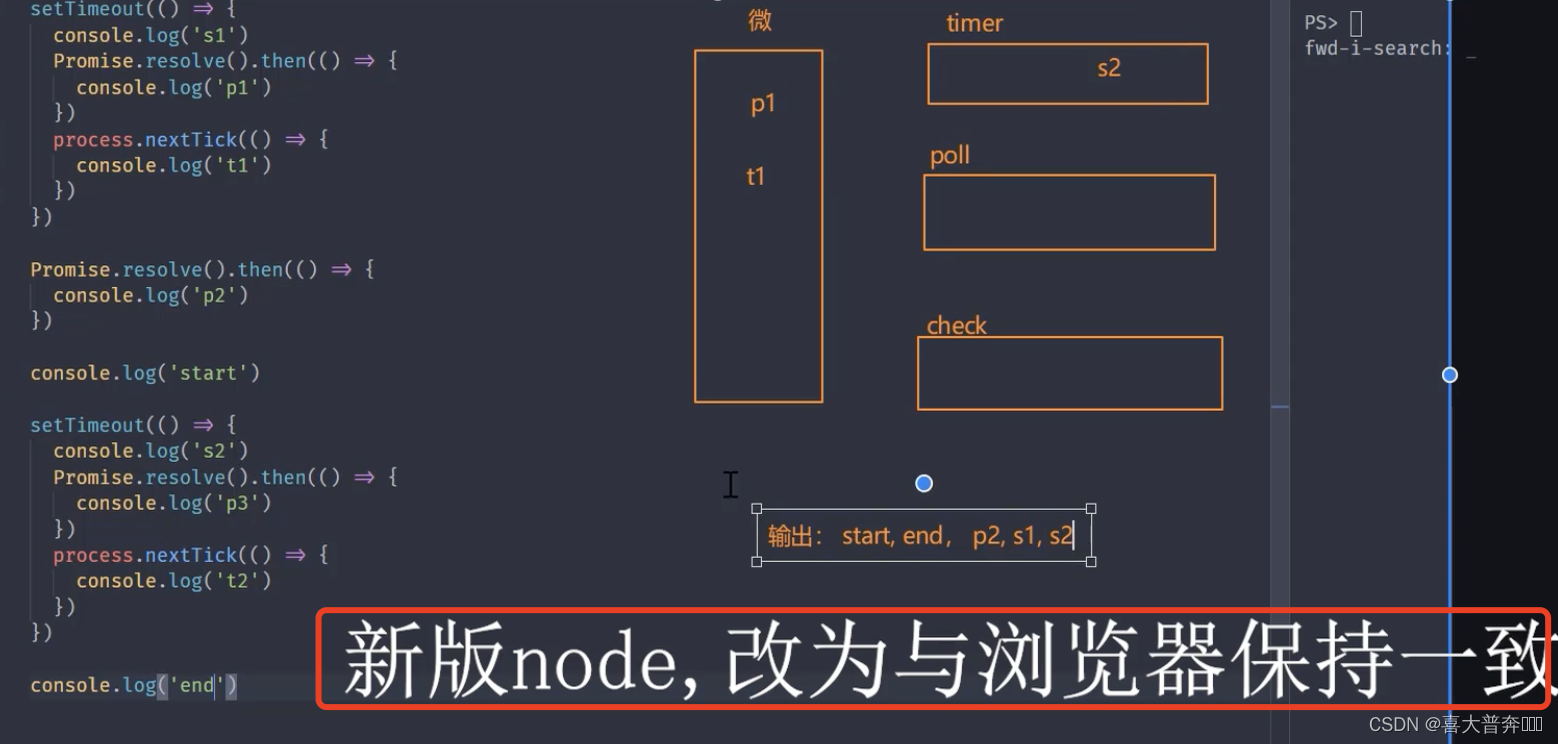
Difference between Nodejs and browser event loop
- The number of task queues is different
- Nodejs microtask execution timing is different
- Different microtask priorities
number of task queues
- There are only two task queues in the browser
- There are 6 event queues in Nodejs
Timing of microtask execution
- Both execute microtasks after the synchronous code has finished executing
- Under the browser platform, every time a macro task is executed, the micro task is cleared
- The Nodejs platform will clear microtasks when the event queue is switched (the new version of Node is not)
Microtask priority
- In the browser event ring, microtasks are stored in the event queue, first in first out
- process.nextTick precedes promise.then in Nodejs
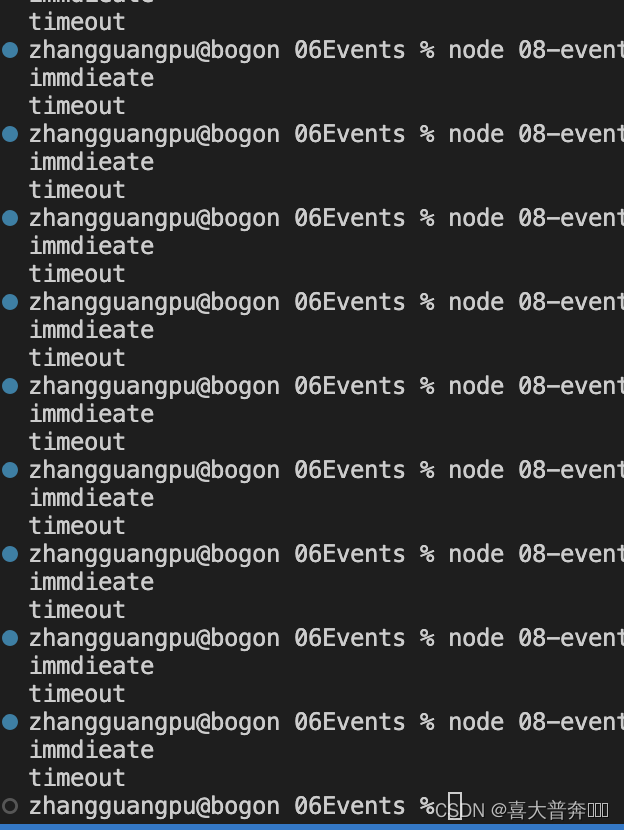
Nodejs Event Ring Frequently Asked Questions
// 复现
setTimeout(() => {


  console.log('timeout')
}, 0)

setImmediate(() => {


  console.log('immdieate')
})
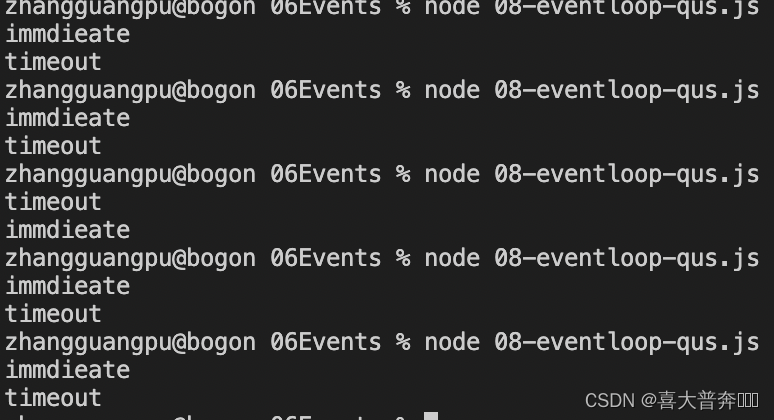
const fs = require('fs')

fs.readFile('./eventEmitter.js', () => {


  setTimeout(() => {


    console.log('timeout')
  }, 0)

  setImmediate(() => {


    console.log('immdieate')
  })
})

Core module Stream
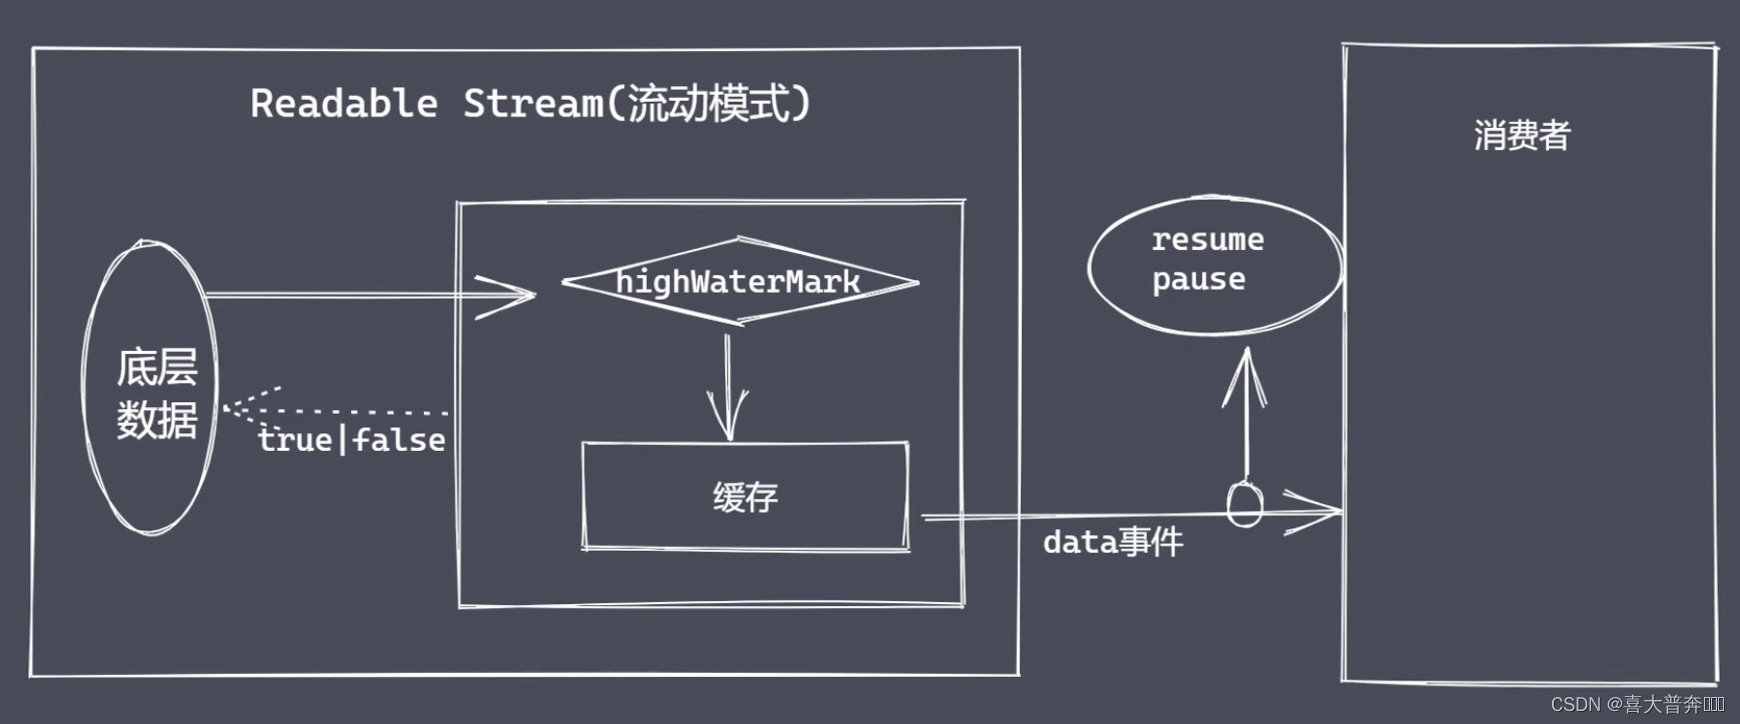
Stream operations in linux:ls | grep *.js
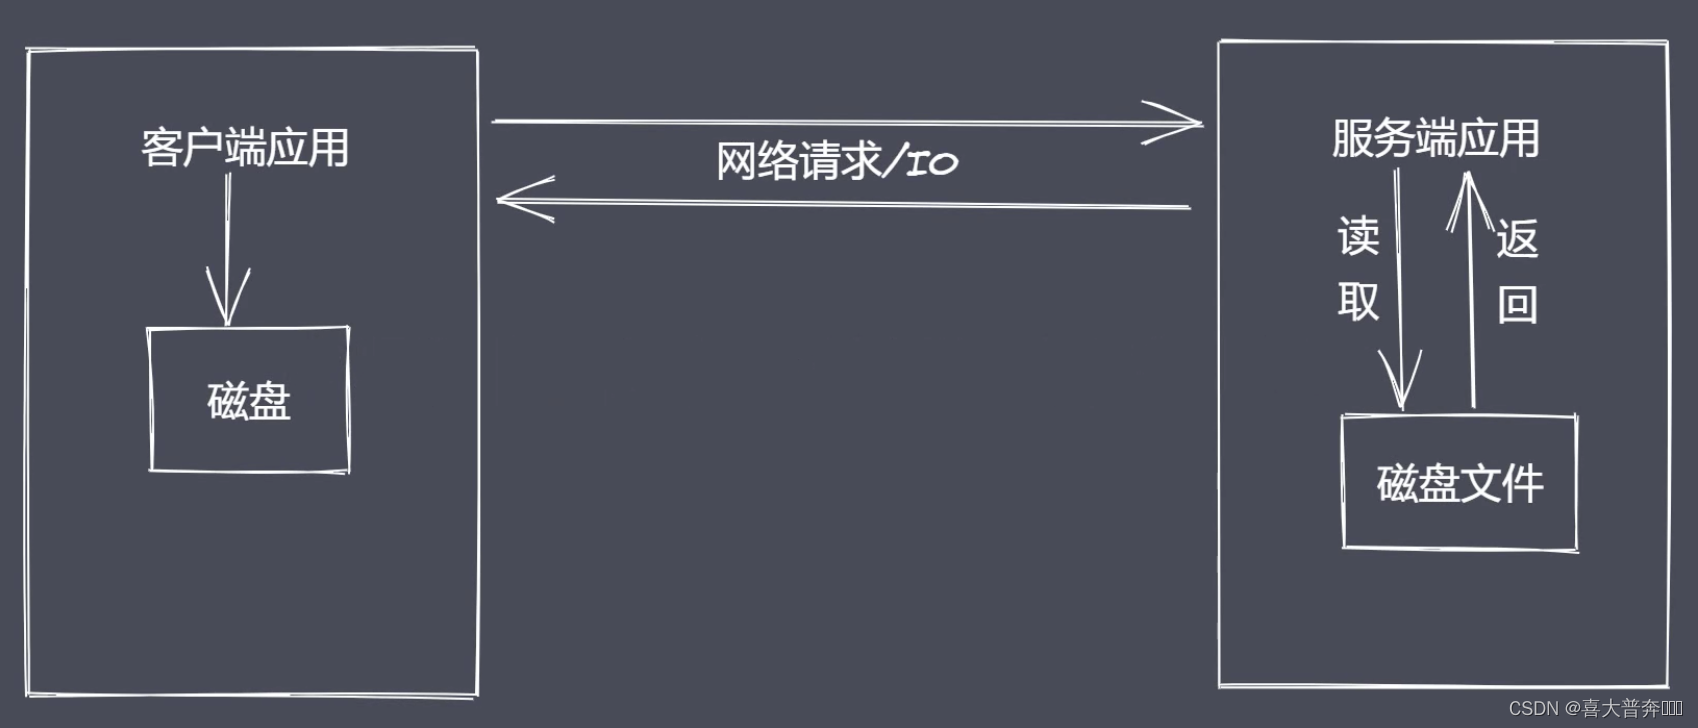
Node.js was born to improve IO performance, and the file operating system and network modules implemented stream interfaces; streams in Node.js are abstract interfaces for processing streaming data.
Why use streams to process data?
common problem:
- To read resource files synchronously, the user needs to wait for the data reading to complete
- The resource file is finally loaded into the memory at one time, and

the advantage of stream processing data is relatively large - Time efficiency: segmented processing of streams can operate multiple data chunks at the same time
- Space efficiency: the stream does not need to occupy a large memory space at the same time
- Ease of use: streaming and management, extensions made easy
Node.js has a built-in stream, which implements stream operation objects
- Readable: Readable stream, capable of reading data
- Writeable: A writable stream, capable of writing data
- Duplex: duplex stream, both readable and writable
- Tranform: transformation stream, readable and writable, and can also realize data conversion
Features:
- The Stream module implements four concrete abstractions (classes)
- All streams inherit from EventEmitter
Demo:
const fs = require('fs')

let rs = fs.createReadStream('./test.txt') // 创建可读流
let ws = fs.createWriteStream('./test1.txt') // 创建可写流

rs.pipe(ws)
readable stream of stream
"Produce a stream for program consumption data"
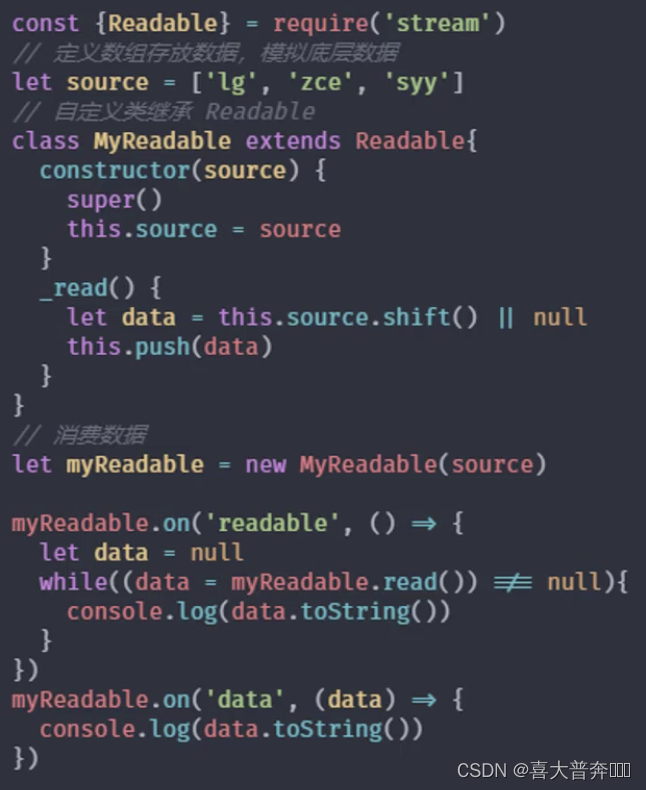
custom readable stream
- Inherit Readable in stream
- Rewrite the _read method to call push to output data
Question: - What to do after the underlying data is read?
- How does a consumer get data from a readable stream?
Two ways to consume data to meet different usage scenarios: flow mode, pause mode
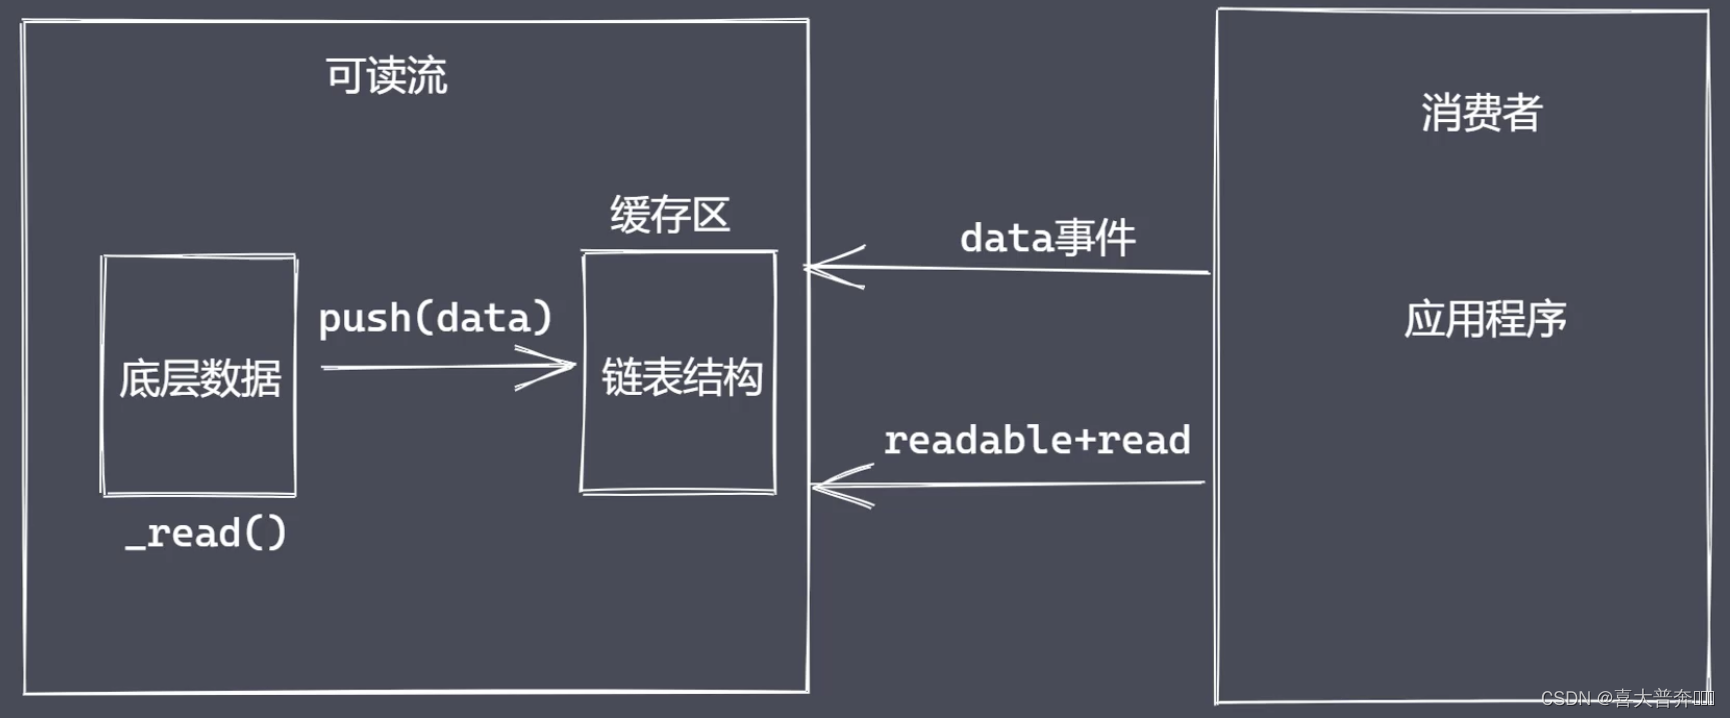
consumption data
- readable event: triggered when there is readable data in the stream
- data event: triggered when the data block in the stream is delivered to the consumer
- other
Summarize:
- Clarify the data production and consumption process
- Using the API to implement a custom readable stream
- Explicit data consumption events make
const {

    Readable} = require('stream')

// 模拟底层数据
let source = ['zgp','hello','world']

// 自定义类继承 Readable
class MyReadable extends Readable {


    constructor(source){


        super()
        this.source = source
    }
    _read(){


        let data = this.source.shift() || null
        this.push(data)
    }
}

let myReadable = new MyReadable(source)
myReadable.on('readable', ()=>{


    let data = null
    // while((data = myReadable.read()) !== null){


    while((data = myReadable.read(2)) !== null){


        console.log(data.toString())
    }
})

myReadable.on('data', (chunk)=>{


    console.log(chunk.toString());
})
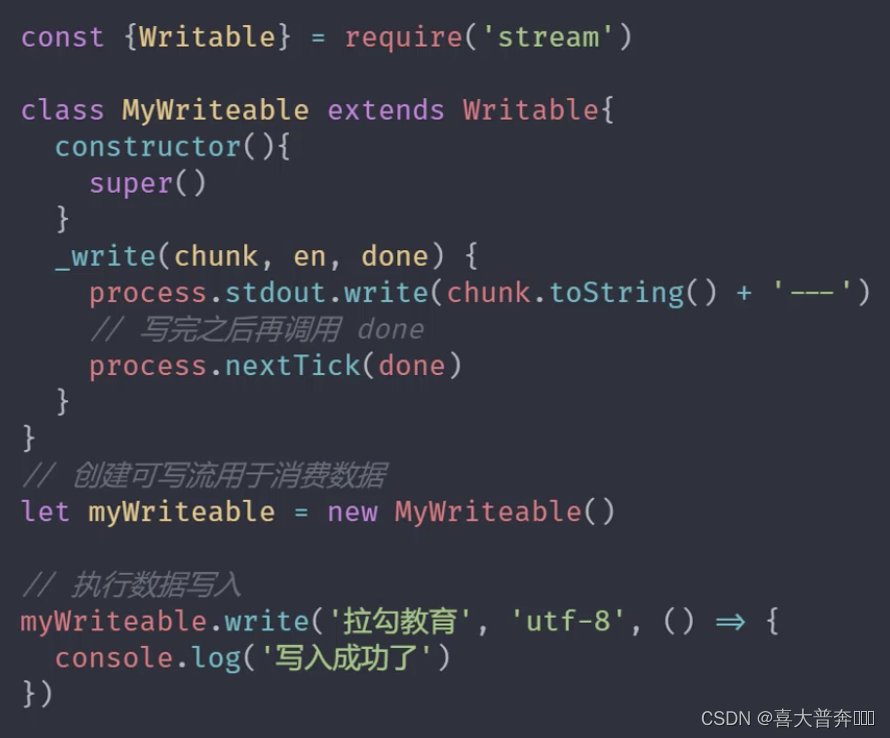
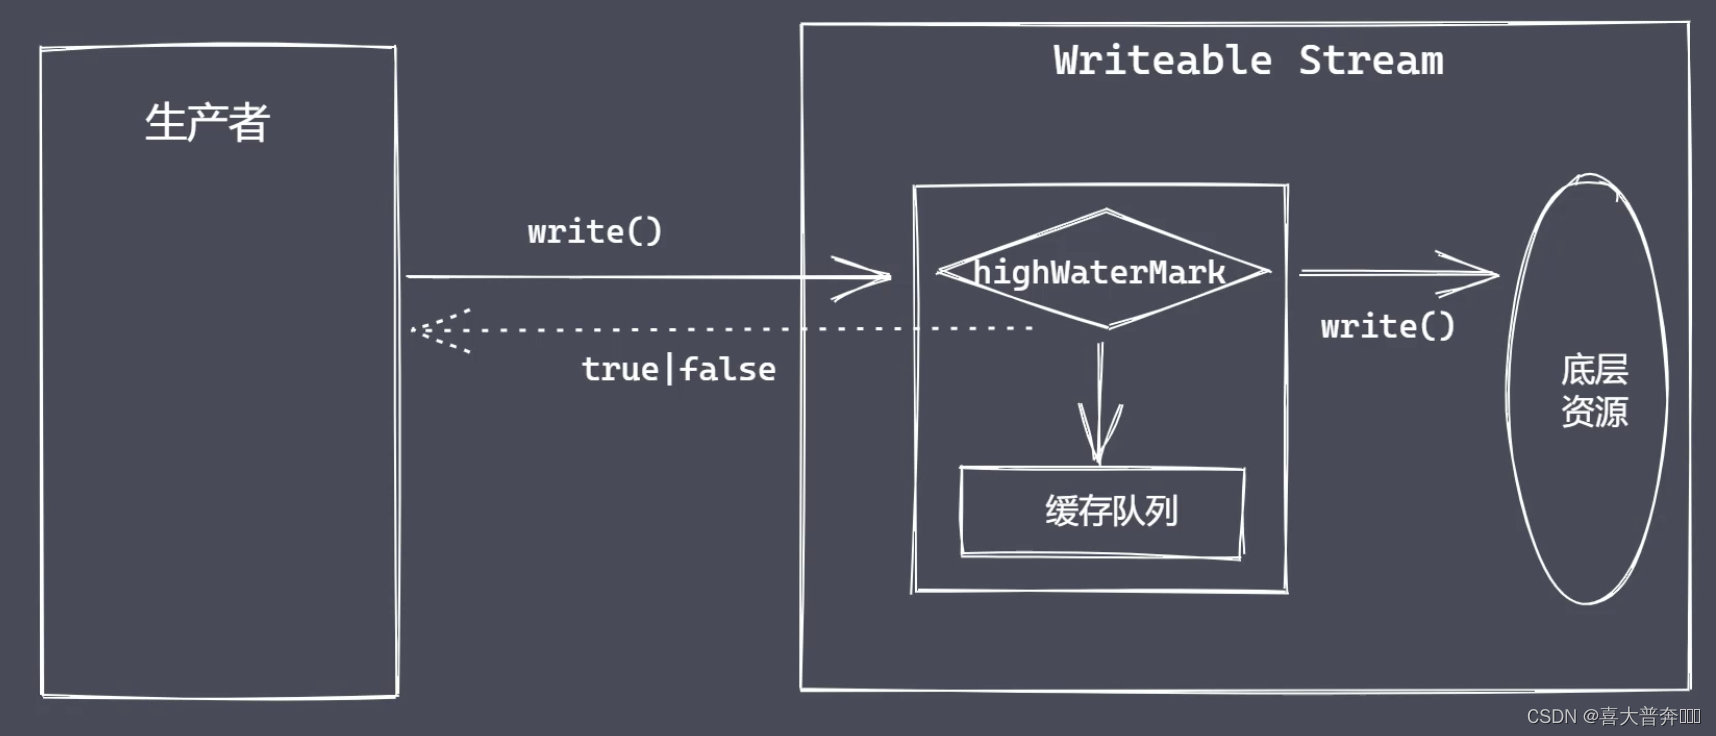
writable stream of stream
"Stream for consuming data"
custom writable stream
- Inherit Writeable from stream module
- Override the _write method, call write to execute the write
event of the writable stream - pipe event: triggered when the readable stream calls the pipe() method
- unpipe event: triggered when the readable stream calls the unpipe() method
const {

    Writable} = require('stream')

class MyWriteable extends Writable {


    constructor(){


        super()
    }
    _write(chunk, encoding, done){


        process.stdout.write(chunk.toString() + ' -- \n')
        process.nextTick(done)
    }
}

let myWriteable = new MyWriteable()

myWriteable.write('喜大普奔', 'utf-8', ()=>{


    console.log('end');
})
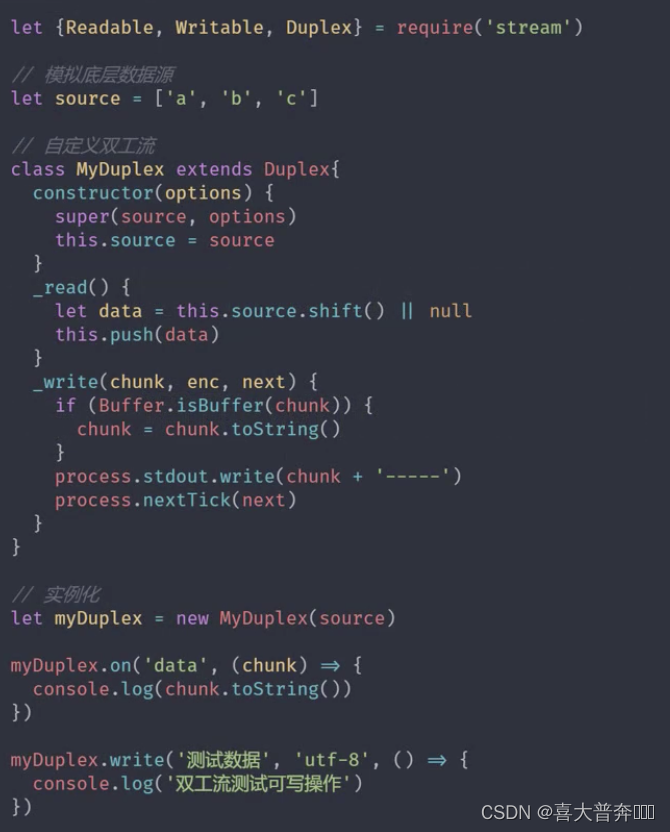
Duplex stream and conversion stream of stream
Duplex && Transform
The stream in Nodejs is a collection of abstract interfaces for stream operations, and readable, writable, duplex, and conversion are a single abstract embodiment.
The core function of stream operation is to process data. The original intention of Nodejs was to solve intensive IO transactions. Whether it is file IO or network IO, it is essentially a data transmission operation. Nodejs has prepared corresponding modules in advance to handle these two IO operations. Data processing modules also inherit stream and EventEmitter.
In this way, in actual applications, we often use a module that inherits the Stream operation directly instead of customizing the operation of a certain stream before using it specifically.
stream, four types of streams, modules that implement stream operations
Duplex is a duplex stream that can both produce and consume
custom duplex stream
- Inherit the Duplex class
- Override the _read method and call push to produce data
- Rewrite the _write method, call write to consume data
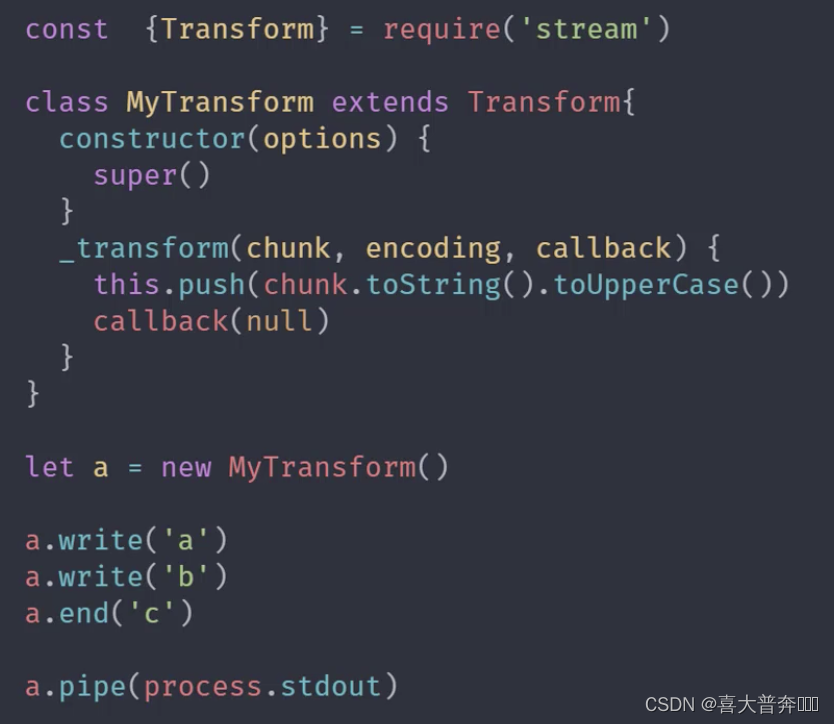
Transform is also a duplex stream
Difference:
Reading and writing in Duplex are independent of each other. The data read by its read operation cannot be directly used as a data source by the write operation, but this operation is possible in Transform, that is to say, in the transformation stream The bottom layer connects the read and write operations. In addition, the conversion stream can also perform corresponding conversion operations on the data. This is achieved by ourselves.
custom conversion flow
- Inherit the Transform class
- Rewrite the _transform method, call push and callback
- Override the _flush method (not required, just process the remaining data)
Four streams in Nodejs - Readable readable stream
- Writeable writable stream
- Duplex stream
- Transform transformation flow
// Duplex
const {

    Duplex} = require('stream')

class MyDuplex extends Duplex{


    constructor(source){


        super()
        this.source = source
    }
    _read(){


        let data = this.source.shift() || null
        this.push(data)
    }
    _write(chunk, encoding, next){


        process.stdout.write(chunk)
        process.nextTick(next)
    }
}

let source = ['zgp','hello', 'world']
let myDu = new MyDuplex(source)

myDu.on('data', (chunk)=>{


    console.log(chunk.toString());
})

myDu.write('测试数据', ()=>{


    console.log(111)
})
const {

    Transform} = require('stream');

class MyTransform extends Transform{


    constructor(){


        super()
    }
    _transform(chunk, encoding, callback){


        this.push(chunk.toString().toUpperCase())
        callback(null)
    }
}

let t = new MyTransform()

t.write('a')

t.on('data', (chunk)=>{


    console.log(chunk.toString());
})
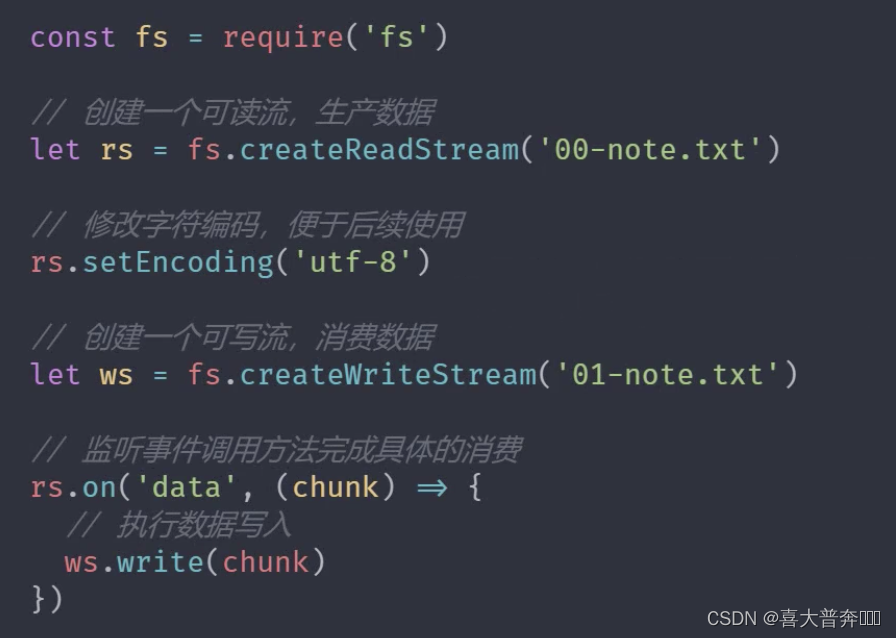
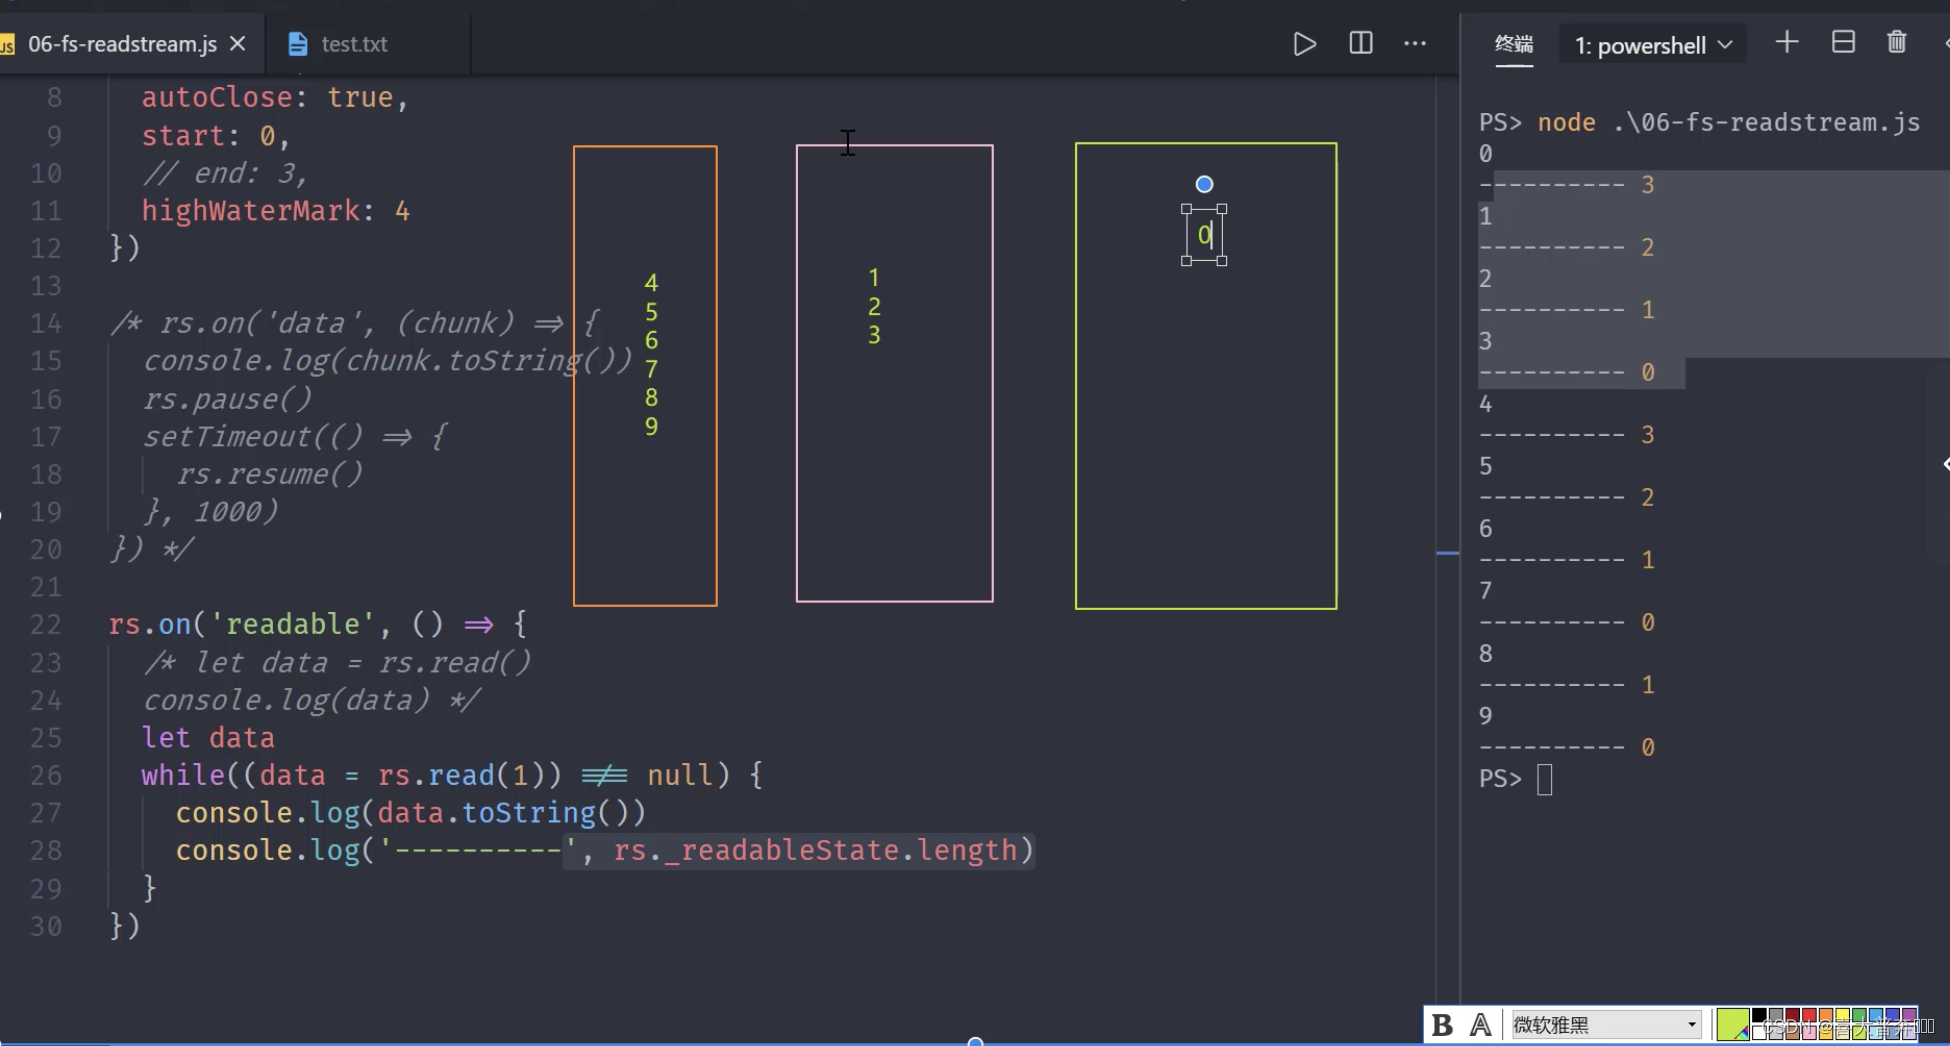
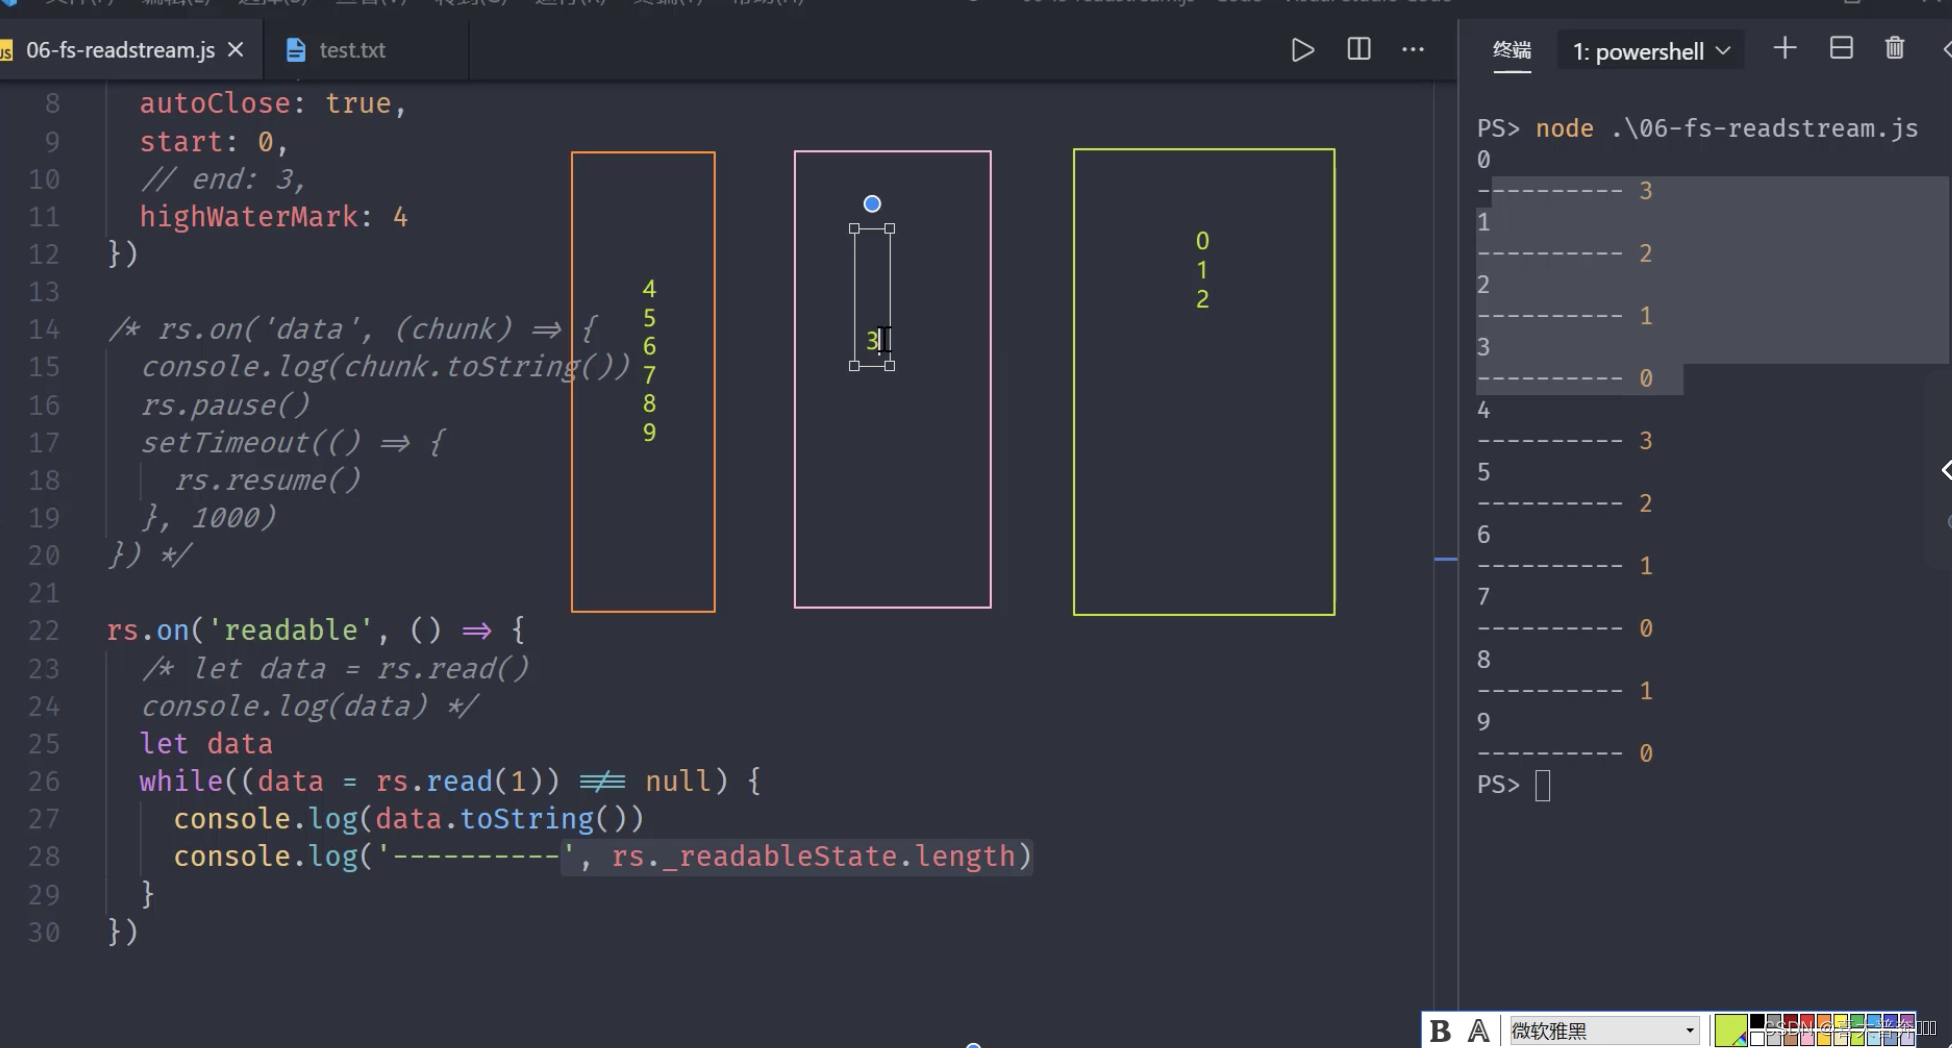
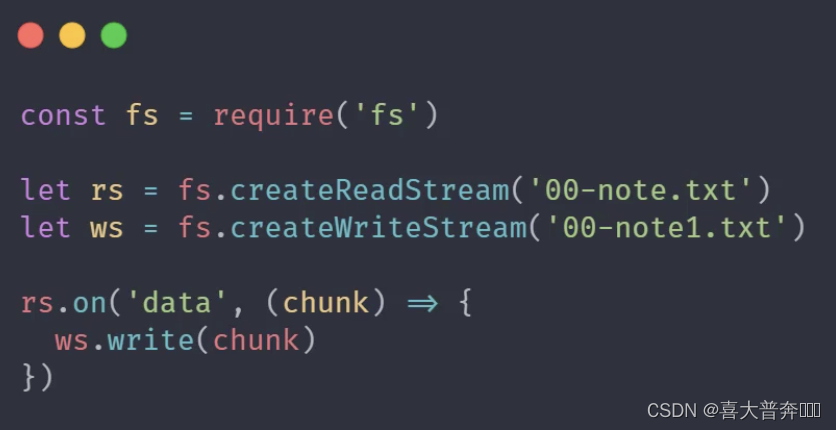
File-readable stream creation and consumption
It is the API that inherits the Readable and EventEmitter classes
const fs = require('fs');

let rs = fs.createReadStream('test.txt', {


    flags: 'r',
    encoding: null, // 编码,null 为二进制
    fd: null, // 标识符,默认从 3 开始
    mode: 438, // 权限位
    autoClose: true, // 自动关闭
    start: 0, // 开始
    // end: 3, // 结束
    highWaterMark: 4, // 水位线,每次读多少字节的数据,Readable 里是 16KB,fs里边修改成了 64,这里为自定义
})
// 流动模式,一口气把数据取完,还有一个暂停模式
// rs.on('data', (chunk)=>{


//     console.log(chunk.toString());
//     rs.pause() // 暂停流动模式
//     setTimeout(()=>{


//         rs.resume() // 打开流动模式
//     }, 500)
// })

rs.on('readable', ()=>{


    // let data = rs.read()
    // console.log(data);
    let data
    while((data = rs.read(3)) !== null){

     // read(4) 里边的数字修改了 createReadStream 里边的水位线
        console.log(data.toString());
        console.log(' ------ ------ ',rs._readableState.length);
    }
})
File-readable stream events and applications
const fs = require('fs');

let rs = fs.createReadStream('test.txt', {


    flags: 'r',
    encoding: null, // 编码,null 为二进制
    fd: null, // 标识符,默认从 3 开始
    mode: 438, // 权限位
    autoClose: true, // 自动关闭
    start: 0, // 开始
    // end: 3, // 结束
    highWaterMark: 4, // 水位线,每次读多少字节的数据,Readable 里是 16KB,fs里边修改成了 64,这里为自定义
})

// 只要调用了 createReadStream 就会触发 open
rs.on('open', (fd)=> {


    console.log(fd+'文件打开了');
})
rs.on('close', ()=> {


    console.log('文件关闭了');
})
let bufferArr = []
rs.on('data', (chunk)=>{


    console.log(chunk.toString()); // 消费完数据,触发 close 事件
    bufferArr.push(chunk)
})
rs.on('end', ()=>{


    console.log('数据消费完毕之后触发 end'); // 消费完数据,触发 end 事件,在 close 事件之前

    console.log('最后得到的要处理的数据',Buffer.concat(bufferArr).toString());
})
rs.on('error', (err)=>{


    console.log('出错了', err); // 出错信息
})
file writable stream
It is the API that inherits the Writable and EventEmitter classes
const fs = require('fs');

const ws = fs.createWriteStream('test1.txt', {


    flags: 'w',
    mode: 438,
    fd: null,
    encoding: 'utf-8',
    start: 0,
    highWaterMark: 3
})

//
// ws.write('测试', ()=>{ // 消耗数据
//     console.log('数据写完了');
// })
// ws.write('数据', ()=>{ // 消耗数据
//     console.log('数据写完了1');
// })
// ws.write('123456', ()=>{ // 消耗数据
//     console.log('数据写完了2');
// })

// ws.write(1, ()=>{ // The "chunk" argument must be of type string or an instance of Buffer or Uint8Array. Received type number (1)
//     console.log('数据写完了');
// })

/**
 * 对于可写流来说,可写入的数据类型不受限制,
 * Writable 里边有不同的模式,如果是 Object ,可以写任意的值,如果是 buffer ,就可以写字符串或者 buffer 或者 Uint8Array,
 * 这里用的是文件的可写流,文件的可写流其实是对 Writable 的重新实现和继承,它这里变要求传入的值是字符串或者 buffer 的形式
 */

// let buf = Buffer.from('abc')
// // 字符串或者 buffer
// ws.write(buf, ()=>{


//     console.log('数据写完了');
// })

// ws.on('open', (fd)=>{


//     console.log(fd+'打开了');
// })

ws.write('1')

// 跟可读流不同,这里触发需要数据写入操作全部完成之后再执行,需要 end 表明写入操作执行完毕
// ws.on('close', ()=>{


//     console.log('文件关闭了');
// })

// end 执行之后就意味着数据写入操作执行完成
// ws.end()

// ws.write('2')

ws.end('测试数据') // end 还有机会再写入一次

ws.on('error', (err)=>{


    console.log('出错了',err);
})
write execution process
By analyzing the write process, we can better understand how the whole process happens after the data is passed from the upstream producer to our current consumer, so as to understand why the current limit/speed control is necessary.
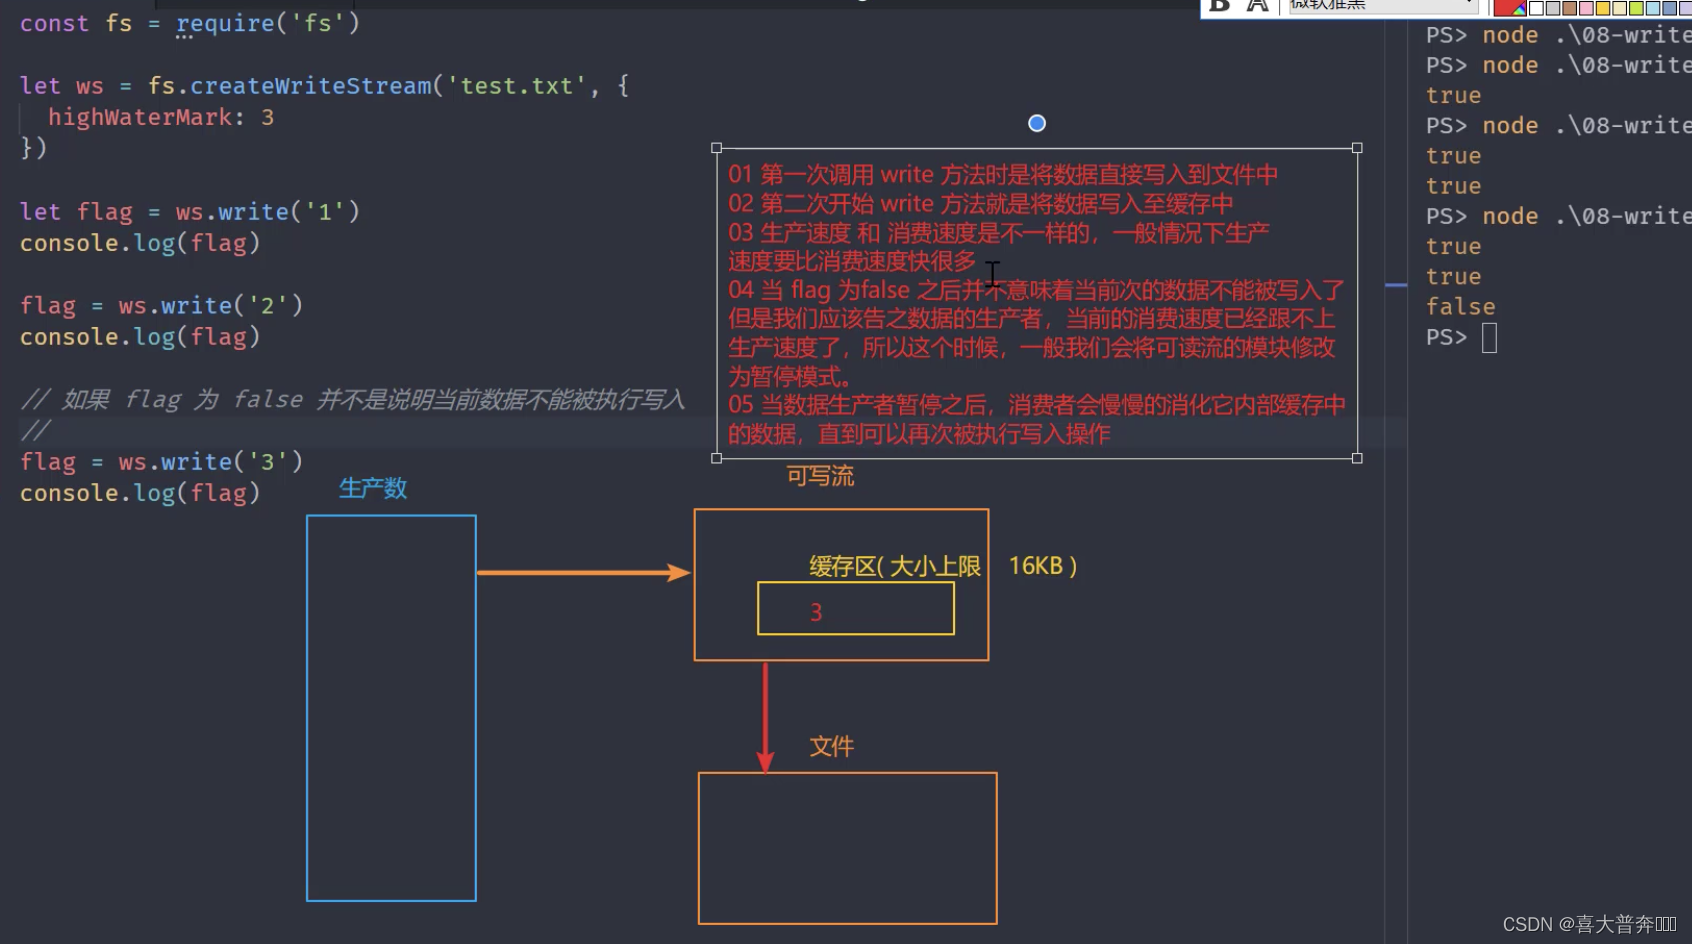
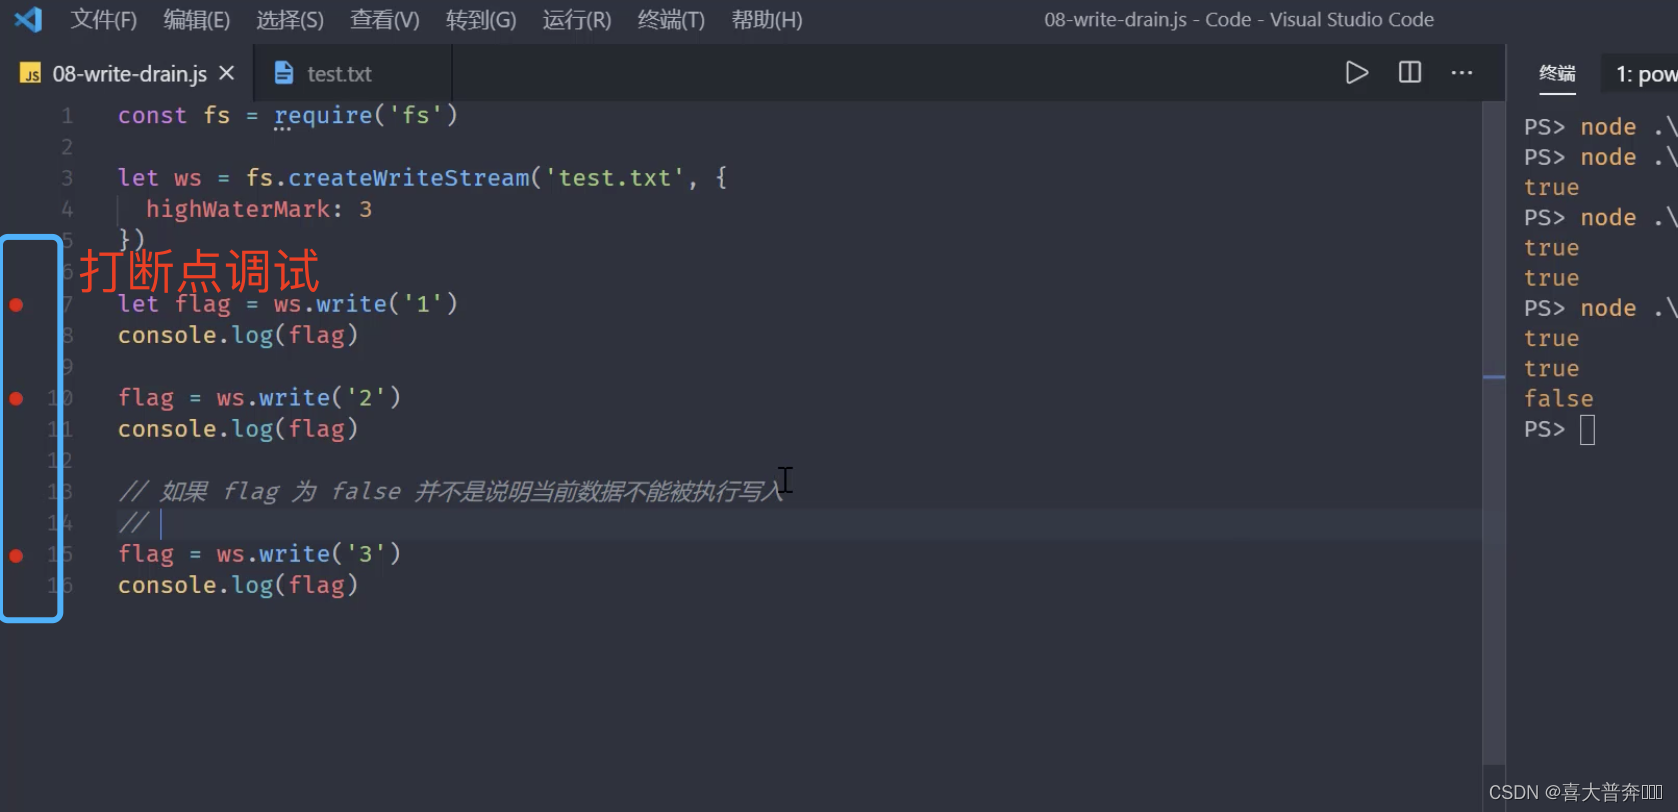
const fs = require('fs');

const ws = fs.createWriteStream('test.txt', {


    highWaterMark: 3
})


/**
 * 1、第一次调用 write 方法时,是将数据直接写入到文件中
 * 2、第二次开始 write 方法就是将数据写入至缓存中
 * 3、生产速度和消费速度是不一样的,一般情况下,生产速度要比消费速度快很多
 * 4、当 flag 为 false 之后,并不意味着数据不能被写入了,但是应该告知数据的生产者,当前的消费速度已经跟不上生产速度了,所以这时候,
 *    一般我们会将可读流的模式修改为暂停模式
 * 5、当数据生产者暂停之后,消费者会慢慢的消化它内部缓存中的数据,直到可以再次被执行写入操作
 * 6、当缓冲区可以继续写入数据时,如何让生产者知道?drain 事件
*/
let flag = ws.write('1')
console.log(flag);
let flag1 = ws.write('2')
console.log(flag1);
// 如果 flag 为 false,并不是说数据不能被写入
let flag2 = ws.write('3')
console.log(flag2);
ws.on('drain', ()=>{


    console.log(111)
})
Control write speed
The drain event is a behavior that is triggered when the write operation is performed when the condition is met. Regarding its use, there is often a question: even if this event is not triggered, our write operation can still be completed, why bother to design this event?
In practice, the drain event is also not very common, because there is a better pipe method to process data.
However, what problem does the pipe method solve so that it does not need to use the drain event frequently.
For example:
The drain event is like the police uncle at the intersection of traffic lights. He does not need to come out for business unless the traffic lights are broken, because it can be consumed in an orderly manner under the command of the system. Obviously, the pipe method is equivalent to traffic lights System, it can take care of everything, but if one day the system breaks down, at this time, Uncle Police will be open for business, and then he will control the incoming traffic at each intersection according to actual needs, and finally follow each order Release bit by bit.
The main function is to control the speed and limit the current. The specific method is to specify a highWaterMark, and then use it in conjunction with the return value of write.
/**
 * 需求:“测试数据” 写入指定文件
 * 1、一次性写入
 * 2、分批写入
 * 对比:
 */

const fs = require('fs');

// const ws = fs.createWriteStream('test.txt') // 默认配置
const ws = fs.createWriteStream('test.txt', {


    highWaterMark: 3
}) // 默认配置

// ws.write('测试数据')

let source = '测试数据'.split('')

let num = 0
let flag = true
function excuteWrite () {


    flag = true
    while (num < source.length && flag) {


        flag = ws.write(source[num])
        num ++
    }
}
excuteWrite()
ws.on('drain', ()=>{


    console.log('drain 执行了')
    excuteWrite()
})

// 更好的 pipe 方法
back pressure mechanism
Specifically, the pipe method, the stream of Nodejs has implemented the back pressure mechanism
Possible problems when reading and writing data
At first glance, there is no problem, but after careful consideration, the data reading speed is much faster than the writing speed
Memory overflow, GC frequent calls, other processes slow down
Based on this scenario, a mechanism that allows smooth flow between data producers and consumers is needed, which is the so-called back pressure mechanism.
Data read operation
Data write operation
// 背压机制
const fs = require('fs');

const rs = fs.createReadStream('test.txt', {


    highWaterMark: 4
})

const ws = fs.createWriteStream('test1.txt', {


    highWaterMark: 1
})

/**
 * 背压机制实现原理
 */
// let flag = true
// rs.on('data', (chunk)=>{


//     flag = ws.write(chunk, ()=>{


//         console.log('写完了')
//     })
//     !flag && rs.pause()
// })
// ws.on('drain', ()=>{


//     console.log('drain 执行了')
//     rs.resume()
// })

rs.pipe(ws)
Simulates a file-readable stream
Refer to the use of native readable streams to implement your own readable stream
Note: The purpose is not to replace the native method, but to better understand the data production process and the principles involved in the implementation process
one
const fs = require('fs');

const EventEmitter = require('events');

class MyFileReadStream extends EventEmitter{


    constructor(path, options = {

     }){


        super()
        this.path = path
        this.flags = options.flags || 'r'
        this.mode = options.mode || 438
        this.autoClose = options.autoClose || 438
        this.start = options.start || 0
        this.end = options.end
        this.highWaterMark = options.highWaterMark || 64 * 1024
        this.open()
    }
    open(){


        // 原生 open 方法来打开指定位置的文件
        fs.open(this.path, this.flags, this.mode, (err, fd)=>{


            if(err) {


                this.emit('error', err)
                return
            }
            this.fd = fd
            this.emit('open', fd)
        })
    }
}

const rs = new MyFileReadStream('test.txt')

rs.on('open', (fd)=>{


    console.log('open - ', fd);
})
rs.on('error', (err)=>{


    console.log(err);
})
two
const fs = require('fs');
const EventEmitter = require('events');

class MyFileReadStream extends EventEmitter{


    constructor(path, options = {

     }){


        super()
        this.path = path
        this.flags = options.flags || 'r'
        this.mode = options.mode || 438
        this.autoClose = options.autoClose || 438
        this.start = options.start || 0
        this.end = options.end
        this.highWaterMark = options.highWaterMark || 64 * 1024
        this.readOffset = 0

        this.open()
        // 在外边监听新事件的时候会被触发,监听什么事件,type就是什么事件
        this.on('newListener', (type)=>{


            if(type === 'data'){


                this.read()
            }
        })
    }
    open(){


        // 原生 open 方法来打开指定位置的文件
        fs.open(this.path, this.flags, this.mode, (err, fd)=>{


            if(err) {


                this.emit('error', err)
                return
            }
            this.fd = fd
            this.emit('open', fd)
        })
    }
    read(){


        console.log(this.fd)
        if(typeof this.fd !== 'number') return this.once('open', this.read)
        let buf = Buffer.alloc(this.highWaterMark)

        fs.read(this.fd, buf, 0, this.highWaterMark, this.readOffset, (err, readBytes)=>{


            if(readBytes){


                this.readOffset += readBytes
                this.emit('data', buf)
                this.read()
            } else {


                this.emit('end')
                this.close()
            }
        })
    }
    close(){


        fs.close(this.fd, ()=>{


            this.emit('close')
        })
    }
}

const rs = new MyFileReadStream('test.txt')

rs.on('open', (fd)=>{


    console.log('open - ', fd);
})
rs.on('error', (err)=>{


    console.log(err);
})

rs.on('data', (chunk)=>{


    console.log('data', chunk)
})

// setTimeout(()=>{


//     rs.on('data', (chunk)=>{


//         console.log('data', chunk)
//     })
// })

// rs.on('fn', ()=>{


// })

// rs.on('end', ()=>{


//     console.log('end');
// })
rs.on('close', ()=>{


    console.log('close');
})
rs.on('end', ()=>{


    console.log('end');
})
three
const fs = require('fs');
const EventEmitter = require('events');

class MyFileReadStream extends EventEmitter {


    constructor(path, options = {

     }) {


        super()
        this.path = path
        this.flags = options.flags || 'r'
        this.mode = options.mode || 438
        this.autoClose = options.autoClose || 438
        this.start = options.start || 0
        this.end = options.end
        this.highWaterMark = options.highWaterMark || 64 * 1024
        this.readOffset = 0

        this.open()
        // 在外边监听新事件的时候会被触发,监听什么事件,type就是什么事件
        this.on('newListener', (type) => {


            if (type === 'data') {


                this.read()
            }
        })
    }
    open() {


        // 原生 open 方法来打开指定位置的文件
        fs.open(this.path, this.flags, this.mode, (err, fd) => {


            if (err) {


                this.emit('error', err)
                return
            }
            this.fd = fd
            this.emit('open', fd)
        })
    }
    read() {


        // console.log(this.fd)
        if (typeof this.fd !== 'number') return this.once('open', this.read)
        let buf = Buffer.alloc(this.highWaterMark)
        let howMuchToRead = this.end ? Math.min(this.end - this.readOffset + 1, this.highWaterMark) : this.highWaterMark
        fs.read(this.fd, buf, 0, howMuchToRead, this.readOffset, (err, readBytes) => {


            if (readBytes) {


                this.readOffset += readBytes
                this.emit('data', buf.subarray(0, readBytes))
                this.read()
            } else {


                this.emit('end')
                this.close()
            }
        })
    }
    close() {


        fs.close(this.fd, () => {


            this.emit('close')
        })
    }
}

const rs = new MyFileReadStream('test.txt', {


    end: 7,
    highWaterMark: 3
})

// rs.on('open', (fd)=>{


//     console.log('open - ', fd);
// })
// rs.on('error', (err)=>{


//     console.log(err);
// })

rs.on('data', (chunk) => {


    console.log('data', chunk)
})

// setTimeout(()=>{


//     rs.on('data', (chunk)=>{


//         console.log('data', chunk)
//     })
// })

// rs.on('fn', ()=>{


// })

// rs.on('end', ()=>{


//     console.log('end');
// })
// rs.on('close', ()=>{


//     console.log('close');
// })
// rs.on('end', ()=>{


//     console.log('end');
// })
Through the above process, we are not replacing the native stream operation for our own MyFileReadStream, but more in the process of implementation, to understand the internal production process, process and consumption process of the file readable stream. some problems.
linked list structure
The structure of storing data
When the file writable stream write method works, some written content needs to be queued in the buffer, following the first-in-first-out rule; in order to save these data, the new version of Node adopts a linked list structure store these data.
Why not use arrays to store data?
Array disadvantages:
- The length of the data stored in the array has an upper limit
- There is a collapse problem in the array
(in js, the array is implemented as an object, and the usage efficiency will be lower)
A linked list is a collection of nodes, each node has an attribute pointing to the next node
Linked list classification
- Doubly linked list
- singly linked list
- circular linked list
One-way linked list
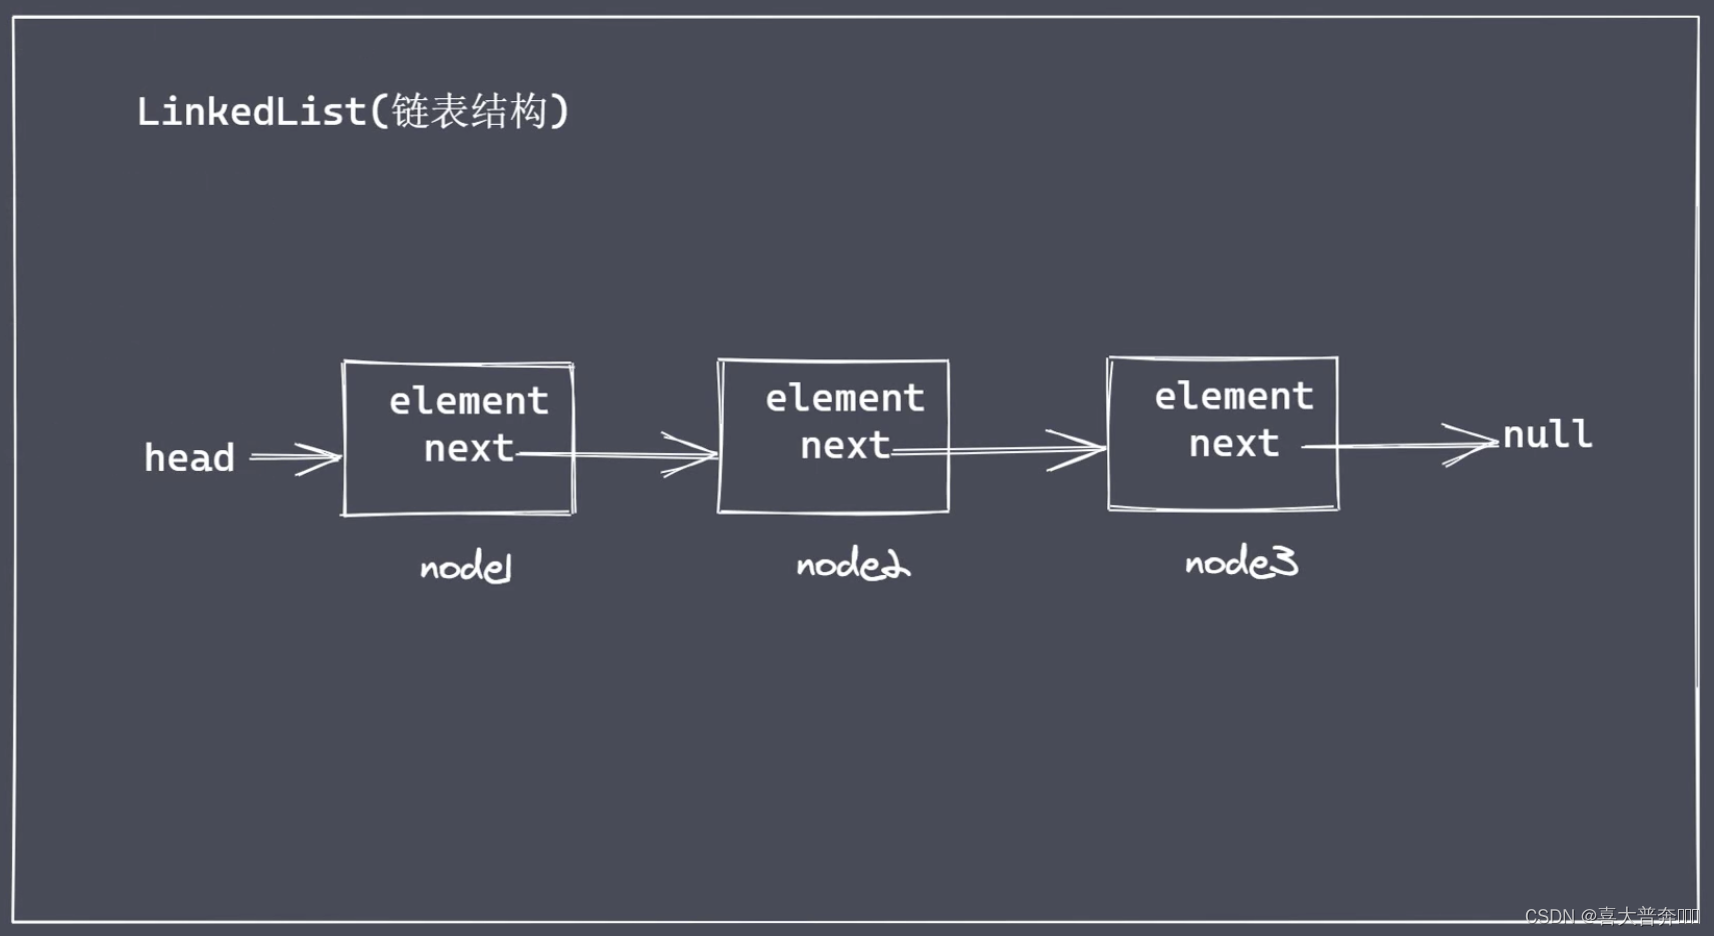
It can be deduced from the above figure that the two-way linked list has more prev attributes, while the circular linked list connects the head and the tail
Mainly for storing data, common actions: adding, deleting, modifying, querying and clearing, etc.
One-way linked list implementation
On the one hand, it is to store the data that needs to be written when customizing the writable stream of the file, and on the other hand, it is also to accumulate a common structure for storing data.
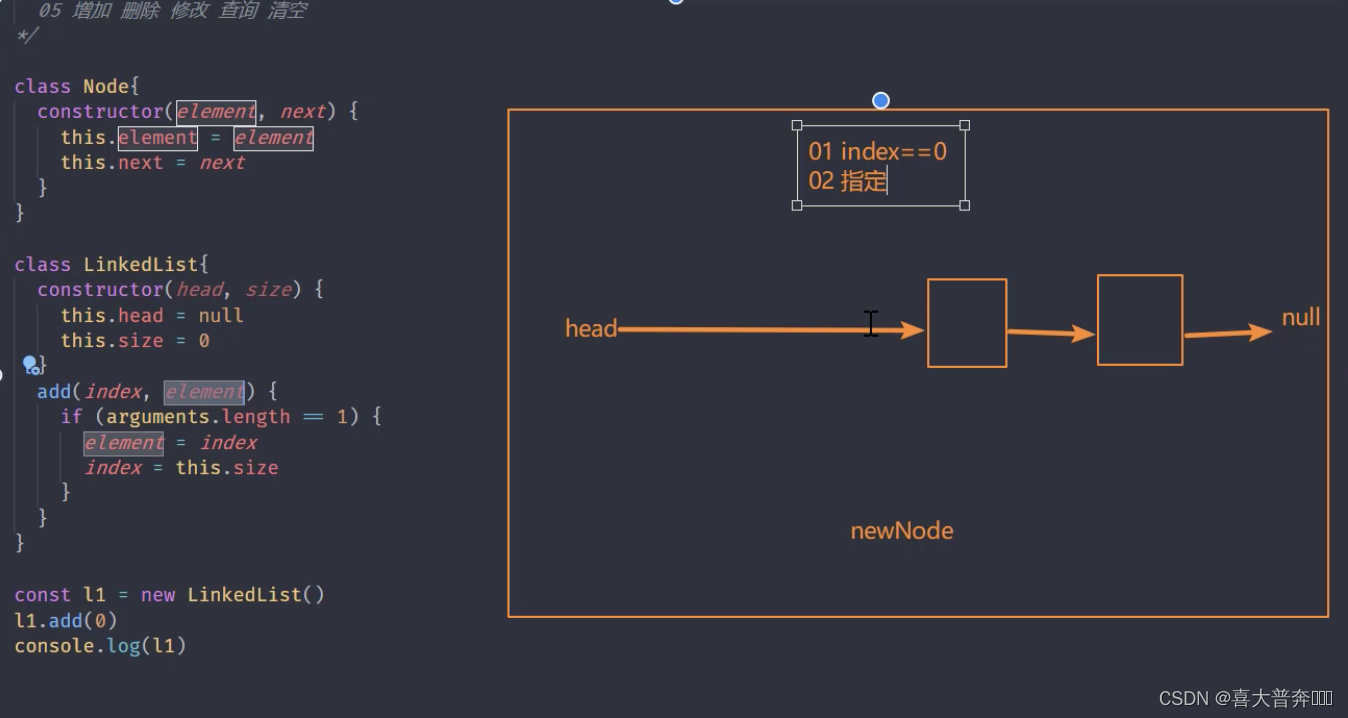

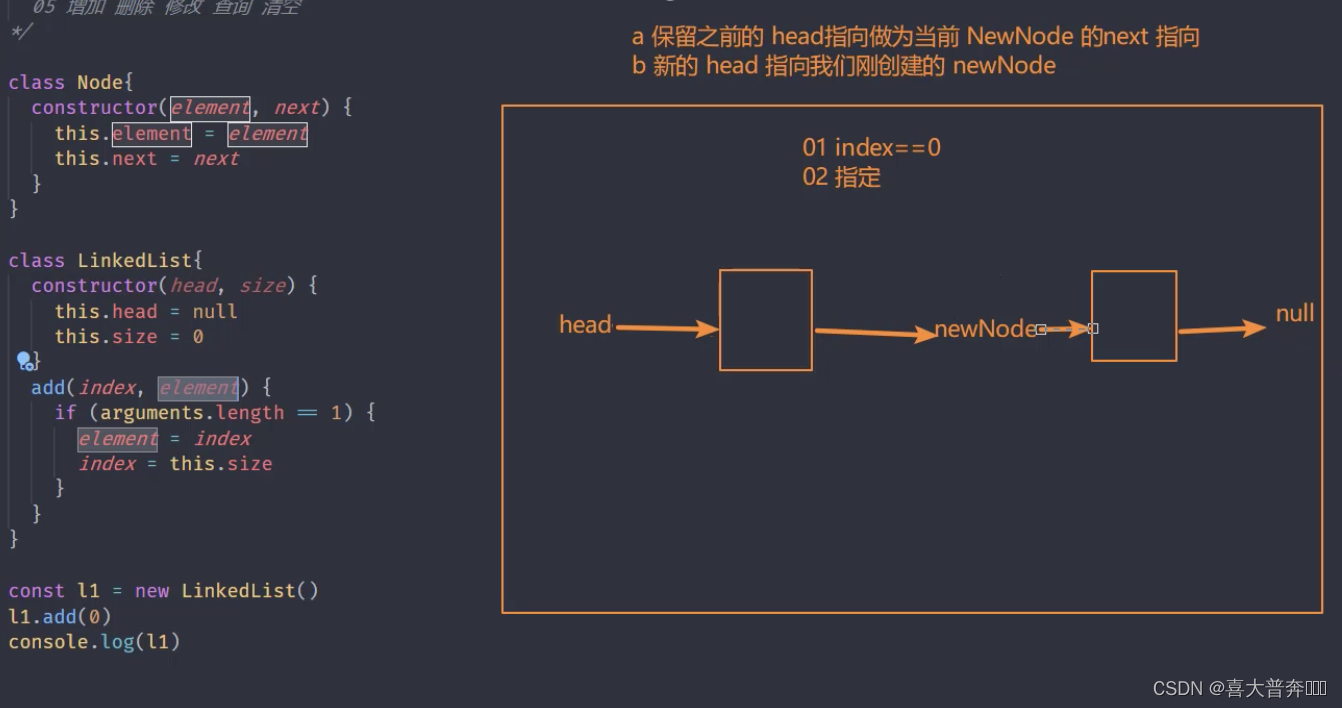
one
/**
 * 链表
 * 01 node + head + null
 * 02 head --> null
 * 03 size
 * node 节点
 * 04 next element
 * 05 增加 删除 修改 查询 清空
 */

class Node {


    constructor(element, next) {


        this.element = element
        this.next = next
    }
}

class LinkedList {


    constructor(head, size){


        this.head = null
        this.size = 0
    }
    // 添加
    add(index, element){


        if(arguments.length == 1){


            element = index
            index = this.size
        }
        if(index < 0 || index > this.size){


            throw new Error('cross the border')
        }
        if (index == 0) {


            let head = this.head // 保存原有 head 指向
            this.head = new Node(element, head) // 新 node 指向原来的 head 指向的地方,也就是老的 head
        } else {


            let prevNode = this._getNode(index - 1)
            prevNode.next = new Node(element, prevNode.next)
        }
        this.size ++
    }
}

const l1 = new LinkedList()
l1.add('node1')
console.log(l1);
two
/**
 * 链表
 * 01 node + head + null
 * 02 head --> null
 * 03 size
 * node 节点
 * 04 next element
 * 05 增加 删除 修改 查询 清空
 */

class Node {


    constructor(element, next) {


        this.element = element
        this.next = next
    }
}

class LinkedList {


    constructor(head, size){


        this.head = null
        this.size = 0
    }
    _getNode(index){


        if(index < 0 || index > this.size){


            throw new Error('cross the border')
        }
        let currentNode = this.head
        for(let i=0; i< index; i++){


            currentNode = currentNode.next
        }
        return currentNode
    }
    // 添加
    add(index, element){


        if(arguments.length == 1){


            element = index
            index = this.size
        }
        if(index < 0 || index > this.size){


            throw new Error('cross the border')
        }
        if (index == 0) {


            let head = this.head // 保存原有 head 指向
            this.head = new Node(element, head) // 新 node 指向原来的 head 指向的地方,也就是老的 head
        } else {


            let prevNode = this._getNode(index - 1)
            prevNode.next = new Node(element, prevNode.next)
        }
        this.size ++
    }
    remove(index){


        if(index < 0 || index > this.size){


            throw new Error('cross the border')
        }
        if (index == 0) {


            let head = this.head
            this.head = head.next
        } else {


            let prevNode = this._getNode(index - 1)
            prevNode.next = prevNode.next.next
        }
        this.size --
    }
}

const l1 = new LinkedList()
l1.add('node1')
l1.add('node2')
l1.add('node3')
// l1.remove(0)
l1.remove(1)
console.dir(l1, {

    depth: 5});
three
/**
 * 链表
 * 01 node + head + null
 * 02 head --> null
 * 03 size
 * node 节点
 * 04 next element
 * 05 增加 删除 修改 查询 清空
 */

class Node {


    constructor(element, next) {


        this.element = element
        this.next = next
    }
}

class LinkedList {


    constructor(head, size){


        this.head = null
        this.size = 0
    }
    _getNode(index){


        if(index < 0 || index > this.size){


            throw new Error('cross the border')
        }
        let currentNode = this.head
        for(let i=0; i< index; i++){


            currentNode = currentNode.next
        }
        return currentNode
    }
    // 添加
    add(index, element){


        if(arguments.length == 1){


            element = index
            index = this.size
        }
        if(index < 0 || index > this.size){


            throw new Error('cross the border')
        }
        if (index == 0) {


            let head = this.head // 保存原有 head 指向
            this.head = new Node(element, head) // 新 node 指向原来的 head 指向的地方,也就是老的 head
        } else {


            let prevNode = this._getNode(index - 1)
            prevNode.next = new Node(element, prevNode.next)
        }
        this.size ++
    }
    remove(index){


        if(index < 0 || index > this.size){


            throw new Error('cross the border')
        }
        if (index == 0) {


            let head = this.head
            this.head = head.next
        } else {


            let prevNode = this._getNode(index - 1)
            prevNode.next = prevNode.next.next
        }
        this.size --
    }
    set(index, element){


        if(index < 0 || index > this.size){


            throw new Error('cross the border')
        }
        let node = this._getNode(index)
        node.element = element
    }
    get(index){


        if(index < 0 || index > this.size){


            throw new Error('cross the border')
        }
        return this._getNode(index)
    }
    clear(){


        this.head = null
        this.size = 0
    }
}

const l1 = new LinkedList()
l1.add('node1')
l1.add('node2')
l1.add('node3')
// l1.set(2,'node3 - 1')
// let l = l1.get(1)
// console.log(l);
l1.clear()
console.dir(l1, {

    depth: 5});
Singly linked list implements queue
Here, the operation of a first-in-first-out queue structure is implemented through a one-way linked list. The main function is to store the data that needs to be queued and written when implementing the core method write of the file writable stream.
/**
 * 链表
 * 01 node + head + null
 * 02 head --> null
 * 03 size
 * node 节点
 * 04 next element
 * 05 增加 删除 修改 查询 清空
 */

class Node {


    constructor(element, next) {


        this.element = element
        this.next = next
    }
}

class LinkedList {


    constructor(head, size){


        this.head = null
        this.size = 0
    }
    _getNode(index){


        if(index < 0 || index > this.size){


            throw new Error('cross the border')
        }
        let currentNode = this.head
        for(let i=0; i< index; i++){


            currentNode = currentNode.next
        }
        return currentNode
    }
    // 添加
    add(index, element){


        if(arguments.length == 1){


            element = index
            index = this.size
        }
        if(index < 0 || index > this.size){


            throw new Error('cross the border')
        }
        if (index == 0) {


            let head = this.head // 保存原有 head 指向
            this.head = new Node(element, head) // 新 node 指向原来的 head 指向的地方,也就是老的 head
        } else {


            let prevNode = this._getNode(index - 1)
            prevNode.next = new Node(element, prevNode.next)
        }
        this.size ++
    }
    remove(index){


        if(index < 0 || index > this.size){


            throw new Error('cross the border')
        }
        let rmNode = null
        if (index == 0) {


            rmNode = this.head
            if(!rmNode) return undefined
            this.head = rmNode.next
        } else {


            let prevNode = this._getNode(index - 1)
            rmNode = prevNode.next
            prevNode.next = rmNode.next
        }
        this.size --
        return rmNode
    }
    set(index, element){


        if(index < 0 || index > this.size){


            throw new Error('cross the border')
        }
        let node = this._getNode(index)
        node.element = element
    }
    get(index){


        if(index < 0 || index > this.size){


            throw new Error('cross the border')
        }
        return this._getNode(index)
    }
    clear(){


        this.head = null
        this.size = 0
    }
}

class Queue {


    constructor(){


        this.linkedList = new LinkedList()
    }
    // 进队列:利用我们的链表结构调用它的 add 方法,把数据添加到链表身上,链表上有了数据以后,就相当于我们的队列里边有了数据
    enQueue(data){


        this.linkedList.add(data)
    }
    deQueue(){


        return this.linkedList.remove(0)
    }
}

let q = new Queue()
q.enQueue('nide1')
q.enQueue('nide2')
q.enQueue('nide3')
// console.dir(q, {depth: 5});
let a = q.deQueue()
console.log(a);
a = q.deQueue()
console.log(a);
a = q.deQueue()
console.log(a);
a = q.deQueue()
console.log(a);
File writable stream implementation
The core operation is to implement one's own write method. Let me emphasize again: whenever we implement a method that already exists in Nodejs itself, it is not to replace it in actual development, but to better understand the existing methods in Nodejs. understanding.
For example, the write method we want to implement now is itself an asynchronous method, but when our colleagues execute multiple writes, Node internally processes it into a serial method, which is what we often use in actual development A concurrent solution for . Here, through the realization of the custom write method, to clarify its solution principle and implementation process.
one
const fs = require('fs');
const EventsEmitter = require('events');
const Queue = require('./linkedList');

class MyWriteStream extends EventsEmitter {


    constructor(path, options = {

     }){


        super()
        this.path = path
        this.flags = options.flags || 'w'
        this.mode = options.mode || 438
        this.autoClose = options.autoClose || true
        this.start = options.start || 0
        this.end = options.end
        this.encoding = options.encoding || 'utf8'
        this.highWaterMark = options.highWaterMark || 16 * 1024
        this.open()
    }
    open(){


        console.log('open')
        // 原生 的 fs.open 完成操作
        fs.open(this.path, this.flags, (err, fd)=>{


            if(err) return this.emit('error', err)
            this.fd = fd
            this.emit('open', fd)
        })
    }
}

let ws = new MyWriteStream('test.txt')

ws.on('open', (fd)=>{


    console.log(fd, '打开了');
})
two
const fs = require('fs');
const EventsEmitter = require('events');
const Queue = require('./linkedList');

class MyWriteStream extends EventsEmitter {


    constructor(path, options = {

     }){


        super()
        this.path = path
        this.flags = options.flags || 'w'
        this.mode = options.mode || 438
        this.autoClose = options.autoClose || true
        this.start = options.start || 0
        this.end = options.end
        this.encoding = options.encoding || 'utf8'
        this.highWaterMark = options.highWaterMark || 16 * 1024
        this.open()
        this.writeOffset = this.start // 偏移量
        this.writing = false // 正在执行写入操作与否
        this.writeLen = 0 // 累计写入量
        this.needDrain = false // 是否触发 drain 事件
        this.cache = new Queue() // 缓存数据结构
    }
    open(){


        // console.log('open')
        // 原生 的 fs.open 完成操作
        fs.open(this.path, this.flags, (err, fd)=>{


            if(err) return this.emit('error', err)
            this.fd = fd
            this.emit('open', fd)
        })
    }
    // 参数不做判断,全部假设参与就是自己的预期参数,就考虑 string 和 buffer 就行
    write(chunk, encoding, callback){


        chunk = Buffer.isBuffer(chunk) ? chunk : Buffer.from(chunk)
        this.writeLen += chunk.length
        // console.log(this.writeLen);
        let flag = this.writeLen < this.highWaterMark
        this.needDrain = !flag

        if (this.writing) {


            // 当前正在执行写入,所以内容应该排队,所以内容应该放缓存队列
            // this.cache.enQueue()
            console.log('执行排队');
        } else {


            // 当前没有在写入状态,执行写入
            this.writing = true
            this._write()
        }

        return flag
    }
    // 真正要执行的写入操作
    _write(chunk, encoding, callback){


        console.log('正在执行写入');
    }
}

let ws = new MyWriteStream('test.txt', {


    // highWaterMark: 2
    highWaterMark: 4
})

ws.on('open', (fd)=>{


    // console.log(fd, '打开了');
})

ws.write('1', 'utf8', ()=>{


    console.log('写入成功');
})
ws.write('2', 'utf8', ()=>{


    console.log('写入成功');
})
let flag = ws.write('3', 'utf8', ()=>{


    console.log('写入成功');
})
console.log(flag);
three
const fs = require('fs');
const EventsEmitter = require('events');
const Queue = require('./linkedList');

class MyWriteStream extends EventsEmitter {


    constructor(path, options = {

     }){


        super()
        this.path = path
        this.flags = options.flags || 'w'
        this.mode = options.mode || 438
        this.autoClose = options.autoClose || true
        this.start = options.start || 0
        this.end = options.end
        this.encoding = options.encoding || 'utf8'
        this.highWaterMark = options.highWaterMark || 16 * 1024
        this.open()
        this.writeOffset = this.start // 偏移量
        this.writing = false // 正在执行写入操作与否
        this.writeLen = 0 // 累计写入量
        this.needDrain = false // 是否触发 drain 事件
        this.cache = new Queue() // 缓存数据结构
    }
    open(){


        // console.log('open')
        // 原生 的 fs.open 完成操作
        fs.open(this.path, this.flags, (err, fd)=>{


            if(err) return this.emit('error', err)
            this.fd = fd
            this.emit('open', fd)
        })
    }
    // 参数不做判断,全部假设参与就是自己的预期参数,就考虑 string 和 buffer 就行
    write(chunk, encoding, callback){


        chunk = Buffer.isBuffer(chunk) ? chunk : Buffer.from(chunk)
        this.writeLen += chunk.length
        // console.log(this.writeLen);
        let flag = this.writeLen < this.highWaterMark
        this.needDrain = !flag

        if (this.writing) {


            // 当前正在执行写入,所以内容应该排队,所以内容应该放缓存队列
            // console.log('执行排队');
            this.cache.enQueue({

    chunk, encoding, callback})
        } else {


            // 当前没有在写入状态,执行写入
            this.writing = true
            this._write(chunk, encoding, ()=>{


                callback()
                // 清空排队的内容
                this._clearBuffer()
            })
        }

        return flag
    }
    // 真正要执行的写入操作
    _write(chunk, encoding, callback){


        // console.log('正在执行写入');
        // console.log(this.fd) // 因为 open 是一个异步操作,所以这里可能拿不到
        if(typeof this.fd !== 'number'){


            return this.once('open', ()=>{


                return this._write(chunk, encoding, callback)
            })
        }
        fs.write(this.fd, chunk, this.start, chunk.length, this.writeOffset, (err, writeLen)=>{


            // console.log('写入成功');
            this.writeOffset += writeLen
            this.writeLen -= writeLen

            callback && callback()
        })
    }
    _clearBuffer(){


        // 先看一下缓存里边内容,有就写入,没有就清空了
        let data = this.cache.deQueue()
        // console.log(data);
        if(data){


            this._write(data.element.chunk, data.element.encoding,()=>{


                data.element.callback && data.element.callback()
                this._clearBuffer()
            })
        } else {


            if(this.needDrain){


                this.needDrain = false
                this.emit('drain')
            }
        }
    }
}

let ws = new MyWriteStream('test.txt', {


    // highWaterMark: 2
    // highWaterMark: 1
})

ws.on('open', (fd)=>{


    console.log('打开文件获得标识符:',fd);
})

let flag = ws.write('1', 'utf8', ()=>{


    console.log('写入成功1');
})
flag = ws.write('20', 'utf8', ()=>{


    console.log('写入成功2');
})
flag = ws.write('测试数据', 'utf8', ()=>{


    console.log('写入成功3');
})

console.log(flag);

ws.on('drain', ()=>{


    console.log('drain');
})
The pipe method uses
The ultimate syntactic sugar for file read and write operations
const fs = require('fs');
// const ReadStream = require('ReadStream');

const rs = fs.createReadStream('f9.txt', {


    highWaterMark: 4 // 可读流默认 64 kb
})

const ws = fs.createWriteStream('test.txt', {


    highWaterMark: 1 // 可写流默认 16kb
})

rs.pipe(ws)
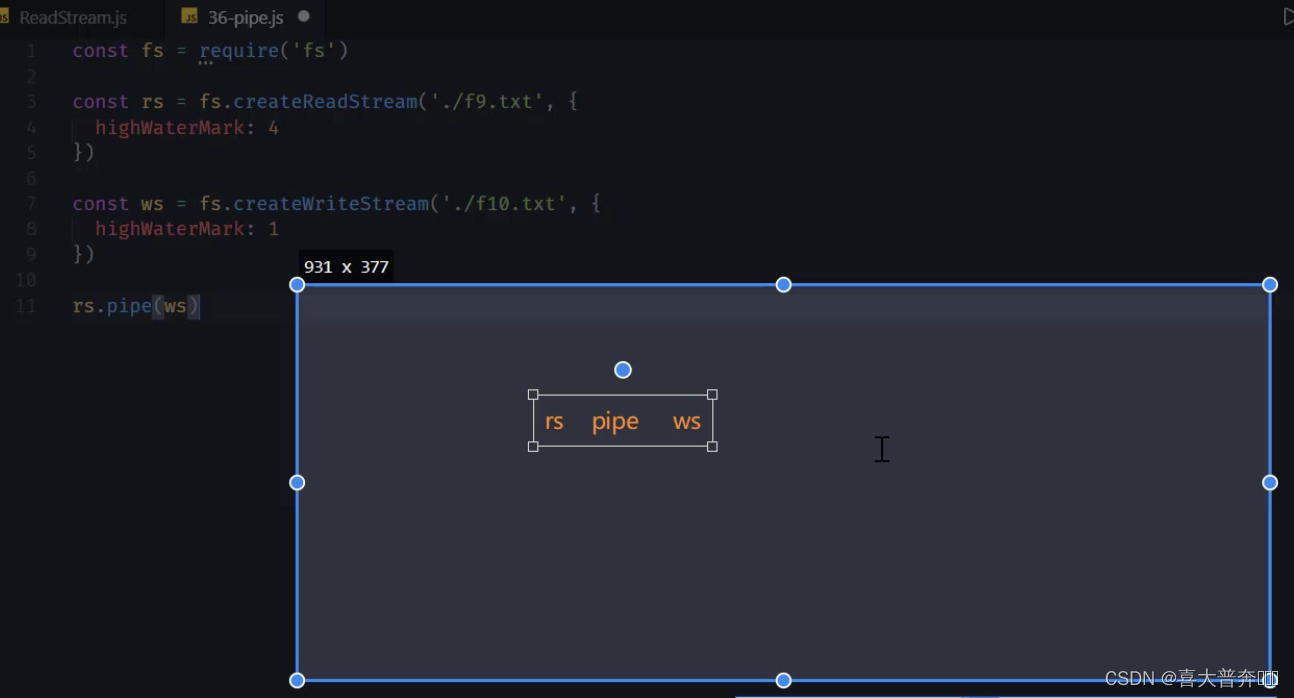
ReadStream.js
const fs = require('fs');
const EventEmitter = require('events');

class ReadStream extends EventEmitter {


    constructor(path, options = {

     }) {


        super()
        this.path = path
        this.flags = options.flags || 'r'
        this.mode = options.mode || 438
        this.autoClose = options.autoClose || 438
        this.start = options.start || 0
        this.end = options.end
        this.highWaterMark = options.highWaterMark || 64 * 1024
        this.readOffset = 0

        this.open()
        // 在外边监听新事件的时候会被触发,监听什么事件,type就是什么事件
        this.on('newListener', (type) => {


            if (type === 'data') {


                this.read()
            }
        })
    }
    open() {


        // 原生 open 方法来打开指定位置的文件
        fs.open(this.path, this.flags, this.mode, (err, fd) => {


            if (err) {


                this.emit('error', err)
                return
            }
            this.fd = fd
            this.emit('open', fd)
        })
    }
    read() {


        // console.log(this.fd)
        if (typeof this.fd !== 'number') return this.once('open', this.read)
        let buf = Buffer.alloc(this.highWaterMark)
        let howMuchToRead = this.end ? Math.min(this.end - this.readOffset + 1, this.highWaterMark) : this.highWaterMark
        fs.read(this.fd, buf, 0, howMuchToRead, this.readOffset, (err, readBytes) => {


            if (readBytes) {


                this.readOffset += readBytes
                this.emit('data', buf.subarray(0, readBytes))
                this.read()
            } else {


                this.emit('end')
                this.close()
            }
        })
    }
    close() {


        fs.close(this.fd, () => {


            this.emit('close')
        })
    }
    pipe(ws){


        this.on('data', (data)=>{


            let flag = ws.write(data)
            // 当写入量超过预期缓存量,就先不要写了
            if (!flag) {


                this.pause()
            }
        })
        ws.on('drain', ()=>{


            this.resume()
        })
    }
}

module.exports = ReadStream
const fs = require('fs');
const myReadStream = require('./ReadStream');

// const rs = fs.createReadStream('f9.txt', {


//     highWaterMark: 4
// })

// const ws = fs.createWriteStream('test.txt', {


//     highWaterMark: 1
// })

// rs.pipe(ws) // 原生的 pipe

// 看内部数据还是可以监听 data 事件的

const rs = new myReadStream('f9.txt')

const ws = fs.createWriteStream('test.txt')

rs.pipe(ws)
communication
Communication basic principle
The final problem to be solved is the network communication between the host and the host.
communication requirements
- There needs to be a transmission medium between the hosts
- There must be a network card device on the host (binary conversion into high and low voltage, high and low voltage reversed into binary)
- Network speed needs to be negotiated between hosts
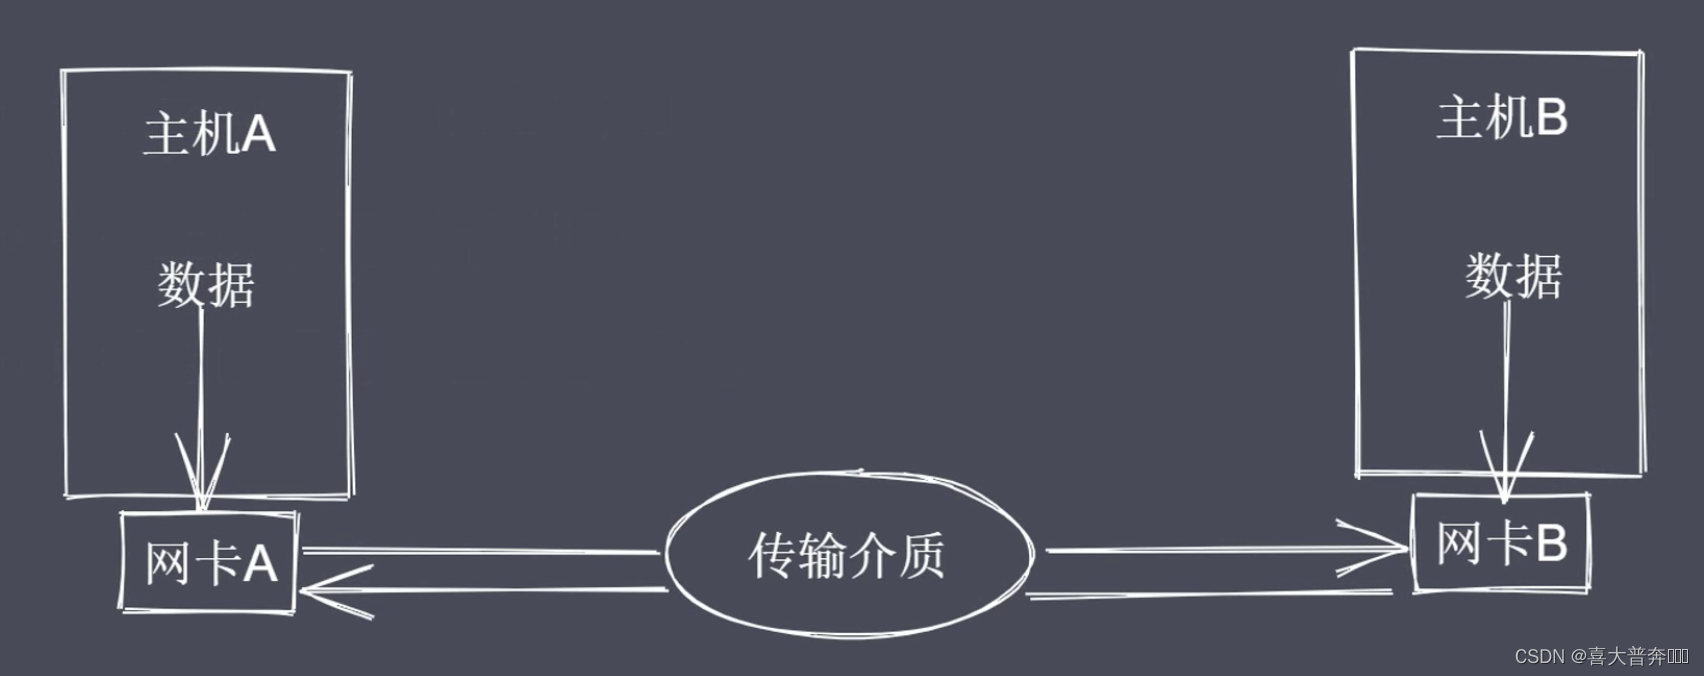
Network communication method
- switch communication
- router communication
How to establish multiple host interconnections?
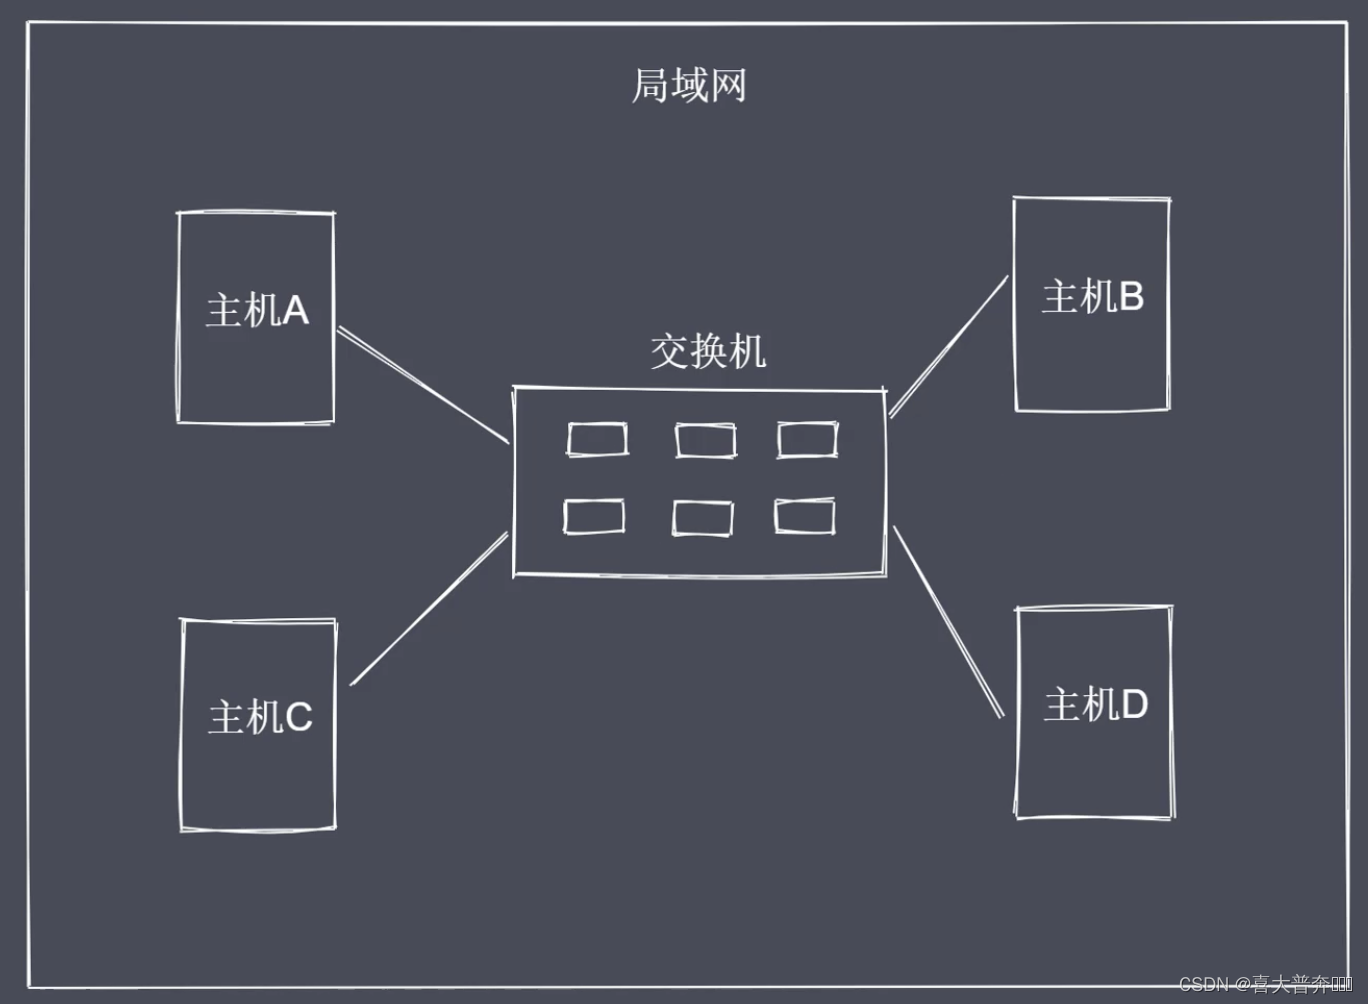
How to locate other hosts in the LAN?
Uniquely identify a host by its Mac address
The number of interfaces on the switch has an upper limit, and a large number of hosts in the LAN will cause broadcast storms.
Clarify the IP address of the target host
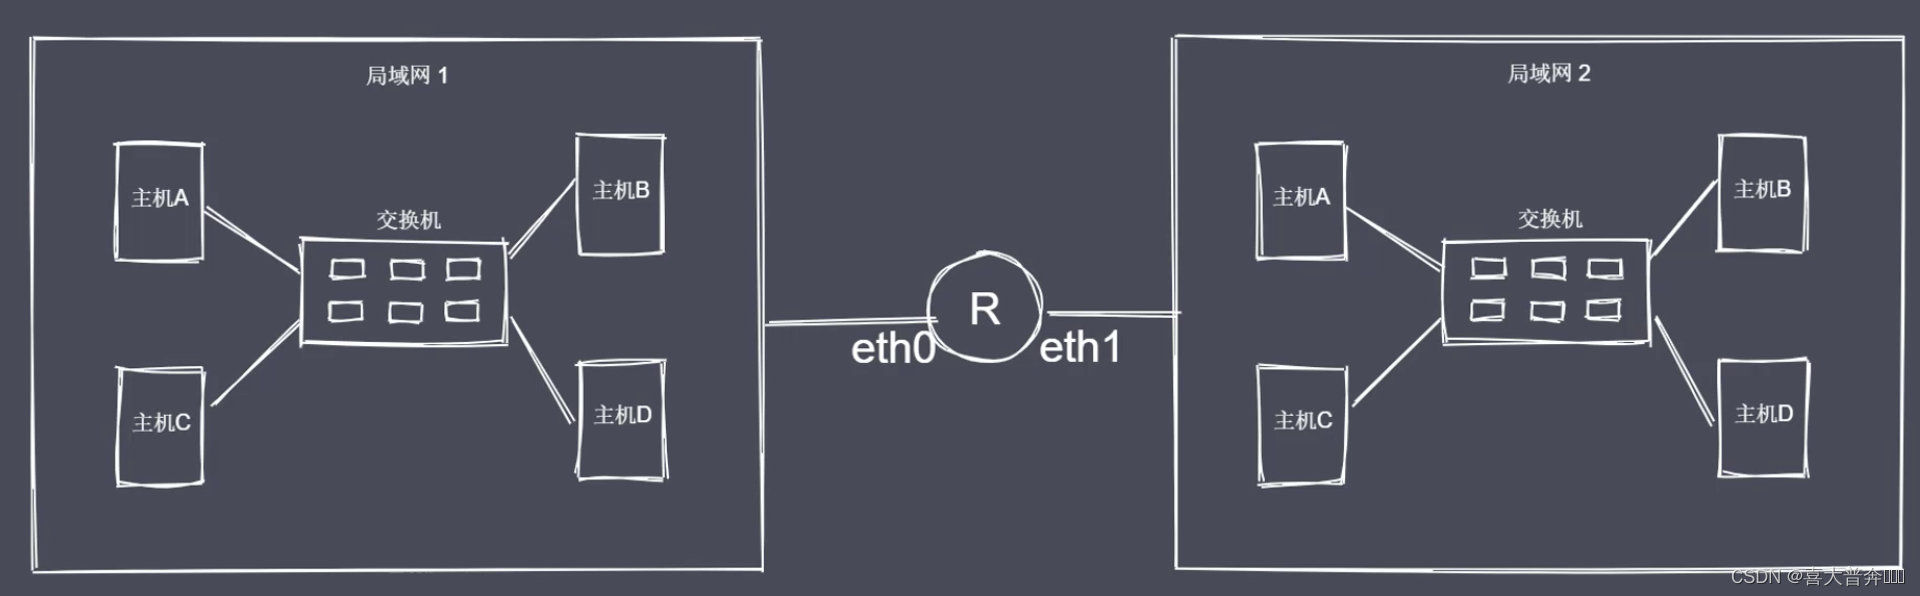
This is not to explain every detail of network communication in detail, but to clarify the process and core concepts of network communication.
Network Hierarchy Model
The main thing is to have a clear structural understanding of the layering of the network, and it is not necessary to grasp how each layer completes specific work.
OSI seven-layer model
- Application layer: the interface between the user and the network
- Presentation layer: data encryption, conversion, compression
- Session layer: control network connection establishment and termination
- Transport layer: Control data transmission reliability
- Network Layer: Determining the Target Network
- Data link layer: determine the target host
- Physical layer: various physical devices and standards
Role: To complete the network communication TCP/IP 4 layer more clearly and standardizedly
. On this basis, the first three layers are called the application layer, the data link and the physical layer are combined called the access layer, and the middle network layer is called the host layer.
Data from A to B is first encapsulated and then unpacked.
Data Encapsulation and Decapsulation
The five-layer division mode of TCP/IP used here
- Application layer: output data
- Transport layer: TCP/UDP, package destination port, source port
- Network layer: IP, destination IP on the package, source IP
- Data link layer: Mac address, target Mac on the package, source Mac
- Physical layer: network card, binary data / high and low voltage
The process of encapsulation and decapsulation is opposite. Encapsulation is to wrap data, and decapsulation is to disassemble data.
http is only the most common protocol in the application layer, TCP is only an important protocol in the transport layer, and network communication itself is relatively complicated, but it does not affect us to use any programming language for development, because regarding communication, the development language itself or The development framework has already been implemented, we just need to use it.
TCP three-way handshake and four-way wave
Here we understand the process of three-way handshake establishment and four-way wave, without delving into the underlying implementation.
TCP protocol
- TCP is a transport layer protocol
- TCP is a connection-oriented protocol
- TCP is used to handle real-time communication
Data transmission reliability is high, and the efficiency is slightly lower than that of UDP

Common control fields
- SYN = 1 means request to establish a connection
- FIN = 1 means request to disconnect
- ACK = 1 means data information confirmation
Three-way handshake
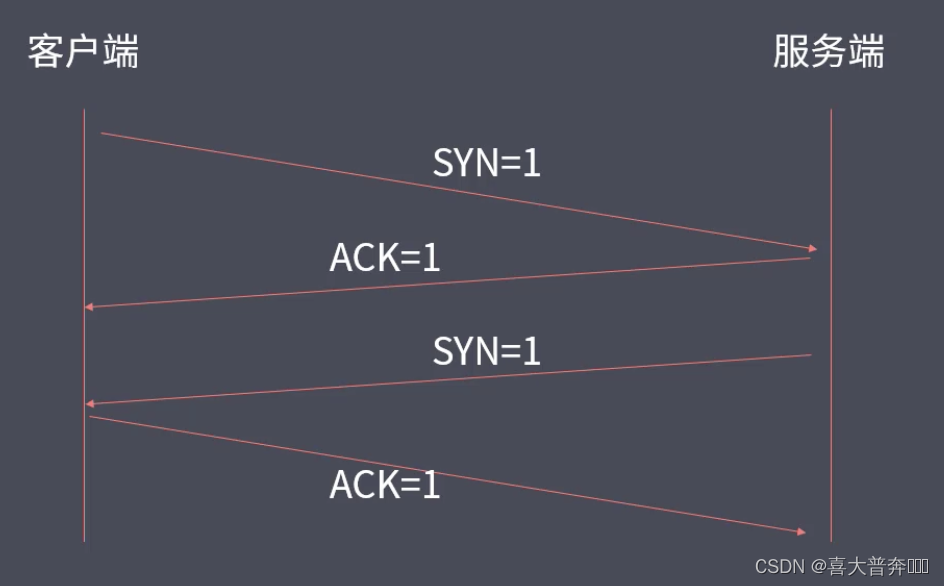
looks like a four-way handshake, but the server sends SYN = 1 while sending ACK = 1 to the client, which becomes the final three-way handshake and four-way handshake
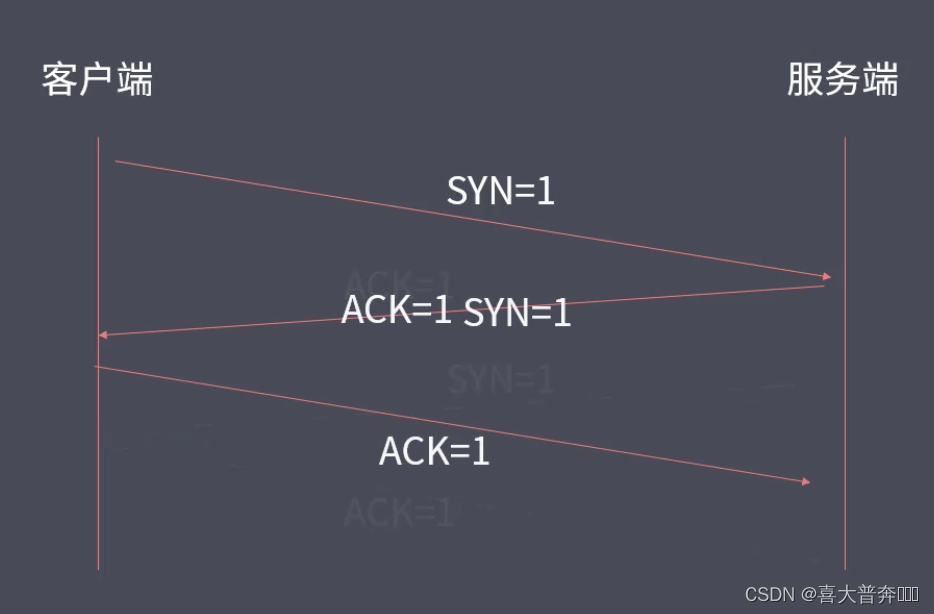
1

-client sends a disconnection request to the server
2-The server sends a message confirmation to the client
3-The server sends a disconnection request to the client
4-The client sends a message confirmation to the server
The 2-3 waved four times cannot be merged, because a server needs to serve multiple clients, and there is no guarantee that after a certain client sends a disconnection request, the server will immediately transmit all the result data back to the client
TCP protocol
- TCP is at the transport layer, port-based, connection-oriented
- To communicate between hosts, a two-way data channel needs to be established first.
- TCP's handshake and wave are essentially four times
Create TCP three-way handshake and four-way handshake
The Net module implements the underlying communication interface
communication process
- Create a server: receive and write client data
- Create a client: send and receive data from the server
- Data transfer: built-in service events and methods to read and write data
communication incident
- listening event: triggered after calling the server.listen method
- connection event: triggered when a new connection is established
- close event: triggered when the server is closed
- error event: triggered when an error occurs
Communication Events & Methods
- data event: This event is triggered when data is received
- write method: send data on the socket, the default is UTF8 encoding
- end operation: triggered when one end of the socket sends a FIN packet, ending the readable end
// server.js
const net = require('net');

// 创建服务端实例
const server = net.createServer()

const PORT = 1234
const HOST = 'localhost'

server.listen(PORT, HOST)

server.on('listening', ()=>{


    console.log(`服务端已开启:${

      HOST}:${

      PORT}`)
})


// 接收消息 | 回写消息
server.on('connection', (socket)=>{


    socket.on('data', (chunk)=>{


        let msg = chunk.toString()
        console.log(msg)
        // 回数据
        socket.write(Buffer.from('你好:' + msg))
    })
})

server.on('close', ()=>{


    console.log('服务端关闭了');
})


server.on('error', (err)=>{


    if(err.code == 'EADDRINUSS'){


        console.log('地址正在被使用');
    } else {


        console.log(err);
    }
})
// client.js
const net = require('net');

const client = net.createConnection({


    port: 1234,
    host: '127.0.0.1'
})

client.on('connect', ()=>{


    client.write('客户端')
})

client.on('data', (chunk)=>{


    console.log(chunk.toString());
})

client.on('error', (err)=>{


    console.log(err);
})

client.on('close', ()=>{


    console.log('客户端断开连接了');
})
TCP sticky packet and its solution
The communication includes two parts: the data sending end and the receiving end. The sending end does not send the data in hand to the receiving end in real time, but has a buffer area, and waits for the amount of data to reach a certain level before performing a sending operation. Similarly, the receiving end It is also consumed after caching. The advantage is to reduce the performance operations brought by IO operations; but the use of data will cause the problem of sticky packets.
There is another question, what kind of conditions will trigger the send operation?
The TCP congestion mechanism determines when to send.
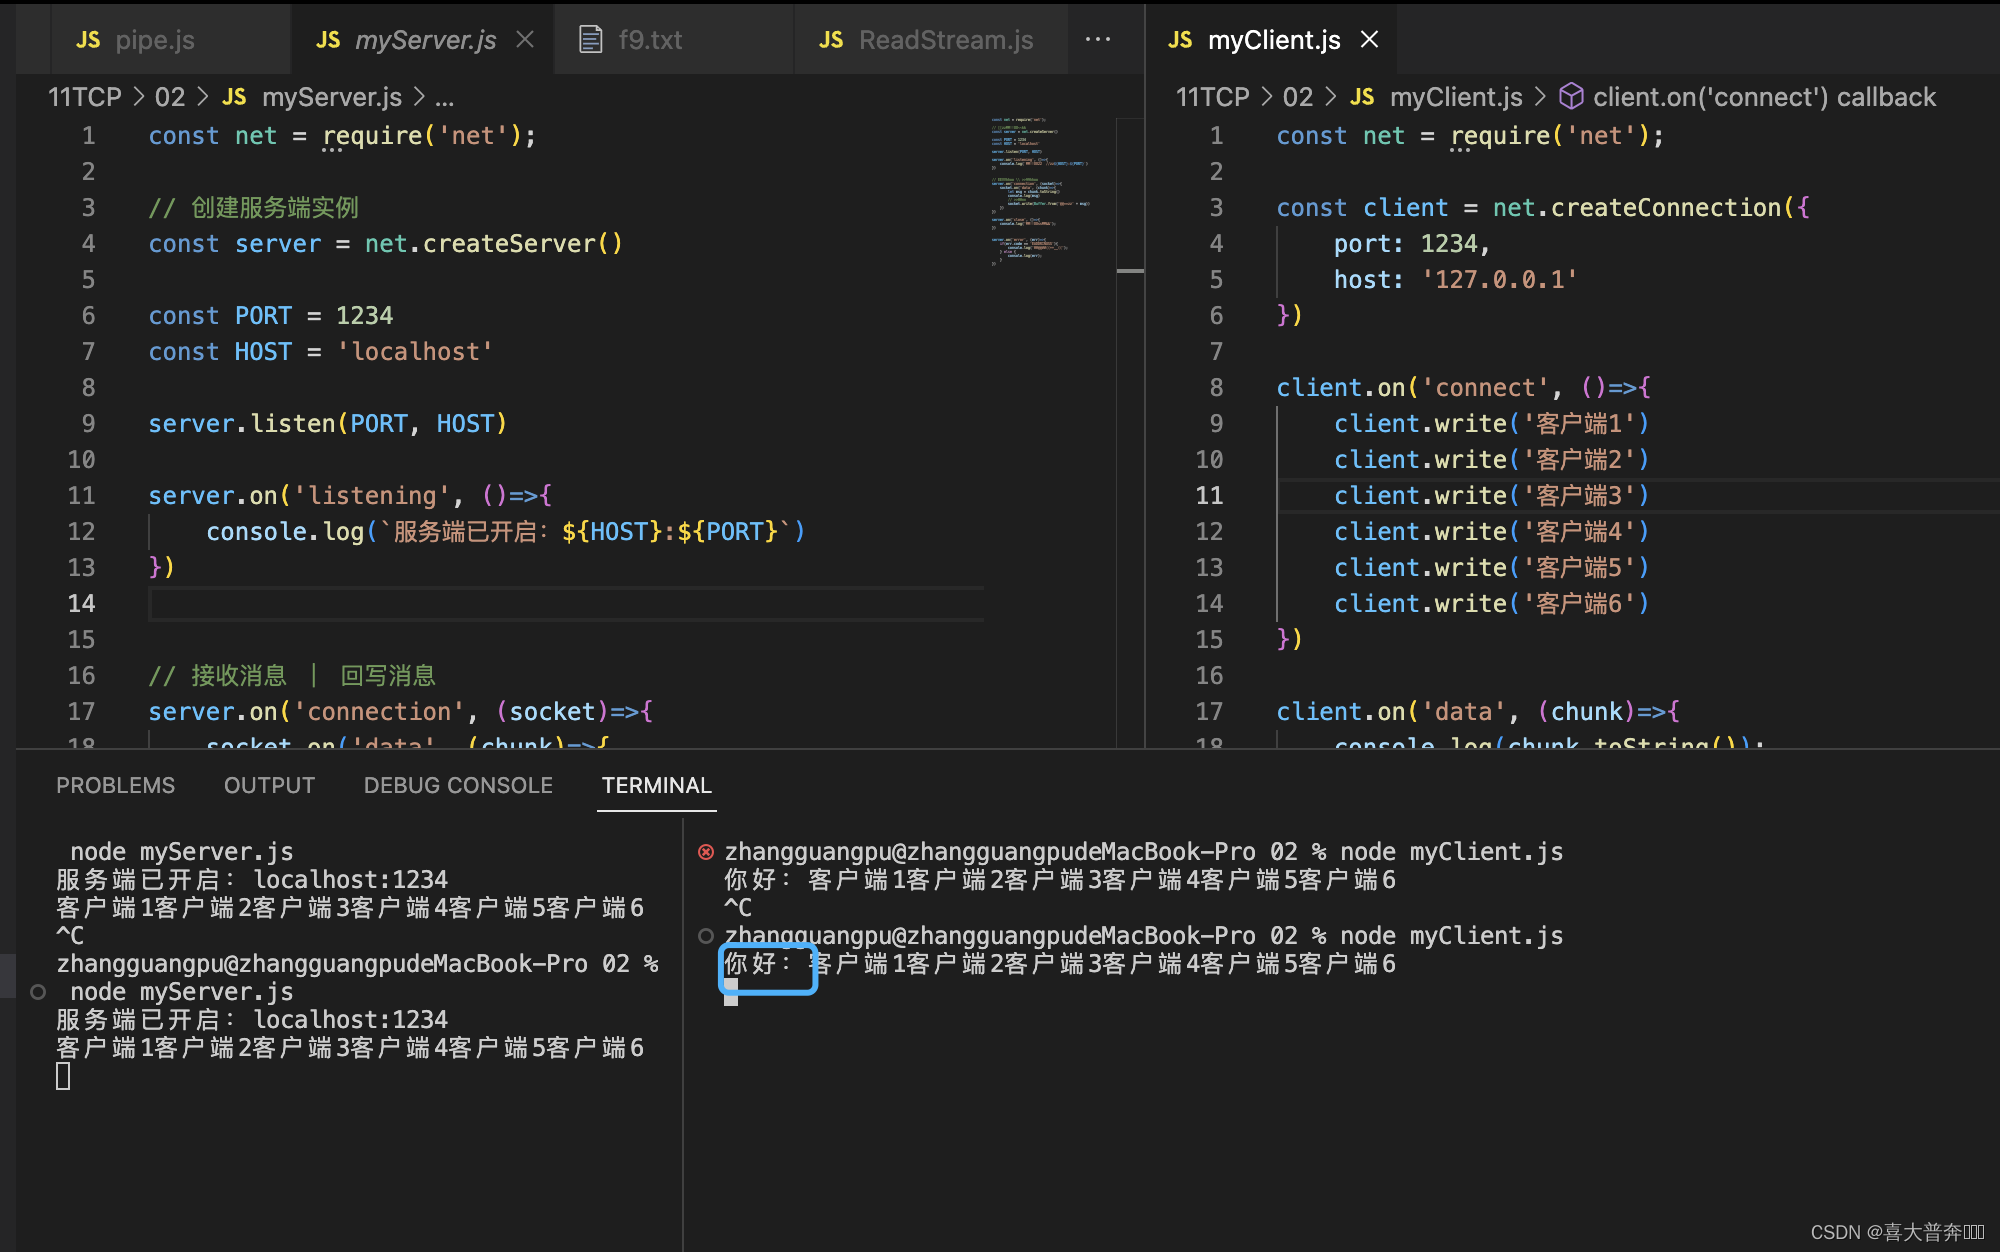
1. Delayed sending

// client.js
const net = require('net');

const client = net.createConnection({


    port: 1234,
    host: '127.0.0.1'
})

let dataArr = [
    '客户端1',
    '客户端2',
    '客户端3',
    '客户端4',
]

client.on('connect', ()=>{


    client.write('客户端')
    for(let i=0; i<dataArr.length; i++){


        (function(val, index){


            setTimeout(()=>{


                client.write(val)
            }, 1000 * (index + 1))
        })(dataArr[i], i)
    }
})

client.on('data', (chunk)=>{


    console.log(chunk.toString());
})

client.on('error', (err)=>{


    console.log(err);
})

client.on('close', ()=>{


    console.log('客户端断开连接了');
})
The disadvantage is also obvious, which reduces the efficiency of data transmission
Packet unpacking implementation
Here, the data transmission method of first packing and then unpacking is used to solve the problem of sticky packets.
The core idea is to pack the data according to the agreed rules, and unpack the data according to the specified rules when using the data in the future.
Here, the method of length encoding is used to agree on the data transmission method of the communication parties.


data transfer process
- Perform data encoding and obtain binary data packets
- Disassemble the data according to the rules to obtain the data of the specified length
Buffer data read and write
- writeInt16BE: write value from the specified location
- readInt16BE: read data from the specified position
Similarly, there are 32 BE, but the current use of 16 BE is enough
// MtTransform.js
class MyTransformCode {


    constructor(){


        // Header 总长度
        this.packageHeaderLen = 4
        // 编号
        this.serialNum = 0
        // 消息体长度
        this.serialLen = 2
    }
    // 编码
    encode(data, serialNum){


        let body = Buffer.from(data)
        // 01 先按照指定的长度申请一片内存空间作为 header 来使用
        const headerBuf = Buffer.alloc(this.packageHeaderLen)

        // 02
        headerBuf.writeInt16BE(serialNum || this.serialNum)

        // 03 将当前这一次传输过来的数据总长度作为消息体 body 的长度写到 header 里的另一个空间当中
        headerBuf.writeInt16BE(body.length, this.serialLen)

        if(serialNum == undefined){


            this.serialNum ++
        }

        return Buffer.concat([headerBuf, body])
    }

    // 解码
    decode(buffer){


        const headerBuf = buffer.subarray(0, this.packageHeaderLen)
        const bodyBuf = buffer.subarray(this.packageHeaderLen)

        return {


            serialNum: headerBuf.readInt16BE(), // 不用参数,写的时候我们按照16进制,往高位上写,读的时候它按照相应的规则把我们写过去的数据读出来
            bodyLength: headerBuf.readInt16BE(this.serialLen), // 跳过编号所在位置
            body: bodyBuf.toString()
        }
    }

    // 获取当前数据包长度的方法
    getPackageLen(buffer){


        /**
         * 加入当前消息体占 1 个字节,body 长度是 1,之前规定 packageHeader 长度为 4 个字节,所以 如果传进来的 buffer 长度都还没有超过 4 个字节的情况下,有两种
         * 一、包不完成
         * 二、数据没传输完成
         * 不管是哪种情况,都说明我们不能从这样的 buffer 里拿数据,所以这里直接把 length 作为 0 来返回就可以了
         */
        if (buffer.length < this.packageHeaderLen) {


            return 0
        } else {


            return this.packageHeaderLen + buffer.readInt16BE(this.serialLen)
        }
    }
}

module.exports = MyTransformCode
// test.js

const MyTransformCode = require('./cusTransform');

let ts = new MyTransformCode()

let str1 = '测试数据'

let encodeBuf = ts.encode(str1, 1)

// console.log(encodeBuf);
// console.log(Buffer.from(str1));

let decodeObj = ts.decode(encodeBuf)
console.log(decodeObj);

let len = ts.getPackageLen(encodeBuf)
console.log(len);
Encapsulation solves sticky packets
// server.js
const net = require('net');
const MyTransform = require('./myTransform');
const server = net.createServer()

let ts = new MyTransform()
let overageBuffer = null

server.listen(1234, 'localhost')

server.on('listening', ()=>{


    console.log('服务端运行在:localhost:1234')
})

server.on('connection', (socket)=>{


    socket.on('data', (chunk) => {


        // let msg = chunk.toString()
        // console.log(msg);
        if(overageBuffer){


            chunk = Buffer.concat([overageBuffer, chunk])
        }
        let packageLen = 0
        while(packageLen = ts.getPackageLen(chunk)){


            const packageCont = chunk.subarray(0,packageLen)
            chunk = chunk.subarray(packageLen)

            const ret = ts.decode(packageCont)
            console.log(ret);
            socket.write(ts.encode('您好: '+ret.body, ret.serialNum))
        }
        overageBuffer = chunk
        // socket.write(Buffer.from('你好:'+msg))
    })
})
// client.js
const net = require('net');
const MyTransform = require('./myTransform');
const client = net.createConnection({


    port: 1234,
    host: 'localhost'
})
let ts = new MyTransform()
let overageBuffer = null

client.on('connect', ()=>{


    console.log('连接成功');
    // client.write('测试客户端1')
    // client.write('测试客户端2')
    // client.write('测试客户端3')
    // client.write('测试客户端4')
    client.write(ts.encode('测试客户端1', 1))
    client.write(ts.encode('测试客户端2', 2))
    client.write(ts.encode('测试客户端3', 3))
    client.write(ts.encode('测试客户端4', 4))
})

client.on('data', (chunk)=>{


    // console.log(chunk.toString());
    if(overageBuffer){


        chunk = Buffer.concat([overageBuffer, chunk])
    }
    let packageLen = 0
    while(packageLen = ts.getPackageLen(chunk)){


        const packageCont = chunk.subarray(0,packageLen)
        chunk = chunk.subarray(packageLen)

        const ret = ts.decode(packageCont)
        console.log(ret);
    }
    overageBuffer = chunk
})
http protocol
Intuitively look at what is the http protocol through the code, and how to use the module in nodejs to open the http service.
// net-httpserver
const net = require('net');

// 创建服务端
const server = net.createServer()

server.listen(1234, ()=>{


    console.log('服务启动了....')
})

server.on('connection', (socket)=>{


    socket.on('data', (data)=>{


        console.log(data.toString());

    })
    socket.end('test http request')
})
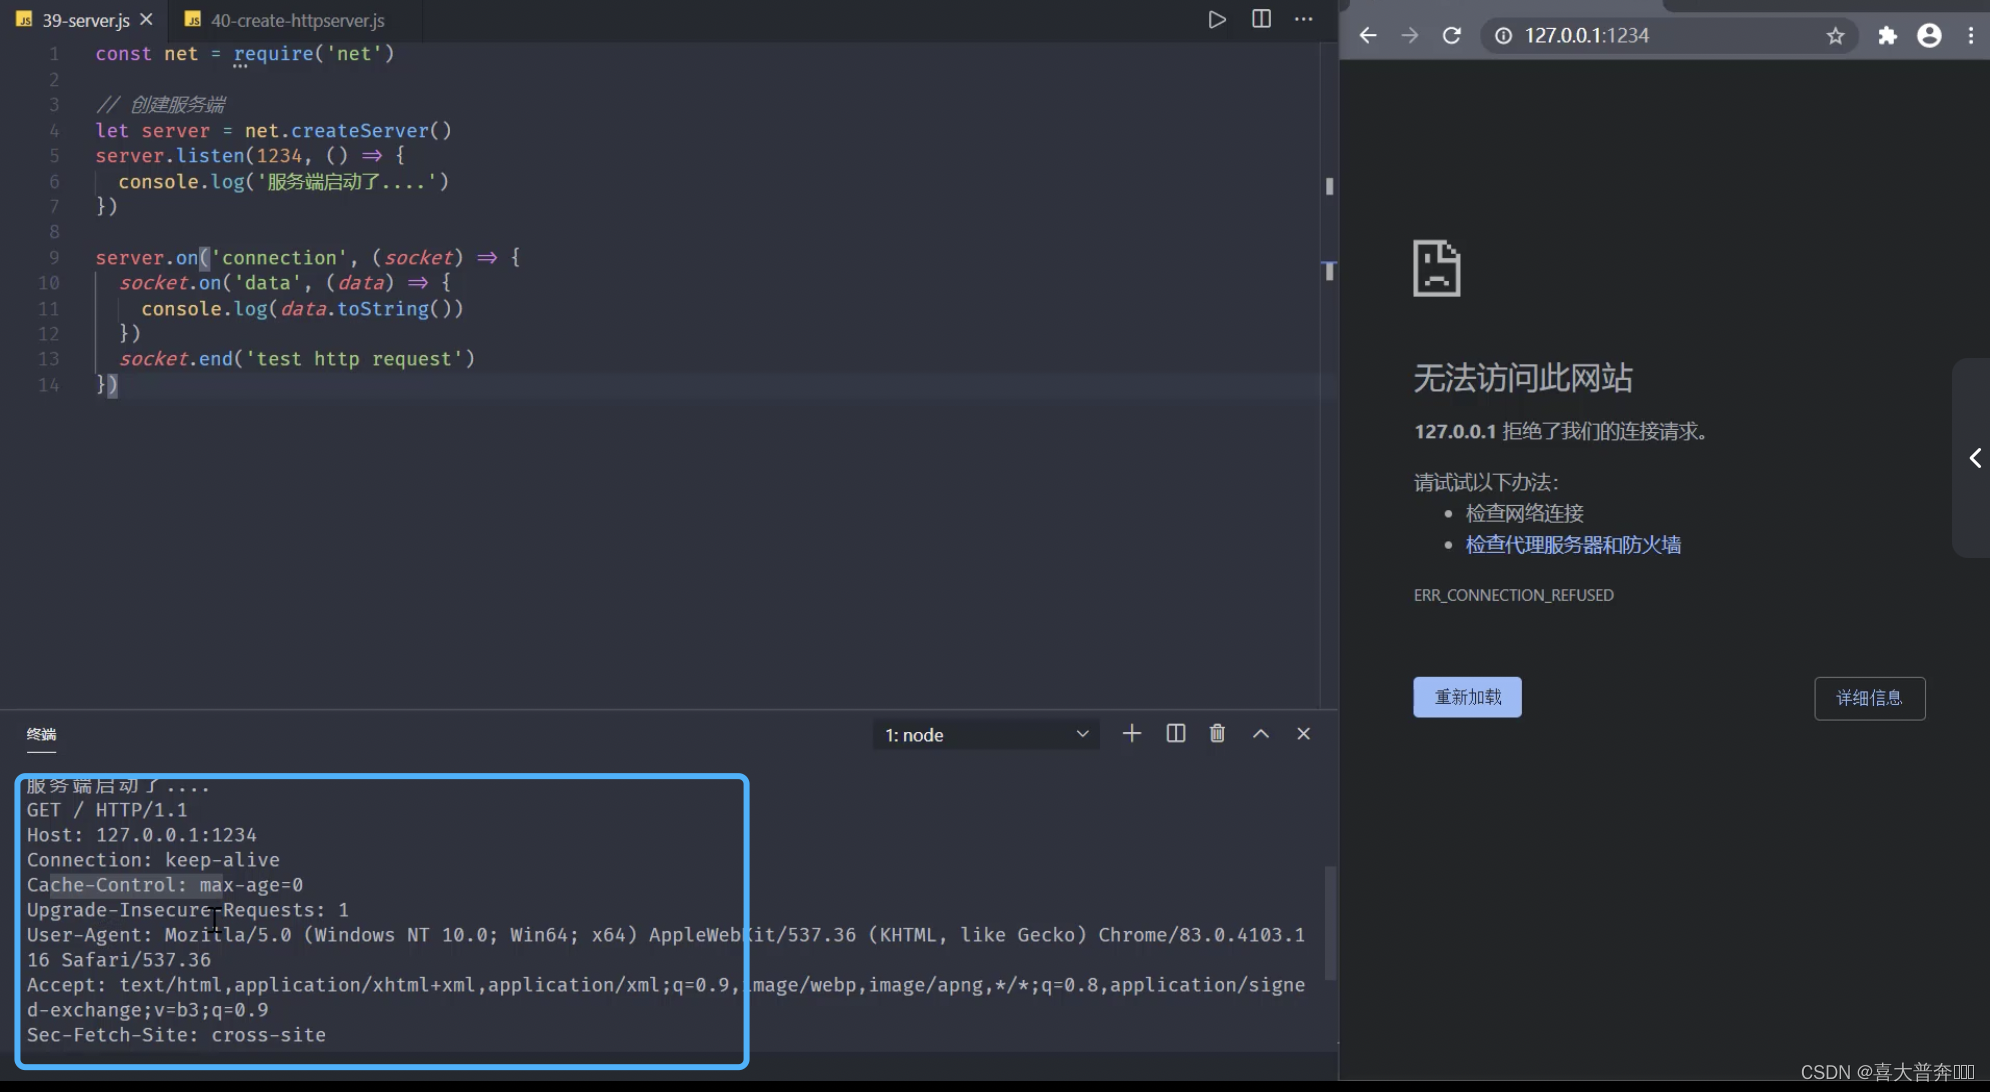
// http-server
const http = require('http');

// 创建服务端
const server = http.createServer((req, res)=>{


    // 针对请求和相应完成各自的操作
    console.log(111)
})

server.listen(1234, ()=>{


    console.log('服务启动了:localhost: 1234');
})
Get http request information
const http = require('http');
const url = require('url');

const server = http.createServer((req, res)=>{


    /**
     * req: 请求信息,req 是可读流,res 是可写流
     * 请求行、请求头、请求空行、请求体,正常我们是不会获取请求空行的
     * 看一下其他三部分哪些是内容是需要拿的
     */
    // 请求路径
    let {

    pathname, query} = url.parse(req.url, true)
    console.log(pathname, query); // 请求地址: http://localhost:1234/index.html?a=1,输出: /index.html [Object: null prototype] { a: '1' }
    // 请求方式
    console.log(req.method); //  请求地址: http://localhost:1234/index.html?a=1,输出: GET
    // 版本号
    // console.log(req.httpVersion); //  请求地址: http://localhost:1234/index.html?a=1,输出: 1.1
    // 请求头
    // console.log(req.headers); //  请求地址: http://localhost:1234/index.html?a=1,输出: 很多东西
    // 请求体数据获取
    // 使用 curl 模拟发送 post 请求
    // curl -v -X POST -d "'name':'zgp'" localhost:1234/
    let arr = []
    req.on('data', (data)=>{


        arr.push(data)
    })
    req.on('end', ()=>{


        console.log(Buffer.concat(arr).toString()); // 'name':'zgp'
    })
})

server.listen(1234, ()=>{


    console.log('server is running in: localhost: 1234')
})
set http response
After receiving the request sent by the client, the server will write data back and forth according to certain rules
const http = require('http');

const server = http.createServer((req, res)=>{


    console.log('有请求进来了')
    // req 是可读流,res 是可写流
    // res.write('ok')
    // res.end()
    // res.end('test ok')
    // res.end('测试数据') // 娴嬭瘯鏁版嵁 乱码,因为没按照协议来
    // res.statusCode = 200
    res.statusCode = 302
    res.setHeader('Content-Type', 'text/html; charset=utf-8') // 设置完之后限制中文正常
    res.end('测试数据')
})

server.listen(1234, ()=>{


    console.log('server is running ...');
})
proxy client
In fact, we use the functions provided by Nodejs to implement an http client by ourselves, and then send requests to a certain server.
The advantage is when we have cross-domain phenomena to solve. The method is that the browser client sends a request to the client created by ourselves, and the proxy client acts as the server to be accessed by the browser, and then let the server middleman we created send a request to another server. The server is an external server that may have a cross-domain phenomenon, but you must know that there is no cross-domain phenomenon when the server sends a request. At this time, the external server will process the result first. Return to our proxy client, and then the proxy client will process the data and write it back to our browser client. It is equivalent to that the browser client directly obtains the data from the external server. This solves the cross-domain problem.
// agentServer.js
// 模拟外部服务端
const http = require('http');
const url = require('url');
const querystring = require('querystring');
const server = http.createServer((req, res)=>{


    // console.log('请求进来了');
    let {

    pathname, query} = url.parse(req.url)
    console.log(pathname, ' ---- >', query);
    // post
    let arr = []
    req.on('data', (data)=>{


        arr.push(data)
    })
    req.on('end', ()=>{


        // console.log(Buffer.concat(arr).toString());
        let obj = Buffer.concat(arr).toString()
        // console.log(req.headers);
        if(req.headers['content-type'] == 'application/json'){


            let data = JSON.parse(obj)
            data.add = '前端开发工程师'
            // console.log(JSON.stringify(data));
            res.end(JSON.stringify(data))
        } else if(req.headers['content-type'] == 'application/x-www-form-urlencoded'){


            let ret = querystring.parse(obj)
            console.log(ret);
            res.end(JSON.stringify(ret))
        }
    })
})

server.listen(1234, ()=>{


    console.log('server is running...');
})
// agentClient.js
// 代理服务端
const http = require('http');

// http.get({


//     host: 'localhost',
//     port: 1234,
//     path: '/?a=1'
// }, (res)=>{


// })

let options = {


    host: 'localhost',
    port: 1234,
    path: '/?a=1',
    method: 'POST',
    headers: {


        // 'Content-Type': 'application/json'
        'Content-Type': 'application/x-www-form-urlencoded'
    }
}
let req = http.request(options, (res)=>{


    let arr = []
    res.on('data', (data)=>{


        arr.push(data)
    })
    res.on('end', () => {


        console.log('回写数据',Buffer.concat(arr).toString());
    })
})

// req.end('测试数据')
// req.end('{"name":"zgp"}')
req.end('a=1&b=2')
Proxy client solves cross-domain
// 外部服务端
// server.js,和 client 设置不同的端口,模拟跨域
const http = require('http');

const server = http.createServer((req, res)=>{


    console.log('请求进来了');
    let arr = []
    req.on('data', (data)=>{


        arr.push(data)
    })
    req.on('end', ()=>{


        let obj = Buffer.concat(arr).toString()
        console.log(obj);
        res.end('外部服务端返回数据')
    })
})

server.listen(1234, ()=>{


    console.log('外部服务端启动了...');
})
// 本地代理服务端
const http = require('http');

let options = {


    port: 1234,
    host: 'localhost',
    method: 'POST',
    path: '/'
}

const server = http.createServer((request, response)=>{


    let req = http.request(options, (res)=>{


        let arr = []
        res.on('data', (data)=>{


            arr.push(data)
        })
        res.on('end', ()=>{


            let ret = Buffer.concat(arr).toString()
            // console.log(obj);
            response.setHeader('Content-Type', 'text/html; charset=utf-8')
            response.end(ret)
        })
    })

    req.end('测试数据')
})

server.listen(2345, ()=>{


    console.log('本地服务端启动了...');
})
Http static service
Use the http module to open a server, and let the browser act as the client to access some static resources provided by the target server according to a certain path.
Note: It is not to implement a complete website service, but to demonstrate some processing principles of responses and requests through native modules before using the web framework and coordinating with the database.
const http = require('http');
const url = require('url');
const fs = require('fs');
const path = require('path');
const mime = require('mime');

const server = http.createServer((req, res)=>{


    console.log('请求进来了');
    let {

    pathname, query} = url.parse(req.url)
    // 1、路径处理
    pathname = decodeURIComponent(pathname)
    let absPath = path.join(__dirname, pathname)
    // 2、目标资源状态处理
    fs.stat(absPath, (err, statObj)=>{


        if(err){


            res.statusCode = 404
            res.end('Not Found')
            return
        }
        if(statObj.isFile()){

     // 说明是文件,直接读取,回写
            fs.readFile(absPath, (err, data)=>{


                res.setHeader('Content-Type', mime.getType(absPath) + '; charset=utf-8')
                res.end(data)
            })
        } else {

     // 说明是目录
            fs.readFile(path.join(absPath, 'index.html'), (err, data)=>{


                res.setHeader('Content-Type', mime.getType(absPath) + '; charset=utf-8')
                res.end(data)
            })
        }
    })
    // res.setHeader('Content-Type', 'text/html; charset=utf-8')
    // res.end('静态服务')
})

server.listen(1234, ()=>{


    console.log('服务端启动了...');
})
lgserver command line configuration
Use some built-in core modules of node and cooperate with some third-party toolkits to implement your own command line tool, so that you can call the corresponding command to start a web service in the specified directory, and then you can use the browser to access the current directory All static resources under .
Here we refer to the use of an existing server tool.
Create a structure:
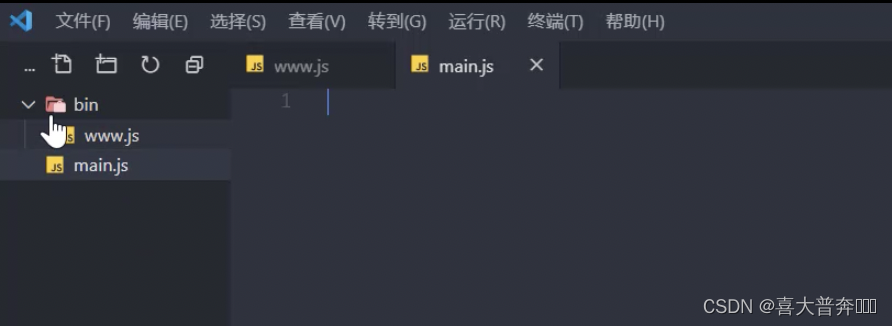
In order to make it easier to see the grammar, add .js to www first
Run again npm init -yto generate the package.json file, modify the command path in the bin to bin/www.js,
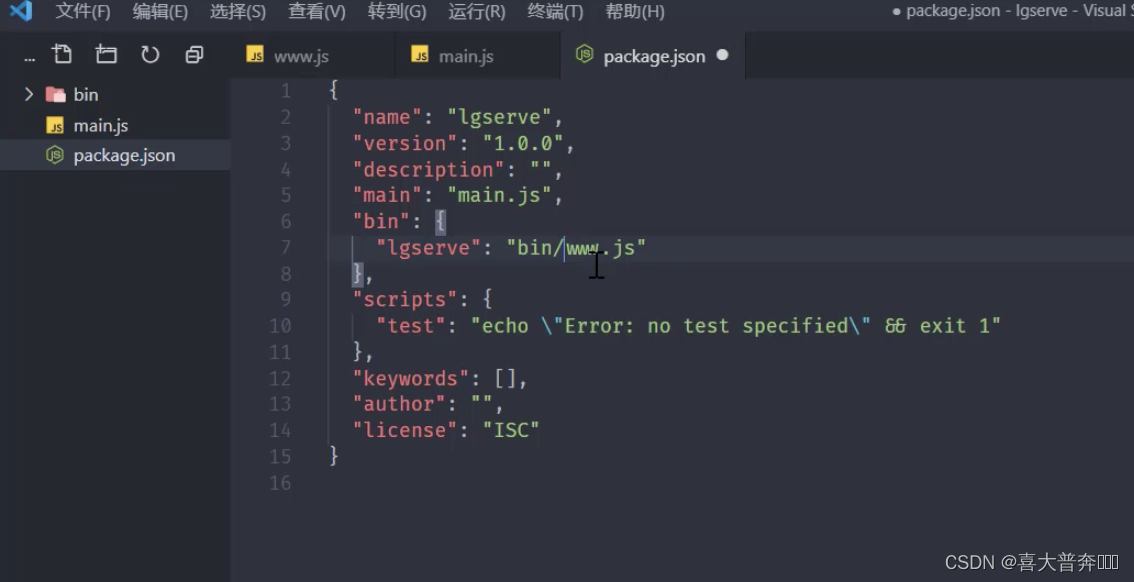
write the description line in www.js #! /usr/bin/env node
, and then output something casually: console.log('executed')
Then link this package to the global, npm linkyou can
Run lgserve
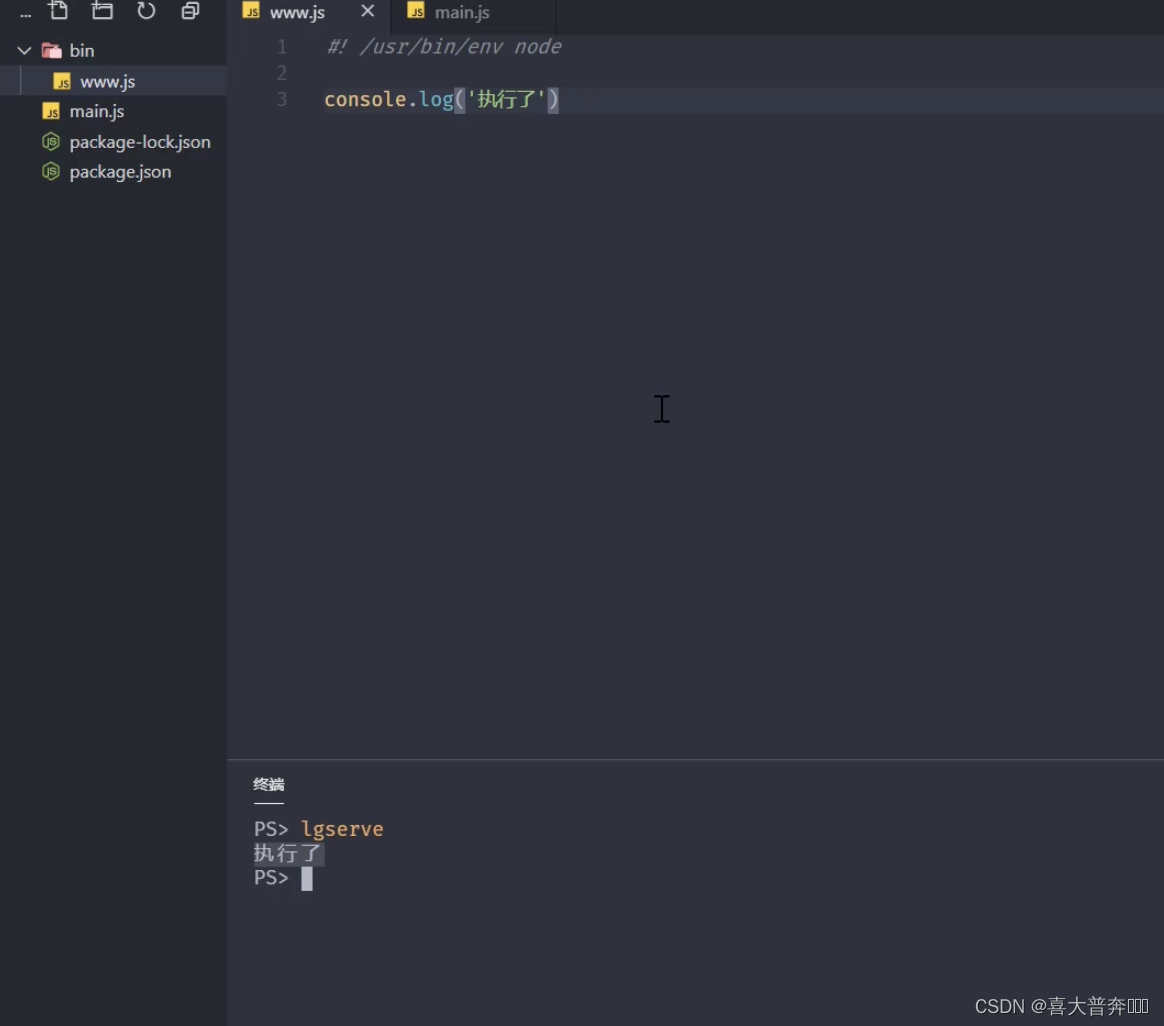
OK directly, and the global command lgserve is generated
Use the third-party toolkit: npm install commander, note: here is the current
"commander": "^6.0.0"version

#! /usr/bin/env node

const {

    program} = require('commander');
// program.option('-p --port', 'set server port')
// 配置信息
let options = {


    '-p --port <dir>': {


        'description': 'init server port',
        'example': 'myloserver -p 3306',
    },
    '-d --directory <dir>': {


        'description': 'init server directory',
        'example': 'myloserver -d c:',
    },
}

function formatConfig(configs, callback){


    Object.entries(configs).forEach(([key, val])=>{


        callback(key, val)
    })
}

formatConfig(options, (cmd, val)=>{


    program.option(cmd, val.description)
})

program.parse(process.argv)
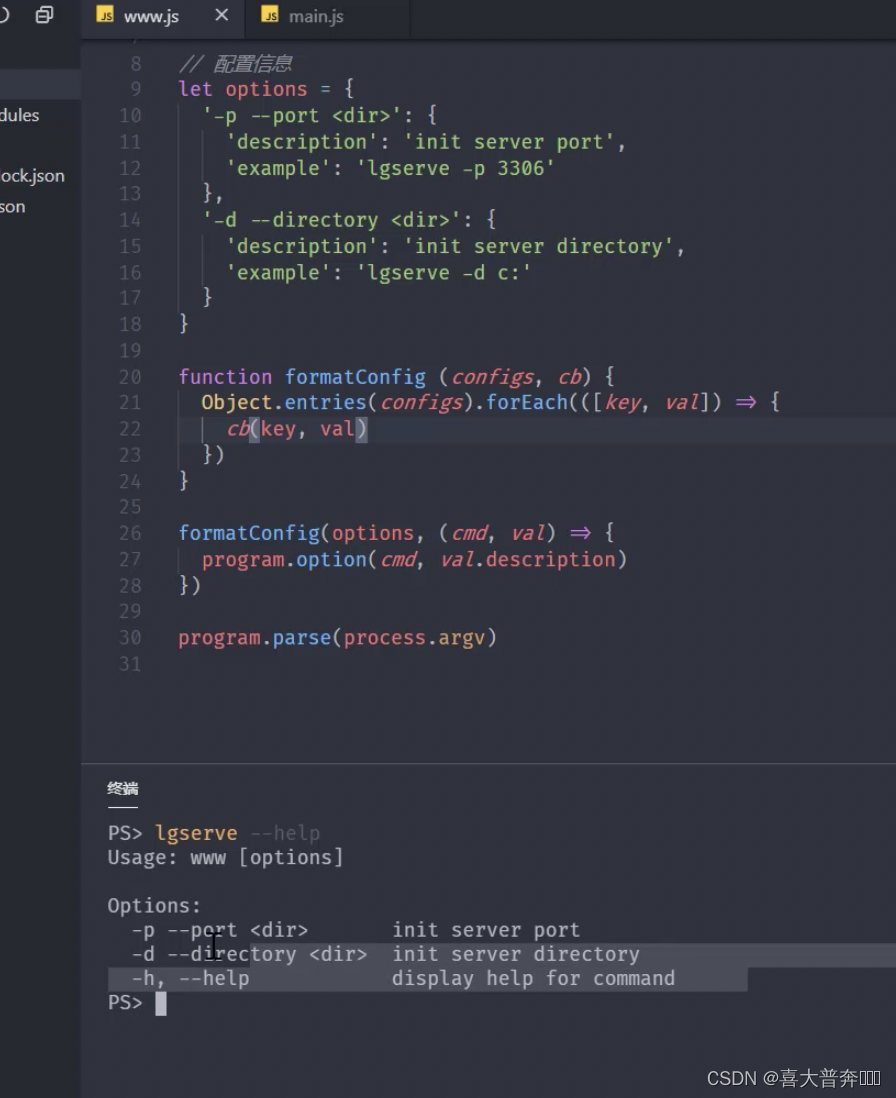
Add the above example and modify the current Usage name:
program.on('--help', ()=>{


    console.log('examples: ');
    formatConfig(options, (cmd, val)=>{


        console.log(val.example)
    })
})

program.name('mylgserver')
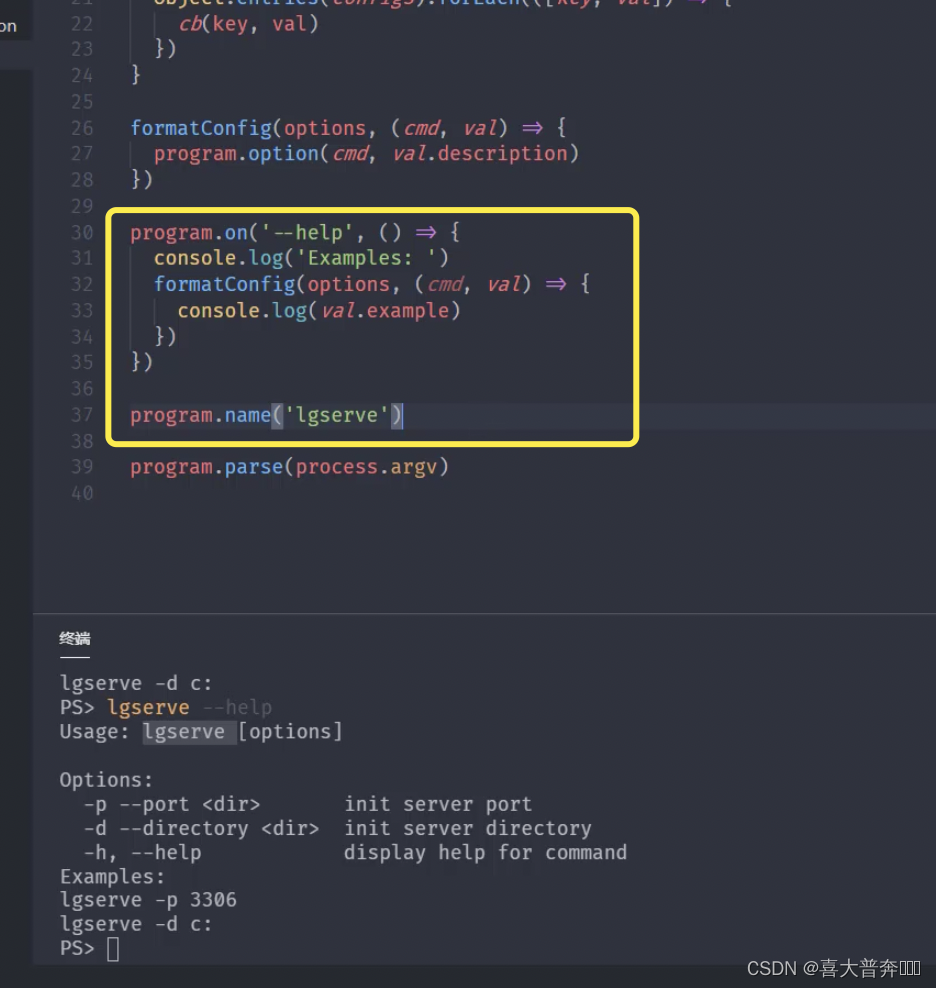
Add the version number: Note that the version number is in package.json
const version = require('../package.json').version;
program.version(version)
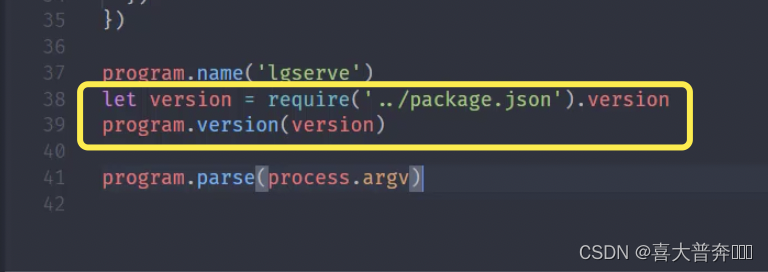
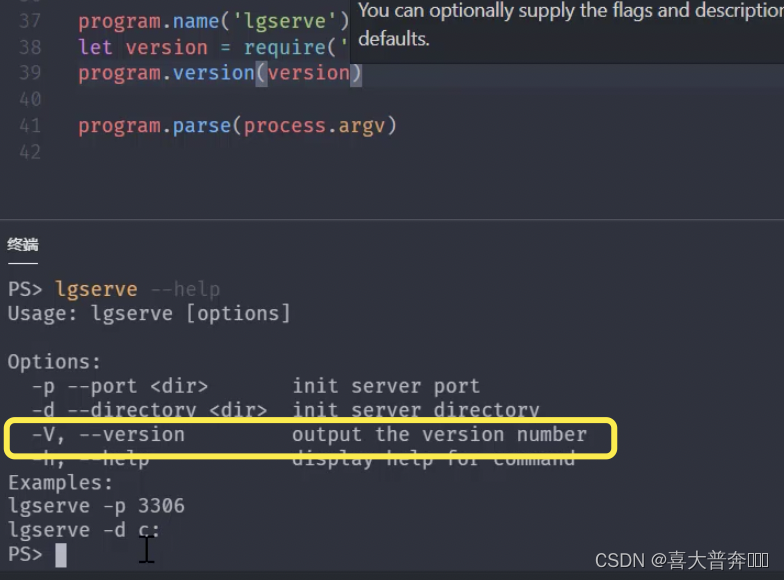
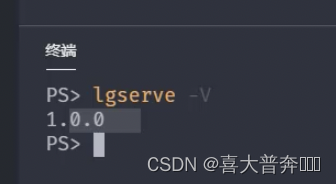
let cmdConfig = program.parse(process.argv)
console.log(cmdConfig);
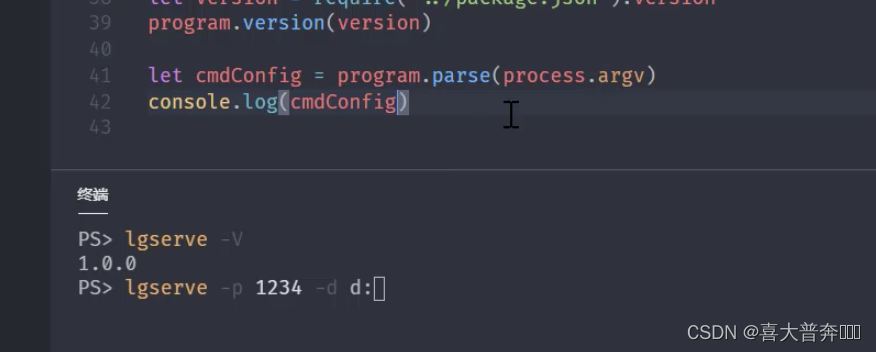
implement:lgserve -p 1234 -d d:
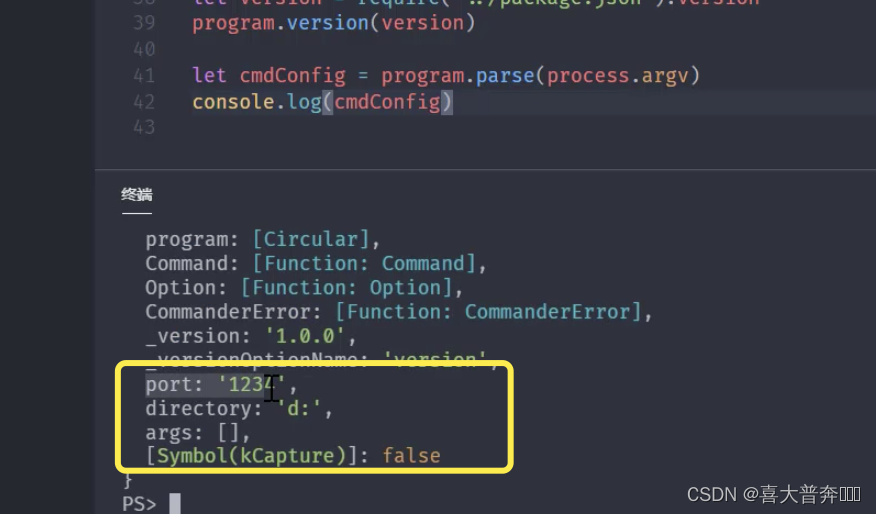
lgserver start web service
The main logic here is placed in main.js and imported directly in www.js, or it can be placed directly in www.js, which is bloated and inconvenient to maintain
const Server = require('../main.js');
new Server(cmdConfig).start()
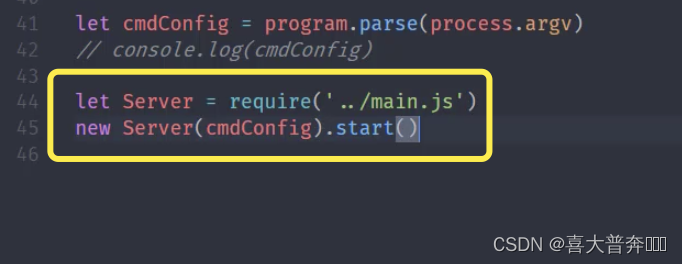
// main.js
const http = require('http');
class Server{


    constructor(config){


        this.config = config
    }
    start(){


        console.log('服务端已经运行了');
    }
}

module.exports = Server
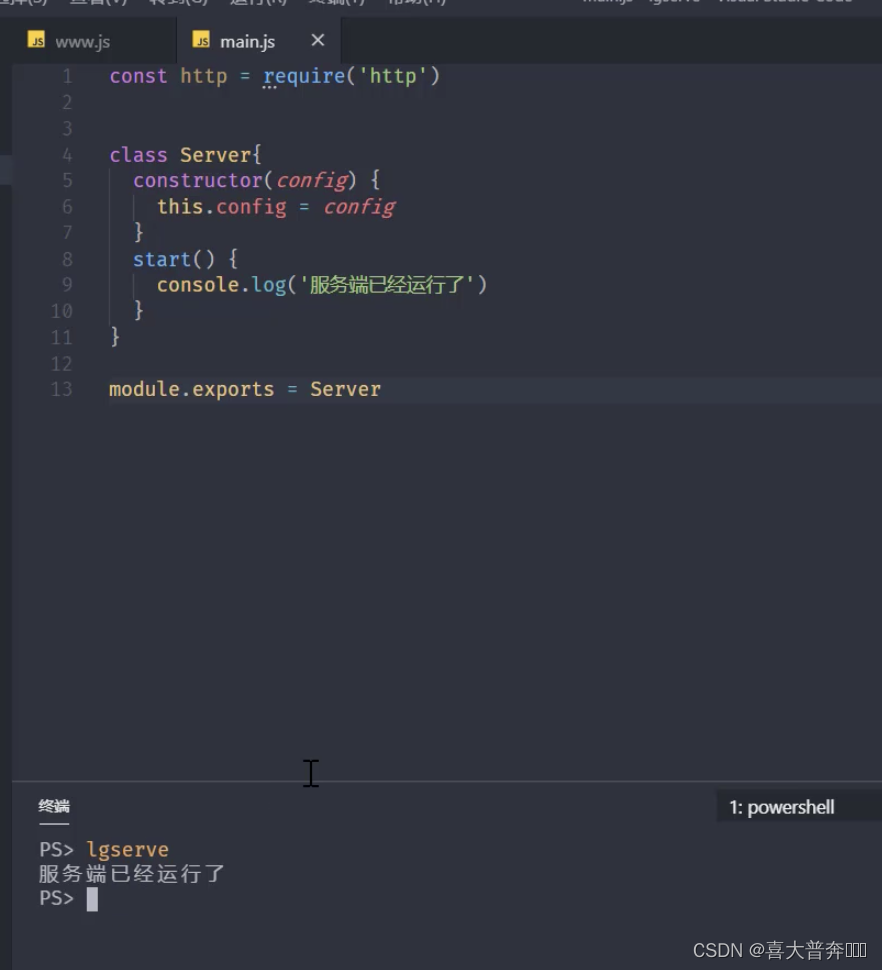
const http = require('http');

function mergeConfig(config){


    return {


        port: 1234,
        directory: process.cwd(),
        ...config
    }
}

class Server{


    constructor(config){


        this.config = mergeConfig(config)
        console.log(this.config);
    }
    start(){


        console.log('服务端已经运行了');
    }
}

module.exports = Server
Run without parameters lgserve
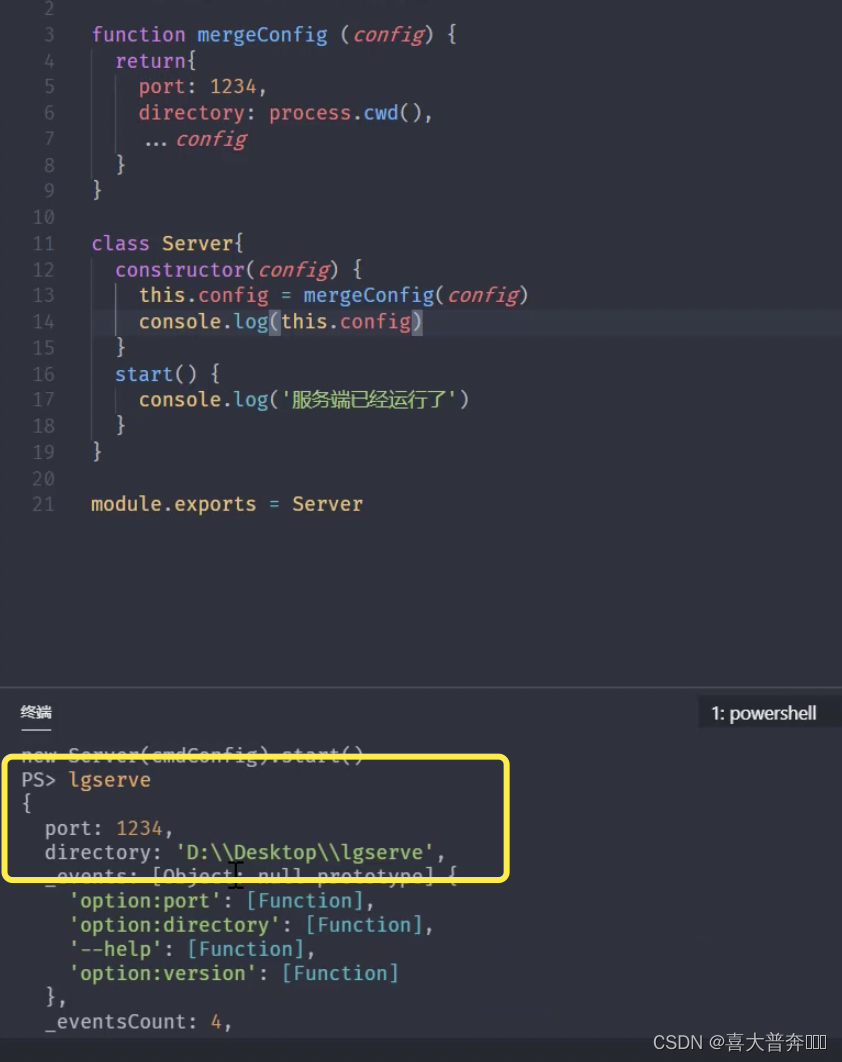
Add parameters: lgserve -p 3307 -d c:
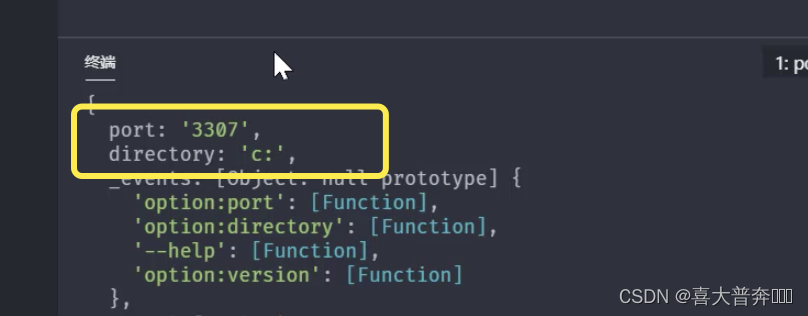
start a service:
	start(){


        let server = http.createServer(this.serveHandle.bind(this))
        server.listen(this.config.port, ()=>{


            console.log('服务端已经启动了......')
        })
    }
    serveHandle(req, res){


        console.log('有请求进来了');
    }
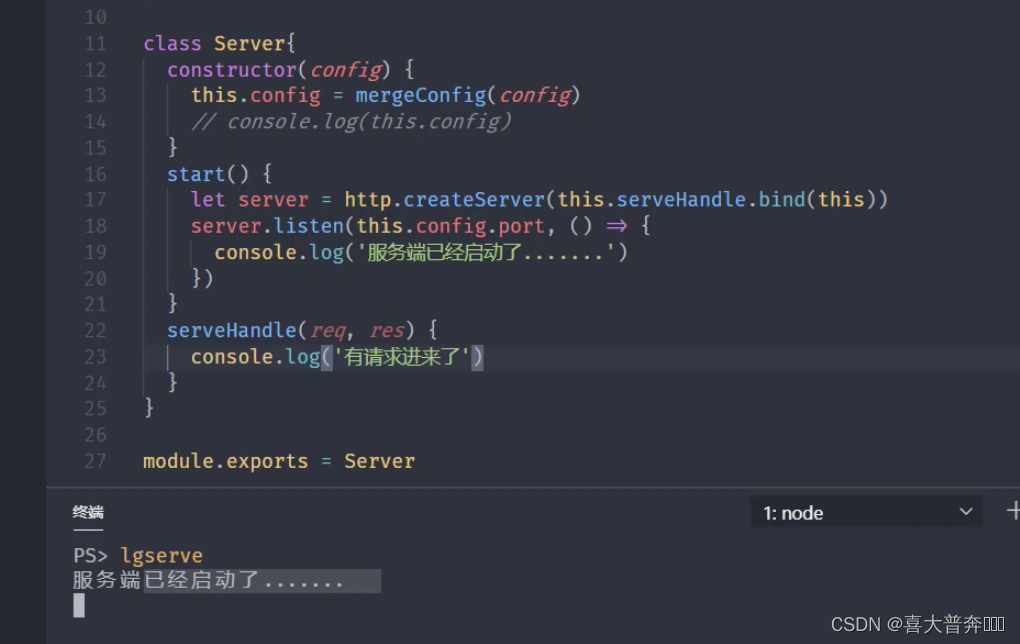
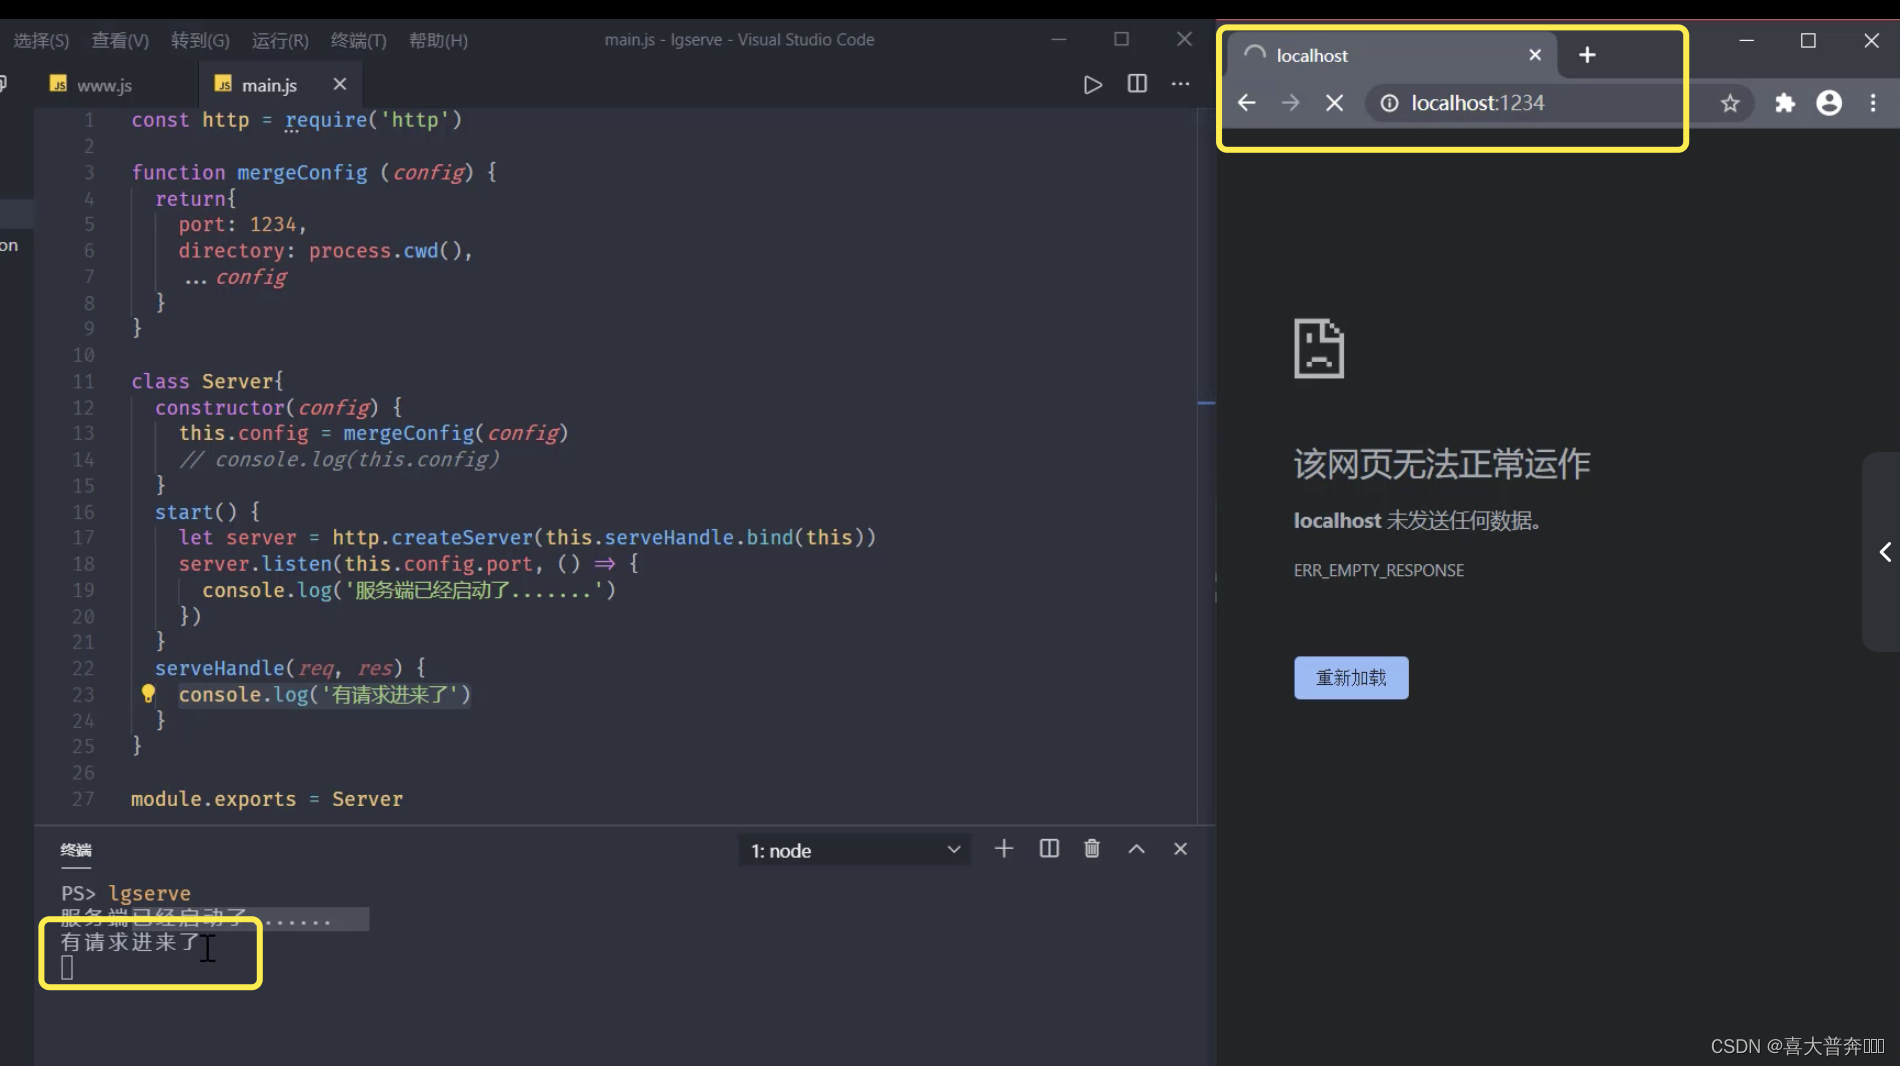
lgserve handles file resources
const http = require('http');
const url = require('url');
const path = require('path');
const fs = require('fs').promises;
const {

     createReadStream } = require('fs');
const mime = require('mime');

function mergeConfig(config) {


    return {


        port: 1234,
        directory: process.cwd(),
        ...config
    }
}

class Server {


    constructor(config) {


        this.config = mergeConfig(config)
    }
    start() {


        let server = http.createServer(this.serveHandle.bind(this))
        server.listen(this.config.port, () => {


            console.log('服务端已经启动了......')
        })
    }
    async serveHandle(req, res) {


        let {

     pathname, query } = url.parse(req.url)
        pathname = decodeURIComponent(pathname)
        let absPath = path.join(this.config.directory, pathname)
        console.log(absPath);
        try {


            let statObj = await fs.stat(absPath)
            if (statObj.isFile()) {

     // 是个文件
                this.fileHandle(req, res, absPath)
            } else {

     // 是个文件夹
                this.fileHandle(req, res, absPath + '/www.js')
            }
        } catch (error) {


            this.errorHandle(req, res, error)
        }

    }
    fileHandle(req, res, absPath) {


        res.statusCode = 200
        res.setHeader('Content-Type', mime.getType(absPath) + '; charset=utf-8')
        createReadStream(absPath).pipe(res)
    }
    errorHandle(req, res, error) {


        // console.log(error);
        res.statusCode = 404
        res.setHeader('Content-Type', 'text/html; charset=utf-8')
        res.end('Not Found')
    }
}

module.exports = Server
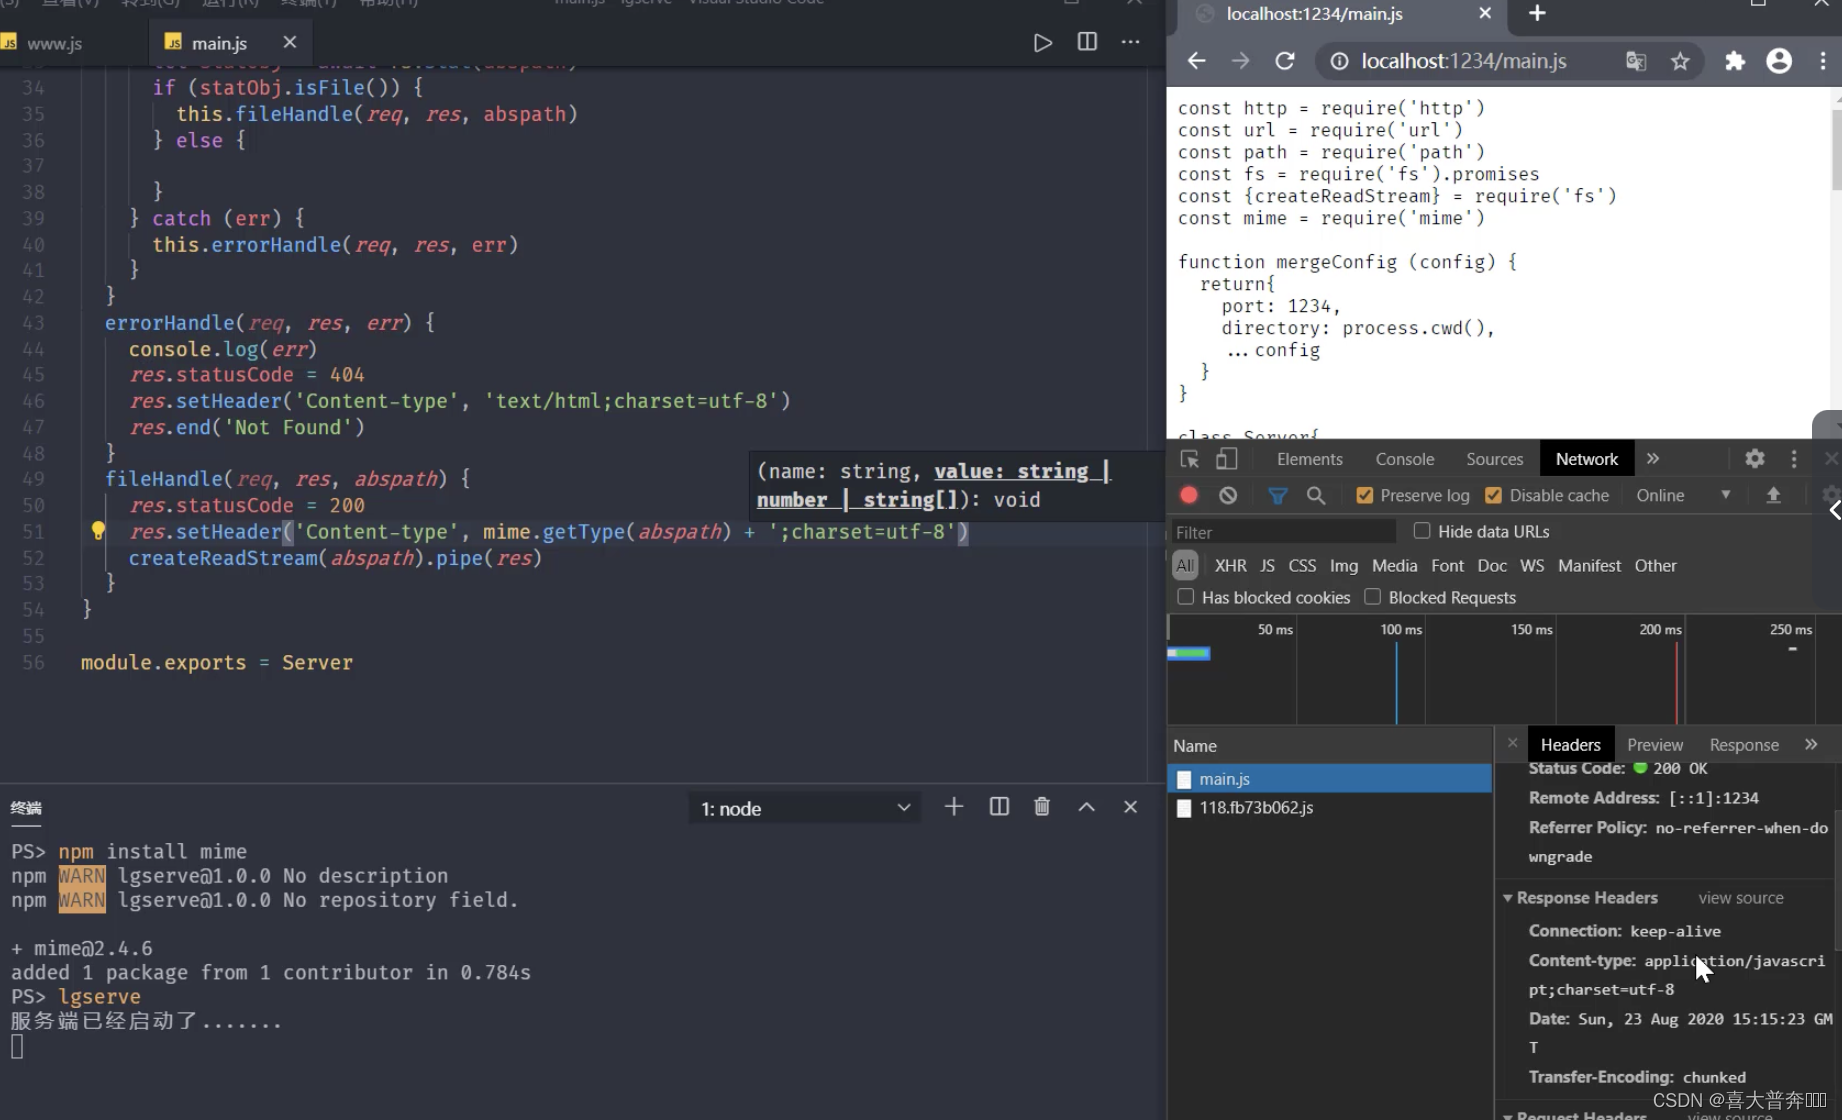
lgserve handles directory resources
The operation of the existing serve tool is that if we visit a directory, it will display all the resource names under it, and display them in the interface corresponding to the browser. The same operation is done here.
# 使用了 ejs 模板引擎
npm install ejs
const http = require('http');
const url = require('url');
const path = require('path');
const fs = require('fs').promises;
const {

     createReadStream } = require('fs');
const mime = require('mime');
const ejs = require('ejs');
const {

     promisify } = require('util')

function mergeConfig(config) {


    return {


        port: 1234,
        directory: process.cwd(),
        ...config
    }
}

class Server {


    constructor(config) {


        this.config = mergeConfig(config)
    }
    start() {


        let server = http.createServer(this.serveHandle.bind(this))
        server.listen(this.config.port, () => {


            console.log('服务端已经启动了......')
        })
    }
    async serveHandle(req, res) {


        console.log('请求进来了')
        console.log(req.url)
        let {

     pathname, query } = url.parse(req.url)
        pathname = decodeURIComponent(pathname)
        let absPath = path.join(this.config.directory, pathname)
        console.log(absPath);
        try {


            let statObj = await fs.stat(absPath)
            if (statObj.isFile()) {

     // 是个文件
                this.fileHandle(req, res, absPath)
            } else {

     // 是个文件夹
                let dirs = await fs.readdir(absPath)
                console.log(dirs);
                // promisify
                let renderFile = promisify(ejs.renderFile)
                let ret = await renderFile(path.resolve(__dirname, 'template.html'), {

    arr: dirs})
                res.end(ret)
            }
        } catch (error) {


            this.errorHandle(req, res, error)
        }

    }
    fileHandle(req, res, absPath) {


        res.statusCode = 200
        res.setHeader('Content-Type', mime.getType(absPath) + '; charset=utf-8')
        createReadStream(absPath).pipe(res)
    }
    errorHandle(req, res, error) {


        // console.log(error);
        res.statusCode = 404
        res.setHeader('Content-Type', 'text/html; charset=utf-8')
        res.end('Not Found')
    }
}

module.exports = Server
<!-- template.html -->
<!DOCTYPE html>
<html lang="en">
<head>
    <meta charset="UTF-8">
    <meta http-equiv="X-UA-Compatible" content="IE=edge">
    <meta name="viewport" content="width=device-width, initial-scale=1.0">
    <title>Document</title>
</head>
<body>
    <ul>
        <% for(let i=0; i< arr.length; i++) { %>
            <!-- <li><%=arr[i]%></li> -->
            <li><a href="#"><%=arr[i]%></a></li>
        <% } %>
    </ul>
</body>
</html>
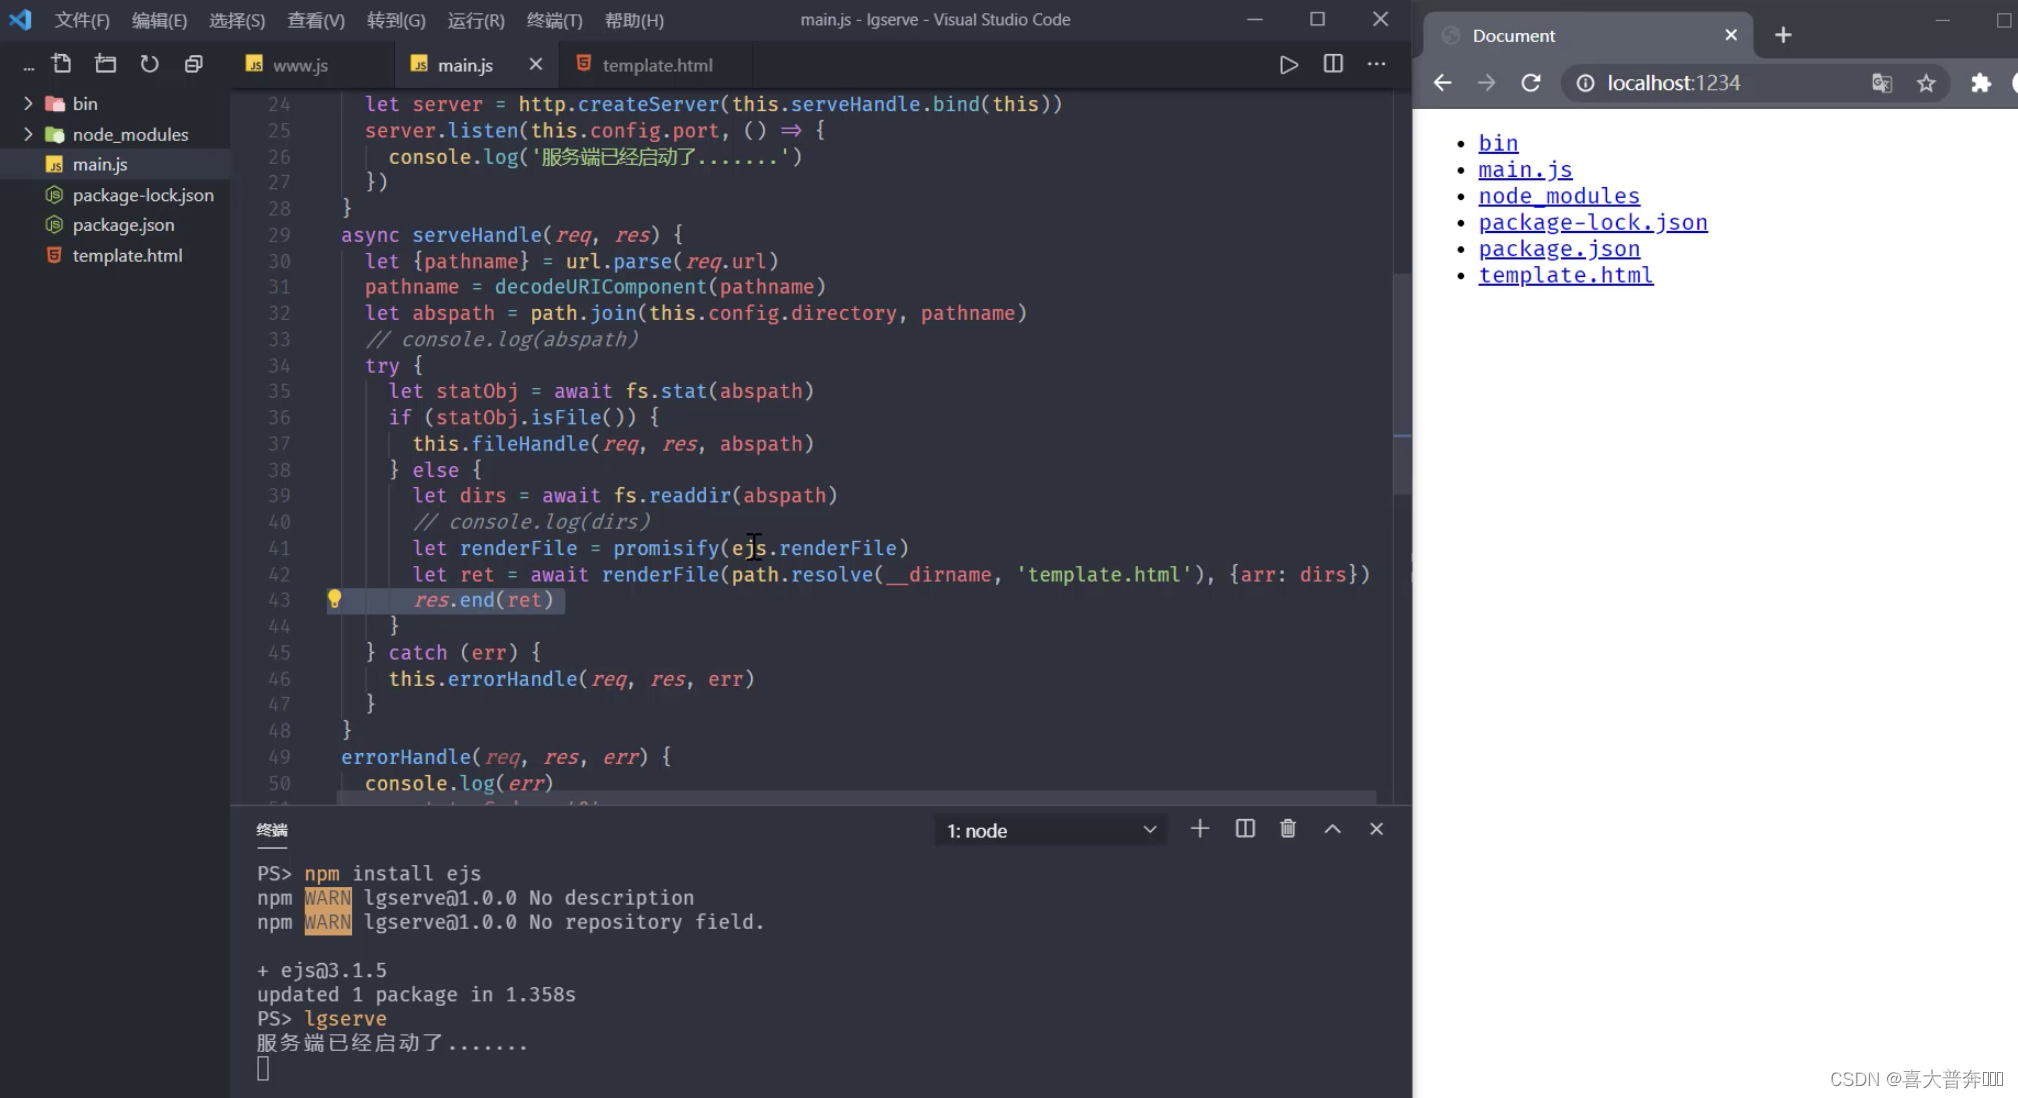
lgserve template data rendering
const http = require('http');
const url = require('url');
const path = require('path');
const fs = require('fs').promises;
const {

     createReadStream } = require('fs');
const mime = require('mime');
const ejs = require('ejs');
const {

     promisify } = require('util')

function mergeConfig(config) {


    return {


        port: 1234,
        directory: process.cwd(),
        ...config
    }
}

class Server {


    constructor(config) {


        this.config = mergeConfig(config)
    }
    start() {


        let server = http.createServer(this.serveHandle.bind(this))
        server.listen(this.config.port, () => {


            console.log('服务端已经启动了......')
        })
    }
    async serveHandle(req, res) {


        console.log('请求进来了')
        console.log(req.url)
        let {

     pathname, query } = url.parse(req.url)
        pathname = decodeURIComponent(pathname)
        let absPath = path.join(this.config.directory, pathname)
        console.log(absPath);
        try {


            let statObj = await fs.stat(absPath)
            if (statObj.isFile()) {

     // 是个文件
                this.fileHandle(req, res, absPath)
            } else {

     // 是个文件夹
                let dirs = await fs.readdir(absPath)

                dirs = dirs.map((item) => {


                    return {


                        path: path.join(pathname, item),
                        dirs: item
                    }
                })
                // promisify
                let renderFile = promisify(ejs.renderFile)
                let parentpath = path.dirname(pathname)
                let ret = await renderFile(path.resolve(__dirname, 'template.html'), {


                    arr: dirs,
                    parent: pathname == '/' ? false : true,
                    parentpath: parentpath,
                    title: path.basename(absPath)
                })
                res.end(ret)
            }
        } catch (error) {


            this.errorHandle(req, res, error)
        }
    }
    fileHandle(req, res, absPath) {


        res.statusCode = 200
        res.setHeader('Content-Type', mime.getType(absPath) + '; charset=utf-8')
        createReadStream(absPath).pipe(res)
    }
    errorHandle(req, res, error) {


        // console.log(error);
        res.statusCode = 404
        res.setHeader('Content-Type', 'text/html; charset=utf-8')
        res.end('Not Found')
    }
}

module.exports = Server
<!DOCTYPE html>
<html lang="en">
<head>
    <meta charset="UTF-8">
    <meta http-equiv="X-UA-Compatible" content="IE=edge">
    <meta name="viewport" content="width=device-width, initial-scale=1.0">
    <title>Document</title>
    <style>
        * {


            list-style: none;
        }
    </style>
</head>
<body>
    <h3>IndexOf <%=title%></h3>
    <ul>
        <% if(parent){ %>
        <li><a href="<%= parentpath %>">上一层</a></li>
        <% } %>
        <% for(let i=0; i< arr.length; i++) { %>
            <!-- <li><%=arr[i]%></li> -->
            <li><a href="<%= arr[i].path %>"><%= arr[i].dirs %></a></li>
        <% } %>
    </ul>
</body>
</html>