Article directory
remote operation
Understanding Distributed Version Control Systems
Everything we've talked about so far (workspaces, staging areas, repositories, etc.), is local, that is, on your computer. Git is actually a distributed version control system. It can be simply understood as:
- Each of us has a complete version library on our computer, so when you work, you don’t need to be connected to the Internet, because the version library is on your own computer
- Since everyone has a complete repository on their computer, how can multiple people collaborate?
- For example, you changed file A on your computer, and your colleague also changed file A on his computer. At this time, the two of you only need to push your respective modifications to each other, and you can see each other's modifications
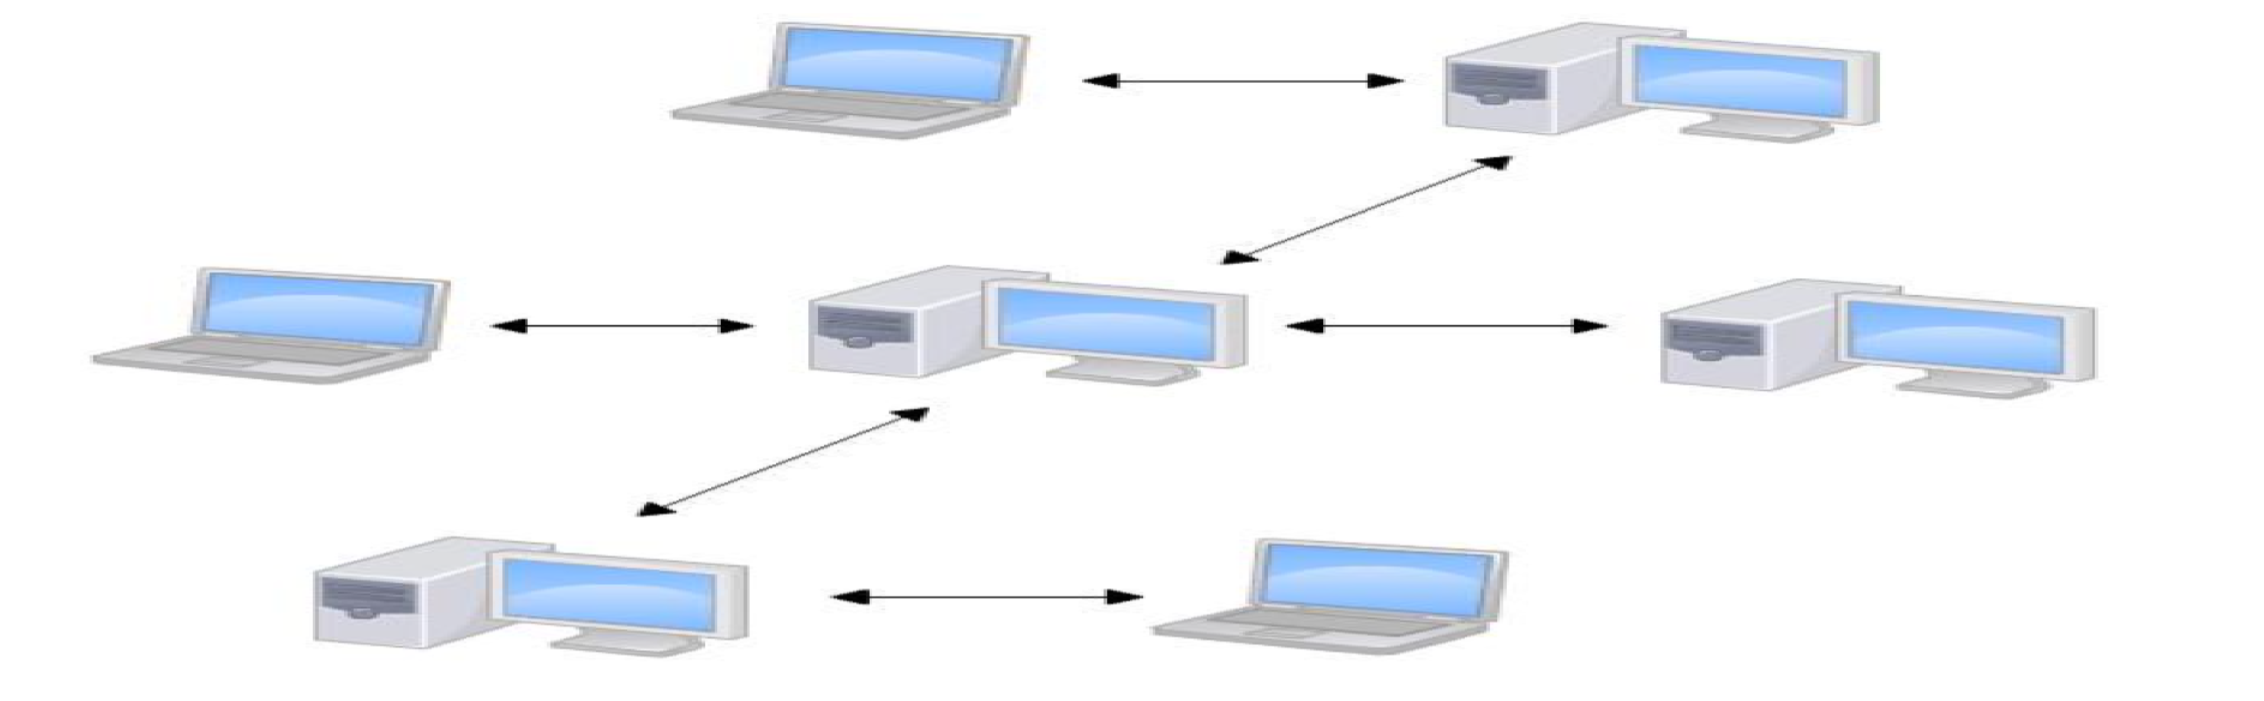
1. The security of the distributed version control system is much higher, because everyone has a complete version library in their computer. It doesn’t matter if someone’s computer is broken, just copy one from other people. .
2. When actually using a distributed version control system, in fact, it is rare to push revisions to the version library on the computers between two people, because maybe the two of you are not in the same local area network, and the two computers cannot access each other. Or maybe your colleague is sick today and his computer is not turned on at all.
3. Therefore, a distributed version control system usually has a computer that acts as a "central server" , but the role of this server is only to facilitate "exchange" of everyone's modifications , and everyone can work without it , it’s just inconvenient to exchange and modify
4. With this "central server" computer, you are not afraid of any local failures (such as bad luck, hard disk failure, and everything on it is
lost, including all the content of git)
remote warehouse
gitee:https://gitee.com/ github:https://github.com/
Specific steps:
1. Create a new remote warehouse. After the creation is successful, we can make a basic setting for the remote warehouse: open source or private
- From the created remote warehouse, we can see that the branches learned locally also exist in the remote warehouse and are managed. The newly created warehouse has one and only one default master branch

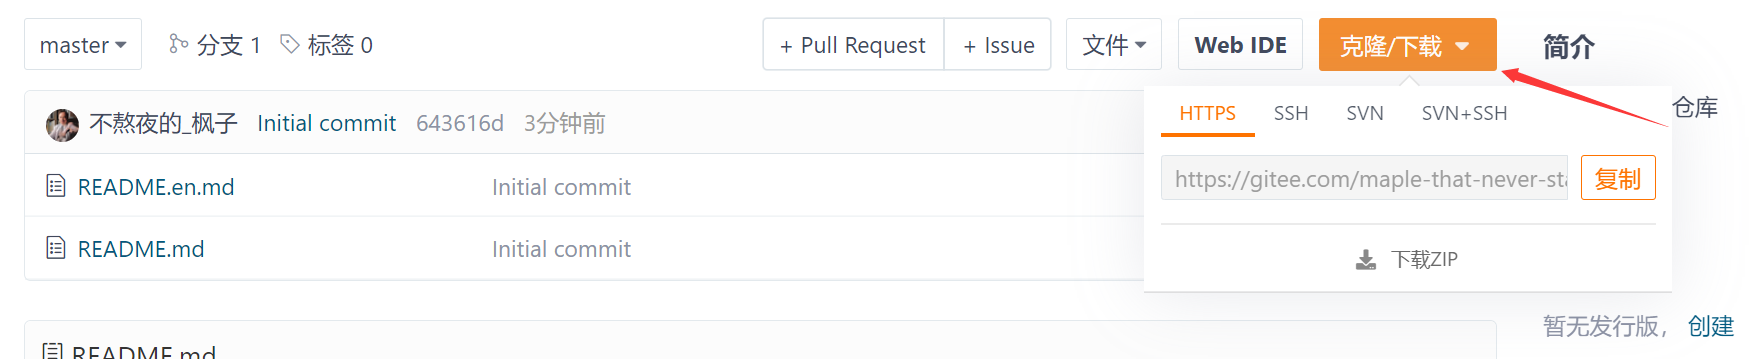
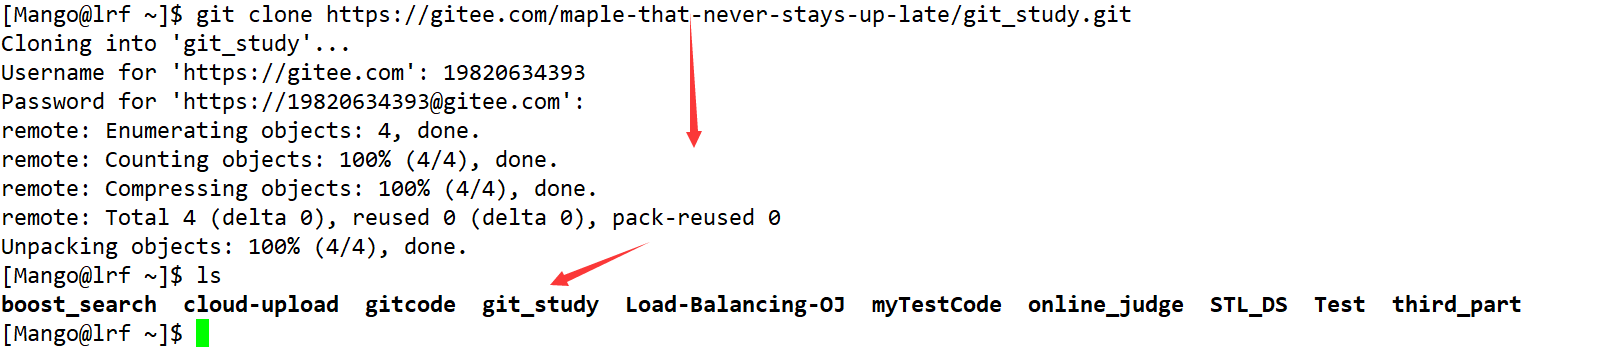
2. Clone the remote warehouse
git clone warehouse link : you can clone/download the remote warehouse to the local
-
SSH protocol and HTTPS protocol are the two most commonly used data transmission protocols for Git
-
The SSH protocol uses public key encryption and public key login mechanism, which reflects its practicability and security. To use this protocol, we need to put our public key on the server and be managed by the Git server.
-
When using the HTTPS method, there is no requirement and can be cloned directly
Method 1: Using HTTPS:
Method 2: Using SSH
Use SSH to clone the repository, because we did not add the public key to the remote repository, the server rejected our clone link
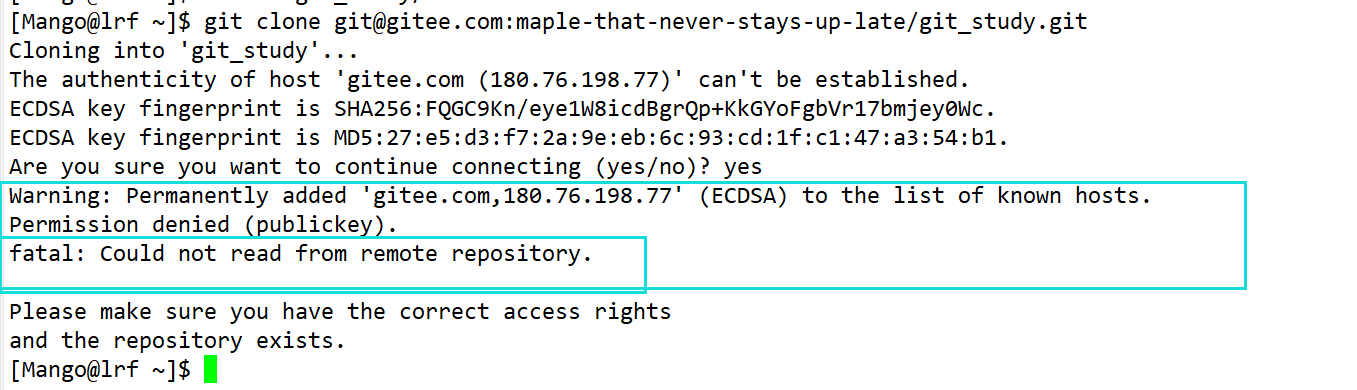
The correct way:
-
Step 1: Create an SSH Key
id_rsaIn the user's home directory, check to see if there is a .ssh directory. If so, check to see if there are any and files in this directoryid_rsa.pub. If you already have one, skip to the next step. If not, you need to create an SSH Key
ssh-keygen -t rsa -C "你的邮箱" #然后一路回车,使用默认值即可

These two are the secret key pair of SSH Key, among which id_rsais the private key, which cannot be leaked out! id_rsa.pubIs the public key, can tell anyone!
- Step 2: Add your own public key to the remote warehouse

After the above is completed, the warehouse can be cloned through the ssh link. If multiple people collaborate on development, GitHub/Gitee allows multiple public keys to be added. Just add the keys on each person’s computer to GitHub/Gitee, and then each computer can submit a push to GitHub/Gitee .
When we clone from the remote repository, in fact Git will automatically associate the local master branch with the remote master branch, and the default name of the remote repository is, locally we can use: git remote : View originthe remote repository Information, if with -v option: display more detailed information

The addresses of origins that can be fetched and pushed are shown above. If you don't have push permission, you can't see the push address
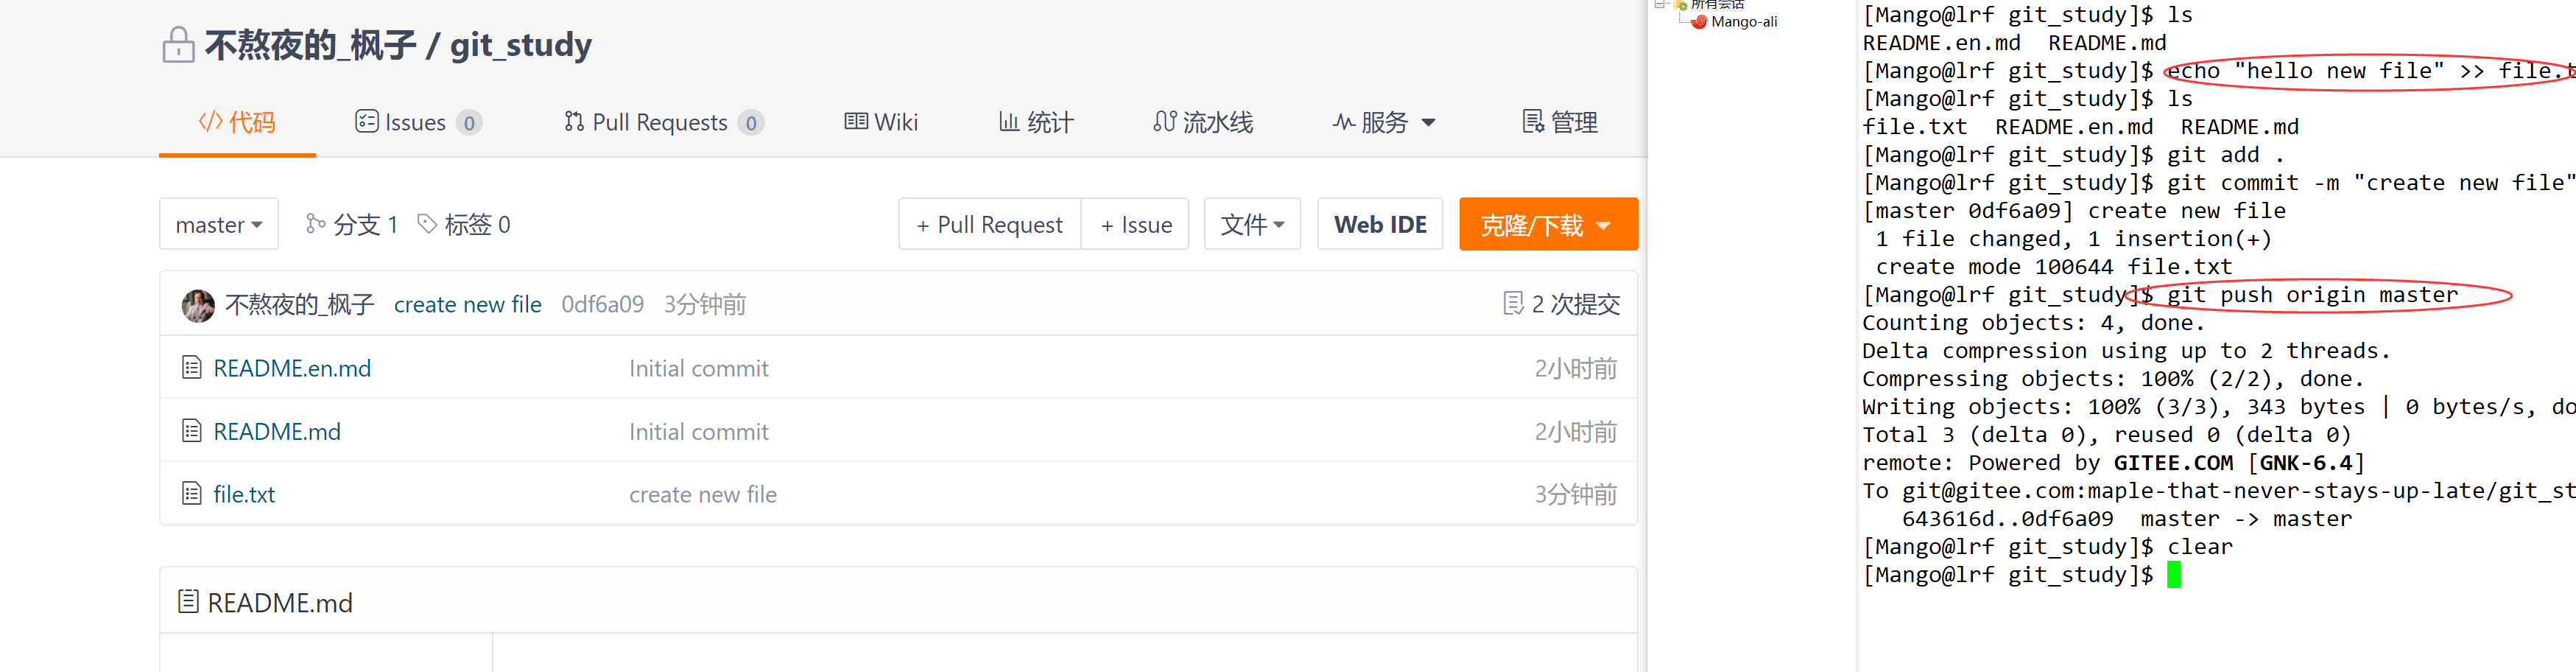
3. Push to the remote warehouse
The remote warehouse has been successfully cloned locally, and we can also submit content to the warehouse, for example: add a
file.txtfile
Pay attention when submitting, if we have set the global name and e-mail before, these two configurations need to be
consistent with the username and email configured on gitee, otherwise an error will occur. Or if the global name and e-mail have never been set, then we will report an error when we submit for the first time
. This requires us to reconfigure, and also pay attention to the need to be consistent with the username and mailbox configured on gitee.
git push : Push the contents of the local warehouse to the remote warehouse
- Format: git push <remote host name> <local branch name>:<remote branch name>
- But if the local branch name is the same as the remote branch name, the colon can be omitted:
git push <远程主机名><本地分支名>
At this point we want to push the local master branch to the master branch of the origin host, then we can:
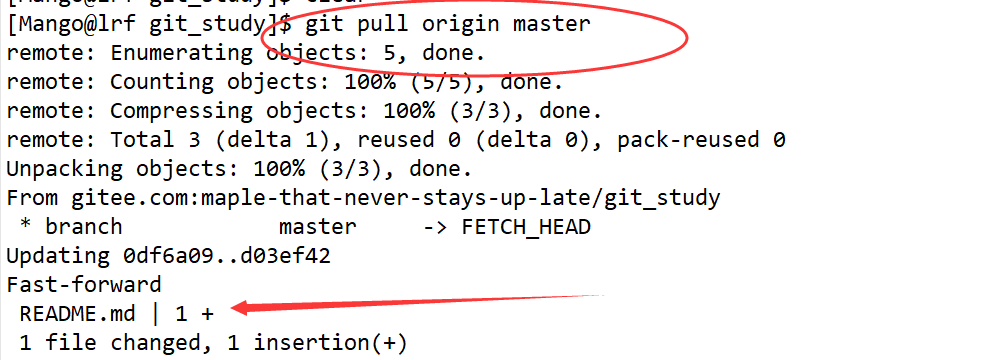
4. Pull the remote warehouse
At this time, if we click on the README.md file on gitee and modify it online, the remote warehouse is one version ahead of the local warehouse. In order to keep the local warehouse the latest version, we need to pull down the remote code. and merged locally
git pull : fetch code from remote and merge local version
- Command format: git pull <remote host name> <remote branch name>:<local branch name>
- If the remote branch is merged with the current branch, the part after the colon can be omitted:
git pull <远程主机名> <远程分⽀名>
Configure Git
ignore special files
In daily development, we do not want or should not submit some files to the remote end, such as the configuration file that saves the database password, so how do we let Git know?
.gitignoreCreate a special file in the root directory of the Git workspace , and fill in the names of the files to be ignored, and Git will automatically ignore these files . However, we need to actively check when we create a warehouse

If this option was not selected at the time, it is also possible to create one in the workspace later.
Example: To ignore all files ending with
.soand , the content at this time is as follows:.ini.gitignore

You can also specify a certain file in .gitignorethe file, because we are currently creating this file in the workspace, so the last step is to submit the file to the remote end through add -> commit -> .gitignorepush
The ability to verify .gitignorefiles: At this point we create two new files in the workspace: a.soandb.ini

At this time, through git statusthe command, you can find that: git does not prompt that there is a new file in the workspace, so it can prove that .gitignorethe file has taken effect.
Another situation: If you just want to add a file to Git, but because this file is .gitignoreignored by the file, it cannot be added at all, what should you do at this time?
- Add the -f option to the add option: add an ignored file git add -f filename
In other words: there may be .gitignorea problem with the writing of the file, and it is necessary to find out which rule is wrong
- git check-ignore : for debugging files excluded by gitignore
For example,
a.sothe file is to be added

At this point git tells us: .gitignorethe rule on line 3 ignores the file, so we can know which rule should be revised.
Sometimes, when we write rules to exclude some files, for example:
#排除所有以.开头的隐藏文件
.*
But in doing so: .*this rule .gitignorealso excludes the file. Although you can git add -f 文件名force files to be added at this time, we still hope not to break .gitignorethe rules, so we can add an exception rule:
# 排除所有.开头的隐藏⽂件:
.*
# 不排除.gitignore
!.gitignore
The way to exclude the specified file from the .gitignore rule is: !文件名, so you only need to add the exception file to it
Configure an alias for the command
Example 1: git statusSimplify the command to: git stThe set command is:
git config --global alias.st status
--globalIt is a global parameter, that is, these commands are available under all Git repositories on this computer. If not added, it only works for the current warehouse
Example 2: git log -1Simplify the command to: git lastto display the latest commit
git config --global alias.last 'log -1'
Example 3: Display a good-looking log: git config --global alias.po '--pretty=oneline'==>git po
git config --global alias.po 'log --pretty=oneline'
Tag management
understand labels
Label: It can be understood as an identification of a commit, which is equivalent to an alias. For example: when a certain version of the project is released, a v1.0label is used to identify the last commit
significance
Compared with the hard-to-remember commit id (version number), the label can solve this problem very well, because the label tag must give an easy-to-remember and meaningful name, when we need to roll back to a certain For important versions, you can quickly locate them by directly using tags
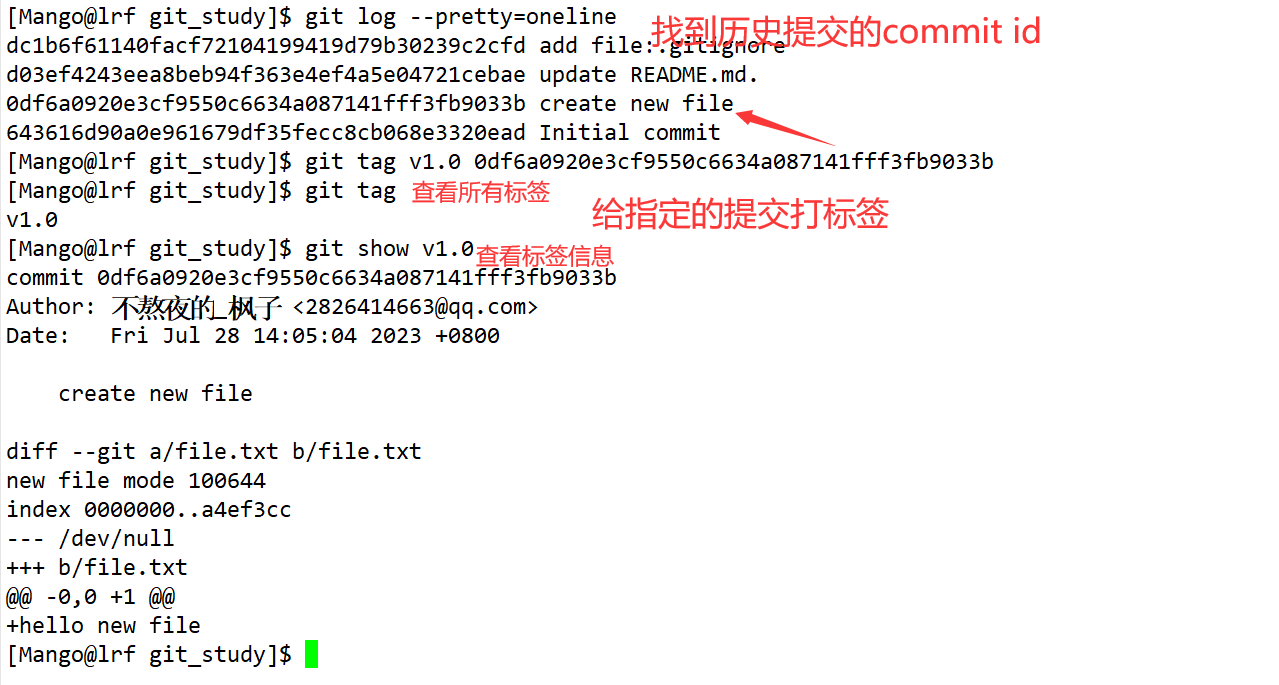
create tags
First you need to switch to the branch that needs to be labeled
git tag label name : the default is to label the latest submission
Label the specified commit:
Method: Find the commit id of the historical submission, and then use the commit id corresponding to the git tag tag name to tag the submission
git tag : view all tags
- NOTE: Tags are not listed in chronological order! instead of sorting alphabetically
git show label name : view label information
Git also provides the ability to create labels with descriptions, use **-a to specify the label name, -m to specify the description text**, the format is
git tag -a label name -m "descriptive text" corresponding to the commit id (if not, the default is to label the latest submission)

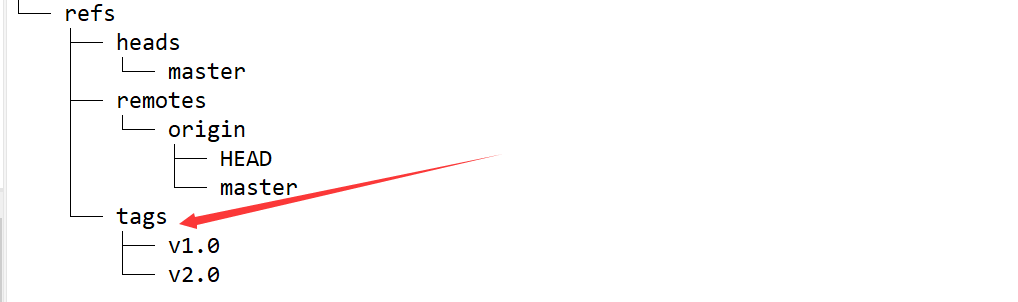
By
tree .gitviewing the contents of the .git directory, we can find that there is an additional tag directory in the refs directory to store the tags we just typed
Action tab
Delete local tags (not submitted to remote)
git tag -d tagname : delete a tag . Because the created tags are only stored locally and will not be automatically pushed to the remote. So mistyped tags can be safely deleted locally.
push label
git push origin tag name : push a tag to the remote
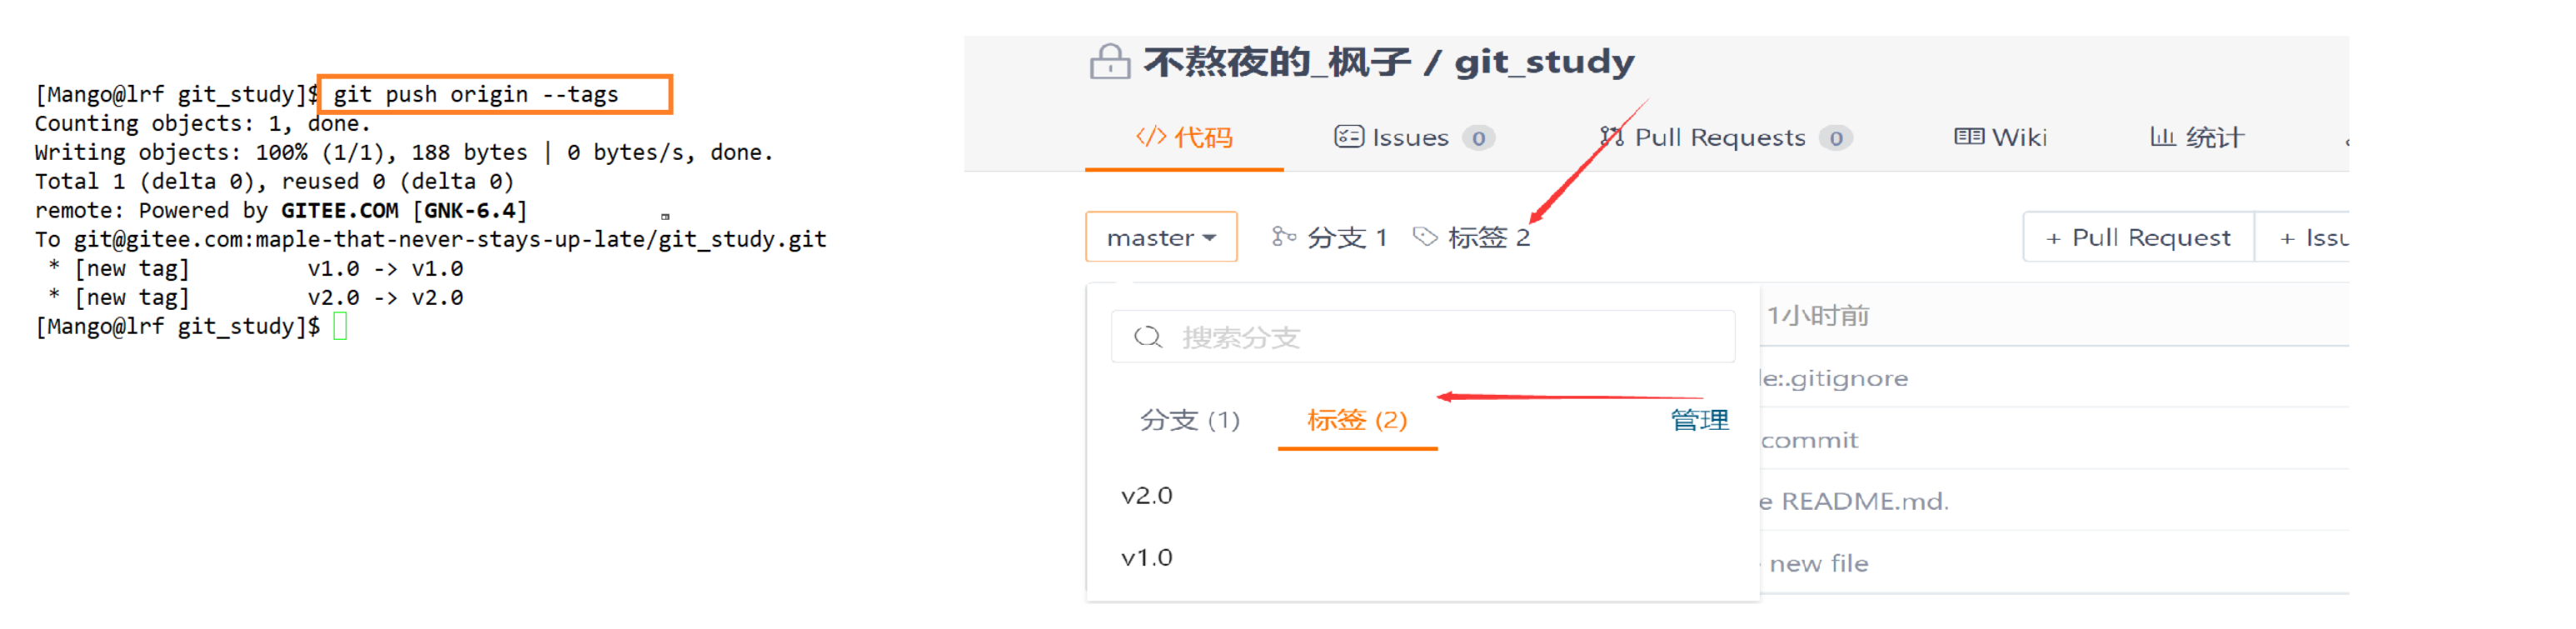
git push origin --tags : If there are many tags locally, you can also push them all at once to the remote end
Delete tags that have been pushed to the remote end
1. First delete from the local 2. Delete from the remote, the command used at this time is alsopush
The command format is: git push origin :refs/tags/tag name
