How does 3DMAX render channel maps?
There are various channels in 3dmax. Generally speaking, the channel is mainly used in the post-processing of the image, which can reduce the workload of repeated rendering and improve the quality of the image. How to render channel image in 3dmax? Here, Mr. Mufeng has prepared two methods of channel image rendering for you, let's take a look!
3DMA channel rendering method one: automatic rendering. Automatic rendering refers to the use of a special third-party 3dmax channel plug-in for rendering. Its advantage is that it does not need to manually set channel rendering parameters, and it can be generated with one click, which is fast and fast. The following is a brief introduction to the method and steps of rendering channels through plug-ins:
Step 1: Download the plug-in of 3dmax rendering channel from the Internet. When downloading, you need to pay attention to whether the plug-in is suitable for our max version and whether its functions are consistent with the functions we need. Here we show you the QuickMask rendering plug-in (one-click channel rendering plug-in). This plug-in provides parameter presets for multiple channel rendering. Users can click the button of the corresponding channel as needed to complete the rendering with one click.

Step 2: Download the one-key channel rendering plug-in QuickMask and decompress it, then in the 3dmax main menu, click "Script -> Run Script", select the decompressed QuickMask script file, and open the QuickMask plug-in.


Step 3: Render the channel map. Click the "Material Channel" button of the QuickMask plugin to start rendering.

Step 4: Rendering done! The rendered channel image is displayed, and you can click "Save". If you are not satisfied with the adjacent colors in the image, you can repeat the previous step until you get a satisfactory material color.

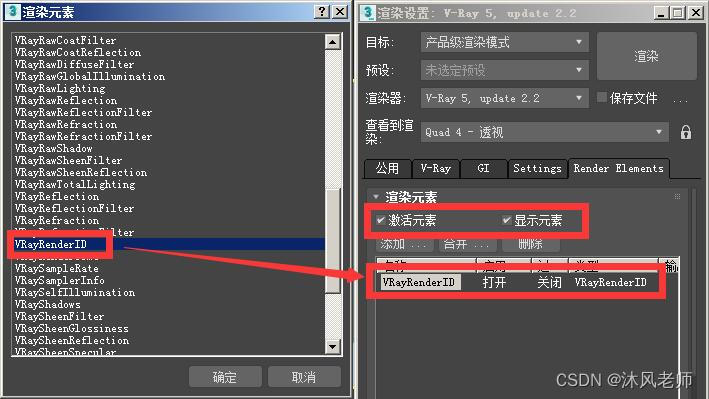
3DMA channel rendering method two: manual setting. "Render Elements" using the Vray renderer. This is a method of manually setting the rendering pass, and it is divided into two cases: framebuffer off and framebuffer on.
(a) The framebuffer is closed.
Step 1: Open the "Render Settings" panel, set the renderer to vray, then switch to the "V-Ray" tab, uncheck the frame buffer.

Step 2: Switch to the "Render Element" tab, check "Activate Element" and "Display Element", click the "Add" button, select VRayRenderID from the list, confirm, and add it to the table.
Step 3: After adding the above content, we can click the "Render" button to render like the rendering rendering.
(2) The frame buffer is opened.
When the frame buffer is turned on, the "VRayRenderID" in the "Render Elements" list will be displayed as "Off", which is caused by the conflict between Vray and 3dMax. If you start rendering directly at this time, there will be no channel map effect of.

In this case, you need to check the "separate rendering pass" in the "V-Ray" tab, and click the "..." below to set the output directory. Go to the output directory to view the corresponding image files.


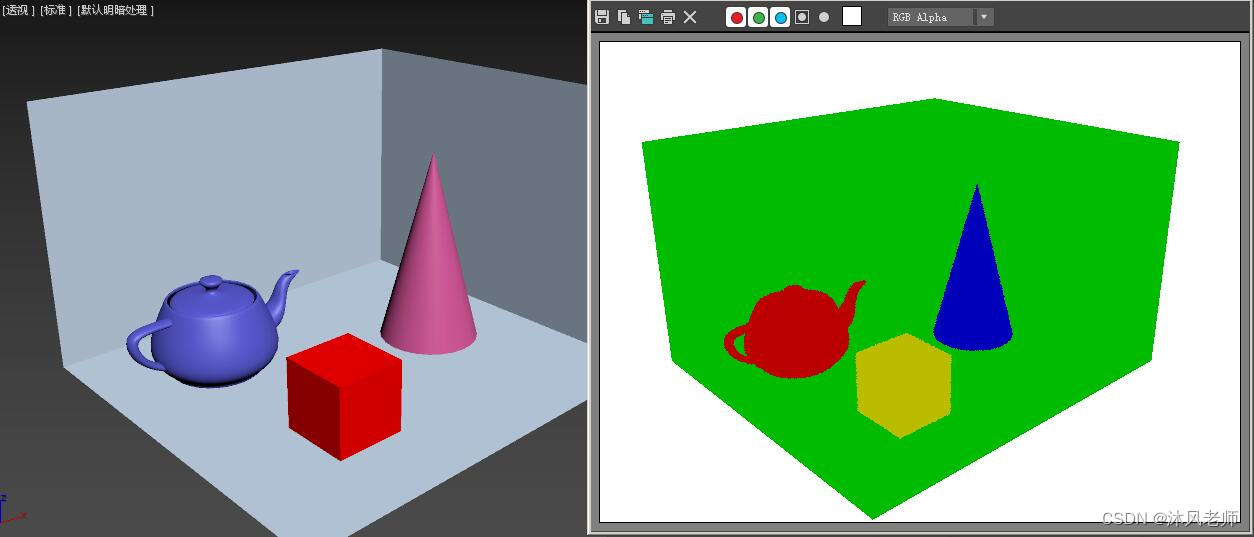
【Generated channel image】
The above are the two commonly used methods for 3dMax rendering channel images. I hope that if you find it helpful, give us a thumbs up. This is also the encouragement and support for us to continue to create! Thanks for your attention, see you next time!