Table of contents
- 1. Introduction to Spring MVC
- Two, SpringMVC entry case
- 3. @RequestMapping annotation
-
- 1. Function of @RequestMapping annotation
- 2. The location of the @RequestMapping annotation
- 3. Attributes of @RequestMapping annotation
- 4. SpringMVC get request parameters
-
- 4.1 Get through servlet API
- 4.2 Acquisition through the formal parameters of the controller method
- 4.3 @RequestParam: Bind the request parameters to the formal parameters of the controller method
- 4.4 @RequestHeader: Bind the request header information with the formal parameters of the controller method
- 4.5 @CookieValue: Bind the cookie data to the formal parameters of the controller method
- 4.6 Acquisition through the formal parameter of the entity class type of the controller method
- 4.7 Filter to solve the problem of garbled characters in obtaining request parameters
- 4. Domain objects share data
-
- 1. Use ServletAPI to share data with request domain objects
- 2. Use ModelAndView to share data with request domain objects
- 3. Use the model to share data with the request domain
- 4. Use modelMap to share data with the request domain
- 5. Use map to share data with the request domain
- 6. The relationship between Model and ModelMap and map
- 7. Share data to the session domain
- 8. Share data with the application domain
- Five, the view of SpringMVC
- 6. RESTful Architecture
- 7. SpringMVC handles ajax requests
- 8. Interceptors and filters
- Nine, exception handler
- Ten, annotation configuration SpringMVC
- Eleven, SpringMVC execution process
- 12. SSM integration exercises
1. Introduction to Spring MVC
1. What is MVC?
MVC is a software architecture idea that divides software into models, views, and controllers.
M: Model, the model layer, refers to the javaBean in the project, which is used to process data. javaBean is divided into two categories:
- One class is called Entity Bean: Specially store business data, such as Student, User, etc.
- One class is called business processing Bean: it refers to Service or Dao object, which is specially used to handle business logic and data access.
V: View, view layer, refers to pages such as html or jsp in the project, the function is to interact with users and display data
C: Controller, control layer, refers to the servlet in the project, the role is to receive requests and respond to browsers
MVC workflow:
The user sends a request to the server through the view layer, the request is received by the controller in the server, the controller calls the corresponding model layer to process the request, and returns the result to the controller after processing, the controller then finds the corresponding view according to the result of the request processing, and renders the data The final response to the browser.
2. What is Spring MVC?
SpringMVC is a follow-up product of Spring and a sub-project of Spring.
SpringMVC is a complete set of solutions provided by Spring for the development of presentation layer. After the presentation layer framework has gone through successive changes of Srust, WebWork, Strust2 and many other products, the industry generally chooses SpringMVC as the preferred solution for Java EE project presentation layer development.
Note: The three-tier architecture is divided into presentation layer (or presentation layer), business logic layer, and data access layer. The presentation layer represents the foreground page and background servlet
3. What are the characteristics of Spring MVC?
- Native products of the Spring family, seamlessly interface with infrastructure such as I0C containers
- Based on the native Servlet, through the powerful front controller DispatcherServlet, the request and response are processed uniformly
- The problems that need to be solved in each segment of the presentation layer are covered in an all-round way, and comprehensive solutions are provided
- The code is fresh and concise, greatly improving development efficiency
- The degree of internal components is high, and the pluggable components can be plugged and played. You can configure the corresponding components for any function you want.
- Excellent performance, especially suitable for the requirements of modern large-scale and ultra-large Internet projects
Two, SpringMVC entry case
1. Development environment
IDE: idea 2021
Build tool: maven 3.6.9
Server: tomcat 8.5.9
Spring version: 5.3.19
2. Create a Maven project
2.1 Add web module
2.2 Introducing dependencies
<dependencies>
  <dependency>
    <groupId>junit</groupId>
    <artifactId>junit</artifactId>
    <version>4.11</version>
    <scope>test</scope>
  </dependency>
  <!--springMVC-->
  <dependency>
    <groupId>org.springframework</groupId>
    <artifactId>spring-webmvc</artifactId>
    <version>5.3.19</version>
  </dependency>
  <dependency>
    <!--日志-->
    <groupId>ch.qos.logback</groupId>
    <artifactId>logback-classic</artifactId>
    <version>1.2.3</version>
  </dependency>
  <!--ServletAPI-->
  <dependency>
    <groupId>javax.servlet</groupId>
    <artifactId>javax.servlet-api</artifactId>
    <version>4.0.1</version>
  </dependency>
  <!--Spring5和Thymeleaf整合包-->
  <dependency>
    <groupId>org.thymeleaf</groupId>
    <artifactId>thymeleaf-spring5</artifactId>
    <version>3.0.15.RELEASE</version>
  </dependency>
</dependencies>
3. Configure web.xml
Role: Register SpringMVC's front controller DispatcherServlet
3.1 Default configuration method
Under this configuration, the configuration file of SpringMVC is located under WEB-INF by default, and the default name is -servlet.xml.
For example, the configuration file of SpringMVC corresponding to the following configuration is located under WEB-NF, and the file name is springMVC-servlet.xml
<!DOCTYPE web-app PUBLIC
 "-//Sun Microsystems, Inc.//DTD Web Application 2.3//EN"
 "http://java.sun.com/dtd/web-app_2_3.dtd" >

<web-app>
  <display-name>Archetype Created Web Application</display-name>

  <!--
      配置SpringMVC的前端控制器DispatcherServlet

      springMVC的配置文件默认的位置和名称
      位置: WEB-INF下
      名称: <servlet-name>-servlet.xml,当前配置下的配置文件名为springMVC-servlet.xml

      url-pattern中/和/*的区别:
        /:匹配浏览器向服务器发送的所有请求(不包括jsp)
        /*:匹配浏览器向服务器发送的所有请求(包括jsp)
  -->
  <servlet>
    <servlet-name>springMVC</servlet-name>
    <servlet-class>org.springframework.web.servlet.DispatcherServlet</servlet-class>
  </servlet>
  <servlet-mapping>
    <servlet-name>springMVC</servlet-name>
    <url-pattern>/</url-pattern>
  </servlet-mapping>
</web-app>
3.2 Extended configuration method
The default configuration method of web.xml, the spring configuration file is located in the WEB-INF directory.
If you want to put the spring configuration file in the java class path (under the resources directory), you can set the location and name of the springMvC configuration file through the label.
<!DOCTYPE web-app PUBLIC
 "-//Sun Microsystems, Inc.//DTD Web Application 2.3//EN"
 "http://java.sun.com/dtd/web-app_2_3.dtd" >

<web-app>
  <display-name>Archetype Created Web Application</display-name>

  <!--
      配置SpringMVC的前端控制器DispatcherServlet

      springMVC的配置文件默认的位置和名称
      位置: WEB-INF下
      名称: <servlet-name>-servlet.xml,当前配置下的配置文件名为springMVC-servlet.xml

      url-pattern中/和/*的区别:
        /:匹配浏览器向服务器发送的所有请求(不包括jsp)
        /*:匹配浏览器向服务器发送的所有请求(包括jsp)
  -->
  <servlet>
    <servlet-name>springMVC</servlet-name>
    <servlet-class>org.springframework.web.servlet.DispatcherServlet</servlet-class>
    <!--设置springMvC配置文件的位置和名称-->
    <init-param>
      <param-name>contextConfigLocation</param-name>
      <param-value>classpath:springMVC.xml</param-value>
    </init-param>
    <!--将DispatcherServlet的初始化时间提前到服务器启动时,避免初次访问加载时间过长-->
    <load-on-startup>1</load-on-startup>
  </servlet>

  <servlet-mapping>
    <servlet-name>springMVC</servlet-name>
    <url-pattern>/</url-pattern>
  </servlet-mapping>
</web-app>
Compiled file directory:
4. Create a request controller
Since the front controller uniformly processes the requests sent by the browser, but the specific requests have different processing procedures, it is necessary to create a class for processing specific requests, that is, the request controller requests each request processing method in the controller to
become Controller method
Because the controller of SpringMVC is served by a POJO (ordinary java class), it needs to be identified as a control layer component through the @Controller annotation and handed over to Spring's IOC container for management. At this time, SpringMVC can recognize the controller The presence
@Controller
public class HelloController {


    /*
        @RequestMapping注解: 处理请求和控制器方法之间的映射关系
        @RequestMapping注解的value属性可以通过请求地址匹配请求,/表示的当前工程的上下文路径
        localhost:8080/springMvC/

    */
    @RequestMapping("/")
    public String protal() {


        System.out.println("请求方法");
        // 将逻辑视图返回
        return "index";
    }

    @RequestMapping("/hello")
    public String hello() {


        return "success";
    }
}
5. Create a SpringMVC configuration file
<?xml version="1.0" encoding="UTF-8"?>
<beans xmlns="http://www.springframework.org/schema/beans"
       xmlns:xsi="http://www.w3.org/2001/XMLSchema-instance"
       xmlns:context="http://www.springframework.org/schema/context"
       xsi:schemaLocation="http://www.springframework.org/schema/beans http://www.springframework.org/schema/beans/spring-beans.xsd http://www.springframework.org/schema/context https://www.springframework.org/schema/context/spring-context.xsd">

    <!--开启扫描-->
    <context:component-scan base-package="com.fd.spring"></context:component-scan>

    <!--配置Thymeleaf视图解析器-->
    <bean id="viewResolver" class="org.thymeleaf.spring5.view.ThymeleafViewResolver">
        <property name="order" value="1"/>
        <property name="characterEncoding" value="UTF-8"/>
        <property name="templateEngine">
            <bean class="org.thymeleaf.spring5.SpringTemplateEngine">
                <property name="templateResolver">
                    <bean class="org.thymeleaf.spring5.templateresolver.SpringResourceTemplateResolver">
                        <!--视图前缀-->
                        <property name="prefix" value="/WEB_INF/templates"/>
                        <!--视图后缀-->
                        <property name="suffix" value=".html"/>
                        <property name="templateMode" value="HTML5"/>
                        <property name="characterEncoding" value="utf-8"/>
                    </bean>
                </property>
            </bean>
        </property>
    </bean>
</beans>
6. Test method
6.1 Project structure
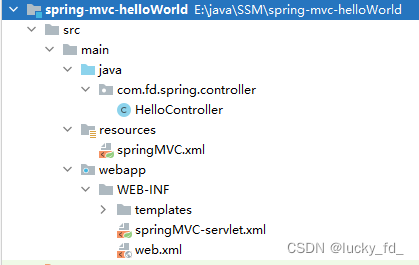
6.2 View layer implementation
index.htmlcode
<!DOCTYPE html>
<html lang="en" xmlns: th="http://www.thymeleaf.org">
<head>
    <meta charset="UTF-8">
    <title>Title</title>
</head>
<body>
    <h1>hello SpringMVC</h1>

<!--
    themeleaf命名空间,自动添加上下文
    th:href="@{/hello} 对应路径:localhost:8080/springMvC/hello
-->
    <a th:href="@{/hello}">测试SpringMVC</a>
    <a href="/hello">测试绝对路径</a>

    <div>
        这是主页界面。。。。。。。。。。
    </div>
</body>
</html>
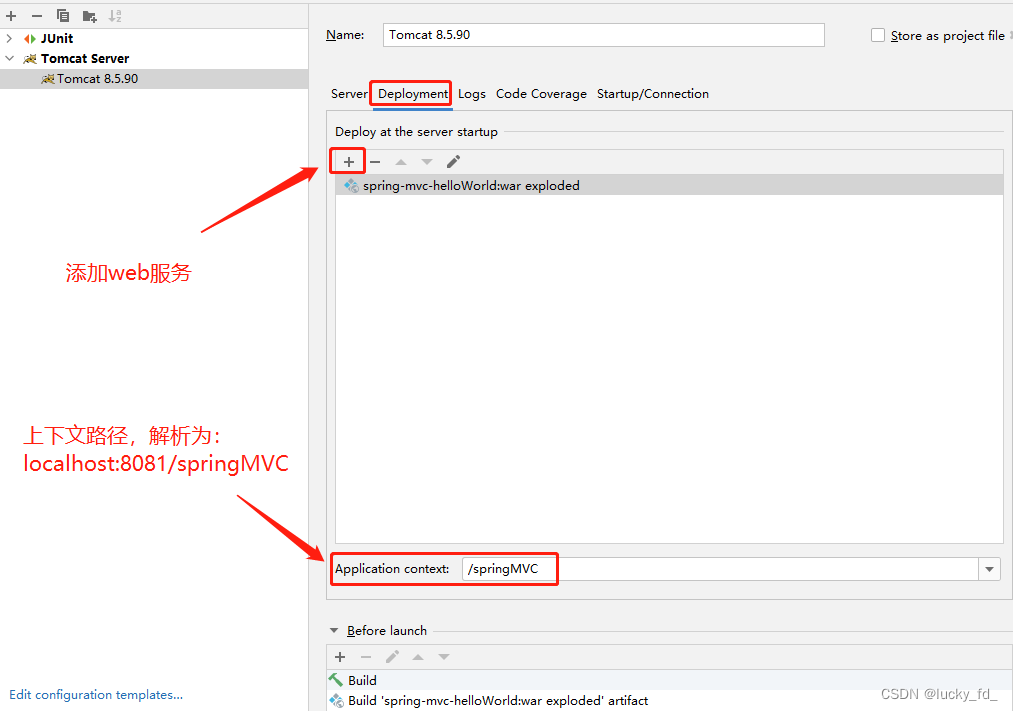
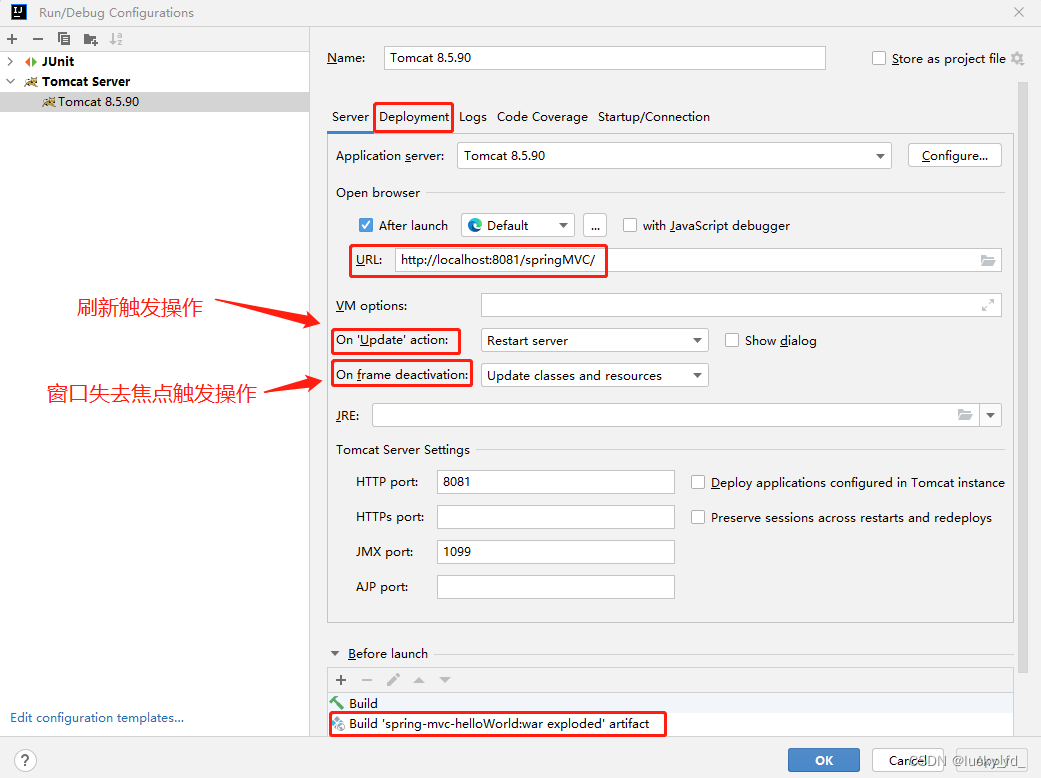
6.3 Start the service on the tomcat server
7. Summary
The browser sends a request. If the request address matches the url-pattern of the front controller, the request will be processed by the front controller DispatcherServlet. The front-end controller will read the core configuration file of SpringMVC, find the controller by scanning components, and match the request address with the value attribute value of the @RequestMapping annotation in the controller. If the match is successful, the controller method identified by the annotation is the processing The requested method. The method of processing the request needs to return a string-type view name, which will be parsed by the view resolver, plus prefixes and suffixes to form the path of the view, rendered by Thymeleaf, and finally forwarded to the page corresponding to the view.
3. @RequestMapping annotation
1. Function of @RequestMapping annotation
From the annotation name, we can see that the function of the @RequestMapping annotation is to associate the request with the controller method that processes the request and establish a mapping relationship.
When SpringMVC receives the specified request, it will find the corresponding controller method in the mapping relationship to process the request
2. The location of the @RequestMapping annotation
@RequestMapping identifies a class: sets the initial information of the request path of the mapping request
@RequestMapping identifies a method: sets the specific information of the mapping request request path
@Controller
@RequestMapping("/test")
public class TestRequestMappingController {


    // 此时请求映射所映射的请求的请求路径为: /test/hello
    @RequestMapping("/hello")
    public String protal() {


        return "index";
    }
}
3. Attributes of @RequestMapping annotation
Annotation source code:
@Target({

    ElementType.TYPE, ElementType.METHOD})
@Retention(RetentionPolicy.RUNTIME)
@Documented
@Mapping
public @interface RequestMapping {


    String name() default "";

    @AliasFor("path")
    String[] value() default {

    };

    @AliasFor("value")
    String[] path() default {

    };

    RequestMethod[] method() default {

    };

    String[] params() default {

    };

    String[] headers() default {

    };

    String[] consumes() default {

    };

    String[] produces() default {

    };
}
3.1 value attribute
@RequestMapping annotation value attribute role: match the request through the requested request path
The value attribute is an array type, that is, the request path sent by the current browser matches any value in the value attribute, and the current request will be processed by the method identified by the annotation.
@Controller
@RequestMapping("/test")
public class TestRequestMappingController {


    @RequestMapping({

    "/hello", "/hai"})
    public String protal() {


        return "index";
    }
}
3.2 method attribute
The function of the method attribute of the @RequestMapping annotation: match the request by the request method of the request
The method attribute is an array of the RequestMethod type, that is, the request method sent by the current browser matches any one of the method attributes, and the current request will be processed by the method identified by the annotation. If the request path of the request sent by the browser matches the value attribute of the RequestMapping annotation, but the request method does not match, the page will report an error: 405 - Request methodxxx'not supported
@Controller
@RequestMapping("/test")
public class TestRequestMappingController {


    // 此时请求映射所映射的请求的请求路径为: /test/hello
    @RequestMapping(value = {

    "/hello", "/hai"},
            method = RequestMethod.GET)
    public String protal() {


        return "index";
    }
}
extension:
On the basis of @RequestMapping, combined with some derived annotations of the request method:
@GetMapping, @postMapping, @DeleteMapping, @PutMapping
- Mapping that handles get requests –> @GetMapping
- Mapping for processing post requests –> @PostMapping
- Mapping for processing put requests –> @PutMapping
- Mapping for processing delete requests –> @DeleteMapping
@Controller
@RequestMapping("/test")
public class TestRequestMappingController {


    // 此时请求映射所映射的请求的请求路径为: /test/hello及/test/hai,请求方法为get请求
    @GetMapping(value = {

    "/hello", "/hai"})
    public String protal() {


        return "index";
    }
}
Commonly used request methods are get, post, put, delete. However, browsers currently only support get and post. If other request method strings (put or delete) are set for the method when the form is submitted, the default request method will be processed according to get. If you want to send put and delete requests,
then Requires filters provided by SpringHiddenHttpMethodFilter, which will be discussed in the RESTful section below.
3.3 params attribute
The params attribute of the @RequestMapping annotation matches the request mapping through the request parameters of
the request The matched request must carry the param request parameter
"!param": the request matched by the request mapping must not carry the param request parameter
"param=value": the request matched by the request mapping must carry the param request parameter and param=value
" param!=value”: It is required that the request matched by the request mapping must carry the param request parameter but param!=value
@Controller
@RequestMapping("/test")
public class TestRequestMappingController {


    // 请求参数必须携带username参数,不能携带password参数,必须携带age参数且值为20
    @GetMapping(value = {

    "/hello", "/hai"},
    params = {

    "username", "!password", "age=20"})
    public String protal() {


        return "index";
    }
}
3.4 headers property
The headers attribute of the @RequestMapping annotation matches the request mapping through the request header
information of the
request The request matched by the request mapping must carry the header request header information
"!header": It is required that the request matched by the request mapping must not carry the header request header information
"header=value": The request matched by the request mapping must carry the header request header information And header=value
"header!=value": It is required that the request matched by the request mapping must carry header request header information and header!=value
If the current request satisfies the value and method attributes of the @RequestMapping annotation, but does not satisfy the headers attribute, the page displays a 404 error, that is, the resource is not found.
3.5 SpringMVC supports ant-style paths
Set some special characters in the value attribute value of the @RequestMapping annotation
?: A single character representing any interest
*: Representing any 0 or more characters
: Representing any directory with any number of layers
Note: When using , only / can be used **/xxx way
@RequestMapping("/a?a")
public String testAnt() {


    return "success";
}
3.6 SpringMVC supports placeholders in paths (focus)
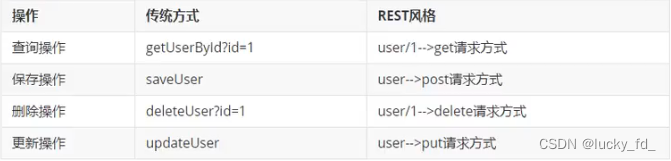
Original method: /deleteUser?id=1
Rest method:: /user/delete/1
The placeholder in the SpringMVC path is often used in the RESTful style. When some data is transmitted to the server through the path in the request path, it is The transmitted data can be represented by a placeholder (xxx) in the value attribute of the corresponding @RequestMapping annotation, and the data represented by the placeholder can be assigned to the formal parameter of the controller method through the @PathVariable annotation.
Case demonstration:
view view:
<!DOCTYPE html>
<html lang="en" xmlns: th="http://www.thymeleaf.org">
<head>
    <meta charset="UTF-8">
    <title>Title</title>
</head>
<body>

    <a th:href="@{/user/delete/1}">测试SpringMVC路径中占位符</a>

</body>
</html>
Controller:
@RequestMapping("/user/delete/{id}")
public String test(@PathVariable String id) {


    System.out.println(id); // id = 1
    return "success";
}
4. SpringMVC get request parameters
4.1 Get through servlet API
You only need to set the formal parameter of HttpservletRequest type in the formal parameter position of the controller method to use the request object in the controller method to obtain the request parameters
Case demonstration:
View layer:
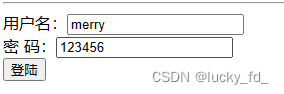
<form th:action="@{/param/servletAPI}" method="post">
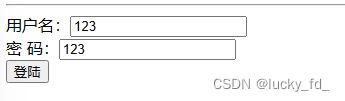
用户名:<input type="text" name="username"><br>
密 码:<input type="text" name="password"> <br>
<input type="submit" value="登陆">
</form>
Control layer:
@RequestMapping("/param/servletAPI")
public String getParamByServletAPI(HttpServletRequest request) {


    String username = request.getParameter("username");
    String password = request.getParameter("password");
    System.out.println("username: " + username + ", password: " + password);
    return "success";
}
Test Results:

4.2 Acquisition through the formal parameters of the controller method
You only need to set a formal parameter in the formal parameter position of the controller method,The name of the formal parameter must be consistent with the name of the request parameter
Case demonstration:
View layer:
<a th:href="@{/param?username=tom&password=123456}">测试控制器方法的形参获取请求参数</a><br>
Control layer:
@RequestMapping("/param")
public String getParam(String username, String password) {


    System.out.println("username: " + username + ", password: " + password);
    return "success";
}
Test Results:

4.3 @RequestParam: Bind the request parameters to the formal parameters of the controller method
Three attributes of @RequestParam annotation: value, required, defaultValue
- value: Set the name of the request parameter bound to the formal parameter
- required: Set whether the request parameter corresponding to the value must be transmitted. The default value is true, which means that the request parameter corresponding to the value must be transmitted, otherwise the page will report an error 400 - Required string parameter xxx' is not present. If set to false, it means that the request parameter corresponding to the value does not have to be transmitted, if not transmitted, the formal parameter value is null
- defaultValue: Set the default value set for the formal parameter when the request parameter corresponding to the value is not transmitted, which has nothing to do with the required attribute value at this time
source code:
@Target({

    ElementType.PARAMETER})
@Retention(RetentionPolicy.RUNTIME)
@Documented
public @interface RequestParam {


    @AliasFor("name")
    String value() default "";

    @AliasFor("value")
    String name() default "";

    boolean required() default true;

    String defaultValue() default "\n\t\t\n\t\t\n\ue000\ue001\ue002\n\t\t\t\t\n";
}
Case demonstration:
View layer:
<form th:action="@{/param}" method="post">
    用户名:<input type="text" name="userName"><br>
    密  码:<input type="text" name="password"> <br>
    <input type="submit" value="登陆">
</form>
Control layer:
// 设置userName参数和username绑定
@RequestMapping("/param")
public String getParamByAnnotation(@RequestParam("userName", defaultValue = "hello") String username,
                                   @RequestParam("password") String password) {


    System.out.println("username: " + username + ", password: " + password);
    return "success";
}
Test Results:

4.4 @RequestHeader: Bind the request header information with the formal parameters of the controller method
The usage is the same as @RequestParam
Case demonstration:
@RequestMapping("/param")
public String getParamByAnnotation(@RequestParam(value = "userName", defaultValue = "hello") String username,
                                   @RequestParam("password") String password,
                                   @RequestHeader("referer") String referer,

                                   ) {


    System.out.println("referer: " + referer);// 提供请求的访问来源,从哪一个请求链接过来的
    System.out.println("username: " + username + ", password: " + password);
    return "success";
}
Test Results:

4.5 @CookieValue: Bind the cookie data to the formal parameters of the controller method
The usage is the same as @RequestParam
Case demonstration:
@RequestMapping("/param")
public String getParamByAnnotation(@RequestParam(value = "userName", defaultValue = "hello") String username,
                                   @RequestParam("password") String password,
                                   @RequestHeader("referer") String referer,
                                   @CookieValue("JSESSIONID") String jsessionId) {


    System.out.println("referer: " + referer);
    System.out.println("jsessionId: " + jsessionId);
    System.out.println("username: " + username + ", password: " + password);
    return "success";
}
Test Results:

4.6 Acquisition through the formal parameter of the entity class type of the controller method
The request parameter needs to set the formal parameter of the entity class type in the formal parameter position of the controller method, and ensure that the attribute name of the attribute in the entity class is consistent with the name of the request parameter. The request parameters can be obtained through the formal parameters of the entity class type
Case demonstration:
Control layer:
@RequestMapping("/param/pojo")
public String getParamByPojo(User user) {


    System.out.println(user);
    return "success";
}
poo:
public class User {


    private String username;

    private String password;

    .....
}
View layer:
<form th:action="@{/param/pojo}" method="post">
    用户名:<input type="text" name="username"><br>
    密  码:<input type="text" name="password"> <br>
    <input type="submit" value="登陆">
</form>
Test Results:

4.7 Filter to solve the problem of garbled characters in obtaining request parameters
To solve the garbled problem of obtaining request parameters, you can use the encoding filter CharacterEncodingFilter provided by SpringMVC, but it must be registered in web.xml
<!--配置Spring的编码过滤器-->
<filter>
  <filter-name>CharacterEncodingFilter</filter-name>
  <filter-class>org.springframework.web.filter.CharacterEncodingFilter</filter-class>
  <!--设置请求的编码方式-->
  <init-param>
    <param-name>encoding</param-name>
    <param-value>UTF-8</param-value>
  </init-param>
  <!--设置请求的编码方式同时还会设置响应的编码方式-->
  <init-param>
    <param-name>forceEncoding</param-name>
    <param-value>true</param-value>
  </init-param>
</filter>
<filter-mapping>
  <filter-name>CharacterEncodingFilter</filter-name>
  <url-pattern>/*</url-pattern>
</filter-mapping>
Note: The filter that handles encoding in SpringMVC must be configured before other filters, otherwise it will be invalid
Code filtering source code analysis:
// 通过web.xml中配置进行初始化赋值
public CharacterEncodingFilter(String encoding, boolean forceEncoding) {


    this(encoding, forceEncoding, forceEncoding);
}
// 判断设置请求及响应的编码格式
protected void doFilterInternal(HttpServletRequest request, HttpServletResponse response, FilterChain filterChain) throws ServletException, IOException {


    String encoding = this.getEncoding();
    if (encoding != null) {


        if (this.isForceRequestEncoding() || request.getCharacterEncoding() == null) {


            request.setCharacterEncoding(encoding);
        }

        if (this.isForceResponseEncoding()) {


            response.setCharacterEncoding(encoding);
        }
    }

    filterChain.doFilter(request, response);
}
4. Domain objects share data
Request scope (request scope): The life cycle of a request scope refers to the process of a request. The page is redirected through forword, and the target page can still obtain the attribute value of the request. If the page is redirected through the redirect method, the new specified URL address will be revisited, and the attribute value of the request will be lost.
Session scope (session scope): The life cycle of a session scope refers to the time when a client is connected to the server. After the session expires or the user automatically logs out, the session becomes invalid. Objects stored in the session scope can be accessed throughout the session.
Application scope (application scope): The life cycle of the application scope is from the start of the server to the shutdown of the server, which is the longest of the four scopes. Objects stored in the application domain can be shared and accessed by all JSPs and Servlets during the entire application process.
1. Use ServletAPI to share data with request domain objects
View layer:
success.html interface code
<!DOCTYPE html>
<html lang="en">
<head>
    <meta charset="UTF-8">
    <title>Title</title>
</head>
<body>
    <h2>欢迎登陆!</h2>
    <!--获取请求域数据-->
    <p th:text="${scope}"></p>
    <!--获取会话域数据-->
    <p th:text="${session.scope}"></p>
    <!--获取应用域数据-->
    <p th:text="${application.scope}"></p>
</body>
</html>
Control layer:
@RequestMapping("/test/servletAPI")
public String servletAPI(HttpServletRequest request) {


    request.setAttribute("scope","hello servletAPI");
    return "success";
}
2. Use ModelAndView to share data with request domain objects
When using ModeLAndView, you can use its Model function to share data with the request domain
Use the view function to set the logical view, but the controller method must use ModelAndView as the return value of the method
@RequestMapping("/test/mav")
public ModelAndView testMAV() {


    /*
    * ModelAndView包含Model和view的功能
    * Model:向请求域中共享数据
    * view:设置逻辑视图实现页面跳转
    *
    * */
    ModelAndView modelAndView = new ModelAndView();
    // 向共享域中共享数据
    modelAndView.addObject("scope", "hello ModelAndView");
    // 设置逻辑视图
    modelAndView.setViewName("success");
    return modelAndView;
}
3. Use the model to share data with the request domain
@RequestMapping("/test/modelMap")
public String testModelMap(ModelMap modelMap) {


    modelMap.addAttribute("scope", "hello, ModelMap");
    return "success";
}
4. Use modelMap to share data with the request domain
@RequestMapping("/test/modelMap")
public String testModelMap(ModelMap modelMap) {


    modelMap.addAttribute("scope", "hello, ModelMap");
    return "success";
}
5. Use map to share data with the request domain
@RequestMapping("/test/map")
public String testMap(Map<String, Object> map) {


    map.put("scope", "hello, map");
    return "success";
}
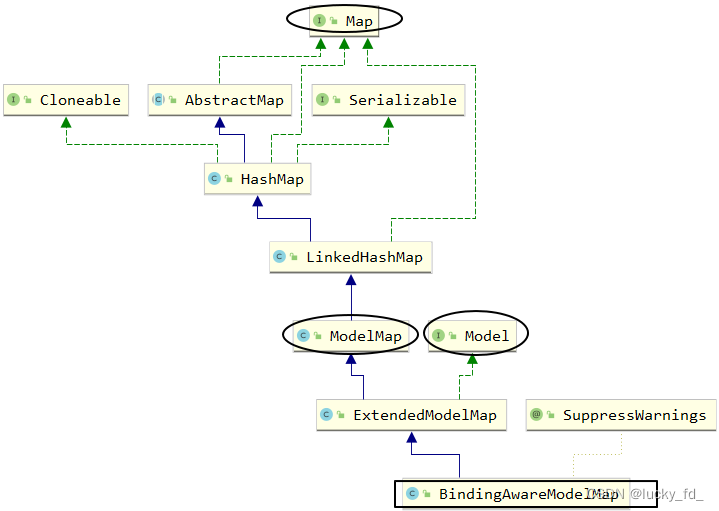
6. The relationship between Model and ModelMap and map
In fact, in the bottom layer, these types of formal parameters are ultimately created through BindingAwareModelMap
- public class BindingAwareModelMap extends ExtendedModelMap
- public class ExtendedModelMap extends ModelMap implements Model
- public class ModelMap extends LinkedHashMap<String, Object>
7. Share data to the session domain
/** 会话域:浏览器打开到关闭*/
@RequestMapping("/test/session")
public String testSession(HttpSession session) {


    session.setAttribute("scope", "hello, session");
    return "success";
}
8. Share data with the application domain
/** 应用域:服务器打开到关闭*/
@RequestMapping("/test/application")
public String testApplication(HttpSession session) {


    ServletContext servletContext = session.getServletContext();
    servletContext.setAttribute("scope", "hello, application");
    return "success";
}
Five, the view of SpringMVC
The view in SpringMVC is the View interface. The function of the view is to render data and display the data in the model to the user.
There are many types of SpringMVC views, and there are forwarding views and redirecting views by default. When the project introduces jstl dependencies, the forwarding view will be automatically converted to jstlView.
If the view technology used is Thymeleaf, the Thymeleaf view parser is configured in the SpringMVC configuration file, and the ThymeleafView is obtained after parsing the view parser
1. ThymeleafView
When the view name set in the controller method does not have any prefix, the view name at this time will be parsed by the view resolver configured in the SpringMVC configuration file, and the final path obtained by splicing the view name with the view prefix and view suffix will pass The forwarding method realizes the jump
@RequestMapping("/test/view/thymeleaf")
public String testThymeleafView() {
    return "success";
}
2. Forward view
The default forwarding view in SpringMVC is InternalResourceView
The situation of creating forwarding view in SpringMV:
When the view name set in the controller method is prefixed with "forward:", the InternalResourceView view is created. At this time, the view name will not be parsed by the view resolver configured in the SpringMVC configuration file, but will be prefixed with "forward :"Removed, the remaining part is used as the final path to realize the jump through forwarding. Example: "forward:/", "forward:/employee"
/** 转发视图*/
@RequestMapping("/test/view/forward")
public String testInternalResourceView() {


    // 直接转发跳转到相应视图,但是视图中的数据没有办法解析。
    return "forward:/test/model";
}
3. Redirect view
The default redirection view in SpringMVC is RedirectView
When the view name set in the controller method is prefixed with "redirect:", the RedirectView view is created. The view name at this time will not be parsed by the view resolver configured in the SpringMVC configuration file, but will be prefixed with "redirect " is removed, and the remaining part is used as the final path to realize the jump through redirection. Example: "redirect:/", "redirect:/employee"
/** 重定向视图*/
@RequestMapping("/test/view/redirect")
public String testRedirectView() {


    return "redirect:/test/model";
}
Note:
When the redirected view is parsed, the redirect: prefix will be removed first, and then it will be judged whether the stripped part starts with /, and if so, the context path will be automatically spliced
4. View controller view-Controller
When the controller method is only used to realize page jumping, that is, when only the view name needs to be set, the processor method can be identified with the view-controller tag in the SpringMVC.xml configuration file. There is no need to encapsulate a controller method separately.
<!--开启扫描-->
<context:component-scan base-package="com.fd.spring"></context:component-scan>

<!--配置Thymeleaf视图解析器-->
<bean id="viewResolver" class="org.thymeleaf.spring5.view.ThymeleafViewResolver">
    <property name="order" value="1"/>
    <property name="characterEncoding" value="UTF-8"/>
    <property name="templateEngine">
        <bean class="org.thymeleaf.spring5.SpringTemplateEngine">
            <property name="templateResolver">
                <bean class="org.thymeleaf.spring5.templateresolver.SpringResourceTemplateResolver">
                    <!--视图前缀-->
                    <property name="prefix" value="/WEB-INF/templates/"/>
                    <!--视图后缀-->
                    <property name="suffix" value=".html"/>
                    <property name="templateMode" value="HTML5"/>
                    <property name="characterEncoding" value="utf-8"/>
                </bean>
            </property>
        </bean>
    </property>
</bean>

<!--开启mvc的注解驱动-->
<mvc:annotation-driven/>

<!--
    视图控制器,为当前的请求直接设置视图名称实现页面跳转
    若设置视图控制器,则只有视图控制器所设置的请求会被处理,其他的请求将全部404,此时必须在配置一个标签:<mvc:annotation-driven />
-->
<mvc:view-controller path="/" view-name="index"></mvc:view-controller>
Note:
When any view-controller is set in SpringMVC, all request mappings in other controllers will be invalid. At this time, it is necessary to set the tag to enable the mvc annotation driver in the core configuration file of SpringMVC: <mvc:annotation-driven />
6. RESTful Architecture
1. Introduction to RESTful
REST: Representational State Transfer, presentation layer resource state transfer
- Resources
A resource is a way of looking at a server that consists of many discrete resources. Each resource is a nameable abstraction on the server. Because resource is an abstract concept, it can not only represent a file in the server file system, a table in the database and other specific things, you can design resources as abstract as your imagination allows. And client application developers can understand. Similar to object-oriented design, resources are organized around nouns, with the nouns being the first focus. A resource can be identified by one or more URIs. A URI is both the name of a resource and its address on the Web. A client application interested in a resource can interact with it through the resource's URI. - Resource representation
A resource representation is a description of the state of a resource at a specific moment in time. Can be transferred (swapped) between client-server. Resource representations can be in multiple formats, such as HTML/XML/JSON/plain text/picture/video/audio and so on. The representation format of resources can be determined through a negotiation mechanism. The representation of the request-response direction usually takes a different format. - State transfer
State transfer refers to the transfer (transfer) between the client and the server to represent the representation of the state of the resource. The purpose of operating resources is achieved indirectly through the expression of transferring and operating resources.
2. Implementation of RESTful
Specifically, in the HTTP protocol, there are four verbs representing the operation mode: GET, POST, PUT, and DELETE.
They correspond to four basic operations: GET is used to obtain resources, POST is used to create new resources, and PUT is used to update resources. DELETE is used to delete resources.
The REST style advocates the use of a unified style design for the URL address. Each word is separated by a slash from front to back, and the request parameters are not carried in the form of question mark key-value pairs. Instead, the data to be sent to the server is used as part of the URL address to ensure the overall style. consistency.
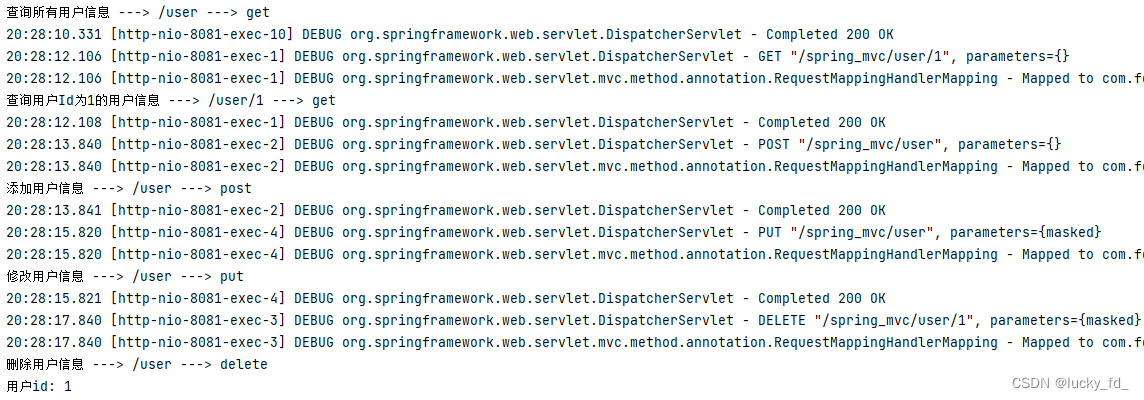
Case presentation:
Control layer:
@Controller
public class TestRestController {


    @RequestMapping("/")
    public String protal() {


        return "index";
    }

    @GetMapping("/user")
    public String getAllUser() {


        System.out.println("查询所有用户信息 ---> /user ---> get");
        return "success";
    }

    @GetMapping("/user/{id}")
    public String getUserById(@PathVariable String id) {


        System.out.println("查询用户Id为1的用户信息 ---> /user/1 ---> get");
        return "success";
    }

    @PostMapping("/user")
    public String addUser() {


        System.out.println("添加用户信息 ---> /user ---> post");
        return "success";
    }

    /**
     * 注意:浏览器目前只能发送get和post请求
     * 若要发送put和delete请求,需要在web.xml中配置一个过滤器HiddenHttpMethodFilter
     * 配置了过滤器之后,发送的请求要满足两个条件,才能将请求方式转换为put或delete
     * 1、当前请求必须为post
     * 2、当前请求必须传输请求参数_method, method的值才是最终的请求方式
     *
     * */

    @PutMapping("/user")
    public String updateUser() {


        System.out.println("修改用户信息 ---> /user ---> put");
        return "success";
    }

    @DeleteMapping("/user/{id}")
    public String deleteUser(@PathVariable String id) {


        System.out.println("删除用户信息 ---> /user ---> delete");
        System.out.println("用户id: " + id);
        return "success";
    }
}
View layer:
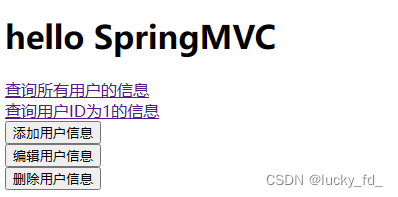
<a th:href="@{/user}">查询所有用户的信息</a><br>

<a th:href="@{/user/1}">查询用户ID为1的信息</a><br>

<form th:action="@{/user}" method="post">
    <input type="submit" value="添加用户信息">
</form>

<form th:action="@{/user}" method="post">
    <input type="hidden" name="_method" value="put">
    <input type="submit" value="编辑用户信息">
</form>

<form th:action="@{/user/1}" method="post">
    <input type="hidden" name="_method" value="delete">
    <input type="submit" value="删除用户信息">
</form>
Test Results:
3. Filter HiddenHttpMethodFilter
Note: The browser can only send get and post requests at present
* To send put and delete requests, you need to configure a filter HiddenHttpMethodFilter in web.xml
* After configuring the filter, the sent request must meet two conditions before it can be sent Convert the request method to put or delete
1. The current request must be post
2. The current request must transmit the request parameter _method, and the value of method is the final request method. If the
above conditions are met, the HiddenHttpMethodFilter filter will convert the request method of the current request It is the value of the request parameter _method, so the value of the request parameter _method is the final request method
<!--配置Spring的编码过滤器-->
<filter>
  <filter-name>CharacterEncodingFilter</filter-name>
  <filter-class>org.springframework.web.filter.CharacterEncodingFilter</filter-class>
  <!--设置请求的编码方式-->
  <init-param>
    <param-name>encoding</param-name>
    <param-value>UTF-8</param-value>
  </init-param>
  <!--设置请求的编码方式同时还会设置响应的编码方式-->
  <init-param>
    <param-name>forceEncoding</param-name>
    <param-value>true</param-value>
  </init-param>
</filter>
<!--设置处理请求方式的过滤器-->
<filter>
  <filter-name>httpMethodFilter</filter-name>
  <filter-class>org.springframework.web.filter.HiddenHttpMethodFilter</filter-class>
</filter>

<filter-mapping>
  <filter-name>CharacterEncodingFilter</filter-name>
  <url-pattern>/*</url-pattern>
</filter-mapping>
<filter-mapping>
  <filter-name>httpMethodFilter</filter-name>
  <url-pattern>/*</url-pattern>
</filter-mapping>

<!--设置SpringMVC的前端控制器-->
<servlet>
  <servlet-name>springMVC</servlet-name>
  <servlet-class>org.springframework.web.servlet.DispatcherServlet</servlet-class>
  <init-param>
    <param-name>contextConfigLocation</param-name>
    <param-value>classpath:spring-mvc.xml</param-value>
  </init-param>
</servlet>
<servlet-mapping>
  <servlet-name>springMVC</servlet-name>
  <url-pattern>/</url-pattern>
</servlet-mapping>
So far, SpringMVC has provided two filters: CharacterEncodingFilter and HiddenHttpMethodFilter
When registering in web.xml, you must first register CharacterEncodingFilter, and then register HiddenHttpMethodFilter
Reason:
The character set is set through the request.setCharacterEncoding(encoding) method in CharacterEncodingFilter.
The request.setCharacterEncoding(encoding) method requires no previous operations to obtain request parameters.
And HiddenHttpMethodFilter has exactly one operation to get the request method
Source code analysis:
public class HiddenHttpMethodFilter extends OncePerRequestFilter {


    private static final List<String> ALLOWED_METHODS;
    public static final String DEFAULT_METHOD_PARAM = "_method";
    private String methodParam = "_method";

    public HiddenHttpMethodFilter() {


    }

    public void setMethodParam(String methodParam) {


        Assert.hasText(methodParam, "'methodParam' must not be empty");
        this.methodParam = methodParam;
    }
    // 执行过滤操作
    protected void doFilterInternal(HttpServletRequest request, HttpServletResponse response, FilterChain filterChain) throws ServletException, IOException {


        HttpServletRequest requestToUse = request;
        // 判断请求方式为post请求
        if ("POST".equals(request.getMethod()) && request.getAttribute("javax.servlet.error.exception") == null) {


            // 获取请求参数为_method的参数,设置请求方式
            String paramValue = request.getParameter(this.methodParam);
            if (StringUtils.hasLength(paramValue)) {


                String method = paramValue.toUpperCase(Locale.ENGLISH);
                if (ALLOWED_METHODS.contains(method)) {


                    requestToUse = new HttpMethodRequestWrapper(request, method);
                }
            }
        }

        filterChain.doFilter((ServletRequest)requestToUse, response);
    }

    static {


        ALLOWED_METHODS = Collections.unmodifiableList(Arrays.asList(HttpMethod.PUT.name(), HttpMethod.DELETE.name(), HttpMethod.PATCH.name()));
    }

    private static class HttpMethodRequestWrapper extends HttpServletRequestWrapper {


        private final String method;

        public HttpMethodRequestWrapper(HttpServletRequest request, String method) {


            super(request);
            this.method = method;
        }

        public String getMethod() {


            return this.method;
        }
    }
}
7. SpringMVC handles ajax requests
1. @RequestBody gets request body information
@RequestBody can obtain the request body information, use the @RequestBody annotation to identify the formal parameters of the controller method, and the request body of the current request will assign values to the formal parameters identified by the current annotation.
Demo case:
Control layer:
@RequestMapping("/test/ajax")
public void testAjax(Integer id, @RequestBody String requestBody, HttpServletResponse response) throws IOException {


    System.out.println("id: " + id);
    System.out.println("requestBody: " + requestBody);
    // 响应到浏览器数据
    response.getWriter().write("hello axios");
}
View layer:
<body>
<div id="app">
<h1>index.html</h1>
<input type="button" value="测试SpringMVC处理Ajax" @click="testAjax()"><br>
</div>
<script type="text/javascript" th:src="@{/js/vue.js}"></script>
<script type="text/javascript" th:src="@{/js/axios.min.js}"></script>
<script type="text/javascript">
/*
axios({
url: '', //请求路径
method: '', // 请求方式
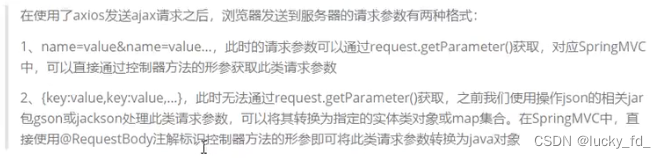
// 以name=value&name=value的方式发送的请求参数,不管使用的请求方式是get或post,请求参数都会被拼接到请求地址后,
// 此种方式的请求参数可以通过request.getParameter()获取
params: {},
// 以json格式发送的请求参数,请求参数会被保存到请求报文的请求体传输到服务器,此种方式的请求参数不可以通过request.getParameter()获取
data: {}
}).then(resp => {
console.log(resp.data)
})
* */
var vue = new Vue({
el: "#app",
methods: {
testAjax() {
axios.post("/spring_mvc/test/ajax?id=1001", {
username: "admin",
password: "12346"
}).then(resp => {
console.log(resp.data)
});
},
}
})
</script>
</body>
Test Results:

2. @RequestBody gets request body parameters in json format
Use the @RequestBody annotation to convert the request parameters in json format into java objects
a> import jackson's dependencies
b> set <mvc:annotation-driven /> in the SpringMVC configuration file
c> in the formal parameter position of the controller method that processes the request , directly set the java type parameter to be converted to the request parameter in json format, and use the @RequestBody annotation to mark
2.1 Import jackson dependencies
<dependency>
    <groupId>com.fasterxml.jackson.core</groupId>
    <artifactId>jackson-databind</artifactId>
    <version>2.15.1</version>
</dependency>
2.2 Test method
Control layer:
@RequestMapping("/test/ajax/requestBody/json")
public void testAjax(@RequestBody User user, HttpServletResponse response) throws IOException {


    System.out.println(user);
    response.getWriter().write("hello requestBody");
}
View layer: index.html
<body>
<div id="app">
    <h1>index.html</h1>

    <input type="button" value="测试SpringMVC处理Ajax" @click="testAjax()"><br>

    <input type="button" value="使用@RequestBody注解处理json格式的请求参数" @click="testRequestBody()"><br>
</div>

<script type="text/javascript" th:src="@{/js/vue.js}"></script>
<script type="text/javascript" th:src="@{/js/axios.min.js}"></script>
<script type="text/javascript">

    /*
    axios({
            url: '', //请求路径
            method: '', // 请求方式
            // 以name=value&name=value的方式发送的请求参数,不管使用的请求方式是get或post,请求参数都会被拼接到请求地址后,
            // 此种方式的请求参数可以通过request.getParameter()获取
            params: {},
            // 以json格式发送的请求参数,请求参数会被保存到请求报文的请求体传输到服务器,此种方式的请求参数不可以通过request.getParameter()获取
            data: {}
        }).then(resp => {
            console.log(resp.data)
        })

    * */
    var vue = new Vue({


        el: "#app",
        methods: {


            testAjax() {


                axios.post("/spring_mvc/test/ajax?id=1001", {


                    username: "admin",
                    password: "12346"
                }).then(resp => {


                    console.log(resp.data)
                });
            },
            testRequestBody() {


                axios.post(
                    "/spring_mvc/test/ajax/requestBody/json",
                    {


                        username: "admin",
                        password: "12346"
                    }
                ).then(resp => {


                    console.log(resp.data)
                })
            },
    })
</script>
</body>
Test Results:

3. @ResponseBody responds to browser data
@ResponseBody is used to identify a control method, and the return value of the method can be directly responded to the browser as the response body of the response message
@ResponseBody
@RequestMapping("/test/responseBody")
public String testResponseBody() {


    return "success";
}
4. @ResponseBody responds to browser json format data
Use the @ResponseBody annotation to respond to data in the browser's json format
a> import jackson's dependencies
b> set <mvc:annotation-driven /> in the SpringMVC configuration file
c> directly use the java object that needs to be converted into a json string as a controller The return value of the method, using the @ResponseBody annotation to identify the controller method, can directly convert the java object into a json string and respond to the browser.
Demo case:
Controller method:
@ResponseBody
@RequestMapping("/test/responseBody/json")
public User testResponseBodyJson() {


    User user = new User("张三", "123465", 23);
    return user;
}
Request method:
testResponseBody() {


    axios.get("/spring_mvc/test/responseBody/json").then(resp => {


        console.log(resp.data)
    })
}
Test Results:

5. @RestController annotation
The @RestController annotation is a composite annotation provided by springMVC. It is marked on the controlled class, which is equivalent to adding the @Controller annotation to the class and adding the @ResponseBody annotation to each method in it.
8. Interceptors and filters
1 Introduction
Filters and Interceptors. The two are very similar in function, but in terms of specific technical implementation, the gap is still relatively large.
Filter is dependent on the Servlet container and is part of the Servlet specification, while the interceptor exists independently and can be used in any situation.
The execution of the Filter is completed by the callback of the Servlet container, and the interceptor is usually executed through a dynamic proxy.
The life cycle of Filter is managed by the Servlet container, while the interceptor can be managed by the IOC container, so you can obtain other Bean instances through injection and other methods, so it will be more convenient to use.
2. Use of filters
So far, SpringMVC has provided two filters: CharacterEncodingFilter and HiddenHttpMethodFilter
When registering in web.xml, you must first register CharacterEncodingFilter, and then register HiddenHttpMethodFilter.
reason:
In CharacterEncodingFilter, the character set is set through the request.setCharacterEncoding(encoding) method.
The request.setCharacterEncoding(encoding) method requires that there be no previous operations to obtain request parameters. And HiddenHttpMethodFilter just has an operation to get the request method.
See above for specific use
3. Use of interceptors
The interceptor in SpringMVC is used to intercept the execution of the controller method
3.1 Interceptor configuration
Interceptors in SpringMVC need to implement the HandlerInterceptor interface
HandlerInterceptor interface
package org.springframework.web.servlet;

import javax.servlet.http.HttpServletRequest;
import javax.servlet.http.HttpServletResponse;
import org.springframework.lang.Nullable;

public interface HandlerInterceptor {


    default boolean preHandle(HttpServletRequest request, HttpServletResponse response, Object handler) throws Exception {


        return true;
    }

    default void postHandle(HttpServletRequest request, HttpServletResponse response, Object handler, @Nullable ModelAndView modelAndView) throws Exception {


    }

    default void afterCompletion(HttpServletRequest request, HttpServletResponse response, Object handler, @Nullable Exception ex) throws Exception {


    }
}
SpringMVC interceptors must be configured in the SpringMVC configuration file
The interceptors configured by the bean and ref tags intercept all requests processed by the DispatcherServlet by default.
<!--配置拦截器-->
    <mvc:interceptors>

        <!--bean和ref标签所配置的拦截器默认对DispatcherServlet处理的所有的请求进行拦截-->
        <!--<bean class="com.fd.springmvc.interceptor.FirstInterceptor"/>-->
        <!--<ref bean="firstInterceptor"></ref>-->

        <!--第三种:自定义请求路径拦截-->
        <mvc:interceptor>
            <!--配置需要拦截的请求的请求路径,/**表示所有请求,/*只表示一层路径下所有请求-->
            <mvc:mapping path="/*"/>
            <!--配置需要排除拦载的请求的请求路径-->
            <mvc:exclude-mapping path="/abc"/>
            <!--配置拦载器-->
            <ref bean="firstInterceptor"/>
        </mvc:interceptor>
    </mvc:interceptors>
3.2 Three methods of interceptors
preHandle(): Executed before the controller method is executed, and its return value indicates the interception (false) or release (true) of the controller method
postHandle(): Executed after the controller method is executed
afterCompletion(): Executed after the controller method After that, execute after dyeing the view
Demo case:
create interceptor
// 实现HandlerInterceptor接口
@Component
public class FirstInterceptor implements HandlerInterceptor {


    @Override
    public boolean preHandle(HttpServletRequest request, HttpServletResponse response, Object handler) throws Exception {


        System.out.println("FirstInterceptor ---> preHandle");
        return HandlerInterceptor.super.preHandle(request, response, handler);
    }

    @Override
    public void postHandle(HttpServletRequest request, HttpServletResponse response, Object handler, ModelAndView modelAndView) throws Exception {


        System.out.println("FirstInterceptor ---> postHandle");
        HandlerInterceptor.super.postHandle(request, response, handler, modelAndView);
    }

    @Override
    public void afterCompletion(HttpServletRequest request, HttpServletResponse response, Object handler, Exception ex) throws Exception {


        System.out.println("FirstInterceptor ---> afterCompletion");
        HandlerInterceptor.super.afterCompletion(request, response, handler, ex);
    }
}
Test Results:

3.3 Execution order of multiple interceptors
The execution order of multiple interceptors is related to the order configured in the SpringMVC configuration file
preHandle() is executed in the order of configuration, while postHandle() and afterCompletion() are executed in reverse order of configuration
If there is an interceptor in the interceptor, preHandle() returns false
- The preHandle() of the interceptor returns false and the preHandle() of the interceptor before it will execute
- The postHandle() of all interceptors are not executed
- The interceptor's afterCompletion() before the interceptor's preHandle() returns false will execute
Demo case:
Create a second interceptor
@Component
public class SecondInterceptor implements HandlerInterceptor {


    @Override
    public boolean preHandle(HttpServletRequest request, HttpServletResponse response, Object handler) throws Exception {


        System.out.println("SecondInterceptor ---> preHandle");
        return false;
    }

    @Override
    public void postHandle(HttpServletRequest request, HttpServletResponse response, Object handler, ModelAndView modelAndView) throws Exception {


        System.out.println("SecondInterceptor ---> postHandle");
        HandlerInterceptor.super.postHandle(request, response, handler, modelAndView);
    }

    @Override
    public void afterCompletion(HttpServletRequest request, HttpServletResponse response, Object handler, Exception ex) throws Exception {


        System.out.println("SecondInterceptor ---> afterCompletion");
        HandlerInterceptor.super.afterCompletion(request, response, handler, ex);
    }
}
Configure spring-mvc.xml
<!--配置拦截器-->
    <mvc:interceptors>
        <mvc:interceptor>
            <!--配置需要拦截的请求的请求路径,/**表示所有请求,/*只表示一层路径下所有请求-->
            <mvc:mapping path="/*"/>
            <!--配置需要排除拦载的请求的请求路径-->
            <mvc:exclude-mapping path="/abc"/>
            <!--配置拦载器-->
            <ref bean="firstInterceptor"/>
        </mvc:interceptor>

        <bean class="com.fd.springmvc.interceptor.SecondInterceptor"/>
    </mvc:interceptors>
Test Results:

4. Interceptor implements source code parsing (understanding)
spring-webmvc: version 5.3.19
...
// 前端控制器DispatchServlet的调度操作方法
protected void doDispatch(HttpServletRequest request, HttpServletResponse response) throws Exception {


    HttpServletRequest processedRequest = request;
    HandlerExecutionChain mappedHandler = null;
    boolean multipartRequestParsed = false;
    WebAsyncManager asyncManager = WebAsyncUtils.getAsyncManager(request);

    try {


        try {


            ModelAndView mv = null;
            Exception dispatchException = null;

            try {


                processedRequest = this.checkMultipart(request);
                multipartRequestParsed = processedRequest != request;
                // 获取拦截器的执行链
                mappedHandler = this.getHandler(processedRequest);
                if (mappedHandler == null) {


                    this.noHandlerFound(processedRequest, response);
                    return;
                }

                HandlerAdapter ha = this.getHandlerAdapter(mappedHandler.getHandler());
                String method = request.getMethod();
                boolean isGet = HttpMethod.GET.matches(method);
                if (isGet || HttpMethod.HEAD.matches(method)) {


                    long lastModified = ha.getLastModified(request, mappedHandler.getHandler());
                    if ((new ServletWebRequest(request, response)).checkNotModified(lastModified) && isGet) {


                        return;
                    }
                }
                // 执行拦截器的preHandle方法,如果方法返回false,直接结束方法
                if (!mappedHandler.applyPreHandle(processedRequest, response)) {


                    return;
                }
                // 执行控制器方法
                mv = ha.handle(processedRequest, response, mappedHandler.getHandler());
                if (asyncManager.isConcurrentHandlingStarted()) {


                    return;
                }

                this.applyDefaultViewName(processedRequest, mv);
                // 执行拦截器的postHandle方法
                mappedHandler.applyPostHandle(processedRequest, response, mv);
            } catch (Exception var20) {


                dispatchException = var20;
            } catch (Throwable var21) {


                dispatchException = new NestedServletException("Handler dispatch failed", var21);
            }
            // 处理前端控制器调度结果
            this.processDispatchResult(processedRequest, response, mappedHandler, mv, (Exception)dispatchException);
        } catch (Exception var22) {


            this.triggerAfterCompletion(processedRequest, response, mappedHandler, var22);
        } catch (Throwable var23) {


            this.triggerAfterCompletion(processedRequest, response, mappedHandler, new NestedServletException("Handler processing failed", var23));
        }

    } finally {


        if (asyncManager.isConcurrentHandlingStarted()) {


            if (mappedHandler != null) {


                // 执行拦截器的afterCompletion方法
                mappedHandler.applyAfterConcurrentHandlingStarted(processedRequest, response);
            }
        } else if (multipartRequestParsed) {


            this.cleanupMultipart(processedRequest);
        }

    }
}

// 处理前端控制器调度结果的方法
private void processDispatchResult(HttpServletRequest request, HttpServletResponse response, @Nullable HandlerExecutionChain mappedHandler, @Nullable ModelAndView mv, @Nullable Exception exception) throws Exception {


    boolean errorView = false;
    if (exception != null) {


        if (exception instanceof ModelAndViewDefiningException) {


            this.logger.debug("ModelAndViewDefiningException encountered", exception);
            mv = ((ModelAndViewDefiningException)exception).getModelAndView();
        } else {


            Object handler = mappedHandler != null ? mappedHandler.getHandler() : null;
            mv = this.processHandlerException(request, response, handler, exception);
            errorView = mv != null;
        }
    }

    if (mv != null && !mv.wasCleared()) {


        // 渲染视图
        this.render(mv, request, response);
        if (errorView) {


            WebUtils.clearErrorRequestAttributes(request);
        }
    } else if (this.logger.isTraceEnabled()) {


        this.logger.trace("No view rendering, null ModelAndView returned.");
    }

    if (!WebAsyncUtils.getAsyncManager(request).isConcurrentHandlingStarted()) {


        if (mappedHandler != null) {


            // 执行拦截器的afterCompletion方法
            mappedHandler.triggerAfterCompletion(request, response, (Exception)null);
        }

    }
}
HandlerExecutionChain class
// 拦截器的处理链
public class HandlerExecutionChain {


    // 控制器执行前的拦截器方法preHandle
    boolean applyPreHandle(HttpServletRequest request, HttpServletResponse response) throws Exception {


        // preHandle()按照配置的顺序执行
        for(int i = 0; i < this.interceptorList.size(); this.interceptorIndex = i++) {


            HandlerInterceptor interceptor = (HandlerInterceptor)this.interceptorList.get(i);
            // 如果preHandle返回false
            if (!interceptor.preHandle(request, response, this.handler)) {


                // 执行拦截器的AfterCompletion方法
                this.triggerAfterCompletion(request, response, (Exception)null);
                return false;
            }
        }

        return true;
    }

    // postHandle方法
    void applyPostHandle(HttpServletRequest request, HttpServletResponse response, @Nullable ModelAndView mv) throws Exception {


        // postHandle()和afterCompletion()按照配置的反序执行
        for(int i = this.interceptorList.size() - 1; i >= 0; --i) {


            HandlerInterceptor interceptor = (HandlerInterceptor)this.interceptorList.get(i);
            interceptor.postHandle(request, response, this.handler, mv);
        }
    }

    // afterCompletion方法
    void triggerAfterCompletion(HttpServletRequest request, HttpServletResponse response, @Nullable Exception ex) {


        // postHandle()和afterCompletion()按照配置的反序执行
        for(int i = this.interceptorIndex; i >= 0; --i) {


            HandlerInterceptor interceptor = (HandlerInterceptor)this.interceptorList.get(i);

            try {


                interceptor.afterCompletion(request, response, this.handler, ex);
            } catch (Throwable var7) {


                logger.error("HandlerInterceptor.afterCompletion threw exception", var7);
            }
        }
    }
}
Nine, exception handler
The exception information in the process of processing the request in SpringMVC is handed over to the exception handler for processing. By implementing the HandlerExceptionResolver interface, a system exception handling logic can be realized.
1. The exception handler SimpleMappingExceptionResolver that comes with SpringMVC
1.1 Configuration-based exception handling
Configure exception handling beans in spring-mvc.xml
<!--配置自定义异常处理,使用SpringMVC自带的SimpleMappingExceptionResolver-->
    <bean class="org.springframework.web.servlet.handler.SimpleMappingExceptionResolver">
        <!--异常映射到指定逻辑试图-->
        <property name="exceptionMappings">
            <props>
                <!--key设置要处理的异常,value设置出现该异常时要跳转的页面所对应的逻辑视图-->
                <prop key="ArithmeticException">error</prop>
            </props>
        </property>
        <!--设置异常信息共享在请求域中,value为请求域的异常信息的属性名-->
        <property name="exceptionAttribute" value="ex"></property>
    </bean>
Case presentation:
Controller method:
@Controller
public class TestController {


    @RequestMapping("/test")
    public String testInterceptor() {


        System.out.println(1/0);
        return "success";
    }
}
error view
<!DOCTYPE html>
<html lang="en" xmlns: th="http://www.thymeleaf.org">
<head>
    <meta charset="UTF-8">
    <title>错误</title>
</head>
<body>

<h1>error.html</h1>

<p th:text="${ex}"></p>
</body>
</html>
The controller reports an ArithmeticException exception, triggers the exception handler, jumps to the error logic view, and returns the exception information to the browser
1.2 Annotation-based exception handling
Create an exception handling component class and mark it with the @ControllerAdvice annotation. When an exception is triggered, the relevant exception handling method in the component will be executed
package com.fd.springmvc.controller;

import org.springframework.ui.Model;
import org.springframework.web.bind.annotation.ControllerAdvice;
import org.springframework.web.bind.annotation.ExceptionHandler;

//将当前类标识为异常处理的组件
@ControllerAdvice
public class ExceptionController {


    //设置要处理的异常信息
    @ExceptionHandler(ArithmeticException.class)
    public String error(Throwable ex, Model model) {


        //ex表示控制器方法所出现的异常
        model.addAttribute("ex", ex);
        return "error";
    }
}
1.3 Source code analysis
The SimpleMappingExceptionResolver class inherits AbstractHandlerExceptionResolver
public class SimpleMappingExceptionResolver extends AbstractHandlerExceptionResolver {


	...
	// 异常处理方法
	@Nullable
    protected ModelAndView doResolveException(HttpServletRequest request, HttpServletResponse response, @Nullable Object handler, Exception ex) {


    	// 获取异常逻辑视图
        String viewName = this.determineViewName(ex, request);
        if (viewName != null) {


            Integer statusCode = this.determineStatusCode(request, viewName);
            if (statusCode != null) {


                this.applyStatusCodeIfPossible(request, response, statusCode);
            }

            return this.getModelAndView(viewName, ex, request);
        } else {


            return null;
        }
    }

}
The AbstractHandlerExceptionResolver class implements the HandlerExceptionResolver interface
public abstract class AbstractHandlerExceptionResolver implements HandlerExceptionResolver, Ordered {


	...

	@Nullable
    public ModelAndView resolveException(HttpServletRequest request, HttpServletResponse response, @Nullable Object handler, Exception ex) {


        if (!this.shouldApplyTo(request, handler)) {


            return null;
        } else {


            this.prepareResponse(ex, response);
            // 执行异常处理的方法,抽象方法由子类实现
            ModelAndView result = this.doResolveException(request, response, handler, ex);
            if (result != null) {


                if (this.logger.isDebugEnabled() && (this.warnLogger == null || !this.warnLogger.isWarnEnabled())) {


                    this.logger.debug(this.buildLogMessage(ex, request) + (result.isEmpty() ? "" : " to " + result));
                }

                this.logException(ex, request);
            }

            return result;
        }
    }

	@Nullable
    protected abstract ModelAndView doResolveException(HttpServletRequest request, HttpServletResponse response, @Nullable Object handler, Exception ex);
}
2. Custom exception handler
Implement the HandlerExceptionResolver interface
public class CustomHandleException implements HandlerExceptionResolver {


    @Override
    public ModelAndView resolveException(HttpServletRequest request, HttpServletResponse response, Object handler,
                                         Exception exception) {


        // 定义异常信息
        String msg;

        // 判断异常类型
        if (exception instanceof MyException) {


            // 如果是自定义异常,读取异常信息
            msg = exception.getMessage();
        } else {


            // 如果是运行时异常,则取错误堆栈,从堆栈中获取异常信息
            Writer out = new StringWriter();
            PrintWriter s = new PrintWriter(out);
            exception.printStackTrace(s);
            msg = out.toString();
        }

        // 返回错误页面,页面显示错误信息
        ModelAndView modelAndView = new ModelAndView();
        modelAndView.addObject("ex", msg);
        modelAndView.setViewName("error");

        return modelAndView;
    }
}
Add in spring-mvc.xml:
<!--自定义异常处理器-->
<bean class="com.fd.springmvc.handler.CustomHandleException" id="customHandleException"/>
3. Exception handling source code analysis (understanding)
spring-webmvc: version 5.3.19
public class DispatcherServlet extends FrameworkServlet {


    @Nullable
    private List<HandlerExceptionResolver> handlerExceptionResolvers; //异常处理器

    ...

    protected void doDispatch(HttpServletRequest request, HttpServletResponse response) throws Exception {


        HttpServletRequest processedRequest = request;
        HandlerExecutionChain mappedHandler = null;
        boolean multipartRequestParsed = false;
        WebAsyncManager asyncManager = WebAsyncUtils.getAsyncManager(request);

        try {


            try {


                ModelAndView mv = null;
                Exception dispatchException = null;

                try {


                    processedRequest = this.checkMultipart(request);
                    multipartRequestParsed = processedRequest != request;
                    mappedHandler = this.getHandler(processedRequest);
                    if (mappedHandler == null) {


                        this.noHandlerFound(processedRequest, response);
                        return;
                    }

                    HandlerAdapter ha = this.getHandlerAdapter(mappedHandler.getHandler());
                    String method = request.getMethod();
                    boolean isGet = HttpMethod.GET.matches(method);
                    if (isGet || HttpMethod.HEAD.matches(method)) {


                        long lastModified = ha.getLastModified(request, mappedHandler.getHandler());
                        if ((new ServletWebRequest(request, response)).checkNotModified(lastModified) && isGet) {


                            return;
                        }
                    }

                    if (!mappedHandler.applyPreHandle(processedRequest, response)) {


                        return;
                    }
                    // 执行控制器方法
                    mv = ha.handle(processedRequest, response, mappedHandler.getHandler());
                    if (asyncManager.isConcurrentHandlingStarted()) {


                        return;
                    }

                    this.applyDefaultViewName(processedRequest, mv);
                    mappedHandler.applyPostHandle(processedRequest, response, mv);
                } catch (Exception var20) {


                    dispatchException = var20;
                } catch (Throwable var21) {


                    dispatchException = new NestedServletException("Handler dispatch failed", var21);
                }
                // 处理控制器方法结果,如果上面方法报错,则dispatchException不为null
                this.processDispatchResult(processedRequest, response, mappedHandler, mv, (Exception)dispatchException);
            } catch (Exception var22) {


                this.triggerAfterCompletion(processedRequest, response, mappedHandler, var22);
            } catch (Throwable var23) {


                this.triggerAfterCompletion(processedRequest, response, mappedHandler, new NestedServletException("Handler processing failed", var23));
            }

        } finally {


            if (asyncManager.isConcurrentHandlingStarted()) {


                if (mappedHandler != null) {


                    mappedHandler.applyAfterConcurrentHandlingStarted(processedRequest, response);
                }
            } else if (multipartRequestParsed) {


                this.cleanupMultipart(processedRequest);
            }

        }
    }
}

// 处理前端控制器调度结果的方法
private void processDispatchResult(HttpServletRequest request, HttpServletResponse response, @Nullable HandlerExecutionChain mappedHandler, @Nullable ModelAndView mv, @Nullable Exception exception) throws Exception {


    boolean errorView = false;
    if (exception != null) {


        if (exception instanceof ModelAndViewDefiningException) {


            this.logger.debug("ModelAndViewDefiningException encountered", exception);
            mv = ((ModelAndViewDefiningException)exception).getModelAndView();
        } else {


            // 执行异常处理方法
            Object handler = mappedHandler != null ? mappedHandler.getHandler() : null;
            mv = this.processHandlerException(request, response, handler, exception);
            errorView = mv != null;
        }
    }

    if (mv != null && !mv.wasCleared()) {


        // 渲染视图
        this.render(mv, request, response);
        if (errorView) {


            WebUtils.clearErrorRequestAttributes(request);
        }
    } else if (this.logger.isTraceEnabled()) {


        this.logger.trace("No view rendering, null ModelAndView returned.");
    }

    if (!WebAsyncUtils.getAsyncManager(request).isConcurrentHandlingStarted()) {


        if (mappedHandler != null) {


            // 执行拦截器的afterCompletion方法
            mappedHandler.triggerAfterCompletion(request, response, (Exception)null);
        }

    }

    // 异常处理方法
    @Nullable
    protected ModelAndView processHandlerException(HttpServletRequest request, HttpServletResponse response, @Nullable Object handler, Exception ex) throws Exception {


        request.removeAttribute(HandlerMapping.PRODUCIBLE_MEDIA_TYPES_ATTRIBUTE);
        ModelAndView exMv = null;
        if (this.handlerExceptionResolvers != null) {


            Iterator var6 = this.handlerExceptionResolvers.iterator();

            while(var6.hasNext()) {


                HandlerExceptionResolver resolver = (HandlerExceptionResolver)var6.next();
                // 执行具体实现的异常处理方法
                exMv = resolver.resolveException(request, response, handler, ex);
                if (exMv != null) {


                    break;
                }
            }
        }
        // 异常逻辑视图
        if (exMv != null) {


            if (exMv.isEmpty()) {


                request.setAttribute(EXCEPTION_ATTRIBUTE, ex);
                return null;
            } else {


                if (!exMv.hasView()) {


                    String defaultViewName = this.getDefaultViewName(request);
                    if (defaultViewName != null) {


                        exMv.setViewName(defaultViewName);
                    }
                }

                if (this.logger.isTraceEnabled()) {


                    this.logger.trace("Using resolved error view: " + exMv, ex);
                } else if (this.logger.isDebugEnabled()) {


                    this.logger.debug("Using resolved error view: " + exMv);
                }

                WebUtils.exposeErrorRequestAttributes(request, ex, this.getServletName());
                return exMv;
            }
        } else {


            throw ex;
        }
    }
}
Ten, annotation configuration SpringMVC
Use configuration classes and annotations to replace the functions of web.xml and SpringMVC configuration files
1. Create an initialization class to replace web.xml
In the Servlet3.0 environment, the container will look for a class that implements the javax.servlet.ServletContainerlnitializer interface in the class path, and if found, use it to configure the Servlet container.
Spring provides an implementation of this interface, called SpringServletContainerlnitializer, which in turn looks for classes that implement WebApplicationlnitializer and hands them over to complete the configuration tasks. Spring 3.2 introduces a convenient basic implementation of WebApplicationlnitializer named AbstractAnnotationConfigDispatcherServletlnitializer. When our class extends AbstractAnnotationConfigDispatcherServletlnitializer and deploys it to a Servlet3.0 container, the container will automatically discover it and use it to configure the Servlet context
// 代替web.xml
public class WebInit extends AbstractAnnotationConfigDispatcherServletInitializer {


    //设置一个配置类代替spring的配置文件
    @Override
    protected Class<?>[] getRootConfigClasses() {


        return new Class[]{

    SpringConfig.class};
    }

    //设置一个配置类代替springMVC的配置文件
    @Override
    protected Class<?>[] getServletConfigClasses() {


        return new Class[]{

    WebConfig.class};
    }

    //设置springMVC的前端控制器DispatcherServlet的urL-pattern
    @Override
    protected String[] getServletMappings() {


        return new String[]{

    "/"};
    }

    //设置过滤器
    @Override
    protected Filter[] getServletFilters() {


        // 设置编码过滤器
        CharacterEncodingFilter characterEncodingFilter = new CharacterEncodingFilter();
        characterEncodingFilter.setEncoding("UTF-8");
        characterEncodingFilter.setForceEncoding(true);
        // 设置处理请求方式的过滤器
        HiddenHttpMethodFilter hiddenHttpMethodFilter = new HiddenHttpMethodFilter();
        return new Filter[]{

    characterEncodingFilter, hiddenHttpMethodFilter};
    }
}
2. Create a SpringConfig configuration class to replace the Spring configuration file
/*代替Spring.xml配置文件*/

@Configuration //将类标识为配置类
@ComponentScan(value = "com.fd.springMVC")
public class SpringConfig {


}
3. Create a WebConfig configuration class to replace the SpringMVC configuration file
/*
    代替Spring-mvc.xml配置文件

    扫描组件、视图解析器、默认的servlet、mvc的注解驱动、视图控制器、文件上传解析器、拦截器、异常解析器
* */

@Configuration //将类标识为配置类
@ComponentScan("com.fd.springMVC.controller") // 开启扫描组件
@EnableWebMvc // 开启mvc注解驱动
public class WebConfig implements WebMvcConfigurer {


    @Override
    // 设置默认的Servlet,处理静态资源
    public void configureDefaultServletHandling(DefaultServletHandlerConfigurer configurer) {


        configurer.enable();
    }

    @Override
    // 配置视图控制器
    public void addViewControllers(ViewControllerRegistry registry) {


        registry.addViewController("/").setViewName("index");
    }

    // @Bean注解修饰的方法返回对象可以被SpringIOC管理,bean的id为方法的方法名
    @Bean
    // 配置文件上传解析器
    public CommonsMultipartResolver multipartResolver() {


        // 默认编码格式为UTF-8
        return new CommonsMultipartResolver();
    }

    @Override
    // 配置拦截器
    public void addInterceptors(InterceptorRegistry registry) {


        FirstInterceptor firstInterceptor = new FirstInterceptor();
        // 添加拦截器,设置拦截的路径和排除的路径
        registry.addInterceptor(firstInterceptor).addPathPatterns("/**").excludePathPatterns("/abc");
    }

    // 配置异常处理
    @Override
    public void configureHandlerExceptionResolvers(List<HandlerExceptionResolver> resolvers) {


        SimpleMappingExceptionResolver simpleMappingExceptionResolver = new SimpleMappingExceptionResolver();
        Properties properties = new Properties();
        // 添加异常错误类型,以及出现该异常时要跳转的页面所对应的逻辑视图
        properties.setProperty("java.lang.ArithmeticException", "error");
        simpleMappingExceptionResolver.setExceptionMappings(properties);
        // 设置异常信息共享在请求域中的异常信息属性名“ex”
        simpleMappingExceptionResolver.setExceptionAttribute("ex");
        // 添加异常处理解析器
        resolvers.add(simpleMappingExceptionResolver);
    }

    // 配置生成模板解析器
    @Bean
    public ITemplateResolver templateResolver() {


        WebApplicationContext webApplicationContext = ContextLoader.getCurrentWebApplicationContext();
        // ServletContextTemplateResolver需要一个servletContext作为构造参数,可以通过WebApplicationContext获取
        ServletContextTemplateResolver templateResolver = new ServletContextTemplateResolver(webApplicationContext.getServletContext());
        templateResolver.setCharacterEncoding("UTF-8");
        templateResolver.setPrefix("/WEB-INF/templates/");
        templateResolver.setSuffix(".html");
        templateResolver.setTemplateMode(TemplateMode.HTML);
        return templateResolver;
    }

    // 生成模板引擎并为模板引擎注入模板解析器
    @Bean // @Bean注解修饰的方法返回对象可以被SpringIOC管理,bean的id为方法的方法名
    public SpringTemplateEngine templateEngine(ITemplateResolver templateResolver) {

     // 注入Bean的同时为bean的属性赋值可以设置在bean方法的参数里,相当于引用赋值
        SpringTemplateEngine springTemplateEngine = new SpringTemplateEngine();
        springTemplateEngine.setTemplateResolver(templateResolver);
        return springTemplateEngine;
    }

    //生成视图解析器并为解析器注入模板引擎
    @Bean // @Bean注解修饰的方法返回对象可以被SpringIOC管理,bean的id为方法的方法名
    public ViewResolver viewResolver(SpringTemplateEngine templateEngine) {

     // 注入Bean的同时为bean的属性赋值可以设置在bean方法的参数里,相当于引用赋值,要求:参数名需要和引用的bean的id相同
        ThymeleafViewResolver viewResolver = new ThymeleafViewResolver();
        viewResolver.setCharacterEncoding("UTF-8");
        viewResolver.setOrder(1);
        // 设置模板引擎
        viewResolver.setTemplateEngine(templateEngine);
        return viewResolver;
    }
}
Eleven, SpringMVC execution process
1. Common components of SpringMVC
- DispatcherServlet: front-end controller, which does not need to be developed by engineers, and is provided by the framework
Function: Unified processing of requests and responses, the center of the entire process control, which calls other components to process user requests. - HandlerMapping: Processor mapper, which does not need to be developed by engineers, and is provided by the framework.
Function: Find the Handler according to the requested url, method and other information, that is, the controller method. - Handler: Processor (controller method created by developers), which needs to be developed by engineers
Function: Under the control of DispatcherServlet, Handler processes specific user requests. - HandlerAdapter: Processor adapter, which does not need to be developed by engineers, and is provided by the framework
Function: Execute the processor (controller method) through HandlerAdapter - ViewResolver: View resolver, which does not need to be developed by engineers, and is provided by the framework
Function: Perform view resolution to obtain corresponding views, such as: ThymeleafView, InternalResourceView, RedirectView - View: View page
Function: Display model data to users through the page
2. DispatcherServlet initialization process
DispatcherServlet is essentially a Servlet, so it naturally follows the Servlet life cycle. So macroscopically, it is the Servlet life cycle to schedule.
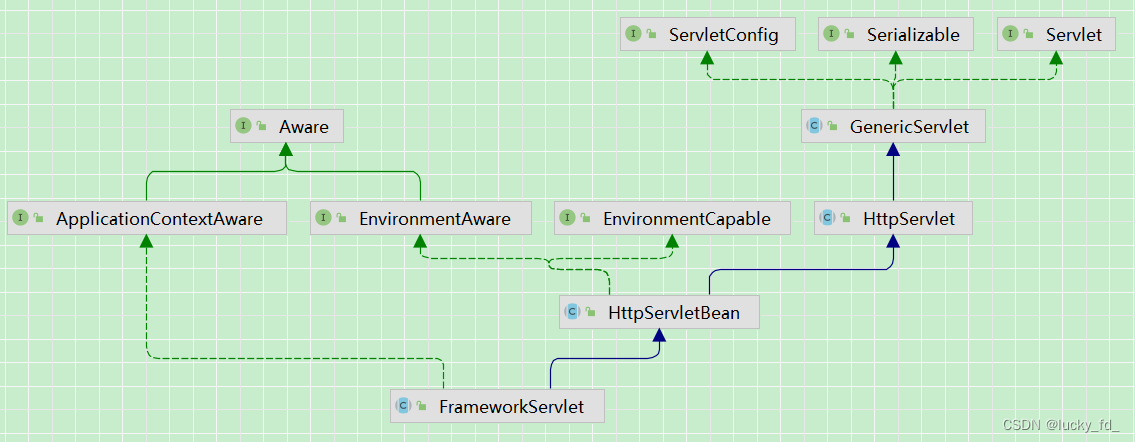
2.1 Initialize WebApplicationContext
In the class: org.springframework.web.servlet.FrameworkServlet
2.2 Create WebApplicationContext
Class: org.springframework.web.servletFrameworkServlet
2.3 DispatcherServlet initialization strategy
After the FrameworkServlet creates the WebApplicationContext, it refreshes the container and calls onRefresh(wac). This method is rewritten in the DispatcherServlet, and the initStrategies(context) method is called to initialize the strategy, that is, to initialize each component of the DispatcherServlet.
Class: org.springframework.web.servlet.DispatcherServlet
2.4 Source Code Inheritance Call Analysis
public interface Servlet {


    // 初始化方法
    void init(ServletConfig var1);
    // 执行方法
    void service(ServletRequest var1, ServletResponse var2);
}

public abstract class GenericServlet implements Servlet {


    public void init(ServletConfig config) throws ServletException {


        this.config = config;
        this.init();
    }

    public void init() throws ServletException {


    }
}

public abstract class HttpServlet extends GenericServlet {


}

public abstract class HttpServletBean extends HttpServlet {


    public final void init() throws ServletException {


        PropertyValues pvs = new ServletConfigPropertyValues(this.getServletConfig(), this.requiredProperties);
        ...
        this.initServletBean();
    }

    protected void initServletBean() throws ServletException {


    }
}

public abstract class FrameworkServlet extends HttpServletBean {


    protected final void initServletBean() throws ServletException {


        ...
        try {


            this.webApplicationContext = this.initWebApplicationContext();
            this.initFrameworkServlet();
        } catch (RuntimeException | ServletException var4) {


            this.logger.error("Context initialization failed", var4);
            throw var4;
        }
        ...
    }

    protected WebApplicationContext initWebApplicationContext() {


        // 获取父级容器(Spring容器)
        WebApplicationContext rootContext = WebApplicationContextUtils.getWebApplicationContext(this.getServletContext());
        WebApplicationContext wac = null;
        if (this.webApplicationContext != null) {


            wac = this.webApplicationContext;
            if (wac instanceof ConfigurableWebApplicationContext) {


                ConfigurableWebApplicationContext cwac = (ConfigurableWebApplicationContext)wac;
                if (!cwac.isActive()) {


                    if (cwac.getParent() == null) {


                        cwac.setParent(rootContext);
                    }
                    this.configureAndRefreshWebApplicationContext(cwac);
                }
            }
        }

        if (wac == null) {


            wac = this.findWebApplicationContext();
        }
        // 创建容器
        if (wac == null) {


            wac = this.createWebApplicationContext(rootContext);
        }
        // 刷新容器
        if (!this.refreshEventReceived) {


            synchronized(this.onRefreshMonitor) {


                this.onRefresh(wac);
            }
        }

        if (this.publishContext) {


            String attrName = this.getServletContextAttributeName();
            this.getServletContext().setAttribute(attrName, wac);
        }
        return wac;
    }

    protected void onRefresh(ApplicationContext context) {


    }
}

public class DispatcherServlet extends FrameworkServlet {


    protected void onRefresh(ApplicationContext context) {


        this.initStrategies(context);
    }
    // 初始化SpringMVC组件
    protected void initStrategies(ApplicationContext context) {


        this.initMultipartResolver(context);
        this.initLocaleResolver(context);
        this.initThemeResolver(context);
        this.initHandlerMappings(context);
        this.initHandlerAdapters(context);
        this.initHandlerExceptionResolvers(context);
        this.initRequestToViewNameTranslator(context);
        this.initViewResolvers(context);
        this.initFlashMapManager(context);
    }
}
3. DispatcherServlet calls the component to process the request
3.1 processRequest()
FrameworkServlet rewrites service and doXxx() in HttpServlet. These methods call
the class of processRequest (request, response): org.springframework.web.servlet.FrameworkServlet
3.2 doService()
Class: orgspringframework.web.servlet.DispatcherServlet
3.3 doDispatch()
Class: orgspringframework.web.servlet.DispatcherServlet
3.4 processDispatchResult()
3.5 Source Code Inheritance Call Analysis
public interface Servlet {


    // 初始化方法
    void init(ServletConfig var1);
    // 执行方法
    void service(ServletRequest var1, ServletResponse var2);
}

public abstract class GenericServlet implements Servlet {


    public abstract void service(ServletRequest var1, ServletResponse var2) throws ServletException, IOException;
}

public abstract class HttpServlet extends GenericServlet {


    public void service(ServletRequest req, ServletResponse res) throws ServletException, IOException {


        HttpServletRequest request;
        HttpServletResponse response;
        try {


            request = (HttpServletRequest)req;
            response = (HttpServletResponse)res;
        } catch (ClassCastException var6) {


            throw new ServletException("non-HTTP request or response");
        }

        this.service(request, response);
    }

    protected void service(HttpServletRequest req, HttpServletResponse resp) throws ServletException, IOException {


        String method = req.getMethod();
        long lastModified;
        if (method.equals("GET")) {


            lastModified = this.getLastModified(req);
            if (lastModified == -1L) {


                this.doGet(req, resp);
            } else {


                long ifModifiedSince = req.getDateHeader("If-Modified-Since");
                if (ifModifiedSince < lastModified / 1000L * 1000L) {


                    this.maybeSetLastModified(resp, lastModified);
                    this.doGet(req, resp);
                } else {


                    resp.setStatus(304);
                }
            }
        } else if (method.equals("HEAD")) {


            lastModified = this.getLastModified(req);
            this.maybeSetLastModified(resp, lastModified);
            this.doHead(req, resp);
        } else if (method.equals("POST")) {


            this.doPost(req, resp);
        } else if (method.equals("PUT")) {


            this.doPut(req, resp);
        } else if (method.equals("DELETE")) {


            this.doDelete(req, resp);
        } else if (method.equals("OPTIONS")) {


            this.doOptions(req, resp);
        } else if (method.equals("TRACE")) {


            this.doTrace(req, resp);
        } else {


            String errMsg = lStrings.getString("http.method_not_implemented");
            Object[] errArgs = new Object[]{

    method};
            errMsg = MessageFormat.format(errMsg, errArgs);
            resp.sendError(501, errMsg);
        }
    }
}

public abstract class HttpServletBean extends HttpServlet {


}

public abstract class FrameworkServlet extends HttpServletBean {


    protected void service(HttpServletRequest request, HttpServletResponse response) throws ServletException, IOException {


        HttpMethod httpMethod = HttpMethod.resolve(request.getMethod());
        if (httpMethod != HttpMethod.PATCH && httpMethod != null) {


            super.service(request, response);
        } else {


            this.processRequest(request, response);
        }
    }

    protected final void doGet(HttpServletRequest request, HttpServletResponse response) throws ServletException, IOException {


        this.processRequest(request, response);
    }

    protected final void doPost(HttpServletRequest request, HttpServletResponse response) throws ServletException, IOException {


        this.processRequest(request, response);
    }

    protected final void doPut(HttpServletRequest request, HttpServletResponse response) throws ServletException, IOException {


        this.processRequest(request, response);
    }

    protected final void doDelete(HttpServletRequest request, HttpServletResponse response) throws ServletException, IOException {


        this.processRequest(request, response);
    }

    protected final void processRequest(HttpServletRequest request, HttpServletResponse response) throws ServletException, IOException {


        ...
        try {


            this.doService(request, response);
        }
        ...
    }
}

public class DispatcherServlet extends FrameworkServlet {


    protected void doService(HttpServletRequest request, HttpServletResponse response) throws Exception {


        ...
        try {


            this.doDispatch(request, response);
        }
        ...
    }
    // 处理请求执行方法
    protected void doDispatch(HttpServletRequest request, HttpServletResponse response) throws Exception {


        ...
        try {


            try {


                ModelAndView mv = null;
                Exception dispatchException = null;

                try {


                    processedRequest = this.checkMultipart(request);
                    multipartRequestParsed = processedRequest != request;
                    mappedHandler = this.getHandler(processedRequest);
                    if (mappedHandler == null) {


                        this.noHandlerFound(processedRequest, response);
                        return;
                    }
                    // 获取处理适配器
                    HandlerAdapter ha = this.getHandlerAdapter(mappedHandler.getHandler());
                    String method = request.getMethod();
                    boolean isGet = HttpMethod.GET.matches(method);
                    if (isGet || HttpMethod.HEAD.matches(method)) {


                        long lastModified = ha.getLastModified(request, mappedHandler.getHandler());
                        if ((new ServletWebRequest(request, response)).checkNotModified(lastModified) && isGet) {


                            return;
                        }
                    }
                    // 执行拦截器的preHandle方法
                    if (!mappedHandler.applyPreHandle(processedRequest, response)) {


                        return;
                    }
                    // 执行控制器方法
                    mv = ha.handle(processedRequest, response, mappedHandler.getHandler());
                    if (asyncManager.isConcurrentHandlingStarted()) {


                        return;
                    }

                    this.applyDefaultViewName(processedRequest, mv);
                    mappedHandler.applyPostHandle(processedRequest, response, mv);
                } catch (Exception var20) {


                    dispatchException = var20;
                } catch (Throwable var21) {


                    dispatchException = new NestedServletException("Handler dispatch failed", var21);
                }
                // // 处理前端控制器调度结果的方法, 如果出现异常走异常处理器
                this.processDispatchResult(processedRequest, response, mappedHandler, mv, (Exception)dispatchException);
            } catch (Exception var22) {


                this.triggerAfterCompletion(processedRequest, response, mappedHandler, var22);
            } catch (Throwable var23) {


                this.triggerAfterCompletion(processedRequest, response, mappedHandler, new NestedServletException("Handler processing failed", var23));
            }

        } finally {


            if (asyncManager.isConcurrentHandlingStarted()) {


                if (mappedHandler != null) {


                    mappedHandler.applyAfterConcurrentHandlingStarted(processedRequest, response);
                }
            } else if (multipartRequestParsed) {


                this.cleanupMultipart(processedRequest);
            }

        }
    }
}
4. The execution process of SpringMVC
1) The user sends a request to the server, and the request is captured by the SpringMVC front controller DispatcherServlet
2) DispatcherServlet parses the request URL, obtains the request resource identifier (URI), and determines the mapping corresponding to the request URI:
a) does not exist
i. Then judge whether mvc:default-servlet-handler is configured
ii. If not configured, the console will report that the mapping cannot be found, and the client will display a 404 error
iii. If there is a configuration, access the target resource (usually a static resource, such as: JS, CSS, HTML), and a 404 error will be displayed if the client cannot be found
b) Execute the following process if it exists
3) According to the URL, call HandlerMapping to obtain all related objects configured by the Handler (including the Handler object and the interceptor corresponding to the Handler object), and finally return it in the form of a HandlerExecutionChain execution chain object.
4) DispatcherServlet selects an appropriate HandlerAdapter according to the obtained Handler.
5) If the HandlerAdapter is obtained successfully, the preHandler(...) method of the interceptor will be executed at this time [Forward]
6) Extract the model data in the Request, fill in the Handler input parameters, start executing the Handler (Controller) method, and process the request. In the process of filling Handler's input parameters, according to your configuration, Spring will help you do some extra work:
a) HttpMessageConveter: convert the request message (such as json, xml, etc.) into an object, and convert the object into the specified response information
b) Data conversion: perform data conversion on the request message. Such as converting String to Integer, Double, etc.
c) Data formatting: data formatting is performed on the request message. Such as converting a string to a formatted number or formatted date, etc.
d) Data verification: verify the validity of the data (length, format, etc.), and store the verification result in BindingResult or Error
7) After the Handler is executed, return a ModelAndView object to the DispatcherServlet
8) At this point, the postHandle(...) method of the interceptor will be executed [reverse]
9) According to the returned ModelAndView (at this time, it will be judged whether there is an exception: if there is an exception, execute HandlerExceptionResolver for exception handling) select a suitable ViewResolver for view resolution, and render the view according to the Model and View.
10) Execute the interceptor's afterCompletion(...) method [reverse] after the slag dyeing view is completed.
11) Return the rendering result to the client
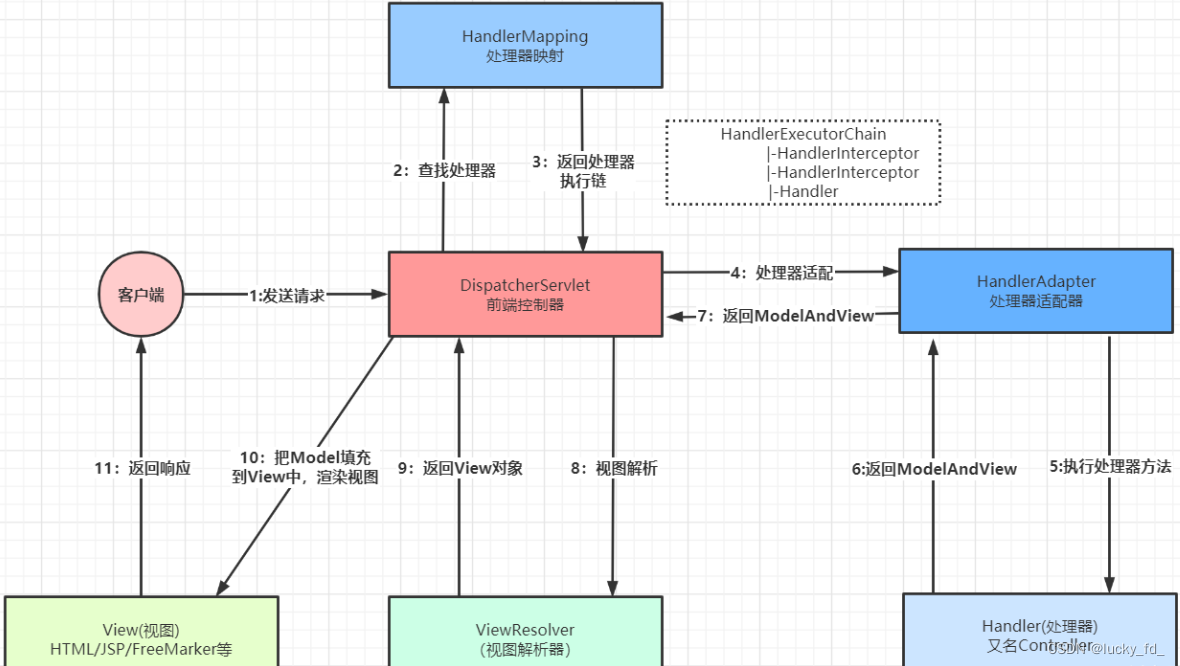
The above picture is borrowed from the Internet and I think it is very vivid. The author of the original picture: Yunchuanshita
12. SSM integration exercises
project structure
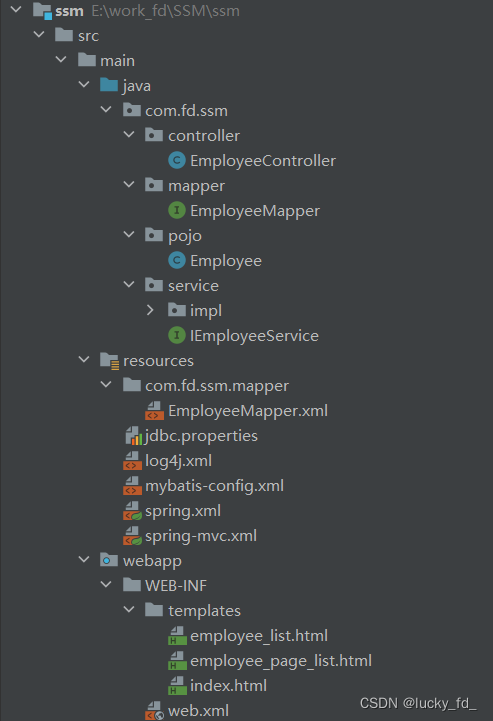
1. Introduce dependencies
<!--统一管理依赖版本-->
    <properties>
        <spring-version>5.3.19</spring-version>
    </properties>

    <dependencies>
        <!--Spring上下文依赖-->
        <dependency>
            <groupId>org.springframework</groupId>
            <artifactId>spring-context</artifactId>
            <version>${spring-version}</version>
        </dependency>
        <!--SpringMVC相关依赖-->
        <dependency>
            <groupId>org.springframework</groupId>
            <artifactId>spring-webmvc</artifactId>
            <version>${spring-version}</version>
        </dependency>
        <!--事务管理器datasource相关包依赖-->
        <dependency>
            <groupId>org.springframework</groupId>
            <artifactId>spring-jdbc</artifactId>
            <version>${spring-version}</version>
        </dependency>
        <dependency>
            <groupId>org.springframework</groupId>
            <artifactId>spring-aop</artifactId>
            <version>${spring-version}</version>
        </dependency>
        <!--spring整合junit的依赖-->
        <dependency>
            <groupId>org.springframework</groupId>
            <artifactId>spring-test</artifactId>
            <version>${spring-version}</version>
        </dependency>
        <!--mybatis核心依赖-->
        <dependency>
            <groupId>org.mybatis</groupId>
            <artifactId>mybatis</artifactId>
            <version>3.5.7</version>
        </dependency>
        <!--mybatis和spring的整合包-->
        <dependency>
            <groupId>org.mybatis</groupId>
            <artifactId>mybatis-spring</artifactId>
            <version>2.0.6</version>
        </dependency>
        <!--数据库连接池-->
        <dependency>
            <groupId>com.alibaba</groupId>
            <artifactId>druid</artifactId>
            <version>1.2.11</version>
        </dependency>
        <dependency>
            <groupId>junit</groupId>
            <artifactId>junit</artifactId>
            <version>4.12</version>
            <scope>test</scope>
        </dependency>
        <!--mysql的驱动-->
        <dependency>
            <groupId>mysql</groupId>
            <artifactId>mysql-connector-java</artifactId>
            <version>8.0.28</version>
        </dependency>
        <!--log4j日志依赖-->
        <dependency>
            <groupId>log4j</groupId>
            <artifactId>log4j</artifactId>
            <version>1.2.17</version>
        </dependency>
        <!--分页插件依赖-->
        <dependency>
            <groupId>com.github.pagehelper</groupId>
            <artifactId>pagehelper</artifactId>
            <version>5.3.0</version>
        </dependency>
        <!--日志相关依赖,slf4j门面日志的实现-->
        <dependency>
            <groupId>ch.qos.logback</groupId>
            <artifactId>logback-classic</artifactId>
            <version>1.2.11</version>
        </dependency>
        <!--servletAPI,DispatcherServlet继承的HttpServlet依赖于Servlet-->
        <dependency>
            <groupId>javax.servlet</groupId>
            <artifactId>javax.servlet-api</artifactId>
            <version>4.0.1</version>
        </dependency>
        <!--json转java对象相关依赖-->
        <dependency>
            <groupId>com.fasterxml.jackson.core</groupId>
            <artifactId>jackson-databind</artifactId>
            <version>2.15.1</version>
        </dependency>
        <!--文件上传的依赖-->
        <dependency>
            <groupId>commons-fileupload</groupId>
            <artifactId>commons-fileupload</artifactId>
            <version>1.4</version>
        </dependency>
        <!--thymeleaf整合spring5的依赖-->
        <dependency>
            <groupId>org.thymeleaf</groupId>
            <artifactId>thymeleaf-spring5</artifactId>
            <version>3.0.15.RELEASE</version>
        </dependency>
    </dependencies>
2. Configuration file
web.xml
<!DOCTYPE web-app PUBLIC
 "-//Sun Microsystems, Inc.//DTD Web Application 2.3//EN"
 "http://java.sun.com/dtd/web-app_2_3.dtd" >

<web-app>
  <display-name>Archetype Created Web Application</display-name>

  <context-param>
    <param-name>contextConfigLocation</param-name>
    <param-value>classpath:spring.xml</param-value>
  </context-param>

  <!--
    url-pattern中/和/*的区别:
        /:匹配浏览器向服务器发送的所有请求(不包括jsp)
        /*:匹配浏览器向服务器发送的所有请求(包括jsp)

  -->

  <!--配置编码过滤器-->
  <filter>
    <filter-name>characterEncodingFilter</filter-name>
    <filter-class>org.springframework.web.filter.CharacterEncodingFilter</filter-class>
    <init-param>
      <param-name>encoding</param-name>
      <param-value>UTF-8</param-value>
    </init-param>
    <init-param>
      <param-name>forceEncoding</param-name>
      <param-value>1</param-value>
    </init-param>
  </filter>
  <filter-mapping>
    <filter-name>characterEncodingFilter</filter-name>
    <url-pattern>/*</url-pattern>
  </filter-mapping>

  <listener>
    <!--在服务器启动时加载spring的配置文件-->
    <listener-class>org.springframework.web.context.ContextLoaderListener</listener-class>
  </listener>

  <!--配置前端控制器DispatcherServlet,处理前端请求映射到控制器-->
  <servlet>
    <servlet-name>dispatcherServlet</servlet-name>
    <servlet-class>org.springframework.web.servlet.DispatcherServlet</servlet-class>
    <init-param>
      <param-name>contextConfigLocation</param-name>
      <param-value>classpath:spring-mvc.xml</param-value>
    </init-param>
    <load-on-startup>1</load-on-startup>
  </servlet>
  <servlet-mapping>
    <servlet-name>dispatcherServlet</servlet-name>
    <url-pattern>/</url-pattern>
  </servlet-mapping>

</web-app>
spring-mvc.xml
<?xml version="1.0" encoding="UTF-8"?>
<beans xmlns="http://www.springframework.org/schema/beans"
       xmlns:xsi="http://www.w3.org/2001/XMLSchema-instance"
       xmlns:context="http://www.springframework.org/schema/context"
       xmlns:mvc="http://www.springframework.org/schema/mvc"
       xsi:schemaLocation="http://www.springframework.org/schema/beans http://www.springframework.org/schema/beans/spring-beans.xsd http://www.springframework.org/schema/context https://www.springframework.org/schema/context/spring-context.xsd http://www.springframework.org/schema/mvc https://www.springframework.org/schema/mvc/spring-mvc.xsd">

    <context:component-scan base-package="com.fd.ssm.controller"/>

    <!--配置Thymeleaf视图解析器-->
    <bean class="org.thymeleaf.spring5.view.ThymeleafViewResolver" id="viewResolver">
        <property name="order" value="1"/>
        <property name="characterEncoding" value="UTF-8"/>
        <property name="templateEngine">
            <bean class="org.thymeleaf.spring5.SpringTemplateEngine">
                <property name="templateResolver">
                    <bean class="org.thymeleaf.spring5.templateresolver.SpringResourceTemplateResolver">
                        <!--视图前缀-->
                        <property name="prefix" value="/WEB-INF/templates/"/>
                        <!--视图后缀-->
                        <property name="suffix" value=".html"/>
                        <property name="templateMode" value="HTML5"/>
                        <property name="characterEncoding" value="utf-8"/>
                    </bean>
                </property>
            </bean>
        </property>
    </bean>

    <!--配置默认处理器,处理静态资源-->
    <mvc:default-servlet-handler></mvc:default-servlet-handler>

    <!--开启注解驱动-->
    <mvc:annotation-driven/>

    <!--配置视图控制器-->
    <mvc:view-controller path="/" view-name="index"/>

    <!--配置文件上传解析器, id必须为multipartResolver-->
    <bean class="org.springframework.web.multipart.commons.CommonsMultipartResolver" id="multipartResolver">
        <property name="defaultEncoding" value="UTF-8"></property>
    </bean>
</beans>
spring.xml
<?xml version="1.0" encoding="UTF-8"?>
<beans xmlns="http://www.springframework.org/schema/beans"
       xmlns:xsi="http://www.w3.org/2001/XMLSchema-instance"
       xmlns:context="http://www.springframework.org/schema/context" xmlns:tx="http://www.springframework.org/schema/tx"
       xsi:schemaLocation="http://www.springframework.org/schema/beans http://www.springframework.org/schema/beans/spring-beans.xsd http://www.springframework.org/schema/context https://www.springframework.org/schema/context/spring-context.xsd http://www.springframework.org/schema/tx http://www.springframework.org/schema/tx/spring-tx.xsd">

    <!--引入jdbc.properties-->
    <context:property-placeholder location="classpath:jdbc.properties"/>

    <!--开启注解扫描,排除控制层组件-->
    <context:component-scan base-package="com.fd.ssm">
        <context:exclude-filter type="annotation" expression="org.springframework.stereotype.Controller"/>
    </context:component-scan>

    <!--配置事务管理器-->
    <bean class="org.springframework.jdbc.datasource.DataSourceTransactionManager" id="transactionManager">
        <property name="dataSource" ref="druidDataSource"/>
    </bean>

    <!--开启事务管理的注解驱动,将使用注解@Transactional标识的方法或类中所有的方法进行事务管理-->
    <tx:annotation-driven transaction-manager="transactionManager"/>

    <!--配置数据源-->
    <bean class="com.alibaba.druid.pool.DruidDataSource" id="druidDataSource">
        <property name="driverClassName" value="${jdbc.driver}"/>
        <property name="url" value="${jdbc.url}"/>
        <property name="username" value="${jdbc.username}"/>
        <property name="password" value="${jdbc.password}"/>
    </bean>

    <!--
        spring整合mybatis配置方式
        mybatis使用方式:
            InputStream stream = Resources.getResourceAsStream("mybatis-config.xml");
            SqlSessionFactoryBuilder sqlSessionFactoryBuilder = new SqlSessionFactoryBuilder();
            SqlSessionFactory sqlSessionFactory = sqlSessionFactoryBuilder.build(stream);
            sqlSession = sqlSessionFactory.openSession(true);
            SelectMapper mapper = sqlSession.getMapper(SelectMapper.class);

    -->
    <!--配置sqlSessionFactoryBean,可以直接在Spring的IOC中获取sqlSessionFactory-->
    <bean class="org.mybatis.spring.SqlSessionFactoryBean" id="sqlSessionFactoryBean">
        <!--
            设置myBatis的核心配置文件的路径,既可以通过mybatis的配置文件的方式配置,也可以直接通过spring配置
        -->
        <property name="configLocation" value="classpath:mybatis-config.xml"/>
        <!--配置数据源-->
        <property name="dataSource" ref="druidDataSource"/>
        <!--设置类型别名所对应的包-->
        <property name="typeAliasesPackage" value="com.fd.ssm.pojo"/>
        <!--设置映射文件的路径,只有映射文件的包和mapper接口的包不一致时需要设置-->
        <!--<property name="mapperLocations" value="classpath:mappers/*.xml"/>-->
    </bean>

    <!--
        配置mapper接口的扫描,可以将指定包下所有的mapper接口,通过sqlSession创建代理实现类对象,并将这些对象交给IOC容器管理
        使用时可以通过直接装配mapper接口,来实现mybatis的使用
    -->
    <bean class="org.mybatis.spring.mapper.MapperScannerConfigurer">
        <property name="basePackage" value="com.fd.ssm.mapper"/>
    </bean>
</beans>
mybatis-config.xml
<?xml version="1.0" encoding="UTF-8" ?>
<!DOCTYPE configuration
        PUBLIC "-//mybatis.org//DTD Config 3.0//EN"
        "https://mybatis.org/dtd/mybatis-3-config.dtd">
<configuration>

    <!--
        Mybatis核心配置文件中的标签必须按照指定的顺序配置
        (properties?,settings?,typeAliases?,typeHandlers?,objectFactory?,objectWrapperFactory?,reflectorFactory?,plugins?,environments?,databaseIdProvider?,mappers?)
    -->
    <settings>
        <!--将下划线映射为驼峰-->
        <setting name="mapUnderscoreToCamelCase" value="true"/>
        <!--开启延迟加载-->
        <setting name="lazyLoadingEnabled" value="true"/>
        <!--按需加载-->
        <setting name="aggressiveLazyLoading" value="false"/>
    </settings>

    <plugins>
        <!--配置分页拦截器-->
        <plugin interceptor="com.github.pagehelper.PageInterceptor"></plugin>
    </plugins>

</configuration>
3. Controller method
@Controller
@RequestMapping("/employee")
public class EmployeeController {


    @Autowired
    private IEmployeeService employeeService;

    @GetMapping
    public String listEmployee(Model model) {


        List<Employee> list =  employeeService.listEmployee();
        // 将数据共享在请求域
        model.addAttribute("list", list);
        return "employee_list";
    }

    @GetMapping("/page/{pageNum}")
    public String listPageEmployee(@PathVariable int pageNum, Model model) {


        // 开启导航分页
        PageHelper.startPage(pageNum, 4);
        // 获取分页后的数据
        List<Employee> list = employeeService.listEmployee();
        /*
        Pagelnfo{

            pageNum:当前页的页码
            pageSize: 每页显示的条数
            size:当前页显示的真实条数
            total: 总记录数
            pages:总页数
            prePage:上一页的页码
            nextPage:下一页的页码
            isFirstPage/isLastPage: 是否为第一页/最后一页
            hasPreviousPage/hasNextPage: 是否存在上一页/下一页
            navigatePages:导航分页的页码数
            navigatepageNums:导航分页的页码,[1,2,3,4,5]
        */
        // 获取分页相关数据
        PageInfo<Employee> pageInfo = new PageInfo<Employee>(list, 5);
        // 将分页数据共享在请求域
        model.addAttribute("pageInfo", pageInfo);
        return "employee_page_list";
    }
}
4. Business layer methods
@Service
public class EmployeeServiceImpl implements IEmployeeService {


    @Autowired
    private EmployeeMapper employeeMapper;

    public List<Employee> listEmployee() {


        return employeeMapper.listEmployee();
    }

    public List<Employee> listPageEmployee(int pageNum) {


        // 开启导航分页
        PageHelper.startPage(pageNum, 4);
        return employeeMapper.listEmployee();
    }
}
5. Data layer approach
public interface EmployeeMapper {


    List<Employee> listEmployee();
}
6. mapper mapping file
<?xml version="1.0" encoding="UTF-8" ?>
<!DOCTYPE mapper
        PUBLIC "-//mybatis.org//DTD Mapper 3.0//EN"
        "http://mybatis.org/dtd/mybatis-3-mapper.dtd">
<mapper namespace="com.fd.ssm.mapper.EmployeeMapper">

    <select id="listEmployee" resultType="employee">
        select * from t_employee
    </select>
</mapper>
7. Presentation layer
index.html
<!DOCTYPE html>
<html lang="en" xmlns: th="http://www.thymeleaf.org">
<head>
    <meta charset="UTF-8">
    <title>首页</title>
</head>
<body>

<h1>index.html</h1>

<a th:href="@{/employee}">查询所有用户的信息</a><br>

<a th:href="@{/employee/page/1}">查询分页用户的信息</a><br>
</body>
</html>
employee_list.html
<!DOCTYPE html>
<html lang="en" xmlns: th="http://www.thymeleaf.org">
<head>
    <meta charset="UTF-8">
    <title>员工列表</title>
</head>
<body>

<p th:each="item : ${list}" th:text="${item}"></p>
</body>
</html>
employee_page_list.html
<!DOCTYPE html>
<html lang="en" xmlns: th="http://www.thymeleaf.org">
<head>
    <meta charset="UTF-8">
    <title>员工列表</title>
</head>
<body>

<p th:each="item : ${pageInfo.list}" th:text="${item}"></p>

<div style="text-align: center">
    <a th:if="${pageInfo.hasPreviousPage}" th:href="@{/employee/page/1}">首页</a>
    <a th:if="${pageInfo.hasPreviousPage}" th:href="@{'/employee/page/' + ${pageInfo.prePage}}">上一页</a>
    <a th:if="${pageInfo.hasNextPage}" th:href="@{'/employee/page/' + ${pageInfo.nextPage}}">下一页</a>
    <a th:if="${pageInfo.hasNextPage}" th:href="@{'/employee/page/' + ${pageInfo.pages}}">尾页</a>
</div>
</body>
</html>
8. Test results

Here we mainly provide an idea of integration and implementation. The implemented function is also relatively simple, that is, a query of employee data. As long as the project integration is successful, other business logics are actually similar, so we don’t need to add more complaints.
I finally finished sorting it out, and it took more than half a month from the start of writing to now. I add points intermittently when I have time. In the process of arranging notes, I also want to understand the process of digestion in depth, so it is relatively slow. Hope it can help others too!