Recently, bloggers searched casually on the Internet, and found that most of the implementations of pop-up payment pages at the bottom are used, and they are implemented by customizing PopupWindow. I don’t want to see the complicated logic in it. Many partners who are not familiar with customization , When you see the three words of customization , there is a feeling of blood pressure. Don’t worry, the bloggers used to be the same as you. If you want to do a good job of customization, you still have to do it yourself. Read books about customization. This time the blogger recommends a very comfortable and subversive traditional custom method to make a bottom pop-up payment page. If you want to make a very friendly bottom pop-up payment page, or other gorgeous animation pop-up any page, then this article The article is not to be missed!
First look at the renderings:
Although the display effect here is pop-up from the bottom, the pop-up method is completely customized and implemented by yourself. There are many restrictions in other ways. You can make this pop-up animation unconstrained without any problem .
The content of this chapter focuses on using the GT_View package class in the GT library to implement custom pop-up windows.
In fact, there are many encapsulated classes provided in the GT library:
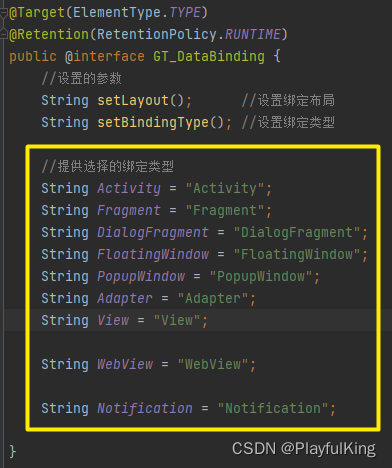
All of these are packaged classes provided by the GT library, and will be added from time to time in the future. This article only introduces the use of the View package class in the GT library.
To use the GT library, of course you need to rely on the GT library first:
 https://github.com/1079374315/GT
Let's take a look at how this effect is achieved, let's add styles and resources first
resource:

round_whitelucency_bg13.xml
<?xml version="1.0" encoding="utf-8"?>
<shape xmlns:android="http://schemas.android.com/apk/res/android"
    android:shape="rectangle">

    <solid android:color="#008E8E8E"/>
    <!-- 设置圆角 -->
    <corners android:radius="1dp"/>
    <!-- 设置边框 -->
    <stroke
        android:width="1dip"
        android:color="#6B000000" />

</shape>
round_whitelucency_bg17.xml
<?xml version="1.0" encoding="utf-8"?>
<shape xmlns:android="http://schemas.android.com/apk/res/android"
    android:shape="rectangle">

    <solid android:color="#FFFFFF"/>
    <!-- 设置圆角 -->
    <corners
        android:topRightRadius="15dp"
        android:topLeftRadius="15dp"
        />
    <!-- 设置边框 -->
    <stroke
        android:width="1dip"
        android:color="#FFFFFF" />

</shape>
style:
<style name="tv_pass">
        <item name="android:layout_width">0dp</item>
        <item name="android:layout_height">match_parent</item>
        <item name="android:layout_weight">1</item>
        <item name="android:gravity">center</item>
        <item name="android:textColor">#000000</item>
        <item name="android:background">#FFFFFF</item>
        <item name="android:textStyle">bold</item>
        <item name="android:textSize">28sp</item>
        <item name="android:layout_marginEnd">2dp</item>
        <item name="android:layout_marginBottom">2dp</item>
    </style>

    <style name="et_pass">
        <item name="android:layout_width">50dp</item>
        <item name="android:layout_height">50dp</item>
        <item name="android:gravity">center</item>
        <item name="android:maxLength">1</item>
        <item name="android:inputType">numberPassword</item>
        <item name="android:layout_marginStart">5dp</item>
        <item name="android:background">@drawable/round_whitelucency_bg13</item>
        <item name="android:textCursorDrawable">@drawable/color_cursor</item>
    </style>
That's all for the beautified style resource pictures, and then attach
Custom xml layout:
<?xml version="1.0" encoding="utf-8"?>
<androidx.constraintlayout.widget.ConstraintLayout xmlns:android="http://schemas.android.com/apk/res/android"
    xmlns:app="http://schemas.android.com/apk/res-auto"
    xmlns:tools="http://schemas.android.com/tools"
    android:id="@+id/cl_filtrate"
    android:layout_width="match_parent"
    android:layout_height="match_parent"
    tools:ignore="RtlSymmetry,LabelFor,NestedWeights,HardcodedText">

    <View
        android:id="@+id/view_bg"
        android:layout_width="match_parent"
        android:layout_height="match_parent"
        android:background="#70000000" />

    <androidx.constraintlayout.widget.ConstraintLayout
        android:id="@+id/ll_bottom1"
        android:layout_width="match_parent"
        android:layout_height="0dp"
        android:background="@drawable/round_whitelucency_bg17"
        android:orientation="vertical"
        app:layout_constraintBottom_toBottomOf="parent"
        app:layout_constraintDimensionRatio="h,1:1">

        <TextView
            android:id="@+id/tv_title"
            android:layout_width="wrap_content"
            android:layout_height="wrap_content"
            android:layout_margin="15dp"
            android:text="请输入二级密码"
            android:textColor="#202020"
            android:textStyle="bold"
            app:layout_constraintStart_toStartOf="parent"
            app:layout_constraintTop_toTopOf="parent" />

        <View
            android:id="@+id/view_line"
            android:layout_width="match_parent"
            android:layout_height="2dp"
            android:layout_marginTop="15dp"
            android:background="#EEEEEE"
            app:layout_constraintTop_toBottomOf="@+id/tv_title" />

        <!-- 密码框 -->
        <LinearLayout
            android:id="@+id/ll_pass"
            android:layout_width="match_parent"
            android:layout_height="wrap_content"
            android:layout_marginTop="15dp"
            android:gravity="center"
            android:orientation="horizontal"
            app:layout_constraintTop_toBottomOf="@+id/view_line">

            <EditText
                android:id="@+id/et_1"
                style="@style/et_pass"
                android:focusable="true" />

            <EditText
                android:id="@+id/et_2"
                style="@style/et_pass" />

            <EditText
                android:id="@+id/et_3"
                style="@style/et_pass" />

            <EditText
                android:id="@+id/et_4"
                style="@style/et_pass" />

            <EditText
                android:id="@+id/et_5"
                style="@style/et_pass" />

            <EditText
                android:id="@+id/et_6"
                style="@style/et_pass" />
        </LinearLayout>

        <TextView
            android:id="@+id/tv_pass"
            android:layout_width="wrap_content"
            android:layout_height="wrap_content"
            android:layout_marginTop="5dp"
            android:padding="10dp"
            android:text="忘记密码?请戳我"
            android:textColor="#202020"
            android:textSize="12sp"
            android:textStyle="bold"
            app:layout_constraintEnd_toEndOf="@+id/ll_pass"
            app:layout_constraintStart_toStartOf="@+id/ll_pass"
            app:layout_constraintTop_toBottomOf="@+id/ll_pass" />

        <View
            android:id="@+id/view_line2"
            android:layout_width="match_parent"
            android:layout_height="3dp"
            android:layout_marginTop="5dp"
            android:background="#EEEEEE"
            app:layout_constraintTop_toBottomOf="@+id/tv_pass" />

        <LinearLayout
            android:id="@+id/ll_bottom"
            android:layout_width="match_parent"
            android:layout_height="0dp"
            android:background="#EEEEEE"
            android:orientation="vertical"
            app:layout_constraintBottom_toBottomOf="parent"
            app:layout_constraintTop_toBottomOf="@+id/view_line2">

            <LinearLayout
                android:layout_width="match_parent"
                android:layout_height="0dp"
                android:layout_weight="1"
                android:orientation="horizontal">

                <TextView
                    style="@style/tv_pass"
                    android:text="1" />

                <TextView
                    style="@style/tv_pass"
                    android:text="2" />

                <TextView
                    style="@style/tv_pass"
                    android:text="3" />

            </LinearLayout>

            <LinearLayout
                android:layout_width="match_parent"
                android:layout_height="0dp"
                android:layout_weight="1"
                android:orientation="horizontal">

                <TextView
                    style="@style/tv_pass"
                    android:text="4" />

                <TextView
                    style="@style/tv_pass"
                    android:text="5" />

                <TextView
                    style="@style/tv_pass"
                    android:text="6" />

            </LinearLayout>

            <LinearLayout
                android:layout_width="match_parent"
                android:layout_height="0dp"
                android:layout_weight="1"
                android:orientation="horizontal">

                <TextView
                    style="@style/tv_pass"
                    android:text="7" />

                <TextView
                    style="@style/tv_pass"
                    android:text="8" />

                <TextView
                    style="@style/tv_pass"
                    android:text="9" />

            </LinearLayout>

            <LinearLayout
                android:layout_width="match_parent"
                android:layout_height="0dp"
                android:layout_weight="1"
                android:orientation="horizontal">

                <TextView
                    style="@style/tv_pass"
                    android:background="#EEEEEE" />

                <TextView
                    style="@style/tv_pass"
                    android:text="0" />

                <LinearLayout
                    android:id="@+id/ll_delete"
                    android:layout_width="0dp"
                    android:layout_height="match_parent"
                    android:layout_weight="1"
                    android:gravity="center">

                    <ImageView
                        android:layout_width="40dp"
                        android:layout_height="40dp"
                        android:src="@drawable/ic_delete" />
                </LinearLayout>

            </LinearLayout>

        </LinearLayout>

    </androidx.constraintlayout.widget.ConstraintLayout>


</androidx.constraintlayout.widget.ConstraintLayout>
Layout renderings:

Let's take a look at the core code of the custom bottom pop-up window :
//加载自定义xml布局
@GT.Annotations.GT_AnnotationView(R.layout.view_pay_pass)
public class PayPassView extends GT.GT_View.AnnotationView {

    /**
     * 必须写的
     * @param context
     * @param viewGroup 装入支付弹窗容器(后面会介绍使用的)
     */
    public PayPassView(Context context, ViewGroup viewGroup) {
        super(context, viewGroup);
    }

    private View view_bg;
    private View ll_bottom1;

    //需要重写的初始化方法
    @Override
    protected void initView(View view) {
        super.initView(view);

        //获取组件
        view_bg = findViewById(R.id.view_bg);
        ll_bottom1 = findViewById(R.id.ll_bottom1);

        //单击事件
        ll_bottom1.setOnClickListener(null);//消耗掉点击密码框的单击事件
        view_bg.setOnClickListener(new View.OnClickListener() {
            @Override
            public void onClick(View view) {
                hide();//单击上部分 半透明黑背景 进行隐藏动画操作
            }
        });
    }

    //显示动画
    public void show() {
        view_bg.setVisibility(View.VISIBLE);
        ll_bottom1.setVisibility(View.VISIBLE);
    }

    //隐藏动画
    private void hide() {
        view_bg.setVisibility(View.GONE);
        ll_bottom1.setVisibility(View.GONE);
    }

}
Seeing the above implementation method, it is simple enough. The only doubt is to load the custom xml layout . This loading custom xml layout is a very basic way to realize the loading layout in the GT library . The above shows The GT library loads the second version of the layout version. The eliminated version is not used by bloggers. It is not easy to use, but there is a more convenient version. Bloggers use the GT library to load the fourth version of the layout . Want to know more about the GT library The way to load the layout is as follows:
Android——GT-DataBinding ( completely liberate findViewById ) TextView tv;//Definition component @Override protected void onCreate(Bundle savedInstanceState) { super.onCreate(savedInstanceState); https://blog.csdn.net/qq_39799899/article/details/121270536?spm=1001.2014.3001.5501home people, It’s really cool to use the fourth edition. Later articles will post the fourth edition for comparison with the second edition.
Next, let's take a look at the layout of the calling payment pop-up page:
activity_main.xml
<?xml version="1.0" encoding="utf-8"?>
<androidx.constraintlayout.widget.ConstraintLayout xmlns:android="http://schemas.android.com/apk/res/android"
    xmlns:app="http://schemas.android.com/apk/res-auto"
    xmlns:tools="http://schemas.android.com/tools"
    android:layout_width="match_parent"
    android:layout_height="match_parent"
    >

    <TextView
        android:id="@+id/btn"
        android:layout_width="wrap_content"
        android:layout_height="wrap_content"
        android:text="开始支付"
        android:background="@drawable/bg_black_et"
        app:layout_constraintVertical_bias="0.28"
        android:paddingTop="5dp"
        android:paddingBottom="5dp"
        android:paddingStart="15dp"
        android:paddingEnd="15dp"
        app:layout_constraintBottom_toBottomOf="parent"
        app:layout_constraintEnd_toEndOf="parent"
        app:layout_constraintStart_toStartOf="parent"
        app:layout_constraintTop_toTopOf="parent" />

    <RelativeLayout
        android:id="@+id/rl"
        android:layout_width="match_parent"
        android:layout_height="match_parent"
        tools:layout_editor_absoluteX="16dp"
        tools:layout_editor_absoluteY="231dp" />

</androidx.constraintlayout.widget.ConstraintLayout>
The bg_black_et.xml inside is provided by the GT library and can be used directly
MainActivity.java
public class MainActivity extends AppCompatActivity {

    private PayPassView payPassView;
    private RelativeLayout rl;

    @Override
    protected void onCreate(Bundle savedInstanceState) {
        super.onCreate(savedInstanceState);
        setContentView(R.layout.activity_main);

        rl = findViewById(R.id.rl);//获取组件容器

        //构建 弹窗支付页面 并将构建好的支付页面 添加到 容器 rl 中
        payPassView = new PayPassView(this,rl);

        findViewById(R.id.btn).setOnClickListener(new View.OnClickListener() {
            @Override
            public void onClick(View view) {
                payPassView.show();//显示支付页面
            }
        });

    }

}
This is simple, in fact, it is to add the payment pop-up window we created to the container. After writing here, you can run it directly to see the effect:
Current code running effect diagram:
The effect is all out. Do you feel that adding a payment page is very simple. This is a completely customized layout page. These family members don’t have to worry about customization anymore.
GT library is born for simplicity
After doing this, the effect is coming out, but it’s not that the animation is very stiff, and there is no response to clicking the number and the back button. That’s for sure. There is no logic in our core code, and there must be no response. No, then Next, the blogger will continue to improve the rest of the logical processing. First, replace the loading layout of the second version with the fourth version. The fourth version needs to add the gt-DataBinding function.

For copying:
//注册 gt-DataBinding 功能
annotationProcessor 'com.github.1079374315:GSLS_Tool:v1.4.2.4'
Copy and paste in the red box and register, then you can use the fourth version to load the layout
After adding and registering, let's change the core code:
It will become popular when inheriting the PayPassViewBinding class , because this class will be automatically generated after compilation
Core code:
//使用 GT_DataBinding 功能
@GT_DataBinding(setLayout = "view_pay_pass", setBindingType = GT_DataBinding.View)
@GT.Annotations.GT_AnnotationView(R.layout.view_pay_pass)//加载自定义xml布局
public class PayPassView extends PayPassViewBinding {

    public PayPassView(Context context, ViewGroup viewGroup) {
        super(context, viewGroup);
    }

    @Override
    protected void initView(View view) {
        super.initView(view);
        ll_bottom1.setOnClickListener(null);//消耗单击密码框事件
        hide();//装入容器后直接隐藏
    }

    //设置单击事件
    @GT.Annotations.GT_Click({R.id.view_bg, R.id.tv_pass})
    public void onCLick(View view) {
        switch (view.getId()) {
            case R.id.tv_pass://忘记密码
                GT.toast(context, "单击了忘记密码");//吐司
                break;
            case R.id.view_bg:
                hide();//单击上部分 半透明黑背景 进行隐藏动画操作
                break;
        }
    }

    //显示动画
    public void show() {
        view_bg.setVisibility(View.VISIBLE);
        ll_bottom1.setVisibility(View.VISIBLE);
    }

    //隐藏动画
    private void hide() {
        view_bg.setVisibility(View.GONE);
        ll_bottom1.setVisibility(View.GONE);
    }

}
The original core code:

Does this comparison feel much simpler than the previous code?
You can run it again and see that the effect is the same as the original one. Next, we will use the fourth version to add subsequent logic processing.
If you want to add animation, the blogger's first thought is that the powerful animation library in the GT library is easy to operate and has clear annotations
Core code modification:
//使用 GT_DataBinding 功能
@GT_DataBinding(setLayout = "view_pay_pass", setBindingType = GT_DataBinding.View)
@GT.Annotations.GT_AnnotationView(R.layout.view_pay_pass)//加载自定义xml布局
public class PayPassView extends PayPassViewBinding {

    public PayPassView(Context context, ViewGroup viewGroup) {
        super(context, viewGroup);
    }

    @Override
    protected void initView(View view) {
        super.initView(view);
        ll_bottom1.setOnClickListener(null);//消耗单击密码框事件
        hide();//装入容器后直接隐藏
    }

    //设置单击事件
    @GT.Annotations.GT_Click({R.id.view_bg, R.id.tv_pass})
    public void onCLick(View view) {
        switch (view.getId()) {
            case R.id.tv_pass://忘记密码
                GT.toast(context, "单击了忘记密码");//吐司
                break;
            case R.id.view_bg:
                hide();//单击上部分 半透明黑背景 进行隐藏动画操作
                break;
        }
    }

    //构建GT动画库
    private static final GT.GT_Animation animation = new GT.GT_Animation();
    //定义 必要的计算参数值
    private int height;

    //显示动画
    public void show() {
        //获取容器的这个View的宽高,好设置动画的动态数据
        height = view_bg.getHeight();

        //使用GT库 移动 Y轴(上下) 动画,来给 组件 ll_bottom1 设置移动
        animation.translateY_T(height, 0, 300, 0, false, ll_bottom1);
        view_bg.setVisibility(View.VISIBLE);//显示半透明黑色背景
    }

    //隐藏动画
    private void hide() {
        //获取容器的这个View的宽高,好设置动画的动态数据
        height = view_bg.getHeight();

        if (height == 0) {//在刚开始创建的时候获取的高会为0,所以直接隐藏支付页
            animation.translateY_T(0, 3000, 1, 0, false, ll_bottom1);
        }else{//后续就更具动态高度进行动画展示
            animation.translateY_T(0, height, 300, 0, false, ll_bottom1);
        }
        view_bg.setVisibility(View.INVISIBLE);//隐藏半透明黑色背景
    }

}
Renderings:
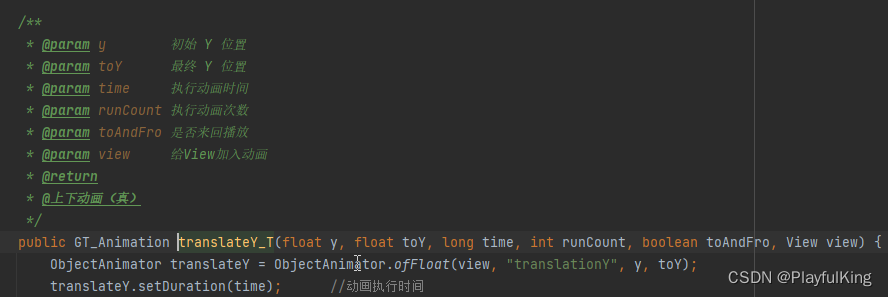
At this time, the bottom pop-up effect will appear on the display payment page when running. Using the Y-axis moving animation in the GT animation library can achieve the bottom pop-up effect very well, and it is very easy to use. Friends who do not know the parameters of the GT library can , try annotating the formal parameters one by one by yourself, and the annotations are also very humane:
Next, the blogger will directly paste all the logic processing core codes, and will not explain too much
Final core code:
@GT_DataBinding(setLayout = "view_pay_pass", setBindingType = GT_DataBinding.View)
@GT.Annotations.GT_AnnotationView(R.layout.view_pay_pass)
public class PayPassView extends PayPassViewBinding {

    private int height;
    private int width;
    private List<EditText> editTextList;
    private int index;//索引

    private static GT.GT_Animation animation = new GT.GT_Animation();

    public PayPassView(Context context, ViewGroup viewGroup) {
        super(context, viewGroup);
    }

    @Override
    protected void initView(View view) {
        super.initView(view);
        hide();
        ll_bottom1.setOnClickListener(v -> {
        });
        editTextList = new ArrayList<>();
    }


    @Override
    public void loadData(View view) {
        super.loadData(view);

        //设置第一个密码框光标
        GT.Thread.getInstance(0).execute(() -> {
            GT.Thread.sleep(300);
            index = 0;
            GT.Thread.runAndroid(() -> et_1.requestFocus());
        });

        //设置每个单独密码的事件
        for (int i = 0; i < ll_pass.getChildCount(); i++) {
            EditText editText = (EditText) ll_pass.getChildAt(i);
            editText.setTag(i);//设置吗每个 EditText 索引
            editTextList.add(editText);
            int finalI = i;
            editText.addTextChangedListener(new TextWatcher() {
                @Override
                public void beforeTextChanged(CharSequence s, int start, int count, int after) {
                }

                @Override
                public void onTextChanged(CharSequence s, int start, int before, int count) {
                }

                @Override
                public void afterTextChanged(Editable s) {
                    String s1 = editText.getText().toString();
                    editText.setSelection(s1.length());
                    if (s1.length() == 0) {//删除的时候
                        index = Integer.parseInt(editText.getTag().toString());
                        if (index - 1 >= 0) {
                            EditText editText1 = editTextList.get(index - 1);
                            editText1.requestFocus();
                        }
                        if (index > 0)
                            index--;
                    } else if (s1.length() == 1) {//输入的时候
                        if (finalI + 1 <= editTextList.size() - 1) {
                            EditText editText1 = editTextList.get(finalI + 1);
                            editText1.requestFocus();
                            index = Integer.parseInt(editText1.getTag().toString());
                        }
                    }
                    transactionPasswordAuthentication();

                }

                //验证交易密码是否全部输入
                private void transactionPasswordAuthentication() {
                    boolean isOk = true;
                    String apppwd = "";
                    for (int i = 0; i < editTextList.size(); i++) {
                        EditText editText1 = editTextList.get(i);
                        String s = editText1.getText().toString();
                        if (s.length() == 0) {
                            isOk = false;
                        }
                        apppwd += s;
                    }
                    if (!isOk) return;
//                    AppUtils.toast("正在支付中...");

                    for (int i = 0; i < editTextList.size(); i++) {
                        EditText editText1 = editTextList.get(i);
                        editText1.setText("");
                    }

                    //这里的支付密码可以通过接口返回数据 或者 GT.EventBus 传递消息出去
                    GT.logt("支付密码:" + apppwd);
                    GT.toast(context, "支付密码:" + apppwd);
                    hide();

                }
            });
        }

        //单击密码设置
        for (int i = 0; i < ll_bottom.getChildCount(); i++) {
            View childAt = ll_bottom.getChildAt(i);
            if (childAt instanceof ViewGroup) {
                ViewGroup vg = (ViewGroup) childAt;
                for (int j = 0; j < vg.getChildCount(); j++) {
                    View childAt1 = vg.getChildAt(j);

                    //输入密码
                    if (childAt1 instanceof TextView) {
                        TextView tv = (TextView) childAt1;
                        tv.setOnClickListener(v -> {
                            EditText editText = editTextList.get(index);
                            editText.setText(tv.getText().toString());
                        });
                    }

                    //删除单个密码框的操作
                    if (childAt1 instanceof LinearLayout) {
                        childAt1.setOnClickListener(v -> {
                            EditText editText = editTextList.get(index);
                            editText.setText("");
                        });
                    }

                }
            }
        }

    }

    //单击事件
    @GT.Annotations.GT_Click({R.id.view_bg, R.id.tv_pass})
    public void onCLick(View view) {
        switch (view.getId()) {
            case R.id.tv_pass://忘记密码
                GT.toast(context, "单击了忘记密码");
                break;
            case R.id.view_bg:
                hide();
                break;

        }
    }

    //显示动画
    public void show() {

        //设置第一个密码框光标
        GT.Thread.getInstance(0).execute(() -> {
            GT.Thread.sleep(300);
            index = 0;
            GT.Thread.runAndroid(() -> {
                if (et_1 != null) et_1.requestFocus();
            });
        });

        height = view_bg.getHeight();
        width = view_bg.getWidth();

        animation.translateY_T(height, 0, 300, 0, false, ll_bottom1);
        view_bg.setVisibility(View.VISIBLE);
        GT.Thread.getInstance(0).execute(() -> {
            for (float a = 0; a < 1; ) {
                if (view_bg == null) break;
                a += 0.01;
                GT.Thread.sleep(1);
                float finalA = a;
                GT.Thread.runAndroid(() -> {
                    if (view_bg != null) {
                        view_bg.setAlpha(finalA);
                    }
                });
            }
        });
    }

    //隐藏动画
    private void hide() {

        //清空密码框剩余的数据
        GT.Thread.getInstance(0).execute(() -> GT.Thread.runAndroid(() -> {
            for (int i = 0; i < editTextList.size(); i++) {
                EditText editText1 = editTextList.get(i);
                if (editText1 == null) return;
                editText1.setText("");
            }
        }));

        height = view_bg.getHeight();
        width = view_bg.getWidth();

        if (height == 0) {
            animation.translateY_T(0, 3000, 1, 0, false, ll_bottom1);
            view_bg.setAlpha(0);
            view_bg.setVisibility(View.INVISIBLE);
        } else {
            animation.translateY_T(0, height, 300, 0, false, ll_bottom1);
            GT.Thread.getInstance(0).execute(() -> {
                for (float a = 1; a > 0; ) {
                    a -= 0.01;
                    GT.Thread.sleep(1);
                    float finalA = a;
                    GT.Thread.runAndroid(() -> {
                        if (view_bg != null) {
                            view_bg.setAlpha(finalA);
                            view_bg.setVisibility(View.INVISIBLE);
                        }
                    });

                }
            });
        }

    }

}
This article focuses on the GT_View packaging class. When you learn the GT_View packaging class, you can customize other pop-up windows at your fingertips. In addition, you can use the GT library animation library proficiently, so you can play left, right, up, down, etc. Unconstrained animation cannot be done. GT library includes Z-axis animation. Combining these animations can directly produce 3D effects.
In this chapter GT_View + GT animation library, realize the custom bottom payment pop-up window
Click to follow and like (〃'▽'〃) to follow the blogger's latest release library: GitHub - 1079374315/GT