Table of contents
foreword
This is a series of articles on learning source code. If you are interested, you can continue to read other articles
Vue source code learning - what does new Vue initialization do?
Vue source code learning - data responsive principle
Vue source code learning - asynchronous update queue and nextTick principle
Vue source code learning - virtual Dom and diff algorithm
1. What is template compilation?
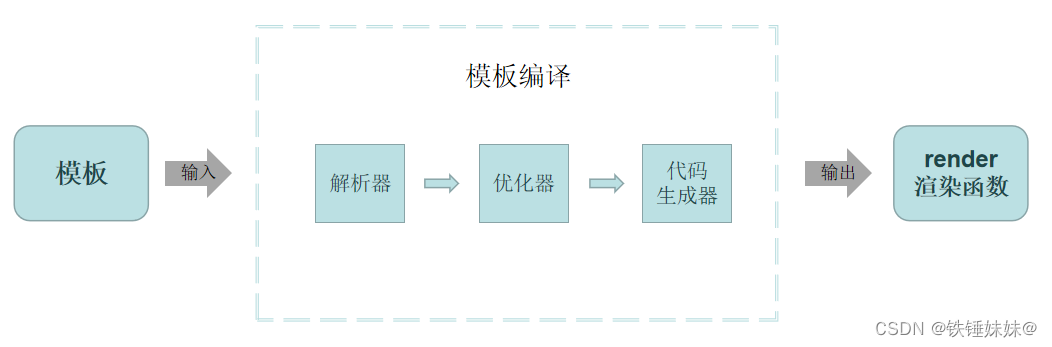
Usually developed and written <template></template>and the variables, expressions, instructions, etc. in it are not HTML syntax, which cannot be recognized by browsers. So it needs to be templateconverted into one JS 函数, so that the browser can execute this function and render the corresponding HTML element, so that the view can run, and this conversion process becomes 模板编译.
The main process is:
- Extract native and non-native HTML in the template, such as bound attributes, events, instructions, variables, etc.
- Generates a function string after some processing
render.renderThe function then generates the corresponding template contentvnode.- Then pass
patchthe process (Diff) to get what is to be rendered into the viewvnode.- Finally, a node is created according to vnode
真实 DOM, that is, the original HTML is inserted into the view to complete the rendering.
Items 1, 2, and 3 above are the process of template compilation. Specifically how to compile and generate the render function string, continue to look down.
2. The process of template compilation to render function string
There are three main stages: 解析 parse;优化 optimise;生成 generate,最终生成可执行函数 render.
-
Template parsing stage : Use a large number of regular expressions to extract
<template></template>information such as tags, attributes, and variables in the template, and parse it into抽象语法树 AST. -
Optimization stage :
遍历 AST, find some of them静态节点and标记make it convenient to skip these static nodes directly when performing diff comparison when the page is re-rendered, and optimize runtime performance. -
Build phase : Convert the final
ASTtorendera function string.
These three steps correspond to three functions, which will be introduced one by one later. First, let's look at where they are called in the baseCompile source code.
3. In-depth template compilation source code
baseCompile()
This is the entry function for template compilation, which receives two parameters:
template: the template string to convertoptions: Parameters required for conversion
// src/compiler/index.ts

export const createCompiler = createCompilerCreator(function baseCompile(
  template: string,  // 要转换的模板字符串
  options: CompilerOptions  // 转换时需要的参数
): CompiledResult {


  // 1. 进行模板编译,并将结果保存为抽象语法树 AST
  const ast = parse(template.trim(), options)
  // 没有禁用静态优化的话
  if (options.optimize !== false) {


  // 2. 遍历 AST,找到其中的一些静态节点并标记
    optimize(ast, options)
  }
 //  3. 将最终的 AST 转化为 render渲染函数
  const code = generate(ast, options)
  return {


    ast,
    render: code.render,  // 返回渲染函数 render
    staticRenderFns: code.staticRenderFns
  }
})
Just a few lines of code, three steps, and calling three methods is very clear.
Let's first take a look at returnwhat is going out at the end, and then dig into the source code of the methods called in these three steps, so that we can know more clearly what the three steps are to do.
For example, there is such a template:
<template>
    <div id="app">{

    {

    name}}</div>
</template>
Print the compiled result, which is the result of the above source code return, and see what it is.
// 把 模板 编译成 抽象语法树 AST
{


  ast: {


    type: 1,
    tag: 'div',
    attrsList: [ {

     name: 'id', value: 'app' } ],
    attrsMap: {

     id: 'app' },
    rawAttrsMap: {

    },
    parent: undefined,
    children: [
      {


        type: 2,
        expression: '_s(name)',
        tokens: [ {

     '@binding': 'name' } ],
        text: '{

    {name}}',
        static: false
      }
    ],
    plain: false,
    attrs: [ {

     name: 'id', value: '"app"', dynamic: undefined } ],
    static: false,
    staticRoot: false
  },
  render: `with(this){return _c('div',{attrs:{"id":"app"}},[_v(_s(name))])}`,
  staticRenderFns: [],
  errors: [],
  tips: []
}
It doesn't matter if you don't understand it for the time being. Pay attention to what the three steps mentioned in the return have done?
ast: It is generated in the first step.static: is the static node mark, which is addedastaccording to in the second step .type(For the specific type, see the table below)render: It is generated in the third step.
I have a general impression, and then look at the source code.
parse() - the parsing phase
<template></template>This method is the main function of the parser, which extracts all the tag, props, and childreninformation in the template string through multiple regular methods , and generates an ASTobject of the corresponding structure.
Core step: call parseHTML()to parse the template string.
- Parsing to the start tag, end tag, text, and comments are processed differently.
- When text information is encountered during the parsing process, the text parser is invoked
parseText()for text parsing.- When an include filter is encountered during parsing, the filter parser is invoked for
parseFilters()parsing.- The results of each step of parsing are merged into one object (that is, the final AST).
// src/complier/parser/index.ts

export function parse(template: string, options: CompilerOptions): ASTElement {


  parseHTML(template, {


    warn,
    expectHTML: options.expectHTML,
    isUnaryTag: options.isUnaryTag,
    canBeLeftOpenTag: options.canBeLeftOpenTag,
    shouldDecodeNewlines: options.shouldDecodeNewlines,
    shouldDecodeNewlinesForHref: options.shouldDecodeNewlinesForHref,
    shouldKeepComment: options.comments,
    outputSourceRange: options.outputSourceRange,

    // 解析到 开始标签 时调用,如<div>
    start(tag, attrs, unary, start, end) {


     // unary 是否是自闭合标签,如 <img />
     // ...
    },

    // 解析到 结束标签 时调用,如</div>
    end(tag, start, end) {


     // ...
    },

    // 解析 文本 时调用
    chars(text: string, start?: number, end?: number) {


      // 这里会判断判断很多东西,来看它是不是带变量的动态文本
      // 然后创建动态文本或静态文本对应的 AST 节点
     // ...
    },

    // 解析到注释时调用
    comment(text: string, start, end) {


    // ...
    }
  })
  return root
}
The above call when parsing the text will mark the AST chars()according to different types of nodes , and this attribute will be used in the next step of marking.type节点类型
| type | AST node type |
|---|---|
| 1 | element node |
| 2 | dynamic text node containing variables |
| 3 | Plain text nodes without variables (static nodes) |
optimize() - optimization phase
This function is ASTfound in 静态节点 和 静态根节点and added 标记, in order to patchskip the comparison of static nodes in the later process, and directly 克隆copy the past, thus optimizing patchthe performance of . We also talked about this in the last virtual dom and diff algorithm (patchVnode function).
// src/compiler/optimizer.ts
export function optimize(
  root: ASTElement | null | undefined,
  options: CompilerOptions
) {


  if (!root) return
  isStaticKey = genStaticKeysCached(options.staticKeys || '')
  isPlatformReservedTag = options.isReservedTag || no
  // 标记静态节点
  markStatic(root)
  // 标记静态根节点
  markStaticRoots(root, false)
}
The general process of the code in the specific function is as follows: (It is good to have an understanding)
Mark static node (markStatic) : It is to judge the type value, refer to the above table.
- The type value is 1: it is a node that contains child elements; set static to false; and recurse child nodes until all child nodes are marked.
- type value is 2: set static to false.
- The type value is 3: it is a plain text node that does not contain child nodes and dynamic attributes, set static to true; this will be skipped when patching, and a copy of the past will be cloned directly.
Mark Static Root Nodes (markStaticRoots) : Static root nodes refer to the entire subtree that will not change during component rendering; the principle is basically the same as marking static nodes, except that nodes that meet the following conditions are considered static root nodes.
- The node itself must be a static node
- must have child nodes
- Child nodes cannot have only one text node
generate() - the generation phase
This is generation render 函数字符串, which means that it will eventually return something like the following.
// 比如有这么个模板
<template>
    <div id="app">{

    {

     name }}</div>
</template>

// 上面模板编译后返回的 render 字段 就是这样的
render: `with(this){return _c('div',{attrs:{"id":"app"}},[_v(_s(name))])}`

// 把内容格式化一下,容易理解一点
with(this){


  return _c(
    'div',
    {

     attrs:{

    "id":"app"} },
    [  _v(_s(name))  ]
  )
}
If you understand the virtual DOM, you can see that the render above is exactly the structure of the virtual DOM, which divides a tag into tag, props, children.
Before looking at the generate source code, we need to understand what the last returned renderfield above means.
(1) Understand the render function string and with syntax
This withis a keyword used to trick lexical scope, which allows us to refer to multiple properties on an object more quickly.
Let's first use an example to show the difference between the with syntax and the normal syntax.
When executing a program without using the with syntax:
 const obj = {

     name: '铁锤妹妹', age: 18 }

console.log(obj.name) // 铁锤妹妹
console.log(obj.age) // 18
console.log(obj.sex) // undefined
When executing a program using the with syntax:
 const obj = {

     name: '铁锤妹妹', age: 18 }
 with (obj) {


   console.log(name) // 铁锤妹妹  不需要写 obj.name 了
   console.log(age) // 18   不需要写 obj.age了
   console.log(sex) // 会报错!!!
 }
with syntax summary:
- The with syntax will change the pointer of the attribute in the lexical scope, and look it up as an obj attribute.
- An error will be reported if
{ }no matchingobjattribute is found within the . withUse it sparingly, it breaks作用域规则and will let it go易读性变差.
_c、 _v 和 _sWhat is that ?
export function installRenderHelpers(target: any) {


  target._s = toString  // 转字符串函数
  target._v = createTextVNode  // 创建文本节点函数
}

// 补充
_c = createElement // 创建虚拟节点函数
So far, let's look at the returned render field, and it will be much clearer.
with(this){

     // 欺骗词法作用域,将该作用域里所有属姓和方法都指向当前组件
  return _c( // 创建一个虚拟节点
    'div', // 标签为 div
    {

     attrs:{

    "id":"app"} }, // 有一个属性 id 为 'app'
    [  _v(_s(name))  ] // 是一个文本节点,所以把获取到的动态属性 name 转成字符串
  )
}
Next, let's look at the source code of generate().
(2)generate
It is to judge whether the AST is empty first, and create a vnode according to the AST if it is not empty, otherwise create a vnode with an empty div.
// src/complier/codegen/index.ts
export function generate(
  ast: ASTElement | void,
  options: CompilerOptions
): CodegenResult {


  const state = new CodegenState(options)
  // 就是先判断 AST 是不是为空,不为空就根据 AST 创建 vnode,否则就创建一个空div的 vnode
  const code = ast
    ? ast.tag === 'script'
      ? 'null'
      : genElement(ast, state)
    : '_c("div")'
  return {


    render: `with(this){return ${

      code}}`,
    staticRenderFns: state.staticRenderFns
  }
}
It can be seen that it is mainly genElement()created through the method vnode, so let's take a look at its source code to see how it was created.
(3)genElement()
It is a bunch of if/elsedifferent generating functions that judge the attributes of the incoming AST element nodes.
Another knowledge point can be found here: v-for 的优先级要高于 v-if,因为先判断 for 的.
// src/complier/codegen/index.ts

export function genElement(el: ASTElement, state: CodegenState): string {


  if (el.parent) {


    el.pre = el.pre || el.parent.pre
  }

  if (el.staticRoot && !el.staticProcessed) {


    return genStatic(el, state)
  } else if (el.once && !el.onceProcessed) {

     // v-once
    return genOnce(el, state)
  } else if (el.for && !el.forProcessed) {

      // v-for
    return genFor(el, state)
  } else if (el.if && !el.ifProcessed) {

      // v-if
    return genIf(el, state)

    // template 节点 && 没有插槽 && 没有 pre 标签
  } else if (el.tag === 'template' && !el.slotTarget && !state.pre) {


    return genChildren(el, state) || 'void 0'
  } else if (el.tag === 'slot') {

      // v-slot
    return genSlot(el, state)
  } else {


    // component or element
    let code
    // 如果有子组件
    if (el.component) {


      code = genComponent(el.component, el, state)
    } else {


      let data
      const maybeComponent = state.maybeComponent(el)
      // 获取元素属性 props
      if (!el.plain || (el.pre && maybeComponent)) {


        data = genData(el, state)
      }

      let tag: string | undefined
      const bindings = state.options.bindings
      if (maybeComponent && bindings && bindings.__isScriptSetup !== false) {


        tag = checkBindingType(bindings, el.tag)
      }
      if (!tag) tag = `'${

      el.tag}'`
      // 获取元素子节点
      const children = el.inlineTemplate ? null : genChildren(el, state, true)
      code = `_c(${

      tag}${


        data ? `,${
        data}` : '' // data
      }${


        children ? `,${
        children}` : '' // children
      })`
    }
    for (let i = 0; i < state.transforms.length; i++) {


      code = state.transforms[i](el, code)
    }
    // 返回上面作为 with 作用域执行的内容
    return code
  }
}
The generation functions called by each type are not listed one by one. In general, there are only three types of vnode nodes created at last, element nodes, text nodes, and comment nodes.
4. The complete process of component rendering/updating
Getting to Know Component Rendering/Updating
After talking about the above content, let's talk about a knowledge point that is highly related to the compiled template: 组件渲染/更新过程.
A component, from rendering to the page, to modifying data to trigger an update (data-driven view), what is the principle behind it, the following are the main points that need to be mastered.
- In fact, before the component is rendered,
模板编译the templatetemplatewill be compiled intorendera function. - After that, it is data monitoring, which is Vue
响应式数据. Through operationsObject.defineProperty(), to monitordataproperties, triggergetterandsettermethods, to achieve real-time data update. - After listening to the data,
renderthe function is executed and generatedvnode. - After
vnodethis step (that is, vdom), the comparison ofpatch(elem,vnode)and will be performedpatch(vnode,newVnode). According to the comparison result, Vue will apply the updated content to真实 DOMto make the page display consistent with the latest virtual DOM result.
This part is still very important. In the previous articles, we understood how to generate the render function, the principle of data responsiveness, and what is virtual dom? diff algorithm? However, the connection between them is still somewhat vague, so here we directly connect the contents of the previous articles. Read on.
If necessary, you can check out my previous articles to learn.
Vue source code learning - what does new Vue initialization do?
Vue source code learning-data responsive principle
Vue source code learning-virtual Dom and diff algorithm
Component rendering/updating process
The component rendering and updating process mainly goes through the following three steps: 初次渲染过程 =》 更新过程 =》 异步渲染.
(1) Initial rendering process
The initial rendering process, that is, how the component is rendered for the first time. Specifically, there are three steps:
- Parse Component Template : Parses
templatea template intorendera function. - Create component instance : Before rendering, Vue will create an instance of the component. (The props, data, methods, computed, watch of the component will be initialized)
- Trigger responsive : When the component is instantiated and the data is passed to
renderthe function for rendering,datathe property will be monitored, and thegetterandsettermethods will be triggered. - Execute the rendering function : execute
renderthe rendering function, generatevnode, proceedpatch(elem,vnode).
These steps are explained in turn below.
1.1) Trigger the responsive
monitoring dataproperty, then we need to trigger the responsive, that is, render data.
At this stage, we need to execute renderthe function, renderwhich will trigger getterthe method, because the data is not updated, just rendered. The method is only manipulated when an update is in progress setter.
1.2) Execute the rendering function
Finally, when the data is rendered, renderthe rendering function generated in the first step will be executed. The rendering function will be generated according to the state and data of the component 虚拟DOM树, and then proceed patch(elem,vnode).
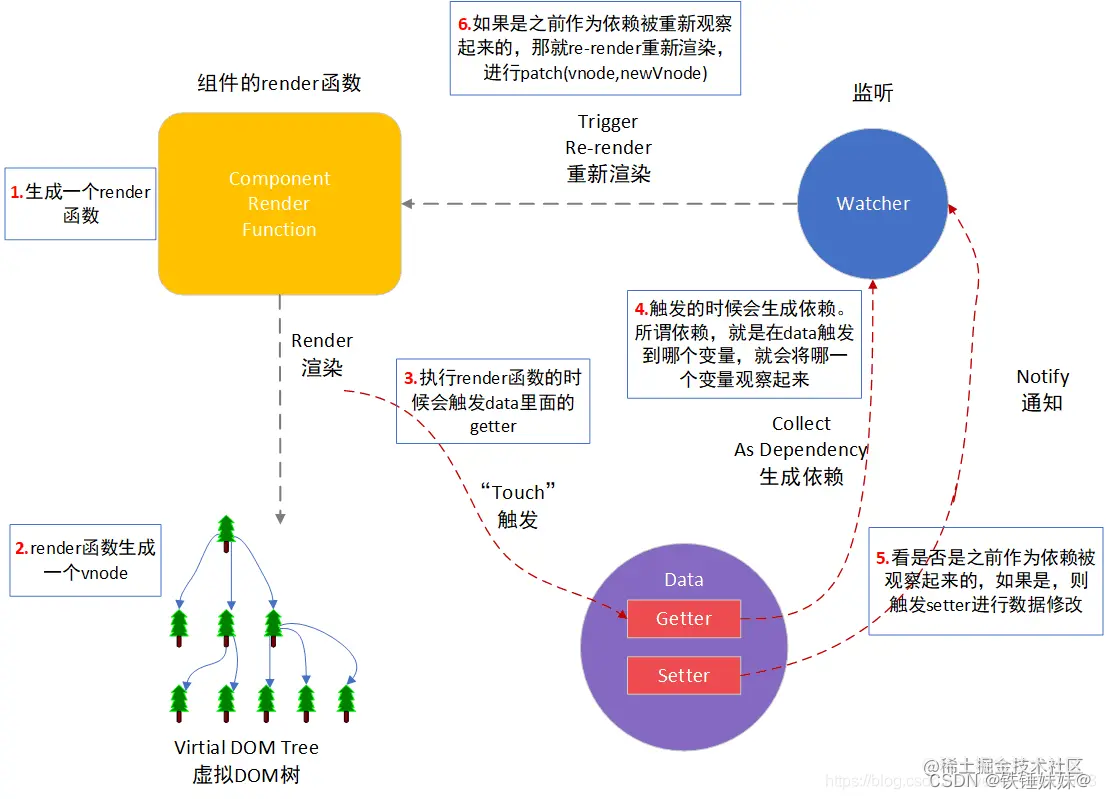
(2) Update process
At this stage, it will be modified dataand triggered setter(note: it has been collected and monitored by dependencies databefore this)getter
After triggering setter, re-execute renderthe function and generate newVodethe final patch(vnode, newVode)diff comparison.
By comparison, Vue can find out the parts that need to be updated, thereby reducing the number of operations on the real DOM. According to the comparison result, Vue will apply the updated content to the real DOM, so that the page display is consistent with the latest virtual DOM result.
Component rendering/updating complete flowchart: (use a picture on the Internet)
(3) Asynchronous rendering
After rendering and updating, our program may also be 多个程序loaded at the same time, which involves a 异步渲染problem.
Multiple data changes, if the view is directly updated multiple times, the performance will be reduced, so an asynchronous update queue is made for view updates to avoid unnecessary calculations and DOM operations. In the next round of event loop, the queue is refreshed and the deduplicated work (the callback function of nextTick) is executed, the component is re-rendered, and the view is updated.
Asynchronous rendering problem, we use $nextTickto solve.
If you are interested in asynchronously updating the rendering view of the DOM, you can go to another series of articles: Vue source code learning - asynchronous update queue and nextTick principle
Doubts
1. Why doesn't the Vue component directly load the data during the rendering process, but first parse the template and convert it into a render function?
This is because Vue's rendering process can be divided into two phases:
编译阶段and运行阶段.
- Compilation phase : Before the component is instantiated, the template needs to be compiled first. This stage parses and converts the template into an executable render function. The compilation phase analyzes the structure and instructions of the template, generates an abstract syntax tree (AST), and then generates a render function based on the AST. At this stage, Vue will not load the actual data, because the specific data is passed in after the component is instantiated.
- Run phase : After the component is instantiated, the run phase is triggered. Vue will call the previously generated render function and pass in the data of the component. At this time, the render function will generate a virtual DOM based on the incoming data, compare it with the diff algorithm, and finally update it to the real DOM.
2. What are the benefits of separating the data from the rendering process?
- Separation of concerns : Separating templates and data makes the concerns of components clearer. The template is responsible for describing the structure and style of the component, while the data is responsible for describing the state and behavior of the component. This makes component development more modular and maintainable.
- Performance optimization : By compiling templates into render functions, Vue can perform some optimization operations during the compilation phase, such as static node marking in advance, optimization of event listeners, etc. This reduces runtime overhead and improves component rendering performance.
You can refer to:
How does the render function come from? Simple explanation of template compilation in Vue
What happened behind the template compilation template?