Recently, the articles are not updated so frequently, maybe every other month or so, an article will be updated, mainly about the demo of the content I am studying or the content that I just use in my work, some of the content will be slightly longer than the previous articles, You can detect the paragraphs you need to view based on the table of contents.
The demo is only written for the second method here, and the first method may be supplemented later.
Method 1:
The user's openid is required to push messages to the user. When the user follows the official account, a unique openid will be generated. The applet can obtain the openid when logging in and registering, but the openid of the applet is the same as that of the public. The openids of the number are independent, and we associate the two through the returned unionid.
Method 2 [demonstrated in this article] :
It can also be realized through the interface provided by WeChat, and the message push can be realized through the openid generated by the user logging in the applet (if the user does not log in the applet, the message push cannot be realized, and the official account must also be followed. )
Official document address: https://developers.weixin.qq.com/miniprogram/dev/OpenApiDoc/mp-message-management/uniform-message/sendUniformMessage.html
Note: The current Mini Program and Official Account must be under the same subject
The requested parameters mainly include
- access_token can be obtained through a get request
- touser The openid of the user, the openid returned by the applet
- mp_template_msg push official account message parameters
- appid The id of the official account
- template_id the id of the template
- The content to be redirected by the url template
- The miniprogram template asks for a small program to jump to
- data The content of the message to be sent by the applet
parameter example
An instance of sending a message
{


  "touser":"OPENID",
  "mp_template_msg":{


        "appid":"APPID ",
        "template_id":"TEMPLATE_ID",
        "url":"http://weixin.qq.com/download",
        "miniprogram":{


            "appid":"xiaochengxuappid12345",
            "pagepath":"index?foo=bar"
        },
        "data":{


            "first":{


                "value":"恭喜你购买成功!",
                "color":"#173177"
            },
            "keyword1":{


                "value":"巧克力",
                "color":"#173177"
            },
            "keyword2":{


                "value":"39.8元",
                "color":"#173177"
            },
            "keyword3":{


                "value":"2014年9月22日",
                "color":"#173177"
            },
            "remark":{


                "value":"欢迎再次购买!",
                "color":"#173177"
            }
        }
    }
}
An instance that returns success data
{


  "errCode": 0,
  "errMsg": "openapi.uniformMessage.send:ok"
}
Integrate Springboot
dependencies used
 <dependencies>
        <dependency>
            <groupId>org.springframework.boot</groupId>
            <artifactId>spring-boot-starter-web</artifactId>
        </dependency>

        <dependency>
            <groupId>com.alibaba</groupId>
            <artifactId>fastjson</artifactId>
            <version>1.2.73</version>
        </dependency>

        <!-- 缓存 用来保存access_token-->
        <dependency>
            <groupId>com.github.ben-manes.caffeine</groupId>
            <artifactId>caffeine</artifactId>
        </dependency>

        <dependency>
            <groupId>org.springframework.boot</groupId>
            <artifactId>spring-boot-configuration-processor</artifactId>
            <optional>true</optional>
        </dependency>

        <!-- lombok包中携带Slf4j日志 -->
        <dependency>
            <groupId>org.projectlombok</groupId>
            <artifactId>lombok</artifactId>
        </dependency>

        <!-- 定时任务 -->
        <dependency>
            <groupId>org.springframework.boot</groupId>
            <artifactId>spring-boot-starter-quartz</artifactId>
        </dependency>

    </dependencies>
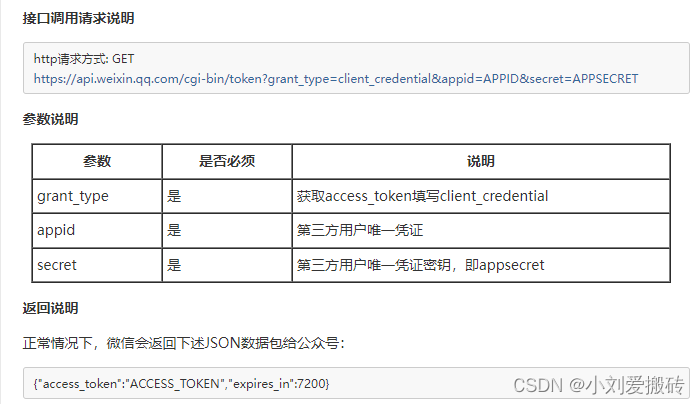
- First you need to get access_token
Official document address: http://caibaojian.com/wxwiki/9a186d136f1e9dce26e9593cadbc7130083b48d0.html
The official account will be required when making interface calls access_token, which is equivalent to the credentials for our interaction with the WeChat server. The access_token will be refreshed every two hours, and the new After the token takes effect, the previous token will be invalid. When the two tokens are alternated, both the old and new tokens can be used within 5 minutes. There is a limit to the number of times we can call the interface every day, and the maximum number of calls per day 2000.
1.1 Create an entity class to save WeChat-related configuration information
@Data
@Component
@PropertySource(value = "classpath:/application.yml")
@ConfigurationProperties(prefix = "wechat")
public class WeChatProperties {


    /**
     * 微信公众号的appid
     */
    @Value("${appId}")
    private String appId;
    /**
     * 微信小程序的secret
     */
    @Value("${secret}")
    private String secret;
    /**
     * 获取access_token的url
     */
    @Value("${accessUrl}")
    private String accessUrl;
    /**
     * 消息发送的id
     */
    @Value("${uniformSend}")
    private String uniformSend;
    /**
     * 微信小程序的appid
     */
    @Value("${miniAppId}")
    private String miniAppId;
    /**
     * 微信小程序跳转页面路径
     */
    @Value("${pagepath}")
    private String pagepath;

    /**
     * 获取token的定时任务corn
     */
    @Value("${corn}")
    private String corn;

}
1.2 Here I directly use the restTemplate interface interface call, you can also use httpclient, free choice,
so here you need to configure the restTemplate
/**
 * @desc:
 * @author: LiuChang
 * @since: 2022/7/22
 */
@Configuration
public class RestTemplateConfig {


    /**
     * rest 模板
     *
     * @param clientHttpRequestFactory
     * @return
     */
    @Bean
    public RestTemplate restTemplate(ClientHttpRequestFactory clientHttpRequestFactory) {


        return new RestTemplate(clientHttpRequestFactory);
    }

    /**
     * 请求连接池的配置信息
     *
     * @return
     */
    @Bean
    public ClientHttpRequestFactory simpleClientHttpRequestFactory() {


        SimpleClientHttpRequestFactory factory = new SimpleClientHttpRequestFactory();
        factory.setConnectTimeout(15000);
        factory.setReadTimeout(5000);
        return factory;
    }

}
- Specify configuration information in the yaml configuration file
server:
  port: 7777
wechat:
  #公众号的appid
  appId:
  #小程序的appid
  miniAppId:
  #小程序的secret
  secret:
  accessUrl: https://api.weixin.qq.com/cgi-bin/token
  uniformSend: https://api.weixin.qq.com/cgi-bin/message/wxopen/template/uniform_send?access_token=
  #小程序跳转的url
  pagepath: pages/index
  #定时任务执行
  corn: 0 0 0/2 * * ?
- Call interface to get token
@Resource
RestTemplate restTemplate;
@Resource
WeChatProperties weChatProperties;

public String getAccessToken() {


        String url = weChatProperties.getAccessUrl();
        // 这里的参数要和下面的Map Key值对应
        String path = "?grant_type={grant_type}&appid={appid}&secret={secret}";
        Map<String, String> params = new HashMap<>(3);
        params.put("grant_type", "client_credential");
        params.put("appid", weChatProperties.getMiniAppId());
        params.put("secret", weChatProperties.getSecret());
        ResponseEntity<String> forObject = restTemplate.getForEntity(url + path, String.class, params);
        JSONObject jsonObject = JSONObject.parseObject(forObject.getBody());
        String accessToken = jsonObject.getString("access_token");
        if (null == accessToken) {


            log.error("获取access_token失败");
        } else {


            //将token保存到缓存中
            //caffeineCache.put("access_token", accessToken);
        }
        return accessToken;
    }
- Introduce cache (can be ignored)
2.1 Cache configuration file I use caffeine for caching here, mainly because the performance of reading is better. Since only the token of the project uses the cache, it will be imported as a whole. You can also use redis/memoryCache
/**
 * @desc: token的缓存配置
 * @author: LiuChang
 * @since: 2022/7/22
 */
@Configuration
public class TokenCacheConfig {


    @Bean
    public Cache caffeineCache() {


        return Caffeine.newBuilder()
                // 设置最后一次写入或访问后经过固定时间过期
//                .expireAfterWrite(90, TimeUnit.MINUTES)
                // 初始的缓存空间大小
                .initialCapacity(100)
                // 缓存的最大条数
                .maximumSize(1000)
                .build();
    }

}
2.2 Use cache
@Resource
Cache<String, Object> caffeineCache;


//获取
 caffeineCache.getIfPresent("access_token")
//放入数据
caffeineCache.put("access_token", accessToken);
- Introduce timing tasks (can be ignored)
3.1 Timing tasks that need to be executed
@Slf4j
@Component
public class QuartzJob extends QuartzJobBean {


    @Resource
    WxMessageSendService wxMessageSendService;

    @Override
    protected void executeInternal(JobExecutionContext context) throws JobExecutionException {


        try {


            // 定时刷新token
            String token = wxMessageSendService.getAccessToken();
            log.info(token);
        } catch (Exception e) {


            log.error("任务失败 error:{}", e.getMessage());
        }
    }
}
3.2 Configuration file for scheduled tasks
@Configuration
public class QuartzConfig {


    /**
     * corn表达式
     */
    @Value("${wechat.corn}")
    private String restartCron;

    @Bean
    public JobDetail restartJob() {


        return JobBuilder.newJob(QuartzJob.class).withIdentity("QuartzJob").storeDurably().build();
    }

    @Bean
    public Trigger restartTrigger() {


        CronScheduleBuilder scheduleBuilder = CronScheduleBuilder.cronSchedule(restartCron);
        return TriggerBuilder.newTrigger().forJob(restartJob())
                .withIdentity("QuartzJob").withSchedule(scheduleBuilder).build();
    }

}
3.3 Add annotations to the startup class
@SpringBootApplication
@EnableScheduling
- Call the official interface, push message test
Entity class of message content
/**
 * @desc: 微信推送消息类
 * @author: LiuChang
 * @since: 2022/7/25
 */
@Data
@AllArgsConstructor
@NoArgsConstructor
public class WxMessageBean {


    private MessageBean first;

    private MessageBean keyword1;

    private MessageBean keyword2;

    private MessageBean keyword3;

    private MessageBean keyword4;

    private MessageBean remark;

    /**
     * 自定义构造,first和remark必传,keyword根据需要自定义个数
     *
     * @param first
     * @param remark
     * @param keyword
     */
    public WxMessageBean(MessageBean first, MessageBean remark, MessageBean... keyword) {


        this.first = first;
        int count = 1;
        for (MessageBean keyword1 : keyword) {


            if (count == 1) {


                this.keyword1 = keyword1;
            } else if (count == 2) {


                this.keyword2 = keyword1;
            } else if (count == 3) {


                this.keyword3 = keyword1;
            } else if (count == 4) {


                this.keyword4 = keyword1;
            }
            count++;
        }

        this.remark = remark;
    }

}
@Data
@AllArgsConstructor
@NoArgsConstructor
public class MessageBean {


    /**
     * 消息内容
     */
    private String value;
    /**
     * color
     */
    private String color;
}
interface writing
@Service
@Slf4j
public class WxMessageSendService {


    @Resource
    RestTemplate restTemplate;
    @Resource
    WeChatProperties weChatProperties;
    @Resource
    Cache<String, Object> caffeineCache;

    /**
     * 推送消息
     *
     * @param openId
     * @param message
     * @return
     */
    public String messageSend(String openId, Object message) {


        String token = (String) caffeineCache.getIfPresent(ConstantEnum.ACCESS_TOKEN.getCode());
        if (token == null) {


            token = this.getAccessToken();
        }
        String url = weChatProperties.getUniformSend() + token;
        // 这里的参数要和下面的Map Key值对应
        JSONObject obj = new JSONObject();
        JSONObject mpTemplateMsg = new JSONObject();
        JSONObject mini = new JSONObject();
        mini.put("appid", weChatProperties.getMiniAppId());
        mini.put("pagepath", weChatProperties.getPagepath());
        mpTemplateMsg.put("data", message);
        mpTemplateMsg.put("miniprogram", mini);
        ///微信公众号appid
        mpTemplateMsg.put("appid", weChatProperties.getAppId());
        ///微信公众号模板id
        mpTemplateMsg.put("template_id", template_id);
        obj.put("touser", openId);
        obj.put("mp_template_msg", mpTemplateMsg);
        ResponseEntity<String> forObject = restTemplate.postForEntity(url, obj, String.class);
        JSONObject object = JSON.parseObject(forObject.getBody());
        Integer errcode = (Integer) object.get("errcode");
        if (errcode == 0) {


            log.info("消息推送成功");
            return null;
        } else if (errcode == 40003) {


            log.error("推送消息的openid错误,openid:{},消息内容:{}", openId, message);
            return "推送消息的openid错误";
        } else if (errcode == 43004) {


            log.error("该用户未关注公众号,openid:{},消息内容:{}", openId, message);
            return "该用户未关注公众号";
        } else {


            return null;
        }
    }

    //下面还有个方法是获取access_token的 这里省略没写,在上面获取token已经将方法写了
}
call interface
@RestController
@RequestMapping("/message_send")
public class WxMessageSendController {
@Resource
WxMessageSendService wxMessageSendService;
/**
* 通过openid和消息内容向指定用户推送公众号模板消息
*
* @return
*/
@PostMapping()
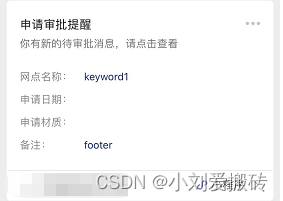
public String messageSend() {
WxMessageBean messageBean = new WxMessageBean(new MessageBean("你有新的待审批消息,请点击查看", "#173177"),
new MessageBean("footer", "#173177"),
new MessageBean("keyword1", "#173177"));
return wxMessageSendService.messageSend(openid, messageBean);
}
}
The result after calling the interface
Precautions:
- The two appids and secrets should be filled in correctly and not reversed
- openid is the id of the user applet
- The access_token parameter is filled in correctly