Introduction to Git and Github
Git is an open source distributed version control system . Github is the world's largest same-sex dating website based on Git code hosting platform . Because it only supports Git as the only repository format for hosting, it is named GitHub, which means that there are countless Git warehouse - the Git version of Baidu Cloud, responsible for storing remote warehouses.
What does unique repository mean?
A unique repository usually means that there is only one main repository (Main Repository), from which all developers pull, modify, and push code to ensure code uniqueness and consistency .
Why do you need a version control tool
When you were in college, the teacher asked you to hand in a paper or a major assignment, but you don’t know how many brothers and sisters you have between your version and the final version under the teacher’s request
First version.rar——>Revised version.rar—>Revised version.rar—>Advanced version.rar—>Final version.rar—>True final version.rar—>Completed version.rar— —>Change again I am a dog.rar—>cnm don’t want to change it anymore.rar—>…
Then if the big job is programming, your code may be walking like flying one second, and die on the spot the next second. Even if the programmer has no object, he will always ask himself what is wrong with me. One of the functions of version control One is to solve these problems, it can help you manage different versions, and you can fall back to any moment at any time.
The second function of version control is collaborative development. Git can automatically merge code, thereby greatly increasing production efficiency.
GitHub terms explained
In order for everyone to further understand and use Git and GitHub, let's take a look at the common terms of GitHub, which can also be said to be basic concepts:
Repository : Repo for short, can be understood as a "warehouse", and our projects are stored in the warehouse. In other words, if we want to build a project, we have to build a warehouse first; if there are multiple projects, we need to build multiple warehouses.
Issues : It can be understood as "problems". To give a simple example, if we open source a project, if someone else reads our project and finds a bug, or feels that there is room for improvement, he can raise an Issue for us, etc. After we resolve the Issues, we can close these Issues; on the contrary, we can also raise Issues for others.
Star : It can be understood as "like". When we feel that a certain project is doing better, we can like this project, and the projects we like will be saved in our Star, which is convenient for us at any time Check. In GitHub, if a project has more than 100 stars, it means that the project is already very good.
Fork : It can be understood as "pulling a branch". If we are interested in a certain project and want to develop new functions based on it, then we can Fork this project, which means copying a completed same project to In our GitHub account, and independent of the original project. After that, we can develop in the project we copied.
Clone : git clone xxIt is a relatively familiar operation, which is similar to the Download function, which can be understood as downloading the cloud code to our own computer locally.
Normally, we need to install git on our local machine, and then use to git clone [仓库地址]download the specified warehouse address code to our local machine.
Push : It can be understood as "push". When you make a modification locally, the modification will be synchronized to your repository on Github.
Pull Request : It can be understood as "submitting a request". This function is based on Fork. If we fork a project, modify it, and feel that the modification is not bad, we can make a request to the owner of the original project. Put forward a Pull request, wait for it to review our request, and after passing the review, we can merge our modified content into the original project, and then we become contributors to the project.
Merge : It can be understood as "merging". If someone else forks our project, modifies it, and submits a Pull request, then we can review the Pull request. If the content of this pull request meets our requirements and does not conflict with our original project, it can be merged into our project. Of course, whether to merge or not is up to us to decide.
Watch : It can be understood as "observation". If we watch a project, if there is any update on the project, we will receive the update notification of the project at the first time, and will also be notified by email if it is set.
Gist : If we have no projects to open source or simply want to share some code snippets, we can choose Gist. But to be honest, if you don't go over the wall, Gist is not easy to use.
Git workflow
The figure below shows the Git workflow and the impact of the main commands on the warehouse

workspace is the workspace, logically it is the state of the local computer, which has not been added to the repository;
staging area is the stage in the repository, which is the temporary storage area. The modification has been added to the repository, but it has not been submitted as a commit, which is similar to a cache;
the local repository is the place of the master in the repository. Only at this point can a new version be successfully generated;
remote repository is a remote warehouse. It is used to upload the local warehouse to the network, which can be used for backup, sharing and cooperation.
Git installation and configuration user information
Download: Git official download address , download the corresponding version and install it.
Configure user information locally:
- Configuration content: user.name and user.email
- Configuration purpose: Git is used to record who did what
- Configuration method: Open Git Bash under windows to operate or modify it directly in the config file, the location is C:\Users\your username.gitconfig
git config#Check if this machine is configured with personal information
git config --global user.name "……"#Define global user name
git config --global user.email "……"#Define global email address
git config --global user.password "……"#Configure password
git config --list#View local configuration information
git config --global --list#View global configuration information
Add public key to Github server
- Configuration purpose:
pull,pushIt is quite annoying to enter the password every time. Use SSH keys, you can save the password every time - How to generate SSH key: first confirm whether the file already exists locally, confirm whether there are files id_rsa and id_rsa.pub in the C:\Users\your username.ssh directory, if not generated by the following method
Run ssh-keygen -t rsa -C "你在github上注册的邮箱", and finally you can see these two files in your home directory.
id_rsa is the private key, do not tell others easily, id_rsa.pub is the public key, you can rest assured to tell anyone

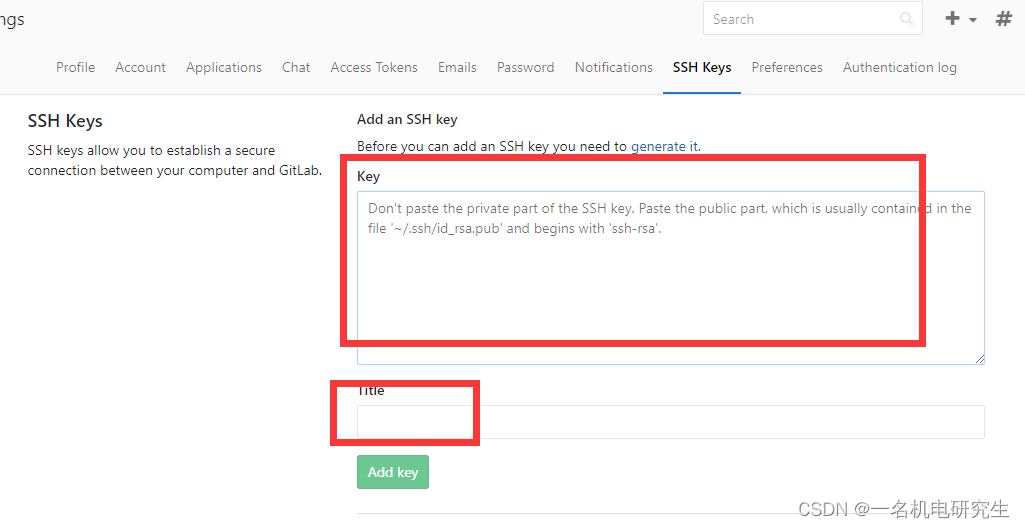
Add the public key to the Github server: copy the content of the local id_rsa.pub to Github’s Setting, as shown in the figure:
Introduction to the basic use of Git and its common commands
First of all, before we do any git operations, we have to switch to the Git warehouse directory. In other words, we have to first enter the top-level file directory of the Git warehouse (that we defined), and then Git Bash Here in this directory, so that subsequent operations can proceed smoothly.
Copy and paste under Git Bash is Ctrl+ Insand Shift+ Ins.
1st command:git status
View the status of the current warehouse.

2nd command:git init
It is used to initialize the warehouse. After this command is run, the directory becomes a Git warehouse, and the master branch of the Git warehouse is entered by default, that is, the main branch, and a hidden .git directory will be generated in the current directory. If you do not see the .git directory, it is because this directory is hidden by default, and ls -ahyou can see it with the command.

3rd command:git add
Create a new text file named hit under this folder, and then enter the command at the cursor of the Git Bash command line window git add hit.txtto add the hit.txt file to the temporary storage area of the Git warehouse.
4th command:git commit
At the cursor in the command line window, enter git commit -m "text commit"the command to submit the hit.txt file to the Git repository

We have successfully submitted the file hit.txt to the Git warehouse, where commit means submission, -m means submission information, and the double quotation marks "" are the submission information.
5th command:git log
At the cursor in the command line window, enter git logthe command to print the commit log of the Git repository

As shown in the figure above, our submission records are displayed. The content of the submission records includes Author submission author, Date submission date and submission information.
6th command:git branch
At the cursor in the command line window, enter git branchthe command to view the branch status of the Git repository:

It shows the branch status in the current warehouse, and now there is only one master branch, where the * number before the master branch means "current branch", for example, * master means that our location is the main branch of the demo warehouse. Enter the command git branch a, and then enter the command git branch, the result is as shown in the figure below:

As shown in the figure above, we created a branch named a, and the current position is still the main branch (branches are easy to create).
7th command:git checkout
At the cursor in the command line window, enter git checkout athe command to switch to branch a:

As shown in the figure above, we have switched to the a branch! Use the command git branchto view the branch status. The * number has also appeared before the a branch.
Here, we have an easier way to view the current branch, that is, the current branch has been given at the end of the command line. In addition, we can also switch directly to the new branch while creating the branch, the command is git checkout -b, for example, enter git checkout -b bthe command:

As shown in the figure above, we created the b branch and switched directly to the b branch.
8th command:git merge
Switch to the master branch, and then enter git merge athe command to merge the a branch into the master branch:
(The merging process is to switch the current branch first, and then use it git merge a(that is, the branch you want to merge, choose yourself))

As shown in the figure above, we have merged the a branch into the main branch! In addition, one thing to note here is: when merging branches, it is necessary to consider whether there is a conflict between the two branches. If there is a conflict, it cannot be merged directly, and the conflict needs to be resolved first; otherwise, it can be merged directly.
What does it mean if two branches in git have conflicts, and what causes it?
In Git, a conflict occurs when two branches have both modified the same part of the same file, and you try to merge them together. In this case, Git cannot automatically decide which change should be kept, so the conflict needs to be resolved manually.
Resolving conflicts often requires opening the files containing conflicts and manually editing them to remove conflicts and select which changes to keep. You can then mark the file as conflict resolved and commit the changes to Git to signify that the conflict is resolved.
Conflicts usually occur when multiple people are working on the same code base and making changes to the same files or code. Without proper coordination and communication, conflicts can result. Therefore, when using Git for collaborative development, you need to keep an eye on other people's changes and try to avoid changing the same code at the same time.
9th command:git branch -d & git branch -D
At the cursor in the command line window, enter git branch -d athe command to delete branch a:

As shown in the figure above, we have deleted branch a! However, sometimes, git branch -dthe command may fail to delete, for example, the code of branch a is not merged into the main branch, etc. If we must delete this branch, we can force delete it through the command git branch -D.
10th command:git tag
At the cursor in the command line window, enter git tag v1.0the command to add a label to the current branch:

As shown above, we have added a v1.0 tag to the current master branch. Use the command git tagto view the records we added tags. git checkout v1.0You can switch to the code state under this label by command .
11th command:git push
At the cursor in the command line window, enter git push <远程仓库地址> <本地分支名>:<远程分支名>the command to push the current branch to the remote repository:

As shown in the figure above, the master branch is pushed to the remote warehouse, and the remote warehouse has no master branch, so the master branch is automatically created.
12th command:git clone
At the cursor in the command line window, enter git clone <远程仓库地址>the command to copy the remote Git repository to the local, so that you can view the project or modify it.

Git command collection
Create repository
git clone <url>: Copy the repository (repository) from an address on the network to the local
git init: Initialize the git repository in the local current directory, and a hidden .git directory will be generated in the current directory
Modify and Submit
git status: View the status of the current warehouse
git diff: Display the difference between the temporary storage area and the working area
git add: Add all files in the current directory to the temporary storage area
git add <file1><file2>: Add one or more files to the temporary storage area
git mv <old> <new>: File rename
git rm <file>: Move files from the temporary storage area to the temporary storage area Delete in the working area
git rm --cached <file>: remove the file from the temporary storage area, but still keep it in the current working directory
git commit -m "commit message": submit the temporary storage area to the local warehouse, and the submission information should best reflect what has been changed
View commit history
git log: View the current version and previous commit records
git log -p <file>: View the commit history of the specified file
git blame <file>: View the commit history of the specified file in a list
Branches and Tags
git branch: List branch basic information
git branch <new-branch>: Create new branch
git branch -d <branch>: Delete branch
git checkout <branch/tag>: Switch to specified branch or label
git checkout -b <branch>: Create and switch to new branch
git switch <branch>: Switch to specified branch
git switch -c <branch>: Create and switch to new branch
git tag: List all local labels
git tag <tagname>: Created based on the latest commit Tags
git tag -d <tagname>: remove tag
Merge and derivative
git merge <branch>: merge the specified branch into the current branch
git rebase <branch>: rebase the specified branch into the current branch
remote operation
git remote -v: View all remote repository
git remote show <remote>: Display information of a remote repository
git remote add <shortname> <url>: Add remote repository
git fetch <remote>: Get code from remote repository
git pull <remote> <branch>: Download code and fast merge
git push <remote> <branch>: Upload code and fast merge
git push <remote> :<branch/tag>: Delete remote branch or tag
git push --tags: Upload all tags