Chapter 2: Basic Operations of Image Processing
This chapter mainly introduces:
- Basic representation of images
- Pixel Access and Manipulation
- Processing of regions of interest
- channel processing
Wait for knowledge points. It should be noted that to use OpenCV for Python, you must be proficient in the Numpy library, especially the Numpy.array library, which is the basis for python to process images.
First, the basic representation of the image:
The basic representation methods of images are:
- Binary image
- Grayscale image
- color image
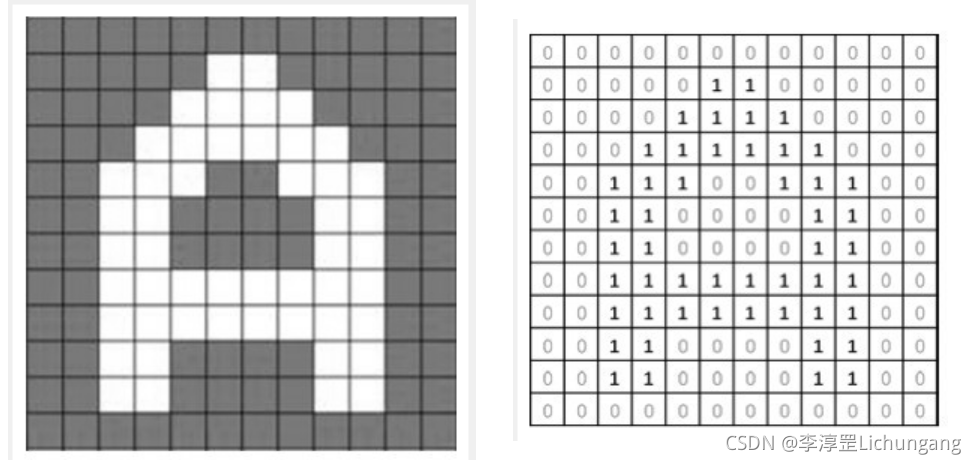
1. Binary image:
A binary image is an image that contains only two colors, black and white.
In computers, images are represented and processed through matrices. For example, the image of A in the figure below, when the computer processes the image, it will first divide it into small squares, that is, pixels, and each pixel is an independent processing unit. Then, set the white pixels to 1 and the black pixels to 0 for subsequent storage and processing operations.
2. Grayscale image:
The binary image is simple and convenient to represent, but because it only has two colors of black and white, the represented image is not delicate enough. If you need to express more details, you need to use more colors.
For example, the grayscale image below:
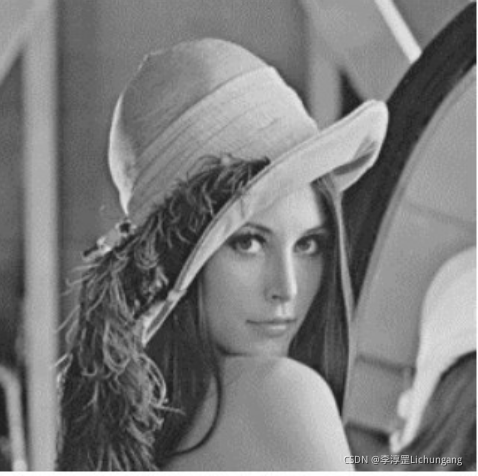
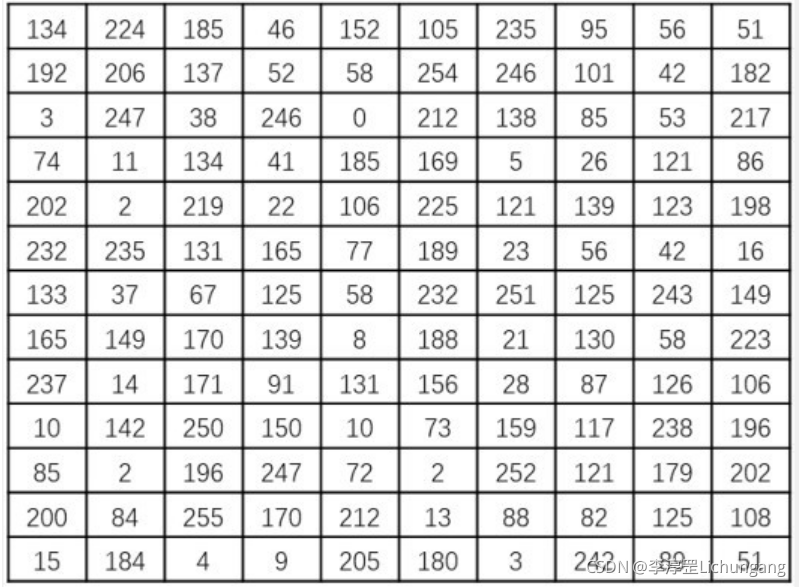
Usually, the computer will process the grayscale into 256 grayscale levels, represented by the interval [0, 255]. Among them, 255 represents pure white, 0 represents pure black, and the rest of the values represent different levels of gray from pure white to pure black.
The value 0-255 used to represent 256 gray levels can be represented by exactly one byte (8 binary digits). The following figure shows the decimal values corresponding to some binary values:
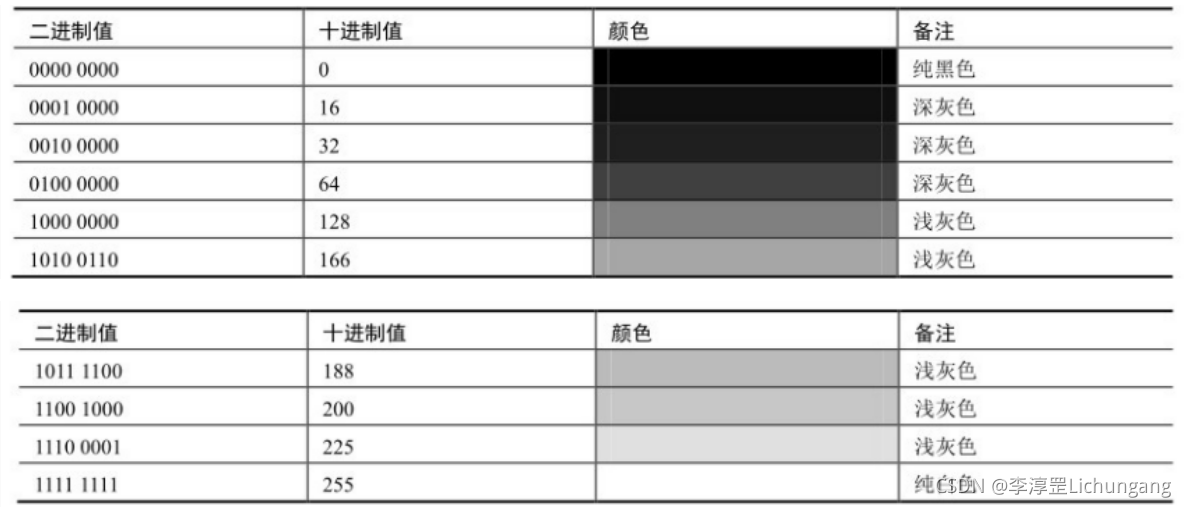
In some cases, 8-bit binary is also used to represent a binary image. In this case, 255 means white, 0 means black, and only 255 and 0 exist in the image.
3. Color image:
Compared with binary images and grayscale images, color images are a more common type of image. Neurophysiological experiments have found that there are three different color receptors on the retina, which can perceive three different colors: red, green and blue, that is, the three primary colors. Various shades of light commonly seen in nature can be formed by mixing the three primary colors in a certain proportion. In addition, from an optical point of view, the color can be analyzed into the main wavelength, purity, lightness, etc. From a psychological and visual point of view, color can be parsed into hue, saturation, brightness, etc. Usually, we refer to the modes in which the above methods express colors in different ways as color spaces, or color spaces, or color modes.
Although different color spaces have different representation methods, various color spaces can be converted according to the corresponding formula.
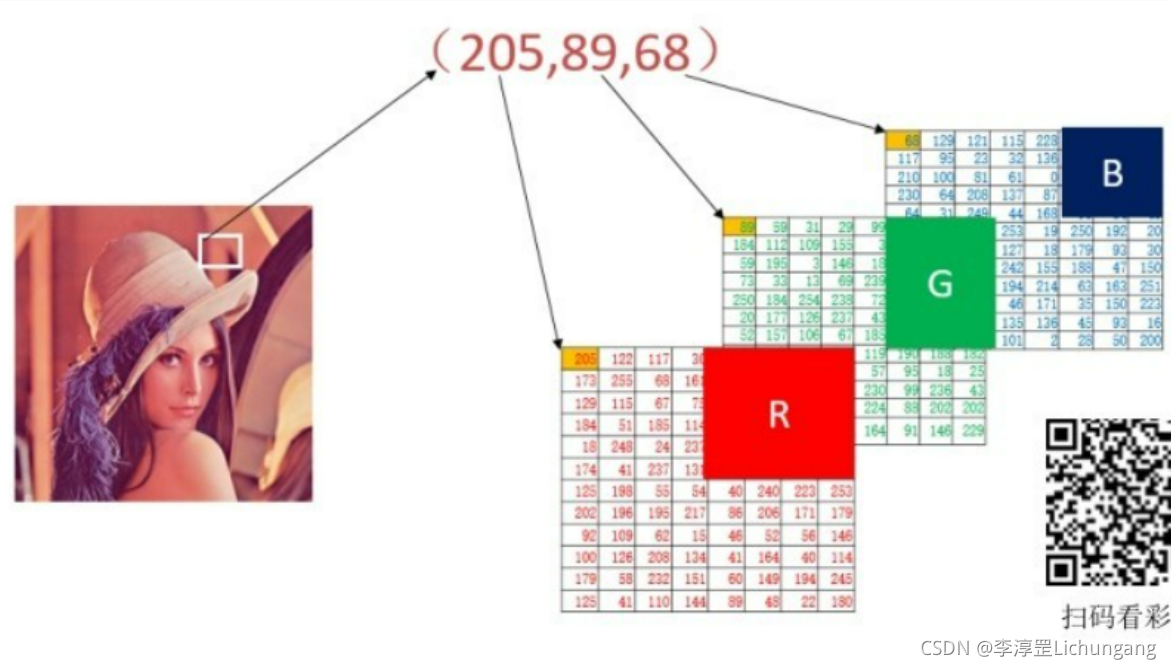
For example, in the RGB color space, there are three channels: R channel, G channel, and B channel. The orientation of each color channel value is between [0, 255]. Therefore, a three-dimensional array is usually used to represent a color image in the RGB color space. Note that in OpenCV, the order of channels is BGR.
2. Pixel processing:
A pixel is the basic unit of image composition, and pixel processing is the basic operation of image processing. Elements in the image can be mirrored, accessed and processed in the form of position index.
1. Binary image and grayscale image:
In OpenCV, the smallest data type is an unsigned 8-bit number. Therefore, there is actually no binary image data type in OpenCV. Binary images are often special grayscale images obtained through processing, using 0 to represent black and 255 to represent white.
Through the previous analysis, we can see that in a computer, an image is a matrix composed of pixels. In OpenCV for Python, images are arrays in Numpy. An OpenCV grayscale image is a two-dimensional array whose pixel values can be accessed using expressions. For example: image[0, 0] can be used to access the unknown pixels at row 0 and column 0 of the image image.
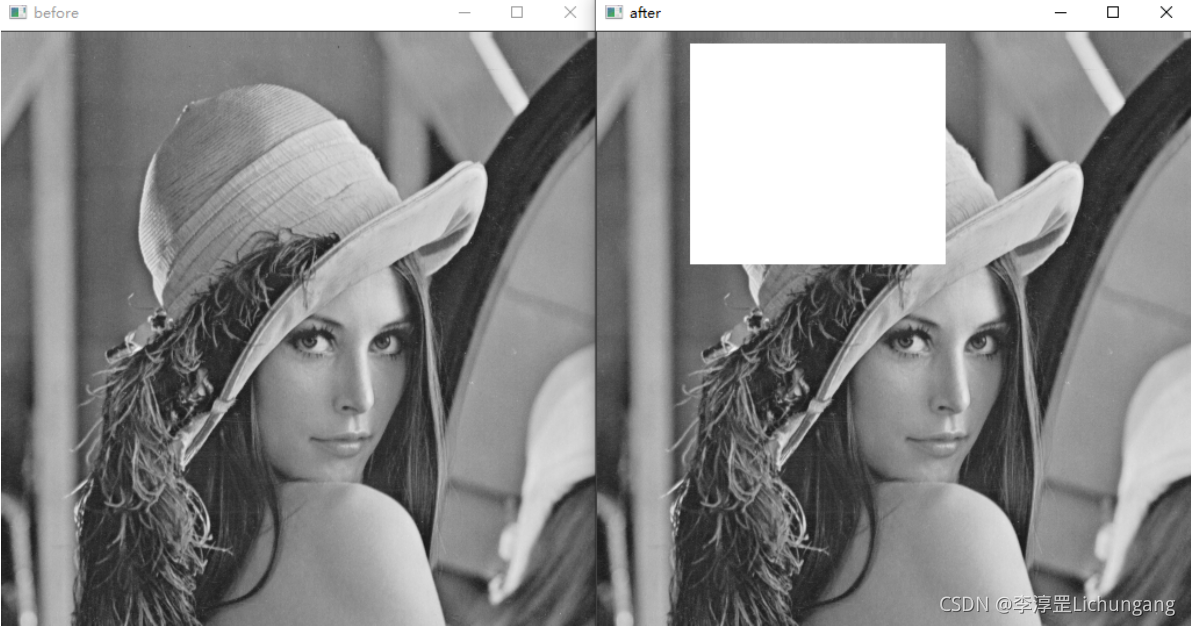
Example: read a grayscale image, and access and modify its pixels:
import cv2
img = cv2.imread('lena.bmp', 0)
cv2.imshow('before', img)
for i in range(10, 100):
    for j in range(80, 100):
        img[i, j] = 255
cv2.imshow('after', img)
cv2.waitKey()
cv2.destroyAllWindows()
2. Color image:
When a color image in RGB mode is read into OpenCV for processing, it will sequentially read the pixels of the B channel, G channel, and R channel of the RGB image in the row direction, and store the pixels in the ndarray column in row units middle. For example, there is a raw RGB image of size R rows by C columns, which is stored in the form of a 3D array in OpenCV underwear BGR mode.
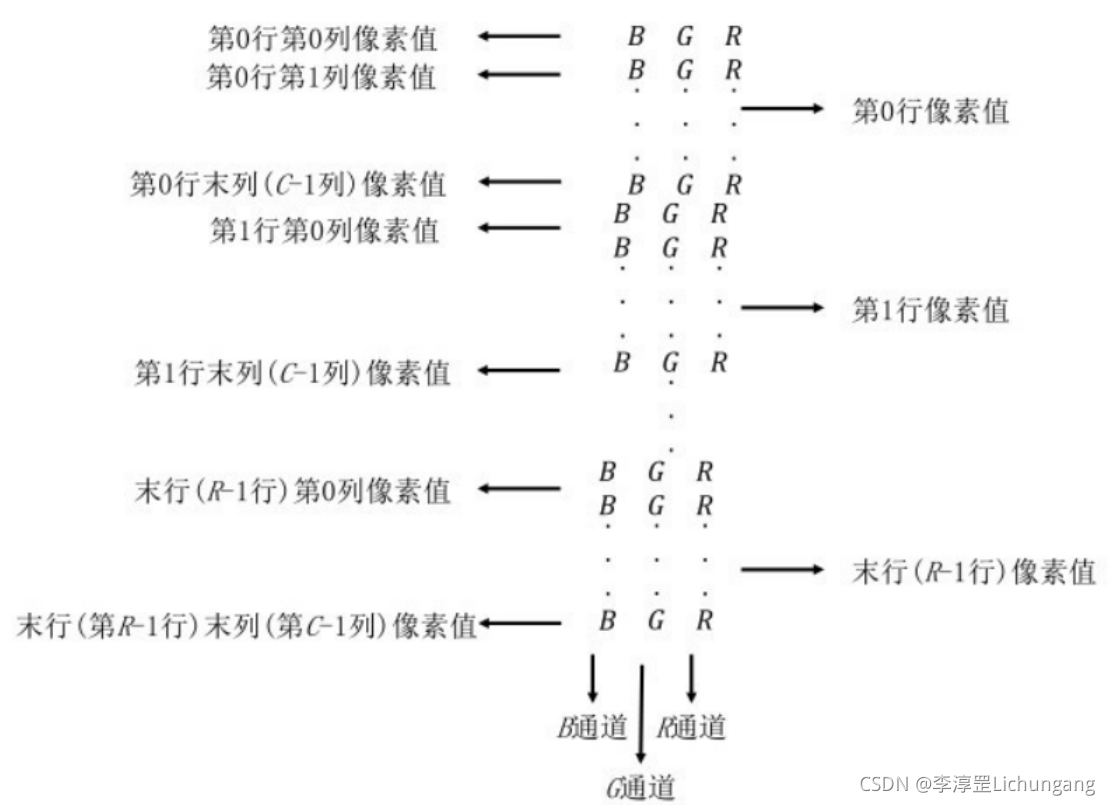
Values inside the array can be accessed using expressions. For example, image[0, 0, 0] can be used to access the B channel of the pixel at row 0, column 0 of the image image.
- The first index represents row 0
- The 2nd index represents column 0
- The 3rd index represents the 0th color channel
Example: read a color image, and access and modify its pixels.
import cv2
img = cv2.imread('lena512color.tiff')
cv2.imshow('before', img)
# 白色
for i in range(0, 50):
    for j in range(0, 100):
        for k in range(0, 3):
            img[i, j, k] = 255
# 灰色
for i in range(50, 100):
    for j in range(0, 100):
        img[i, j] = [128, 128, 128]
# 黑色
for i in range(100, 150):
    for j in range(0, 100):
        img[i, j] = 0
cv2.imshow('after', img)
cv2.waitKey()
cv2.destroyAllWindows()

3. Use numpy.array to access pixels:
numpy.array provides item() and itemset() rows to access and modify pixel values, and these two functions are optimized to greatly improve processing efficiency. When accessing and modifying the value of a pixel, using the functions provided by numpy.array is much faster than using the index directly, and the readability of these two functions is also better.
-
Binary images and grayscale images:
Binary images can be understood as special grayscale images.- item(): access pixels, syntax: item(row, column)
- item(): modify pixel value, syntax: itemset(index value, new value)
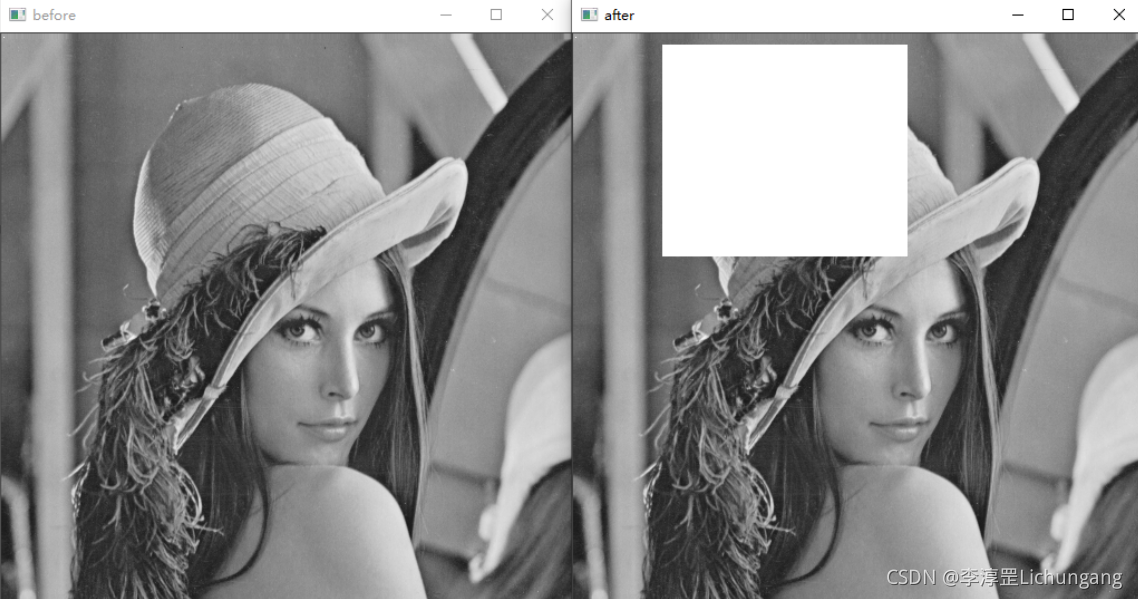
Example: Read a grayscale image, access and modify pixel values.
import cv2
img = cv2.imread('../lena.bmp', 0)
print('读取像素点img.item(3, 2)=', img.item(3, 2))
img.itemset((3, 2), 255)
print('修改后像素点img.item(3, 2)=', img.item(3, 2))
cv2.imshow('before', img)
for i in range(10, 200):
    for j in range(80, 300):
        img.itemset((i, j), 255)
cv2.imshow('after', img)
cv2.waitKey()
cv2.destroyAllWindows()
-
Color image:
-
You can also use the item() function and itemset() function to access and modify the pixel values of color images, the process is similar to the operation of grayscale images. The difference is that channel information needs to be supplemented.
-
item(): Access the pixel value of the EGB mode image. Syntax: item(row, column, channel)
-
itemset(): Modify the RGB mode image pixel value. Syntax: itemset(triple index value, new value)
It should be noted that for the access of RGB images, the row, column and channel must be specified at the same time, such as img.item(a, b, c). It is not possible to specify only rows and columns.
Example: Read a colored image, and perform pixel access and modification on it
import cv2 img = cv2.imread('lena512color.tiff') cv2.imshow('before', img) print('访问img.item(0, 0, 0) = ', img.item(0, 0, 0)) # 白色 for i in range(0, 50): for j in range(0, 100): for k in range(0, 3): img.itemset((i, j, k), 255) cv2.imshow('after', img) print('修改后端img.item(0, 0, 0) = ', img.item(0, 0, 0)) cv2.waitKey() cv2.destroyAllWindows() -
insert image description here
Visit img.item(0, 0, 0) = 125
Modify backend img.item(0, 0, 0) = 255
3. Region of interest (ROI):
During image processing, we may be interested in a specific region of the image, which is called a region of interest (ROI). After setting the region of interest ROI, you can perform overall operations on the region. For example, after an area of interest A is assigned to a variable B, the variable B can be assigned to another area C, so as to achieve the purpose of copying the area A in the area C.
Example 1: Assume that the current image name is img, and the numbers in the figure represent row numbers and column numbers respectively. Then, the black ROI in the image can be expressed as img[200:400, 200:400],
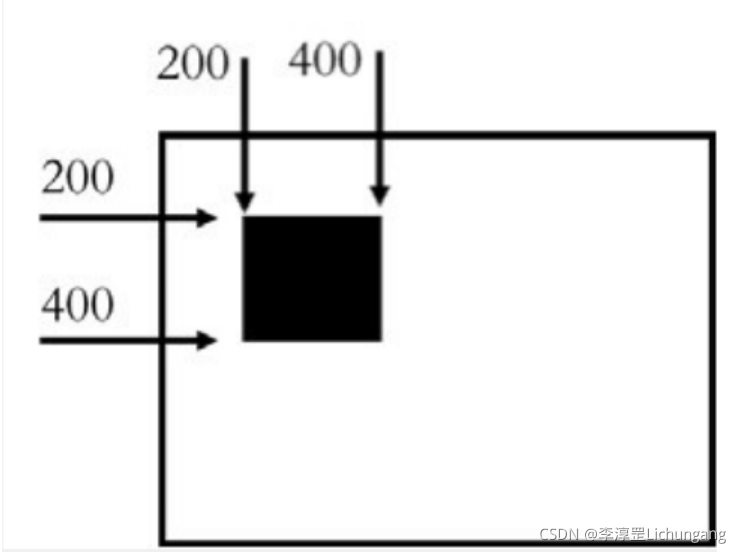
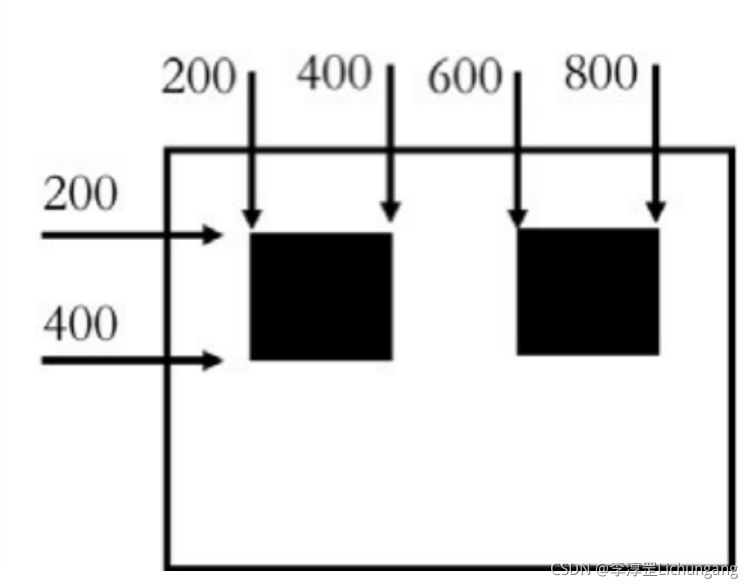
Through the following statement, the black ROI in the figure can be copied to the right side of the area:
a = img[200:400, 200:400]
img[200:400, 600:800] = a
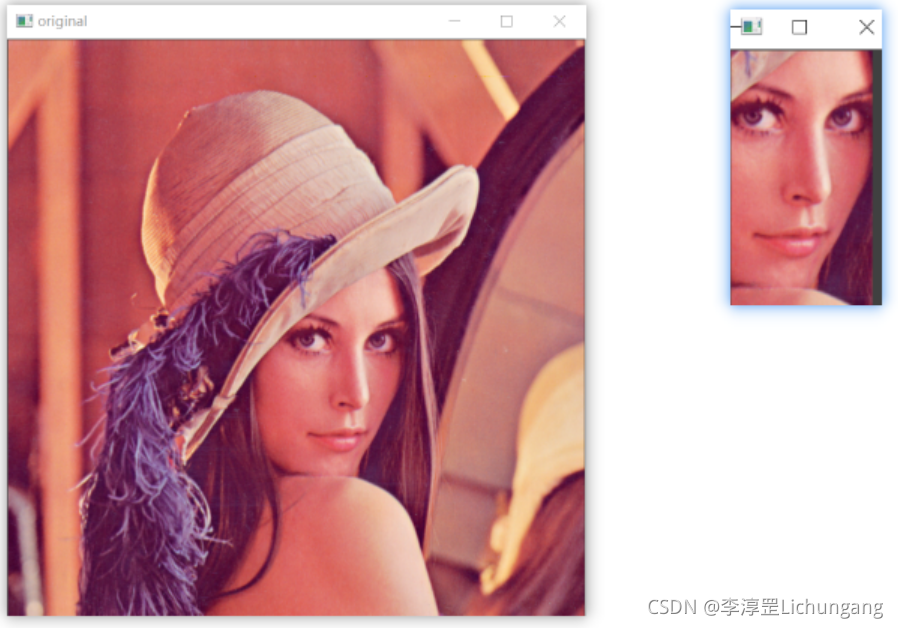
Example 2: Obtain the face information of the image lena and display it.
import cv2
a = cv2.imread('lena512color.tiff', cv2.IMREAD_UNCHANGED)
face = a[220: 400, 250: 350]
cv2.imshow('original', a)
cv2.imshow('face', face)
cv2.waitKey()
cv2.destroyAllWindows()
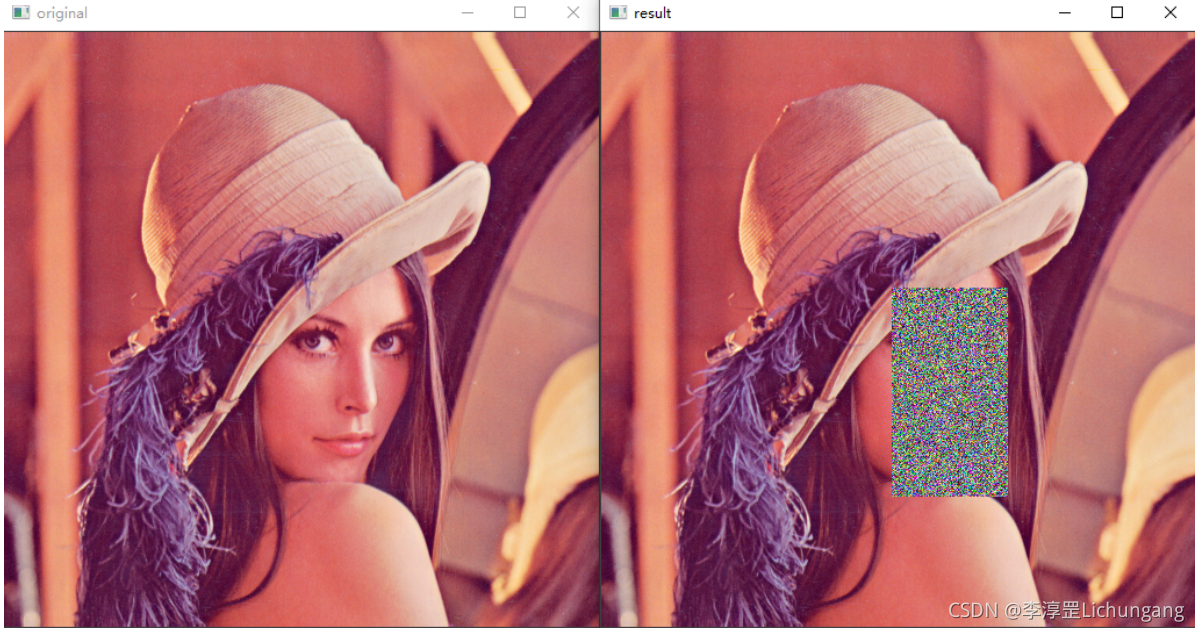
Example 3: Encoding the face of the lena image
import cv2
import numpy as np
a = cv2.imread('../lena512color.tiff', cv2.IMREAD_UNCHANGED)
cv2.imshow('original', a)
face = np.random.randint(0, 256, (180, 100, 3))
a[220: 400, 250: 350] = face
cv2.imshow('result', a)
cv2.waitKey()
cv2.destroyAllWindows()
4. Channel operation:
In an RGB image, the image is composed of three channels: R channel, G channel, and B channel. It should be noted that in OpenCV, channels are stored in the order of B channel-G channel-R channel. During image processing, channel splitting and channel merging can be performed on the image as required.
1. Channel splitting:
For RGB images, the R channel, G channel, and B channel can be split separately. In OpenCV, channels can be split either by index or by function.
-
Split channels by index:
Through indexing, each channel can be directly extracted from the image. For example: for the BGR image img in OpneCV
- b = img[ : , : , 0]
- g = img[ : , : , 1]
- r = img[ : , : , 2]
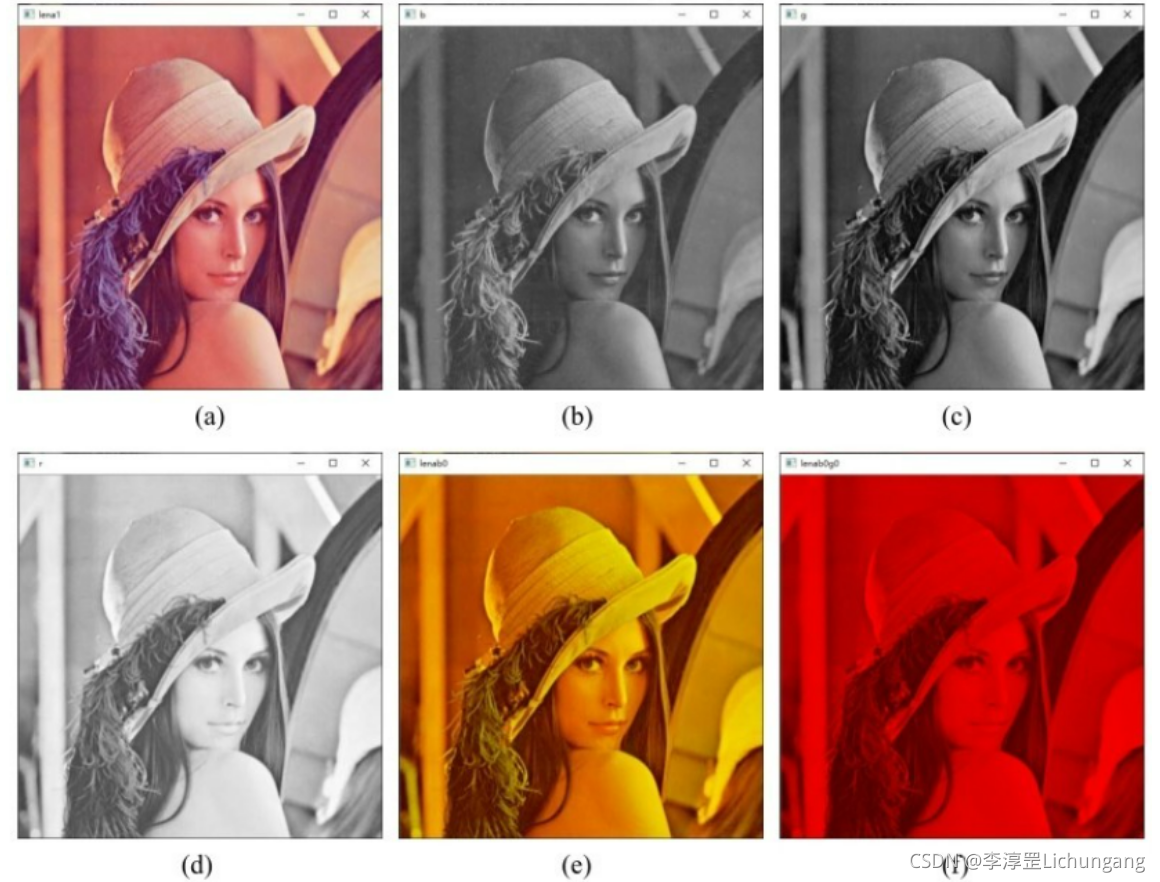
Example: Write a program to demonstrate the effect of image channel division and channel value transformation on color images.
import cv2
lena = cv2.imread('lena512color.tiff')
cv2.imshow('lena1', lena)
b = lena[:, :, 0]
g = lena[:, :, 1]
r = lena[:, :, 2]
cv2.imshow('b', b)
cv2.imshow('g', g)
cv2.imshow('r', r)
lena[:, :, 0] = 0
cv2.imshow('lenab0', lena)
lena[:, :, 1] = 0
cv2.imshow('lenabogo', lena)
cv2.waitKey()
cv2.destroyAllWindows()
-
Split channels by function:
The function cv2.split() is able to split the channels of an image. For example, the following statement can be used to split the color BGR image img to obtain the B, G, and R channels of the image.
-
b, g, r = cv2.split(img)
b = cv2.split(img)[0]
g = cv2.split(img)[1]
r = cv2.split(img)[2]
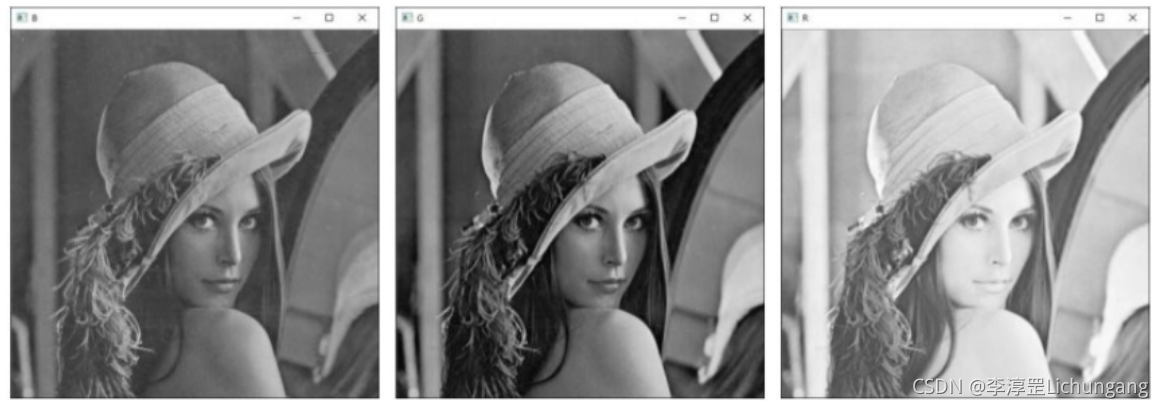
Example: splitting image channels using the function cv2.split()
import cv2 lena = cv2.imread('../lena512color.tiff') b, g, r = cv2.split(lena) cv2.imshow('B', b) cv2.imshow('G', g) cv2.imshow('R', r) cv2.waitKey() cv2.destroyAllWindows() -
2. Channel merging:
Channel merging is the inverse process of channel splitting. By merging channels, grayscale images of three channels can be combined into a color image. The function cv2.merge() can realize the merging of image channels. If there are B, G, R three-channel images, use the function cv2.merge() to merge them into a BGR three-channel color image. The implementation statement is: bgr_img = cv2.merge([b, g, r])
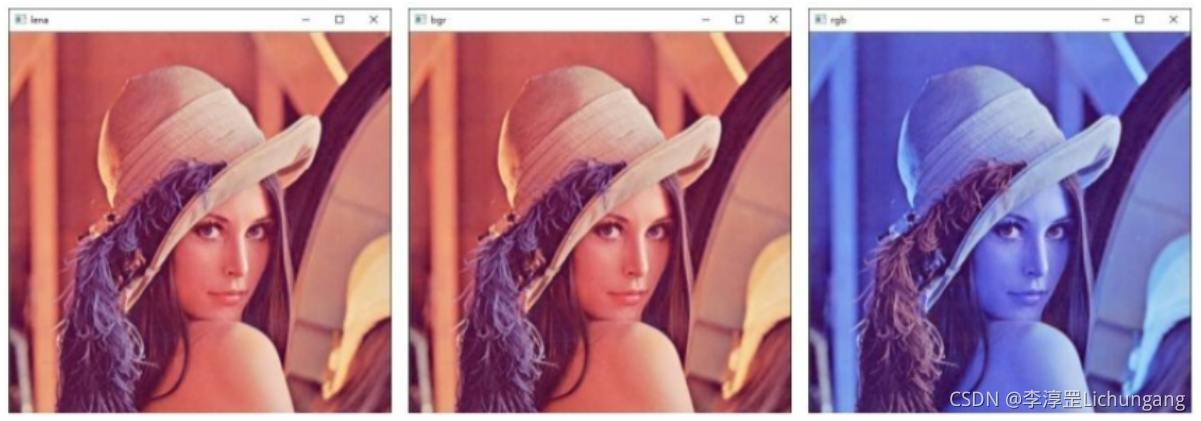
Example: Merge channels using the function cv2.merge().
import cv2
lena = cv2.imread('../lena512color.tiff')
b, g, r = cv2.split(lena)
bgr = cv2.merge([b, g, r])
rgb = cv2.merge([r, g, b])
cv2.imshow('lena', lena)
cv2.imshow('bar', bgr)
cv2.imshow('rgb', rgb)
cv2.waitKey()
cv2.destroyAllWindows()
5. Get image properties:
In the process of image processing, it is often necessary to obtain the attributes of the image, such as the size and type of the image. Here are a few commonly used properties
- shape: If it is a color image, an array containing the number of rows, columns, and channels will be returned; if it is a binary image or a grayscale image, only the number of rows and columns will be returned. Whether the return value of this property contains the number of channels can determine whether the image is a grayscale image or a color image.
- size: Returns the number of pixels of the image. Its value is "number of rows × number of columns × number of channels", and the number of channels for grayscale images and binary images is 1
- dtype: the data type of the returned image
Example:
import cv2
gray = cv2.imread('../lena.bmp', 0)
color = cv2.imread('../lena512color.tiff')
print('图像gray属性')
print('gray.shape=', gray.shape)
print('gray.size=', gray.size)
print('gray.dtype=', gray.dtype)
print('图像color属性')
print('color.shape=', color.shape)
print('color.size=', color.size)
print('color.dtype=', color.dtype)
-
Terminal output:
Image gray attribute
gray.shape= (512, 512)
gray.size= 262144
gray.dtype= uint8
Image color attribute
color.shape= (512, 512, 3)
color.size= 786432
color.dtype= uint8
The content of this article is summarized from the book "OpenCV Easy Getting Started", and you can refer to this book for details.