This article follows the previous article "Linux Basic Tutorial (Part 1)", welcome to bookmark.
4 Commonly used basic commands in Linux
When Linux first came out, there was no graphical interface, and all operations were completed by commands, such as disk operations, file access, directory operations, process management, file permission settings, etc. In the workplace, a large number of server maintenance work is done remotely through SSH It is done by the client, and there is no graphical interface, and all maintenance work needs to be done through commands. Some commonly used commands in Linux:
| Order |
Corresponding to English |
effect |
|---|---|---|
| ls |
list |
View the contents of the current directory |
| pwd |
print working derectory |
View current folder |
| cd [directory name] |
change directory |
switch folder |
| touch [filename] |
touch |
If the file does not exist, create a new file |
| mkdir [directory name] |
make directory |
Create a directory |
| rm [filename] |
remove |
delete the specified filename |
| clear |
clear |
clear screen |
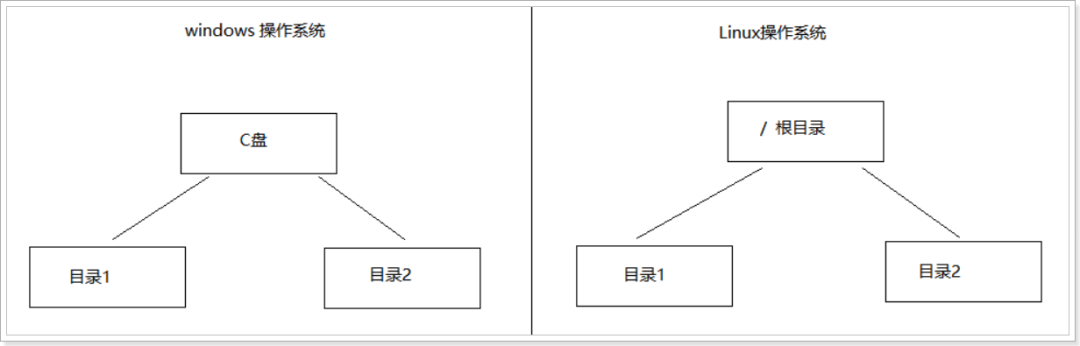
Linux file system directory tree
The windows system can have multiple drive letters, such as C drive, D drive, and E drive.
Linux does not have the concept of a drive letter. There is only one root directory /, and all files are under it:
Linux main directory:
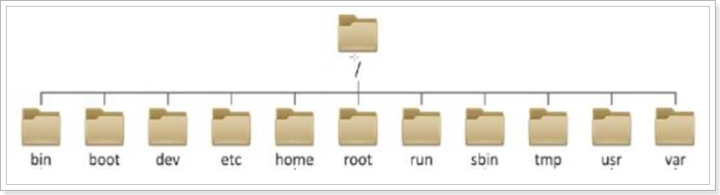
/bin: directory where binary commands are located
/boot : The file directory required by the system boot program, booting the system to boot
/dev : Device software directory, disk, CD-ROM drive,
/etc: system configuration, startup programs
/home: The home of ordinary users, the default data storage directory of the directory
/lib: Storage of shared library files and kernel modules required to start the system and run commands
/mnt: the mount point for temporarily mounting the storage device,
/proc: When the operating system is running, process information and kernel information are stored here
/root: The home directory of the Linux super-authority user root
/sbin: commands related to the management system, [for super administrators]
/tmp: Temporary file directory, this directory is used as a recycle bin
/usr: user or system software application directory
/var: directory for storing system logs
Note: Generally, do not operate directories and files not created by yourself, otherwise the server may crash.
1 Command help manual
Because there are many options for a command, rote memorization will definitely not work, so you need to refer to the manual.
Online manual: https://www.runoob.com/linux/linux-command-manual.html
1.1 help command
Command format: command --help
Example: ls --help
Description: Display the help information of the command command
Disadvantages: Although you can query the help information of the command, it does not provide page turning and search functions.
1.2 man command
Command format: man command
Example: man ls
Explanation: The abbreviation of manual when querying the user manual of the command command is a manual provided by Linux, which contains detailed instructions for most commands and functions.
Operation keys when using man:
| operation key |
Function |
|---|---|
| space bar |
Display the next screen of the manual |
| Enter key |
Scrolling the home page at a time also takes one line |
| b |
scroll back one screen |
| f |
Scroll forward one screen |
| q (quit) |
quit |
| /word |
search word string |
| n(next) |
search next |
| N |
search previous |
2 Common commands for files and directories
Goal: Learn to master the following commands
-
View directory contents: ls
-
Switch directory: cd
-
Create and delete operations: touch, rm, mkdir
-
Copy and move files: cp, mv
-
View file content: cat, less, tail, head, grep
-
Miscellaneous: echo, redirect > and >>, pipe |
2.1. View the content of the directory
2.1.1. Terminal usage skills
A. Auto-completion
-
After typing the first few letters of the file/directory/command, press the tab key
-
If there are other files/directories/commands, press the tab key again, the system will prompt the possible commands
B. Commands that have been used
-
Use the up/down cursor keys to switch back and forth between previously used commands
-
If you want to exit the selection and do not want to execute the currently selected command, you can press ctrl + c
2.1.2, ls command description
ls is an abbreviation of the English word list. Its function is to list the contents of the directory. It is one of the most commonly used commands for users. Because you need to edit files on the server, you need to confirm whether there are files and directories under Linux in the specified directory. Features:
-
The linux file or directory name can be up to 256 characters
-
Files beginning with . are hidden files, which need to be displayed with the -a parameter
-
. represents the current directory
-
.. represents the parent directory
case:
1 Create file 01.txt
2 Create hidden file 02.txt
3 List hidden and non-hidden files
2.1.3, common options of ls command
If you only use the ls command, you can only see non-hidden files in the current directory.
If you want to enhance the function, you need to learn more options
| options |
English |
meaning |
|---|---|---|
| -a |
all |
Display all subdirectories and files in the specified directory, including hidden files |
| -l |
Display file details in a list |
|
| -h |
human-readable |
Use -l to display file sizes in a human-friendly way |
case:
1 Switch to /usr/tmp to clear the content
2 Create a hidden file non-hidden file directory
3 View the contents of the current directory (disadvantages: hidden files cannot be seen)
4 View all contents of the current directory (both hidden and non-hidden)
5 View the detailed information of the directory content (view file type, permissions, size, etc. Disadvantages: file size has no unit)
6 Simplify the merge to view the details of the directory content (to display the file size)
The command is as follows:

2.1.4, the use of wildcards in the ls command
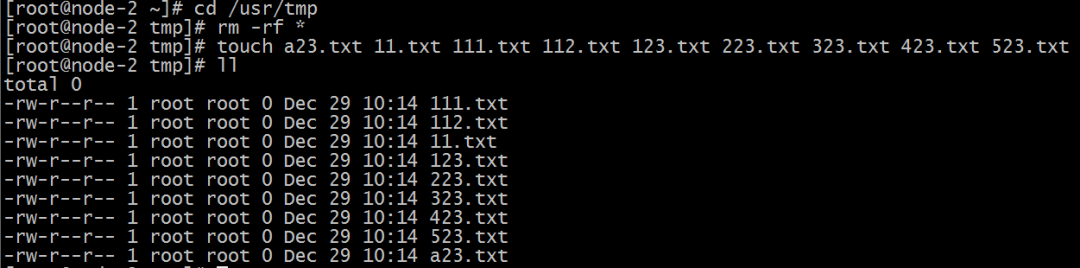
Preparation
# Switch to the temporary directory (use first, explain later)
cd /usr/tmp
# Clear directory content (use first, explain later)
rm -rf *
# Create a file
touch a23.txt 11.txt 111.txt 112.txt 123.txt 223.txt 323.txt 423.txt 523.txt
# View directory content
ls
code show as below
| wildcard |
meaning |
|---|---|
| * |
represent any number of characters |
| ? |
Represents any character, and can only be one |
| [abc] |
Match any of a, b, c |
| [a-f] |
Matches any character from a to f |
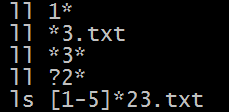
case:
1 View files or directories starting with 1
2 View files or directories ending with 3.txt
3 View the list of files containing 3
4 View files whose second character is 2
5 View the directory or file name whose first character is 1 to 5 and ends with 23.txt
2.2. Switch directory
2.2.1, cd command
cd is the abbreviation of the English word change directory, its function is to change the current working directory, and it is also one of the most commonly used commands by users
Note: All directory and file names in linux are case sensitive
| Order |
meaning |
|---|---|
| cd directory |
Switch to the specified directory |
| cd .. |
Switch to parent directory |
| cd - |
You can switch between the last two directories |
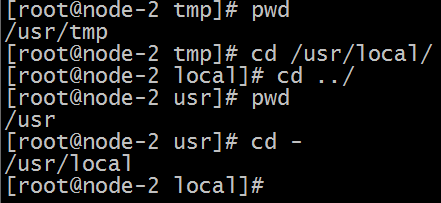
Requirements: 1 View the current directory
2 switch to /usr/local
3 Switch to the upper directory /usr
4 Go back to the last accessed directory and the code is as follows:
2.2.2, relative path and absolute path
2.2.2.1, relative path
Features: When entering a path relative to the path, the first part does not start with "/", which means relative to the location of the current directory
Disadvantages: The relative path will also change when the reference working directory changes
Demo case:
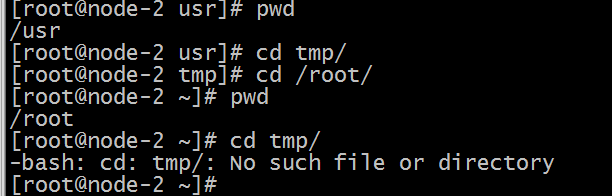
Requirement 1: The current working directory is /usr, use the relative path to switch to the /usr/tmp directory
Requirement 2: The current working directory is /root, use the relative path to switch to the /usr/tmp directory
When in the root directory, the relative path cannot be used to switch to the /usr/tmp directory
code show as below:
2.2.2.2. Absolute path
Features: Absolute path When entering the path, the front is /, indicating the specific directory location starting from the root directory
Advantages: accurate positioning, will not change due to changes in the working directory
Demo case:
Requirement 1: The current working directory is /usr, use the absolute path to switch to the /usr/tmp directory
Requirement 2: The current working directory is /root, use the absolute path to switch to the /usr/tmp directory
summary:
Relative path When entering the path, it does not start with / at the beginning, which means relative to the directory where the current directory is located
Absolute path When entering the path, start with / at the beginning, indicating the specific directory location starting from the root directory
2.3, create and delete operations
2.3.1. Create file
Command format: touch file
case:
Step 1: Create a blank file
touch file that does not exist
Step Two: Change the Last Modified Date of the File
touch existing files
summary:
Create a file and modify the last access time of a file by touching the file name
2.3.2. Create directory
Command format: mkdir file directory
case:
Step 1: Create a directory with no hierarchical relationship (single-level directory)
mkdir directory name
Step 2: Create a directory with a hierarchical relationship (create a multi-level directory)
mkdir -p directory 1/directory 2/directory 3
mkdir command options:
| options |
English |
meaning |
|---|---|---|
| -p |
parent |
Can create directories recursively |
2.3.3. Delete files or directories
Realize the function of deleting files and directories through the rm -rf file/directory command
The English corresponding to rm is remove meaning: delete
Case 1: Delete file (with prompt)
rm file
Case 2: Delete file (cancel prompt)
rm -f file
| parameter |
English |
meaning |
|---|---|---|
| -f |
force |
Force delete, ignore non-existing files, without prompting |
Case 3: Delete directory rm -rf directory
| parameter |
English |
meaning |
|---|---|---|
| -r |
recursive |
Recursively delete the contents of the directory, this parameter must be added when deleting the folder |
Case 4: rm combined with wildcards
Commonly used wildcards: ?[abc][az]
rm -rf .txt
Summary: The function of deleting files or directories is completed through rm -rf files/directories.
NOTE: Be careful with the rm command, as files cannot be recovered after deletion
Remember: In enterprise development, you only delete files you create
2.4, copy and move files
| Order |
Corresponding to English |
effect |
|---|---|---|
| tree [directory name] |
tree |
List the contents of a directory in a tree view |
| cp source file object file |
copy |
Copy a file or directory |
| mv source file destination file |
move |
Move or rename a file or directory |
2.4.1, tree command
The file directory structure can be listed in a tree diagram through the tree command
Preparation:
Create a directory
mkdir -p /export/aaa/bbb/ccc
Create a file
touch /export/aaa/01.txt /export/aaa/02.txt
touch /export/aaa/bbb/03.txt /export/aaa/bbb/04.txt
touch /export/aaa/bbb/ccc/05.txt /export/aaa/bbb/ccc/06.txt
Case 1: Display files and directories in a directory in a tree structure
If a directory is specified, the contents of the specified directory are displayed
如果不指定目录,就显示当前目录的内容
tree [目录]
提示:默认没有安装tree时,需要联网安装
安装 tree组件
yum -y install tree
卸载 tree组件
yum -y remove tree
案例2:只显示当前目录中的文件夹(目录)
tree -d [目录]
| 选项 |
英文 |
含义 |
|---|---|---|
| -d |
derictory (目录) |
只显示目录, 不显示文件 |
案例3:显示指定的两层
tree -L n [目录]
| 选项 |
英文 |
含义 |
|---|---|---|
| -L |
level (层级) |
显示几层目录 |
2.4.2、cp命令(拷贝)
通过 cp 实现复制将指定的 文件 或 目录 复制到 两一个 文件 或 目录中
案例1: 备份指定文件
cp 文件1 备份文件名
使用场景:当需要对服务器中的相关配置文件进行修改时,或其他软件中的配置文件进行修改时(例:mysql):建议先对要修改的配置文件进行:cp操作 备份操作
案例2: 将文件复制到目录中
cp 文件1 目录/
案例3: 将文件复制到另一个文件中, 实现覆盖效果
cp 文件1 文件2(存在的)
案例4: 复制目录 到指定 目录中
cp -r 目录1/ 目录2/
| 命令 |
英文 |
作用 |
|---|---|---|
| -r |
recursive (递归) |
递归复制目标目录的内容 |
小结: cp命令的功能是将给出的 文件 或 目录 复制到另一个 文件 或 目录中
2.4.3、mv命令(移动)
通过mv 命令可以用来 移动 文件 或 目录, 也可以给 文件或目录重命名
案例1: 将文件 移动 另一个目录中
mv 文件 目录/
案例2: 重命名
mv 旧文件名 新文件名
案例3: 将目录移动到 另一个目录中
mv 被移动目录 目标目录
2.5、查看文件内容
| 命令 |
对应英文 |
作用 |
|---|---|---|
| cat 文件名(小文件) |
concatenate |
查看小文件内容 |
| less -N 文件名 |
less |
分屏 显示大文件内容 |
| head -n 文件名 |
查看文件的前一部分 |
|
| tail -n 文件名 |
查看文件的最后部分 |
|
| grep 关键字 文件名 |
grep |
根据关键词, 搜索文本文件内容 |
准备工作:
清空指定目录内容
cd /export/
rm -rf *
复制 /etc/passwd 文件 到 /export/ 目录中
cp /etc/passwd /export/
复制 /etc/profile 文件 到 /export/ 目录中
cp /etc/profile /export/
罗列目录中内容
tree /export
2.5.1、cat命令
通过 cat 会一次显示所有的内容, 适合 查看内容较少 的文本文件
案例1: 显示文件内容
cat 文件名
案例2: 显示文件内容(显示行号 包含空行)
cat -n 文件名
| 参数 |
英文 |
含义 |
|---|---|---|
| -n |
number |
显示行号 |
缺点: 空行也显示行号
案例3: 显示文件内容(显示行号 排除空行)
cat -b 文件名
| 参数 |
英文 |
含义 |
|---|---|---|
| -b |
number-nonblank |
非空行 显示行号 |
扩展:nl 文件名 也可以实现 非空行显示行号的效果
| 命令 |
英文 |
含义 |
|---|---|---|
| nl 文件 |
number lines of files |
查看文件内容 且 非空行显示行号 |
小结: 通过 cat 文件名 查看小文件内容
2.5.2、less命令
-
通过 less [参数] 文件名 命令可以用于分屏显示文件内容, 每次只显示一页内容
-
less 命令适合查看 内容较多 的文本文件
准备工作:
>> 重定向这个命令, 为了课程需要 我们先用, 后面我们会讲
将文件 /etc/profile 的内容 追加到 /export/01.txt目录中
cat /etc/profile >> /export/01.txt
cat /etc/profile >> /export/01.txt
cat /etc/profile >> /export/01.txt
cat /etc/profile >> /export/01.txt
cat /etc/profile >> /export/01.txt
案例1 : 分屏显示文件内容 less -N 文件名 ###分屏展示文件内容,适合大文件
| 参数 |
英文 |
含义 |
|---|---|---|
| -N |
number |
显示文件内容 且 显示行号 |
使用 less 的操作键:
| 操作键 |
功能 |
|---|---|
| 空格键 |
显示下一屏幕 |
| Enter 键 |
一次滚动一行 |
| b |
回滚一屏 |
| f |
向前一屏 |
| q |
退出 |
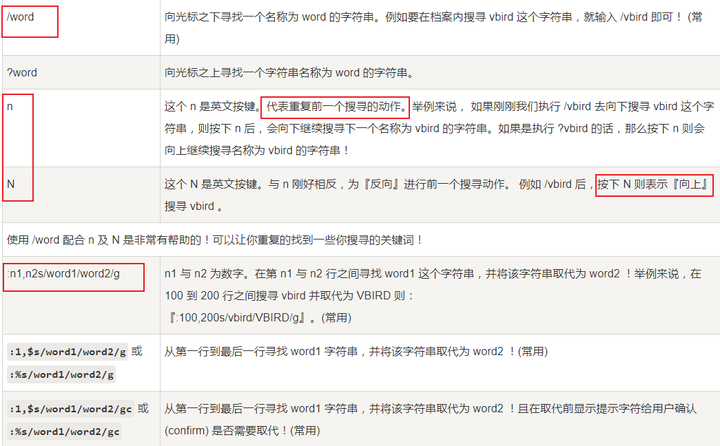
| /word |
搜索word字符串 |
案例2 : 根据关键词搜索内容
根据关键词搜索
/word
| 操作键 |
功能 |
|---|---|
| n |
向下找 |
| N |
向上找 |
小结:针对 linux中的文本文件信息,可以使用cat或less进行查看
通常cat适用于文本内容比较少的情况下 命令:cat 文件名 cat -n 文件名 nl 文件名
less适用文本内容比较多的情况 命令:less -N 文件名
常用操作:
f 下一页
b 上一页
q 退出
/检查的关键字 搜索文本中的关键字
n:向下继续检索
N:向上检索
2.5.3、head命令
通过 head 命令查看文档的前几行内容
准备工作:
# 准备一个26个字母的文件,上传到 /export/ 目录下
案例1: 查看文件的前5行内容
head -n 数字 文件
| 参数 |
英文 |
含义 |
|---|---|---|
| -n |
number |
表示显示前几行内容 |
2.5.4、tail命令
tail命令用来查看文档(日志)的后几行内容
案例1: 查看文档的最后10行内容
tail -10 文件
案例2: 动态显示文档的最后内容,一般用来查看日志
tail -f 文件名
使用场景:在开发中当某个服务启动后,需要监控该服务中的相关参数信息时,会查看服务的日志文件信息
在开发中,通常会把一些日志信息,写入到一个log文件中。当遇到一些bug时,需要对当前的log文件进行日志的监控或查看。会使用:tail -f log日志文件 监控日志中输出的信息,从而来排查bug
案例3: 动态显示文档的最后10行内容
tail -100f 文件名
小结:
通过
head 命令查看文档的前几行内容
head -n 数值 文件名 --查看文件的前n行信息
通过
tail -10f 文件 命令 查看文档(日志)的后几行内容
tail -数值 文件名 --查看文件的后n行信息
tail -f 文件名 --动态的查看文件中的信息 (会一直滚屏)
2.6、其他命令
2.6.1、管道 |
通过 命令1 | 命令2 可以将命令1的结果 通过 命令2 作进一步的处理
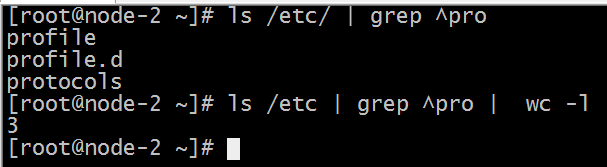
案例1 : 过滤 /etc/ 目录下 以 pro 开头的文件
ls /etc/ | grep ^pro
案例2 : 搜索 存在关键字 的行数
ls /etc | grep ^pro | wc -l
命令:wc[参数] [文件] ###打印文件的行数, 单词数, 字节数
参数:-l ###显示行数
小结: 管道符:|
作用:把执行的第一个命令结果,放入到管道中,用来执行第二个命令
例:ls /etc | grep ^pro
第一个命令:查看/etc下所有的文件或目录
第一个命令执行结果:/etc下所有的文件和目录
第二个命令:grep ^pro 搜索以pro开头的文件或目录 第二个命令执行结果:把/etc下所有的文件或目录中,以pro开头检索出来
2.6.2、echo命令
echo string 将字符串输出到控制台 , 通常会和 重定向 联合使用
演示案例:
echo hello
# 如果字符串有空格, 为了避免歧义 请增加 双引号 或者 单引号
echo "hello world"
2.6.3、重定向 >(覆盖)和>>(追加)
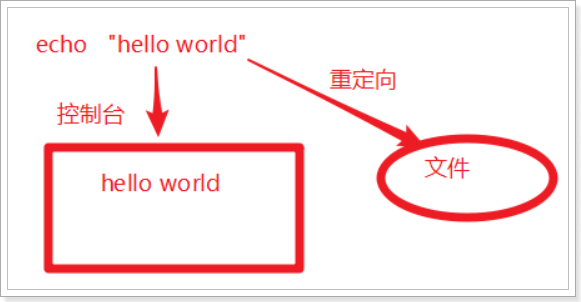
默认情况下linux执行命令后,命令的结果会输出到控制台
通过 重定向 可以将结果 输出到文件
案例1: 将 命令的成功结果 覆盖 指定文件内容
echo 2222 > 01.txt
| 命令 |
作用 |
|---|---|
| 结果 > 文件名 |
> 表示输出, 会覆盖文件的原有内容 |
案例2: 将 命令的成功结果 追加 指定文件的后面
echo 3333333 >> 01.txt
| 命令 |
作用 |
|---|---|
| 命令 >> 文件名 |
>> 表示追加, 会将内容追加到已有文件的末尾 |
案例3: 将 命令的失败结果 追加 指定文件的后面
cat 不存在的目录 &>> error.log
| 命令 |
作用 |
|---|---|
| 命令 &>> 文件 |
&>> 表示不区分错误类型 通通放到 日志中 |
小结:通过 命令 > 文件 将命令的成功结果 覆盖 指定文件内容
通过 命令 >> 文件 将命令的成功结果 追加 指定文件的后面
通过 命令 &>> 文件 将 命令的失败结果 追加 指定文件的后面
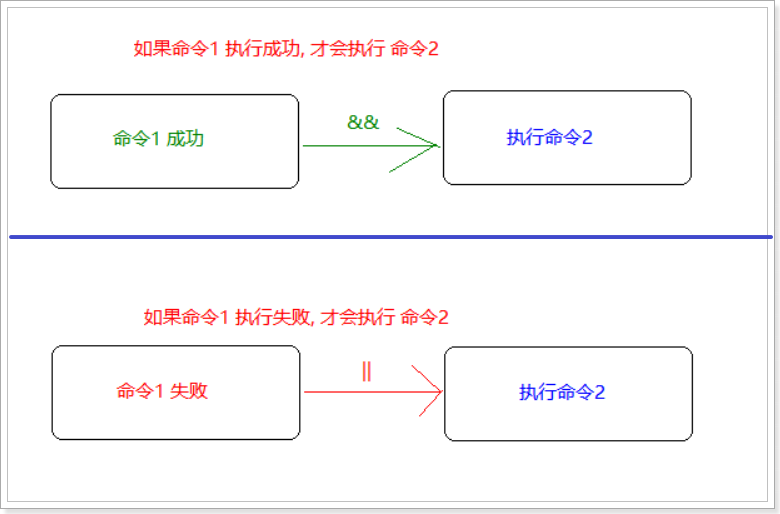
2.6.4、&&和||
案例1:如果创建目录成功, 就提示创建成功
| 命令 |
作用 |
|---|---|
| 命令1 && 命令2 |
如果 命令1执行成功了, 才执行 命令2 |
mkdir -p 正确目录 && echo "提示创建目录成功
案例2:如果创建目录失败, 就提示创建失败
| 命令 |
作用 |
|---|---|
| 命令1 || 命令2 |
如果 命令1 执行失败了, 才执行 命令2 |
mkdir 错误目录 || echo "提示创建目录失败"
练习:
1 如果创建目录成功, 就切换到指定目录
2 如果创建文件成功, 就罗列新建文件 所在目录的内容
2.6.5、软链接(创建快捷方式)

软链接也叫符号链接,相当于windows的快捷方式。主要使用场景:当文件存储的目录比较深时,为了快速的去访问藏的比较深的文件,可以给这类文件创建一个访问的快捷方式。
软链接类似一个文本文件,里面存放的是源文件的路径,指向源文件实体。删除源文件,软链接文件依然存放,但是无法访问指向的源文件路径内容了。失效的时候一般是红字白底闪烁提示。
命令格式:ln -s /源文件的绝对路径 快捷方式的访问路径
| 命令 |
英文 |
作用 |
|---|---|---|
| ln -s 目标文件绝对路径 快捷方式路径 |
link |
给目标文件增加一个软链接, 通俗讲就是快捷方式 |
小结: 注意: 必须 增加 -s , 否则 就变成了 硬链接。
硬链接的作用之一是允许一个文件拥有多个有效路径名,这样用户就可以建立硬链接到重要的文件,以防止“误删”源数据。
之所以文件建立了硬链接就会防止数据误删,是因为文件系统的原理是,只要文件的索引节点还有一个以上的链接(仅删除了该文件的指向),只删除其中一个链接并不影响索引节点本身和其他的链接(数据的实体并未删除),只有当最后一个链接被删除后,此时如果有新数据要存储到磁盘上,被删除的文件的数据块及目录的链接才会被释放,空间被新数据暂用覆盖。
4.3 Linux搜索命令
3.1、find搜索
find是linux中最常见的搜索命令。
find命令在linux系统的整个目录结构中搜索文件,并对搜索结果执行指定的操作。find的使用格式如下:
find <指定目录> <指定条件> <指定动作>
- <指定目录>:所要搜索的目录及其所有子目录。默认为当前目录
- <指定条件>:所要搜索的文件的特征
- <指定动作>:对搜索结果进行特定的处理
如果什么参数也不加,find默认搜索当前目录及其子目录,并且不过滤任何结果(也就是返回所有文件),将它们全都显示在屏幕上。
3.1.1、find命令基本应用
通过find命令 在特定目录下(包含它的后代目录) 搜索符合条件的文件。
find命令的基本使用格式:
| 命令格式 |
作用 |
|---|---|
| find [路径] -name '*.txt' |
查找指定路径下扩展名是 .txt的文件, 包括子目录 |
说明:1、如果省略路径, 表示在当前文件夹下查找
2、之前学习的通配符, 在使用find命令时同时可用
准备工作
# 切换目录到 /root/test_tar/
mkdir /root/test_tar cd test_find/
# 新增目录 且 切换目录 且 新增文件
mkdir -p aaa/bbb/ccc/ddd/eee/ touch aaa/bbb/ccc/ddd/eee/abc.txt touch aaa/123.txt touch aaa/312.txt
# 查看 /root/test_tar 目录中的内容
tree /root/test_tar
案例1: 搜索指定目录下, 文件是 abc.txt的文件
# ===================实现目标============================
# 方式一: 指定全目录
find /root/test_tar/ -name 'abc.txt'
# 方式二: 当前目录
find . -name 'abc.txt'
# 方式三: 当前目录 可以 省略 不写
find -name 'abc.txt'
案例2: 搜索指定目录下, 文件名 包含 1 的文件
# =================准备工作===============
# 创建测试文件
touch /root/test_tar/12.txt /root/test_tar/616.txt /root/test_tar/321.txt
# =================实现目录===============
find /root/test_tar/ -name "1"

案例3: 搜索指定目录下,所有以.txt 为扩展名的文件
find /root/test_tar/ -name "*.txt"
案例4: 搜索指定目录下, 以数字1开头的文件
find /root/test_tar -name "1*"

3.1.2、find扩展实例
find命令的基本格式:find 目录 -name ‘.txt’
find . -name ".log" -ls 在当前目录查找以.log 结尾的文件, 并显示详细信息。
find /root/ -perm 777 查找/root/目录下权限为 777 的文件
find . -type f -name "*.log" 查找当目录,以.log 结尾的普通文件
find . -type d | sort 查找当前所有目录并排序
find . -size +100M 查找当前目录大于 100M 的文件
3.2、grep命令
grep 命令是一种强大的文本搜索工具,它能使用正则表达式搜索文本,并把匹配的行打印出来
使用实例:
ps -ef | grep sshd 查找指定 ssh 服务进程
ps -ef | grep sshd | grep -v grep 查找指定服务进程,排除 gerp 本身
ps -ef | grep sshd -c 查找指定进程个数
cat a.txt | grep -f b.txt 从文件中读取关键词进行搜索 输出 a.txt 文件中含有从 b.txt 文件中读取出的关键词的内容行
cat a.txt | grep -nf b.txt 从文件中读取关键词进行搜索, 显示行号
grep -n 'linux' test.txt 从文件中查找关键词,并显示行号
cat test.txt | grep ^u 找出以 u 开头的行内容
cat test.txt |grep ^[^u] 输出非 u 开头的行内容
cat test.txt |grep hat$ 输出以 hat 结尾的行内容
cat test.txt | grep -E "ed|at" 显示包含 ed 或者 at 字符的内容行
3.3、locate命令
locate命令其实是“find -name”的另一种写法,但是要比后者快得多,原因在于它不搜索具体目录,而是搜索一个数据库(/var/lib/locatedb),这个数据库中含有本地所有文件信息。Linux系统自动创建这个数据库,并且每天自动更新一次,所以使用locate命令查不到最新变动过的文件。为了避免这种情况,可以在使用locate之前,先使用updatedb命令,手动更新数据库。
如果是精简版 CentOS 系统需要安装 locate 命令
yum -y install mlocate
updatedb 命令来创建 locate 命令依赖的数据库
updatedb
使用实例:
locate /etc/sh 搜索 etc 目录下所有以 sh 开头的文件
locate pwd 查找和 pwd 相关的所有文件
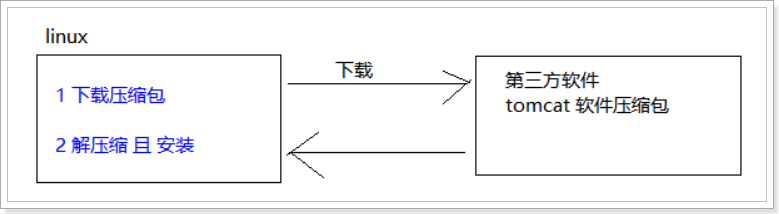
4.4 解压缩命令
解压缩命令能做什么呢?
1、从第三方下载软件压缩包, 解压缩后安装软件到服务器上;
2、通过打包压缩备份文件
4.1、打包和解包
准备工作
# 清空指定目录内容
mkdir /root/test_tar cd /root/test_tar/ && rm -rf *
# 创建测试文件
touch 1.txt 2.txt 3.txt
# 创建有内容的测试目录
mkdir -p /root/test_tar/aaa/ touch /root/test_tar/aaa/4.txt /root/test_tar/aaa/5.txt
# 查看结果
tree /root/test_tar
4.1.1、打包
生活中的事例:将冬天的衣服放到袋中
在linux中可以把多个文件打包成为一个大文件,且打包后的文件需要以 .tar 结尾
tar 是linux中打包命令
# 将 一系列文件 打包成 一个大文件
tar -cvf 打包名.tar 被打包的目录 tar -cvf 打包名.tar 被打包的文件1 被打包的文件2 被打包的文件3
tar 选项说明
| 命令 |
英文 |
含义 |
|---|---|---|
| c |
create |
生成档案文件, 创建打包文件 |
| v |
verbosely(啰嗦的) |
像 '唐僧' 一样报告进度 |
| f |
file |
指定档案的文件名称, f后面一定是 .tar 文件, 所以必须放到左后 |
练习题:
练习1: 将1.txt、2.txt、3.txt 打包成 123.tar文件
tar cvf 123.tar 1.txt 2.txt 3.txt
练习2: 将有内容的aaa目录 打包成 aaa.tar 文件
tar cvf aaa.tar aaa/
4.1.2、解包
生活中的事例:从袋子中把冬天的衣服取出来
在linux中,使用tar 命令进行解包
# 将一个打包后的 分解成 一系列小文件, 分解位置为 当前目录
tar -xvf 打包名.tar ##解压到当前目录下
# 将一个打包后的 分解成 一系列小文件, 分解位置为 指定目录
tar -xvf 打包名.tar -C 解包路径位置 ## -C 指定目录 解压到指定的目录下
| 命令 |
英文 |
含义 |
|---|---|---|
| x |
extract (提取) |
解包 |
| C (大写C) |
directory (目录) |
默认保存到当前目录, 通过-C 更改解压目录, 注意: 解压目录必须存在 |
练习题:
练习1: 将 123.tar 解压到 当前目录中
tar xvf 123.tar
练习2: 将 aaa.tar 解包到 /root/test_tar/test/a1/b1/c1/ 目录中
4.2、压缩和解压缩
准备工作
# 创建测试文件
touch 1.txt 2.txt 3.txt
# 创建有内容的测试目录
mkdir -p /root/test_tar/aaa/
touch /root/test_tar/aaa/4.txt /root/test_tar/aaa/5.txt
# 查看结果
tree /root/test_tar
4.2.1、使用gzip格式压缩和解压缩
在 Linux 中, 最常用的压缩文件格式是 xxx.tar.gz
在 tar 命令中有一个选项 -z 可以调用 gzip , 从而可以方便的实现压缩和解压缩的功能
命令格式如下:
# 压缩文件
tar -zcvf 打包压缩文件名.tar.gz 被压缩的文件/目录
# 解压缩文件(记忆敲门: 至孝潍坊)
tar -zxvf 打包文件.tar.gz
# 解压缩到指定路径
tar -zxvf 打包文件.tar.gz -C 目录路径
tar 的选项说明
| 命令 |
英文 |
含义 |
|---|---|---|
| z |
gzip |
使用gzip压缩和解压缩 |
| j |
bzip2 |
使用bzip2压缩和解压缩 |
练习题:
练习1: 将1.txt、2.txt、3.txt 打包压缩成 123.tar.gz文件(gzip压缩格式)
tar zcvf 123.tar.gz 1.txt 2.txt 3.txt
练习2: 将有内容的aaa目录 打包成 aaa.tar.gz 文件(gzip压缩格式)
tar zcvf aaa.tar.gz aaa/
练习3: 将 123.tar.gz 解压到 当前目录中(gzip压缩格式)
练习4: 将 aaa.tar.gz 解包到 /root/test_tar/bbb 目录中(gzip压缩格式)
4.2.2、使用bzip2格式压缩和解压缩
在 Linux 中, bzip2 压缩文件格式是 xxx.tar.bz2
在 tar 命令中有一个选项 -j 可以调用 bzip2 , 从而可以方便的实现压缩和解压缩的功能
命令格式如下:
压缩文件
tar -jcvf 打包压缩文件名.tar.bz2 被压缩的文件/目录
解压缩文件
tar -jxvf 打包文件.tar.bz2
解压缩到指定路径
tar -jxvf 打包文件.tar.bz2 -C 目录路径
tar 的选项说明
| 命令 |
英文 |
含义 |
|---|---|---|
| z |
gzip |
使用gzip压缩和解压缩 |
| j |
bzip2 |
使用bzip2压缩和解压缩 |
练习题:
练习1:将1.txt、2.txt、3.txt打包压缩成123.tar.bz2文件(bzip2压缩格式) tar jcvf 123.tar.bz2 1.txt 2.txt 3.txt
练习2: 将有内容的aaa目录 打包成 aaa.tar.bz2 文件(bzip2压缩格式)
练习3: 将 123.tar.bz2 解压到 当前目录中(bzip2压缩格式)
练习4: 将 aaa.tar.bz2 解包到 /root/test_tar/bbb 目录中(bzip2压缩格式)
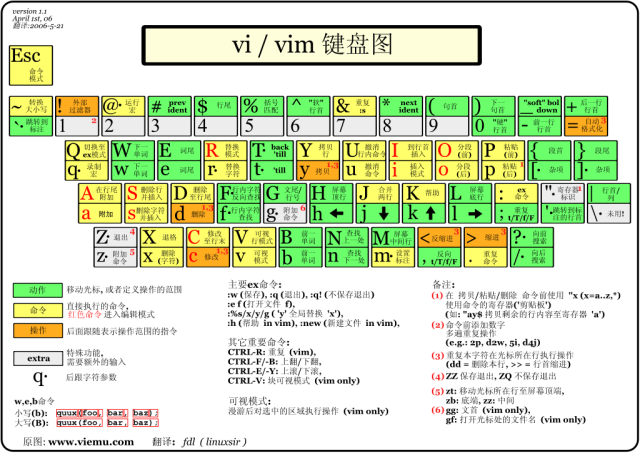
5 vi/vim文本编辑器
1. 编辑器简介
vi编辑器是所有Unix及Linux系统下标准的编辑器,相当于windows系统中的记事本一样,它的强大不逊色于任何最新的文本编辑器。是使用Linux系统不能缺少的工具。由于对Unix及Linux系统的任何版本,vi编辑器是完全相同的。
vim(vi improved)编辑器是从 vi 发展出来的一个文本编辑器。代码补完、编译及错误跳转、语法高亮等方便编程的功能特别丰富,在程序员中被广泛使用。
简单的来说, vi 是老式的,不过功能已经很齐全了,但是还是有可以进步的地方。vim 则可以说是程序开发者的一项很好用的工具。vim 的官方网站 (http://www.vim.org) 自己也说 vim 是一个程序开发工具而不是文字处理软件。
vi/vim编辑器的核心设计思想:
让程序员的手指始终保持在键盘的核心区域, 就能完成所有的编辑操作
2. 打开和新建文件
如果当前的linux系统中输出:vim命令后,出现命令的不识别的情况,需要安装VIM
安装方式:yum -y install vim*
在终端中输入vim在后面跟上 文件名 即可
vim 文件名
-
如果文件已经存在, 会直接打开该文件
-
如果文件不存在, 保存且退出时 就会新建一个文件
2.1、打开文件并且定位行
在日常工作中, 有可能会遇到打开一个文件, 并定位到指定行的情况。
例如: 在开发时候知道某一行代码有错误, 可以快速定位到出错误代码的位置,这个时候, 可以使用以下命令打开文件:
vim 文件名 +行数
提示: 如果只带上+ 而不指定行号, 会直接定位到文件末尾
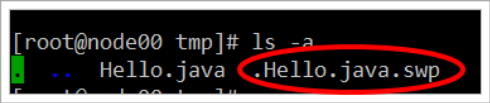
2.2、异常处理
如果 vi 异常退出, 在磁盘上可能会保存有 交换文件
下次再使用 vi 编辑文件时, 会看到以下屏幕信息, 按下字母 d 删除交换文件即可。
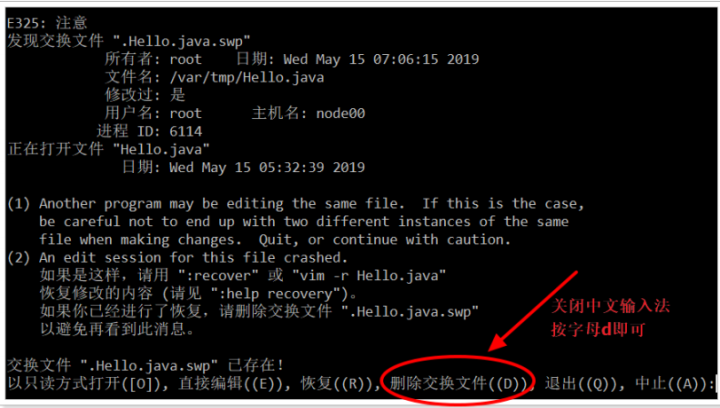
这种现象如何产生:编辑文件时没有退出, 直接关闭会话窗口。
2.3、vi/vim三种工作模式
基本上 vi/vim 共分为三种模式,分别是:命令模式(Command mode),输入模式(Insert mode)和底线命令模式(Last line mode).

1、命令模式
打开文件首先进入命令模式, 是使用vim的入口。
命令模式下下敲击键盘动作会被Vim识别为命令,而非输入字符。
若想要编辑文本:必须切换到输入模式。
2、底线命令模式
执行 保存 退出等操作 (是从命令模式进入的)
要退出 vi 返回到控制台, 需要在底线命令模式下输入命令,是 vi编辑器 的出口。
在底线命令模式中,基本的命令有(已经省略了冒号):
q 退出程序
w 保存文件
wq 保存且退出文件
wq! 强制保存且退出文件
3、输入编辑模式
正常的编辑文字
3. 常用命令
vi命令还是比较多, 实际使用中也就是那么几个。不奢求一下子全部都记住, 个别命令忘记了, 只是会影响编辑速度而已 . 在使用vi命令时, 注意关闭中文输入法。
熟能生巧,多用多会。
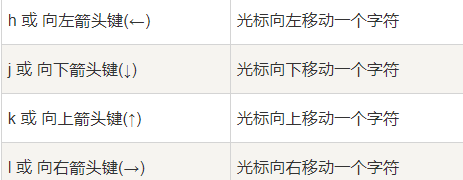
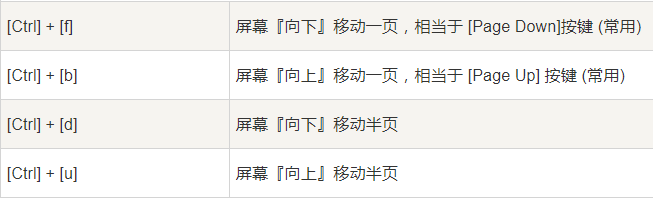
3.1、光标移动
移动光标的方法
如果想要进行多次移动的话,例如向下移动 30 行,可以使用 "30j" 或 "30↓" 的组合按键, 亦即加上想要进行的次数(数字)后,按下动作即可!
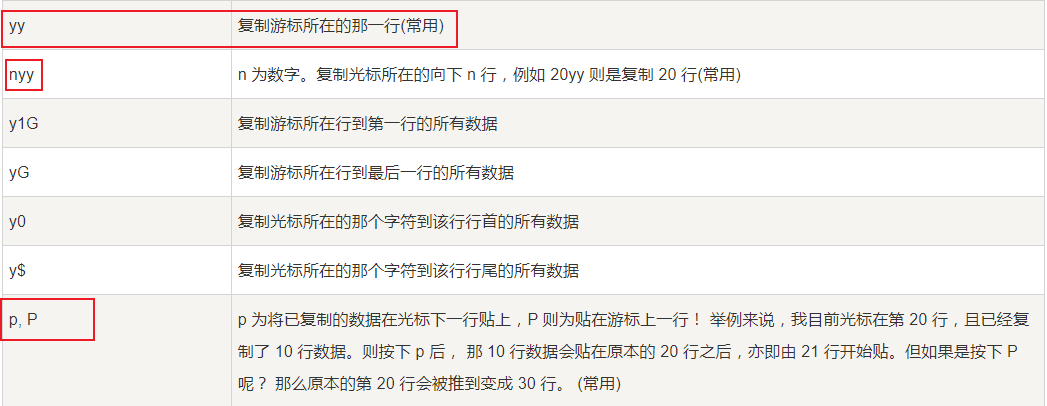
3.2、复制粘贴
3.3、搜索替换
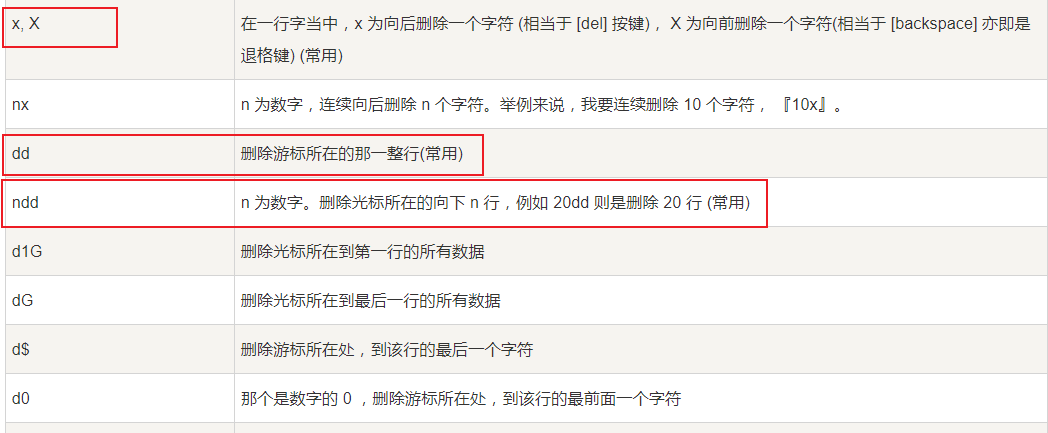
3.4、删除
4. 撤销和恢复撤销
在学习编辑命令之前,先要知道怎样撤销之前一次 错误的 编辑操作
| 命令 |
英文 |
功能 |
|---|---|---|
| u |
undo |
撤销上次的命令(ctrl + z) |
| Ctrl + r |
uredo |
恢复撤销的命令 |
5. Insert command (important)
In addition to commonly used i to enter the editing mode in vi, the following commands are also provided to enter the editing mode
| Order |
English |
Function |
commonly used |
|---|---|---|---|
| i |
insert |
Insert text before the current character |
commonly used |
| I |
insert |
Insert text at the beginning of the line |
More commonly used |
| a |
append |
Append text after current character |
|
| A |
append |
Add text at the end of the line |
More commonly used |
| o |
Insert a blank line after the current line |
commonly used |
|
| O |
Insert a blank line before the current line |
commonly used |
Summary: Before entering the editing mode, you can enter different editing states with the usual input commands
i: After entering the edit mode, locate in front of the current cursor
I: After entering the edit mode, locate to the first position of the current line
a: After entering the edit mode, position to the back of the current cursor to add the content to be written
A: After entering the edit mode, locate to the end of the current line
o: After entering the edit mode, add a blank line after the current line
O: After entering the edit mode, add a blank line before the current line