This article was first published on the WeChat public account CVHub. Without authorization, it is not allowed to be sold in any form or reproduced to other platforms privately. Violators will be held accountable!
Title: DETRs Beat YOLOs on Real-time Object Detection
Paper: https://arxiv.org/pdf/2304.08069.pdf
Code: https://github.com/PaddlePaddle/PaddleDetection/tree/develop/configs/rtdetr
guide

As we all know, in the field of target detection, the YOLO series models have always played the role of big brother. Although its detection performance is excellent, it has been widely criticized that its post-processing is too cumbersome and time-consuming, not easy to optimize and not robust enough.
Recently, Transformerthe end-to-end detector based on (DETR) has achieved remarkable performance. However, DETRthe problem of high computational cost in , has not been effectively addressed, limiting their practical applications and preventing them from fully exploiting the advantages of no post-processing, such as non-maximum suppression ( ) NMS.
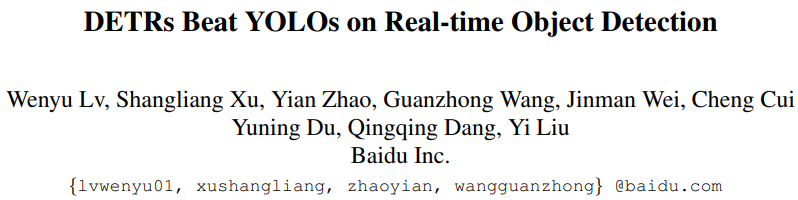
Ever since, Baidu has recently implemented and open sourced the first real-time end-to-end object detector based on DETR RT-DETR, which effectively avoids the reasoning delay caused by NMS and improves performance.
Specifically, the authors design an efficient hybrid encoder to efficiently process multi-scale features by decoupling intra-scale interactions and cross-scale fusion, and propose IoU-aware query selection to improve the initialization of target queries. In addition, RT-DETR supports the use of different decoder layers to flexibly adjust the inference speed without retraining, thus facilitating the practical application of real-time object detectors.

Finally, RTDETR-L achieved 53.0% AP and 114 FPS on COCO val2017, while RT-DETR-X achieved 54.8% AP and 74 FPS, both in speed and accuracy better than all YOLO detectors of the same scale . In addition, RTDETR-R50 has 2.2% higher AP than DINO-Deformable-DETR-R50 in accuracy, and about 21 times higher in FPS, reaching 53.1% AP and 108 FPS!
We briefly introduce the theoretical part here, and the specific interpretation can refer to: https://mp.weixin.qq.com/s/o03QM2rZNjHVto36gcV0Yw. This article teaches you how to complete the deployment of the RT-DETR model from zero to one. For the specific code, you can directly click to read the original text at the end of the article and jump directly to Github. Welcome to click a star!
install dependencies
- Create a new virtual environment [optional]
conda create -n paddlepaddle python=3.8 -y
conda activate paddlepaddle
- Download the corresponding paddle version [PaddlePaddle >= 2.4.1]
# 此处安装了适配 CUDA11.7 的 PaddleGPU 2.4.2 版本,请根据自己本地环境修改
python -m pip install paddlepaddle-gpu==2.4.2.post117 -f https://www.paddlepaddle.org.cn/whl/linux/mkl/avx/stable.html
- Download the code repository
git clone https://github.com/PaddlePaddle/PaddleDetection.git
git checkout develop
# Install other dependencies
cd PaddleDetection
pip install -r requirements.txt
# Compile and install paddledet
python setup.py install
- Download pre-trained weights and test whether the environment is normal
# 下载权重
wget https://bj.bcebos.com/v1/paddledet/models/rtdetr_r50vd_6x_coco.pdparams && mkdir weights && mv rtdetr_r50vd_6x_coco.pdparams ./weights

# 测试看能否正常 infer,测试图片自行替换下
python tools/infer.py -c configs/rtdetr/rtdetr_r50vd_6x_coco.yml -o weights=https://bj.bcebos.com/v1/paddledet/models/rtdetr_r50vd_6x_coco.pdparams --infer_img=bus.jpg
- Modify the configuration file
First, enter the file path [PaddleDetection/configs/rtdetr/ base /rtdetr_r50vd.yml] to modify the export configuration of DETR:

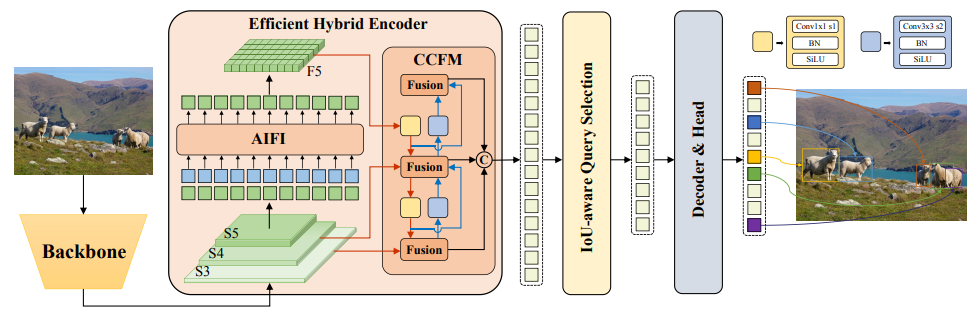
Secondly, enter the file path [PaddleDetection/ppdet/modeling/architectures/detr.py] to merge the post-processing output for easy deployment
Note that the score output here is not normalized by default. If you want to achieve it in one step, you can directly add sigmoid to process it. But it is not a big problem, because our deployment code has been implanted with automatic judgment, which can be dynamically adapted according to the output value, and it can be added here or not. In addition, the default export method is static. If you want to change it to a dynamic shape, you only need to call the [PaddleDetection/scripts/paddle_infer_shape.py] function to modify it
--input_shape_dict="{'image': [-1, 3, -1, -1]", where -1 represents dynamic input.
Finally, just export the model weights directly:
python tools/export_model.py -c configs/rtdetr/rtdetr_r50vd_6x_coco.yml \
              -o weights=https://bj.bcebos.com/v1/paddledet/models/rtdetr_r50vd_6x_coco.pdparams trt=True \
              --output_dir=output_inference
- Convert model format
pip install onnx==1.13.0
pip install paddle2onnx==1.0.5

paddle2onnx --model_dir=./output_inference/rtdetr_r50vd_6x_coco/ \
            --model_filename model.pdmodel  \
            --params_filename model.pdiparams \
            --opset_version 16 \
            --save_file ./output_inference/rtdetr_r50vd_6x_coco/rtdetr_r50vd_6x_coco.onnx
Here we only use ONNXRUNTIME for demonstration. For those who want to deploy to the TensorRT platform, you can directly refer to the conversion script provided by PaddleDetection. The deployment process is similar. You only need to write pre-processing and post-processing according to this project.
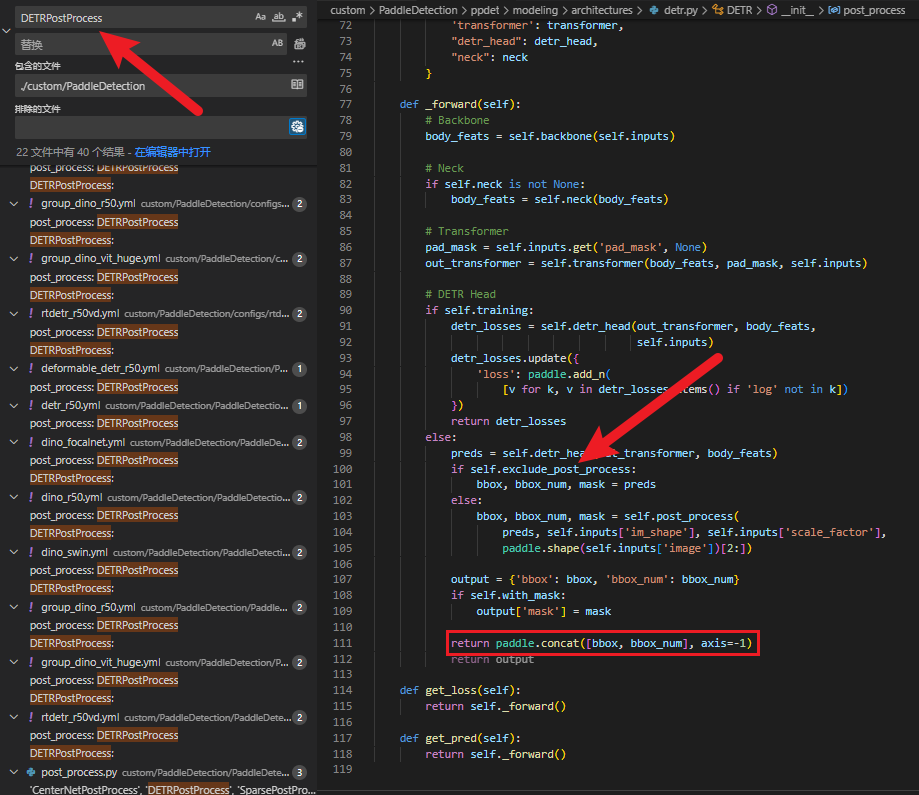
- Use onnxsim to simplify the output and open it with netron to check:
pip install netron
pip3 install -U pip && pip3 install onnxsim
onnxsim input_onnx_model output_onnx_model
| Origin | Modify |
|---|---|
 |
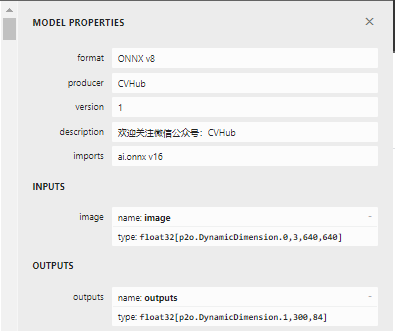 |
On the left is the original exported model without any processing, and on the right is the exported model with appropriate adjustments.
Python deployment
This part is relatively simple. After the above operating system, onnxruntimethe library should have been installed by default. Next, we only need to run it according to the following code.
$ git clone https://github.com/CVHub520/rtdetr-onnxruntime-deploy.git
$ cd rtdetr-onnxruntime-deploy
$ mkdir weights && cd weights
$ wget https://github.com/CVHub520/rtdetr-onnxruntime-deploy/releases/download/v1.0.0/rtdetr_r50vd_6x_coco_cvhub.onnx
$ cd ../python
$ python3 main.py
C++ deployment
- Install and compile
ONNXRUNTIME, takeLinuxthe environment as an example.
- First, download the source code:
git clone https://github.com/Microsoft/onnxruntime
cd onnxruntime/
- Before installation, we first enter the onnxruntime directory, where the build.sh file is a compilation script, open it first:
#!/bin/bash
# Copyright (c) Microsoft Corporation. All rights reserved.
# Licensed under the MIT License.

# Get directory this script is in
DIR="$( cd "$( dirname "${

       BASH_SOURCE[0]}" )" && pwd )"
OS=$(uname -s)

if [ "$OS" = "Darwin" ]; then
    DIR_OS="MacOS"
else
    DIR_OS="Linux"
fi

if [[ "$*" == *"--ios"* ]]; then
    DIR_OS="iOS"
elif [[ "$*" == *"--android"* ]]; then
    DIR_OS="Android"
fi

#requires python3.6 or higher
python3 $DIR/tools/ci_build/build.py --build_dir $DIR/build/$DIR_OS "$@"
It can be seen that this processing logic is only to judge the current system environment first, and compile for different operating platforms. The main compilation options are under the tools/ci_build/build.pyfile. After opening the file, let's focus on the parameter parse_arguments()description of the function. Specifically, we pick a few of the more common ones:
- –build_dir: It is used to specify the storage path of the compiled library file, which cannot be defaulted. Here, it is specified in DIR / build / DIR/build/D I R / b u i l d / DIR_O directory;
- –config: There are four modes, namely ["Debug", "MinSizeRel", "Release", "RelWithDebInfo"], for example, MinSizeRel, as the name implies, optimizes the size of the target file, while RelWithDebInfo represents the original target file with Debug information, Release is the release version, whose target file size is between these two. Generally, you can directly press the default, or choose according to your own needs. For example, we directly choose the Release version here.
- –parallel: Whether to enable multi-core compilation, it is recommended to enable it, otherwise the compilation speed is extremely slow;
- –skip-tests: unit test, it is recommended to enable and skip directly;
- –use_cuda: Enable it if you need to use cuda acceleration; note that if you enable this item, you need to specify the paths of --cuda_home and --cudnn_home, which are stored in the /usr/local directory by default;
- –build_shared_lib: Whether to compile into a dynamic library, the default is to compile a static library;
- Default behavior is --update --build --test for native architecture builds.
- Default behavior is --update --build for cross-compiled builds.
- –use_tensorrt: Whether to use tensorrt to accelerate, if enabled, you need to specify the --tensorrt_home parameter.
- No problem, we can choose the appropriate compilation parameters according to our own needs. Here, the cuda and cudnn paths need to be changed to our own local paths! :
./build.sh --skip_tests --use_cuda --config Release --build_shared_lib --parallel --cuda_home /usr/local/cuda-11.7 --cudnn_home /usr/local/cuda-11.7
Note that this process will involve the download of many files. If the git access is very slow, it will cause multiple interruptions. At this time, you can repeat the operation multiple times. If the network fails all the time, please refer to the problem summary. If you are unlucky, the whole process may take several hours, please be patient.

- Install the compilation
OpenCVenvironment.
For installation steps, please refer to this tutorial: https://zhuanlan.zhihu.com/p/392751819
- download project
$ cd rtdetr-onnxruntime-deploy
$ mkdir weights && cd weights
$ wget https://github.com/CVHub520/rtdetr-onnxruntime-deploy/releases/download/v1.0.0/rtdetr_r50vd_6x_coco_cvhub.onnx
$ cd ../cplusplus
NOTE: To build the project, make sure that onnxruntime and opencv are properly installed. Then, run the command as directed. Don't forget to update the ONNXRUNTIME_DIR and OpenCV_DIR cmake options in the CMakeLists.txt file to match your custom environment.
$ mkdir build && cd build
$ cmake ..
$ make
$ ./main
# ./main --use_cuda
Result display
| Python | C++ |
|---|---|
 |
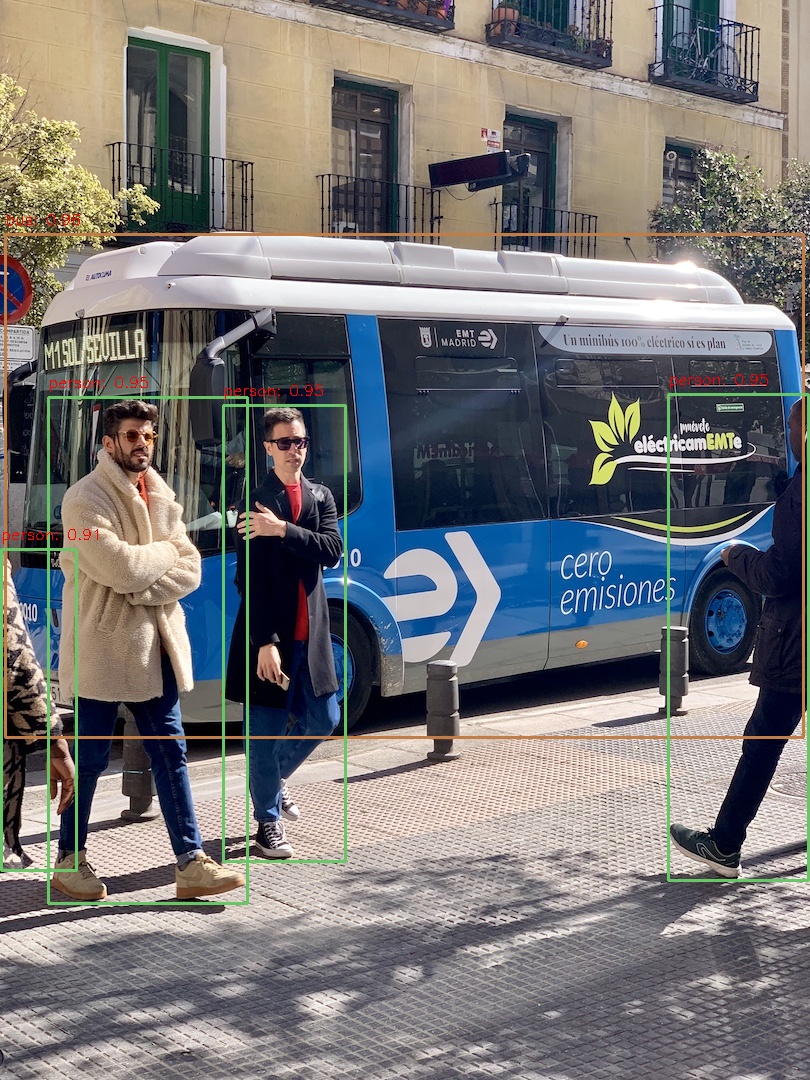 |
The bounding box coordinates are perfectly aligned with little loss of precision.
Summarize
This article briefly introduces some basic generalizations of the RT-DETR model, and demonstrates how to deploy it in a local environment based on Python and C++. For the complete project code, please visit the Github address. If you have any questions, please add WeChat: cv_huber, remark "RTDETR" to enter the exchange group discussion. Finally, everyone is welcome to click a star to encourage and support, thank you for your long-term support!
From now on, Knowledge PlanetCVHub will be officially opened , and the following services will be provided in the first phase:
- This planet focuses on knowledge question-and-answer services, including but not limited to algorithm principles , project practice , career planning , scientific research ideas , etc.
- This planet adheres to high-quality AI technology sharing, covering: daily high-quality paper delivery , high-quality paper interpretation and knowledge point summary , etc.
- The planet invites AI leaders from various industries to provide experience sharing in various industries , and the members of the planet can deeply understand the latest academic/industrial progress in various industries.
- This planet shares ideas for academic papers from time to time, including but not limited to
Challengeanalysis, innovation mining , experimental configuration , writing experience , etc. - This planet provides a large number of employment recruitment resources for AI positions , including but not limited to
CV, ,NLP,AIGCetc.; at the same time, it shares various practical tools and dry goods information from time to time .
