Table of contents
introduction
- This article aims to help friends who do not know python programming to quickly use the RapidVideOCR video hard subtitle extraction tool.
- Operating system that can run: Windows | Mac | Linux
Configuration Environment
1. Install VideoSubFinder software (for extracting subtitle keyframes)
2. Install python software (for running RapidVideOCR)
-
Download the python installation package
- Open python official website → https://www.python.org, select your own system to enter the download interface (VideoSubFinder tool is currently only available for Windows)

- Open python official website → https://www.python.org, select your own system to enter the download interface (VideoSubFinder tool is currently only available for Windows)
-
Find the version you want, take python 3.10.7 as an example. If the download speed is slow, you can join the RapidVideOCR QQ group (706807542) to obtain group files.

-
After the download is complete, double-click to open the exe to start preparing for installation. Click Custom Install and choose the installation location. At the same time, remember to tick the last item
Add Python 3.10 to PATH

-
Just click next

-
Check to change the path

-
Click Install and wait for the installation to complete.

-
Win + r input
cmd, enter, enter the command window

-
Enter python to see if it looks like the picture below, if it appears, it proves that the installation is successful

Disclaimer: The above part of the image comes from the tutorial of installing python_3.10.7 version of the ultimate nanny tutorial -
Add
Scriptsdirectory to environment variable- Win + q, enter "edit" → click to edit the system environment variable

- Open Environment Variables → User Variables → Path → Edit

- Win + q, enter "edit" → click to edit the system environment variable
- Create a new Script directory path under the Python installation directory, as shown in the figure below, remember to click Save.

3. Install the RapidVideOCR tool
- Win + r input
cmd, enter, enter the command window

- Enter
pip install rapid_videocr -i https://pypi.douban.com/simple/Install RapidVideOCR

- Test whether the installation is successful, input
rapid_videocr -h, if the output similar to the following figure appears, the installation is successful.

- use
- command line use
- Win + r input
cmd, enter, enter the command window - input
rapid_videocr -i RGBImages -s result -m concat. Among themRGBImages, it is generated by VideoSubFinder software and can be customized, for example:G:\ProgramFiles\_self\RapidVideOCR\test_files\RGBImagesetc.

- Win + r input
- script use
-
Create a new TXT file on the desktop, name it
rapid_videocr.py, and pay attention to changing the suffix name to*.py. -
Open it with Notepad and copy the following code into
rapid_videocr.pyitfrom rapid_videocr import RapidVideOCR # RapidVideOCR有两个初始化参数 # is_concat_rec: 是否用单张图识别,默认是False,也就是默认用单图识别 # concat_batch: 叠图识别的图像张数,默认10,可自行调节 # out_format: 输出格式选择,[srt, txt, all], 默认是 all # is_print_console: 是否打印结果,[0, 1], 默认是0,不打印 extractor = RapidVideOCR(is_concat=False, out_format='all', is_print_console=False) # Windows: 路径前加了一个r rgb_dir = r'G:\ProgramFiles\_self\RapidVideOCR\test_files\RGBImages' # Linux/Mac写法如下 rgb_dir = 'test_files/TXTImages' save_dir = 'result' extractor(rgb_dir, save_dir) -
Change
rgb_dirthe following directory toRGBImagesthe directory path generated by VideoSubFinder.- Windows: add an r before the path
rgb_dir = r'G:\ProgramFiles\_self\RapidVideOCR\test_files\RGBImages' - Linux/Mac is written as follows:
rgb_dir = 'test_files/TXTImages'
- Windows: add an r before the path
-
Win + rOpen the terminal and enter the following code, press Enter to execute.$ cd Desktop $ python rapid_videocr.py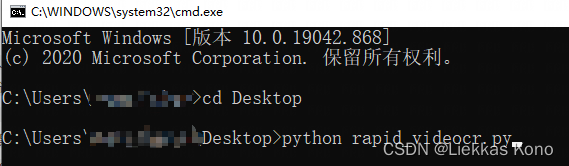
-
- command line use
write at the end
- At this point, the subtitles can be extracted correctly and the srt file can be generated.
- See RapidVideOCR for details