@SpringBootApplication
Declare to let spring boot automatically configure the program necessary, this configuration is equivalent to:
@Configuration , @EnableAutoConfiguration and @ComponentScan three configurations.
@RestController
The @RestController annotation includes the original @Controller and @ResponseBody annotations. Friends who have used Spring already know the @Controller annotation very well, so I won’t repeat it here. The @ResponseBody annotation converts the returned data structure into Json format. So @RestController can be seen as a combination of @Controller and @ResponseBody, which is equivalent to being lazy. After we use @RestController, we don't need to use @Controller anymore. But you need to pay attention to one problem: if the front and back ends are separated and template rendering is not used, such as Thymeleaf, in this case, you can directly use @RestController to pass the data to the front end in json format, and the front end will parse it after receiving it; but if the front and back ends are not separated and you need to use templates to render, generally the Controller will return to a specific page, then @RestController cannot be used at this time, for example:
public String getUser() {
    return "user";
}
In fact, it needs to return to the user.html page. If @RestController is used, the user will be returned as a string, so we need to use the @Controller annotation at this time. This will be explained again in the next section Spring Boot integrates Thymeleaf template engine.
@RequestMapping
@RequestMapping is an annotation used to process request address mapping, which can be used on classes or methods . The annotation at the class level will map a specific request or request pattern to a controller, indicating that all methods in the class that respond to the request use this address as the parent path; at the method level, it indicates that it further specifies the mapping relationship to the processing method.
This annotation has 6 attributes, and generally there are three attributes commonly used in projects: value, method, and produces.
value attribute: specify the actual address of the request, value can be omitted
method attribute: specify the type of request, mainly GET, PUT, POST, DELETE, the default is GET
produces attribute: specify the return content type, such as produces = "application/json; charset=UTF-8"
The @RequestMapping annotation is relatively simple, for example:
@RestController
@RequestMapping(value = "/test", produces = "application/json; charset=UTF-8")
public class TestController {

    @RequestMapping(value = "/get", method = RequestMethod.GET)
    public String testGet() {
        return "success";
    }
}
This is very simple, start the project and enter localhost:8080/test/get in the browser to test it.
For the four different request methods, there are corresponding annotations. It is not necessary to specify the method attribute in the @RequestMapping annotation every time. The above GET method request can directly use the @GetMapping("/get") annotation, and the effect is the same. Correspondingly, the annotations corresponding to PUT mode, POST mode and DELETE mode are @PutMapping, @PostMapping and DeleteMapping respectively.
@PathVariable
The @PathVariable annotation is mainly used to obtain url parameters. Spring Boot supports restfull-style urls. For example, a GET request carries a parameter id. We receive the id as a parameter and use the @PathVariable annotation. as follows:
@GetMapping("/user/{id}")
public String testPathVariable(@PathVariable Integer id) {
    System.out.println("获取到的id为:" + id);
    return "success";
}
Here is a problem to pay attention to. If you want to directly assign the id value in the placeholder in the url to the parameter id, you need to ensure that the parameters in the url are consistent with the parameters received by the method, otherwise it cannot be received. If they are not consistent, it can actually be resolved. You need to use the value attribute in @PathVariable to specify the corresponding relationship. as follows:
@RequestMapping("/user/{idd}")
public String testPathVariable(@PathVariable(value = "idd") Integer id) {
    System.out.println("获取到的id为:" + id);
    return "success";
}
For the accessed url, the position of the placeholder can be anywhere, not necessarily at the end, for example: /xxx/{id}/user. In addition, url also supports multiple placeholders, method parameters are received with the same number of parameters, the principle is the same as one parameter, for example:
@GetMapping("/user/{idd}/{name}")
    public String testPathVariable(@PathVariable(value = "idd") Integer id, @PathVariable String name) {
        System.out.println("获取到的id为:" + id);
        System.out.println("获取到的name为:" + name);
        return "success";
    }
Run the project, request localhost:8080/test/user/2/zhangsan in the browser, and you can see the console output the following information:
获取到的id为:2
获取到的name为:zhangsan
Therefore, the reception of multiple parameters is supported. Similarly, if the name of the parameter in the url is different from that in the method, you also need to use the value attribute to bind the two parameters.
@RequestParam
As the name suggests, the @RequestParam annotation is also used to obtain request parameters. We introduced the @PathValiable annotation above to obtain request parameters. So what is the difference between @RequestParam and @PathVariable? The main difference is: @PathValiable gets the parameter value from the url template, that is, this style of url: http://localhost:8080/user/{id} ; while @RequestParam gets the parameter value from the request, that is, this style of url: http://localhost:8080/user?id=1 . Let's use this url with the parameter id to test the following code:
@GetMapping("/user")
public String testRequestParam(@RequestParam Integer id) {
    System.out.println("获取到的id为:" + id);
    return "success";
}
The id information can be printed out from the console normally. Similarly, the parameters on the url need to be consistent with the parameters of the method. If they are inconsistent, you also need to use the value attribute to describe it. For example, the url is: http://localhost:8080/user?idd=1
 @RequestMapping("/user")
public String testRequestParam(@RequestParam(value = "idd", required = false) Integer id) {
    System.out.println("获取到的id为:" + id);
    return "success";
}
In addition to the value attribute, there are two more commonly used attributes:
required attribute: true means the parameter must be passed, otherwise a 404 error will be reported, false means optional.
defaultValue attribute: default value, indicating the default value if there is no parameter with the same name in the request.
It can be seen from the url that when the @RequestParam annotation is used on a GET request, the parameters spliced in the url are received. In addition, this annotation can also be used for POST requests to receive parameters submitted by the front-end form. If the front-end submits username and password parameters through the form, then we can use @RequestParam to receive them, and the usage is the same as above.
@PostMapping("/form1")
    public String testForm(@RequestParam String username, @RequestParam String password) {
        System.out.println("获取到的username为:" + username);
        System.out.println("获取到的password为:" + password);
        return "success";
    }
Let's use postman to simulate form submission and test the interface:

Then the problem comes, if there is a lot of form data, it is impossible for us to write many parameters in the background method, and each parameter needs to be annotated with @RequestParam. In this case, we need to encapsulate an entity class to receive these parameters, and the attribute names in the entity should be consistent with the parameter names in the form.
public class User {
    private String username;
    private String password;
    // set get
}
If you use entity reception, we can't add @RequestParam annotation in front, just use it directly.
@PostMapping("/form2")
    public String testForm(User user) {
        System.out.println("获取到的username为:" + user.getUsername());
        System.out.println("获取到的password为:" + user.getPassword());
        return "success";
    }
Use postman to test the form submission again, and observe the return value and the log printed by the console. In actual projects, an entity class is generally encapsulated to receive form data, because there are generally a lot of form data in actual projects.
@RequestBody
The @RequestBody annotation is used to receive the entity from the front end, and the received parameters are also corresponding entities. For example, the front end submits two parameters username and password through json. At this time, we need to encapsulate an entity in the back end to receive it. In the case of passing more parameters, it is very convenient to use @RequestBody to receive. For example:
public class User {
    private String username;
    private String password;
    // set get
}
@PostMapping("/user")
public String testRequestBody(@RequestBody User user) {
System.out.println("获取到的username为:" + user.getUsername());
System.out.println("获取到的password为:" + user.getPassword());
return "success";
}We use the postman tool to test the effect, open postman, and then enter the request address and parameters. We use json to simulate the parameters, as shown in the figure below, and return success after calling.
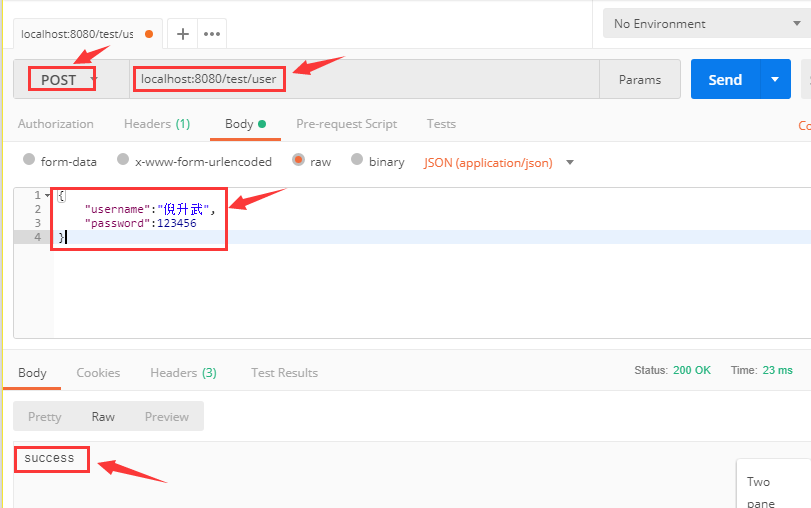
At the same time, look at the logs output by the background console:
获取到的username为:倪升武
获取到的password为:123456
可以看出,@RequestBody 注解用于 POST 请求上,接收 json 实体参数。它和上面我们介绍的表单提交有点类似,只不过参数的格式不同,一个是 json 实体,一个是表单提交。在实际项目中根据具体场景和需要使用对应的注解即可。
@Controller
用于定义控制器类,在spring项目中由控制器负责将用户发来的URL请求转发到对应的服务接口(service层),一般这个注解在类中,通常方法需要配合注解@RequestMapping。
@Service
通常用于修饰service层的组件,声明一个对象,会将类对象实例化并注入到bean容器里面。
@Service
public class DeptService {

 //具体的方法
}
@Component
泛指组件,当组件不好归类的时候,可以使用这个注解进行标注,功能类似于于@Service。
@Component
public class DeptService {

 //具体的方法
}
@Repository
通常用于修饰dao层的组件,@Repository注解属于Spring里面最先引入的一批注解,它用于将数据访问层 (DAO层 ) 的类标识为Spring Bean,具体只需将该注解标注在 DAO类上即可,示例代码如下:
@Repository
public interface RoleRepository extends JpaRepository<Role,Long> {

 //具体的方法
}
为什么现在使用的很少呢?
主要是因为当我们配置服务启动自动扫描dao层包时,Spring会自动帮我们创建一个实现类,然后注入到bean容器里面。当某些类无法被扫描到时,我们可以显式的在数据持久类上标注@Repository注解,Spring会自动帮我们声明对象。
@Bean
相当于 xml 中配置 Bean,意思是产生一个 bean 对象,并交给spring管理,示例代码如下:
@Configuration
public class AppConfig {

   //相当于 xml 中配置 Bean
    @Bean
    public Uploader initFileUploader() {
        return new FileUploader();
    }

}
@Autowired
自动导入依赖的bean对象,默认时按照byType方式导入对象,而且导入的对象必须存在,当需要导入的对象并不存在时,我们可以通过配置required = false来关闭强制验证。
@Autowired
private DeptService deptService;
@Resource
也是自动导入依赖的bean对象,由JDK提供,默认是按照byName方式导入依赖的对象;而@Autowired默认时按照byType方式导入对象,当然@Resource还可以配置成通过byType方式导入对象
/**
 * 通过名称导入(默认通过名称导入依赖对象)
 */
@Resource(name = "deptService")
private DeptService deptService;

/**
 * 通过类型导入
 */
@Resource(type = RoleRepository.class)
private DeptService deptService;
@Qualifier
当有多个同一类型的bean时,使用@Autowired导入会报错,提示当前对象并不是唯一,Spring不知道导入哪个依赖,这个时候,我们可以使用@Qualifier进行更细粒度的控制,选择其中一个候选者,一般于@Autowired搭配使用,示例如下:
@Autowired
@Qualifier("deptService")
private DeptService deptService;
@Scope
用于生命一个spring bean的作用域,作用的范围一共有以下几种:
singleton:唯一 bean 实例,Spring 中的 bean 默认都是单例的。
prototype:每次请求都会创建一个新的 bean 实例,对象多例。
request:每一次 HTTP 请求都会产生一个新的 bean,该 bean 仅在当前 HTTP request 内有效。
session:每一次 HTTP 请求都会产生一个新的 bean,该 bean 仅在当前 HTTP session 内有效。
/**
 * 单例对象
 */
@RestController
@Scope("singleton")
public class HelloController {

}
@Entity和@Table
表明这是一个实体类,这两个注解一般一块使用,但是如果表名和实体类名相同的话,@Table可以省略。
@Id
表示该属性字段对应数据库表中的主键字段。
@Column
表示该属性字段对应的数据库表中的列名,如果字段名与列名相同,则可以省略。
@Configuration
表示声明一个 Java 形式的配置类,Spring Boot 提倡基于 Java 的配置,相当于你之前在 xml 中配置 bean,比如声明一个配置类AppConfig,然后初始化一个Uploader对象。
@Configuration
public class AppConfig {
    @Bean
    public Uploader initOSSUploader() {
        return new OSSUploader();
    }
}
@EnableAutoConfiguration
@EnableAutoConfiguration可以帮助SpringBoot应用将所有符合条件的@Configuration配置类,全部都加载到当前SpringBoot里,并创建对应配置类的Bean,并把该Bean实体交给IoC容器进行管理。
某些场景下,如果我们想要避开某些配置类的扫描(包括避开一些第三方jar包下面的配置,可以这样处理。
@Configuration
@EnableAutoConfiguration(exclude = { org.springframework.boot.autoconfigure.security.servlet.SecurityAutoConfiguration.class})
public class AppConfig {
 //具有业务方法
}
@ComponentScan
标注哪些路径下的类需要被Spring扫描,用于自动发现和装配一些Bean对象,默认配置是扫描当前文件夹下和子目录下的所有类,如果我们想指定扫描某些包路径,可以这样处理。
@ComponentScan(basePackages = {"com.xxx.a", "com.xxx.b", "com.xxx.c"})
@value
可以在任意 Spring 管理的 Bean 中通过这个注解获取任何来源配置的属性值,比如你在application.properties文件里,定义了一个参数变量!
config.name=zhangsan
在任意的bean容器里面,可以通过@Value注解注入参数,获取参数变量值。
@RestController
public class HelloController {

    @Value("${config.name}")
    private String config;

    @GetMapping("config")
    public String config(){
        return JSON.toJSONString(config);
    }
}