How to access pod metadata
**When we run the container in the pod, do we also want to get the environment information of the current pod? **The yaml list we wrote is very simple. In fact, after deployment, k8s will add fields that are not written in the yaml list, so how do we pass our pod environment information and container metadata to the container? Is it also the fields that are filled in by default for me by obtaining these k8s?
There are 3 ways:
- via environment variables
- Through the Downward API
- By interacting with ApiServer
via environment variables
It is relatively simple to obtain pod information through environment variables. Do you still remember the way we converted the data in the volume into environment variables and passed them into the container?
This time we also use a similar method to transfer data, which should be simpler than before, but what we transfer this time is environmental information, such as the IP of the pod, the name of the pod, the namespace, the service account to which the pod belongs, and the node name, CPU/Memory request/limit size, etc.
Let 's take a look at the yaml list information of the pod


In the above yaml list information, each field can be passed to the container as an environment variable, we can try to write a
- Write a yaml manifest and create a pod named my-downward
- The container uses busybox as the basic image. Since the container needs to run in the pod, we need to run a program in the container, such as sleep 8888888 or any other program that can run for a long time

apiVersion: v1
kind: Pod
metadata:
  name: my-downward
spec:
  containers:
  - name: my-downward
    image: busybox
    command: ["sleep","8888888"]
    env:
    - name: XMT_POD_NAME
      valueFrom:
        fieldRef:
          fieldPath: metadata.name
    - name: XMT_NAMESPACE
      valueFrom:
        fieldRef:
          fieldPath: metadata.namespace
    - name: XMT_NODENAME
      valueFrom:
        fieldRef:
          fieldPath: spec.nodeName
    - name: XMT_SERVICE_ACCOUNT
      valueFrom:
        fieldRef:
          fieldPath: spec.serviceAccountName
    - name: XMT_REQUEST_CPU
      valueFrom:
        resourceFieldRef:
          resource: requests.cpu
          divisor: 1m
    - name: XMT_LIMITS_MEMORY
      valueFrom:
        resourceFieldRef:
          resource: limits.memory
          divisor: 1Ki
The above-mentioned environment variables of XMT_ * are configured by myself , and the source is the corresponding configuration in the pod. After kubectl create the above yaml file, you can view the effect as follows
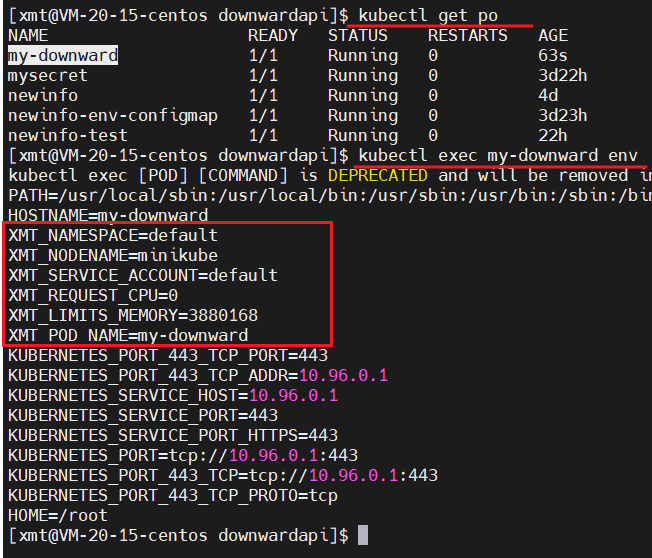
The environment variable is as shown above. When we need to use the environment variable in the container, we can take it and use it at any time, which is very convenient.
You can see the one-to-one correspondence between the environment variables in the container and the env on the yaml list

By way of Downward Api volume
Of course, we can also use the second method, that is, through the Downward Api volume method. The specific operation method is similar to the above environment variable method , but using the volume method will generate files under the specified path
Does Downward Api look like Restful Api? Does it all get data by accessing the interface?
This is not the case. Downward Api actually uses pod definition and status information as environment variables or files of the container to transfer data to the container, as shown in the figure

The way Downward Api rolls can be written like this:
apiVersion: v1
kind: Pod
metadata:
  name: my-downward-vv
  labels:
    xmtconf: dev
spec:
  containers:
  - name: my-downward-vv
    image: busybox
    command: ["sleep","8888888"]
    volumeMounts:
    - name: my-downward-vv
      mountPath: /etc/myvv
  volumes:
  - name: my-downward-vv
    downwardAPI:
      items:
      - path: "xmtPodName"
        fieldRef:
          fieldPath: metadata.name
      - path: "xmtNamespace"
        fieldRef:
          fieldPath: metadata.namespace
      - path: "xmtLabels"
        fieldRef:
          fieldPath: metadata.labels
Looking at this yaml is relatively simple, similar to the way of writing and mounting. Here, items under the downward API are used to pass each data. The source of data is written in a similar way to the above-mentioned environment variables.

We can see that the Downward Api mounts the data, and the specific file will be presented in the form of key-value pairs, and will also be presented in the form of text
Let's change the label of the pod to prod, and verify whether the corresponding files in the container will be modified accordingly?
kubectl label pod my-downward-vv xmtconf=prod --overwrite

Enter the container to see /etc/myvv/xmtLabelsif the file has changed

From the above effects, it can be seen that when using the Downward Api volume, the corresponding environment variables will exist in the form of files in the directory we specified
If we modify the value corresponding to the environment variable while the program is running, the content of the file in the volume will also be modified accordingly
How to interact with APiServer?
Since the third method and ApiServer method can be used, why use environment variables and Downward Api method?
Naturally, the Downward Api method is limited. The limitation is that the Downward Api method can only obtain the data of its own pod. If we want to obtain resource information of other pods, we need to interact with the Api Server at this time.
Similar to this:

Then let's write a pod, let the container in the pod interact with ApiServer, here we need to pay attention to two points:
- We need to determine the location of ApiServer so that we can have a chance to access it correctly
- Need to pass the authentication of ApiServer
Let's write a pod to use curl to access ApiServer in this pod
Make yourself a simple mirror with curl
FROM ubuntu:latest
RUN  apt-get update -y
RUN  apt install curl -y
ENTRYPOINT ["sleep", "8888888"]
Make the image and push the image to dockerhub
docker build -t xiaomotong888/xmtcurl .
docker push xiaomotong888/xmtcurl
Write a simple yaml, run the pod
mycurl.yaml
apiVersion: v1
kind: Pod
metadata:
  name: xmt-curl
spec:
  containers:
  - name: xmt-curl
    image: xiaomotong888/xmtcurl
    command: ["sleep","8888888"]
After the pod runs successfully, we enter the container
kubectl exec -it xmt-curl bash
We can check the ip of the kubernetes service in the k8s environment, and we can access it like this

Access kubernetes in the container

This is because there is no certificate, we need to import the certificate and token so that we can access the ApiServer correctly, and an important operation is also required
To create a clusterrolebinding , you need to create the binding before you can access the ApiServer normally. If the binding is not created, then the following steps are done, and the ApiServer will report 403 Forbidden
kubectl create clusterrolebinding gitlab-cluster-admin --clusterrole=cluster-admin --group=system:serviceaccounts --namespace=dev
Remember the location of the certificate?
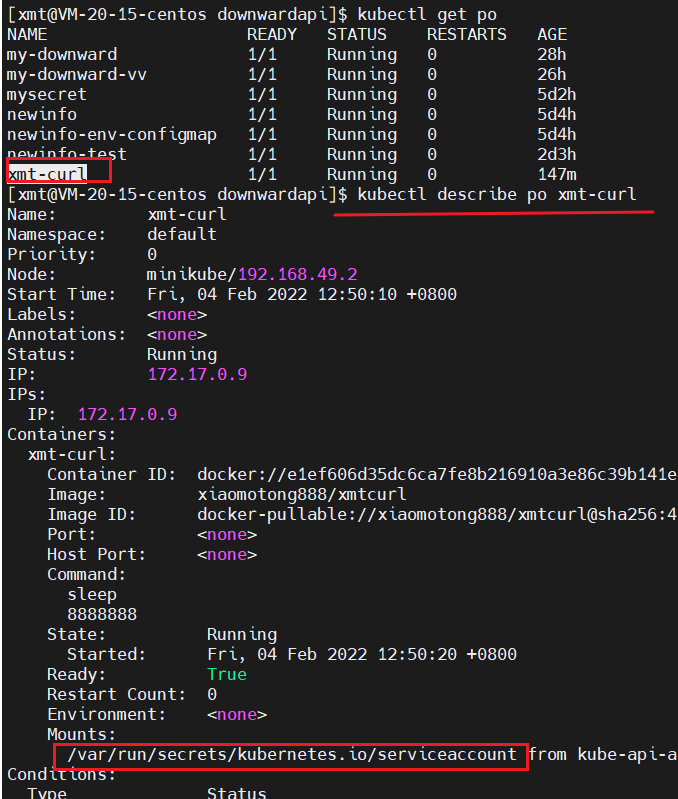
We have checked the default k8s mount location before, /var/run/secrets/kubernetes.io/serviceaccountwhich contains namespace, certificate, token

At this time, when we access k8s ApiServer, we can add the certificate
curl --cacert /var/run/secrets/kubernetes.io/serviceaccount/ca.crt https://kubernetes
We can import an environment variable, so we don't need to receive the import certificate when accessing k8s ApiServer
export CURL_CA_BUNDLE=/var/run/secrets/kubernetes.io/serviceaccount/ca.crt
https://gitee.com/common_dev/mypic20220206/raw/master/image-20220204152125059.png
It can be seen that the effect is different from before. Now the 403 is reported because there is no token. At this time, we can add the token
TOKEN=$(cat /var/run/secrets/kubernetes.io/serviceaccount/token)

In this way, you can see what APIs the apiServer has. These APIs are all filled in when we write the yaml list with apiVersion
Then use a picture to end today's sharing

The application in the container completes the authentication with the ApiServer through the certificate, and completes the interface interaction with the ApiServer through the token and namespace
That’s all for today, what I have learned, if there is any deviation, please correct me
Welcome to like, follow and collect
Friends, your support and encouragement is my motivation to keep sharing and improve quality

Ok, that's it for this time
Technology is open, and our mentality should be even more open. Embrace change, live in the sun, and strive to move forward.
I am A Bing Yunyuan , welcome to like, follow and collect, see you next time~
For more, you can check Zero Sound's live broadcast at 8 o'clock every night: https://ke.qq.com/course/417774