
Introduction nvm is the abbreviation of node version manager (node version management tool), which is a command-line tool for managing and switching to different versions of node.js.
Different projects may require different versions of node.js and npm (node package manager). For example, one of the projects I need to develop recently is based on node version 12.22.7, and the other is based on version 16.X or later. For the convenience of switching , I learned to install nvm.
In addition, if we develop and produce npm packages ourselves, we also need to test them in different versions of Node.js environments.
self-examination
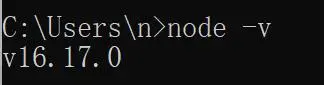
First check whether the current computer is installed with node, cmd (command prompt) to open the computer terminal, check the currently installed node version, enter:
node -vCopy
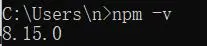
To view the currently installed npm version, enter:
npm -vCopy
If no relevant command is displayed, or the command cannot be found, it means that the current computer does not have node installed, and you can start the installation from step 2;
If the version number of node and the version number of npm are displayed, it means that the current computer has installed node, and you need to perform step 1;
Note: If you installed yarn, you also need to uninstall it, and reinstall it after installing nvm.
1. Uninstall node
To install nvm, you must first completely uninstall the node installed on the current computer, otherwise it will affect the installation and subsequent execution of nvm!
Follow the steps below to uninstall step by step:
Uninstall nodejs from programs in control panel
Control Panel -> Uninstall Program -> Find nodejs right click -> Uninstall
Delete the installation directory of node, the default is C:\Program Files\nodejs, it may also be in other disks, depending on the choice during installation
Find and delete the .npmrc file, the default is C:\User\username (for example: C:\User\kaigejava)
View the following files one by one
C:\Program Files (x86)\Nodejs
C:\Program Files\Nodejs
C:\Users\username\AppData\Roaming\npm
C:\Users\username\AppData\Roaming\npm-cache delete if it exists
Check the environment variables, delete all node-related configurations, and open the environment variables: right-click My Computer -> Properties -> Advanced -> Environment Variables -> Delete the Path of the user variable -> delete the node in the NODE_PATH of the system variable
Check node and npm, enter node-v, npm-v in cmd, and restart the computer
2. Install nvm
In fact, nvm-windows is installed under the windows system, and nvm only supports installation under Linux and Mac systems;
nvm-windows is slightly different from nvm, but the functions are roughly the same, both for switching node versions;
Go to the nvm-windows warehouse to download:
Click on the latest version to download and install (just install it in a fool’s way), the latest version is 1.1.10

3. Execute nvm
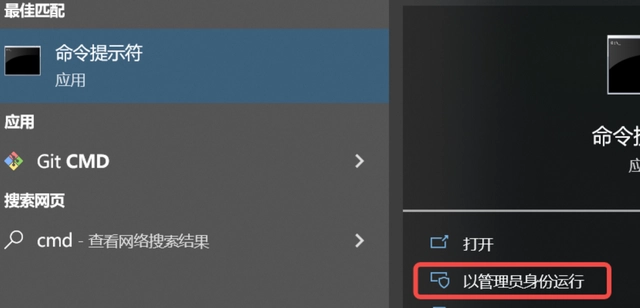
Execute cmd as administrator
Execute nvm list available to view all node versions
Execute nvm install xxx (eg: nvm install 12.22.7) to install the specified version
Once you install a version of node, the corresponding version of npm will be automatically installed for you, so there is no need to install npm separately

Execute nvm list to view the installed node version

Execute nvm use xxx (eg: nvm use 12.22.7) to switch to the specified node environment

4. Add other nvm commands
nvm use latest install the latest version
nvm use lts install long term support version
Installing a Long Term Support (LTS) version of Node is better as it has fewer bugs