I. Introduction
Today is the short-semester training for the summer vacation. I was required to take notes in class, so I will share my learning process in the next five days.
Two. QT installation process
First, here's my link:
I originally uploaded it to my Alibaba Cloud disk, but the compressed package was not shared. Sorry, everyone can private message me and ask me for the installation package.
installation steps:
-
1. In the interface of the installation folder, it is recommended that you do not install Qt on the C disk of the system disk (for example, I have made a change here and installed it on the D disk. Of course, you can also install it on the C disk), and keep other The default is fine. Continue to click "Next".
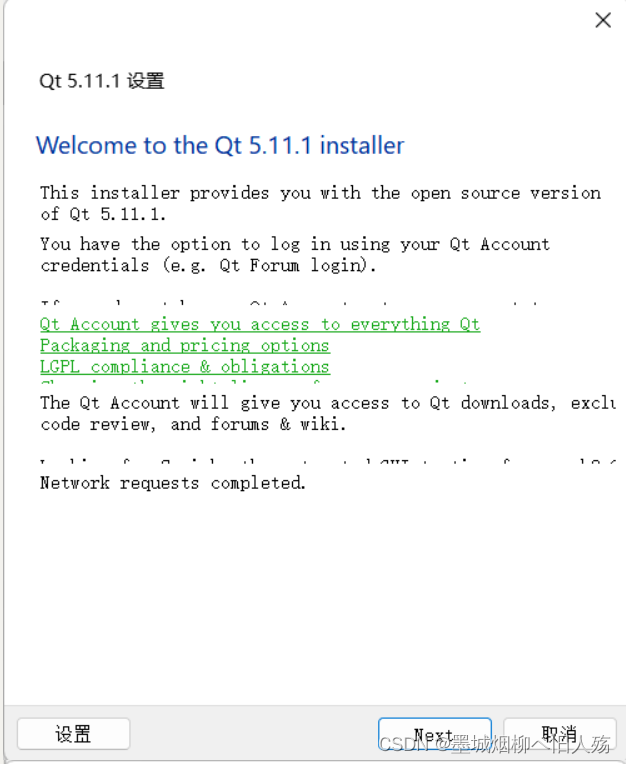

If the Skip (like the next position in my picture) button is grayed out, please disconnect from the network to install.
-
2. Keep clicking Next, and select the installation path. It is the same as installing most software at ordinary times, without explanation.
-
3. Now, here comes the key point. In the component selection interface, please be sure to select the components required to install Qt, otherwise you will not be able to run normally after installation. First, click the > arrow in front of each item to expand the content of the subitems. (Take 5.11 as an example)
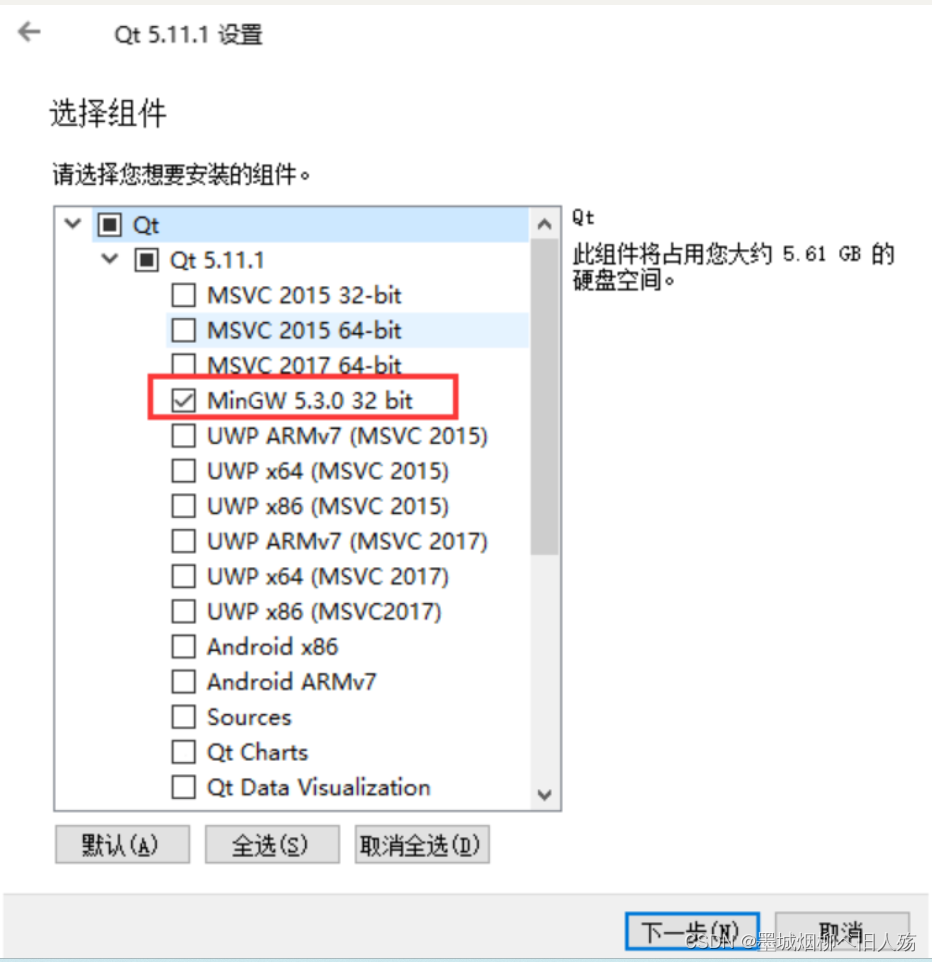

After the selection is complete, continue to click "Next".
- 4. Then execute the next step until the installation is complete.
3. Explore the software
1. Create a project
After I just finished the installation today, I found that there is no shortcut on the desktop. I was confused, checked some information, and finally found the .exe executable file in the installation directory, and started today's topic.
My .exe file is in D:,
\QT\Tools\QtCreator\binand the name is .qtcreator.exeNote here that you find that there are many .exe files in your installation directory, and only .exeqtcreator.exeis the protagonist of our experiment today.
The software is opened in Chinese, so we feel more familiar. You can modify the environment, font, brightness, etc. in "Tools-Options", you can try it yourself.
-
1. Right-click the file and select "New File or Project".
-
2. Click "Application" in the leftmost list box, select the project type as in the dialog box shown in the figure
Qt Widgets Application, and click the "Choose..." button
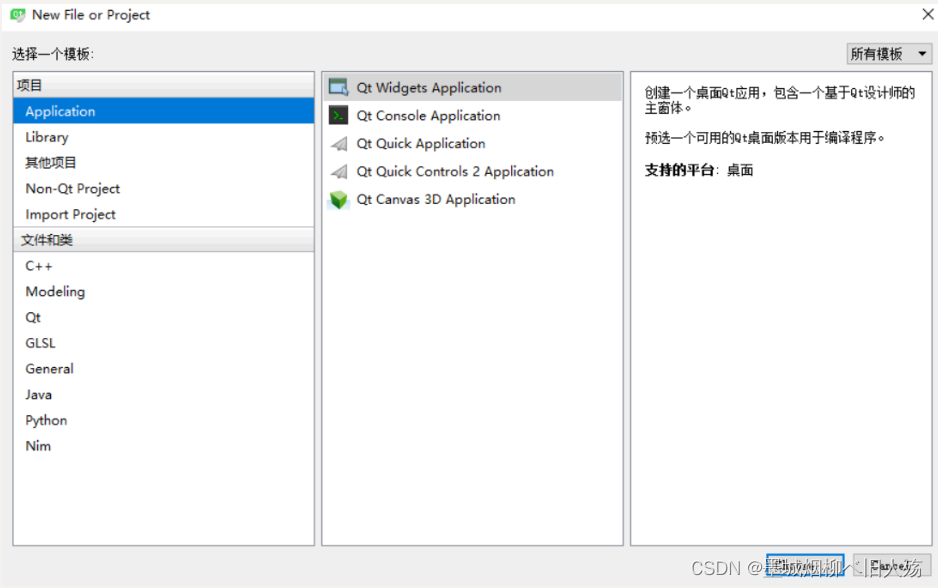
There are five options in the middle column here. The teacher in class also directly said the first one. I checked the information:
- Qt Widgets Application, an application with a Graphical User Interface (GUI) interface that supports desktop platforms. The design of GUI is completely based on C++ language, using a set of C++ class library provided by Qt.
- Qt Console Application, console application, without GUI interface, is generally used to learn C/C++ language, and can create such projects when only simple input and output operations are required.
- Qt Quick Application, to create deployable Qt Quick 2 applications. Qt Quick is a set of GUI development framework supported by Qt. Its interface design adopts QML language, and its program framework adopts C++ language. Use Qt Quick to design a very dazzling user interface, which is generally used for the design of borderless applications on mobile devices or embedded devices.
- Qt Quick Controls 2 Application, to create deployable Qt Quick 2 applications based on Qt Quick Controls 2 components. The Qt Quick Controls 2 component is only available for Qt 5.7 and later.
- Qt Canvas 3D Application, which creates Qt Canvas 3D QML projects, is also an interface design based on QML language and supports 3D canvases.
After checking these, I don’t quite understand, here we still choose 1 according to the requirements.
-
3. Set the project name and project path in the pop-up window, and then select the compiler. We only downloaded one just now, so there is no choice.
-
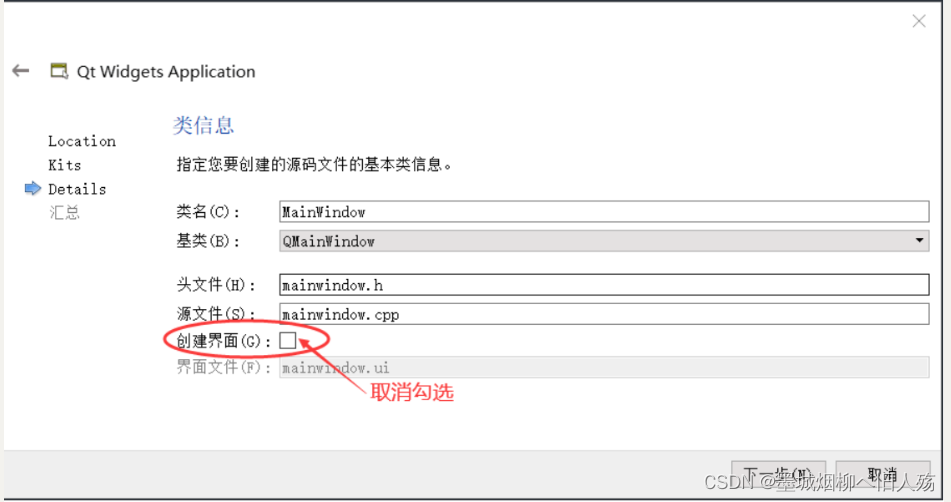
4. Click the "Next" button in the displayed interface, and select the base class of the interface to be created in this interface. There are 3 base classes to choose from:
- QMainWindow is the main window class, the main window has a main menu bar, toolbar and status bar, similar to the main window of a general application;
- QWidget is the base class of all visual interface classes, and the interface created by selecting QWidget can support various interface components;
- QDialog is a dialog class that can create a dialog-based interface;
-
5. Then click the "Next" button, and a page will appear, summarizing the files that need to be created and the file storage directory. Click the "Finish" button to complete the creation of the project.
2. Understand the interface
Under the project name node, various source files in the project are managed in groups. Several files and groups are as follows:
- Demo.pro is a project management file, including some setting items for the project.
- Headers group, under this node are all header files (.h) in the project, the project has a header file mainwindow.h, which is the header file of the main window class.
- Sources group: under this node are all C++ source files (.cpp) in the project. The project has two C++ source files. mainwindow.cpp is the implementation file of the main window class, corresponding to the mainwindow.h file. main.cpp is the main function file and the entry point of the application.
- Forms group: Under this node are all interface files (.ui) in the project. The project shown in Figure 5 has an interface file mainwindow.ui, which is the interface file of the main window. Interface files are text files that describe the composition of the interface using the XML language.
The display content of the upper and lower sub-windows on the left can be selected through a drop-down list box above it. The display content that can be selected includes projects, open documents, bookmarks, file system, class view, outline, etc. The upper sub-window shows the file directory tree of the project, and the lower part shows the list of open files. You can choose to display the class view at the bottom, so that the structure of all classes in the project is displayed below, which is convenient for program browsing and quick switching to the required code location.
3. Compile, debug and run the project
Click the "Project" button on the left toolbar of the main window, and the project compilation setting interface will appear.
The compiler tools available in this project are displayed under "Build & Run" on the left column of the interface. To use which compiler for project compilation, just click its name, and the name of the selected compiler will be in bold express. Here we choose to use the MinGW 32bit compiler (we only have this installed).
Each compiler has two setting interfaces, Build and Run. On the Build setting interface, there is a "Shadow build" check box. If this option is checked, a compiled file directory will be created in the same level directory of the project after compilation. The directory name contains compiler information. This method is generally used to create executable files of different versions using different compilers. If this item is not checked, after compiling, subdirectories "Debug" and "Release" will be created under the project directory to store the compiled files.
After designing the mainwindow.ui file and setting up the compilation tools, you can compile, debug or run the project. There are 4 buttons under the toolbar on the left side of the main window, and their functions are as follows:
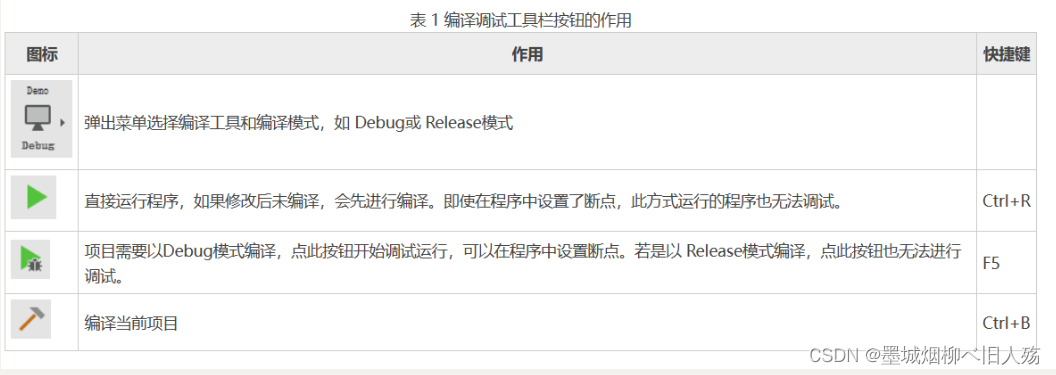
First compile the project, and then run the program after there are no errors. At this point, because we have nothing, all pop-up windows should be blank windows.
4. Program framework
1. Basic framework
If we do not check the Create interface option during the project we just created, then your project should not have a .ui file under the forms folder in the file tree directory on the left. Here is a look at my picture:
You can see that there are two project files on the left, among which 03cacluthe option to create an interface is checked, and 04testthe option to create an interface is not checked in the file, so the .ui file is missing. Let's look at the following project, .prothe file refers to our project file, which is equivalent to the last link file (note that it is not an executable file), so there is another way to run the project, you can directly select and right-click to run 04test.
With other language foundations, we should guess what this main file should be main.cpp, so let's look at it first.
2. main.cppDocuments
With other language foundations, we should guess what this main file should be main.cpp, so let's look at it first. main.cpp is the main function file, which mainly contains the entry function of the application, that is, the main() function.
We know that in C language (the blogger did not learn C++), the grammatical format of the main function is fixed:
int main(int argc, char *argv[]){


    //填充代码
    return 0;
}
Then the QT interface program should also have a fixed format:
int main(int argc, char *argv[])
{
    QApplication a(argc, argv);
	//填充代码
    return a.exec();
}
Remember: when using the Qt framework to write an application with an interface, the main() function must contain the 3rd and 5th line of code, otherwise the program cannot run normally.
But when we open our main.cppfile, it does look like this:
#include "mainwindow.h"
#include <QApplication>

int main(int argc, char *argv[])
{
    QApplication a(argc, argv);
    MainWindow w;
    w.show();

    return a.exec();
}
Let's annotate the code:
-
Lines 1~2: Because the main() function defines objects of the QApplication and MainWindow classes respectively, it is necessary to import mainwindows.h and the QApplication header files. The mainwindow.h file is created by ourselves and
" "enclosed in double quotes when imported; QApplication is provided to us by Qt and enclosed in<>quotation marks when imported. -
Line 7: MainWindow is a self-defined class that inherits from the QMainWindow main window class, so MainWindow is also a main window class. w is an object instantiated from the MainWindow class, representing a main window. (The .h file below you
Headersis actually a header file describing a main window, and then we instantiate it in main.cpp)
-
Line 8: By default, all components (controls, widgets) provided by Qt are hidden and will not be displayed automatically. By calling the show() method provided by the MainWindow class, the w window can be displayed after the program runs.
3. mainwindow.handmainwindow.cpp
Gradually understand, at the beginning I found that we hardly modified main.cppthe files for the few small projects we wrote, and all of them were operated in these two files.
When creating a project, we defined a main window class inherited from QMainWindow in the dialog box shown in the figure, and named it MianWindow. The definition part of this class is located in the mainwindow.h header file, and the implementation part is located in the mainwindow.cpp source in the file.
The mainwindow.h punch card should look like this:
#ifndef MAINWINDOW_H
#define MAINWINDOW_H

#include <QMainWindow>

class MainWindow : public QMainWindow
{
    Q_OBJECT

public:
    MainWindow(QWidget *parent = 0);
    ~MainWindow();
};

#endif // MAINWINDOW_H
Putting mainwindow.cppopen should look like this:
#include "mainwindow.h"

MainWindow::MainWindow(QWidget *parent)
    : QMainWindow(parent)
{
}

MainWindow::~MainWindow()
{

}
In the initial state, the MainWindow class consists of Q_OBJECT, constructor and destructor. Here we will focus on Q_OBJECT and constructor:
- Q_OBJECT: It is essentially a defined macro. All components that need the "signal and slot" function must introduce Q_OBJECT as a private attribute member into the class. The interface program designed in this section will not use "signals and slots", so Q_OBJECT can be deleted.
- Constructor with parameters: QWidget is the base class of all components, with the help of the parent pointer, the parent window can be specified for the current window. For example, in Figure 1, the QLabel text box is located in the main window, and the main window is its parent window. When the parent window is deleted, all child windows are also deleted together. Of course, you can also not specify the parent window, then the current window will be an independent window and will not be affected by other windows.
Let's explain this piece:
public:
    MainWindow(QWidget *parent = 0);
    ~MainWindow();
Constructors and destructors are special member functions in C++ that are used to perform some operations during the creation and destruction of objects.
A constructor is a function that is called automatically when an object is created. The main function of the constructor is to complete the initialization of the object, including assigning values to member variables and allocating memory. Every class has at least one constructor, or a default constructor if not explicitly defined.
A destructor is a function that is called automatically when an object is destroyed. The main function of the destructor is to release the resources occupied by the object, such as releasing dynamically allocated memory, closing files, and so on. Every class has at least one destructor, or a default destructor if not explicitly defined.
Constructors and destructors are named the same as the class name, but are preceded by a ~ sign to denote a destructor. They require no return type and cannot be overloaded.
Under the Q_OBJECT macro, constructors and destructors can only be declared in public.
Look at this line again:
class MainWindow : public QMainWindow
This is a declaration of a C++ class, using class inheritance. Among them MainWindowis the class name of the class, and the part after the colon public QMainWindowindicates that the class publicly inherits from the QMainWindowclass. In C++, classes can extend their functionality through inheritance, and classes that inherit from other classes are called derived classes. In this case, MainWindowa derived class that inherits and extends QMainWindowthe functionality of the class. Regarding the access control specifier public, it means that all public members inherited from the parent class are still public in the subclass and can be accessed by other code. Private and protected members cannot be directly accessed by other code and can only be used inside the class. Therefore, here, MainWindowthe class exposes QMainWindowthe same public interface as the class, so that other code can QMainWindowuse it as it is used MainWindow.
I have never learned C++, and rely on the only remaining knowledge of C language to understand.
In addition, one more knowledge point needs to be added:
In C/C++ code, when we need to use a header file, we can use #includethe directive to include it. However, in a large-scale project, there may be multiple source files that need to include the same header file. If it is not controlled, it is easy to have the problem that the header file is included repeatedly, which will cause compilation errors and affect the normal operation of the program.
To avoid this problem, we can add the following code at the beginning of the header file:
#ifndef MAINWINDOW_H
#define MAINWINDOW_H

// 头文件内容

#endif // MAINWINDOW_H
Among them, #ifndefcheck MAINWINDOW_Hwhether has been defined, if not, execute the following #defineto define it as a macro. This macro can be understood as a flag to mark whether the header file has been included.
Next, we add at the end of the header file #endifto indicate the end of conditional compilation.
In this way, when the compiler processes another source file that needs to include this header file, since MAINWINDOW_Hhas been defined as a macro, it will be ignored when the header file is included again. In this way, the problem of header files being repeatedly included can be avoided.
4. mainwindow.cppunderstand
Look at this sentence first:
MainWindow::~MainWindow()
{

}
We now know ~MainWindowthat it is a destructor, but what are the two preceding colons? What is its function, and what is generally on the front right? The two colons are scope resolution operators, usually used to access member functions and static member variables of a class. Here, MainWindow::~MainWindow()it means the destructor of the MainWindow class.
A destructor is a special function of a class whose name ~starts with a tilde followed by the class name and is used to release resources when the object is destroyed. Destructors have no return value and cannot have parameters. If you do not explicitly define a destructor, the compiler will automatically generate a default destructor.
In C++, member functions can be static or non-static. For non-static member functions, it needs to be called through the object; for static member functions, you can use the scope resolution operator to call directly, such as ClassName::functionName(). Here, it is a destructor of ~MainWindow()a class , so the scope resolution operator is used .MainWindow
Note that member functions declared in a class definition are non-static by default. When defining a member function in an implementation file, you need to specify which class the function belongs to, so you need to use a scope resolution operator to indicate affiliation, eg MainWindow::~MainWindow().
Look at this sentence again:
MainWindow::MainWindow(QWidget *parent)
    : QMainWindow(parent)
{
}
Even if we don’t read the following, we should be able to guess it here. This should be the defined MainWindowconstructor, but we don’t know what the latter part is. You should be able to guess the function parameters in (). Here we first understand the relationship between the two base classes, QWidgetand QMainWindoware two different Qt classes, both of which are base classes in the Qt library.
QWidgetClass is a basic user interface element class used to create and manage controls such as windows, buttons, labels, edit boxes, etc. QMainWindowA class is a special window class used to create the main window and provides some common operations and layout methods. Because QMainWindowit inherits from QWidget, you can use QWidgetall the features of , as well as some of its own.
In Qt, every window must have a parent window. Normally, a child window is nested inside a parent window, and the parent window is the main window. Therefore, when creating a Qt application, usually create an QMainWindowobject as the main window first, and then add other controls and sub-windows on this window.
It should be noted that QWidgetboth and QMainWindoware abstract classes and cannot be instantiated directly. Usually, we need to inherit these classes and rewrite some virtual functions to realize our own functions. Before inheriting, you need to include the corresponding header file first, such as #include <QWidget>or #include <QMainWindow>.
Both of them are a base class (you should have seen it when you created the project), but
QMainWindowinherit fromQWidget, so you can useQWidgetall the functions of , as well as some functions unique to you. This is the relationship between the two of them.
After understanding this, look at this code again. This is MainWindowthe implementation of the constructor of the class.
- Function name:
MainWindow::MainWindowYesMainWindowThe constructor of the class, which is used to initialize the object when it is created. - Parameter:
(QWidget *parent)Indicates that the constructor has a pointer parameter of QWidget type, which represents the pointer of the parent window, and the default value isnullptr. - Initialization list:
QMainWindow(parent)Indicates callingQMainWindowthe constructor of the base class andparentpassing parameters to it. This statement is done through the initialization list, which is executed before the body of the constructor. - Constructor body: The code block inside curly braces is the constructor body, which is used to complete other initialization work or perform other operations.
Generally speaking, the function of this constructor is to call the constructor of the base class for initialization and complete other initialization work. Since the window classes in Qt are usually inherited from QWidgetor QMainWindow, the constructor of the base class needs to be called in the constructor to initialize.
This single colon and the content immediately following it is the constructor's initializer list (initializer list), which is used to initialize the class member variables.
In C++, member variables usually need to be initialized in the constructor. For convenience, C++ provides initialization list syntax to do this. An initializer list begins with a colon :followed by comma-separated names of member variables and their initialization values. The initialization values for each member variable are enclosed in parentheses and separated by commas.
In this case, QMainWindow(parent)it is part of the initialization list. It means calling QMainWindowthe constructor of the base class and parentpassing parameters to it for initialization. Since the window class in Qt is usually inherited from QWidgetor QMainWindow, it is necessary to call the constructor of the base class in the constructor to initialize.
5. Implement a simple calculator
Next, start our first program --- implement a simple calculator.
1. Use the .ui program
After we use the .ui file, the QT program can help us solve some problems to a large extent. The reason is that we can drag in the .ui file, which saves us the time to define components. Here, after we create a new project, in the .ui file, manually drag it into the following screen:

Here is a brief introduction. The first, third, and fifth controls are lineEditcalled text editing lines in Chinese, while the second control is comboBoxcalled a check box in Chinese. The fourth control is pushButtoncalled a button in Chinese. . These can be found in the toolbar on the left, and it should be enough to explore the following by yourself.
Next, open our .h file, which should look like this:
#ifndef MAINWINDOW_H
#define MAINWINDOW_H

#include <QMainWindow>

namespace Ui {
class MainWindow;
}

class MainWindow : public QMainWindow
{
    Q_OBJECT

public:
    explicit MainWindow(QWidget *parent = 0);
    ~MainWindow();

private slots:
    void on_pushButton_clicked();

private:
    Ui::MainWindow *ui;
};

#endif // MAINWINDOW_H
main.cppWe don't care about the file for now, in another .cpp file, enter the following code:
#include "mainwindow.h"
#include "ui_mainwindow.h"
MainWindow::MainWindow(QWidget *parent) :
QMainWindow(parent),
ui(new Ui::MainWindow)
{
ui->setupUi(this);
}
MainWindow::~MainWindow()
{
delete ui;
}
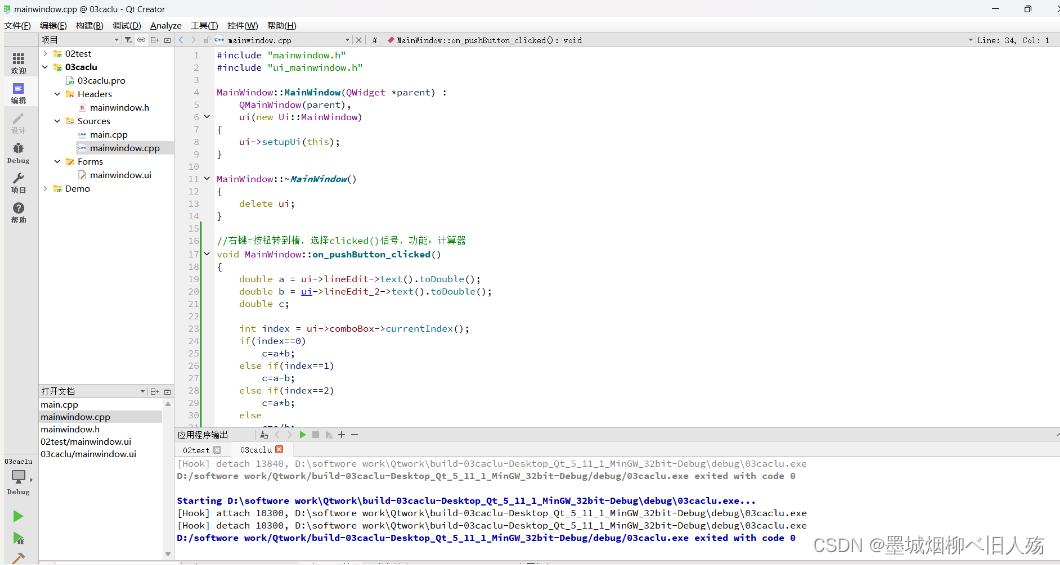
//右键=按钮转到槽,选择clicked()信号,功能:计算器
void MainWindow::on_pushButton_clicked()
{
double a = ui->lineEdit->text().toDouble();
double b = ui->lineEdit_2->text().toDouble();
double c;
int index = ui->comboBox->currentIndex();
if(index==0)
c=a+b;
else if(index==1)
c=a-b;
else if(index==2)
c=a*b;
else
c=a/b;
ui->lineEdit_3->setText(QString::number(c)); //double--->string
}
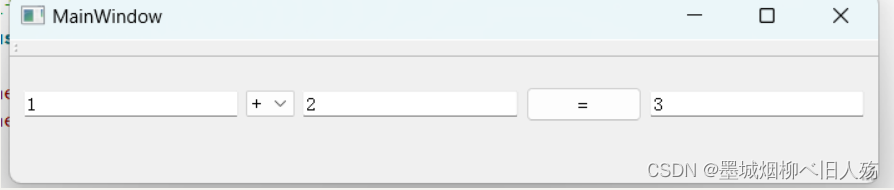
Next we can start running the project.
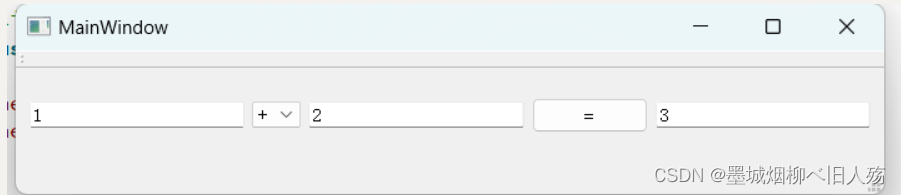
The result of the operation is:
2. Do not use .ui files
Create a new project, select QWidget as the base class, so as to prevent us from using QMainWindow, and then enter the following code in the .h file:
#ifndef WIDGET_H
#define WIDGET_H

#include <QWidget>
#include <QtWidgets>   //1.所有部件的头文件
class Widget : public QWidget
{
    Q_OBJECT

public:
    Widget(QWidget *parent = 0);
    ~Widget();

private slots:
    void caculator();  //自定义的槽函数声明


private :
    QPushButton *pushButton;
    QComboBox *comboBox;
    QLineEdit *lineEdit1;
    QLineEdit *lineEdit2;
    QLineEdit *lineEdit3;
};

#endif // WIDGET_H
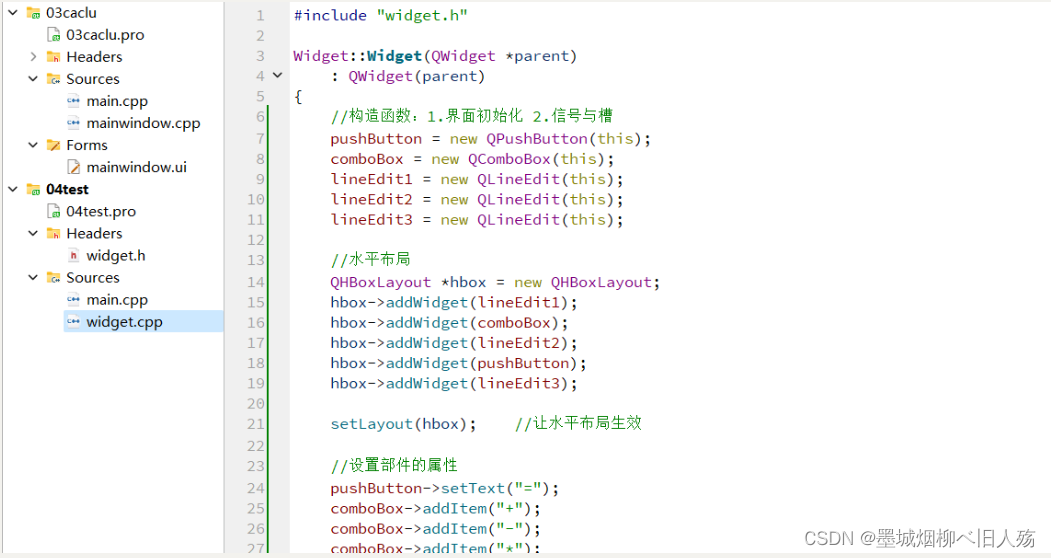
Enter the following code in widget.cpp:
#include "widget.h"

Widget::Widget(QWidget *parent)
    : QWidget(parent)
{
    //构造函数:1.界面初始化 2.信号与槽
    pushButton = new QPushButton(this);
    comboBox = new QComboBox(this);
    lineEdit1 = new QLineEdit(this);
    lineEdit2 = new QLineEdit(this);
    lineEdit3 = new QLineEdit(this);

    //水平布局
    QHBoxLayout *hbox = new QHBoxLayout;
    hbox->addWidget(lineEdit1);
    hbox->addWidget(comboBox);
    hbox->addWidget(lineEdit2);
    hbox->addWidget(pushButton);
    hbox->addWidget(lineEdit3);

    setLayout(hbox);    //让水平布局生效

    //设置部件的属性
    pushButton->setText("=");
    comboBox->addItem("+");
    comboBox->addItem("-");
    comboBox->addItem("*");
    comboBox->addItem("/");

    //信号与槽
    connect(pushButton,SIGNAL(clicked(bool)),this,SLOT(caculator()));

}

Widget::~Widget()
{

}

//槽函数:实现计算器功能
void Widget::caculator()
{
    double a = lineEdit1->text().toDouble();
    double b = lineEdit2->text().toDouble();
    double c;

    int index = comboBox->currentIndex();
    if(index==0)
        c=a+b;
    else if(index==1)
        c=a-b;
    else if(index==2)
        c=a*b;
    else
        c=a/b;
    lineEdit3->setText(QString::number(c));        //double--->string
}
The result is still:
6. Implement a picture viewer
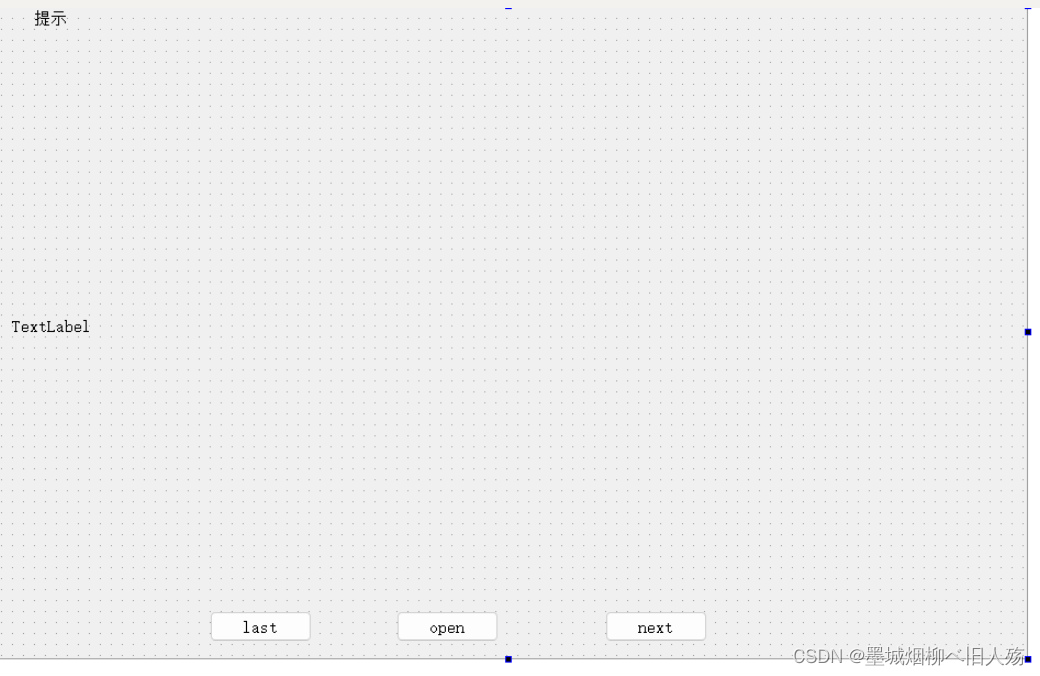
1. Modify the .ui file
2. Edit the mainwindow.h file
#ifndef WIDGET_H
#define WIDGET_H

#include <QWidget>

namespace Ui {
class Widget;
}

class Widget : public QWidget
{
    Q_OBJECT

public:
    explicit Widget(QWidget *parent = 0);
    ~Widget();

private slots:
    void on_pushButton_clicked();

    void on_pushButton_2_clicked();

    void on_pushButton_3_clicked();

private:
    Ui::Widget *ui;
    QStringList filenames;
    int count;//图片的总数
    int num;//图片的下标
};

#endif // WIDGET_H
3. Edit mainwindow.cpp file
#include "widget.h"
#include "ui_widget.h"
#include <QFileDialog>

Widget::Widget(QWidget *parent) :
    QWidget(parent),
    ui(new Ui::Widget)
{
    ui->setupUi(this);
    //设置label2
    ui->label_2->setMinimumSize(501,331);

    ui->label_2->setScaledContents(true);   //自动调整
}

Widget::~Widget()
{
    delete ui;
}

void Widget::on_pushButton_clicked()
{
    //实现显示个图片
    filenames = QFileDialog::getOpenFileNames();
    count = filenames.size(); //图片的总数


    ui->label_2->setPixmap(QPixmap(filenames.at(0)));
    num =0;
}

void Widget::on_pushButton_2_clicked()
{
    //上一张
    if(num==0)
        num=count-1;
    else
        num--;

    ui->label_2->setPixmap(QPixmap(filenames.at(num)));
}

void Widget::on_pushButton_3_clicked()
{
    //下一张
    if(num==count-1)
        num=0;
    else
        num++;

    ui->label_2->setPixmap(QPixmap(filenames.at(num)));
}
4. Running results
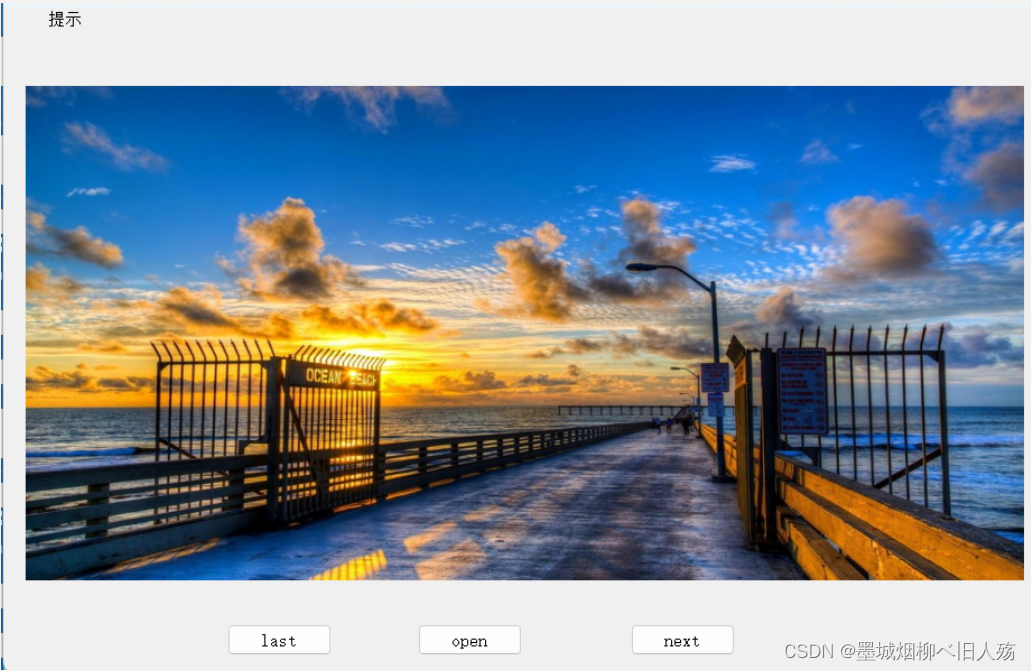
At this point we can use three buttons to control the up and down view of the picture.
These two program codes were actually written under the leadership of the training teacher. There is no way, this kind of five-day class will be handed in for project defense on Friday after four days of class. It starts from 0, and the code can’t be read. I am also convinced. Alright, I'm here today, and I'll try to understand these two program codes tomorrow.