This article introduces how to deploy the JavaWeb project managed by maven to the Linux cloud server, including jdk configuration, Apache Tomcat configuration, mysql configuration, server restart, etc. In this article, server version: Ubuntu 14.04.1, jdk version: 1.7.0_79, mysql version: 5.5.53, Tomcat version: apache-tomcat-7.0.73. Without further ado, let's get straight to the point.
1. Configure jdk
Download the corresponding jdk version for your own server, and readers can download it from Baidu.
Upload the downloaded jdk compressed package to the cloud server, and use the tar -zxvf xxx.tar.gz command to extract it to a custom folder. This article extracts it to the /home/ubuntu/fangw/ folder.
Execute the vim /etc/profile command on the terminal to configure jdk, add the following content to the end of the profile file (please modify the specific folder path according to your own situation), save and exit.
export JAVA_HOME=/home/ubuntu/fangw/jdk1.7.0_79
export JRE_HOME=${JAVA_HOME}/jre
export CLASSPATH=.:${JAVA_HOME}/lib:${JRE_HOME}/lib
export PATH=${JAVA_HOME}/bin:$PATH
Execute the source /etc/profile command on the terminal to make the configuration take effect.
Execute the java -version command on the terminal and if the following figure appears, it means that the jdk configuration has been completed.

Two, install and configure mysql
Execute the sudo apt-get install mysql-server mysql-client command in the terminal to install mysql, and you will be asked to enter the password halfway.
After the installation is complete, enter the service mysql restart command in the terminal. If the following figure appears, it means that the installation is successful:

Note: The installed mysql is not allowed to be accessed from the external network, and can only be operated on the server through a series of instructions. If you want mysql on the server to allow external network access, you need to change the mysql configuration file.
Enter the vim /etc/mysql/my.cnf command in the terminal, comment out the code shown in the figure below (add # in front), and then restart mysql to access it through the external network.

The advantage of this is that the database can be operated remotely through tools such as Navicat for MySQL, which is very convenient.
If you modify the my.cnf file, enter the service mysql restart command in the terminal to make the modification take effect. The service mysql stop command is to stop running the mysql service. The service mysql status command is to view the status of the mysql service.
Three, configure tomcat
Download the corresponding Apache Tomcat version for your own server, and readers can download it from Baidu.
Unzip the downloaded Apache Tomcat zip package to a custom folder. This article unzips it to the /home/ubuntu/fangw/ folder.
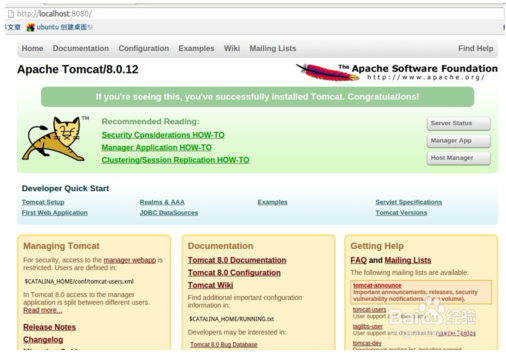
Switch to the bin folder under apache, execute the sh startup.sh command, and enter http://localhost:8080/ in the browser after tomcat starts, where localhost can be changed to the IP or domain name of your cloud server.
If the following page appears, it means that the tomcat configuration is successful.
Note: Some tutorials say that the jdk environment variable needs to be added in bin/startup.sh. I don't understand why it needs to be added. No environment variables are added in this project, and tomcat can start as usual.
If you want tomcat to support port 80 (for example, only ports 80 and 43 are supported in WeChat development), you need to modify the server.xml file in the conf folder under tomcat:

Change the default 8080 in the picture above to 80.
Fourth, install and configure apache-maven
The apache-maven version in this article is 3.3.9. Baidu downloads apache-maven-3.3.9-bin.zip and uploads it to the cloud server.
Unzip the archive to a custom folder. Add the following paragraph in the <mirrors> tag in the apache-maven-3.3.9/conf/settings.xml file:
<mirror>
<id>alimaven</id>
<name>aliyun maven</name>
<url>http://maven.aliyun.com/nexus/content/groups/public/</url>
<mirrorOf>central</mirrorOf>
</mirror>
The purpose of this passage is to configure the Ali data source for maven. Of course, you can also configure local data sources for maven, provided that you have maven resources locally, and then add the following sentence in settings.xml:
<localRepository>G:\MAVEN\repository</localRepository>
If there are no maven resources locally, this sentence cannot be added.
5. Deploy the Javaweb project to the tomcat of the cloud server
First, package the project into a war package in eclipse or myeclipse. Proceed as follows:
Right-click the item with the mouse ---->export---->Select War File in the pop-up window

Select the storage location, and click finish to export the war package.
Upload the exported war package to the webapp folder under tomcat, and then execute the sh startup.sh command under the bin folder. You can access it after tomcat starts.
The logs will be stored in the logs folder under tomcat. The command to stop tomcat is sh shutdown.sh
6. The cloud server and tomcat will restart automatically at regular intervals
Because the server memory is very small, the server memory usage will be overloaded and crash when running the project. So I set the cloud server to automatically restart at 4:30 every morning, and the tomcat server starts up.
Edit the /etc/crontab file and add the following sentence at the end of the file:
30 4 * * * root init 6
This sentence means to restart the server at 4:30 every day. init 6 stands for reboot.
Everyone is welcome to leave a message in the comment area. If you have any questions, please feel free to consult, I will reply as soon as possible~~~~~
Finally, play a wave of advertising. Search the public account "Buy and save" on WeChat, and get coupons when you shop on Taobao, and you can save money when you shop.
