Article Directory
This tutorial is based on Docker and modified in Silicon Valley
What is Docker
The container virtualization technology that solves the problem of operating environment and configuration software container, facilitates continuous integration and contributes to the overall release.
The environment configuration is so troublesome. If you change a machine, you have to do it all over again, which is labor-intensive and time-consuming. Many people think, can the problem be solved fundamentally, and the software can be installed with the environment? That is to say, when installing, copy the original environment exactly. With Docker, developers can eliminate the "works on my machine" problem when co-coding.
![[External link picture transfer failed, the source site may have an anti-leeching mechanism, it is recommended to save the picture and upload it directly (img-UgNhgjBy-1584000574509)(en-resource://database/8251:1)]](https://img-blog.csdnimg.cn/20200312161006389.png?x-oss-process=image/watermark,type_ZmFuZ3poZW5naGVpdGk,shadow_10,text_aHR0cHM6Ly9ibG9nLmNzZG4ubmV0L3RoZV9saWFuZw==,size_16,color_FFFFFF,t_70)
Docker Philosophy
Docker is a cloud open source project based on the Go language.
The main goal of Docker is "Build, Ship and Run Any App, Anywhere", which is to make the user's APP (which can be a WEB application or a database application) etc.) and its operating environment can achieve " one package, run everywhere ".
The emergence of Linux container technology solves such a problem, and Docker is developed on the basis of it. Run the application on the Docker container, and the Docker container is consistent on any operating system, which realizes cross-platform and cross-server. You only need to configure the environment once, and you can deploy it on another machine with one click, which greatly simplifies the operation
what can be done
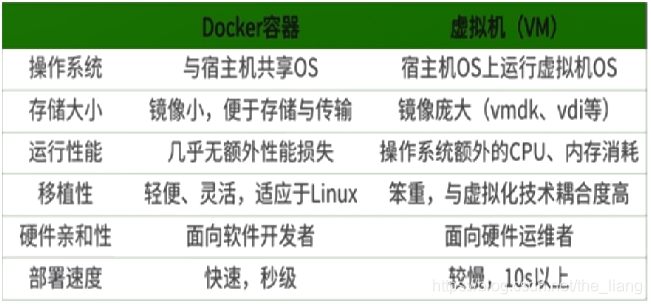
Virtual machine (virtual machine) is a solution with environment installation.
Disadvantages of virtual machines: high resource usage, many redundant steps, slow startup
Due to these shortcomings of the previous virtual machine, Linux has developed another virtualization technology: Linux Containers (Linux Containers, abbreviated as LXC).
Instead of simulating a complete operating system , Linux containers isolate processes. With containers, it is possible to package all the resources needed for software to run into an isolated container. Unlike a virtual machine, a container does not need to be bundled with a complete operating system, but only the library resources and settings required for the software to work. The system thus becomes efficient and lightweight and ensures that the software deployed in any environment can run consistently.
Compare the differences between Docker and traditional virtualization methods:
-
Traditional virtual machine technology is to virtualize a set of hardware, run a complete operating system on it, and then run the required application process on the system;
-
The application process in the container runs directly on the host's kernel. The container does not have its own kernel, and there is no hardware virtualization. Therefore, containers are more portable than traditional virtual machines.
-
Each container is isolated from each other, and each container has its own file system. The processes between containers will not affect each other, and computing resources can be distinguished.
Basic composition of Docker
-
A Docker image (Image) is a read-only template. Images can be used to create Docker containers, and one image can create many containers.
-
Docker uses a container (Container) to run an application or a group of applications independently. A container is a running instance created from an image . It can be started, started, stopped, deleted. Each container is an isolated and secure platform. The container can be regarded as a simple version of the Linux environment (including root user authority, process space, user space and network space, etc.) and the applications running in it. The definition of a container is almost the same as that of an image, and it is also a unified perspective of a stack of layers. The only difference is that the top layer of the container is readable and writable.
-
The warehouse (Repository) is a place where image files are stored centrally.
There is a difference between a warehouse (Repository) and a warehouse registration server (Registry). There are often multiple warehouses stored on the warehouse registration server, and each warehouse contains multiple images, and each image has a different tag (tag).
Warehouses are divided into public warehouses (Public) and private warehouses (Private). The largest public repository is Docker Hub , which stores a large number of images for users to download. Domestic public warehouses include Alibaba Cloud, NetEase Cloud, etc.
Install in Linux
Install Docker on CentOS 6.8
-
yum install -y epel-release
Docker is released using EPEL. The OS of the RHEL system must first ensure that the EPEL warehouse is already held, otherwise, first check the version of the OS, and then install the corresponding EPEL package. -
start installation:
yum install -y docker-io -
Configuration file location after installation:
/etc/sysconfig/docker -
Start the Docker background service:
service docker start -
Verify Docker version:
docker version
Install Docker on CentOS 7
If you are not root, prepend the command with
sudo
-
Make sure the system is CentOS7 and above:
cat /etc/redhat-release

-
Uninstall the old version:
 yum remove docker \
                  docker-common \
                  docker-selinux \
                  docker-engine
If yum reports that none of these packages are installed, this is normal.
- Yum installs gcc related:
yum -y install gcc
yum -y install gcc-c++
- Install required packages
yum install -y yum-utils device-mapper-persistent-data lvm2
(Ignored) Modify the mirror address provided in the official document.
Note that the mirror address provided in the official document may still be slow to access, so you need to use the mirror image of Alibaba Cloud
-
(Ignored) Update yum package index:yum makecache fast -
Install the latest version of Docker CE:
yum install docker-ce
If the installation fails, please Baidu: docker image installation
-
Or install a specific version:
- List available versions:
yum list docker-ce.x86_64 --showduplicates | sort -r
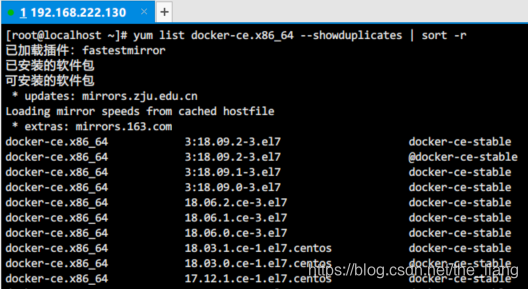
- To install a specific version, append the version string to the package name, separating them with a hyphen (-):
yum install docker-ce-<VERSION>
- List available versions:
-
Start Docker:
systemctl start docker -
Verify Docker: docker version

-
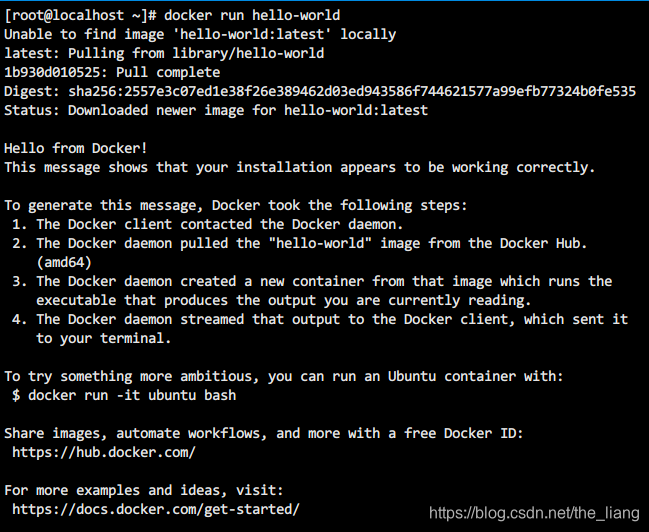
HelloWorld:
docker run hello-world, by running hello-world, Docker first checks whether the image is needed locally, and does not automatically pull it from the warehouse and run it.
If the loading is slow, please see the following tutorial to configure the mirror accelerator
Docker China official image acceleration
Through Docker's official image acceleration, users in China can quickly access the most popular Docker images. The image is hosted in mainland China, and local users will now enjoy faster download speeds and greater stability, enabling more agile development and delivery of Dockerized applications.
Docker China official image acceleration can be accessed through registry.docker-cn.com. This repository only contains popular public mirrors. Private images still need to be pulled from the US registry.
You can use the following command to pull directly from the image acceleration address:
docker pull registry.docker-cn.com/myname/myrepo:mytag
For example:
docker pull registry.docker-cn.com/library/ubuntu:16.04
Note: Unless you have modified the Docker daemon's
--registry-mirrorparameters (see below), you will need to specify the name of the official image in full. For example, library/ubuntu, library/redis, library/nginx.
Configure the Docker daemon with --registry-mirror
You can configure the Docker daemon to use Docker's official image acceleration by default. In this way, you can accelerate the image pull through the official image by default, instead of specifying it every time you pull registry.docker-cn.com.
You can pass arguments when the Docker daemon starts --registry-mirror:
docker --registry-mirror=https://registry.docker-cn.com daemon
To make changes permanent, you can edit /etc/docker/daemon.jsonthe file and add the registry-mirrors key.
{


  "registry-mirrors": ["https://registry.docker-cn.com"]
}
After modifying and saving, restart Docker to make the configuration take effect:systemctl restart docker
Note: You can also use Docker for Mac and Docker for Windows to set it up.
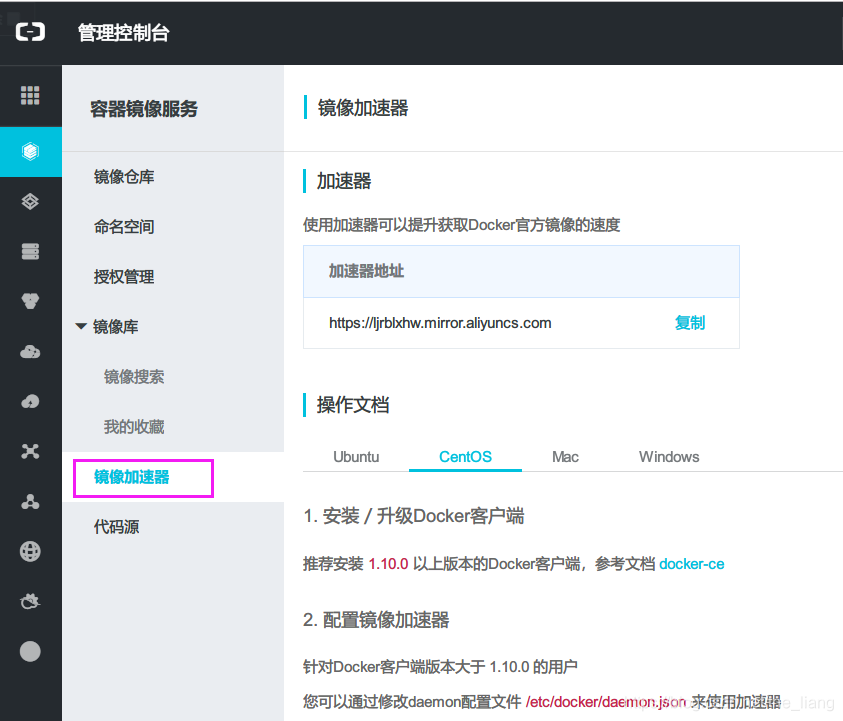
Alibaba Cloud Mirror Acceleration
In view of the domestic network problem, it is very slow to pull the Docker image later. We may need to configure the accelerator to solve it. I use the image address of my own account in Alibaba Cloud (you need to register and have your own accelerator address)
-
Register an Aliyun account (Taobao account is available): https://dev.aliyun.com/search.html
-
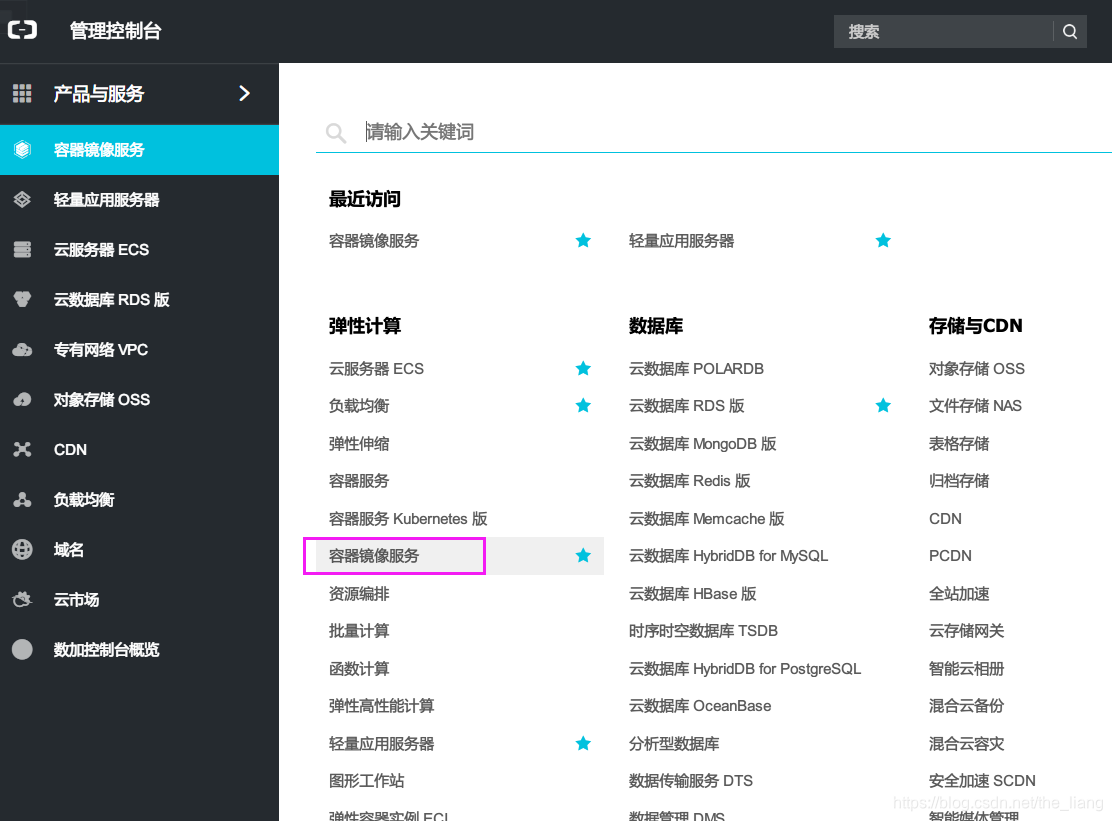
Find [Container Mirroring Service] in the management console
-
Create a link to obtain the accelerator address: https://cr.console.aliyun.com/cn-hangzhou/mirrors
-
Configure CentOS6.8 native Docker to run mirror accelerator
- Modify the Docker configuration:
vim /etc/sysconfig/docker - Configure your own Alibaba Cloud acceleration address into
other_args="--registry-mirror=https://你自己的账号加速地址.mirror.aliyuncs.com"
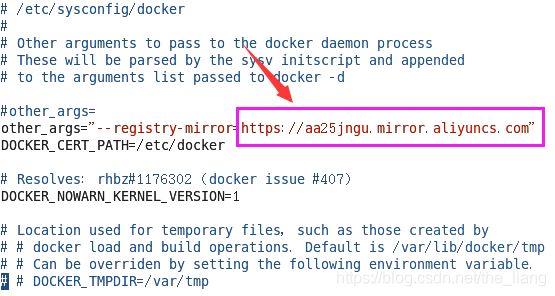
- Restart the Docker service:
service docker restart - Verify configuration succeeded:
ps -ef | grep docker. If the following accelerator link appears in the result, it proves that the configuration is successful.

- Modify the Docker configuration:
-
CentOS7 configuration image accelerator: For users whose Docker client version is greater than 1.10.0, you can use the accelerator by modifying the daemon configuration file /etc/docker/daemon.json
- Edit the Docker configuration file:
vi /etc/docker/daemon.json - Add accelerator address
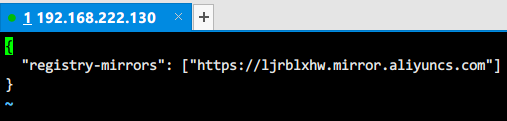
- restart docker
- Edit the Docker configuration file:
systemctl daemon-reload
systemctl restart docker
Configuration is complete! !
underlying principle
- how to work?
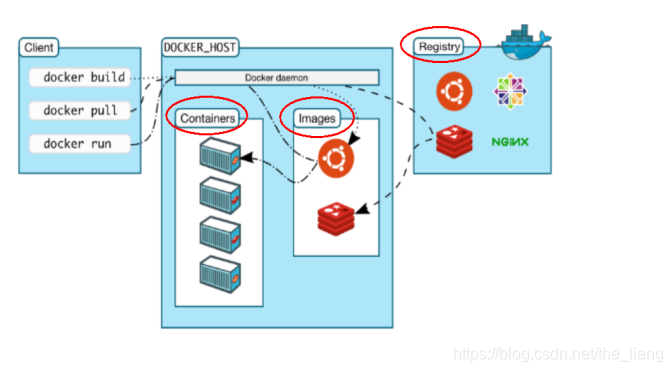
Docker is a system with a Client-Server structure. The Docker daemon runs on the host and is accessed from the client through a Socket connection. The daemon accepts commands from the client and manages the containers running on the host. A container is a runtime environment, which is the container we mentioned earlier.
- Why is Docker faster than virtual machines?
- Docker has fewer abstraction layers than virtual machines. Since docker does not need Hypervisor to realize hardware resource virtualization, the programs running on the docker container directly use the hardware resources of the actual physical machine. Therefore, docker will have obvious advantages in efficiency in terms of CPU and memory utilization.
- Docker uses the kernel of the host machine without the need for a Guest OS. Therefore, when creating a new container, docker does not need to reload an operating system kernel like a virtual machine. Still avoiding the time-consuming and resource-consuming process of booting and loading the operating system kernel, when creating a new virtual machine, the virtual machine software needs to load the Guest OS, and this new process takes minutes. However, docker omits this process because it directly uses the operating system of the host machine, so it only takes a few seconds to create a new docker container.
Common commands
start service
CentOS6: Use the chkconfig command.
Start the service: service docker start
Boot up automatically: chkconfig docker on
Disable auto-start:chkconfig docker off
CentOS7: Use enable and disable in systemctl
Start the service: systemctl start docker
Boot up automatically: systemctl enable docker
Disable auto-start:systemctl disable docker
help command
Docker help command: docker --help
Docker detailed command: docker COMMAND --help
View version: docker version
Docker statistics:docker info
mirror command
List all images on this machine: images

- Description of each option:
- REPOSITORY: Represents the mirrored warehouse source
- TAG: the tag of the image
- IMAGE ID: image
- IDCREATED: Image creation time
- SIZE: image size
Note : in the Docker command IMAGEcan refer to REPOSITORY, IMAGE ID,REPOSITORY:TAG
The same warehouse source can have multiple TAGs, which represent different versions of the warehouse source. We use REPOSITORY:TAGto define different images. If you don't specify a version tag for a mirror, for example if you only use ubuntu, docker will default to using ubuntu:latestthe mirror

- OPTIONS Description:
-a: List all local images (including intermediate image layers)
-q: Only display the image ID.
--digests: Display summary information of the image
--no-trunc: Display complete image information
Search mirror: search
Manually search from the Docker mirror repository: Docker Hub
Order:docker search [OPTIONS] 镜像名字
- OPTIONS description:
-f, --filter filter: filter output according to the provided conditions
–format string: use Go template to format string pretty print search
–limit int: limit the number of search results (default 25)
–no-trunc: do not truncated output
Download mirror: pull
Command: docker pull 镜像名字[:TAG]
Example:
Download image: docker pull tomat, equivalent to docker pull tomat:latest
download specified version:docker pull tomcat:7.0
Need to query the version/TAG of the image, go to Docker Hub to search
Delete mirror by ID: rmi
Order:docker rmi [OPTIONS] IMAGE [IMAGE...]
- OPTIONS description:
-f, --force : Force delete mirror
–no-prune : Do not delete unmarked parent mirror
Example:
Forcibly delete mirrors: docker rmi -f hello-world
Delete multiple mirrors docker rmi hello-world nginx:latest
Delete all mirrors: docker rmi -f $(docker images -qa), in fact, retrieve all mirror IDs in the subcommand, and then execute the deletion
container command
There is a mirror to create a container, which is the fundamental premise (download a CentOS mirror demo):docker pull centos
Create and start the container: run
Order:docker run [OPTIONS] IMAGE [COMMAND] [ARG...]
-
OPTIONS description (commonly used): some are a minus sign, some are two minus signs
–name=”new name of the container”: specify a name for the container
-d: run the container in the background and return the container ID, that is, start the daemon container ;
-i: Run the container in interactive mode, usually used with -t
-t: reassign a pseudo-input terminal for the container, usually used with -i
-P : Random port mapping
-p : Specify port mapping, there are the following four formatsip:hostPort:containerPort ip::containerPort hostPort:containerPort containerPort
Example:
Start tomcat: docker run -it -p 8888:8080 tomcat: Indicates that port 8888 of the host is mapped to port 8080 of the container, so that the container can be accessed through port 8888. 主机IP:8888That is, you can access tomcat through the link:

Note that the corresponding ports need to be opened for other hosts to access
Run the container centos in interactive mode
docker run -it centos
ps -ef
The id of the executed command is consistent with the id of the running container, indicating that it is in the container centos
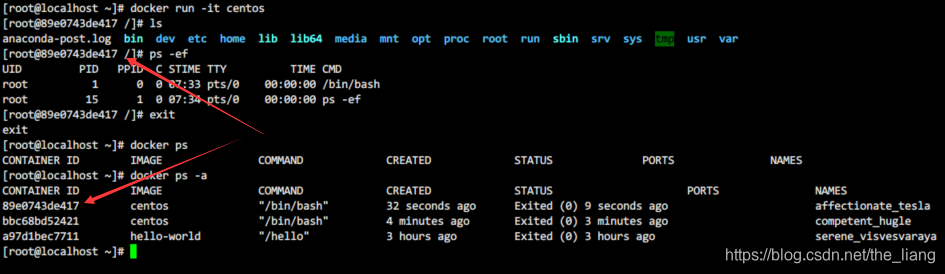
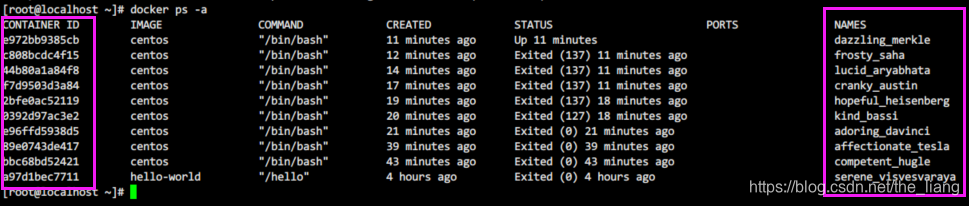
List running containers: ps
Order:docker ps [OPTIONS]
- OPTIONS description (commonly used):
-a: List all currently running containers + those that have been run in history (without this parameter, it means that they are running)
-l: Display the recently created container.
-n : Display the last n created containers.
-q: Silent mode, only display the container number.
--no-trunc : Do not truncate output.
Example:
Show recently created containers: docker ps -l
Show the last 3 created containers:docker ps -n 3

- Description of each option:
- CONTAINER ID: Container ID
- IMAGE: image name
- COMMAND: the command to execute
- CREATED: container creation time
- STATUS: startup status
- PORTS: port mapping
- NAMES: container name
Note : in the Docker command CONTAINERcan refer to CONTAINER ID,NAMES
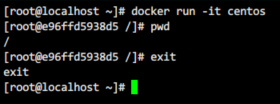
Exit the container: exit
When logged into a Docker container, exitexit and stop the container with the command
Another way to exit: the shortcut key ctrl+P+Qcan make the container exit without stopping
Example: Interact with the centos container and exit
Exit by shortcut key:
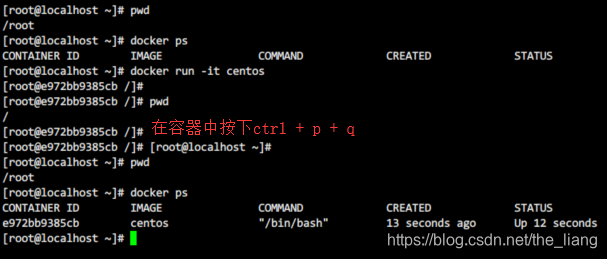
If the shortcut key does not work, please check whether the hotkey is occupied
Start the container: start
Order:docker start [OPTIONS] CONTAINER [CONTAINER...]
Example:docker start 容器ID或者容器名
Restart the container: restart
Order:docker restart [OPTIONS] CONTAINER [CONTAINER...]
Example:docker restart 容器ID或者容器名
Stop the container: stop
Order:docker stop [OPTIONS] CONTAINER [CONTAINER...]
Example:docker stop 容器ID或者容器名
Force stop container: kill
Order:docker kill [OPTIONS] CONTAINER [CONTAINER...]
Example:docker kill 容器ID或者容器名
Remove container: rm
Order:docker rm [OPTIONS] CONTAINER [CONTAINER...]
- OPTIONS description:
-f : Forcefully remove the running container
-l, --link : delete the specified link
-v, --volumes : delete the volume associated with the container
Example:
delete a single container: docker rm 容器ID
delete multiple containers: docker rm -f $(docker ps -a -q)
delete multiple containers 2: docker ps -a -q | xargs docker rm: assign the result of the query to xargs
important order
container command
Start the daemon container: run
Following the startup container above, use one of its parameters -dto set it to guard mode
Order:docker run -d 容器名
Use a mirror centos:latestto start a container in background mode
Example: docker run -d centos【Error example】
Question : Pass docker ps -awill find that the container has exited!
A very important point: If you want a Docker container to run in the background, there must be a foreground process.
If the commands run by the container are not those that have been suspended (such as running top, tail), they will automatically exit.
This is a mechanism problem of docker, such as your web container, we take nginx as an example, under normal circumstances, we only need to start the corresponding service to configure the startup service. For example service nginx start, in doing so, nginx runs in the background process mode, resulting in no application running in the docker foreground. After such a container is started in the background, it will immediately commit suicide because he thinks he has nothing to do. So the best solution is: Run the program you want to run as a foreground process:docker run -it centos
View container logs: logs
Order:docker logs [OPTIONS] CONTAINER
- OPTIONS description:
--details : show additional details provided to the log
-f, --follow : follow the latest log output
--since string : show logs since timestamp (eg: 2013-01-02T13:23:37 ) or Related logs
–tail string: the number of lines to display from the end of the log (display all by default)
-t, --timestamps: display timestamps
–until string: display logs before the timestamp (such as 2013-01-02T13:23:37)
Example:
Show container logs: docker logs 容器ID/名称
Display container logs dynamically:
-
Run the container and execute the shell script so that it is not idle and does not kill the process:
docker run -d centos /bin/sh -c "while true;do echo hello docker;sleep 2;done" -
View logs: request to display the latest three logs, display timestamps, and track log output
docker logs --tail 3 -t -f 13617502c43e
View the running process in the container: top
Order:docker top CONTAINER [ps OPTIONS]
Example:docker top hungry_feistel

View the internal details of the container: inspect
Order:docker inspect [OPTIONS] NAME|ID [NAME|ID...]
- OPTIONS description:
-f, --format string : Use the given Go template to format the output
-s, --size : If the type is a container, display the total file size
–type string : Return JSON of the specified type
Example:
View the mounted directory with the physical host:docker inspect --format "{
{.Mounts}}" 容器ID

- Another way to view:
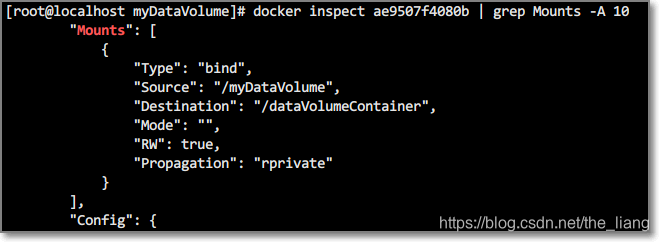
docker inspect 容器ID | grep Mounts -A 10
it means to find Mounts, and display 10 lines
Enter a running container and interact: attach/exec
Order:docker attach [OPTIONS] CONTAINER
Example:
re-entering the container:docker attach 容器ID
Order:docker exec [OPTIONS] CONTAINER COMMAND [ARG...]
- OPTIONS Description:
-d, --detach : detach mode: run command in background
--detach-keys string : override key sequence for detached container
-e, --env list : set environment variable
-i, --interactive : even Keep STDIN open even without connection
--privileged: Give extended privileges to commands
-t, --tty: Assign a pseudo-terminal
-u, --user string: Username or UID (in the format: <name|uid>[: <group|gid>])
-w, --workdir string : working directory inside the container
Example: docker exec 13617502c43e ls -l: It is equivalent to executing the command in the container ls -land returning to the local machine
So what is the difference between attach and exec?
- attach directly enters the terminal of the container startup command, and does not start a new process
- exec is to open a new terminal in the container and start a new process
That is to say, the attach command will enter the container, while exec can directly execute the command and display the result without entering the container.
At the same time, the following two commands both indicate entering the container
docker attach 容器ID
docker exec -t 容器ID /bin/bash
Copy the container and the host file: cp
Order:
docker cp [OPTIONS] CONTAINER:SRC_PATH DEST_PATH|-
docker cp [OPTIONS] SRC_PATH|- CONTAINER:DEST_PATH
Example:
docker cp 容器ID:容器内路径 目的主机路径: docker cp d641bbb4438b:/usr/test.txt ./
docker cp 目的主机路径 容器ID:容器内路径:docker cp ./test.txt d641bbb4438b:/

Docker image
The Docker image is a UnionFS (Union File System)
Union file system (UnionFS) is a layered, lightweight and high-performance file system, which supports the modification of the file system as a submission to superimpose layer by layer, and can mount different directories to the same virtual Under the file system (unite several directories into a single virtual filesystem).
The Union filesystem is the basis of Docker images. Images can be inherited through layers. Based on the base image (without a parent image), various specific application images can be made. Features: Load multiple file systems at the same time, but from the outside, only one file system can be seen. Joint loading will superimpose the file systems of each layer, so that the final file system will contain all underlying files and directories
Docker image loading principle
The docker image is a lightweight, executable, independent software package used to package the software operating environment and software developed based on the operating environment . It contains everything needed to run a certain software, including code, runtime, and libraries. , environment variables and configuration files.
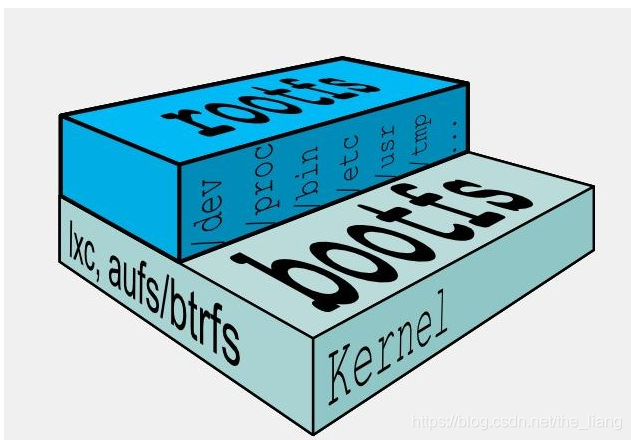
The mirror is actually composed of layer-by-layer file systems, this layer of file system UnionFS.
The bootfs (boot file system) mainly includes the bootloader and the kernel. The bootloader is mainly used to bootload the kernel. When Linux starts, it will load the bootfs file system. The bottom layer of the Docker image is the bootfs. This layer is the same as our typical Linux/Unix system, including the boot loader and kernel. When the boot loading is complete, the entire kernel is in the memory. At this time, the right to use the memory has been transferred from the bootfs to the kernel. At this time, the system will also uninstall the bootfs.
rootfs (root file system), on top of bootfs. It contains standard directories and files such as /dev, /proc, /bin, /etc in a typical Linux system. Rootfs is a variety of different operating system distributions, such as Ubuntu, Centos and so on.
Usually, the CentOS we install into the virtual machine is several G, why is it only 200M here for docker? ?

For a streamlined OS, the rootfs can be very small and only needs to include the most basic commands, tools, and program libraries. Because the underlying layer directly uses the Host's kernel, you only need to provide the rootfs. It can be seen that for different Linux distributions, the bootfs is basically the same, but the rootfs will be different, so different distributions can share the bootfs.
layered mirroring
Take our pull as an example. During the download process, we can see that the docker image seems to be downloaded layer by layer.
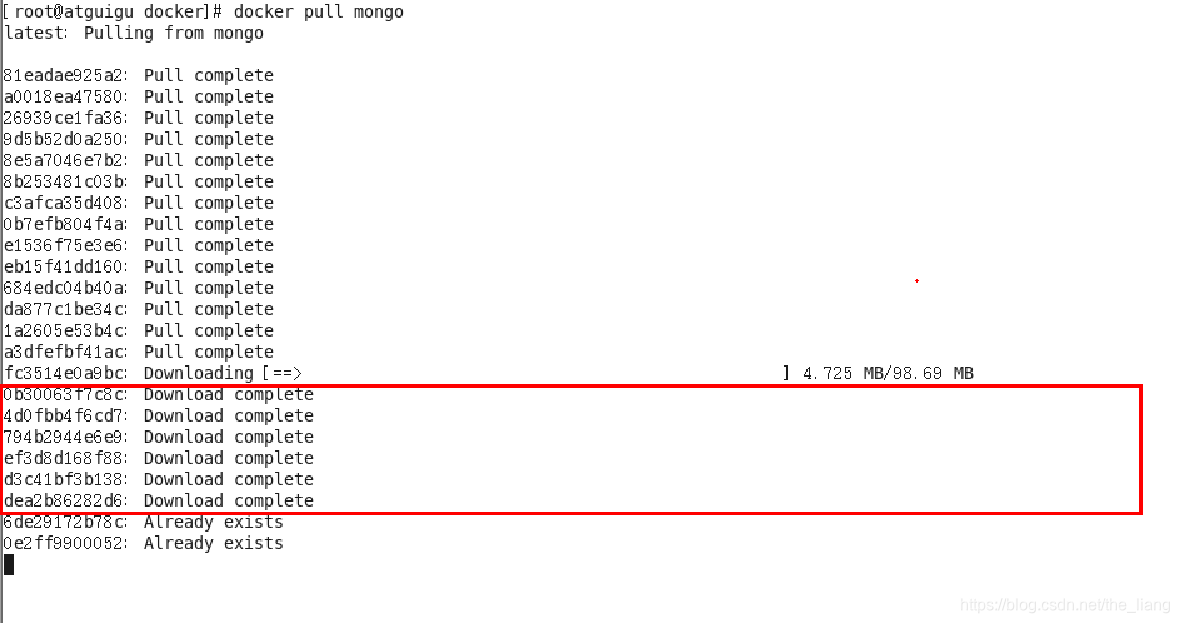
Why does the Docker image adopt this layered structure?
One of the biggest benefits is sharing resources
For example, if multiple images are built from the same base image, then the host only needs to save one base image on the disk and load one base image in memory to serve all containers. And every layer of the image can be shared.
Docker image features
Docker images are all read-only . When the container starts, a new writable layer is loaded on top of the image. This layer is usually called the "container layer", and everything under the "container layer" is called the "mirror layer".
Mirror copy commit: commit
Create a new image based on container changes, and use docker commit to submit a copy of the container to make it a new image
Order:docker commit [OPTIONS] CONTAINER [REPOSITORY[:TAG]]
- OPTIONS description:
-a, --author string : set author name
-c, --change list : apply Dockerfile directives to created image
-m, --message string : commit log
-p, --pause : pause during commit container (default true)
Example:
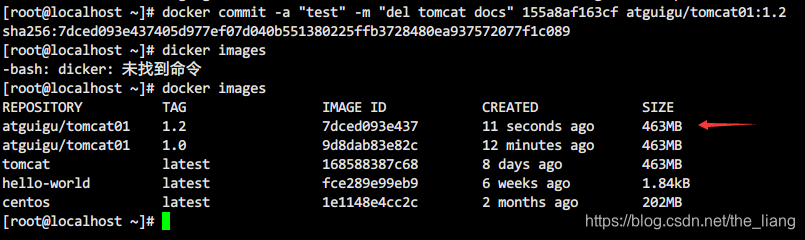
docker commit -m="提交的描述信息" -a="作者" 容器ID 要创建的目标镜像名:[标签名]
docker commit -a "theliang" -m "del tomcat docs" 155a8af163cf atguigu/tomcat01:1.2
docker imagesYou can see the image you just created by command
container data volume
Let's take a look at Docker's philosophy first:
- Package the application and running environment into a container to run, and the running can be accompanied by the container, but we hope that the data requirement is persistent
- It is desirable to have the possibility to share data between containers
If the data generated by the Docker container is not transformed into a new image through docker commit, so that the data is saved as part of the image, then when the container is deleted, the data will naturally disappear. To save data in docker we use volumes .
Similar to rdb and aof files in Redis
effect
A volume is a directory or file that exists in one or more containers and is mounted to the container by docker, but does not belong to the joint file system, so it can bypass the Union File System to provide some features for persistent storage or shared data:
The design purpose of the volume is the persistence of data, which is completely independent of the life cycle of the container, so Docker will not delete the data volume mounted by it when the container is deleted
Features:
- Data volumes can share or reuse data between containers
- Changes in the volume can take effect directly
- Changes in the data volume will not be included in the update of the mirror
- The lifecycle of a data volume lasts until there are no containers using it
data volume
Add data volume directly: run -v
Order:docker run -it -v /宿主机绝对路径目录:/容器内目录 镜像名
Example: docker run -it -v /myDataVolume:/dataVolumeContainer centos
means: associate the myDataVolume folder under the root directory of the host with the dataVolumeContainer directory under the root directory of the container (the folder will be created automatically after running the command)
-
Check whether the data volume is mounted successfully:
docker inspect 容器ID
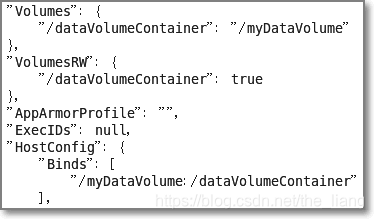
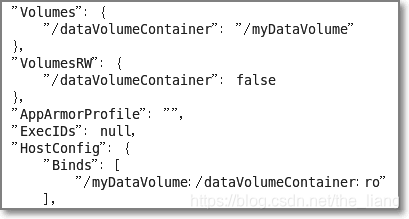
- The new version checks whether the data volume is mounted successfully:
- The new version checks whether the data volume is mounted successfully:
-
Other viewing methods:
docker inspect --format "{
     {.Config.Volumes}}" 容器ID
The information displayed here is only the information of the local data volume of the docker container, and the location information of the mounting directory of the physical host associated with it. Use the following information to view:
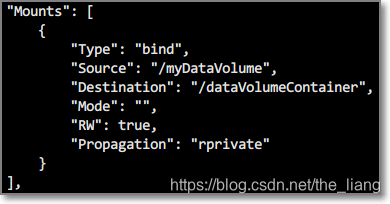
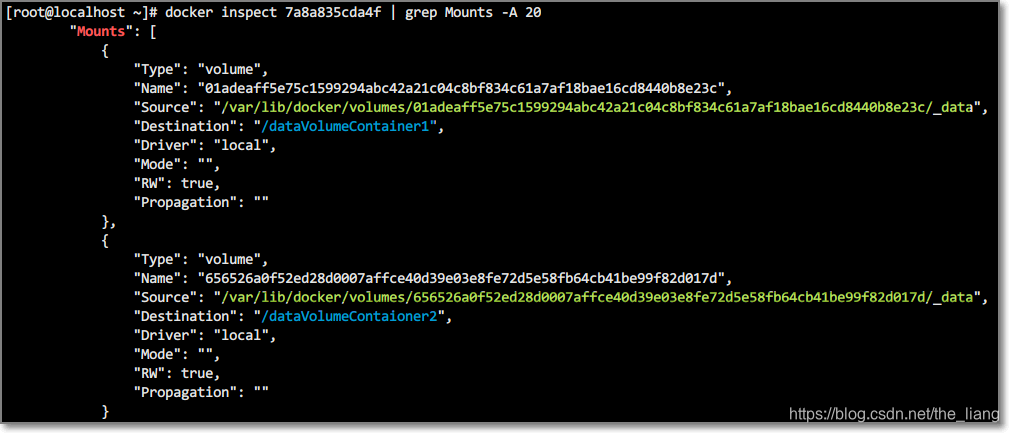
docker inspect -f "{ {.Mounts}}" 容器ID -
Also displayed by using grep:
docker inspect 容器ID | grep Mounts -A 10 -
Data sharing between containers and hosts:
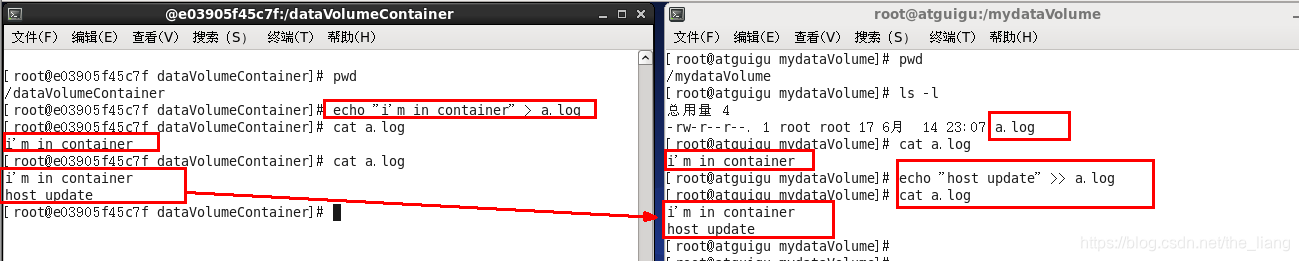
-
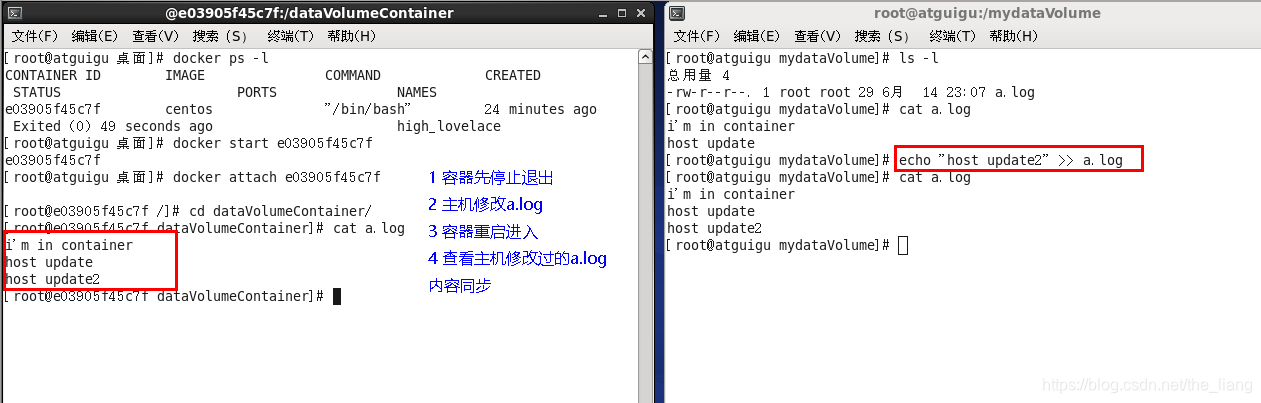
After the container stops and exits, whether the host data is synchronized after modification: yes
Example: command with permission:
docker run -it -v /宿主机绝对路径目录:/容器内目录:ro 镜像名
here is an extra :roread only, which means that the container has only read-only permission and cannot modify the file.
Dockerfile creation: build
Role: Build an image from Dockerfile
Command:docker build [OPTIONS] PATH | URL | -
- OPTIONS description:
-f, --file string: specify Dockerfile, the file named Dockerfile under PATH will be used by default
-t, --tag list: name and tag (optional), format:name:tag
For the sake of portability and sharing , -v 主机目录:容器目录this method cannot be implemented directly in the Dockerfile.
Since the host directory is dependent on a specific host, it cannot be guaranteed that such a specific directory exists on all hosts.
Example: According to the image centos, add two data volumes (wrapped with one layer) to generate a new image
- Create a file in the root directory:
/mydocker/dockerfile1, with the following content:
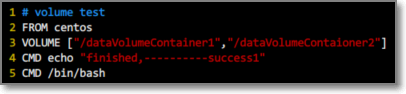
# volume test
FROM centos
VOLUME ["/dataVolumeContainer1","/dataVolumeContaioner2"]
CMD ECHO "finished,----------success1"
CMD /bin/bash
- Excuting an order:
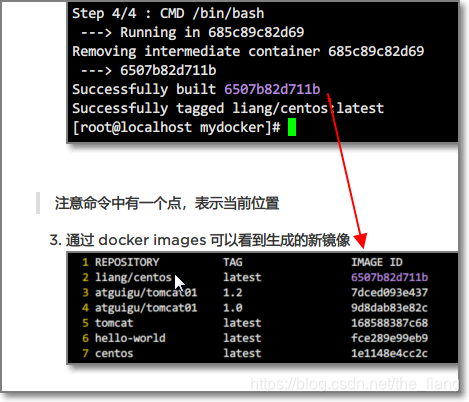
docker build -f /mydocker/dockerfile1 --tag liang/centos .
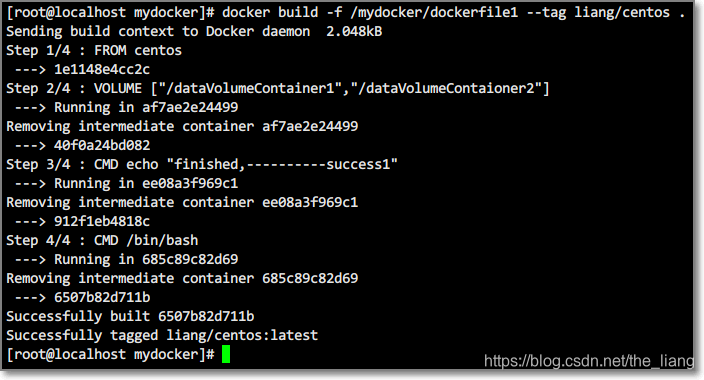
Note that there is a dot in the command, indicating the current position
- You can see the generated new image through docker images
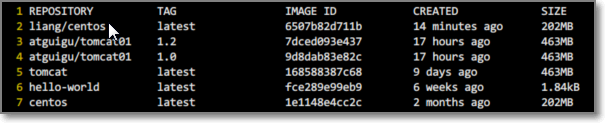
At the same time, you can notice that after executing the build command, an IMAGE ID will be generated, which is the final generated image ID
- Start a new image: You can see that two data volumes have been created in the container
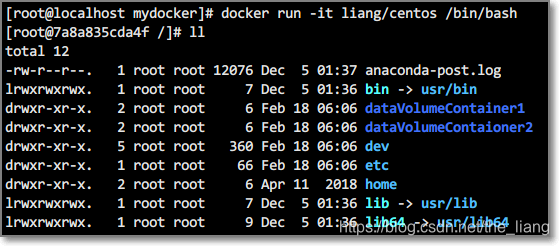
Through the above steps, the volume directory address in the container is already known, but where is the corresponding host directory address?
Solution: You can view the container details through inspect, and the detailed operation inspect示例、直接添加数据卷示例is given in
So after opening the default address of the host, you can operate on the file

Remarks: Docker mounts the host directory Docker access appears
cannot open directory .: Permission denied
Solution: add one more--privileged=trueparameter after mounting the directory
docker run -it -v /myDataVolume:/dataVolumeContainer --privileged=true centos
data volume container
The named container mounts the data volume, and other containers realize data sharing by mounting this (parent container). The container that mounts the data volume is called the data volume container
In other words, the active hard disk is mounted on the active hard disk to realize the transitive dependence of data.
Sharing between containers: run --volumes-from
Order:dockeer run -it --name 子容器ID --volumes-from 父容器ID 容器名
Example: To create a data volume container
-
First create a parent container, we can use the one created in the above example
liang/centosas a template:
docker run -it --name dc01 theliang/centos -
Create child containers (dc02 and dc03), inheriting from dc01
docker run -it --name dc02 --volumes-from dc01 liang/centos
At this point, the two data volumes in the dc01 container can be shared by its sub-containers, and data can be shared between them through the data volumes
important point:
- After deleting the parent container dc01, after dc02 is modified, dc03 can still access the data volume
- After deleting dc02, dc03 can still access the data volume
- Create dc04 to inherit dc03 and then delete dc03, dc04 can still access the data volume
Summary: For the transfer of configuration information between containers, the life cycle of the data volume continues until no container uses it .
Docker networking related
Docker's networking mode
Docker currently supports the following 5 network modes:
When docker run creates a Docker container, you can use the -net option to specify the network mode of the container.
- host mode: use
-net=hostto specify. The network is shared with the host. At this time, the container does not use the namespace of the network. All the devices of the host, such as Dbus, will be exposed to the container, so there are security risks. - container mode: use
-net=container:NAME_or_IDto specify. Specifies to share the network with a container instance. - none mode: Use
-net=noneto specify. If no network is set, it means that there is no network card configured in the container, and the user can configure it manually. - bridge mode: Use to
-net=bridgespecify, default setting. At this time, the docker engine will create a veth pair, one end is connected to the container instance and named eth0, and the other end is connected to the specified bridge (such as docker0), so the container instance on the same host is connected to the same bridge , they can communicate with each other. When the container is created, a SNAT rule is automatically created for the communication between the container and the outside world. If the user uses the -p or -Pe port, a corresponding port mapping rule will also be created. - Custom mode: Use custom network, you can use to
docker network createcreate, and support a variety of network drivers by default, users can freely create bridge network or overlay network.
The default is bridge mode, and the network address is 172.17.0.0/16. Container instances on the same host can communicate, but they cannot communicate across hosts.
host mode
If the host mode is used when starting the container, the container will not obtain an independent Network Namespace, but will share a Network Namespace with the host. The container will not virtualize its own network card, configure its own IP, etc., but use the host's IP and port.
container mode
This mode specifies that a newly created container shares a Network Namespace with an existing container instead of sharing it with the host. The newly created container will not create its own network card, configure its own IP, but share the IP, port range, etc. with a specified container. Similarly, in addition to the network aspects of the two containers, other things such as file systems and process lists are still isolated. The processes of the two containers can communicate through the lo network card device.
none mode
This mode is different from the previous two. In this mode, the Docker container has its own Network Namespace, however, no network configuration is performed for the Docker container. That is to say, this Docker container has no network card, IP, routing and other information. We need to add a network card, configure IP, etc. for the Docker container by ourselves.
bridge mode
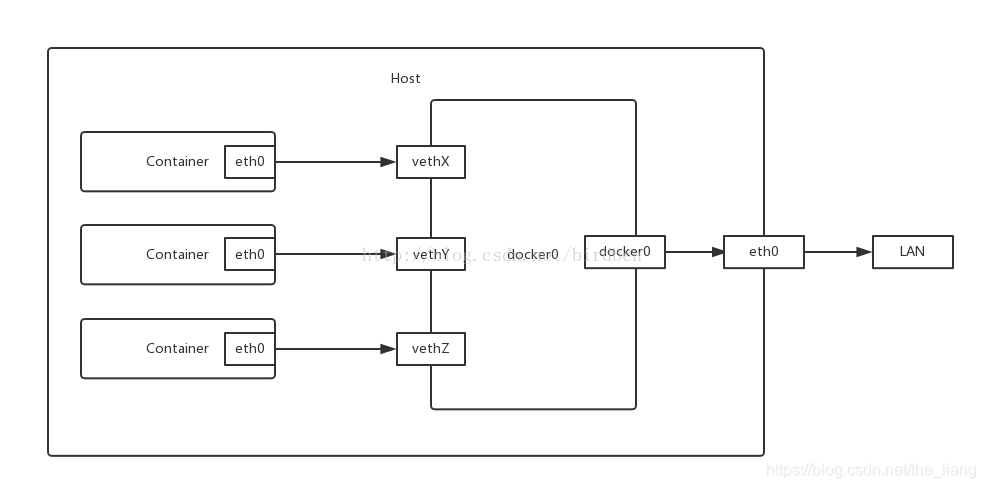
The bridge mode is the default network setting of Docker. This mode will allocate Network Namespace, set IP, etc. for each container, and connect a Docker container on a host to a virtual network bridge.
When the Docker server starts, a virtual network bridge named docker0 will be created on the host, and the Docker container started on this host will be connected to this virtual bridge. The working mode of the virtual bridge is similar to that of a physical switch, so that all containers on the host are connected to a layer 2 network through the switch.
The next step is to assign an IP to the container. Docker will select an IP address and subnet different from the host machine from the private IP network segment defined by RFC1918 to assign to docker0, and the container connected to docker0 will be selected from this subnet. An unoccupied IP is used. Generally, Docker will use the network segment 172.17.0.0/16, and assign 172.17.42.1/16 to the docker0 bridge (you can see docker0 by using the ifconfig command on the host, and it can be considered as the management interface of the bridge. It is used as a virtual network card on the host machine)
When a Docker container is created, a pair of veth pair interfaces are created at the same time (when a data packet is sent to one interface, the other interface can also receive the same data packet). One end of this pair of interfaces is in the container, ie eth0; the other end is local and mounted to the docker0 bridge, and the name starts with veth (for example, vethAQI2QT). In this way, the host can communicate with the container, and the containers can communicate with each other. Docker creates a virtual shared network between the host and all containers.
Communication between different containers on the same host
Here, the communication between different containers on the same host mainly uses the Docker bridge (Bridge) mode. The bridge interface runs locally on a separate Docker host, and it is the mechanism behind all three connection methods we mention later.
$ ifconfig docker0
docker0   Link encap:Ethernet  HWaddr 56:84:7a:fe:97:99
          inet addr:172.17.42.1  Bcast:0.0.0.0  Mask:255.255.0.0
          UP BROADCAST MULTICAST  MTU:1500  Metric:1
          RX packets:0 errors:0 dropped:0 overruns:0 frame:0
          TX packets:0 errors:0 dropped:0 overruns:0 carrier:0
          collisions:0 txqueuelen:0
          RX bytes:0 (0.0 B)  TX bytes:0 (0.0 B)
connection method
- Method 1: You can communicate by using the IP address of the container. This method will result in hard-coding of the IP address, which is inconvenient for migration, and the IP address may change after the container is restarted, unless a fixed IP address is used.
- Method 2: You can communicate through the IP of the host and the port number exposed by the container. This method is relatively simple, and can only rely on the process listening on the exposed port for limited communication.
- Method 3: You can use the container name to communicate through the link mechanism of docker. In this way, docker's link mechanism can communicate with another container through a name. The link mechanism facilitates the container to discover other containers and can safely transfer some connection information to other containers. Use name to give the container an alias for easy memory and use. Even if the container is restarted and the address changes, it will not affect the connection between the two containers.
# 查看容器的内部IP
$ docker inspect --format='{

    {.NetworkSettings.IPAddress}}' $CONTAINER_ID
# Elasticsearch容器
$ docker inspect --format='{

    {.NetworkSettings.IPAddress}}' 4d5e7a1058de
172.17.0.2
# Kibana容器
$ docker inspect --format='{

    {.NetworkSettings.IPAddress}}' 4f26e64bfe82
172.17.0.4
Method 1: Use the IP address of the container to communicate
# 进入Kibana容器
$ docker exec -it 4f26e64bfe82 /bin/bash
# 在Kibana容器使用ES容器的IP地址来访问ES服务
$ curl -XGET 'http://172.17.0.2:9200/_cat/health?pretty'
1493707223 06:40:23 ben-es yellow 1 1 11 11 0 0 11 0 - 50.0%
Method 2: Use the host's IP plus the port number exposed by the container to communicate
# 进入Kibana容器
$ docker exec -it 4f26e64bfe82 /bin/bash
# 在Kibana容器使用宿主机的IP地址来访问ES服务(我这里本机的IP地址是10.10.1.129)
$ curl -XGET 'http://10.10.1.129:9200/_cat/health?pretty'
1493707223 06:40:23 ben-es yellow 1 1 11 11 0 0 11 0 - 50.0%
Method 3: Use docker's link mechanism to communicate
# 先启动ES容器,并且使用--name指定容器名称为:elasticsearch_2.x_yunyu
$ docker run -itd -p 9200:9200 -p 9300:9300 --name elasticsearch_2.x_yunyu birdben/elasticsearch_2.x:v2
# 启动Kibana容器,并且使用--link指定关联的容器名称为ES的容器名称:elasticsearch_2.x_yunyu
$ docker run -itd -p 5601:5601 --link elasticsearch_2.x_yunyu --name kibana_4.x_yunyu birdben/kibana_4.x:v2
# 查看运行的容器
$ docker ps
CONTAINER ID        IMAGE                               COMMAND                  CREATED             STATUS              PORTS
4f26e64bfe82        birdben/kibana_4.x:v2               "docker-entrypoint..."   25 hours ago        Up 15 minutes       0.0.0.0:5601->5601/tcp                                                       kibana_4.x_yunyu
4d5e7a1058de        birdben/elasticsearch_2.x:v2        "docker-entrypoint..."   26 hours ago        Up 19 hours         0.0.0.0:9200->9200/tcp, 0.0.0.0:9300->9300/tcp                               elasticsearch_2.x_yunyu
# 在Kibana容器使用--link的容器名称来访问ES服务
$ curl -XGET 'http://elasticsearch_2.x_yunyu:9200/_cat/health?pretty'
1493707223 06:40:23 ben-es yellow 1 1 11 11 0 0 11 0 - 50.0%
In fact, the -link mechanism is to add an ES container name resolution to the /etc/hosts file in the Docker container. With this name resolution, you can communicate with the target container without using IP. In addition, when the target container restarts, Docker will be responsible for updating the /etc/hosts file, so you don’t have to worry about the IP address changing after the container restarts. Solve the problem that cannot take effect.
The /etc/hosts file for the Kibana container
127.0.0.1       localhost
::1     localhost ip6-localhost ip6-loopback
fe00::0 ip6-localnet
ff00::0 ip6-mcastprefix
ff02::1 ip6-allnodes
ff02::2 ip6-allrouters
172.17.0.2      4d5e7a1058de
/etc/hosts file for ES container
127.0.0.1       localhost
::1     localhost ip6-localhost ip6-loopback
fe00::0 ip6-localnet
ff00::0 ip6-mcastprefix
ff02::1 ip6-allnodes
ff02::2 ip6-allrouters
172.17.0.2      elasticsearch_2.x_yunyu 4d5e7a1058de
172.17.0.4      4f26e64bfe82
When docker introduces new network features, the link mechanism becomes somewhat redundant, but in order to be compatible with earlier versions, the function of the -link mechanism on the default network remains unchanged. After docker introduces new network features, a built-in DNS Server, but only This DNS Server will work only after the user creates a custom network.
Communication between different containers across hosts
(to be continued)
Using Docker Compose
(to be continued)
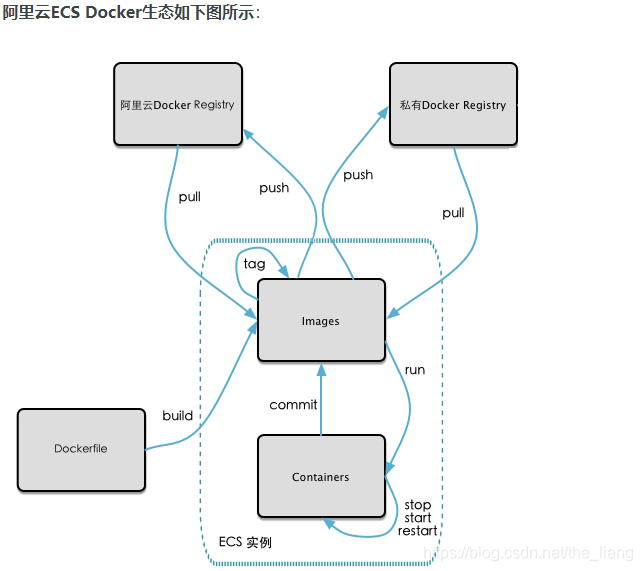
Dockerfile
Dockerfile is a build file used to build a Docker image , and is a script composed of a series of commands and parameters.

Build three steps
- Write Dockerfile
- docker build
- docker run
Take the container centos as an example Docker Official Images
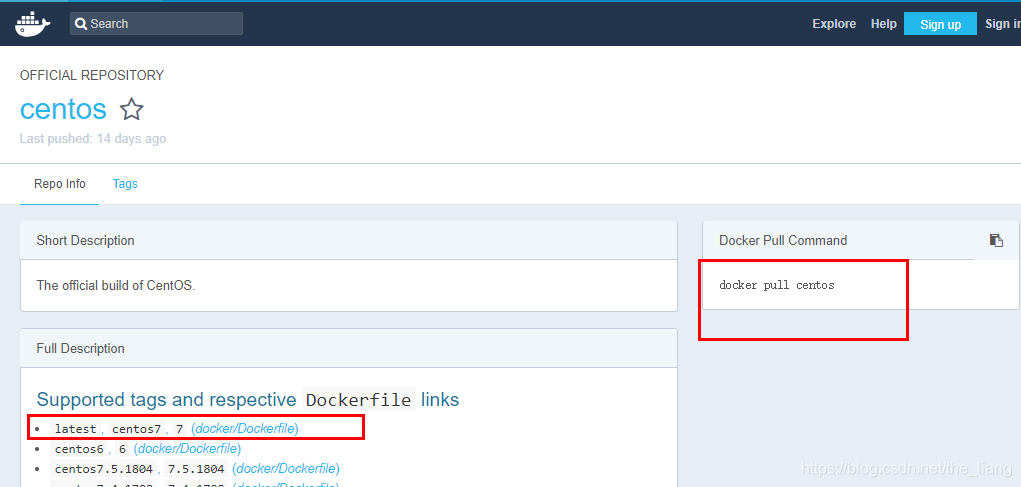

DockerFile build process analysis
basic rules:
- Each reserved word instruction must be uppercase and followed by at least one parameter
- Instructions are executed sequentially from top to bottom
- #Represents comments
- Each command creates a new image layer and commits the image
Docker executes the general process of Dockerfile
- docker runs a container from a base image
- Execute an instruction and make changes to the container
docker commitCommit a new image layer by doing something like- docker runs a new container based on the image just submitted
- Execute the next instruction in the dockerfile until all instructions are executed
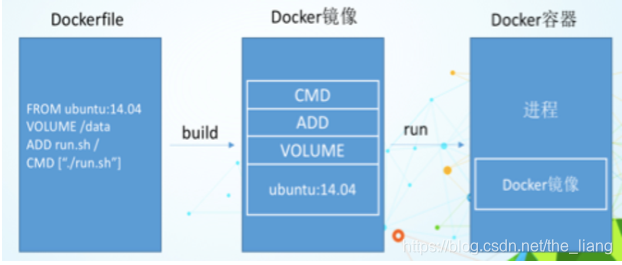
From the perspective of application software, Dockerfile, Docker image and Docker container represent three different stages of software:
- Dockerfile is the raw material of software
- Docker images are software deliverables
- The Docker container can be considered as the running state of the software.
The Dockerfile is development-oriented, the Docker image becomes the delivery standard, and the Docker container involves deployment and operation and maintenance. The three are indispensable, and they work together to serve as the cornerstone of the Docker system.
- Dockerfile, you need to define a Dockerfile, which defines everything the process needs. The content involved in Dockerfile includes executing code or files, environment variables, dependent packages, runtime environment, dynamic link library, operating system distribution, service process and kernel process (when the application process needs to deal with system services and kernel processes, this Need to consider how to design namespace permission control) and so on;
- Docker image, after defining a file with Dockerfile, a Docker image will be generated during docker build, and when the Docker image is run, it will actually start to provide services;
- Docker containers, containers provide services directly.
DockerFile architecture (reserved word instructions)
ADD: Copy the files in the host directory into the image and the ADD command will automatically process the URL and decompress the tar archive
CMD: specify a command to be run when the container starts. There can be multiple CMD commands in the Dockerfile, but only the last one takes effect. CMD Will be replaced by the parameters after docker run
COPY: similar to ADD, copy files and directories to the image. Copy the file/directory from the <source path> in the build context directory to the <target path> location in the image of the new layer DockerFile
architecture (reserved word instruction)
ENTRYPOINT: specify a command to run when a container starts, ENTRYPOINT of The purpose is the same as CMD, which is to specify the container startup program and parameters
ENV: used to set the environment variable during the image building process
EXPOSE: the port exposed by the current container
FROM: the base image, which image the current new image is based on
MAINTAINER: the image maintainer's Name and email address
ONBUILD: run the command when building an inherited Dockerfile, the onbuild of the parent image is triggered after being inherited by the child:
RUNthe command that needs to be run when the container is built
VOLUME: the container data volume, used for data preservation and persistence work
WORKDIR: After the container is created, the terminal will log in to the working directory by default, a foothold

Some examples:
ENV MY_PATH /usr/mytest: This environment variable can be used in any subsequent RUN command, just like the environment variable prefix is specified in front of the command; these environment variables can also be used directly in other commands, such as:WORKDIR $MY_PATH
COPY src dest| COPY ["src","dext"]Copy from the build context directory src to the location dest in the new layer mirror
CMD startup command:
The format specified by CMD is similar to RUN, and there are also two formats:
- shell format:
CMD <命令> - excel format:
CMD ["可执行文件","参数1","参数2"...] - Parameter list format:
CMD ["参数1","参数2"...]. After specifying the ENTERYPOINT command, use CMD to specify specific parameters
the case
Base image: scratch
99% of the images in Docker Hub are built by installing and configuring the required software in the base image
FROM scratch

Custom mirror: mycentos
- Hub default CentOS image

So by customizing the mycentos image, it has: default path after login, vim editor, viewing network configuration ifconfig support
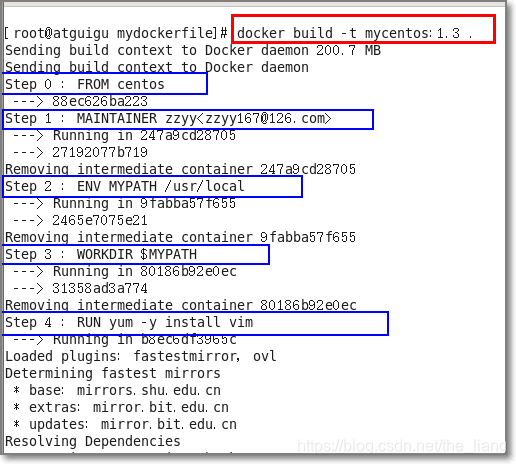
- Create and edit Dockerfile (storage path and file name can be different)
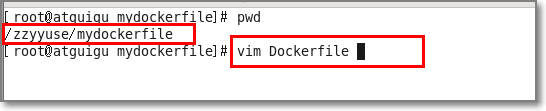
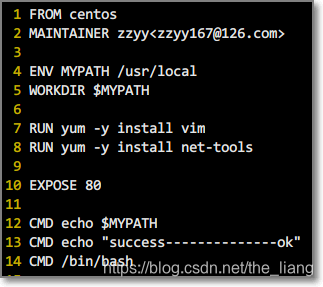
FROM centos                             # 基于CentOS镜像
MAINTAINER zzyy<[email protected]>       # 镜像维护者姓名和邮箱

ENV MYPATH /usr/local               # 设置环境变量
WORKDIR $MYPATH                  # 引用环境变量为默认工作目录

RUN yum -y install vim              # 构建时运行的命令:安装 vim
RUN yum -y install net-tools        # 构建时运行的命令:安装 net-tools,使之支持ifconfig

EXPOSE 80                               # 对外暴露的端口

CMD echo $MYPATH                    # 输出环境变量
CMD echo "success----------------OK"    # 输出提示信息
CMD /bin/bash                           # 执行 /bin/bash
- Build:
docker build -f /mydocker/Dockerfile -t 新镜像名字:TAG .. Note: There is a dot at the end of the command, indicating the current path. If there is a file named Dockerfile in the current path, you can omit-fand its parameters

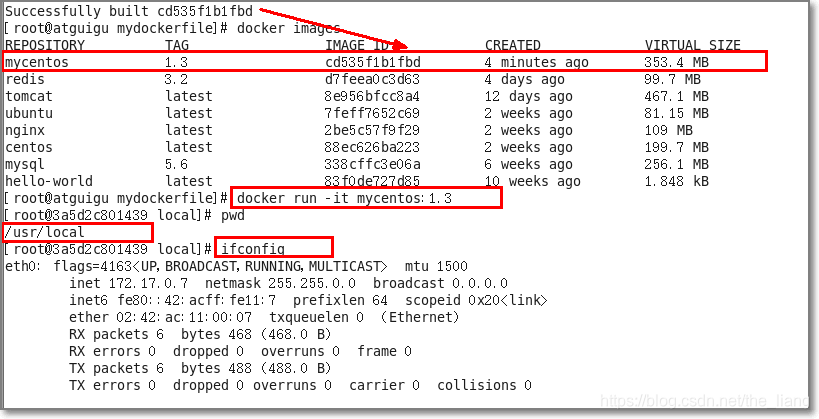
- Run:
docker run -it 新镜像名字:TAG
As you can see, our own new image already supports the vim/ifconfig command, and the extension is successful.
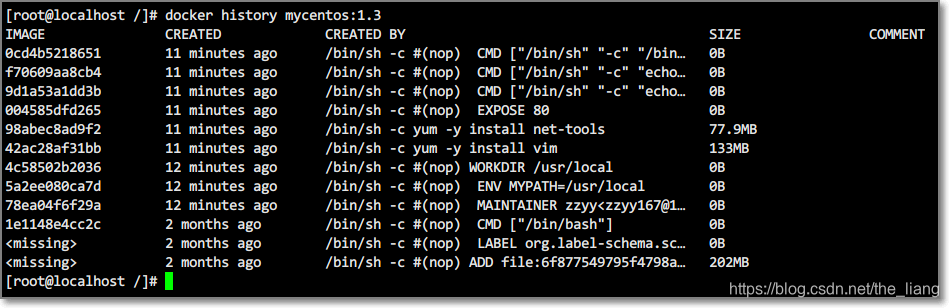
- List the change history of an image:
docker history 镜像名
CMD/ENTRYPOINT mirroring case
Both specify the command to run when a container starts
-
CMD : There can be multiple CMD instructions in the Dockerfile, but only the last one takes effect, and CMD will be replaced by the parameters after docker run. For example, the default running command of tomcat is:
CMD ["catalina.sh", "run"], if the command is added when running:docker run -it -p 8888:8080 tomcat ls -l, the original command will be invalidated and it will not start. -
ENTRYPOINT :
docker runSubsequent parameters will be passed to ENTRYPOINT as parameters, and then form a new command combination
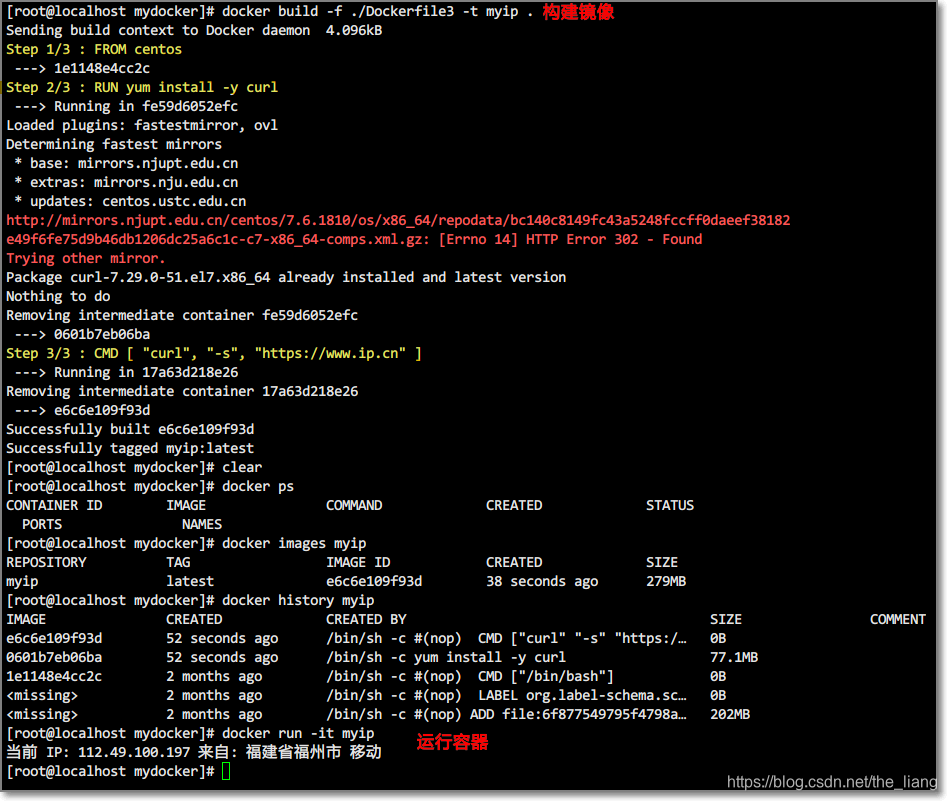
Example: Make a CMD version of a container that can query IP information
FROM centos
RUN yum install -y curl
CMD [ "curl", "-s", "https://www.ip.cn" ]
Three steps to build The above example already exists, so I won’t go into details here
crul command explanation:
- The curl command can be used to perform operations such as downloading, sending various HTTP requests, and specifying HTTP headers. If the system does not have curl, you can use it to
yum install curlinstall it. - curl is to output the downloaded file to stdout
using the command:curl http://www.baidu.com
after execution, the html source code of www.baidu.com will be displayed on the screen
This is the easiest method to use. Use this command to obtain the page pointed to by http://curl.haxx.se. Similarly, if the URL here points to a file or a picture, it can be directly downloaded to the local. If the download is an HTML document, then by default only the header of the file will be displayed, that is, the header of the HTML document. To display all, please add parameters-i

Then the problem comes, if we want to display the HTTP header information, we need to add -ithe parameter, we can see the error that the executable file cannot be found, executable file not found. As we said before, the command follows the image name, and the default value of CMD will be replaced at runtime. So here -ireplaces the original CMD, rather than adding curl -s https://www.ip.cnafter the original . And -iit is not an order at all, so naturally it cannot be found.
If we want to add the -i parameter, we must re-enter the command completely:
docker run myip curl -s https://www.ip.cn -i
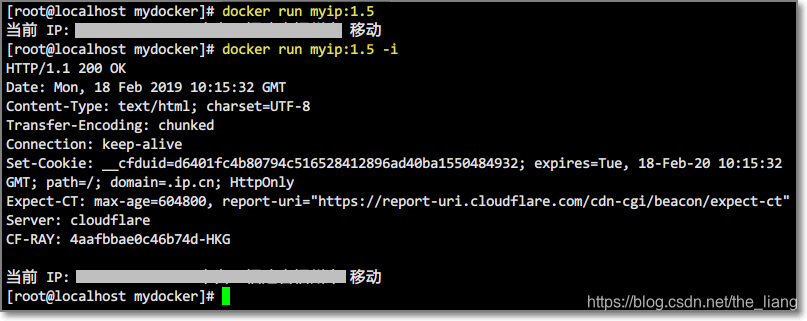
But we can also use ENTROYPOINT to make a container for querying IP information
FROM centos
RUN yum install -y curl
ENTRYPOINT [ "curl", "-s", "https://www.ip.cn" ]
At this point, you can directly add parameters to docker run
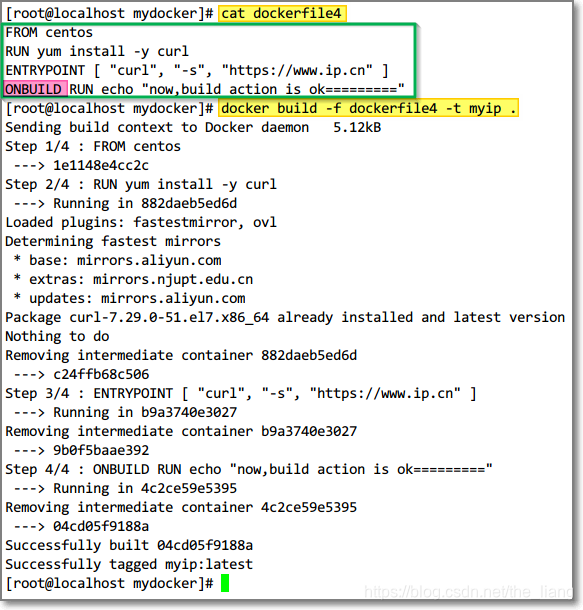
ONBUILD example
Run the command when building an inherited Dockerfile, the onbuild of the parent image is triggered after the parent image is inherited by the child
FROM centos
RUN yum install -y curl
ENTRYPOINT [ "curl", "-s", "https://www.ip.cn" ]
ONBUILD RUN echo "now,build action is ok========="
Build a mirror myip:
Build a sub-container that inherits from the myip container
FROM myip
RUN yum install -y curl
ENTRYPOINT [ "curl", "-s", "https://www.ip.cn" ]

Tomcat example: COPY/ADD
- Create a directory:
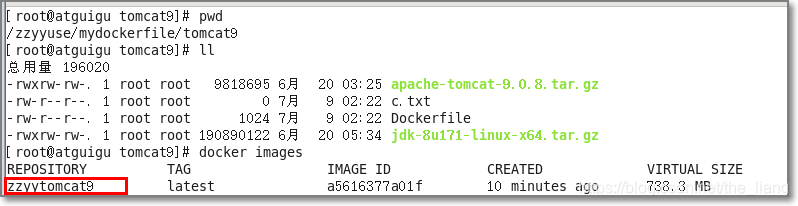
mkdir -p /zzyyuse/mydockerfile/tomcat9 - There are the following files in the directory: Obtain by yourself, not necessary
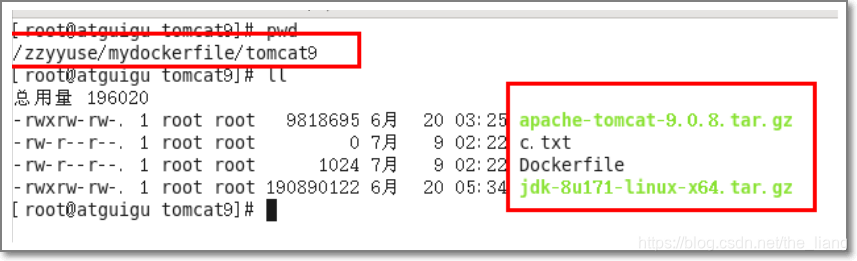
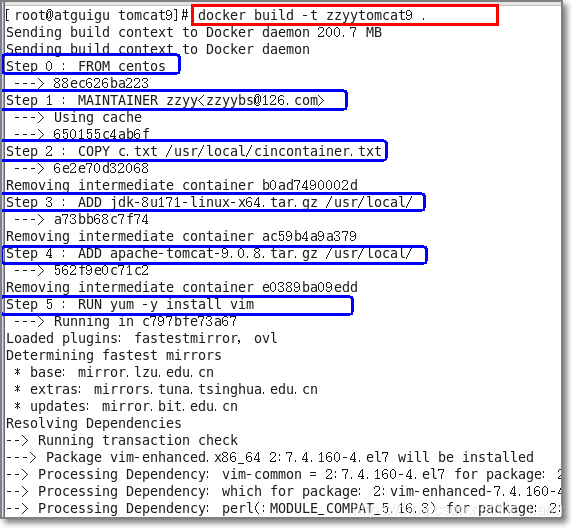
FROM centos
MAINTAINER zzyy<[email protected]>
# 把宿主机当前上下文的c.txt拷贝到容器/usr/local/路径下
COPY c.txt /usr/local/cincontainer.txt
# 把java与tomcat添加到容器中
ADD jdk-8u171-linux-x64.tar.gz /usr/local/
ADD apache-tomcat-9.0.8.tar.gz /usr/local/
# 安装vim编辑器
RUN yum -y install vim
#设置工作访问时候的WORKDIR路径,登录落脚点
ENV MYPATH /usr/local
WORKDIR $MYPATH
# 配置java与tomcat环境变量
ENV JAVA_HOME /usr/local/jdk1.8.0_171
ENV CLASSPATH $JAVA_HOME/lib/dt.jar:$JAVA_HOME/lib/tools.jar
ENV CATALINA_HOME /usr/local/apache-tomcat-9.0.8
ENV CATALINA_BASE /usr/local/apache-tomcat-9.0.8
ENV PATH $PATH:$JAVA_HOME/bin:$CATALINA_HOME/lib:$CATALINA_HOME/bin
# 容器运行时监听的端口
EXPOSE  8080
# 启动时运行tomcat
# ENTRYPOINT ["/usr/local/apache-tomcat-9.0.8/bin/startup.sh" ]
# CMD ["/usr/local/apache-tomcat-9.0.8/bin/catalina.sh","run"]
CMD /usr/local/apache-tomcat-9.0.8/bin/startup.sh && tail -F /usr/local/apache-tomcat-9.0.8/bin/logs/catalina.out
- Construction: pay attention to the role of ADD and COPY in this process
- run


- Publish the tested web service test in combination with the aforementioned container volume: create web.xml and jsp files
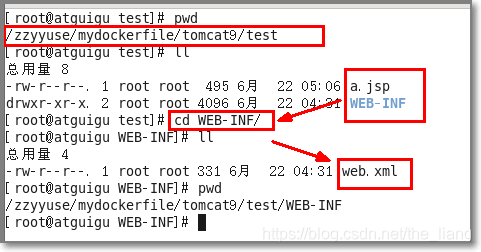
<?xml version="1.0" encoding="UTF-8"?>
<web-app xmlns:xsi="http://www.w3.org/2001/XMLSchema-instance"
  xmlns="http://java.sun.com/xml/ns/javaee"
  xsi:schemaLocation="http://java.sun.com/xml/ns/javaee http://java.sun.com/xml/ns/javaee/web-app_2_5.xsd"
  id="WebApp_ID" version="2.5">

  <display-name>test</display-name>
</web-app>
<%@ page language="java" contentType="text/html; charset=UTF-8" pageEncoding="UTF-8"%>
<!DOCTYPE html PUBLIC "-//W3C//DTD HTML 4.01 Transitional//EN" "http://www.w3.org/TR/html4/loose.dtd">
<html>
<head>
<meta http-equiv="Content-Type" content="text/html; charset=UTF-8">
<title>Insert title here</title>
</head>
<body>
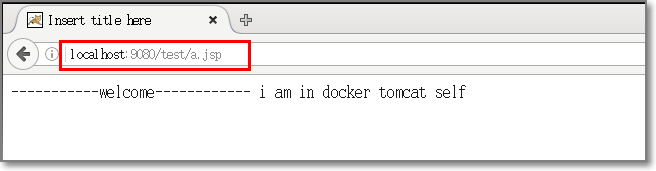
-----------welcome------------
<%="i am in docker tomcat self "%>
<br>
<br>
<% System.out.println("=============docker tomcat self");%>
</body>
</html>
- test


Common Container Operations
- Search mirrors:
docker search NAME - Pull the image:
docker pull IMAGES - Check out the mirror:
docker images - Start the image:
docker run -d IMAGES - Stop the container:
docker stop CONTAINER_ID - Remove container:
docker rm CONTAINER_ID
install centos
- Pull the image:
docker pull centos - Start the container:
docker run -itd --name CENTOS_NAME centos /bin/bash - into the container:
docker exec CENTOS_NAME /bin/bash - Exit the container:
ctrl + p + q
install tomcat
- Pull the image:
docker pull tomcat:7 - Start the container:
docker run -d -p 8080:8080 tomcat:7
install mysql
- Pull the image:
docker pull mysql:5.6 - Start the container:
docker run -d -p 3306:3306 mysql:5.6
Start with a data volume:
docker run -d -p 3306:3306 --name mysql \
-v /root/mysql/conf:/etc/mysql/conf.d \
-v /root/mysql/logs:/logs \
-v /root/mysql/data:/var/lib/mysql \
-e MYSQL_ROOT_PASSWORD=123456 \
mysql:5.6
data backup:
docker exec myql服务容器ID
sh -c ' exec mysqldump --all-databases -uroot -p"root" '
> /root/all-databases.sql
install redis
-
Pull the image:
docker pull redis -
Start the container:
docker run -d -p 6379:6379 redis redis-server --appendonly yes -
Run the redis client:
docker exec -it [运行着Rediis服务的容器ID] redis-cli
Start with a data volume:
docker run -d -p 6379:6379 \
-v /root/myredis/data:/data \
-v /root/myredis/conf/redis.conf:/usr/local/etc/redis/redis.conf \
redis redis-name /usr/local/etc/redis/redis.conf \
--appendonly yes
/root/myredis/conf/redis.confCreate a new redis.conf file in the host directory
vim /root/myredis/conf/redis.conf/redis.conf
Write the redis.conf configuration file, the configuration will not be provided here, and it will be completed after startup
install zookeeper
Zookeeper is a sub-project of Apacahe Hadoop. It is a tree-type directory service that supports change push. It is suitable as a registration center for Dubbo services . It has high industrial strength and can be used in production environments and is recommended.
Therefore, it is required to install zookeeper and dubbo-admin images, and at the same time establish a connection between these two containers.
- Pull the image:
docker pull zookeeper - Start the container:
docker run -d \
--name zookeeper_name \
--restart always \
-p 2181:2181 \
-p 2888:2888 \
-p 3888:3888 \
zookeeper
--restart always: Since zookeeper "fails fast", it is better to always restart it.- This image includes
EXPOSE 2181 2888 3888(zookeeper client port, follow port, select port), so standard container linking will make it automatically available to linked containers.
Install dubbo-admin
In order to allow users to better manage and monitor many dubbo services, the official provides a visual monitoring program dubbo-admin, but this monitoring will not affect the use even if it is not installed.
- Pull the image:
docker pull chenchuxin/dubbo-admin - Start the container:
docker run -d \
-p 8080:8080 \
-e admin.registry.address=zookeeper://192.168.222.130:2181 \
-e dubbo.admin.root.password=root \
-e dubbo.admin.guest.password=guest \
--link [name:alias] \
chenchuxin/dubbo-admin
- Test: Access link: http://host IP:8080, enter account password root
--link list: When the --link method is used, the container as the client can access the container through the private network. At the same time, Docker will set some environment variables in the client's container to record the bound IP and PORT. In other words, it is equivalent to making the two containers on the same network.
Install RabbitMQ
- Pull the image:
docker pull rabbitmq:3-management - Start the container:
docker run -d \
-p 5672:5672 \
-p 15672:15672 \
--name myrabbitmq \
rabbitmq:3-management
-managementTAG with a web interface- 5672 corresponds to the RabbitMQ port
- 15672 corresponds to the access port of the RabbitMQ management web interface
By accessing: http://IP:15672, the user name and password areguest
Install ElasticSearch
- Pull the image:
docker pull elasticsearch - Start the container:
docker run -d \
-e ES_JAVA_OPTS="-Xms256m -Xmx256m" \
-p 9200:9200 \
-p 9300:9300 \
--name ES_name \
elasticsearch
-e ES_JAVA_OPTS: Indicates modifying the memory of the JVM virtual machine to prevent memory overflow- 9200: http communication port
- 9300: When creating a distributed elasticsearch, the port for communication between each node
Versions above 6.0 require 2G memory space by default. If the system runs without 2G memory, an error will be reported:
max virtual memory areas vm.max_map_count [65530] is too low, increase to at least [262144]
elasticsearch用户拥有的内存权限太小,至少需要262144;
Solution:
- run:
sysctl -w vm.max_map_count=262144 - View results:
sysctl -a|grep vm.max_map_count, will displayvm.max_map_count = 262144 - Permanent modification:
/etc/sysctl.confAdd a line at the end of the filevm.max_map_count=262144to make permanent modification
Publish the local image to Alibaba Cloud
- Image generation: You can use the previous Dockerfile method. You can also use the commit method, as shown in the following
docker commit [OPTIONS] 容器ID [REPOSITORY[:TAG]]
example:docker commit -a theliang -m "new mycentos 1.4 from 1.3 " 45e4aa594e06 mycentos:1.4

- Enter the Alibaba Cloud development platform , create a warehouse image, and bind the code source (Github)
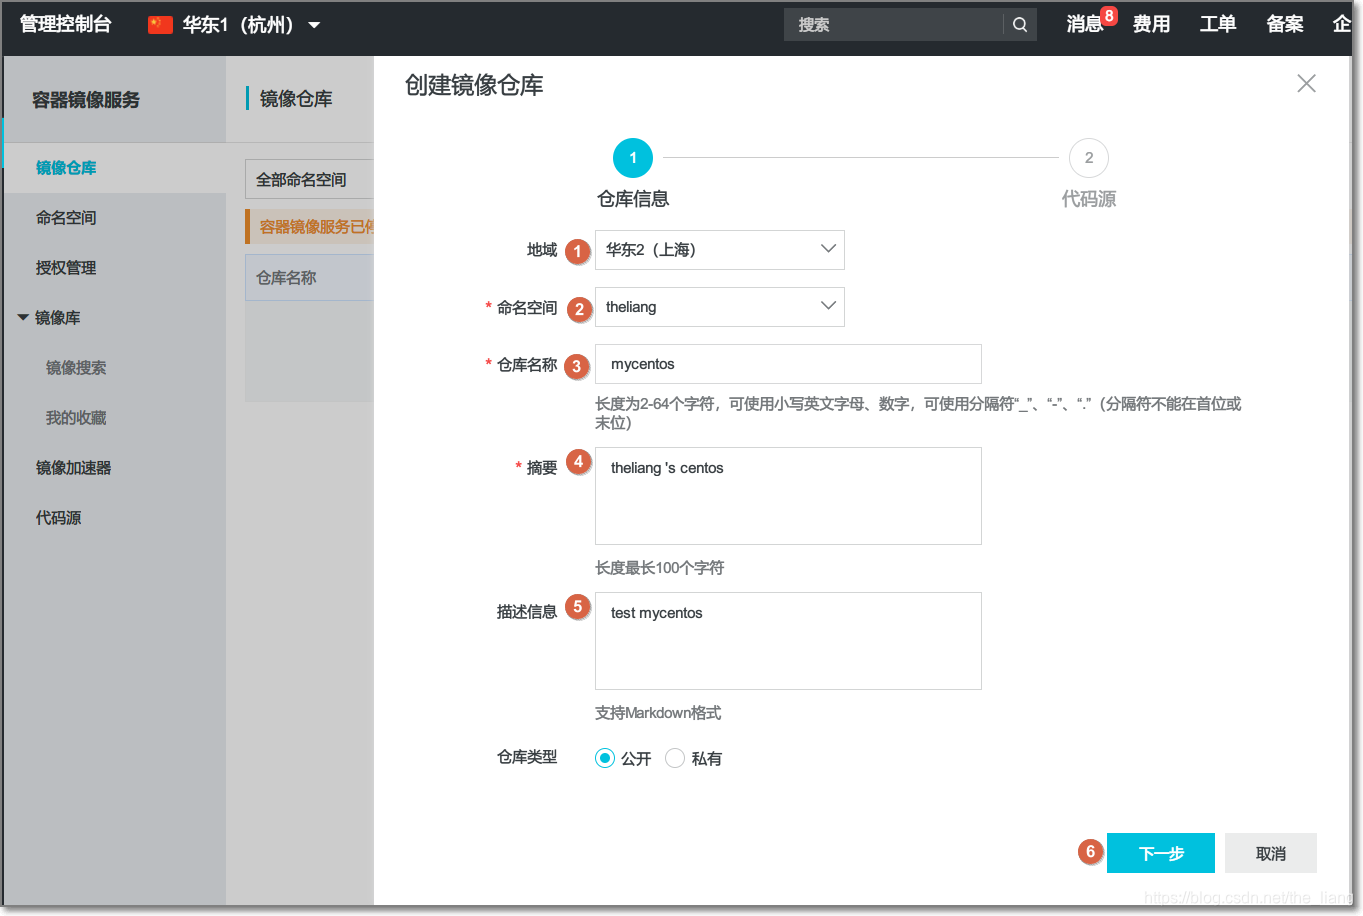
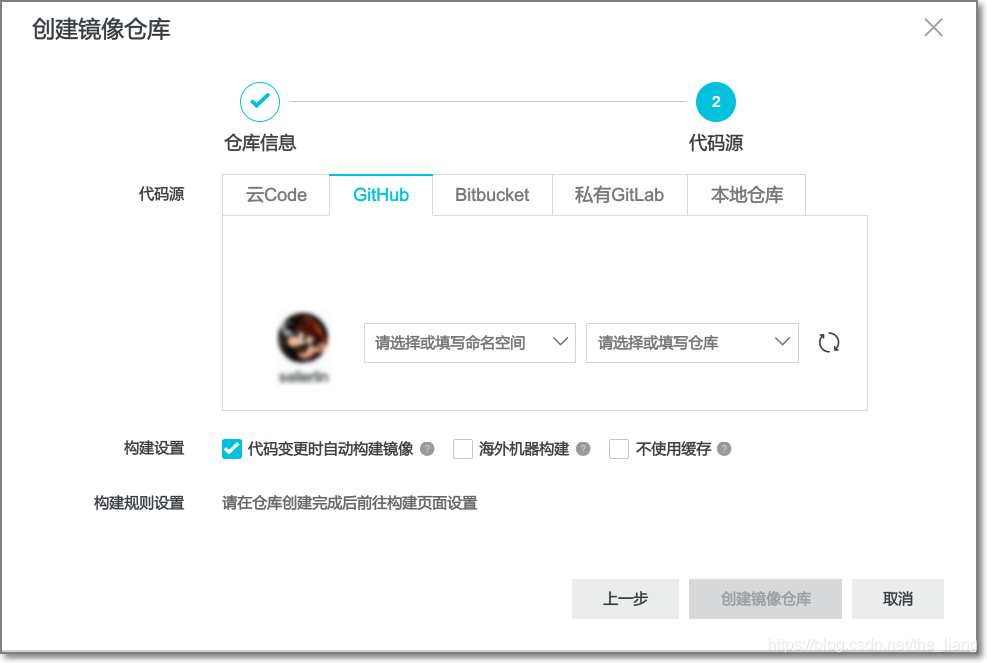

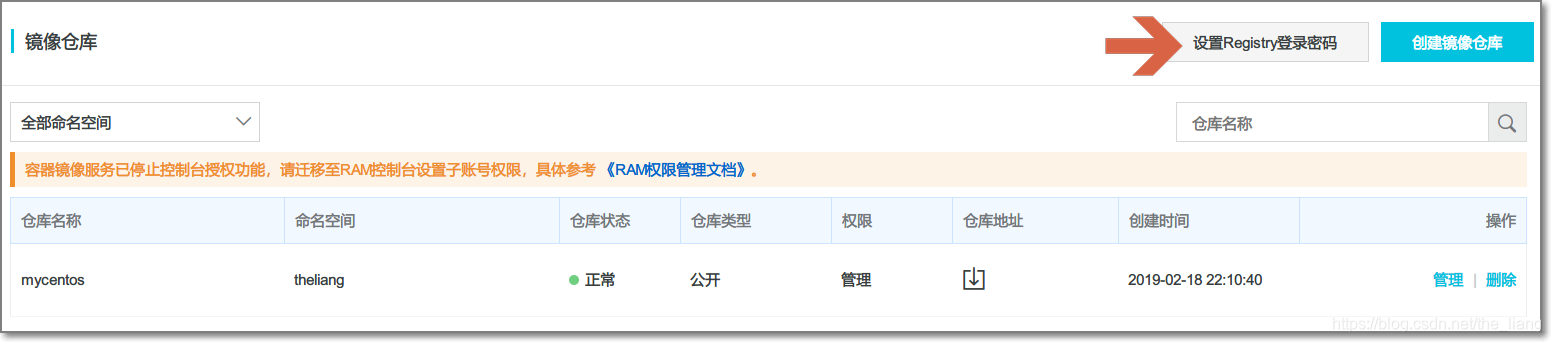
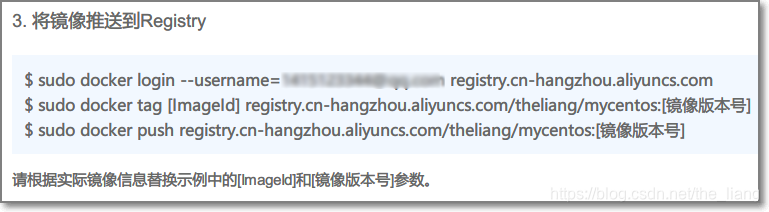
- Manage the mirror warehouse, which contains the operation guide
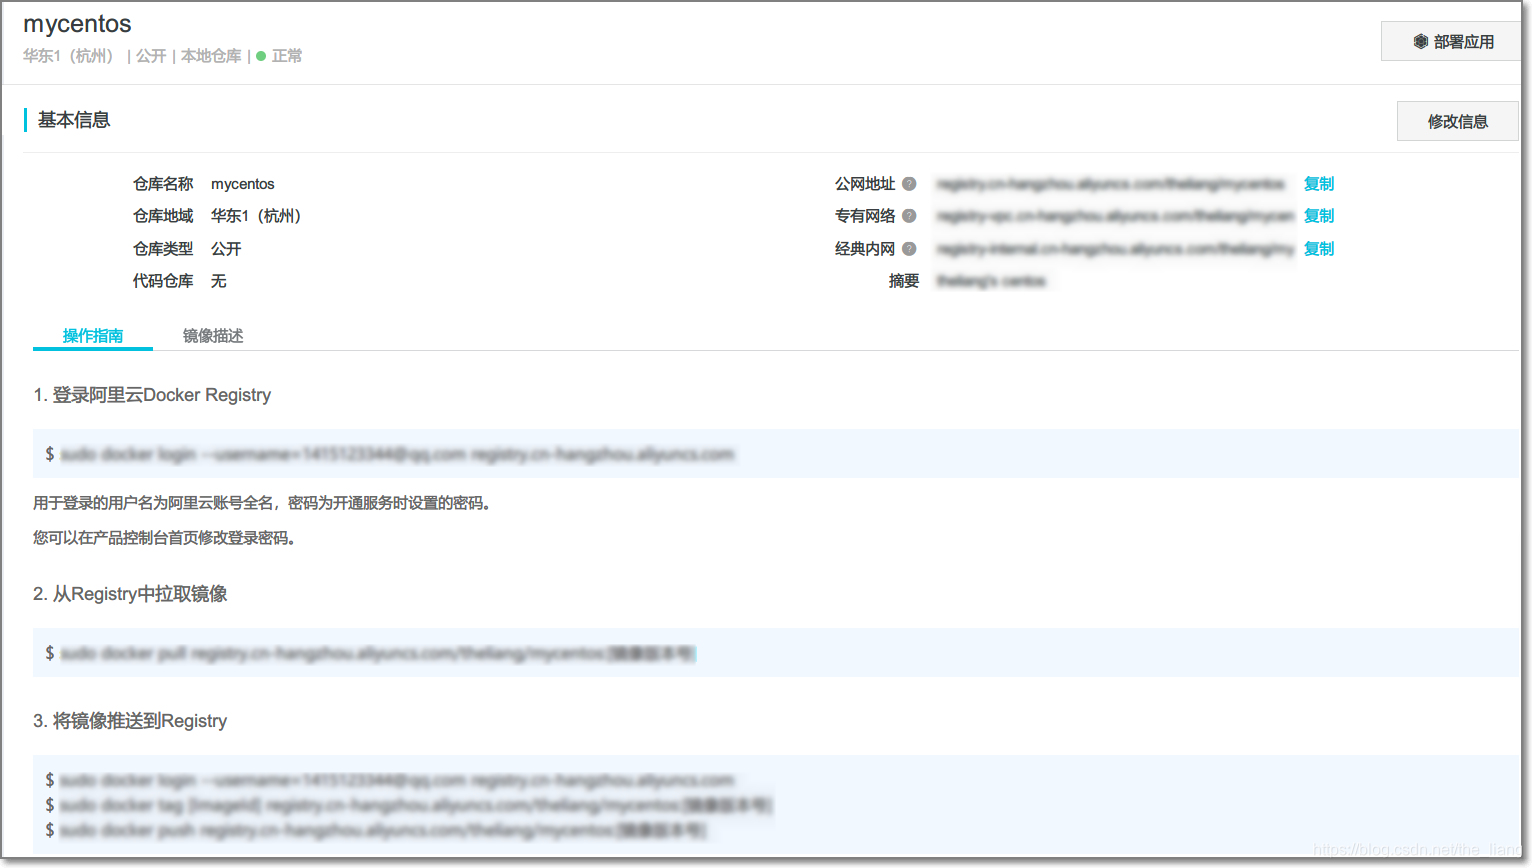
- Set the login authorization password (in the first step of the operation guide, the password used for the prompt is set here, please note that it is not your login password!)
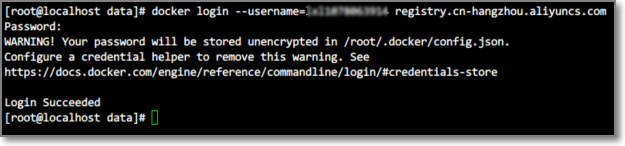
- Login: follow the first step of the operation guide, and then enter the set password to log in successfully
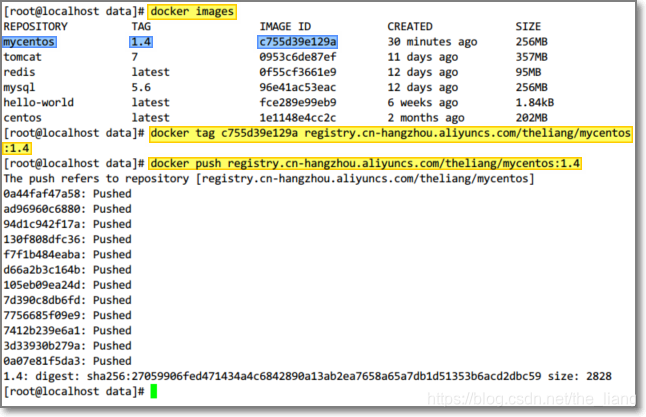
- Push the image to Registry: [image version number] can be different from IMAGE ID
After following the instructions:
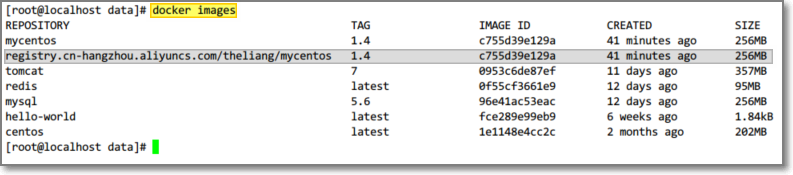
You can see the image after push in the local warehouse
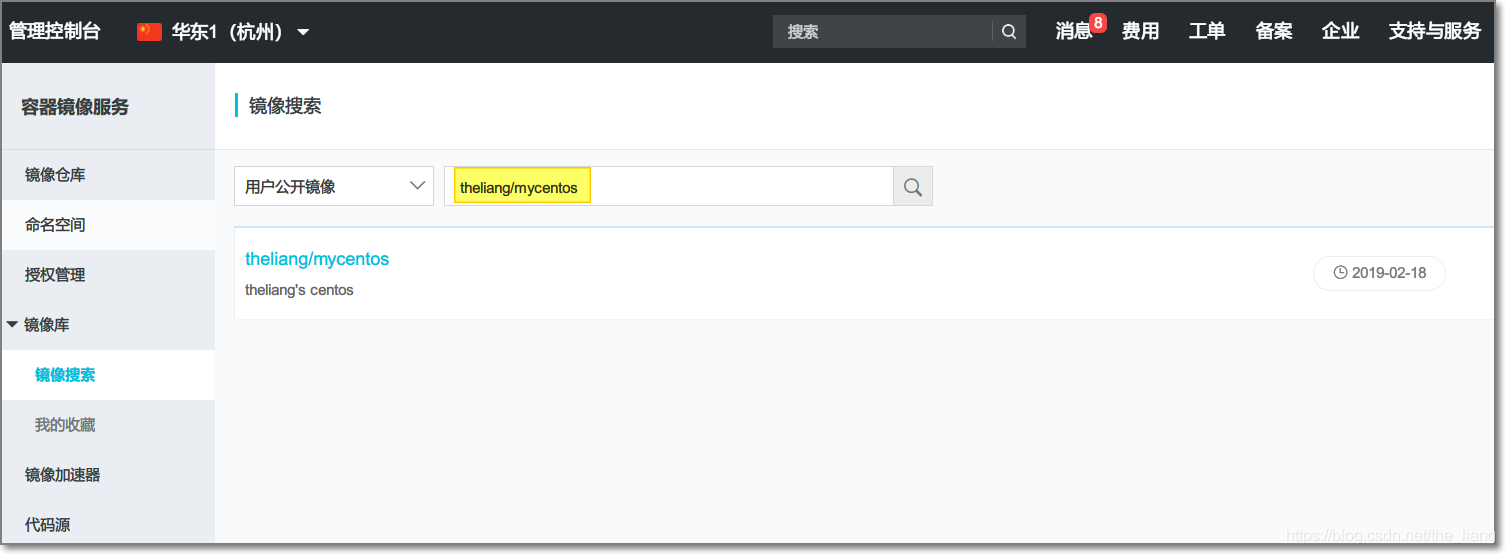
It can also be found on the public cloud :
It is also possible in [Console] - [Mirror Library] - [Mirror Search]:
- Pull the image from the Registry: open the image to be downloaded in the image search, select a mirror address, and use the
docker pullcommand to pull the image
