MyBatis
- 1. Introduction to MyBatis
- 2. Build MyBatis
- 3. Detailed explanation of the core configuration file
- 4. Addition, deletion and modification of MyBatis
- 5. Two ways for MyBatis to obtain parameter values (emphasis)
- 6. Various query functions of MyBatis
- 7. Execution of special SQL
- Eight, custom mapping resultMap
- 9. Dynamic SQL
- 10. MyBatis cache
- 11. Reverse engineering of MyBatis
- 12. Pagination plugin
MyBatis information
链接:https://pan.baidu.com/s/1_Gr1QdfxsVTFGJC6V3i00Q?pwd=1tc5
提取码:1tc5
1. Introduction to MyBatis
1. History of MyBatis
MyBatis was originally iBatis, an open source project of Apache. In June 2010, the project was migrated from Apache Software Foundation to Google Code. As the development team transferred to Google Code, iBatis3.x officially changed its name to MyBatis. The code was migrated to Github in November 2013.
The word iBatis comes from the combination of "internet" and "abatis", which is a Java-based persistence layer framework. The persistence layer framework provided by iBatis includes SQL Maps and Data Access Objects (DAO).
2. MyBatis Features
1) MyBatis is an excellent persistence layer framework that supports customized SQL, stored procedures, and advanced mapping
2) MyBatis avoids almost all JDBC code and manual setting of parameters and obtaining result sets
3) MyBatis can use simple XML or annotations for Configuration and original mapping, mapping interfaces and Java POJOs (Plain Old Java
Objects, ordinary Java objects) into records in the database
4) MyBatis is a semi-automatic ORM (Object Relation Mapping) framework
3. MyBatis download
MyBatis download address: https://github.com/mybatis/mybatis-3
4. Comparison with other persistence layer technologies
JDBC
SQL is mixed in the Java code with a high degree of coupling, resulting in hard-coded internal damage. It is
not easy to maintain and SQL changes in the actual development requirements, and frequent modifications are common. The
code is long and the development efficiency is low .
Hibernate and JPA
are easy to operate and high development efficiency.
Long, difficult and complex SQL needs to bypass the framework
Internally automatically generated SQL, it is not easy to do special optimization
Based on the full-mapping fully automatic framework, it is difficult to partially map POJOs with a large number of fields.
Too many reflective operations lead to a decrease in database performance.
MyBatis
is lightweight and has excellent performance.
SQL and Java coding are separated, and the functional boundaries are clear. Java code focuses on business, and SQL statement focuses on data.
The development efficiency is slightly lower than that of HIbernate, but it is completely acceptable.
2. Build MyBatis
1. Development environment
IDE: idea 2020.3
Build tool: maven 3.6.1
MySQL version: MySQL 5.7
MyBatis version: MyBatis 3.5.7
2. Create a maven project
a> Packaging method: jar
b> Import dependencies
       <!-- Mybatis核心 -->
        <dependency>
            <groupId>org.mybatis</groupId>
            <artifactId>mybatis</artifactId>
            <version>3.5.7</version>
        </dependency>
        <!-- junit测试 -->
        <dependency>
            <groupId>junit</groupId>
            <artifactId>junit</artifactId>
            <version>4.12</version>
            <scope>test</scope>
        </dependency>
        <!-- MySQL驱动 -->
        <dependency>
            <groupId>mysql</groupId>
            <artifactId>mysql-connector-java</artifactId>
            <version>5.1.47</version>
        </dependency>
3. Create the core configuration file of MyBatis
It is customary to name it mybatis-config.xml. This file name is just a suggestion, not a mandatory requirement. After Spring is integrated in the future, this configuration file can be omitted, so you can copy and paste directly when operating.
The core configuration file is mainly used to configure the environment for connecting to the database and the global configuration information of MyBatis. The core configuration file is stored in the src/main/resources directory
<?xml version="1.0" encoding="UTF-8" ?>
<!DOCTYPE configuration
PUBLIC "-//mybatis.org//DTD Config 3.0//EN"
"http://mybatis.org/dtd/mybatis-3-config.dtd">
<configuration>
	<!--设置连接数据库的环境-->
	<environments default="development">
	<environment id="development">
	<transactionManager type="JDBC"/>
	<dataSource type="POOLED">
	<property name="driver" value="com.mysql.jdbc.Driver"/>
	<property name="url"
	value="jdbc:mysql://localhost:3306/MyBatis"/>
	<property name="username" value="root"/>
	<property name="password" value="123456"/>
	</dataSource>
	</environment>
	</environments>
	<!--引入映射文件-->
	<mappers>
	<mapper resource="mappers/UserMapper.xml"/>
	</mappers>
</configuration>
4. Create mapper interface
public interface UserMapper {


/**
* 添加用户信息
*/
int insertUser();
}
5. Create a MyBatis mapping file
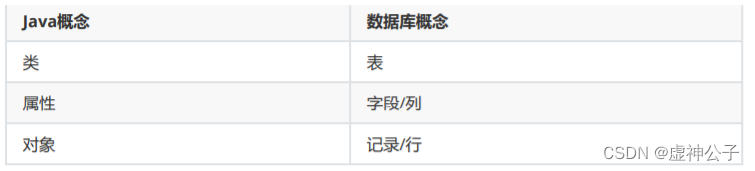
Related concepts: ORM (Object Relationship Mapping) object-relational mapping.
Object: Java entity class object
Relationship: relational database
Mapping: the correspondence between the two
1. Naming rules for mapping files:
the class name of the entity class corresponding to the table + Mapper.xml
For example: table t_user, mapped entity The class is User, and the corresponding mapping file is UserMapper.xml.
Therefore, a mapping file corresponds to an entity class, and corresponds to the operation of a table.
The MyBatis mapping file is used to write SQL, access and operate the data in the table. The
storage location of the MyBatis mapping file is Under the src/main/resources/mappers directory
2, MyBatis can operate data facing the interface, and two must be consistent:
a> the full class name of the mapper interface and the namespace (namespace) of the mapping file are consistent
b> the method in the mapper interface The method name is consistent with the id attribute of the label that writes SQL in the mapping file
<?xml version="1.0" encoding="UTF-8" ?>
<!DOCTYPE mapper
        PUBLIC "-//mybatis.org//DTD Mapper 3.0//EN"
        "http://mybatis.org/dtd/mybatis-3-mapper.dtd">
<mapper namespace="com.xusheng.mybatis.mapper.UserMapper">

    <!--int insertUser();-->
    <insert id="insertUser">
        insert into t_user values(null,'admin','123456',23,'男','12345@qq.com')
    </insert>

</mapper>
6. Test function through junit
package com.xusheng.mybatis.test;

import com.xusheng.mybatis.mapper.UserMapper;
import com.xusheng.mybatis.pojo.User;
import org.apache.ibatis.io.Resources;
import org.apache.ibatis.session.SqlSession;
import org.apache.ibatis.session.SqlSessionFactory;
import org.apache.ibatis.session.SqlSessionFactoryBuilder;
import org.junit.Test;

import java.io.IOException;
import java.io.InputStream;
import java.util.List;
public class MyBatisTest {


    /**
     * SqlSession默认不自动提交事务,若需要自动提交事务
     * 可以使用SqlSessionFactory.openSession(true);
     */
    @Test
    public void testMyBatis() throws IOException {


        //加载核心配置文件
        InputStream is = Resources.getResourceAsStream("mybatis-config.xml");
        //获取SqlSessionFactoryBuilder
        SqlSessionFactoryBuilder sqlSessionFactoryBuilder = new SqlSessionFactoryBuilder();
        //获取sqlSessionFactory
        SqlSessionFactory sqlSessionFactory = sqlSessionFactoryBuilder.build(is);
        //获取SqlSession
        //创建SqlSession对象,此时通过SqlSession对象所操作的sql都必须手动提交或回滚事务
        //SqlSession sqlSession = sqlSessionFactory.openSession();
        //创建SqlSession对象,此时通过SqlSession对象所操作的sql都会自动提交
        SqlSession sqlSession = sqlSessionFactory.openSession(true);
        //获取mapper接口对象
        //调用UserMapper接口中的方法,就可以根据UserMapper的全类名匹配元素文件,通过调用的方法名匹配映射文件中的SQL标签,并执行标签中的SQL语句
        UserMapper mapper = sqlSession.getMapper(UserMapper.class);
        //测试功能
        int result = mapper.insertUser();
        //提交事务
        //sqlSession.commit();
        System.out.println("result:"+result);
    }
}
SqlSession: represents the session between the Java program and the database. (HttpSession is a session between a Java program and a browser)
SqlSessionFactory: It is a "factory" that "produces" SqlSession.
Factory mode: If the process of creating an object is basically fixed, then we can encapsulate the code related to creating this object into a "factory class", and use this factory class to "produce" the objects we need in the future.
7. Add log4j log function
a> add dependency
 <!-- log4j日志 -->
        <dependency>
            <groupId>log4j</groupId>
            <artifactId>log4j</artifactId>
            <version>1.2.17</version>
        </dependency>
b>Join the configuration file of log4j
<?xml version="1.0" encoding="UTF-8" ?>
<!DOCTYPE log4j:configuration SYSTEM "log4j.dtd">

<log4j:configuration xmlns:log4j="http://jakarta.apache.org/log4j/">

    <appender name="STDOUT" class="org.apache.log4j.ConsoleAppender">
        <param name="Encoding" value="UTF-8" />
        <layout class="org.apache.log4j.PatternLayout">
            <param name="ConversionPattern" value="%-5p %d{MM-dd HH:mm:ss,SSS} %m  (%F:%L) \n" />
        </layout>
    </appender>
    <logger name="java.sql">
        <level value="debug" />
    </logger>
    <logger name="org.apache.ibatis">
        <level value="info" />
    </logger>
    <root>
        <level value="debug" />
        <appender-ref ref="STDOUT" />
    </root>
</log4j:configuration>
3. Detailed explanation of the core configuration file
The tags in the core configuration file must follow a fixed order:
properties?, settings?, typeAliases?, typeHandlers?, objectFactory?, objectWrapperFactory?, reflectorFactory?, plugins?, environments?, databaseIdProvider?, mappers?
<?xml version="1.0" encoding="UTF-8" ?>
<!DOCTYPE configuration
PUBLIC "-//mybatis.org//DTD Config 3.0//EN"
"http://mybatis.org/dtd/mybatis-3-config.dtd">
<configuration>
<!--
MyBatis核心配置文件中,标签的顺序:
properties?,settings?,typeAliases?,typeHandlers?,
objectFactory?,objectWrapperFactory?,reflectorFactory?,
plugins?,environments?,databaseIdProvider?,mappers?
-->
<!--引入properties文件-->
<properties resource="jdbc.properties" />
<settings>
<!--将表中字段的下划线自动转换为驼峰-->
<setting name="mapUnderscoreToCamelCase" value="true"/>
<!--开启延迟加载-->
<setting name="lazyLoadingEnabled" value="true"/>
</settings>
<!--设置类型别名-->
<typeAliases>
<!--
typeAlias:设置某个类型的别名
属性:useUnicode=true&useSSL=false
type:设置需要设置别名的类型
alias:设置某个类型的别名,若不设置该属性,那么该类型拥有默认的别名,即类名且不区分大小写
-->
<!--<typeAlias type="com.atguigu.mybatis.pojo.User"></typeAlias>-->
<!--以包为单位,将包下所有的类型设置默认的类型别名,即类名且不区分大小写-->
<package name="com.xusheng.mybatis.pojo"/>
</typeAliases>
<!--设置连接数据库的环境-->
<environments default="development">
<environment id="development">
<transactionManager type="JDBC"/>
<!--
dataSource:设置数据源
属性:
type:设置数据源的类型,type="POOLED|UNPOOLED|JNDI"
type="POOLED":使用数据库连接池,即会将创建的连接进行缓存,下次使用可以从
缓存中直接获取,不需要重新创建
type="UNPOOLED":不使用数据库连接池,即每次使用连接都需要重新创建
type="JNDI":调用上下文中的数据源
-->
<dataSource type="POOLED">
<!--设置连接数据库的驱动-->
<property name="driver" value="${jdbc.driver}"/>
<!--设置连接数据库的连接地址-->
<property name="url" value="${jdbc.url}"/>
<!--设置连接数据库的用户名-->
<property name="username" value="${jdbc.username}"/>
<!--设置连接数据库的密码-->
<property name="password" value="${jdbc.password}"/>
</dataSource>
</environment>
</environments>
<!--引入映射文件-->
<mappers>
<!-- <mapper resource="mapper/UserMapper.xml"/>-->
<!--
以包为单位引入映射文件
要求:
1、mapper接口所在的包要和映射文件所在的包一致
2、mapper接口要和映射文件的名字一致
-->
<package name="com.xusheng.mybatis.mapper"/>
</mappers>
</configuration>
4. Addition, deletion and modification of MyBatis
1. Add
<!--int insertUser();-->
    <insert id="insertUser">
        insert into t_user values(null,'admin','123456',23,'男','12345@qq.com')
    </insert>
2. Delete
 <!--void deleteUser();-->
    <delete id="deleteUser">
        delete from t_user where id = 5
    </delete>
3. Modify
<!--void updateUser();-->
    <update id="updateUser">
        update t_user set username = '张三' where id = 4
    </update>
4. Query an entity class object
 <!--User getUserById();-->
    <!--
        查询功能的标签必须设置resultType或resultMap
        resultType:设置默认的映射关系
        resultMap:设置自定义的映射关系
    -->
    <select id="getUserById" resultType="com.xusheng.mybatis.pojo.User">
        select * from t_user where id = 3
    </select>
5. Query Collection
  <!--List<User> getAllUser();-->
    <select id="getAllUser"  resultType="com.xusheng.mybatis.pojo.User">
        select * from t_user
    </select>
Note:
1. The label select of the query must set the attribute resultType or resultMap, which is used to set the mapping relationship between the entity class and the database table
resultType: automatic mapping, used when the attribute name is consistent with the field name in the table
resultMap: custom mapping, used One-to-many or many-to-one or inconsistent field names and attribute names
2. When the queried data is multiple, entity classes cannot be used as return values, only collections can be used, otherwise TooManyResultsException will be thrown
; but if the queried There is only one piece of data, and entity classes or collections can be used as return values
5. Two ways for MyBatis to obtain parameter values (emphasis)
Two ways for MyBatis to obtain parameter values: ${} and #{}
The essence of ${} is string splicing, and the essence of #{} is placeholder assignment.
${} uses string splicing to splice sql. When assigning values to fields of string type or date type, single quotation marks need to be added manually; but #{} uses placeholder assignment to splice sql, and at this time, when assigning values to fields of string type or date type, it can be added automatically apostrophe
1. A parameter of a single literal type
If the method parameter in the mapper interface is a single literal type,
you can use KaTeX parse error: Expected 'EOF', got '#' at position 4: {} and #̲{} to get the value of the parameter with any name, ... {} need to add single quotes manually
2. Multiple literal type parameters
If there are multiple method parameters in the mapper interface,
MyBatis will automatically put these parameters in a map collection, with arg0, arg1... as keys and parameters as values; param1
, param2... as keys and parameters as value; therefore, you only need to access the keys of the map collection through KaTeX parse error: Expected 'EOF', got '#' at position 4: {} and #̲{} to get... {} need to add single quotes manually
3. Parameters of map collection type
If the method in the mapper interface requires multiple parameters, you can manually create a map collection and put the data in the map. You
only need to pass KaTeX parse error: Expected 'EOF', got '#' at position 4: { } and #̲{} access the keys of the map collection to get... {} need to add single quotes manually
4. Parameters of the entity class type
If the method parameter in the mapper interface is an entity class object,
you can use KaTeX parse error: Expected 'EOF', got '#' at position 4: {} and #̲{} at this time to access the attributes in the entity class object... {} need to add single quotes manually
5. Use @Param to identify parameters
The method parameters in the mapper interface can be identified through the @Param annotation
. At this time, these parameters will be placed in the map collection, with the value attribute value of the @Param annotation as the key and the parameter as the value; with
param1, param2... as the key, and with The parameter is a value; you only need to access the keys of the map collection through KaTeX parse error: Expected 'EOF', got '#' at position 4: {} and #̲{} to get... {} need to add single quotes manually
6. Various query functions of MyBatis
1. Query an entity class object
/**
* 根据用户id查询用户信息
* @param id
* @return
*/
User getUserById(@Param("id") int id);
<!--User getUserById(@Param("id") int id);-->
<select id="getUserById" resultType="User">
	select * from t_user where id = #{

    id}
</select>
2. Query a list collection
/**
* 查询所有用户信息
* @return
*/
List<User> getUserList();
<!--List<User> getUserList();-->
<select id="getUserList" resultType="User">
	select * from t_user
</select>
3. Query a single data
/**
* 查询用户的总记录数
* @return
* 在MyBatis中,对于Java中常用的类型都设置了类型别名
* 例如:java.lang.Integer-->int|integer
* 例如:int-->_int|_integer
* 例如:Map-->map,List-->list
*/
int getCount();
<!--int getCount();-->
<select id="getCount" resultType="_integer">
	select count(id) from t_user
</select>
4. Query a piece of data as a map collection
/**
* 根据用户id查询用户信息为map集合
* @param id
* @return
*/
Map<String, Object> getUserToMap(@Param("id") int id);
<!--Map<String, Object> getUserToMap(@Param("id") int id);-->
<select id="getUserToMap" resultType="map">
	select * from t_user where id = #{

    id}
</select>
<!--结果:{

    password=123456, sex=男, id=1, age=23, username=admin}-->
5. Query multiple pieces of data as a map collection
method one:
/**
* 查询所有用户信息为map集合
* @return
* 将表中的数据以map集合的方式查询,一条数据对应一个map;若有多条数据,就会产生多个map集合,此
时可以将这些map放在一个list集合中获取
*/
List<Map<String, Object>> getAllUserToMap();
<!--Map<String, Object> getAllUserToMap();-->
<select id="getAllUserToMap" resultType="map">
	select * from t_user
</select>
Method 2:
/**
* 查询所有用户信息为map集合
* @return
* 将表中的数据以map集合的方式查询,一条数据对应一个map;若有多条数据,就会产生多个map集合,并
且最终要以一个map的方式返回数据,此时需要通过@MapKey注解设置map集合的键,值是每条数据所对应的
map集合
*/
@MapKey("id")
Map<String, Object> getAllUserToMap();
<!--Map<String, Object> getAllUserToMap();-->
<select id="getAllUserToMap" resultType="map">
	select * from t_user
</select>
结果:
<!--
{


1={

    password=123456, sex=男, id=1, age=23, username=admin},
2={

    password=123456, sex=男, id=2, age=23, username=张三},
3={

    password=123456, sex=男, id=3, age=23, username=张三}
}
-->
7. Execution of special SQL
1. Fuzzy query
/**
* 测试模糊查询
* @param mohu
* @return
*/
List<User> testMohu(@Param("mohu") String mohu);
<!--List<User> testMohu(@Param("mohu") String mohu);-->
<select id="testMohu" resultType="User">
<!--select * from t_user where username like '%${

    mohu}%'-->
<!--select * from t_user where username like concat('%',#{

    mohu},'%')-->
select * from t_user where username like "%"#{

    mohu}"%"
</select>
2. Batch delete
/**
* 批量删除
* @param ids
* @return
*/
int deleteMore(@Param("ids") String ids);
<!--int deleteMore(@Param("ids") String ids);-->
<delete id="deleteMore">
delete from t_user where id in (${

    ids})
</delete>
3. Dynamically set the table name
/**
* 动态设置表名,查询所有的用户信息
* @param tableName
* @return
*/
List<User> getAllUser(@Param("tableName") String tableName);
<!--List<User> getAllUser(@Param("tableName") String tableName);-->
<select id="getAllUser" resultType="User">
select * from ${

    tableName}
</select>
4. Add function to get auto-incremented primary key
t_clazz(clazz_id,clazz_name)
t_student(student_id,student_name,clazz_id)
1. Add class information
2. Obtain the id of the newly added class
3. Assign students to the class, that is, change the class id of a certain school to the id of the newly added class
/**
* 添加用户信息
* @param user
* @return
* useGeneratedKeys:设置使用自增的主键
* keyProperty:因为增删改有统一的返回值是受影响的行数,因此只能将获取的自增的主键放在传输的参
数user对象的某个属性中
*/
int insertUser(User user);
<!--int insertUser(User user);-->
<insert id="insertUser" useGeneratedKeys="true" keyProperty="id">
insert into t_user values(null,#{

    username},#{

    password},#{

    age},#{

    sex})
</insert>
Eight, custom mapping resultMap
1. resultMap handles the mapping relationship between fields and attributes
If the field name is inconsistent with the attribute name in the entity class, you can set a custom map through resultMap
<!--
resultMap:设置自定义映射
属性:
id:表示自定义映射的唯一标识
type:查询的数据要映射的实体类的类型
子标签:
id:设置主键的映射关系
result:设置普通字段的映射关系
association:设置多对一的映射关系
collection:设置一对多的映射关系
属性:
property:设置映射关系中实体类中的属性名
column:设置映射关系中表中的字段名
-->
<resultMap id="userMap" type="User">
<id property="id" column="id"></id>
<result property="userName" column="user_name"></result>
<result property="password" column="password"></result>
<result property="age" column="age"></result>
<result property="sex" column="sex"></result>
</resultMap>
<!--List<User> testMohu(@Param("mohu") String mohu);-->
<select id="testMohu" resultMap="userMap">
<!--select * from t_user where username like '%${

    mohu}%'-->
select id,user_name,password,age,sex from t_user where user_name like
concat('%',#{

    mohu},'%')
</select>
If the field name is inconsistent with the attribute name in the entity class, but the field name conforms to the rules of the database (use _), and the attribute name in the entity class conforms
to the rules of Java (use camel case).
At this time, the field name and entity can also be processed in the following two ways The mapping relationship of attributes in the class
a> You can alias the field to ensure that it is consistent with the attribute name in the entity class
b> You can set a global configuration information mapUnderscoreToCamelCase in the core configuration file of MyBatis, which can be in the query table When data is generated, the field name of type _ is automatically converted to camel case
. For example: the field name user_name, if mapUnderscoreToCamelCase is set, the field name will be converted to userName at this time
2. Many-to-one mapping processing
Query the employee information and the department information corresponding to the employee
a> Cascading method to process the mapping relationship
<resultMap id="empDeptMap" type="Emp">
	<id column="eid" property="eid"></id>
	<result column="ename" property="ename"></result>
	<result column="age" property="age"></result>
	<result column="sex" property="sex"></result>
	<result column="did" property="dept.did"></result>
	<result column="dname" property="dept.dname"></result>
</resultMap>
<!--Emp getEmpAndDeptByEid(@Param("eid") int eid);-->
<select id="getEmpAndDeptByEid" resultMap="empDeptMap">
	select emp.*,dept.* from t_emp emp left join t_dept dept on emp.did =
dept.did where emp.eid = #{

    eid}
</select>
b>Use association to process mapping relationship
<resultMap id="empDeptMap" type="Emp">
	<id column="eid" property="eid"></id>
	<result column="ename" property="ename"></result>
	<result column="age" property="age"></result>
	<result column="sex" property="sex"></result>
	<association property="dept" javaType="Dept">
	<id column="did" property="did"></id>
	<result column="dname" property="dname"></result>
</association>
</resultMap>
<!--Emp getEmpAndDeptByEid(@Param("eid") int eid);-->
<select id="getEmpAndDeptByEid" resultMap="empDeptMap">
	select emp.*,dept.* from t_emp emp left join t_dept dept on emp.did =
dept.did where emp.eid = #{

    eid}
</select>
c> step by step query
1) query employee information
/**
* 通过分步查询查询员工信息
* @param eid
* @return
*/
Emp getEmpByStep(@Param("eid") int eid)
<resultMap id="empDeptStepMap" type="Emp">
	<id column="eid" property="eid"></id>
	<result column="ename" property="ename"></result>
	<result column="age" property="age"></result>
	<result column="sex" property="sex"></result>
	<!--
	select:设置分步查询,查询某个属性的值的sql的标识(namespace.sqlId)
	column:将sql以及查询结果中的某个字段设置为分步查询的条件
	-->
<association property="dept"
select="com.atguigu.MyBatis.mapper.DeptMapper.getEmpDeptByStep" column="did">
</association>
</resultMap>
<!--Emp getEmpByStep(@Param("eid") int eid);-->
<select id="getEmpByStep" resultMap="empDeptStepMap">
	select * from t_emp where eid = #{

    eid}
</select>
2) Query department information according to the department id corresponding to the employee
/**
* 分步查询的第二步:根据员工所对应的did查询部门信息
* @param did
* @return
*/
Dept getEmpDeptByStep(@Param("did") int did);
<!--Dept getEmpDeptByStep(@Param("did") int did);-->
<select id="getEmpDeptByStep" resultType="Dept">
	select * from t_dept where did = #{

    did}
</select>
3. One-to-many mapping processing
a>collection
/**
* 根据部门id查新部门以及部门中的员工信息
* @param did
* @return
*/
Dept getDeptEmpByDid(@Param("did") int did);
<resultMap id="deptEmpMap" type="Dept">
	<id property="did" column="did"></id>
	<result property="dname" column="dname"></result>
	<!--
	ofType:设置collection标签所处理的集合属性中存储数据的类型
	-->
	<collection property="emps" ofType="Emp">
	<id property="eid" column="eid"></id>
	<result property="ename" column="ename"></result>
	<result property="age" column="age"></result>
	<result property="sex" column="sex"></result>
	</collection>
</resultMap>
<!--Dept getDeptEmpByDid(@Param("did") int did);-->
<select id="getDeptEmpByDid" resultMap="deptEmp`在这里插入代码片`Map">
	select dept.*,emp.* from t_dept dept left join t_emp emp on dept.did =
emp.did where dept.did = #{

    did}
</select>
b> step-by-step query
1) query department information
/**
* 分步查询部门和部门中的员工
* @param did
* @return
*/
Dept getDeptByStep(@Param("did") int did);
<resultMap id="deptEmpStep" type="Dept">
<id property="did" column="did"></id>
<result property="dname" column="dname"></result>
<collection property="emps" fetchType="eager"
select="com.atguigu.MyBatis.mapper.EmpMapper.getEmpListByDid" column="did">
</collection>
</resultMap>
<!--Dept getDeptByStep(@Param("did") int did);-->
<select id="getDeptByStep" resultMap="deptEmpStep">
select * from t_dept where did = #{

    did}
</select>
2) Query all employees in the department according to the department id
/**
* 根据部门id查询员工信息
* @param did
* @return
*/
List<Emp> getEmpListByDid(@Param("did") int did);
<!--List<Emp> getEmpListByDid(@Param("did") int did);-->
<select id="getEmpListByDid" resultType="Emp">
	select * from t_emp where did = #{

    did}
</select>
分步查询的优点:可以实现延迟加载,但是必须在核心配置文件中设置全局配置信息:
lazyLoadingEnabled:延迟加载的全局开关。当开启时,所有关联对象都会延迟加载
aggressiveLazyLoading:当开启时,任何方法的调用都会加载该对象的所有属性。 否则,每个
属性会按需加载
此时就可以实现按需加载,获取的数据是什么,就只会执行相应的sql。此时可通过association和
collection中的fetchType属性设置当前的分步查询是否使用延迟加载,fetchType="lazy(延迟加
载)|eager(立即加载)"
9. Dynamic SQL
The dynamic SQL technology of the Mybatis framework is a function of dynamically assembling SQL statements according to specific conditions. Its purpose is to solve the pain point problem when splicing SQL statement strings.
1. if
The if tag can be judged by the expression of the test attribute. If the result of the expression is true, the content in the tag will be executed; otherwise, the content in the tag will not be executed
<!--List<Emp> getEmpListByMoreTJ(Emp emp);-->
<select id="getEmpListByMoreTJ" resultType="Emp">
	select * from t_emp where 1=1
	<if test="ename != '' and ename != null">
		and ename = #{

    ename}
	</if>
	<if test="age != '' and age != null">
		and age = #{

    age}
	</if>
	<if test="sex != '' and sex != null">
		and sex = #{

    sex}
	</if>
</select>
2、where
<select id="getEmpListByMoreTJ2" resultType="Emp">
	select * from t_emp
	<where>
		<if test="ename != '' and ename != null">
			ename = #{

    ename}
		</if>
		<if test="age != '' and age != null">
			and age = #{

    age}
		</if>
		<if test="sex != '' and sex != null">
			and sex = #{

    sex}
		</if>
	</where>
</select>
Where and if are generally used in combination:
a> If the if conditions in the where tag are not met, the where tag has no function, that is, the where keyword will not be added
b> If the if conditions in the where tag are met, the where tag will automatically Add the where keyword and remove the redundant and at the front of the condition
Note: the where tag cannot remove the redundant and at the end of the condition
3、trim
<select id="getEmpListByMoreTJ" resultType="Emp">
	select * from t_emp
	<trim prefix="where" suffixOverrides="and">
		<if test="ename != '' and ename != null">
			ename = #{

    ename} and
		</if>
		<if test="age != '' and age != null">
			age = #{

    age} and
		</if>
		<if test="sex != '' and sex != null">
			sex = #{

    sex}
		</if>
	</trim>
</select>
trim is used to remove or add content in the tag
common attributes:
prefix: add some content in front of the content in the trim tag
prefixOverrides: remove some content in front of the content in the trim tag
suffix: the content in the trim tag Add some content later
suffixOverrides: Remove some content after the content in the trim tag
4、choose、when、otherwise
choose、when、otherwise相当于if…else if…else
<!--List<Emp> getEmpListByChoose(Emp emp);-->
<select id="getEmpListByChoose" resultType="Emp">
	select <include refid="empColumns"></include> from t_emp
	<where>
		<choose>
			<when test="ename != '' and ename != null">
				ename = #{

    ename}
			</when>
			<when test="age != '' and age != null">
				age = #{

    age}
			</when>
			<when test="sex != '' and sex != null">
				sex = #{

    sex}
			</when>
			<when test="email != '' and email != null">
				email = #{

    email}
			</when>
		</choose>
	</where>
</select>
5、foreach
<!--int insertMoreEmp(List<Emp> emps);-->
<insert id="insertMoreEmp">
	insert into t_emp values
	<foreach collection="emps" item="emp" separator=",">
	(null,#{

    emp.ename},#{

    emp.age},#{

    emp.sex},#{

    emp.email},null)
	</foreach>
</insert>
<!--int deleteMoreByArray(int[] eids);-->
<delete id="deleteMoreByArray">
	delete from t_emp where
	<foreach collection="eids" item="eid" separator="or">
	eid = #{

    eid}
	</foreach>
</delete>
<!--int deleteMoreByArray(int[] eids);-->
<delete id="deleteMoreByArray">
	delete from t_emp where eid in
	<foreach collection="eids" item="eid" separator="," open="(" close=")">
	#{

    eid}
	</foreach>
</delete>
属性:
collection:设置要循环的数组或集合
item:表示集合或数组中的每一个数据
separator:设置循环体之间的分隔符
open:设置foreach标签中的内容的开始符
close:设置foreach标签中的内容的结束符
6. SQL fragment
sql fragment, which can record a public sql fragment, and import it through the include tag where it is used
<sql id="empColumns">
	eid,ename,age,sex,did
</sql>
select <include refid="empColumns"></include> from t_emp
10. MyBatis cache
1. MyBatis's first-level cache
一级缓存是SqlSession级别的,通过同一个SqlSession查询的数据会被缓存,下次查询相同的数据,就
会从缓存中直接获取,不会从数据库重新访问
使一级缓存失效的四种情况:
1) 不同的SqlSession对应不同的一级缓存
2) 同一个SqlSession但是查询条件不同
3) 同一个SqlSession两次查询期间执行了任何一次增删改操作
4) 同一个SqlSession两次查询期间手动清空了缓存
2. Second level cache of MyBatis
二级缓存是SqlSessionFactory级别,通过同一个SqlSessionFactory创建的SqlSession查询的结果会被
缓存;此后若再次执行相同的查询语句,结果就会从缓存中获取
二级缓存开启的条件:
a>在核心配置文件中,设置全局配置属性cacheEnabled="true",默认为true,不需要设置
b>在映射文件中设置标签<cache />
c>二级缓存必须在SqlSession关闭或提交之后有效
d>查询的数据所转换的实体类类型必须实现序列化的接口
使二级缓存失效的情况:
两次查询之间执行了任意的增删改,会使一级和二级缓存同时失效
3. Related configuration of the secondary cache
在mapper配置文件中添加的cache标签可以设置一些属性:
eviction属性:缓存回收策略
LRU(Least Recently Used) – 最近最少使用的:移除最长时间不被使用的对象。
FIFO(First in First out) – 先进先出:按对象进入缓存的顺序来移除它们。
SOFT – 软引用:移除基于垃圾回收器状态和软引用规则的对象。
WEAK – 弱引用:更积极地移除基于垃圾收集器状态和弱引用规则的对象。
默认的是 LRU。
flushInterval属性:刷新间隔,单位毫秒
默认情况是不设置,也就是没有刷新间隔,缓存仅仅调用语句时刷新
size属性:引用数目,正整数
代表缓存最多可以存储多少个对象,太大容易导致内存溢出
readOnly属性:只读,true/false
true:只读缓存;会给所有调用者返回缓存对象的相同实例。因此这些对象不能被修改。这提供了
很重要的性能优势。
false:读写缓存;会返回缓存对象的拷贝(通过序列化)。这会慢一些,但是安全,因此默认是
false。
4. The order of MyBatis cache query
先查询二级缓存,因为二级缓存中可能会有其他程序已经查出来的数据,可以拿来直接使用。
如果二级缓存没有命中,再查询一级缓存
如果一级缓存也没有命中,则查询数据库
SqlSession关闭之后,一级缓存中的数据会写入二级缓存
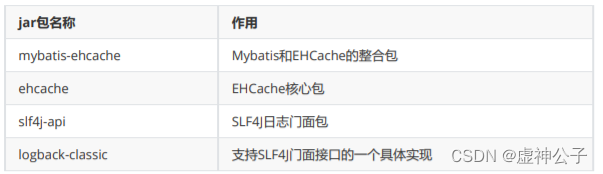
5. Integrate third-party cache EHCache
a> Add dependencies
<!-- Mybatis EHCache整合包 -->
        <dependency>
            <groupId>org.mybatis.caches</groupId>
            <artifactId>mybatis-ehcache</artifactId>
            <version>1.2.1</version>
        </dependency>
        <!-- slf4j日志门面的一个具体实现 -->
        <dependency>
            <groupId>ch.qos.logback</groupId>
            <artifactId>logback-classic</artifactId>
            <version>1.2.3</version>
        </dependency>
b> function of each jar package
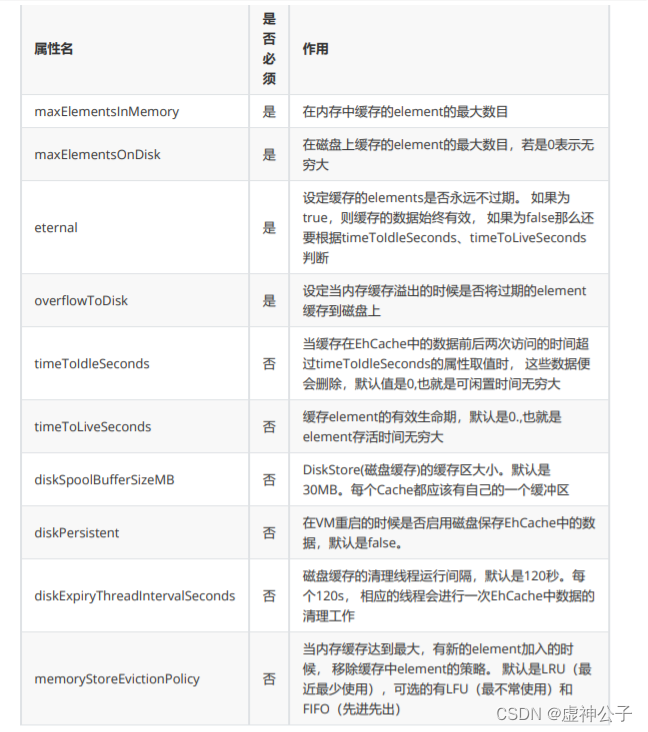
 c> create EHCache configuration file ehcache.xml
<?xml version="1.0" encoding="utf-8" ?>
<ehcache xmlns:xsi="http://www.w3.org/2001/XMLSchema-instance"
         xsi:noNamespaceSchemaLocation="../config/ehcache.xsd">
    <!-- 磁盘保存路径 -->
    <diskStore path="D:\atguigu\ehcache"/>

    <defaultCache
            maxElementsInMemory="1000"
            maxElementsOnDisk="10000000"
            eternal="false"
            overflowToDisk="true"
            timeToIdleSeconds="120"
            timeToLiveSeconds="120"
            diskExpiryThreadIntervalSeconds="120"
            memoryStoreEvictionPolicy="LRU">
    </defaultCache>
</ehcache>
d> Set the type of the second level cache
<cache type="org.mybatis.caches.ehcache.EhcacheCache"/>
e> join the logback log
When SLF4J exists, log4j as a simple log will be invalid. At this time, we need to use the specific implementation of SLF4J logback to print the log.
Create the logback configuration file logback.xml
<?xml version="1.0" encoding="UTF-8"?>
<configuration debug="true">
    <!-- 指定日志输出的位置 -->
    <appender name="STDOUT"
              class="ch.qos.logback.core.ConsoleAppender">
        <encoder>
            <!-- 日志输出的格式 -->
            <!-- 按照顺序分别是:时间、日志级别、线程名称、打印日志的类、日志主体内容、换行 -->
            <pattern>[%d{

    HH:mm:ss.SSS}] [%-5level] [%thread] [%logger] [%msg]%n</pattern>
        </encoder>
    </appender>

    <!-- 设置全局日志级别。日志级别按顺序分别是:DEBUG、INFO、WARN、ERROR -->
    <!-- 指定任何一个日志级别都只打印当前级别和后面级别的日志。 -->
    <root level="DEBUG">
        <!-- 指定打印日志的appender,这里通过“STDOUT”引用了前面配置的appender -->
        <appender-ref ref="STDOUT" />
    </root>

    <!-- 根据特殊需求指定局部日志级别 -->
    <logger name="com.xusheng.crowd.mapper" level="DEBUG"/>

</configuration>
f>EHCache configuration file description
11. Reverse engineering of MyBatis
Forward engineering: Create Java entity classes first, and the framework is responsible for generating database tables based on entity classes. Hibernate supports forward engineering.
Reverse engineering: Create the database table first, and the framework is responsible for reversely generating the following resources based on the database table:
Java entity class
Mapper interface
Mapper mapping file
1. Steps to create reverse engineering
a> Add dependencies and plugins
<?xml version="1.0" encoding="UTF-8"?>
<project xmlns="http://maven.apache.org/POM/4.0.0"
         xmlns:xsi="http://www.w3.org/2001/XMLSchema-instance"
         xsi:schemaLocation="http://maven.apache.org/POM/4.0.0 http://maven.apache.org/xsd/maven-4.0.0.xsd">
    <modelVersion>4.0.0</modelVersion>

    <groupId>com.xusheng.mybatis</groupId>
    <artifactId>MyBatis_MBG</artifactId>
    <version>1.0-SNAPSHOT</version>
    <packaging>jar</packaging>

    <properties>
        <maven.compiler.source>8</maven.compiler.source>
        <maven.compiler.target>8</maven.compiler.target>
    </properties>

    <!-- 依赖MyBatis核心包 -->
    <dependencies>
        <dependency>
            <groupId>org.springframework.boot</groupId>
            <artifactId>spring-boot-starter</artifactId>
        </dependency>

        <dependency>
            <groupId>org.springframework.boot</groupId>
            <artifactId>spring-boot-starter-test</artifactId>
            <scope>test</scope>
        </dependency>

        <!--mybatis-plus启动器-->
        <dependency>
            <groupId>com.baomidou</groupId>
            <artifactId>mybatis-plus-boot-starter</artifactId>
            <version>3.5.1</version>
        </dependency>

        <!--lombok用于简化实体类开发-->
        <dependency>
            <groupId>org.projectlombok</groupId>
            <artifactId>lombok</artifactId>
            <optional>true</optional>
        </dependency>

        <!--mysql驱动-->
        <dependency>
            <groupId>mysql</groupId>
            <artifactId>mysql-connector-java</artifactId>
            <scope>runtime</scope>
        </dependency>

        <dependency>
            <groupId>com.baomidou</groupId>
            <artifactId>mybatis-plus-generator</artifactId>
            <version>3.5.1</version>
        </dependency>
        <dependency>
            <groupId>org.freemarker</groupId>
            <artifactId>freemarker</artifactId>
            <version>2.3.31</version>
        </dependency><!--mybatis-plus启动器-->
        <dependency>
            <groupId>com.baomidou</groupId>
            <artifactId>mybatis-plus-boot-starter</artifactId>
            <version>3.5.1</version>
        </dependency>

        <!--lombok用于简化实体类开发-->
        <dependency>
            <groupId>org.projectlombok</groupId>
            <artifactId>lombok</artifactId>
            <optional>true</optional>
        </dependency>


        <dependency>
            <groupId>org.mybatis</groupId>
            <artifactId>mybatis</artifactId>
            <version>3.5.7</version>
        </dependency>
        <!-- junit测试 -->
        <dependency>
            <groupId>junit</groupId>
            <artifactId>junit</artifactId>
            <version>4.12</version>
            <scope>test</scope>
        </dependency>

        <!-- MySQL驱动 -->
        <dependency>
            <groupId>mysql</groupId>
            <artifactId>mysql-connector-java</artifactId>
            <version>5.1.3</version>
        </dependency>

        <!-- log4j日志 -->
        <dependency>
            <groupId>log4j</groupId>
            <artifactId>log4j</artifactId>
            <version>1.2.17</version>
        </dependency>

        <dependency>
            <groupId>com.github.pagehelper</groupId>
            <artifactId>pagehelper</artifactId>
            <version>5.2.0</version>
        </dependency>
        <dependency>
            <groupId>com.baomidou</groupId>
            <artifactId>mybatis-plus-generator</artifactId>
            <version>3.5.1</version>
        </dependency>
        <dependency>
            <groupId>org.freemarker</groupId>
            <artifactId>freemarker</artifactId>
            <version>2.3.31</version>
        </dependency>
        <dependency>
            <groupId>org.springframework.boot</groupId>
            <artifactId>spring-boot-starter-web</artifactId>
            <version>RELEASE</version>
            <scope>compile</scope>
        </dependency>
    </dependencies>

    <!-- 控制Maven在构建过程中相关配置 -->
    <build>

        <!-- 构建过程中用到的插件 -->
        <plugins>

            <!-- 具体插件,逆向工程的操作是以构建过程中插件形式出现的 -->
            <plugin>
                <groupId>org.mybatis.generator</groupId>
                <artifactId>mybatis-generator-maven-plugin</artifactId>
                <version>1.3.0</version>

                <!-- 插件的依赖 -->
                <dependencies>

                    <!-- 逆向工程的核心依赖 -->
                    <dependency>
                        <groupId>org.mybatis.generator</groupId>
                        <artifactId>mybatis-generator-core</artifactId>
                        <version>1.3.2</version>
                    </dependency>

                    <!-- 数据库连接池 -->
                    <dependency>
                        <groupId>com.mchange</groupId>
                        <artifactId>c3p0</artifactId>
                        <version>0.9.2</version>
                    </dependency>

                    <!-- MySQL驱动 -->
                    <dependency>
                        <groupId>mysql</groupId>
                        <artifactId>mysql-connector-java</artifactId>
                        <version>5.1.8</version>
                    </dependency>
                </dependencies>
            </plugin>
        </plugins>
    </build>

</project>
b>Create the core configuration file of MyBatis
c>Create a configuration file for reverse engineering
文件名必须是:generatorConfig.xml
<?xml version="1.0" encoding="UTF-8"?>
<!DOCTYPE generatorConfiguration
        PUBLIC "-//mybatis.org//DTD MyBatis Generator Configuration 1.0//EN"
        "http://mybatis.org/dtd/mybatis-generator-config_1_0.dtd">
<generatorConfiguration>
    <!--
            targetRuntime: 执行生成的逆向工程的版本
                    MyBatis3Simple: 生成基本的CRUD(清新简洁版)
                    MyBatis3: 生成带条件的CRUD(奢华尊享版)
     -->
    <context id="DB2Tables" targetRuntime="MyBatis3">
        <!-- 数据库的连接信息 -->
        <jdbcConnection driverClass="com.mysql.jdbc.Driver"
                        connectionURL="jdbc:mysql://localhost:3306/mybatis_plus"
                        userId="root"
                        password="root">
        </jdbcConnection>
        <!-- javaBean的生成策略-->
        <javaModelGenerator targetPackage="com.xusheng.mybatis.pojo" targetProject=".\src\main\java">
            <property name="enableSubPackages" value="true" />
            <property name="trimStrings" value="true" />
        </javaModelGenerator>
        <!-- SQL映射文件的生成策略 -->
        <sqlMapGenerator targetPackage="com.xusheng.mybatis.mapper"  targetProject=".\src\main\resources">
            <property name="enableSubPackages" value="true" />
        </sqlMapGenerator>
        <!-- Mapper接口的生成策略 -->
        <javaClientGenerator type="XMLMAPPER" targetPackage="com.xusheng.mybatis.mapper"  targetProject=".\src\main\java">
            <property name="enableSubPackages" value="true" />
        </javaClientGenerator>
        <!-- 逆向分析的表 -->
        <!-- tableName设置为*号,可以对应所有表,此时不写domainObjectName -->
        <!-- domainObjectName属性指定生成出来的实体类的类名 -->
        <table tableName="t_emp" domainObjectName="Emp"/>
        <table tableName="t_dept" domainObjectName="Dept"/>
    </context>
</generatorConfiguration>
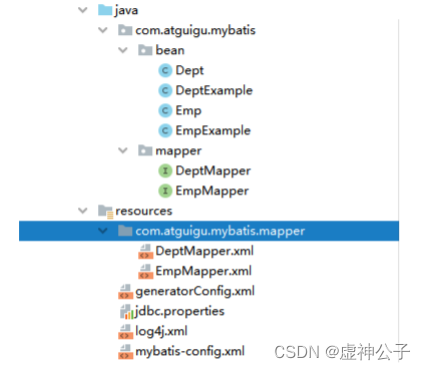
d> Execute the generate target of the MBG plug-in
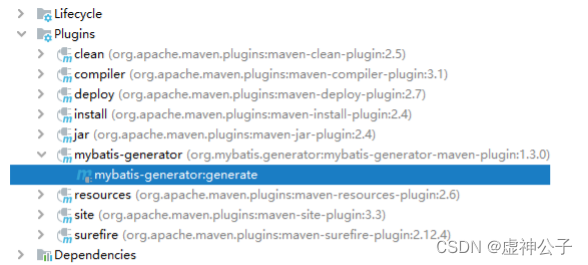
Effect:
2. QBC query
@Test
public void testMBG() throws IOException {


	InputStream is = Resources.getResourceAsStream("mybatis-config.xml");
	SqlSession sqlSession = new
	SqlSessionFactoryBuilder().build(is).openSession(true);
	EmpMapper mapper = sqlSession.getMapper(EmpMapper.class);
	EmpExample empExample = new EmpExample();
	//创建条件对象,通过andXXX方法为SQL添加查询添加,每个条件之间是and关系
	empExample.createCriteria().andEnameLike("a").andAgeGreaterThan(20).andDidIsNot
	Null();
	//将之前添加的条件通过or拼接其他条件
	empExample.or().andSexEqualTo("男");
	List<Emp> list = mapper.selectByExample(empExample);
	for (Emp emp : list) {


	System.out.println(emp);
	}
}
12. Pagination plugin
1. Steps to use the pagination plug-in
a> Add dependencies
 <!-- https://mvnrepository.com/artifact/com.github.pagehelper/pagehelper -->
        <dependency>
            <groupId>com.github.pagehelper</groupId>
            <artifactId>pagehelper</artifactId>
            <version>5.2.0</version>
        </dependency>
b>Configure the paging plug-in
Configure the plug-in in the core configuration file of MyBatis
<plugins>
<!--设置分页插件-->
	<plugin interceptor="com.github.pagehelper.PageInterceptor"></plugin>
</plugins>
2. The use of pagination plug-ins
a>在查询功能之前使用PageHelper.startPage(int pageNum, int pageSize)开启分页功能
pageNum: the page number of the current page
pageSize: the number of items displayed on each page
b>在查询获取list集合之后,使用PageInfo<T> pageInfo = new PageInfo<>(List<T> list, intnavigatePages)获取分页相关数据
list: the data after pagination
navigatePages: the page number of the navigation pagination
c>分页相关数据
PageInfo{


pageNum=8, pageSize=4, size=2, startRow=29, endRow=30, total=30, pages=8,
list=Page{

    count=true, pageNum=8, pageSize=4, startRow=28, endRow=32, total=30,
pages=8, reasonable=false, pageSizeZero=false},
prePage=7, nextPage=0, isFirstPage=false, isLastPage=true, hasPreviousPage=true,
hasNextPage=false, navigatePages=5, navigateFirstPage4, navigateLastPage8,
navigatepageNums=[4, 5, 6, 7, 8]
}
常用数据:
pageNum:当前页的页码
pageSize:每页显示的条数
size:当前页显示的真实条数
total:总记录数
pages:总页数
prePage:上一页的页码
nextPage:下一页的页码
isFirstPage/isLastPage:是否为第一页/最后一页
hasPreviousPage/hasNextPage:是否存在上一页/下一页
navigatePages:导航分页的页码数
navigatepageNums:导航分页的页码,[1,2,3,4,5]