This article mainly introduces how to deploy dynamic web pages through Nginx + fastCGI.
Introduction to CGI
Before introducing fastCGI, let me introduce what CGI is.
CGI: Common Gateway Interface, public gateway interface. On the physical level, it is a program that runs on the server and provides an interface with the client HTML page.
Nginx+CGI processing steps
User sends HTTP request to web server
The web server forks a CGI child process and hands the user request to the CGI program
The CGI program transmits the processing result to the Web server, and the CGI child process is destroyed
The web server returns the result to the user
Disadvantages of CGI
Every time CGI processes a request, it must fork a child process, and after processing the request, the child process is destroyed. Frequent creation and destruction of processes will greatly reduce the efficiency of the Web server.
fastCGI
fastCGI is an optimization of CGI. fastCGI does not create a process every time a request is processed, thus avoiding the frequent creation and destruction of CGI processes, which can greatly improve the efficiency of the server.
The following will focus on fastCGI
fastCGI
FastCGI is a scalable, high-speed communication interface between HTTP server and dynamic scripting language. The main advantage is to separate dynamic language and HTTP server.
It is mainly to keep the CGI process in memory for management and scheduling to obtain higher performance.
How fastCGI works
Load the fastCGI process manager when the web server starts
The fastCGI process manager initializes itself, starts multiple CGI child processes and waits for connections from the Web server
When a client request arrives at the web server, the fastCGI process manager selects and connects to a CGI process to handle the request
After the fastCGI child process finishes processing, it returns the result to the Web server
question
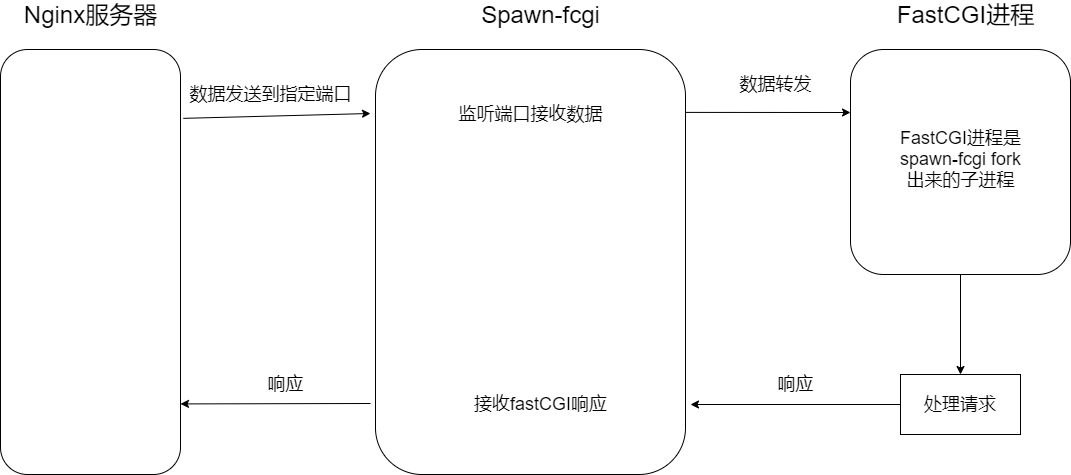
Under Nginx, fastCGI is separated from the server, that is, Nginx cannot directly call fastCGI, and needs to be managed by spawn-fcgi
spawn-fcgi
spawn-fcgi is a bridge between Nginx and fastCGI, responsible for data communication between Nginx and fastCGI
Command: spawn-fcgi -a IP -p PORT -f fastcgi program
IP: Nginx server ip address, which is 192.168.206.128 configured above
PORT : The port to which the server sends data, which is the port 10010 we configured above
fastcgi program: spawn-fcgi fork fastcgi process, fastcgi program needs to be implemented and compiled by ourselves.
Write fastcgi program
This is written with reference to a demo in fastcgi. It mainly implements the login function. If you enter the correct user name and password, the login success interface will be displayed. If you enter the wrong user name and password, the login interface will continue to be displayed and you will be prompted to log in again.
There are some environment variables in the FastCGI program, we can get the corresponding value through the getenv function
REQUEST_METHOD: request method (GET/POST)
CONTENT_TYPE: data type
REQUEST_URI:URI
SERVER_PROTOCOL: HTTP protocol
REMOTE_ADDR: Client IP
REMOTE_PORT: client port
SERVER_NAME: Server IP
SERVER_PORT: server port
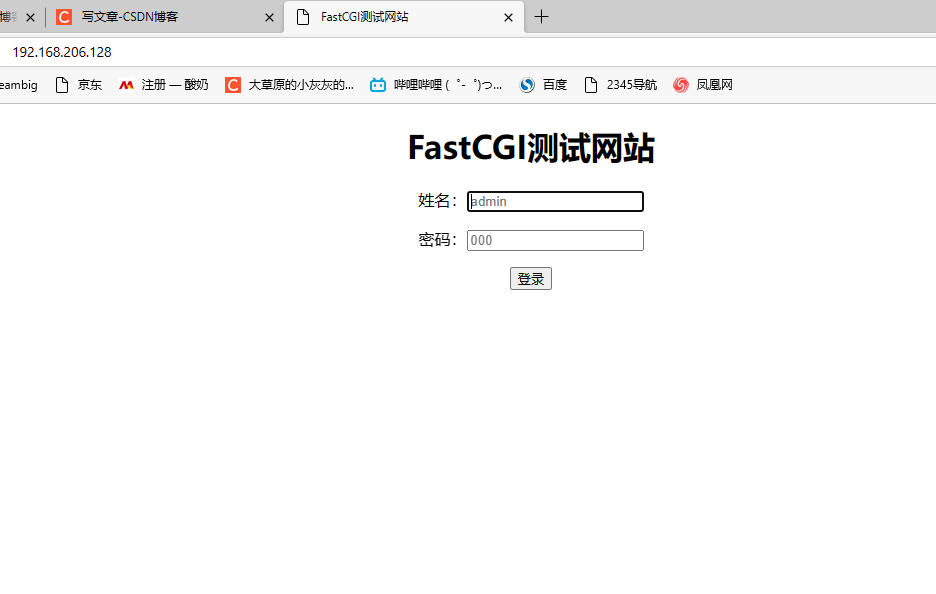
test
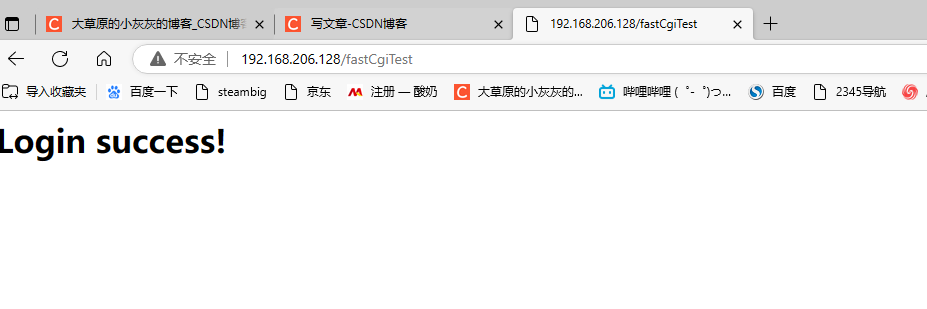
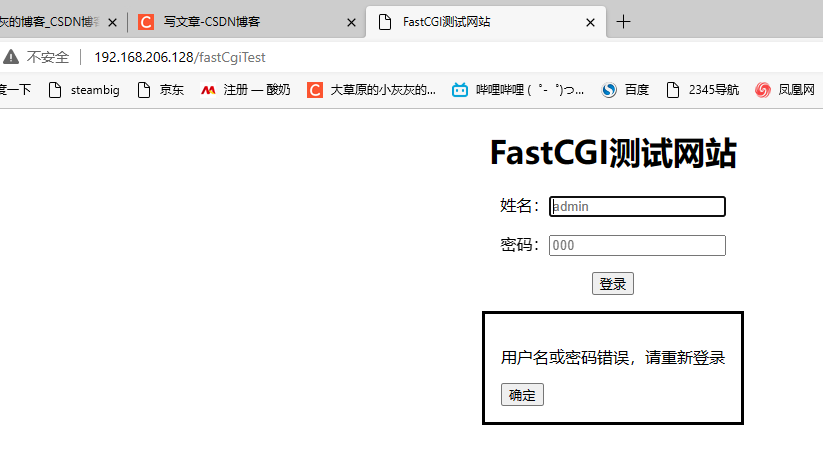
First, we access Nginx in the browser, the default port is 80. Then the login webpage we wrote will be displayed. After entering the user name and password in the login webpage, click submit, and a POST request will be sent to the /fastCgiTest command configured in the Nginx configuration file. Nginx will forward the command to the fastCGI program according to the ip and port, and the fastCGI program will process the POST request data. If the user name and password are correct, it will show that the login is successful. If the user name and password are wrong, it will continue to display the login interface and prompt the user to log in again.
Visit Nginx first to display the default web page
Enter the correct user name and password, and the fastCGI program will display a successful login interface after processing
Enter the wrong user name and password, after the fastCGI program processes, the login interface will be displayed again, and prompt to log in again