
Table of contents
rocketmq environment construction
docker installation
yum -y install docker 安装
systemctl start docker 启动
systemctl restart docker 重启
systemctl stop docker 停止
systemctl enable docker 开机自启
There is a pit ahead---------If you operate the firewall [start or stop] during docker running, you must restart
docker systemctl restart dockeredit configuration file
vi /etc/docker/daemon.json
Copy the following content in /etc/docker/daemon.json
{ "registry-mirrors":
["https://32xw0apq.mirror.aliyuncs.com"] }
systemctl daemon-reload
systemctl restart docker
JDK installation
Install JDK11
If it is a tar.gz file, execute the decompression command
tar -zxvf jdk-11.0.11_linux-x64_bin.tar.gzAfter decompression, it is installed in the current directory by default

Set java environment variables in /etc/profile file

Enter the command to check if the installation is complete
java -version

The above prompt appears, indicating that the jdk installation is normal
redis installation
Run redis with docker
docker run -d --name redis -p 6390:6379 redis --requirepass "123456"
After the installation is complete, check the redis process, as shown in the figure above, the installation is normal
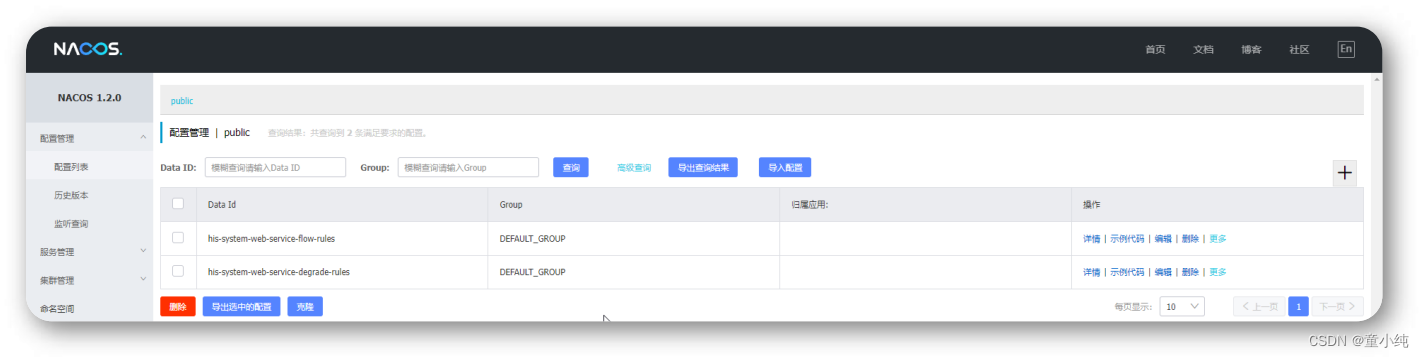
nacos console installation
Download the nacos compressed package and use the following command to decompress it
tar -zxvf nacos-server-1.2.0.tar.gz
Enter the bin directory under the nacos installation path to execute the startup command
./startup.sh -m standaloneUse the ps command to view the process status

Enter http://your ip:8848 to start the nacos console
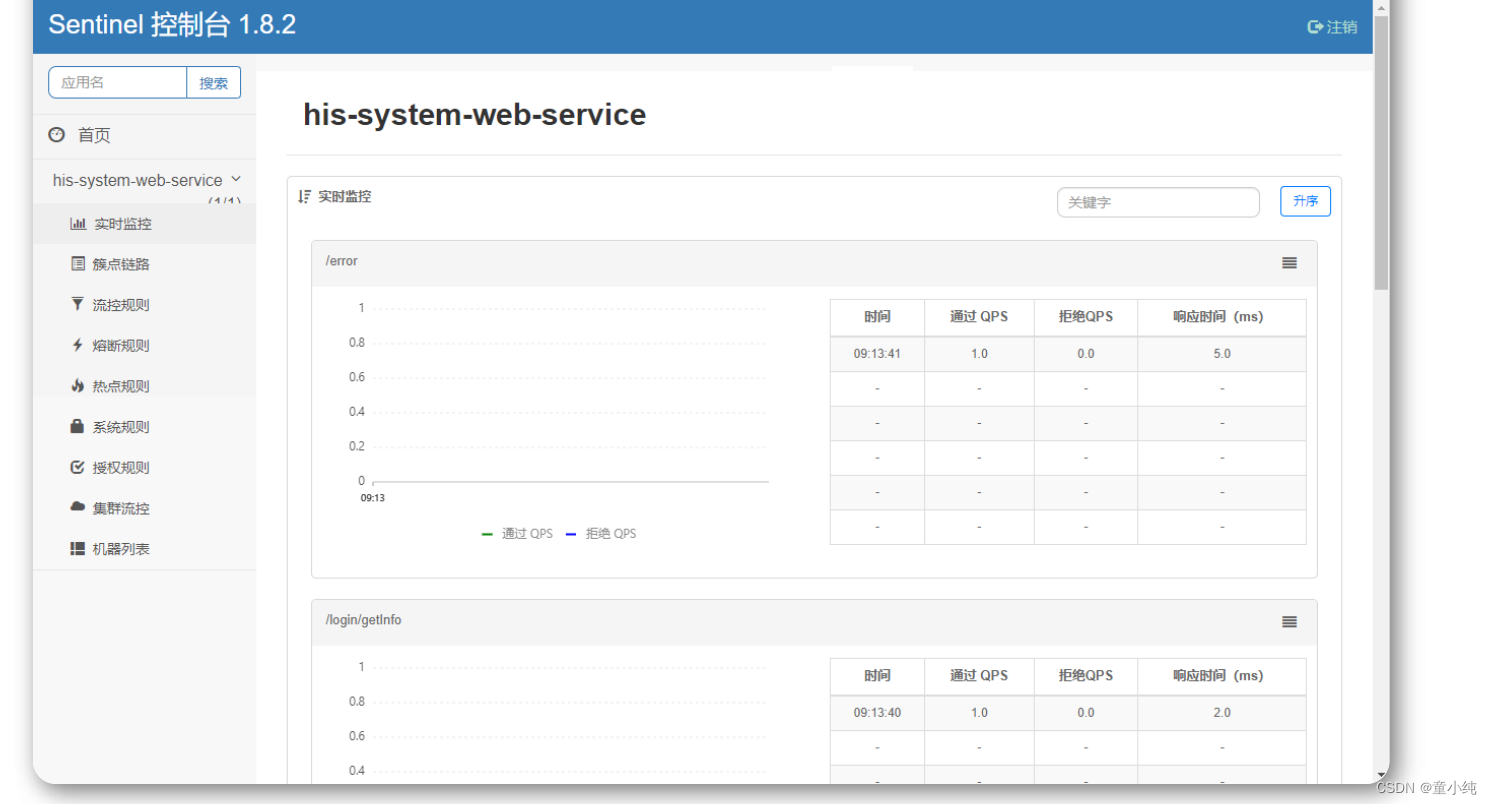
sentinel console installation
Download the sentinel-dashboard-1.8.2.jar package, open the command line window in the directory where the jar package is located, and execute the following command to start the console
java -jar sentinel-dashboard-1.8.2.jar

Enter the default username and password sentinel to enter the main interface
rocketmq environment construction
Environmental requirements
JDK 11.0.5
4G+ free
You can use the wget command to download, decompress and install
wget
https://archive.apache.org/dist/rocketmq/4.5.1/
rocketmq-all-4.5.1-bin-release.zip
modify the script
bin/runserver.sh
bin/runbroker.sh
bin/tools.sh
nameserver:
#!/bin/sh
# Licensed to the Apache Software Foundation
(ASF) under one or more
# contributor license agreements. See the
NOTICE file distributed with
# this work for additional information
regarding copyright ownership.
# The ASF licenses this file to You under the
Apache License, Version 2.0
# (the "License"); you may not use this file
except in compliance with
# the License. You may obtain a copy of the
License at
#
# http://www.apache.org/licenses/LICENSE-2.0
#
# Unless required by applicable law or agreed
to in writing, software
# distributed under the License is distributed
on an "AS IS" BASIS,
# WITHOUT WARRANTIES OR CONDITIONS OF ANY KIND,
either express or implied.
# See the License for the specific language
governing permissions and
# limitations under the License.
#==============================================
=============================================
# Java Environment Setting
#==============================================
=============================================
error_exit ()
{
echo "ERROR: $1 !!"
exit 1
}
[ ! -e "$JAVA_HOME/bin/java" ] &&
JAVA_HOME=$HOME/jdk/java
[ ! -e "$JAVA_HOME/bin/java" ] &&
JAVA_HOME=/usr/java
[ ! -e "$JAVA_HOME/bin/java" ] && error_exit
"Please set the JAVA_HOME variable in your
environment, We need java(x64)!"
export JAVA_HOME
export JAVA="$JAVA_HOME/bin/java"
export BASE_DIR=$(dirname $0)/..
export CLASSPATH=${BASE_DIR}/lib/rocketmqnamesrv4.5.0.jar:${BASE_DIR}/lib/*:${BASE_DIR}/conf:${
CLASSPATH}
#export
CLASSPATH=.:${BASE_DIR}/conf:${CLASSPATH}
#echo "BASE_DIR:$BASE_DIR"
#echo "CLASSPATH:$CLASSPATH"
#==============================================
=============================================
# JVM Configuration
#==============================================
=============================================
JAVA_OPT="${JAVA_OPT} -server -Xms1g -Xmx1g -
Xmn512m -XX:MetaspaceSize=128m -
XX:MaxMetaspaceSize=320m"
#JAVA_OPT="${JAVA_OPT} -server -Xms4g -Xmx4g -
Xmn2g -XX:MetaspaceSize=128m -
XX:MaxMetaspaceSize=320m"
JAVA_OPT="${JAVA_OPT} -
XX:CMSInitiatingOccupancyFraction=70 -
XX:+CMSParallelRemarkEnabled -
XX:SoftRefLRUPolicyMSPerMB=0 -
XX:+CMSClassUnloadingEnabled -
XX:SurvivorRatio=8"
JAVA_OPT="${JAVA_OPT} -verbose:gc -
Xlog:gc:/dev/shm/rmq_srv_gc.log"
JAVA_OPT="${JAVA_OPT} -XX:-
OmitStackTraceInFastThrow"
JAVA_OPT="${JAVA_OPT} -XX:-UseLargePages"
#JAVA_OPT="${JAVA_OPT} -Xdebug -
Xrunjdwp:transport=dt_socket,address=9555,serve
r=y,suspend=n"
JAVA_OPT="${JAVA_OPT} ${JAVA_OPT_EXT}"
JAVA_OPT="${JAVA_OPT} -cp ${CLASSPATH}"
$JAVA ${JAVA_OPT} $@
vim bin/runserver.sh
delete
UseCMSCompactAtFullCollection
UseParNewGC
UseConcMarkSweepGC
Modify memory:
JAVA_OPT="${JAVA_OPT} -server -Xms256m -Xmx256m
-Xmn128m -
XX:MetaspaceSize=64mm -
XX:MaxMetaspaceSize=160mm"
-Xloggc is changed to -Xlog:gc
broker:
#!/bin/sh
# Licensed to the Apache Software Foundation
(ASF) under one or more
# contributor license agreements. See the
NOTICE file distributed with
# this work for additional information
regarding copyright ownership.
# The ASF licenses this file to You under the
Apache License, Version 2.0
# (the "License"); you may not use this file
except in compliance with
# the License. You may obtain a copy of the
License at
#
# http://www.apache.org/licenses/LICENSE-2.0
#
# Unless required by applicable law or agreed
to in writing, software
# distributed under the License is distributed
on an "AS IS" BASIS,
# WITHOUT WARRANTIES OR CONDITIONS OF ANY KIND,
either express or implied.
# See the License for the specific language
governing permissions and
# limitations under the License.
#==============================================
============================
# Java Environment Setting
#==============================================
============================
error_exit ()
{
echo "ERROR: $1 !!"
exit 1
}
[ ! -e "$JAVA_HOME/bin/java" ] &&
JAVA_HOME=$HOME/jdk/java
[ ! -e "$JAVA_HOME/bin/java" ] &&
JAVA_HOME=/usr/java
[ ! -e "$JAVA_HOME/bin/java" ] && error_exit
"Please set the JAVA_HOME
variable in your environment, We need
java(x64)!"
export JAVA_HOME
export JAVA="$JAVA_HOME/bin/java"
export BASE_DIR=$(dirname $0)/..
export
CLASSPATH=.${JAVA_HOME}/jre/lib/ext:${BASE_DIR}
/lib/*:${BASE_DIR}/conf:${CLASSPATH}
#==============================================
============================
# JVM Configuration
#==============================================
============================
JAVA_OPT="${JAVA_OPT} -server -Xms256m -Xmx256m
-Xmn128m"
JAVA_OPT="${JAVA_OPT} -XX:+UseG1GC -
XX:G1HeapRegionSize=16m -XX:G1ReservePercent=25
-XX:InitiatingHeapOccupancyPercent=30 -
XX:SoftRefLRUPolicyMSPerMB=0"
JAVA_OPT="${JAVA_OPT} -verbose:gc -
Xloggc:/dev/shm/mq_gc_%p.log -
XX:+PrintGCDetails"
JAVA_OPT="${JAVA_OPT} -XX:-
OmitStackTraceInFastThrow"
JAVA_OPT="${JAVA_OPT} -XX:+AlwaysPreTouch"
JAVA_OPT="${JAVA_OPT} -
XX:MaxDirectMemorySize=15g"
JAVA_OPT="${JAVA_OPT} -XX:-UseLargePages -XX:-
UseBiasedLocking"
#JAVA_OPT="${JAVA_OPT} -Xdebug -
Xrunjdwp:transport=dt_socket,address=9555,serve
r=y,suspend=n"
JAVA_OPT="${JAVA_OPT} ${JAVA_OPT_EXT}"
JAVA_OPT="${JAVA_OPT} -cp ${CLASSPATH}"
numactl --interleave=all pwd > /dev/null 2>&1
if [ $? -eq 0 ]
then
 if [ -z "$RMQ_NUMA_NODE" ] ; then
numactl --interleave=all $JAVA
${JAVA_OPT} $@
 else
 numactl --cpunodebind=$RMQ_NUMA_NODE --
membind=$RMQ_NUMA_NODE $JAVA
 ${JAVA_OPT} $@
 fi
else
 $JAVA ${JAVA_OPT} --addexports=java.base/jdk.internal.ref=ALL-UNNAMED
$@
fi
vim bin/runbroker.shdelete:
PrintGCDateStamps
PrintGCApplicationStoppedTime
PrintAdaptiveSizePolicy
UseGCLogFileRotation
NumberOfGCLogFiles=5
GCLogFileSize=30m
tools:
#!/bin/sh
# Licensed to the Apache Software Foundation
(ASF) under one or more
# contributor license agreements. See the
NOTICE file distributed with
# this work for additional information
regarding copyright ownership.
# The ASF licenses this file to You under the
Apache License, Version 2.0
# (the "License"); you may not use this file
except in compliance with
# the License. You may obtain a copy of the
License at
#
#   http://www.apache.org/licenses/LICENSE-2.0
#
# Unless required by applicable law or agreed
to in writing, software
# distributed under the License is distributed
on an "AS IS" BASIS,
# WITHOUT WARRANTIES OR CONDITIONS OF ANY KIND,
either express or implied.
# See the License for the specific language
governing permissions and
# limitations under the License.
#==============================================
============================
=================
# Java Environment Setting
#==============================================
============================
=================
error_exit ()
{
  echo "ERROR: $1 !!"
  exit 1
}
[ ! -e "$JAVA_HOME/bin/java" ] &&
JAVA_HOME=$HOME/jdk/java
[ ! -e "$JAVA_HOME/bin/java" ] &&
JAVA_HOME=/usr/java
[ ! -e "$JAVA_HOME/bin/java" ] && error_exit
"Please set the JAVA_HOME
variable in your environment, We need
java(x64)!"
export JAVA_HOME
export JAVA="$JAVA_HOME/bin/java"
export BASE_DIR=$(dirname $0)/..
# export
CLASSPATH=.:${BASE_DIR}/conf:${CLASSPATH}
export
CLASSPATH=.${JAVA_HOME}/jre/lib/ext:${BASE_DIR}
/lib/*:${BASE_DIR}/conf:${CL
ASSPATH}
#==============================================
============================
=================
# JVM Configuration
#==============================================
============================
=================
JAVA_OPT="${JAVA_OPT} -server -Xms256m -Xmx256m
-Xmn256m -XX:PermSize=128m
-XX:MaxPermSize=128m"
# JAVA_OPT="${JAVA_OPT} -
Djava.ext.dirs=${BASE_DIR}/lib:${JAVA_HOME}/jre
/lib/ext"
JAVA_OPT="${JAVA_OPT} -cp ${CLASSPATH}"
$JAVA ${JAVA_OPT} $@
vim bin/tools.sh
# 删除 JAVA_OPT="${JAVA_OPT} -
Djava.ext.dirs=${BASE_DIR}/lib:${JAVA_HOME}/jre
/lib/ext"
Enter the rocketmq directory and start the nameserver
nohup sh mqnamesrv > /dev/null 2>&1 &Then start the broker
nohup sh mqbroker -n localhost:9876 > /dev/null
2>&1 &
fastdfs installation
1. Download the fastdfs image
docker pull registry.cn-beijing.aliyuncs.com/tianzuo/fastdfs2. Start mirroring
docker run -d --restart=always --
privileged=true --net=host --name=fastdfs -e
IP=192.168.139.128 -e WEB_PORT=8888 -v
${HOME}/fastdfs:/var/local/fdfs registry.cn-beijing.aliyuncs.com/tianzuo/fastdfs
3. View the mirror image
docker ps -a

5. Test upload
vim /etc/fdfs/client.conf
#需要修改的内容如下
base_path=/home/fastdfs
#tracker服务器IP和端口
tracker_server=192.168.139.128:22122
#保存后测试,返回ID表示成功 如:group1/M00/00/00/xxx.png
/usr/bin/fdfs_upload_file /etc/fdfs/client.conf /root/fastdfs/1.png


group1/M00/00/00/wKjTiF7h5EWASb5aAACGZa9JdFo611.png
mysql installation
Download the necessary installation files, execute the installation commands in order, initialize mysql after completion, and modify the initial password

Download the necessary installation files, execute the installation commands in order, initialize mysql after completion, and modify the initial password
Remove mariadb first , and then install and decompress mysql-5.7.28-1.el7.x86_64.rpm-bundle.tar. After decompression, a series of rpm installation packages will be generated. The order of installation is 1) mysql-community-common- 5.7.28-1.el7.x86_64.rpm 2) mysql-community-libs-5.7.28-1.el7.x86_64.rpm 3) mysql-community-libs-compat-5.7.28-1.el7.x86_64. rpm 4) mysql-community-client-5.7.28-1.el7.x86_64.rpm 5) mysql-community-server-5.7.28-1.el7.x86_64.rpm 6) mysql-community-devel-5.7.28 -1.el7.x86_64.rpm
initialize mysql
mysqld --initialize --user=mysqlView initial password
cat /var/log/mysqld.logEnter mysql and change the initial password
>mysql -uroot -p
>set password=password('123456');
mycat install
Download Mycat-server-1.6.7.5-release-linux.tar.gz, unzip it, enter the mycat/bin directory, and execute the startup command
./mycat start 启动
./mycat stop 停止
./mycat restart 重启
./mycat status 查看状态
Access mycat, after the connection is successful, it is the same as operating mysql
mysql -uroot -proot -h127.0.0.1 -P8066
mysql master-slave build
I'll talk about it later
Read-write separation configuration
I'll talk about it later
idea installation
Download and install by yourself, the 2020.2 version is used in the project