Table of contents
foreword
Artificial AI dialogue technology is hot recently. I believe many people will think of making a WeChat chat robot, so that their relatives and friends who don't know the program very well can experience it.
At present, most WeChat chatbots are based on itchat or wxautoapi to operate WeChat. The principle is to monitor and operate the web version port of WeChat to achieve the purpose of sending and receiving SMS. However, Tencent officials are very strict about this method. Many WeChat accounts (including mine) can no longer be used, and even if they use them, they will face the risk of being banned.
It is also implemented with pyautogui, but the portability of this image recognition-based technology is not very good, and it is difficult to realize certain functions.
In this article, uiautomation is used to operate WeChat on the PC side, and the official openai library is used to obtain AI automatic reply, so as to realize the function of WeChat chat robot.
This WeChat chatbot has the following functions:
1. You can reply to multiple friends, and can automatically detect unread messages and reply.
2. Configure the number of contextual contacts and the word limit for daily questions, and the word limit can be refreshed every morning.
3. VIP permissions can be configured for friends, with more contextual contact numbers and question restrictions.
4. You can reply to group messages, only when group friends @chatbot will reply.
1. What is uiautomation?
uiautomation is a python module that encapsulates the Microsoft UIAutomation API. It can search and click controls on the windows desktop. Because it is completely a desktop-level operation and does not involve API interface issues, it is not easy to be blocked. At least that's how it works on WeChat.
The original github address link of uiautomation
2. How to use openai?
openai is an official python library. You can get ChatGPT's answers through the API interface. It is worth noting how to implement the context function. The following is a demo code:
# Note: you need to be using OpenAI Python v0.27.0 for the code below to work
import openai

openai.ChatCompletion.create(
  model="gpt-3.5-turbo",
  messages=[
        {"role": "system", "content": "You are a helpful assistant."},
        {"role": "user", "content": "Who won the world series in 2020?"},
        {"role": "assistant", "content": "The Los Angeles Dodgers won the World Series in 2020."},
        {"role": "user", "content": "Where was it played?"}
    ]
)
In messages, {"role": "system", "content": "You are a helpful assistant."} is the header, and system messages help to set the behavior of the assistant. In the example above, the assistant is instructed "You are a helpful assistant". Typically, conversations are first formatted with system messages, followed by alternating user and assistant messages.
{"role": "user", "content": "Who won the world series in 2020?"} is the first conversation, "role": "user" means that it was initiated by the user, and the question asked is "Who won the world series in 2020?".
And {"role": "assistant", "content": "The Los Angeles Dodgers won the World Series in 2020."} is the first answer, "role": "assistant" means it is AI, and the answer content is "The Los Angeles Dodgers won the World Series in 2020."
{"role": "user", "content": "Where was it played?"} is the second answer, so that the context can be linked back and forth.
It should be noted that the sending of messages also takes up the number of tokens. The charging price of openai's chat-3.5 model is 0.002 US dollars per K token. Although each account has a free quota of 18 US dollars, there is no limit to the number of contexts. It may not take long for your The quota exploded.
3. Use steps
1. Preliminary preparation
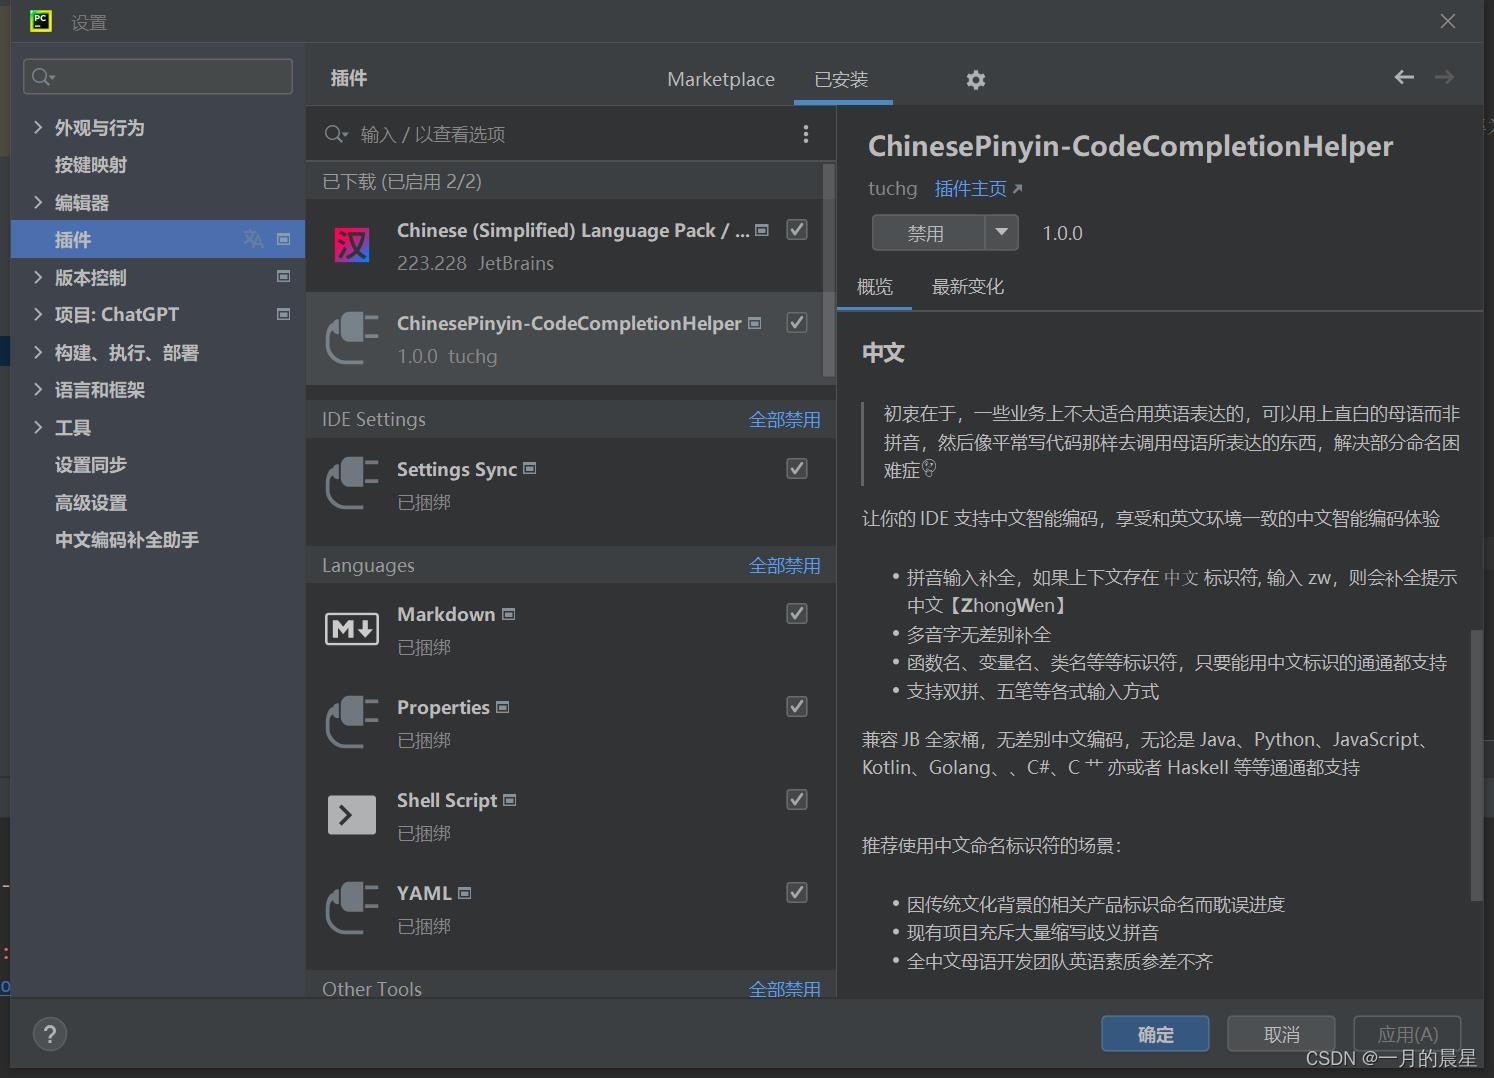
First of all, I recommend a pytharm plug-in, which can use Chinese variables. For those who are not good at English like me, the most annoying thing is to think about variable names. With this plug-in, it will be much more convenient and reduce comments. Just search Chinese directly in the plugin:
Secondly, you need to roll back the version of urllib3 to 1.25.11, because using openai requires a proxy, but an error will be reported above version 1.26, and version 1.25.11 does not have this problem. Open cmd and enter the following command:
pip uninstall urllib3
pip install urllib3==1.25.11
2. Import library
import time
from datetime import datetime
import uiautomation as ui  # 导入控件控制库
import pyperclip  # 导入剪切板相关库
import pyautogui  # 导入自动操作库
import openai
3. Main program
openai.api_key = ""  # 这里填入你自己的OpenAi的API
ui.SetGlobalSearchTimeout(0)  # 设置全局搜索超时
info = {}
'''
用户配置,范例:
{'张':{
        '更新时间': '2023-04-01',
        '是否VIP': '是”,
        '最大Token数': 5000,
        '已使用Token数': 0,
        '上下文联系数量': 5,
        'messages':[{'role': 'system', 'content': '张的对话'}]
        }
}
'''
VipList = ['赵某', '王某', '智障']  # vip名单


# 对用户创建一个专门的配置文件,用于存放权限以及对话上下文
def 用户配置(name, group=False):
    global info
    # 第一步:检索配置中是否存在该人
    if name in info:  # 如果在配置列表中
        if info[name]['更新时间'] != datetime.now().strftime('%y-%m-%d'):  # 如果当前日期和更新时间不同,更新频率为1天
            info[name]['更新时间'] = datetime.now().strftime('%y-%m-%d')  # 刷新更新时间
            info[name]['已使用Token数'] = 0  # 重置已使用Token数
            info[name]['messages'] = [{'role': 'system', 'content': name + '的对话'}]  # 重置messages
    else:  # 不在配置列表中
        info[name] = {}  # 以用户名创建配置列表
        info[name]['更新时间'] = datetime.now().strftime('%y-%m-%d')
        info[name]['messages'] = [{'role': 'system', 'content': name + '的对话'}]
        info[name]['已使用Token数'] = 0
    # 第二步:判断一下用户是否为vip
    if name in VipList:  # 如果用户为vip用户
        info[name]['是否VIP'] = '是'
        info[name]['最大Token数'] = 5000
        info[name]['上下文联系数量'] = 10
    else:  # 如果用户非vip用户
        info[name]['是否VIP'] = '否'
        info[name]['最大Token数'] = 1000
        info[name]['上下文联系数量'] = 1
    # 第三步:判断一下用户是否为群聊用户
    if group:
        info[name]['是否VIP'] = '否'
        info[name]['最大Token数'] = 100000  # 因为是在群聊中所有人一起使用,可以设适当设置大一些,谨慎使用!
        info[name]['上下文联系数量'] = 1  # 因为是在群聊中所有人一起使用,所以最好就设置成不联系上下文了


def getOpenAiMsg(name, question):
    """
    此函数这是向OpenAi发送对话,并返回AI的回答
    Args:
        name:用户的名称,用于读写对应的用户配置,str格式
        question:对话的具体内容,str格式
    Returns:
        answer:AI的回答,str格式
    """
    global info
    if question == "权限":  # 如果用户输入“权限”,
        answer = name + "\n" \
                 + "更新时间: " + info[name]['更新时间'] + "\n" \
                 + "是否VIP: " + info[name]['是否VIP'] + "\n" \
                 + "上下文联系数量: " + str(info[name]['上下文联系数量']) + "\n" \
                 + "最大Token数: " + str(info[name]['最大Token数']) + "\n" \
                 + "已使用Token数: " + str(info[name]['已使用Token数'])
        return answer  # 则返回用户配置信息,不会触发后续的OpenAi自动回复

    if info[name]['已使用Token数'] >= info[name]['最大Token数']:  # 查询是否超出配额
        answer = '很抱歉,你今天使用量超出最大配额,发送“权限”查看您的账号情况'
        return answer
    else:
        if len(info[name]['messages']) >= 2 * info[name]['上下文联系数量'] + 1:  # 如果上下文数量超出预设
            # 删除第一组对话
            info[name]['messages'].pop(1)
            info[name]['messages'].pop(1)

    if info[name]['上下文联系数量'] <= 1:  # 如果上下文数量设置为1
        info[name]['messages'] = [{'role': 'user', 'content': question}]  # 直接设置一条即可
    else:
        info[name]['messages'].append({'role': 'user', 'content': question})  # 增添对话信息

    try:
        response = openai.ChatCompletion.create(
            model='gpt-3.5-turbo',
            messages=info[name]['messages'],
            temperature=0.2
        )
        answer = response.choices[0].message.content  # 从返回值中提取回答
        # 把回答添加到用户配置中的上下文,为了防止tokens爆炸,限制了字数
        info[name]['messages'].append({'role': 'assistant', 'content': answer[:100]})
        info[name]['已使用Token数'] = info[name]['已使用Token数'] + response.usage.total_tokens
        return answer
    except:
        answer = '很抱歉,服务器出错,请重试'
        return answer


def 普通用户回复():
    """普通用户的回复"""
    wx = ui.WindowControl(Name="微信", searchDepth=1)  # 绑定名为微信的主窗口控件
    wx.SwitchToThisWindow()  # 主窗口置前显示
    hw = wx.ListControl(Name="会话")  # 绑定对话列表
    we = hw.EditControl(searchDepth=3)  # 查找新对话
    if we.Exists(0):
        好友 = we.GetParentControl().GetParentControl()
        姓名 = 好友.Name
        print("聊天对象:" + 姓名)
        we.Click(simulateMove=False)
        last_msg = wx.ListControl(Name="消息").GetChildren()[-1].Name  # 获取最新消息
        print("获得消息:" + last_msg)

        用户配置(姓名)
        response = getOpenAiMsg(姓名, last_msg)  # 将收到的信息转发给OpenAi
        print("你的回复:\n" + response)
        # print(info[姓名])     # 调试用,查看下用户配置
        print(
            '已消耗标记:' + str(info[姓名]['已使用Token数']) + "\n--------------------------------------------------\n")
        # 输入回复信息
        pyperclip.copy(response)  # 复制信息
        pyautogui.hotkey('ctrl', 'v')  # 粘贴
        pyautogui.press('enter')  # 回车

        # 隐藏对话
        好友.RightClick()
        右键菜单 = ui.MenuControl(ClassName="CMenuWnd")
        if 右键菜单.Exists(3, 0.1):
            右键菜单.TextControl(Name="不显示聊天").Click()


def 群聊用户回复():
    """群聊用户的回复,请将群消息接收设置为消息免打扰"""
    wx = ui.WindowControl(Name="微信", searchDepth=1)  # 绑定名为微信的主窗口控件
    wx.SwitchToThisWindow()  # 主窗口置前显示
    hw = wx.ListControl(Name="会话")  # 绑定名为对话列表
    we = hw.EditControl(SubName="有人@我", searchDepth=5)  # 查找新对话
    if we.Exists(0):
        群对象 = we.GetParentControl().GetParentControl().GetParentControl().GetParentControl()
        群名 = 群对象.Name
        print("聊天群对象:" + 群名)
        we.Click(simulateMove=False)
        last_msg = wx.ListControl(Name="消息").GetChildren()[-1].Name  # 获取最新消息
        last_msg = last_msg[7:len(last_msg)]  # 将@信息删除,注意这里要和你自身的微信名相匹配,尤其注意微信被@后会多一个‘\u2005’的字符
        # print(wx.ListControl(Name="消息").GetChildren()[-1]) # 感兴趣的可以用这行命令去看下原始消息文本
        # print(last_msg == '权限')  # 建议先在群里发送”权限“两个字,用这行命令比对一下
        print("获得群消息:" + last_msg)

        用户配置(群名, True)
        response = getOpenAiMsg(群名, last_msg)  # 将收到的信息转发给OpenAi
        print("你的回复:\n" + response)
        print(
            '已消耗标记:' + str(info[群名]['已使用Token数']) + "\n--------------------------------------------------\n")
        # 输入回复信息
        pyperclip.copy(response)  # 复制信息
        pyautogui.hotkey('ctrl', 'v')  # 粘贴
        pyautogui.press('enter')  # 回车

        # 隐藏对话
        群对象.RightClick()  # 隐藏权限
        右键菜单 = ui.MenuControl(ClassName="CMenuWnd")
        if 右键菜单.Exists(3, 0.1):
            右键菜单.TextControl(Name="不显示聊天").Click()


print("======================================\n开始\n======================================\n")
while True:
    普通用户回复()
    群聊用户回复()  # 记得把群消息接收设置为消息免打扰
    time.sleep(0.2)
4. Demonstration effect
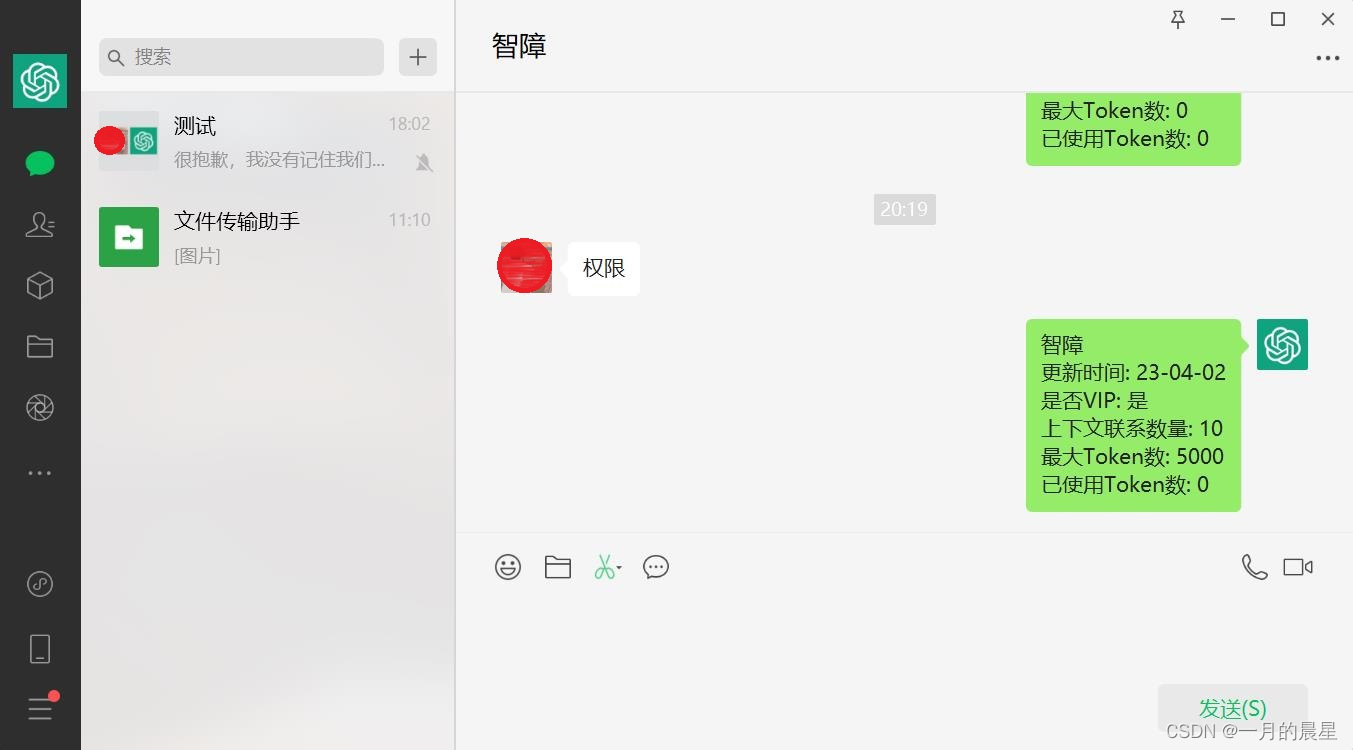
When talking with friends, when sending "permissions", chatgpt will not be triggered, but the corresponding permissions of the user will be checked
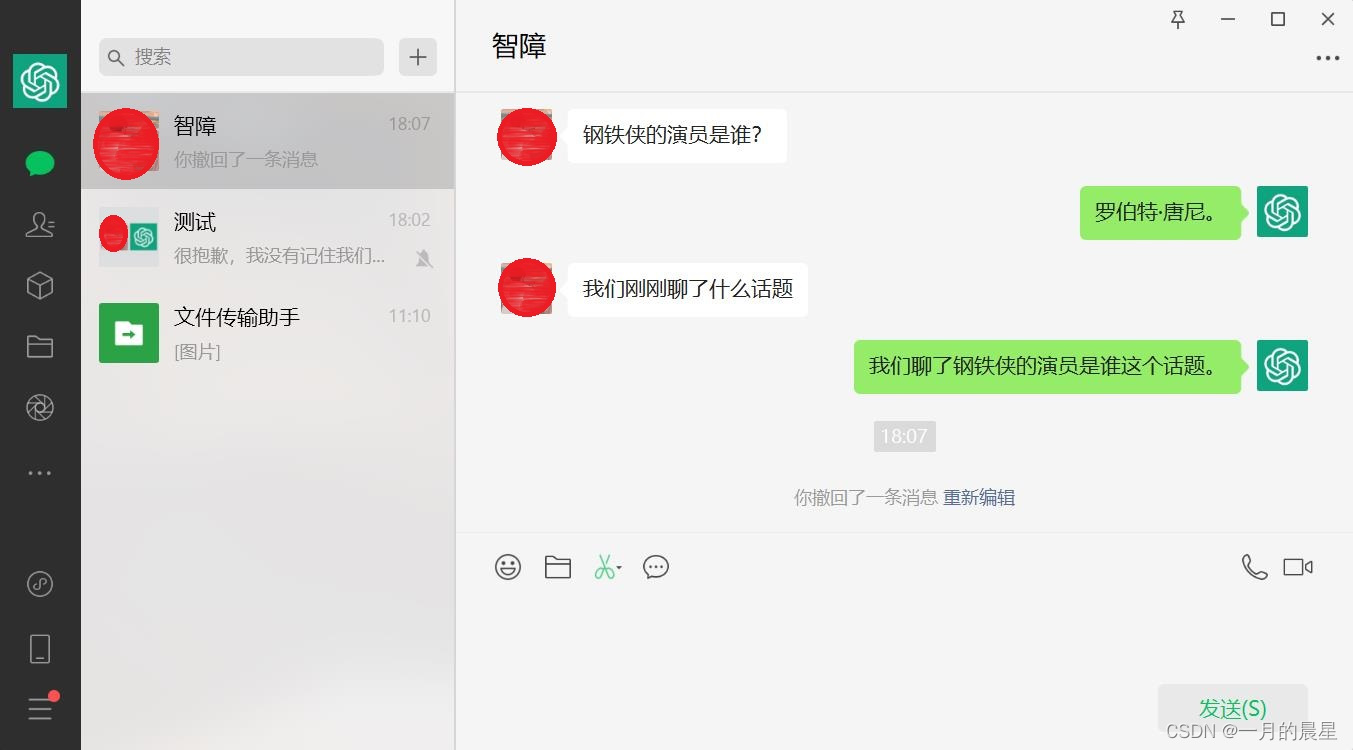
Friend dialogue, you can see that the context connection can be triggered correctly
For group chat, considering cost, group chat generally does not set contextual connection.

Summarize
This article only briefly introduces some relevant knowledge of uiautomation and openai, as well as the corresponding implementation code. In the future, we will consider deploying this program directly on the server for long-term operation. Unfortunately, in the products of domestic manufacturers such as Alibaba Cloud and Tencent Cloud, overseas clouds that can be deployed The server is not cheap, and the domestic server needs to be connected to a proxy. The actual experience is still affected by network fluctuations. When it is fast, you can reply in seconds, and when it is slow, you have to wait for more than ten seconds.
Finally, programming is not easy, and the writing of the article is also very hard. I spent a lot of money to step on the pit. I am asking for a donation here, and you can give as much as you like~