Java backend + frontend uses WebSocket to push messages (process + detailed code)
During the development of the project, I encountered the need to realize the function of the server actively sending data to the front-end page. Realizing this function is nothing more than using polling and websocket technology, but after considering real-time and resource consumption, I finally decided to use websocket. Now let’s record the implementation of Websocket technology in Java~
There are usually two ways to implement Websocket in Java: 1. Create a WebSocketServer class, which contains methods such as open, close, message, error, etc.; 2. Use the webSocketHandler class provided by Springboot to create its child class and override the method. Although our project uses the Springboot framework, it still adopts the first method.
Create a simple example operation process of WebSocket
1. Introduce Websocket dependency
<!-- https://mvnrepository.com/artifact/org.springframework.boot/spring-boot-starter-websocket -->
        <dependency>
            <groupId>org.springframework.boot</groupId>
            <artifactId>spring-boot-starter-websocket</artifactId>
            <version>2.7.0</version>
        </dependency>
2. Create a configuration class WebSocketConfig
import org.springframework.context.annotation.Bean;
import org.springframework.context.annotation.Configuration;
import org.springframework.web.socket.server.standard.ServerEndpointExporter;

/**
 * 开启WebSocket支持
 */
@Configuration
public class WebSocketConfig {


    @Bean
    public ServerEndpointExporter serverEndpointExporter() {


        return new ServerEndpointExporter();
    }
}
3. Create WebSocketServer
Under the websocket protocol, the backend server is equivalent to the client in ws, you need to use @ServerEndpoint to specify the access path, and use @Component to inject into the container
@ServerEndpoint: When the ServerEndpointExporter class is declared and used through Spring configuration, it will scan for classes annotated with @ServerEndpoint. The annotated class will be registered as a WebSocket endpoint. All configuration items are in the attributes of this annotation
(such as: @ServerEndpoint("/ws") )
In the following chestnuts, @ServerEndpoint specifies that the access path contains sid, which is used to distinguish each page
import com.alibaba.fastjson.JSONObject;
import lombok.extern.slf4j.Slf4j;
import org.springframework.stereotype.Component;
import org.springframework.util.StringUtils;
import javax.websocket.*;
import javax.websocket.server.PathParam;
import javax.websocket.server.ServerEndpoint;
import java.io.IOException;
import java.net.Socket;
import java.util.*;
import java.util.concurrent.ConcurrentHashMap;

/**
 * @ServerEndpoint 注解是一个类层次的注解,它的功能主要是将目前的类定义成一个websocket服务器端,
 * 注解的值将被用于监听用户连接的终端访问URL地址,客户端可以通过这个URL来连接到WebSocket服务器端
 */
@ServerEndpoint("/notice/{userId}")
@Component
@Slf4j
public class NoticeWebsocket {


    //记录连接的客户端
    public static Map<String, Session> clients = new ConcurrentHashMap<>();

    /**
     * userId关联sid(解决同一用户id,在多个web端连接的问题)
     */
    public static Map<String, Set<String>> conns = new ConcurrentHashMap<>();

    private String sid = null;

    private String userId;


    /**
     * 连接成功后调用的方法
     * @param session
     * @param userId
     */
    @OnOpen
    public void onOpen(Session session, @PathParam("userId") String userId) {


        this.sid = UUID.randomUUID().toString();
        this.userId = userId;
        clients.put(this.sid, session);

        Set<String> clientSet = conns.get(userId);
        if (clientSet==null){


            clientSet = new HashSet<>();
            conns.put(userId,clientSet);
        }
        clientSet.add(this.sid);
        log.info(this.sid + "连接开启!");
    }

    /**
     * 连接关闭调用的方法
     */
    @OnClose
    public void onClose() {


        log.info(this.sid + "连接断开!");
        clients.remove(this.sid);
    }

    /**
     * 判断是否连接的方法
     * @return
     */
    public static boolean isServerClose() {


        if (NoticeWebsocket.clients.values().size() == 0) {


            log.info("已断开");
            return true;
        }else {


            log.info("已连接");
            return false;
        }
    }

    /**
     * 发送给所有用户
     * @param noticeType
     */
    public static void sendMessage(String noticeType){


        NoticeWebsocketResp noticeWebsocketResp = new NoticeWebsocketResp();
        noticeWebsocketResp.setNoticeType(noticeType);
        sendMessage(noticeWebsocketResp);
    }


    /**
     * 发送给所有用户
     * @param noticeWebsocketResp
     */
    public static void sendMessage(NoticeWebsocketResp noticeWebsocketResp){


        String message = JSONObject.toJSONString(noticeWebsocketResp);
        for (Session session1 : NoticeWebsocket.clients.values()) {


            try {


                session1.getBasicRemote().sendText(message);
            } catch (IOException e) {


                e.printStackTrace();
            }
        }
    }

    /**
     * 根据用户id发送给某一个用户
     * **/
    public static void sendMessageByUserId(String userId, NoticeWebsocketResp noticeWebsocketResp) {


        if (!StringUtils.isEmpty(userId)) {


            String message = JSONObject.toJSONString(noticeWebsocketResp);
            Set<String> clientSet = conns.get(userId);
            if (clientSet != null) {


                Iterator<String> iterator = clientSet.iterator();
                while (iterator.hasNext()) {


                    String sid = iterator.next();
                    Session session = clients.get(sid);
                    if (session != null) {


                        try {


                            session.getBasicRemote().sendText(message);
                        } catch (IOException e) {


                            e.printStackTrace();
                        }
                    }
                }
            }
        }
    }

    /**
     * 收到客户端消息后调用的方法
     * @param message
     * @param session
     */
    @OnMessage
    public void onMessage(String message, Session session) {


        log.info("收到来自窗口"+this.userId+"的信息:"+message);
    }

    /**
     * 发生错误时的回调函数
     * @param error
     */
    @OnError
    public void onError(Throwable error) {


        log.info("错误");
        error.printStackTrace();
    }

}
An object that encapsulates a sending message can be used directly
import io.swagger.annotations.ApiModel;
import io.swagger.annotations.ApiModelProperty;
import lombok.Data;

@Data
@ApiModel("ws通知返回对象")
public class NoticeWebsocketResp<T> {


    @ApiModelProperty(value = "通知类型")
    private String noticeType;

    @ApiModelProperty(value = "通知内容")
    private T noticeInfo;

}
4. websocket call
A user calls the interface, actively sends the information to the backend, and the backend actively pushes it to the specified/all users after receiving it
@RestController
@RequestMapping("/order")
public class OrderController {


	@GetMapping("/test")
    public R test() {


    	NoticeWebsocket.sendMessage("你好,WebSocket");
        return R.ok();
    }
}
Front-end WebSocket connection
<!DOCTYPE html>
<html lang="en">
<head>
    <meta charset="UTF-8">
    <title>SseEmitter</title>
</head>
<body>
<div id="message"></div>
</body>
<script>
var limitConnect = 0;
init();
function init() {


var ws = new WebSocket('ws://192.168.2.88:9060/notice/1');
// 获取连接状态
console.log('ws连接状态:' + ws.readyState);
//监听是否连接成功
ws.onopen = function () {


    console.log('ws连接状态:' + ws.readyState);
    limitConnect = 0;
    //连接成功则发送一个数据
    ws.send('我们建立连接啦');
}
// 接听服务器发回的信息并处理展示
ws.onmessage = function (data) {


    console.log('接收到来自服务器的消息:');
    console.log(data);
    //完成通信后关闭WebSocket连接
    // ws.close();
}
// 监听连接关闭事件
ws.onclose = function () {


    // 监听整个过程中websocket的状态
    console.log('ws连接状态:' + ws.readyState);
reconnect();

}
// 监听并处理error事件
ws.onerror = function (error) {


    console.log(error);
}
}
function reconnect() {


    limitConnect ++;
    console.log("重连第" + limitConnect + "次");
    setTimeout(function(){


        init();
    },2000);

}
</script>
</html>
After the project starts, the console prints the connection information after opening the page.

After calling the order/test method, the front end prints the push message content.
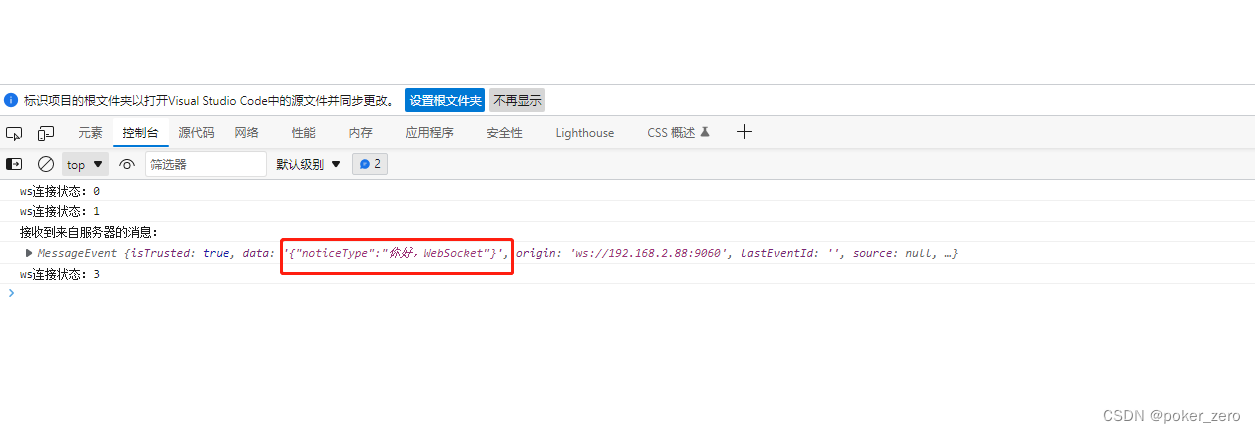
In this way, the websocket communication can be carried out by calling the URL through the interface or ws~
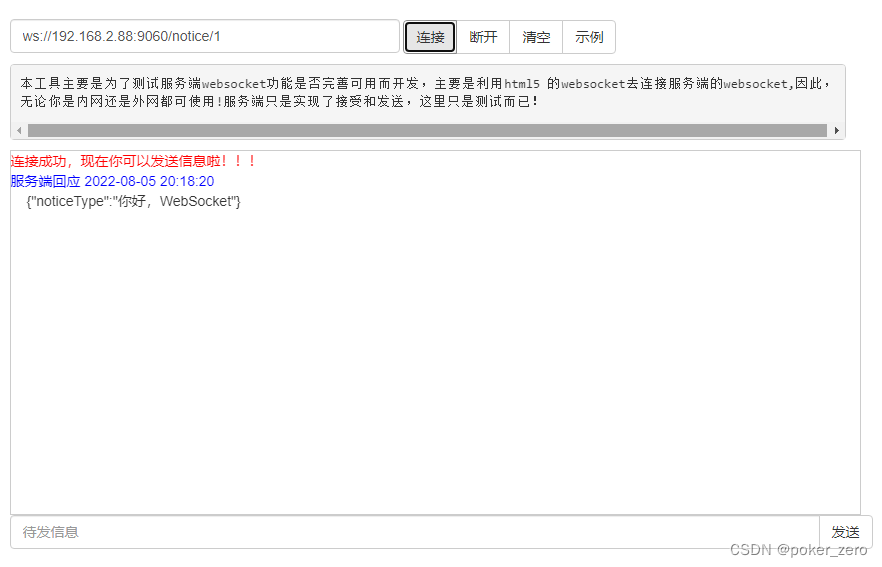
If there is no front-end page, you can also use the online WebSocket test