Express
1. Getting to know Express
1.1 Introduction to Express
1. What is Express
The official concept: Express is a fast, open and minimalist web development framework based on the Node.js platform.
Popular understanding: The function of Express is similar to the built-in http module, which is specially used to create a web server.
The essence of Express: it is a third-party package on npm, which provides a convenient way to quickly create a web server.
Express's Chinese official website: http://www.expressjs.com.cn/
2. Further understand Express
Thoughts: Can I create a web server without using Express?
Answer: Yes, you can use the native http module provided by Node.js.
Thinking: Ji Shengyu and He Shengliang (why do you still use Express when there is a built-in http module)?
Answer: The http built-in module is very complicated to use and the development efficiency is low; Express is further encapsulated based on the built-in http module, which can greatly improve the development efficiency.
Thinking: What is the relationship between http built-in modules and Express?
Answer: Similar to the relationship between Web API and jQuery in the browser. The latter is further encapsulated based on the former.
3. What can Express do?
For front-end programmers, the two most common types of servers are:
Web site server: a server that provides external Web page resources.
API interface server: a server dedicated to providing API interfaces externally.
Using Express, we can conveniently and quickly create a server for a Web site or a server for an API interface.
1.2 Basic usage of Express
1. Install
In the directory where the project is located, run the following terminal command to install express into the project:
npm i [email protected]
2. Create a basic web server
// 1. 导入express
const express = require('express')
// 2. 创建基本的Web服务器
const app = express()

// 调用app.listen(端口号,启动成功后的回调函数),启动服务器
app.listen(80,() => {


	console.log('express server running at http://127.0.0.1')
})
3. Listen for GET requests
Through the app.get() method, you can monitor the client's GET request. The specific syntax format is as follows:
// 参数1:客户端请求的URL地址
// 参数2:请求对应的处理函数
// req: 请求对象(包含了与请求相关的属性与方法)
// res:响应对象(包含了与响应相关的属性与方法)
app.get('请求URL',function(req,res) {

    /*处理函数*/})
4. Listen for POST requests
Through the app.post() method, you can monitor the client's POST request. The specific syntax is as follows:
// 参数1:客户端请求的URL地址
// 参数2:请求对应的处理函数
// req: 请求对象(包含了与请求相关的属性与方法)
// res:响应对象(包含了与响应相关的属性与方法)
app.post('请求URL',function(req,res) {

    /*处理函数*/})
5. Respond the content to the client
Through the res.send() method, the processed content can be sent to the client:
app.get('/user',(req,res) => {


	//向客户端发送 JSON 对象
	res.send({

     name: 'zs', age: '20', gender: '男' })
})

app.post('/user',(req,res) => {


	//向客户端发送文本内容
	res.send('请求成功')
})
6. Obtain the query parameters carried in the URL
Through the req.query object, you can access the parameters sent by the client to the server in the form of a query string:
app.get('/', (req, res) => {


  console.log(req.query)
})
7. Get the dynamic parameters in the URL
Through the req.params object, you can access the URL, through: the matched dynamic parameters:
// 访问 http://127.0.0.1/user/1874
app.get('/user/:id', (req, res) => {


  res.send(req.params) // 返回 {id:'1874'}
})
// 访问 http://127.0.0.1/user/1874/lhd
app.get('/user/:id/:name', (req, res) => {


  res.send(req.params) // 返回 {id:'1874',name:'lhd'}
})
1.3 Hosting static resources
1. express.static()
Express provides a very useful function called express.static(). Through it, we can easily create a static resource server. For example, the pictures, CSS files, and JavaScript files in the public directory can be uploaded through the following code Open access to:
app.use(express.static('./public'))
Note: Express looks for files in the specified static directory and provides access to resources externally. Therefore, the name of the directory where the static files are stored will not appear in the URL.
2. Host multiple static resource directories
If you want to host multiple static resource directories, call the express.static() function multiple times:
app.use(express.static('./public'))
app.use(express.static('./files'))
When accessing static resource files, the express.static() function will search for the required files according to the order in which the directories are added.
3. Mount path prefix
If you want to mount the path prefix before the managed static resource access path, you can use the following method:
app.use('/public', express.static('./public'))
Now, you can access the files in the public directory through addresses prefixed with /public
1.4 nodemon
1. Why use nodemon
When writing and debugging a Node.js project, if you modify the code of the project, you need to close it manually frequently, and then restart it, which is very cumbersome.
Now, we can use the tool nodemon (https://www.npmjs.com/package/nodemon), which can monitor changes in project files. When the code is modified, nodemon will automatically restart the project for us, which is very convenient development and debugging.
2. Install nodemon
// 安装为全局可用工具
npm i nodemon -g
3. Use nodemon
// 原本启动
node app.js
// nodemon 启动
nodemon app.js
2. Express routing
2.1 The concept of routing
1. What is routing
Broadly speaking, routing is a mapping relationship.
2. Routing in real life

3. Routing in Express
In Express, routing refers to the mapping relationship between client requests and server processing functions.
The routing in Express is composed of three parts, which are the type of request, the URL address of the request, and the processing function. The format is as follows:
// METHOD:请求方式,PATH:请求路径,HANDLER:处理函数
app.METHOD(PATH, HANDLER)
4. Examples of routing in Express
// 示例:使用 get 请求返回 get,使用 post 返回 post
app.get('/', (req, res) => {


  res.send('This is GET request')
})
app.post('/', (req, res) => {


  res.send('This is POST request')
})
5. Route matching process
Whenever a request arrives at the server, it needs to be matched by the route first. Only after the matching is successful, the corresponding processing function will be called.
When matching, the matching will be performed in the order of the routing. If the request type and the requested URL are successfully matched at the same time, Express will transfer the request to the corresponding function for processing.
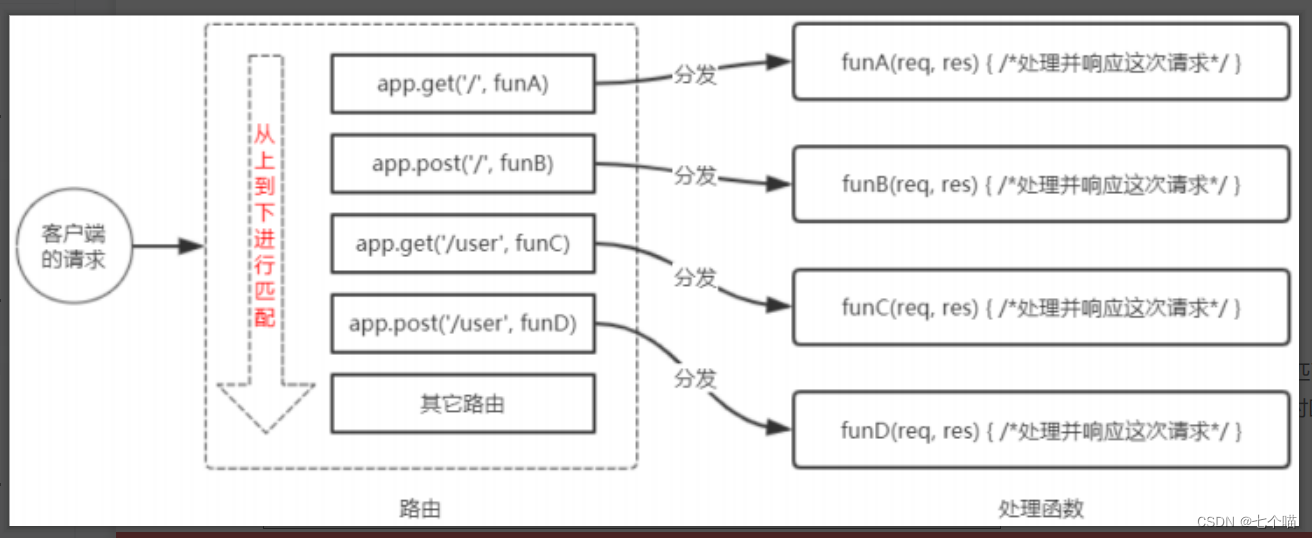
Points to note for route matching:
- Matches are performed in the order in which they are defined.
- The corresponding processing function will be called only when the request type and the requested URL match successfully at the same time.
2.2 Use of routing
1. The simplest usage
The easiest way to use routing in Express is to mount the routing to the app. The example code is as follows:
const express = require('express')
//
const app = express()

// 挂载路由
app.get('/',(req, res) => {

     res.send('Hello World.') })
app.post('/',(req, res) => {

     res.send('Post Request.') })

// 启动Web服务器
app.listen(80, () => {

     console.log('server running at http://127.0.0.1') })
2. Modular Routing
In order to facilitate the modular management of routes, Express does not recommend directly mounting routes to the app, but recommends that routes be separated into separate modules.
- The steps to extract routing into a separate module are as follows:
- Create the .js file corresponding to the routing module
- Call the express.Router() function to create a routing object
- Mount a specific route to the route object
- Use module.exports to share routing objects externally
- Register the routing module with the app.use() function
// ./router/user.js
var express = require('express') // 导入express
var router = express.Router() // 创建路由对象

// 挂载具体路由
router.get('/user/list', (req, res) => {


  res.send('Get user list')
})
router.post('/user/add', (req, res) => {


  res.send('Add new user')
})

module.exports = router // 向外导出路由对象
3. Register the routing module
// 1.导入路由模块
const userRouter = require('./router/user.js')

// 2.使用 app.use() 注册路由模块
app.use(userRouter)
4. Add a prefix to the routing module
Similar to how to uniformly mount access prefixes for static resources when hosting static resources, the way to add prefixes to routing modules is also very simple:
// 1. 导入路由模块
const userRouter = require('./router/user.js')

// 2. 使用app.use()注册路由模块,并添加统一的访问前缀
app.use('/api',useRouter)
3. Express middleware
3.1 The concept of middleware
1. What is middleware
Middleware (Middleware), specifically refers to the middle processing link of the business process.
2. Real life examples
When treating sewage, there are generally three treatment steps to ensure that the treated wastewater meets the discharge standards.
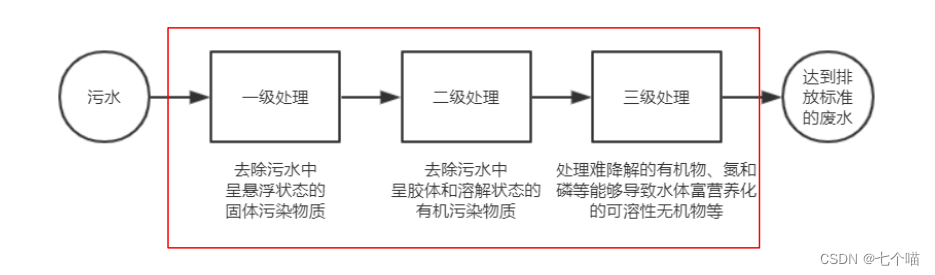
These three intermediate processing links of sewage treatment can be called middleware.
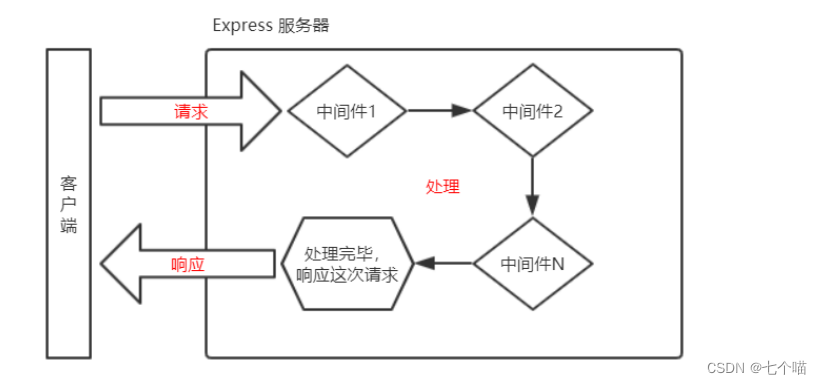
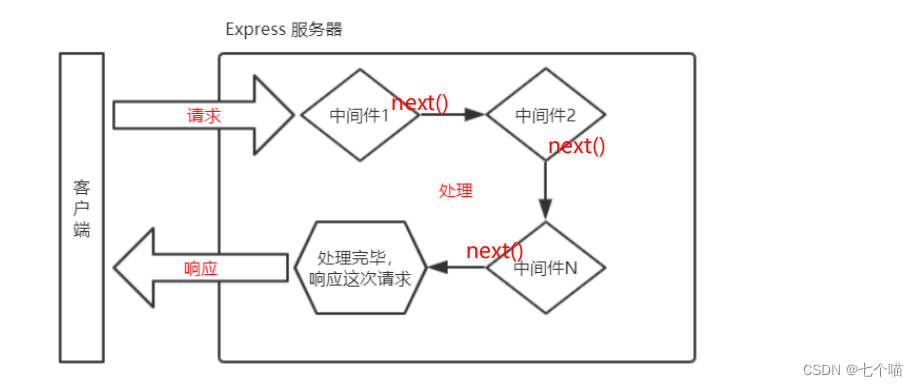
3. The calling process of Express middleware
When a request arrives at the Express server, multiple middleware can be called continuously to preprocess the request.
4. Format of Express middleware
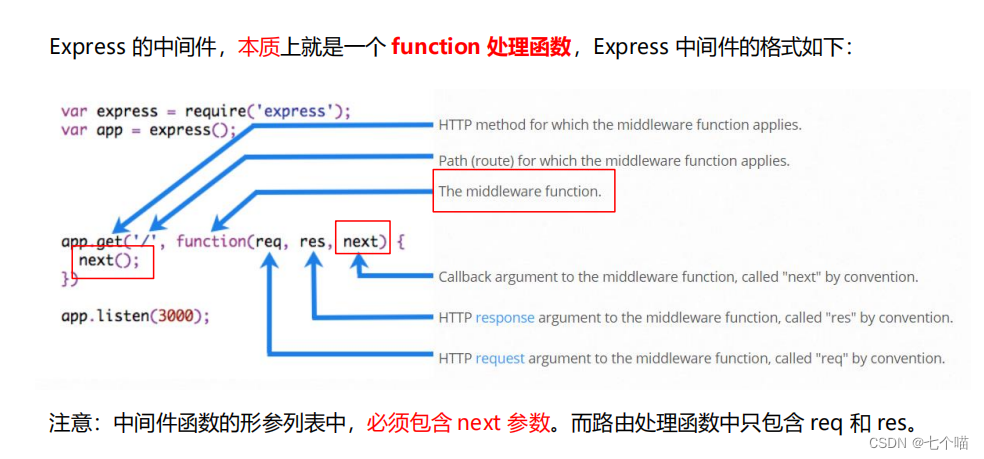
5. The role of the next function
The next function is the key to realize the continuous invocation of multiple middleware, and it means to transfer the flow relationship to the next middleware or route.
3.2 First experience of Express middleware
1. Define the middleware function
The simplest middleware function can be defined as follows:
// mw 指向的就是一个中间件函数
const mw = function(req.res,next){


    console.log('这是个简单的中间件函数')
    next()
}
2. Global middleware
Any request initiated by the client will trigger the middleware after reaching the server, which is called globally effective middleware.
By calling app.use (middleware function), you can define a globally effective middleware. The sample code is as follows:
// mw 指向的就是一个中间件函数
const mw = function(req.res,next){


    console.log('这是个简单的中间件函数')
    next()
}

// 全局生效的中间件
app.use(mw)
3. Define a simplified form of global middleware
app.use(function (req, res, next) {


  console.log('这是给简单的中间件函数')
  next()
})
4. The role of middleware
Multiple middleware share the same req and res. Based on such features, we can uniformly add custom properties or methods to req or res objects in upstream middleware for use by downstream middleware or routes.

5. Define multiple global middleware
Multiple global middleware can be defined consecutively using app.use(). After the client request reaches the server, it will be called in sequence according to the order defined by the middleware
. The sample code is as follows:
// 完整示例
const express = require('express')
const app = express()

app.use((req, res, next) => {


  console.log('第一个中间件')
  next()
})
app.use((req, res, next) => {


  console.log('第二个中间件')
  next()
})

app.get('/', (req, res) => {


  res.send({

     info: '请求了服务器', method: req.method })
})

app.listen(80, () => {


  console.log('http://127.0.0.1')
})
6. Locally effective middleware
Middleware defined without app.use() is called locally effective middleware. The sample code is as follows:
const mw = function (req, res, next) {


  console.log('中间件函数')
  next()
}
app.get('/', mw, (req, res) => {


  res.send('Hellow World')
})
app.get('/user', (req, res) => {


  res.send('Hellow World')
})
7. Define multiple partial middleware
Multiple partial middleware can be used in routing in the following two equivalent ways:
// mw1与mw2 为中间件函数,两种方式等价
app.get('/', mw1, mw2, (req, res) => {


  xxx
})
app.get('/', [mw1, mw2], (req, res) => {


  xxx
})
8. Understand 5 precautions for using middleware
① Be sure to register the middleware before routing
② Requests sent by the client can call multiple middleware for processing continuously
③ After executing the business code of the middleware, don’t forget to call the next() function
④ In order to prevent code logic confusion, Do not write additional code after calling the next() function
⑤ When multiple middlewares are called continuously, req and res objects are shared between multiple middlewares
3.3 Classification of middleware
In order to make it easier for everyone to understand and remember the use of middleware, Express officially divides common middleware usage into five categories, namely:
① application-level middleware
② routing-level middleware
③ error-level middleware
④ Express built-in
⑤ third-party middleware
1. Application-level middleware
The middleware bound to the app instance through app.use() or app.get() or app.post() is called application-level middleware. The code example is as follows:
// 应用级别的中间件(全局中间件)
app.use((req,res,next) => {


	next()
})

// 应用级别的中间件(局部中间件)
app.get('',mw1,() => {


	res.send('Home Page.')
})
2. Routing level middleware
The middleware bound to the express.Router() instance is called route-level middleware. Its usage is no different from application-level middleware. However, the application-level middleware is bound to the app instance, and the routing-level middleware is bound to the router instance. The code example is as follows:
var app = express()
var router = express.Router()

router.use((req, res, next) => {


  console.log('Time:',Date.now())
  next()
})
app.use('/', router)
3. Wrong level middleware
The role of error level middleware: it is specially used to catch abnormal errors that occur in the entire project, so as to prevent the problem of abnormal collapse of the project.
Format: In the function processing function of the error level middleware, there must be 4 formal parameters, and the order of the formal parameters is (err, req, res, next) respectively.
// 示例
app.get('/', (req, res) => {


  throw new Error('服务器出错') // 错误发生后,下面的语句无法执行
  res.send('Hellow World') // 无法响应
})
app.use((err, req, res, next) => {


  console.log('发生了错误' + err.message)
  res.send('Error!' + err.message) // 捕获错误,向客户端响应
})
Note: Error-level middleware must be registered after all routes!
4. Express built-in middleware
Since Express 4.16.0, Express has built-in 3 commonly used middleware, which greatly improves the development efficiency and experience of Express projects:
① express.static Built-in middleware for quickly hosting static resources, such as: HTML files, pictures , CSS styles, etc. (no compatibility)
② express.json parses request body data in JSON format (with compatibility, only available in version 4.16.0+)
③ express.urlencoded parses request body data in URL-encoded format (with Compatibility, only available in 4.16.0+ version)
5. Third-party middleware
The middleware that is not officially built-in by Express but developed by a third party is called third-party middleware. In the project, you can download and configure third-party middleware on demand, so as to improve the development efficiency of the project.
For example: In versions prior to [email protected], body-parser, a third-party middleware, is often used to parse request body data. The steps are as follows:
① Run npm install body-parser to install middleware
② Use require to import middleware
③ Call app.use() to register and use middleware
- Note: Express's built-in express.urlencoded middleware is further encapsulated based on the third-party middleware body-parser.
Example:
const express = require('express')
const app = express()

// 注意:除了错误级别的中间件,其他的中间件,必须在路由之前进行配置
// 通过express.json()这个中间件,解析表单中的JSON格式的数据
app.use(express.json())

// 通过express.urlencoded()这个中间件,来解析表单中的url-encoded格式的数据
app.use(express.urlencoded({

     extended: false }))

app.post('/user', (req, res) => {


  // 在服务器,可以使用req.body这个属性,来接收客户端发送过来的请求体数据
  // 默认情况下,如果不配置解析表单数据的中间件,则req.body默认等于undefined
  console.log(req.body)
  res.send('ok')
})
app.post('/book', (req, res) => {


  // 在服务器端,可以通过req,body来获取JSON格式的表单数据和url-encoded格式的数据
  console.log(req.body)
})
3.4 Custom middleware
1. Requirements description and implementation steps
Manually simulate a middleware like express.urlencoded to parse the form data submitted by POST to the server.
Implementation steps:
① Define middleware
② Listen to the data event of req
③ Listen to the end event of req
④ Use the querystring module to parse the request body data
⑤ Mount the parsed data object as req.body
⑥ Encapsulate the custom middleware as a module
2. Define middleware
Use app.use() to define globally effective middleware, the code is as follows
app.use(function(req,res,next) {


	// 中间件的业务逻辑
})
3. Listen to the data event of req
In the middleware, it is necessary to listen to the data event of the req object to obtain the data sent from the client to the server.
If the amount of data is too large to be sent all at once, the client will cut the data and send it to the server in batches. Therefore, the data event may be triggered multiple times. When the data event is triggered each time, the data obtained is only a part of the complete data, and the received data needs to be spliced manually.
// 定义变量,用来存储客户端发送到服务器的数据
let str = ''
// 监听 req 对象的事件(客户端发送过来的新的请求体数据)
req.on('data',(chunk) => {


	// 拼接请求体数据,隐式转换为字符串
	str += chunk
})
4. Listen to the end event of req
When the request body data is received, the end event of req will be triggered automatically.
Therefore, we can get and process the complete request body data in the end event of req. The sample code is as follows:
// 监听 req 对象的 end 事件(请求体发送完毕后自动触发)
req.on('end',() =>{


	// 打印完整的请求体数据
	console.log(str)
})
5. Use the querystring module to parse the request body data
Node.js has a built-in querystring module, which is specially used to process query strings. Through the parse() function provided by this module, the query string can be easily parsed into an object format. The sample code is as follows:
// 导入处理 querystring 的 Node.js 内置模块
const qs = require('querystring')

// 调用 qs.parse()方法,把查询字符串解析为对象
const body = qs.parse(str)
6. Mount the parsed data object as req.body
The upstream middleware and downstream middleware and routing share the same req and res. Therefore, we can mount the parsed data as a custom attribute of req and name it req.body for downstream use. The sample code is as follows:
req.on('end',() => {


	const body = qs.parse(str) // 调用 qs.parse() 方法,把查询字符串解析为对象
	req.body = body			   // 将解析出来的请求体对象,挂载为 req.body 属性
	next()					   // 最后,一定要调用 next() 函数,执行后续的业务逻辑
})
7. Encapsulate custom middleware as a module
In order to optimize the structure of the code, we can encapsulate the custom middleware function as an independent module. The sample code is as follows:
//
const qs = require('querystring')
function bodyParser(req,res,next) {

     /*省略其它代码*/ }
module.exports = bodyParser // 向外导出解析请求体数据的中间件函数

// -----------------------------------------------------------------------

// 1. 导入自定义的中间件模块
const myBodyParser = require('custom-body-parser')
// 2. 注册自定义的中间件模块
app.use(myBodyParser)
4. Use Express to write the interface
4.1 CORS cross domain resource sharing
1. Interface cross domain problem
The GET and POST interfaces just written have a very serious problem: they do not support cross-domain requests.
There are two main solutions to the interface cross-domain problem:
① CORS (mainstream solution, recommended)
② JSONP (defective solution: only supports GET requests)
2. Use cors middleware to solve cross-domain problems
cors is a third-party middleware for Express. By installing and configuring cors middleware, you can easily solve cross-domain problems.
The usage steps are divided into the following 3 steps:
① Run npm install cors to install middleware
② Use const cors = require('cors') to import middleware
③ Call app.use(cors()) to configure middleware before routing
3. What is CORS
CORS (Cross-Origin Resource Sharing) consists of a series of HTTP response headers that determine whether the browser prevents the front-end JS code from obtaining resources across domains.
By default, the browser's same-origin security policy will prevent web pages from "cross-domain" access to resources. However, if the interface server is configured with CORS-related HTTP response headers, the browser-side cross-domain access restrictions can be lifted.

4. Notes on CORS
① CORS is mainly configured on the server side. The client browser can request the interface with CORS enabled without any additional configuration.
② CORS has compatibility in browsers. Only browsers that support XMLHttpRequest Level2 can normally access the server interface with CORS enabled (for example: IE10+, Chrome4+, FireFox3.5+).
5. CORS response header - Access-Control-Allow-Origin
An Access-Control-Allow-Origin field can be carried in the response header, and its syntax is as follows:
// origin 参数的值指定了只允许访问该资源的外域 url
Access-Control-Allow-Origin:<origin>|*
// 只允许来自 http://127.0.0.1 的请求
res.setHeader('Access-Control-Allow-Origin', 'http://127.0.0.1')
// 如果指定了 Access-Control-Allow-Origin 字段的值为通配符 *,表示允许来自任何域的请求
res.setHeader('Access-Control-Allow-Origin', '*')
6. CORS response header - Access-Control-Allow-Headers
By default, CORS only supports the client sending the following 9 request headers to the server:
Accept, Accept-Language, Content-Language, DPR, Downlink, Save-Data, Viewport-Width, Width, Content-Type (values are limited to text/plain, multipart/form-data, application/x-www-form-urlencoded)
If the client sends additional request header information to the server, the server needs to pass Access-Control-Allow- Headers Declare additional request headers, otherwise the request will fail this time!
// 允许客户端额外向服务器发送Content-Type请求头和X-Custom-Header请求头
// 注意:多个请求头之间使用英文的逗号进行分割
res.setHeader('Access-Control-Allow-Headers', 'Content-Type,X-Custom-Header')
7. CORS response header - Access-Control-Allow-Methods
By default, CORS only supports GET, POST, and HEAD requests initiated by the client.
If the client wants to request resources from the server through PUT, DELETE, etc., it needs to specify the HTTP methods allowed by the actual request through Access-Control-Alow-Methods on the server side.
The sample code is as follows:
// 只允许POST、GET、DELETE、HEAD请求方法
res.setHeader('Access-Control-Allow-Methods', 'POST,GET,DELETE,HEAD')
// 允许所有的HTTP请求方法
res.setHeader('Access-Control-Allow-Methods', '*')
8. Classification of CORS requests
When the client requests the CORS interface, according to the request method and request header, the CORS request can be divided into two categories, namely:
① simple request
② preflight request
9. Simple request
A request that meets the following two conditions at the same time is a simple request:
① Request method: one of GET, POST, HEAD
② HTTP header information does not exceed the following fields: no custom header field, Accept, Accept- Language, Content-Language, DPR, Downlink, Save-Data, Viewport-Width, Width, Content-Type (only three values application/x-www-formurlencoded, multipart/form-data, text/plain)
10. Preflight Request
As long as the request meets any of the following conditions, a preflight request is required:
① The request method is a request method type other than GET, POST, or HEAD
② The request header contains custom header fields
③ The application/json format is sent to the server Before the formal communication
between the browser and the server, the browser will send an OPTION request for pre-check to know whether the server allows the actual request, so this OPTION request is called "pre-check request". After the server successfully responds to the preflight request, the real request will be sent with real data.
11. The difference between simple request and preflight request
The characteristics of simple requests: only one request will occur between the client and the server.
The characteristics of the preflight request: there will be two requests between the client and the server, and the real request will be initiated only after the OPTION preflight request is successful.
4.2 JSONP interface
1. Review the concept and characteristics of JSONP
Concept: browser-side via
2. Precautions for creating JSONP interface
If CORS cross-origin resource sharing has been configured in the project, in order to prevent conflicts, the JSONP interface must be declared before configuring the CORS middleware. Otherwise, the JSONP interface will be treated as an interface with CORS enabled. The sample code is as follows:
// 优先创建 JSONP 接口【这个接口不会被处理成 CORS 接口】
app.get('/api/jsonp',(req,res) => {

     })

// 再配置 CORS 中间件【后续的所有接口,都会被处理 CORS 接口】
app.use(cors())

// 这是一个开启了 CORS 的接口
app.get('/api/get',(req,res) => {

     })
3. Steps to implement the JSONP interface
① Obtain the name of the callback function sent by the client
② Obtain the data to be sent to the client in the form of JSONP
③ According to the data obtained in the previous two steps, a string of function calls is spliced
④ The string obtained in the previous step is concatenated, and the response for client
4. The specific code to implement the JSONP interface
// 服务器端
app.get('/api/jsonp',(req,res)=>
	//1.获取客户端发送过来的回调函数的名字
	const funcName req.query.callback
	/2.得到要通过JSONP形式发送给客户端的数据
	const data = {

     name:'lhd',age:19 }
	//3.根据前两步得到的数据,拼州接出一个函数调用的字符串
    // xxx = `$(funcName)(${JSON.stringify(data)})` md文档不识别``
	const scriptstr = xxx
	//4.把上步拼接得到的字符串,响应给客户端的<scr1pt>标签进行解析执行
	res.send(scriptstr)
})
// 客户端
$.ajax({


    method:'GET',
	url:'http://127.0.0.1/api/jsonp',
	dataType:'jsonp', 					//表示要发起J50NP的i情球
	success:function (res){


		console.log(res)
	}
})