Article directory
-
- grammar
-
-
- 1. Form input binding
- 2. Some built-in commands
- 3. Vue life cycle
- 4. Component Basics
- 5. Vue CLI Scaffolding
- 6. Components go deep
- 7. Plugins
- 8. scoped style
- 9. Browser local storage
- 10. Interaction between components
- 11. Global event bus
- 12.$nextTick
- 13. Transitions and Animations
- 14. Configure proxy
- 15. Slot
-
grammar
1. Form input binding
Form input requires two-way data binding, so use v-model.
- Text:
<input type="text" v-model="user" />collect value; type=password, text, number. - Multiline text:
<textarea v-model="text"></textarea>does not accept interpolation syntax; - Radio button:
<input type="radio" name="sex" v-model="userInfo.sex" value="male">The radio button needs to identify the name, otherwise it will not be exclusive, and the value of the mobile phone; - Multi-selection box:
<input type="checkbox" v-model="userInfo.hobby" value="study">: If the value attribute is not configured, then the collected attribute is checked (checked or unchecked, it is a Boolean value); if the value attribute is configured:
①The initial value of v-model is not an array, then the collected is checked ( Checked or unchecked, it is a Boolean value)
②The initial value of v-model is an array, then what is collected is an array composed of values - Drop-down box:
<select v-model="userInfo.city"> <option value="">请选择校区</option> <option value="beijing">北京</option> <option value="shanghai">上海</option> <option value="shenzhen">深圳</option> <option value="wuhan">成都</option> </select>
text type and element will bind value property and listen to input event;
and will bind checked property and listen to change event;
will bind value property and listen to change event
v-model will ignore the initial value, checked or selected attribute on any form element, the initial value should be declared in JavaScript using the data option.
Three modifiers of v-model:
- lazy: collect data after losing the focus, collect data after the input event by default, and collect data after the change event after adding lazy.
- number: Convert the input string to a valid number
- trim: By default, the spaces at both ends of the user input are automatically removed
filter :
Definition: Display the data to be displayed after specific formatting (suitable for some simple logic processing)
Registration filter:
Vue.filter(name, callback) global filter
new Vue {filters: {}} local filter
Use filter: {
{ xxx | 过滤器名}}orv-bind:属性 = "xxx | 过滤器名"
- Filters can accept additional parameters, and multiple filters can also be connected in series
- The original data is not changed, but new corresponding data is generated
2. Some built-in commands
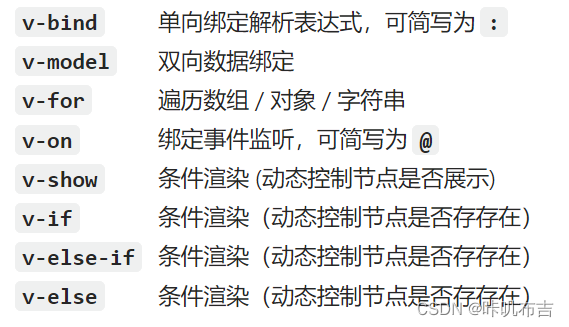
v-text: v-text will replace the content in the node,<div v-text="str"></div>;v-html: Render the content containing the html structure to the specified node, which will replace all the content in the node,<div v-html="str"></div>;v-cloak: The essence is a special attribute. After the Vue instance is created and takes over the container, the v-cloak attribute will be deleted; so you can use the v-cloak attribute to take over the node when loading Vue is slow. Set this attribute to be invisible and solve { { xx }}question;v-once: After the initial dynamic rendering of the node, it is regarded as static content, and future data changes will not cause the update of the v-once structure, which can be used to optimize performance;v-pre: Skip the compilation process of the node where v-pre is located, you can use it to skip: nodes that do not use instruction syntax or interpolation syntax will speed up compilation
Custom directive :
- Local instructions:
new Vue({


  directives:{


    指令名:配置对象
  }
})

new Vue({


  directives:{


    指令名:回调函数
  }
})
- global directive
Vue.directive(指令名, 配置对象)
或
Vue.directive(指令名, 回调函数)
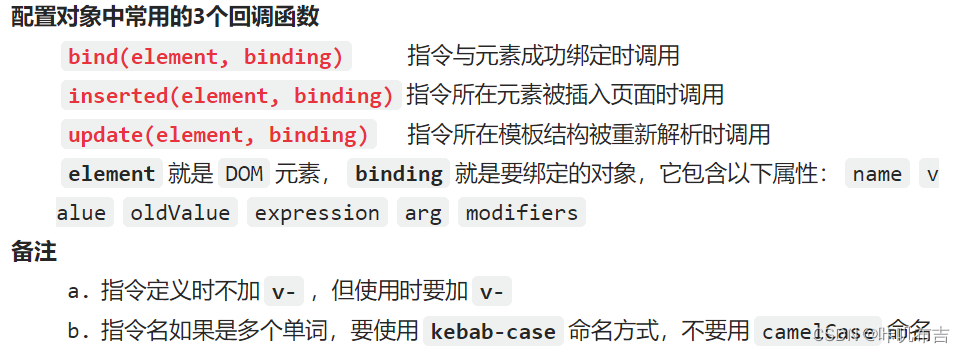
Vue.directive('fbind', {
// 指令与元素成功绑定时(一上来)
bind(element, binding) {
// element就是DOM元素,binding就是要绑定的
element.value = binding.value
},
// 指令所在元素被插入页面时
inserted(element, binding) {
element.focus()
},
// 指令所在的模板被重新解析时
update(element, binding) {
element.value = binding.value
}
})
3. Vue life cycle
- Life cycle is also known as life cycle callback function, life cycle function, life cycle hook
- It is a function with some special names that Vue calls for us at critical moments
- The name of the life cycle function cannot be changed, but the specific content of the function is written by the programmer according to the requirements
- The this point in the life cycle function is the vm or component instance object
After Vue completes the parsing of the template and puts the initial real DOM elements into the page (mounting is complete), it calls mounted;
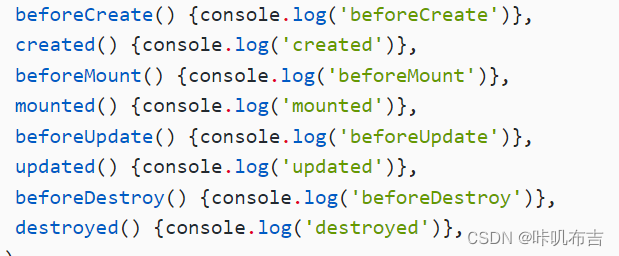
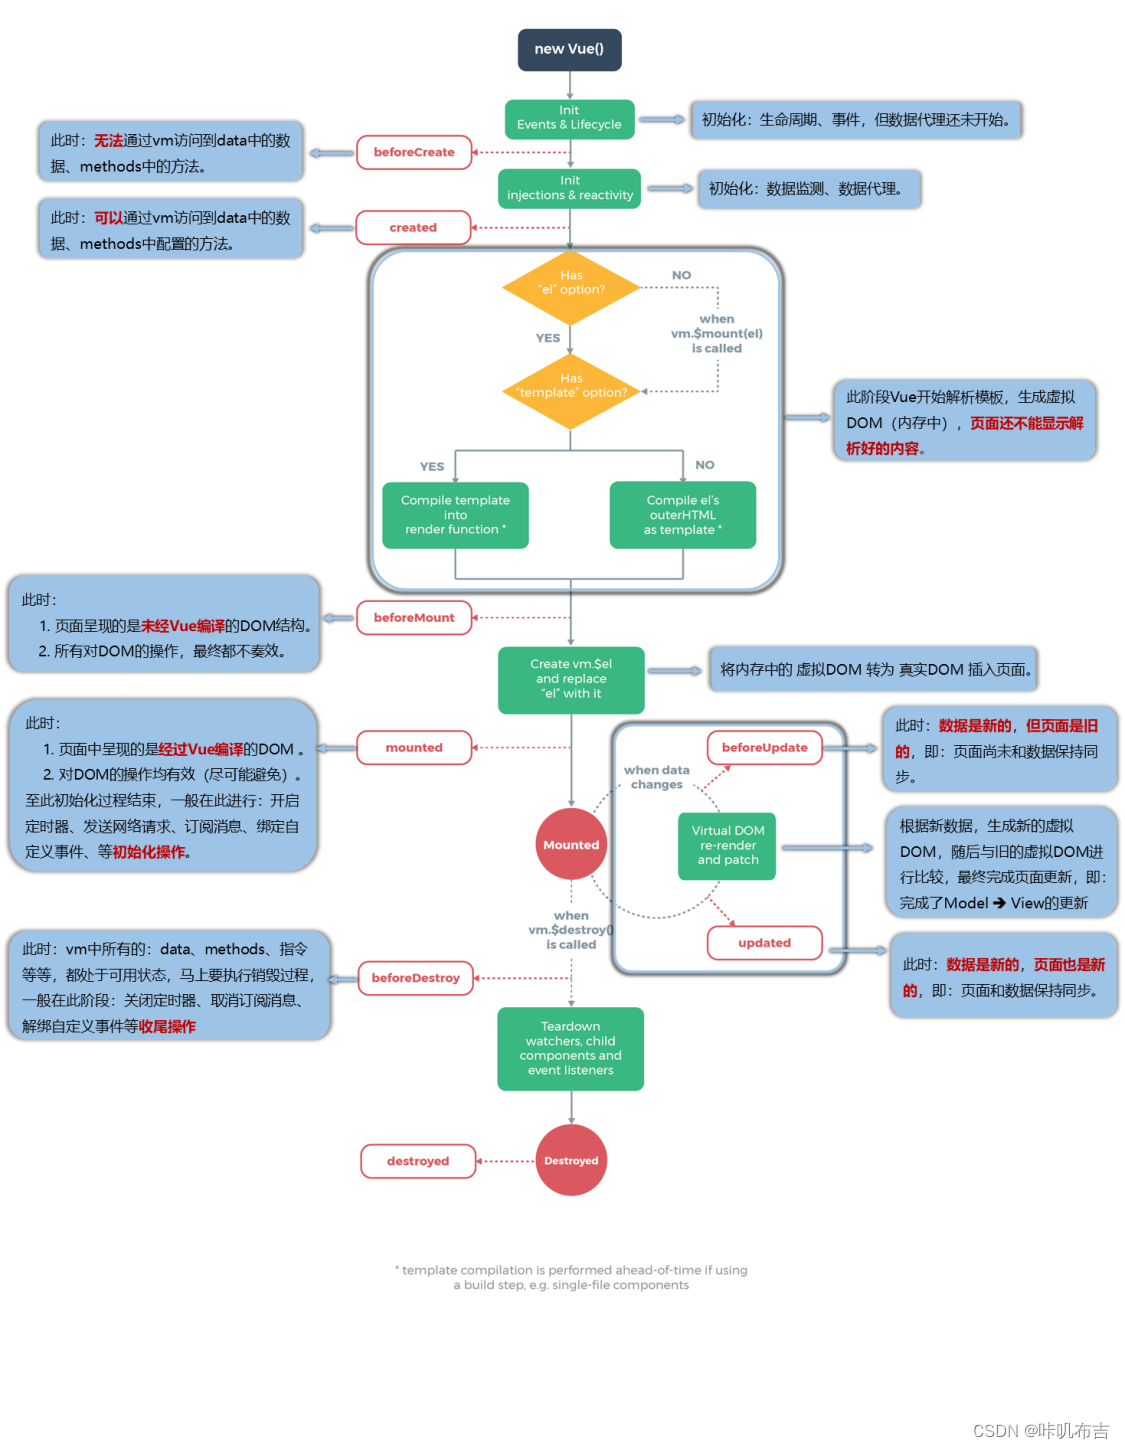
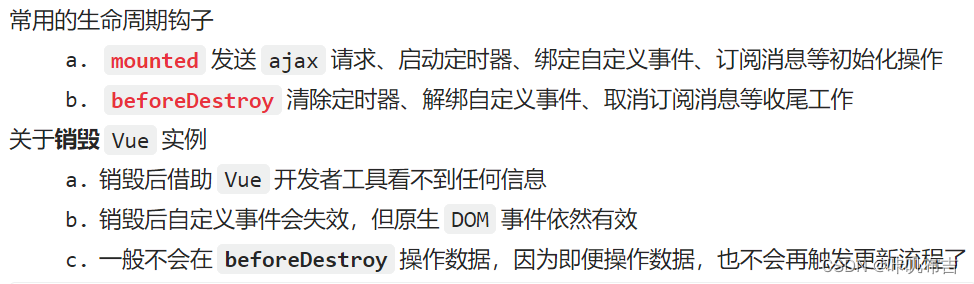
Data proxy and data monitoring: before and after creation;
virtual DOM: about to be mounted and completed;
model->view: about to be updated and completed;
all: about to be destroyed and completed.
4. Component Basics
A component is a collection of code and resources used to implement local functions.
Components allow us to divide the UI into independent, reusable parts and think about each part separately. In practical applications, components are often organized into a nested tree structure:
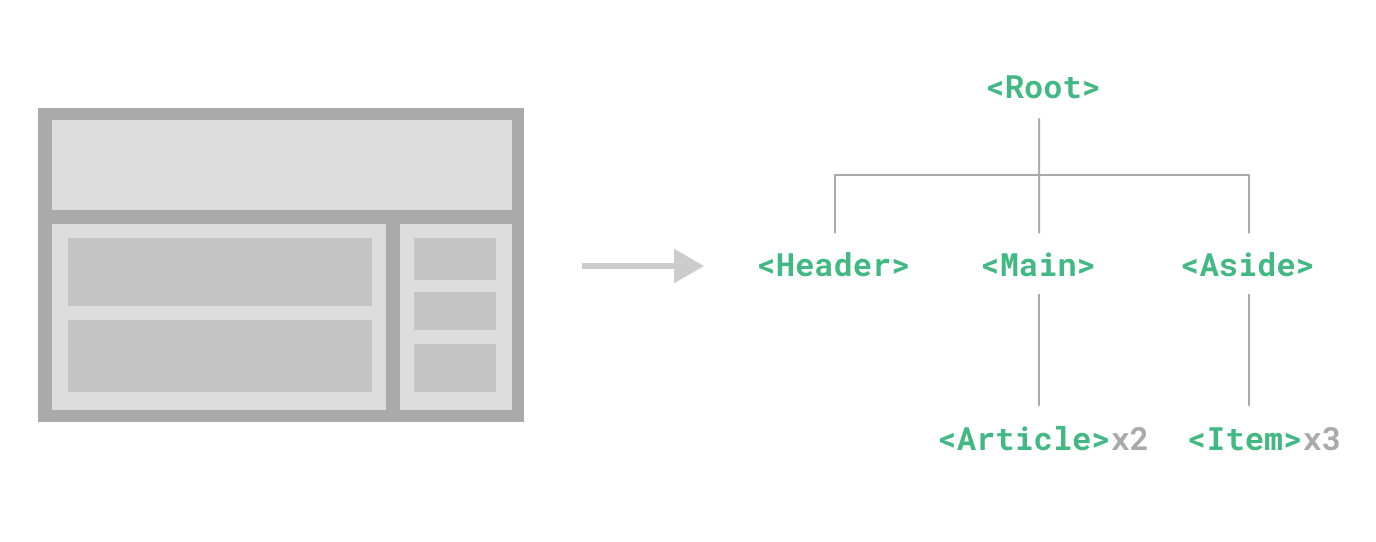
Advantages : Reuse coding, simplify project coding, and improve operating efficiency.
Non-single-file components: one file contains n components
Single-file components: one file contains only one component, suffix.vue
Using non-single-file components : (not recommended)
create :
const 组件名 = Vue.extend({

    options})
- Do not write el in the configuration item, because in the end all components must be managed by a vm, and the el in the vm determines which container to serve
- data must be written as a function to avoid data reference relationship when components are reused
Register :
//局部注册
new Vue({


el:'',
data:{

    },
components:{

    组件名:组件}
})
//全局注册
Vue.component('组件名',组件)
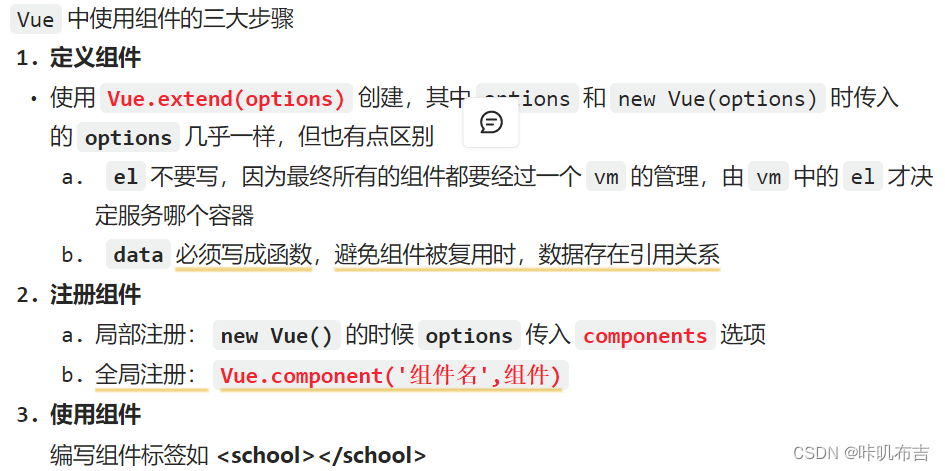
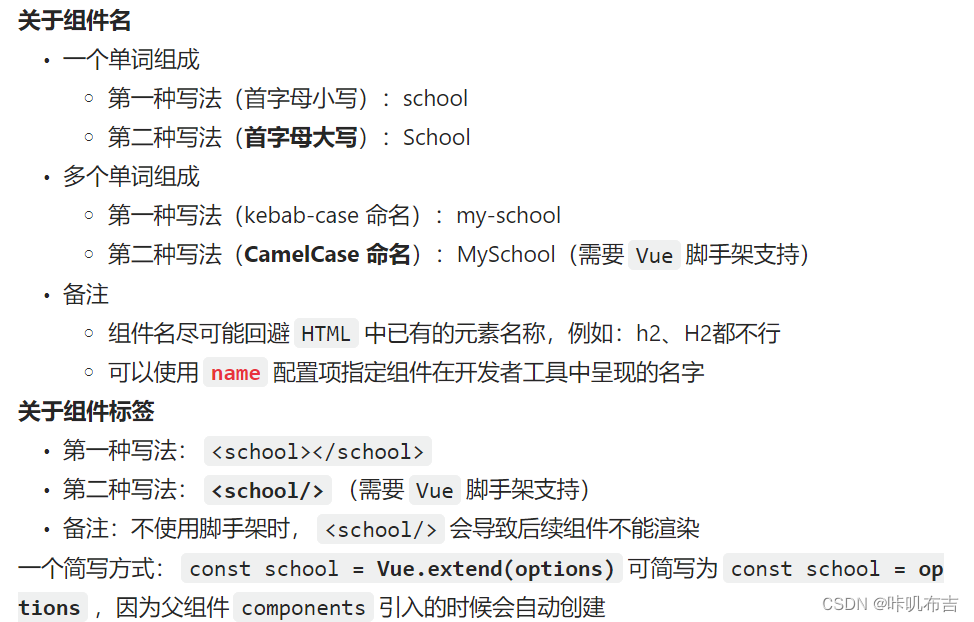
Self-closing tags can only be handled in scaffolding. If you write the template directly in the DOM (such as the content of native elements), the compilation of the template needs to follow the HTML parsing behavior in the browser, and you must explicitly use the closing tag.
VueComponent :
- The school component is essentially a constructor named VueComponent, which is not defined by the programmer, but generated by Vue.extend()
- We only need to write or, when Vue parses, it will help us create an instance object of the school component, that is, the new VueComponent(options) that Vue will help us execute
- Every time Vue.extend is called, a brand new VueComponent is returned, that is, different components are different objects
- In the component configuration, the data function, the function in the methods, the function in the watch, and the function in the computed are all VueComponent instance objects.
- In new Vue (options) configuration: data function, functions in methods, functions in watch, functions in computed, their this are all Vue instance objects
- The instance object of VueComponent, hereinafter referred to as vc (component instance object) the instance object of Vue, hereinafter referred to as vm
- VueComponent.prototype.proto === Vue.prototype, so that the component instance object vc can access the properties and methods on the Vue prototype
Single file component :
- The naming adopts the hump naming method;
- There must be one and only one root element in the template;
- Create a vue file: template tag (structure), script tag (interaction), style tag (style), pay attention to export default exposure, and write name.
<template>
  <button @click="count++">You clicked me {

    {

     count }} times.</button>
</template>
<script>
export default {


  name:'组件名',
  data() {


    return {


      count: 0
    }
  }
}
</script>
- Use: introduce components, register, and use tags;
<script>
import ButtonCounter from './ButtonCounter.vue'

export default {


  components: {


    ButtonCounter
  }
}
</script>

<template>
  <h1>Here is a child component!</h1>
  <ButtonCounter />使用
</template>
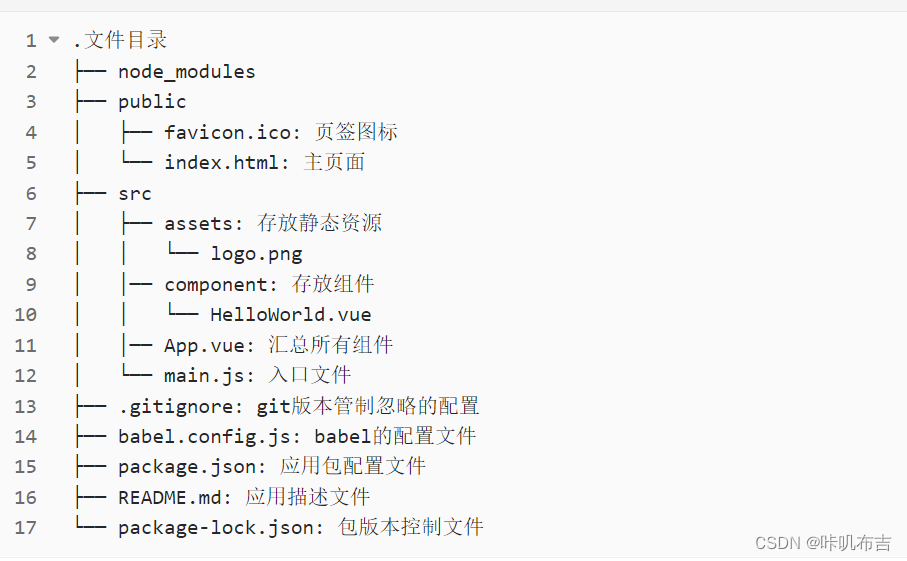
Introduce the overall structure of the vue project :
- Prepare the single-file component vue file designed by yourself;
- Create
APP.vuea file and call the component; - Then create main.js and call
App.vue; - Create index.html and import main.js.
If you don't want to write anything in main.js, you can write it as follows:
new Vue({


    template:`<App></App>`,
    el:'#root',
    components:{

    App}
})
5. Vue CLI Scaffolding
Render function (rendering function): Use js language to build DOM, because vue is a virtual DOM, so when you get the template template, it must be translated into a VNode function, and use the render function to build DOM, and vue does not need to translate process. When introducing incomplete vue, use render. The render function is the same as the template to create an html template, but in some scenarios, the code is tedious and cumbersome to implement with a lot of repetitions, and the render function can be used at this time.
new Vue({


  el:'#app',
  // render函数功能:将App组件放入容器中
  // 简写形式
  render: h => h(App),
  // 完整形式
  // render(createElement){


  //   return createElement(App)
  // }
})
6. Components go deep
ref attribute :
- ref is used to register reference information (replacement of id) for elements or subcomponents. The application gets the real DOM element on the html tag, and the component instance object vc is obtained by the application on the component tag.
- Usage
a: mark:<h1 ref="xxx"></h1>or<School ref="xxx"></School>
b: obtain:this.$refs.xxx
props configuration item :
- Let the component receive data from the outside;
- props have higher priority than data
<Demo name="xxx" :age="18"/>Add the age before passing the data:, and make the 18 in it a number through v-bind- Receive data
The first way (receive only) props: ['name', 'age']
The second way (restriction type) props: {name:String, age:Number}
The third way (restriction type, restriction necessary properties, specify a default value)
props: {


    name: {


        type: String,	 // 类型
        required: true,// 必要性
        default: 'cess'// 默认值
    }
}
Note: props are read-only. The bottom layer of Vue will monitor your modifications to props. If you modify props, a warning will be issued. If the business needs really need to be modified, please copy the contents of props to data, and then modify data. The data.
mixin :
Function: The configuration shared by multiple components can be extracted into a mixed-in object.
When data and methods conflict, components take precedence; life cycle hooks are all required. Hooks for mixins will be called before the component's own hooks.
definition:
const mixin = {


    data() {

    ....},
    methods: {

    ....}
    ....
}
use:
- global mixins
Vue.mixin(xxx) - Partial mix-in
mixins:['xxx']
7. Plugins
Function: Used to enhance
the essence of Vue: an object containing the install method, the first parameter of install is Vue, and the second and subsequent parameters are the data passed by the plug-in user.
Some global operations can be written in it.
Define the plugin:
export default {


  install(Vue,x,y,z){

    }
}
Use plugin: Vue.use(plugin name, data)
8. scoped style
Function: Let the style take effect locally to prevent conflicts
. Writing method:<style scoped>
9. Browser local storage
WebStorage (js local storage)
storage content size generally supports about 5MB (different browsers may not be the same). The
browser side implements the local storage mechanism through the Window.sessionStorage and Window.localStorage properties.
Related API
xxxStorage.setItem('key', ' value') This method accepts a key and value as parameters, and will add the key-value pair to the storage. If the key exists, update its corresponding value
xxxStorage.getItem('key') This method accepts a key as a parameter , returns the value corresponding to the key name
xxxStorage.removeItem('key') This method accepts a key name as a parameter, and deletes the key name from the storage
xxxStorage.clear() This method will clear all the data in the storage
Remark
- The content stored in SessionStorage will disappear when the browser window is closed
- The content stored in LocalStorage needs to be manually cleared before it disappears
- xxxStorage.getItem(xxx) If the value corresponding to xxx cannot be obtained, then the return value of getItem() is null
- The result of JSON.parse(null) is still null
10. Interaction between components
If the child component wants to pass data to the parent component, it must bind a custom event to the child component in the parent component (the callback of the event is in A).
- Bind custom events
- The first way, in the parent component
<Demo @事件名="方法"/>or<Demo v-on:事件名="方法"/> - The second way, in the mounted in the parent component
this.$refs.demo.$on('事件名',方法)
- Transfer data: props
- trigger custom event
this.$emit('事件名',数据) - Unbind custom events
this.$off('事件名')
parent component:
<!--传一个函数类型的props数据-->
<School :getSchoolName="getSchoolName"/>

  <!-- 通过父组件给子组件绑定一个自定义事件实现子给父传递数据(第一种写法,使用@或v-on) -->
  <Student @demo="m1"/>

    <!-- 通过父组件给子组件绑定一个自定义事件实现子给父传递数据(第二种写法,使用ref) -->
    <Student ref="student" @click.native="show"/>
<script>
  import Student from './components/Student'
  import School from './components/School'

  export default {


    name:'App',
    components:{

      School,Student},
    data() {


      return {


        msg:'你好啊!',
        studentName:''
      }
    },
    methods: {


      getSchoolName(name){


        console.log('App收到了学校名:',name)
      },
      m1(){


        console.log('demo事件被触发了!')
      },
      show(){


        alert(123)
      }
    },
    mounted() {


      this.$refs.student.$on('demo',this.m1) // 绑定自定义事件
      // this.$refs.student.$once('demo',this.m1) // 绑定自定义事件(一次性)
    },
  }
</script>
Subassembly:
<h2>当前求和为:{

    {

    number}}</h2>
<button @click="add">点我number++</button>
<button @click="unbind">解绑自定义事件</button>
<button @click="death">销毁当前Student组件的实例(vc)</button>
<script>
	export default {


		name:'Student',
		data() {


			return {


				name:'张三',
				sex:'男',
				number:0
			}
		},
		methods: {


			add(){


			//父组件中的自定义事件名与数据
	 	this.$emit('atguigu',this.name,666,888,900)
				// this.$emit('demo')
				// this.$emit('click')
			},
			unbind(){


        // 解绑
				this.$off('atguigu') //解绑一个自定义事件
				// this.$off(['atguigu','demo']) //解绑多个自定义事件
				// this.$off() //解绑所有的自定义事件
			},
			death(){


        // 销毁了当前Student组件的实例,销毁后所有Student实例的自定义事件全都不奏效
				this.$destroy()
			}
		},
	}
</script>
11. Global event bus
A way to communicate between arbitrary components is essentially an object that must satisfy the following conditions:
- All component objects must be able to see him
- This object must be able
$on$emit$offto bind, fire and unbind events using methods
Steps to use :
- Define the global event bus in main.js
new Vue({


   	...
   	beforeCreate() {


   		Vue.prototype.$bus = this // 安装全局事件总线,$bus 就是当前应用的 vm
   	},
    ...
})
- Use event bus
a: Receive data: A component wants to receive data, then bind a custom event to $bus in A component, and the callback of the event stays in A component itself
export default {


    methods(){


        demo(data){

    ...}
    }
    ...
    mounted() {


        this.$bus.$on('xxx',this.demo)
    }
}
b: provide data:this.$bus.$emit('xxx',data)
- In the beforeDestroy hook, use $off() to unbind the events used by the current component
12.$nextTick
This is a life cycle hook this.$nextTick (callback function) executes
its specified callback after the next DOM update.
Executed in the specified callback function
this.$nextTick(function () {


        this.$refs.inputTitle.focus();
      });
13. Transitions and Animations
To be added
14. Configure proxy
To solve the cross-domain problem :
- cors
- jsonp
- Configure the proxy server: the port number itself is the same as that of the proxy server, and there is no cross-domain problem in the interaction between the proxy server and the server because the request methods are different.
How to configure proxy server :
Configuration file vue.config.js:
Method 1 :
module.exports = {


  devServer:{


    proxy:"http://localhost:5000"
  }
}
illustrate
- Advantages: simple configuration, just send it directly to the front end (8080) when requesting resources
- Disadvantages: multiple proxies cannot be configured, and it is not possible to flexibly control whether requests go through proxies
- Working method: If the agent is configured according to the above, when a resource that does not exist in the front end is requested, the request will be forwarded to the server (matching front-end resources first)
Method two :
module.exports = {


    pages: {


        index: {


            entry: 'src/main.js',
        },
    },
    lintOnSave:false,
    //开启代理服务器(方式二)
	devServer: {


        proxy: {


            '/api1': {

    //请求前缀
                target: 'http://localhost:5000',
                pathRewrite:{

    '^/api1':''},//重写,把api1去掉
                // ws: true, //用于支持websocket,默认为true
                // changeOrigin: true //用于控制请求头中的host值,默认值为true
            },
            '/api2': {


                target: 'http://localhost:5001',
                pathRewrite:{

    '^/api2':''},
            }
        }
    }
}
15. Slot
Slots: Let the parent component insert the html structure to the specified position of the child component. It is also a way of communication between components, which is
suitable for parent components ===> child components.
Classification: default slots, named slots, scoped slots
Default slot :
parent component:
<Category title="美食" >
<!-- 自己写结构,插进去-->
			<img src="https://s3.ax1x.com/2021/01/16/srJlq0.jpg" alt="">
		</Category>
Subassembly:
<div class="category">
		<h3>{

   { title }}分类</h3>
		<!-- 定义一个插槽(挖个坑,等着组件的使用者进行填充) -->
		<slot>我是一些默认值,当使用者没有传递具体结构时,我会出现</slot>
	</div>
Named slots :
parent component:
<Category title="美食" >
			<img slot="conter" src="https://s3.ax1x.com/2021/01/16/srJlq0.jpg" alt="">
			<a slot="footer" href="http://www.atguigu.com">更多美食</a>
		</Category>
Subassembly:
<div class="category">
		<h3>{

   {title}}分类</h3>
		<!-- 定义一个插槽(挖个坑,等着组件的使用者进行填充) -->
		<slot name="center">我是一些默认值,当使用者没有传递具体结构时,我会出现1</slot>
		<slot name="footer">我是一些默认值,当使用者没有传递具体结构时,我会出现2</slot>
	</div>
</template>
Scoped slots : data is determined by child components, and structure is determined by parent components.
parent component:
<Category title="游戏">
			<template scope="atguigu">
				<ul>
					<li v-for="(g,index) in atguigu.games" :key="index">{

    {

    g}}</li>
				</ul>
			</template>
		</Category>
Subassembly:
<div class="category">
		<h3>{

    {

    title}}分类</h3>
		<slot :games="games" msg="hello">我是默认的一些内容</slot>
	</div>