Article Directory
foreword
This paper mainly introduces some basic methods of image segmentation based on thresholding.
1. Threshold-based segmentation method
1.1 Fixed threshold method - histogram bimodal method
The method is based on the phenomenon of double peaks appearing on the image histogram. When an image has bimodality, two peaks appear in its histogram, corresponding to two different color or brightness regions in the image. At this time, we can use the histogram bimodal method to automatically determine the appropriate threshold. The basic idea is as follows:
- Computes the grayscale histogram of an image.
- According to the positions of the two peaks of the histogram, the threshold between the two peaks is calculated as the threshold of the image.
- According to the calculated threshold, the image is binarized, and the image is divided into two parts, the target and the background.
Note: This method is only suitable for images with double peaks . For images with single peaks or inconspicuous peaks, other threshold segmentation methods need to be used.
usecv2.threshold(src, thresh, maxval, type)函数。
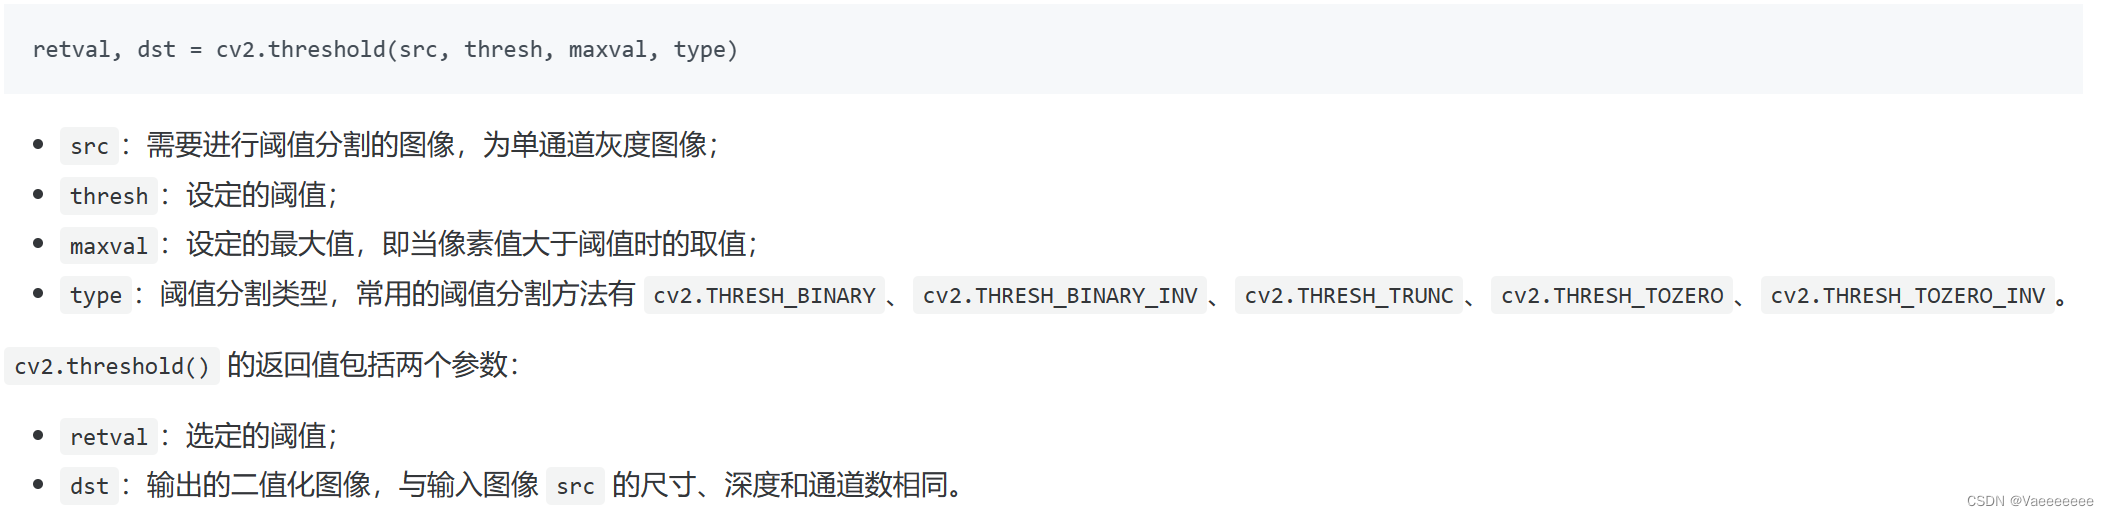
The commonly used thresholding methods are:
1.THRESH_BINARY 二值阈值化
该方法将像素值与设定的阈值进行比较,若像素值大于等于阈值,则将该像素值设为最大值,否则设为0。可以用于处理灰度图像与彩色图像。

2.THRESH_BINARY_INV 反二值阈值化
该方法将像素值与设定的阈值进行比较,若像素值小于阈值,则将该像素值设为最大值,否则设为0。可以用于处理灰度图像与彩色图像。

3.THRESH_TRUNC 截断阈值化
该方法将像素值与设定的阈值进行比较,若像素值大于等于阈值,则将该像素值设为阈值,否则不更改。可以用于处理灰度图像。

4.THRESH_TOZERO 零阈值化
该方法将像素值与设定的阈值进行比较,若像素值大于等于阈值,则不更改,否则设为0。可以用于处理灰度图像。

5.THRESH_TOZERO_INV 反零阈值化
该方法将像素值与设定的阈值进行比较,若像素值小于等于阈值,则不更改,否则设为0。可以用于处理灰度图像
code:
# 直方图双峰法
import cv2
import numpy as np
from matplotlib import pyplot as plt
# 读取图像(阈值处理方法不同)
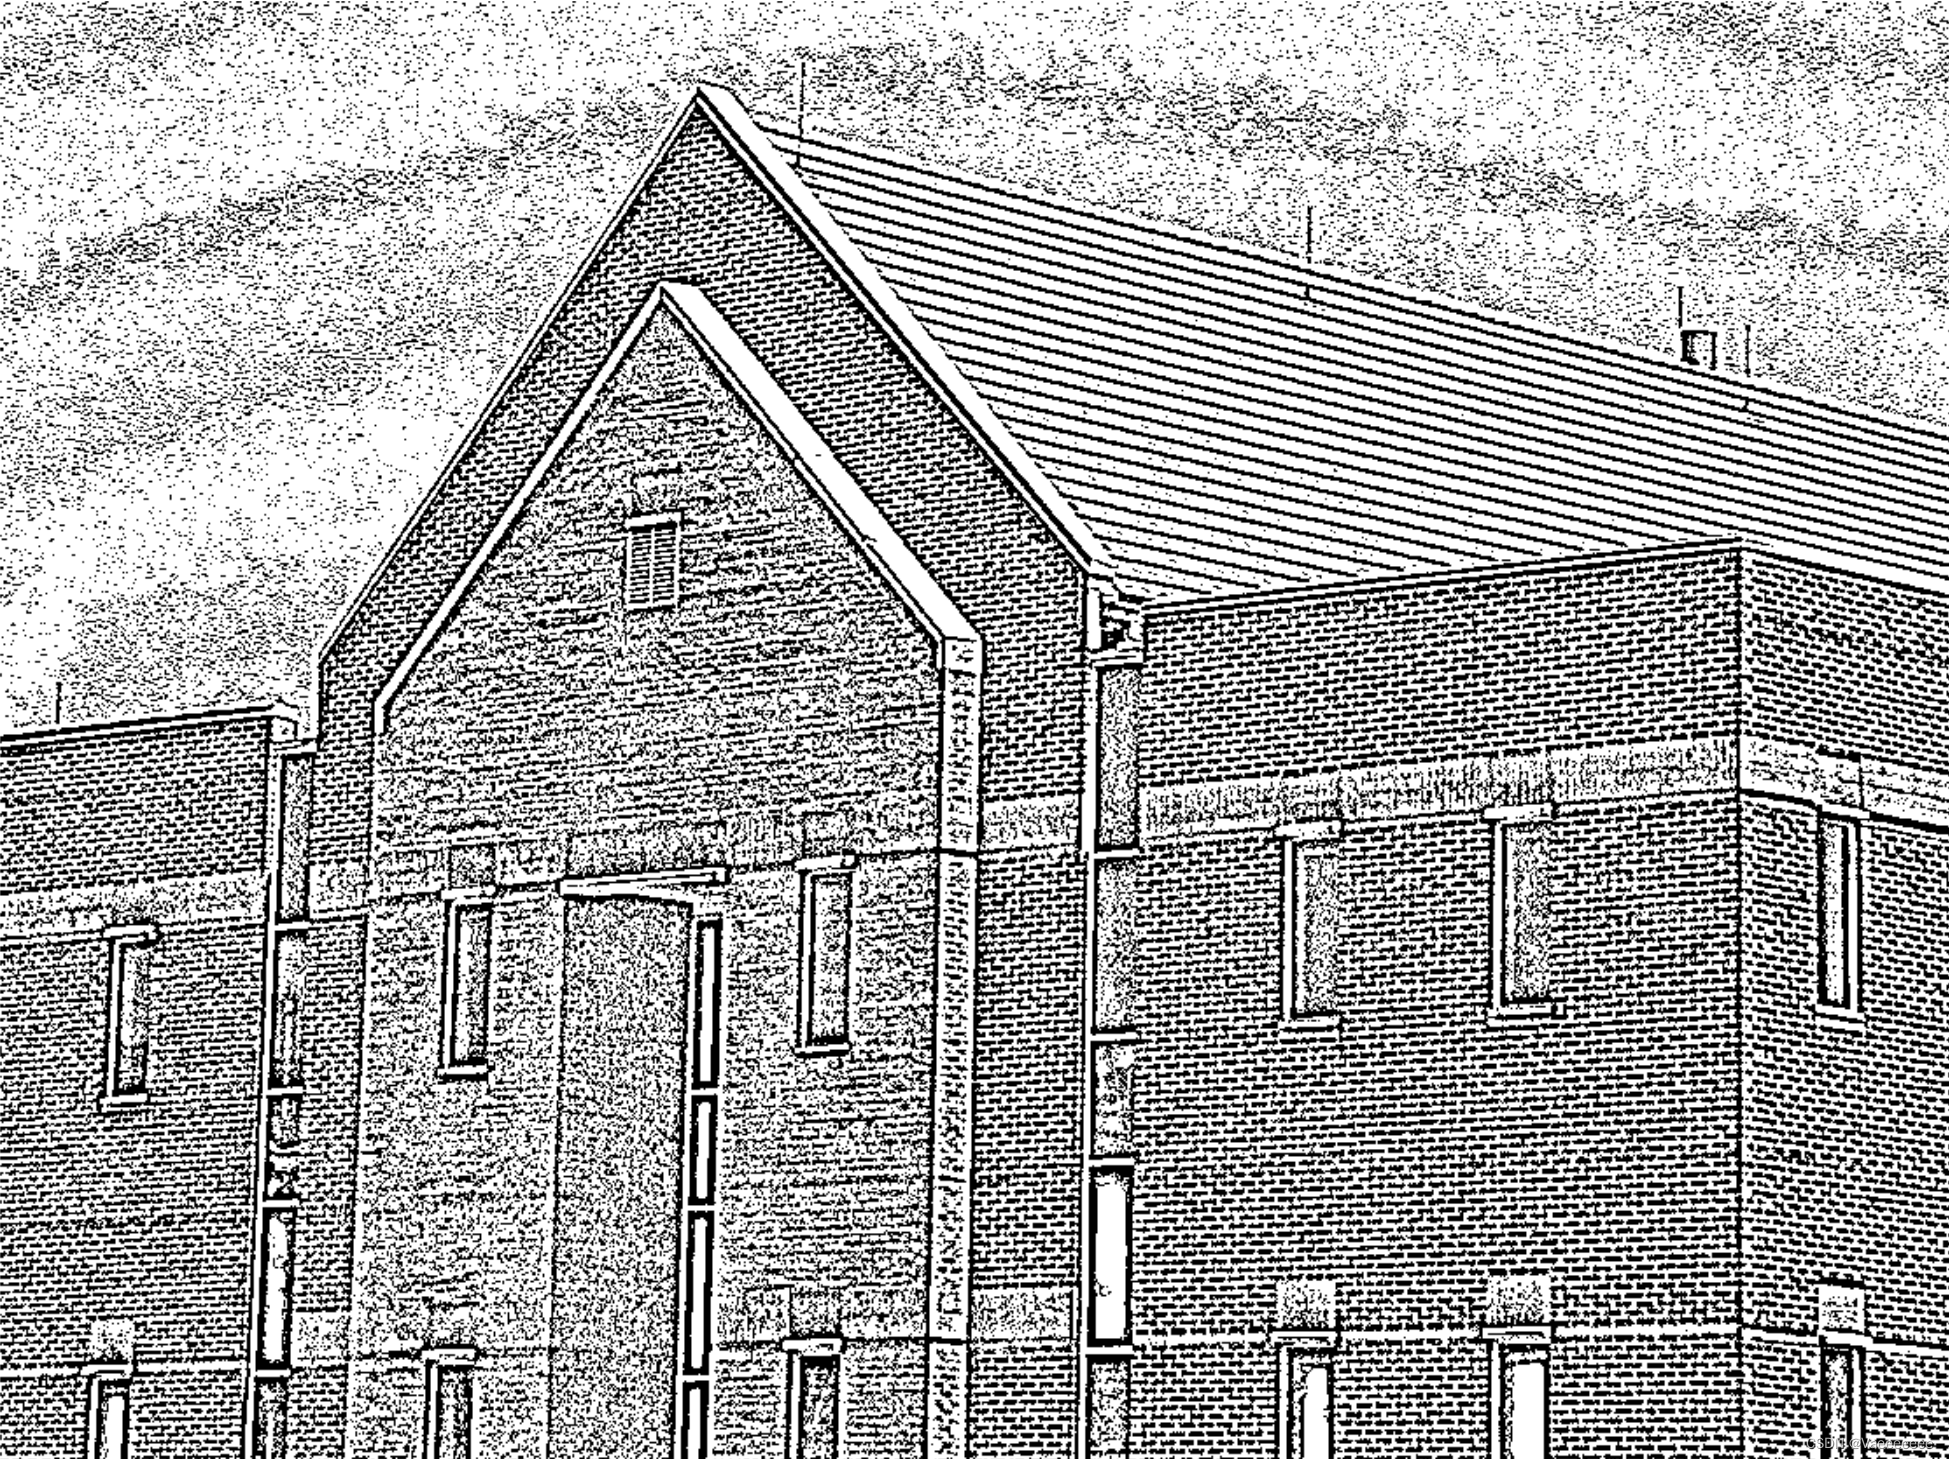
img = cv2.imread('house.tif',0)
x,img1 = cv2.threshold(img,150,255,cv2.THRESH_BINARY)
x,img2 = cv2.threshold(img,150,255,cv2.THRESH_TRUNC)
x,img3 = cv2.threshold(img,150,255,cv2.THRESH_TOZERO)
# 显示原始图像和恢复后的图像
plt.figure(figsize=(20, 20))
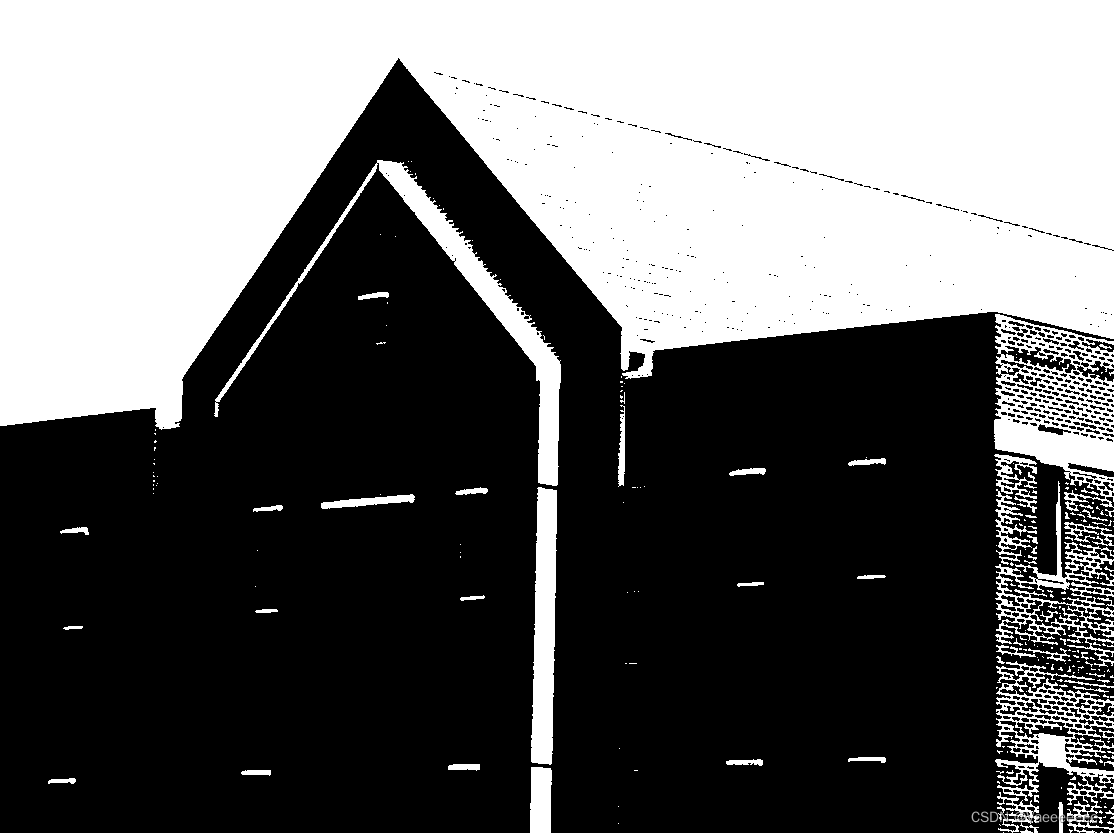
plt.subplot(221), plt.imshow(img, cmap='gray')
plt.title('Input Image'), plt.xticks([]), plt.yticks([])
plt.subplot(222), plt.imshow(img1, cmap='gray')
plt.title('seg img THRESH_BINARY'), plt.xticks([]), plt.yticks([])
plt.subplot(223), plt.imshow(img2, cmap='gray')
plt.title('seg img THRESH_TRUNC'), plt.xticks([]), plt.yticks([])
plt.subplot(224), plt.imshow(img3, cmap='gray')
plt.title('seg img THRESH_TOZERO'), plt.xticks([]), plt.yticks([])
plt.show()

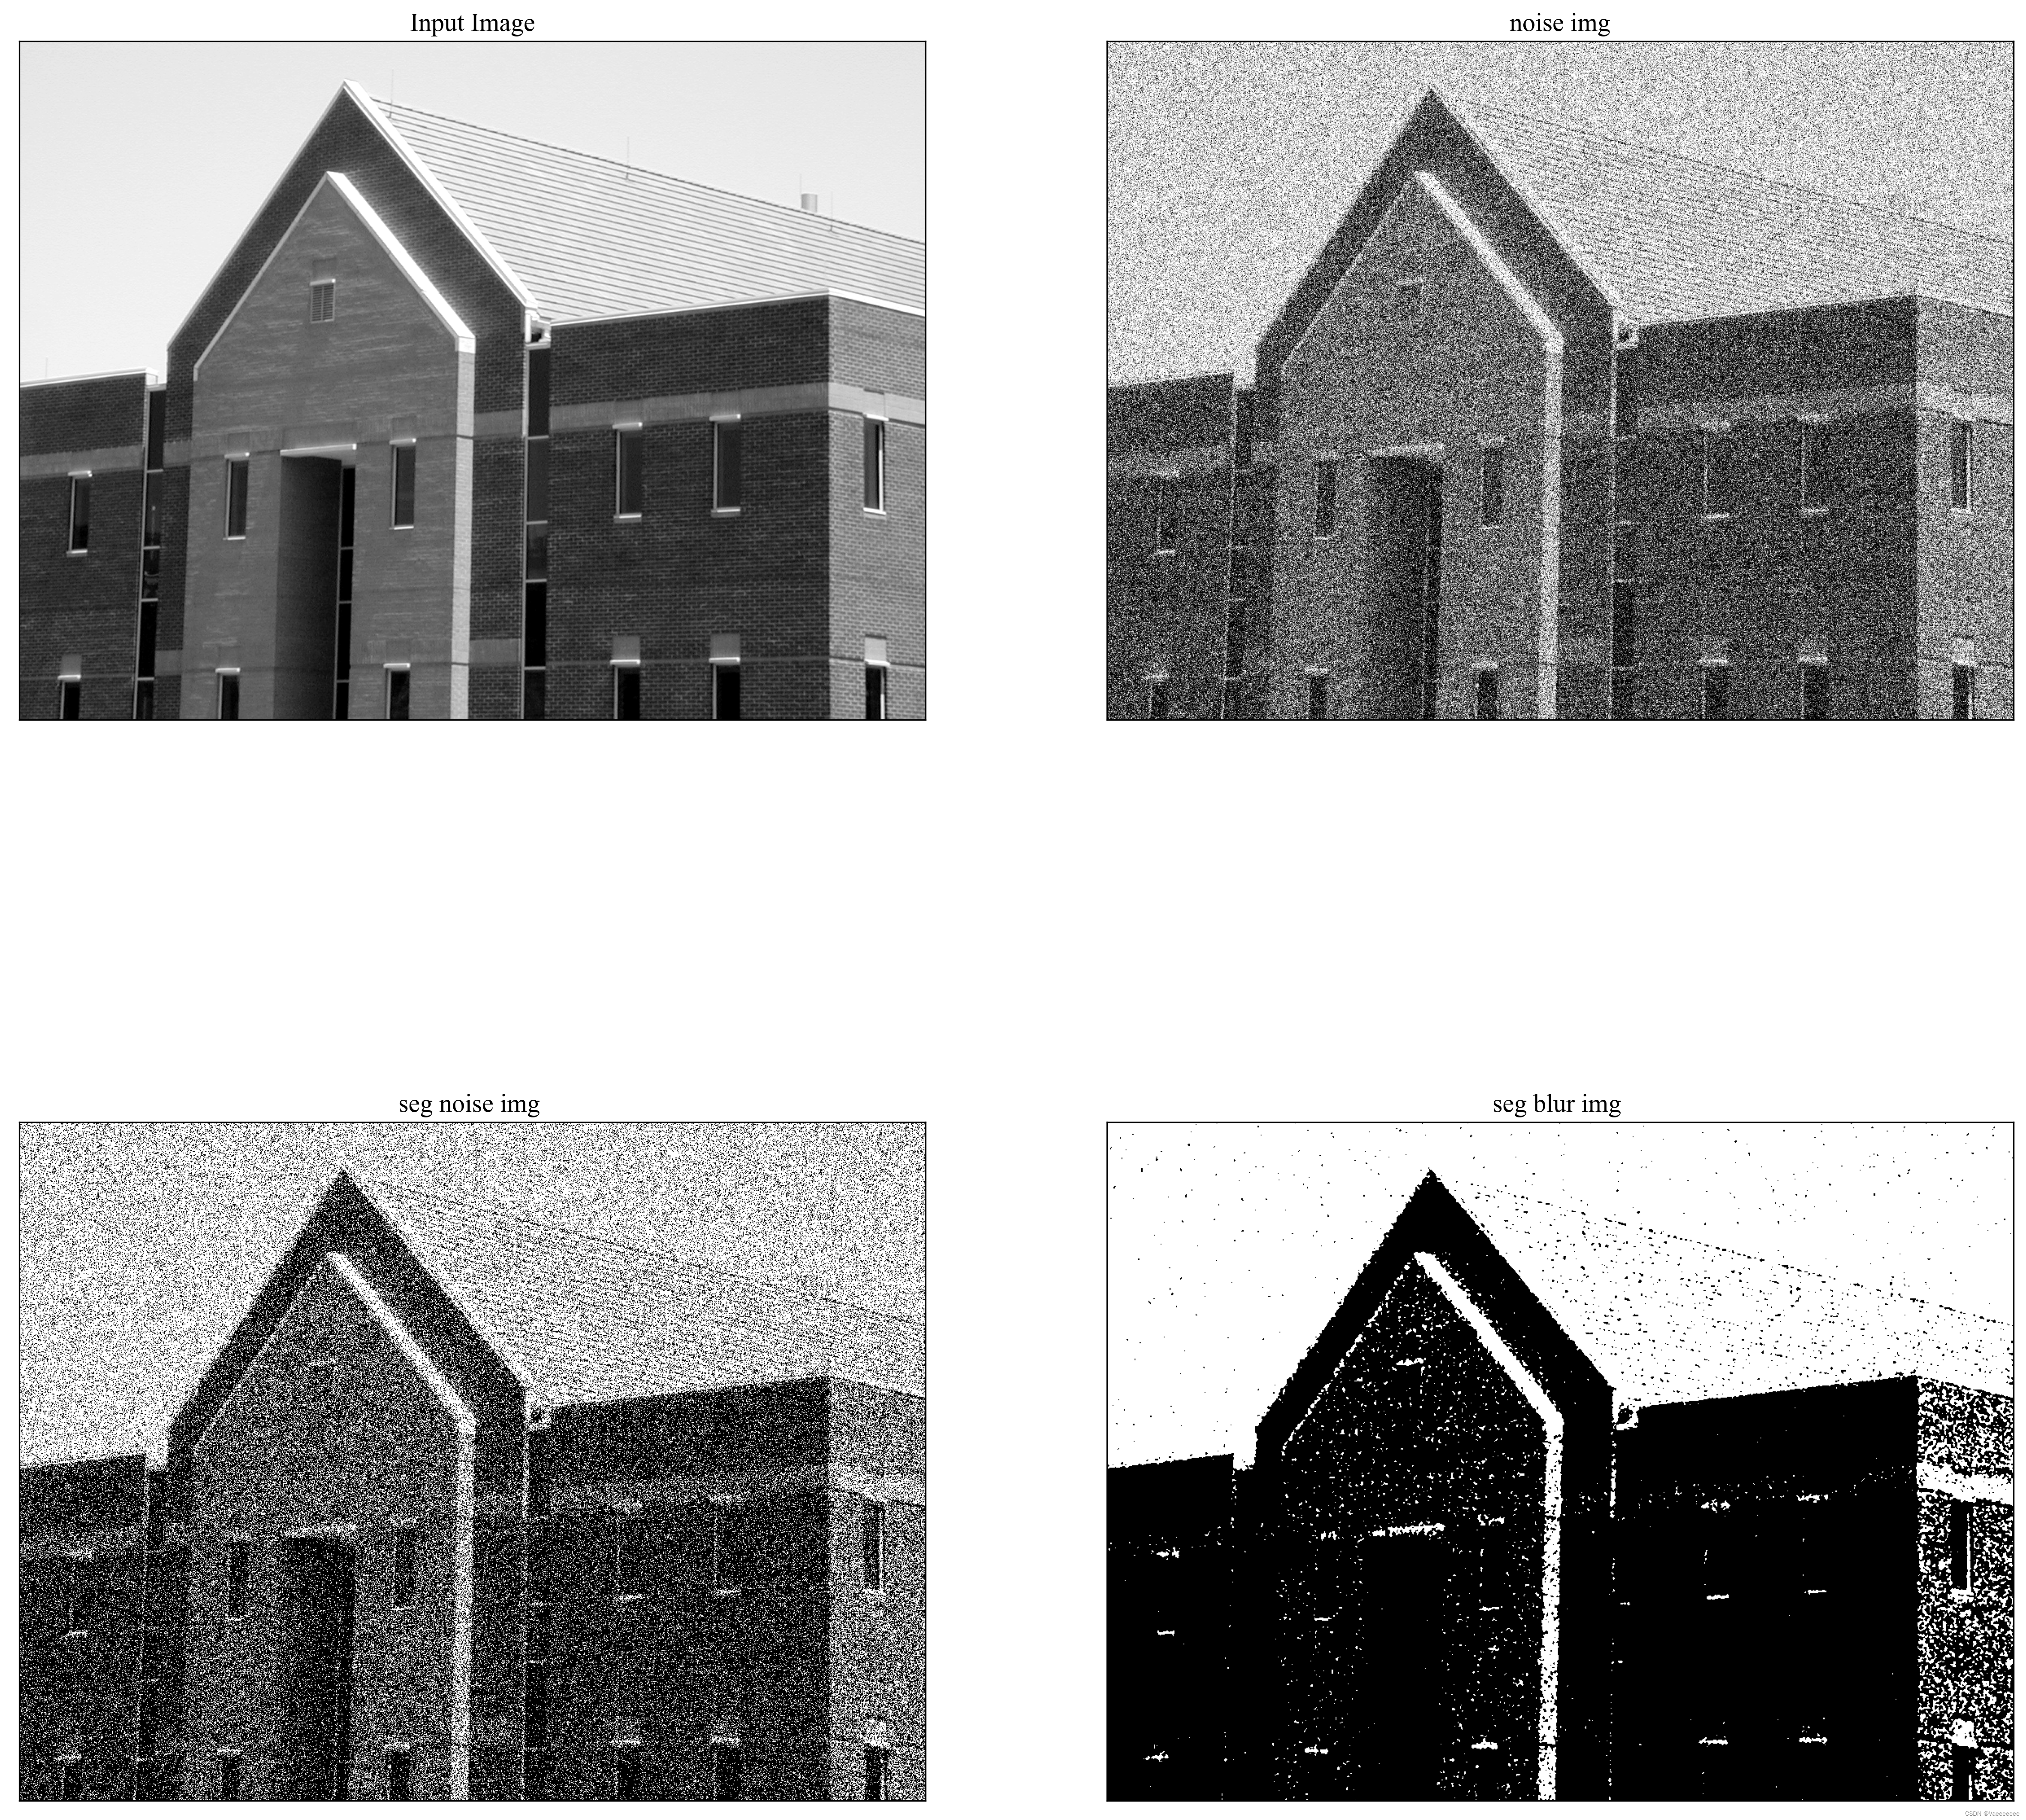
The disadvantage of this global threshold processing method is that the effect of noise processing is not good, and smoothing processing is required.
import cv2
import random
import numpy as np
from matplotlib import pyplot as plt
img = cv2.imread('house.tif',0)

# 加上高斯噪声
noise = np.random.normal(0,100,size=img.size).reshape(img.shape[0],img.shape[1])
img1 = img + noise
img1 = np.clip(img1,0,255)


# 平滑处理
img2 = cv2.GaussianBlur(img1,(5,5),0)

# 直方图双峰法
x,img3 = cv2.threshold(img,150,255,cv2.THRESH_BINARY)
x,img4 = cv2.threshold(img1,150,255,cv2.THRESH_BINARY)
x,img5 = cv2.threshold(img2,150,255,cv2.THRESH_BINARY)

# 显示原始图像和恢复后的图像
plt.figure(figsize=(20, 20))
plt.subplot(221), plt.imshow(img, cmap='gray')
plt.title('Input Image'), plt.xticks([]), plt.yticks([])
plt.subplot(222), plt.imshow(img1, cmap='gray')
plt.title('noise img'), plt.xticks([]), plt.yticks([])
plt.subplot(223), plt.imshow(img4, cmap='gray')
plt.title('seg noise img '), plt.xticks([]), plt.yticks([])
plt.subplot(224), plt.imshow(img5, cmap='gray')
plt.title('seg blur img '), plt.xticks([]), plt.yticks([])
plt.show()
1.2 Iterative Threshold Image Segmentation
The main idea of this adaptive image segmentation method is to iterate the gray value of the image and continuously adjust the threshold to make the segmentation more accurate.
The segmentation steps are as follows:
- Randomly pick an initial threshold (can be the average gray value of the image)
- According to the threshold, the image is divided into two parts: the part less than or equal to the threshold is the foreground, and the part greater than the threshold is the background
- Calculate the average gray value of the foreground and background
- Use the average of the average gray values of the foreground and background as the new threshold
- If the new threshold is the same as the original threshold, the segmentation ends. Otherwise, go back to step 2 and repeat iterations until convergence
code:
#  迭代阈值图像分割法
import numpy as np
from PIL import Image

# 读取图像
img = Image.open('house.tif').convert('L')
width, height = img.size
pixels = img.load()

# 初始化阈值
threshold = 150
delta = 1
while delta > 0:
    # 根据阈值将图像分割
    foreground = []
    background = []
    for y in range(height):
        for x in range(width):
            if pixels[x, y] > threshold:
                background.append(pixels[x, y]) #大于阈值的部分为背景
            else:
                foreground.append(pixels[x, y]) #小于等于阈值的部分为前景
    avr_foreground = sum(foreground) // len(foreground)
    avr_background = sum(background) // len(background)
    # 更新阈值
    new_threshold = (avr_foreground + avr_background) // 2
    delta = abs(new_threshold - threshold)
    threshold = new_threshold

# 重新分割图像
for y in range(height):
    for x in range(width):
        if pixels[x, y] > threshold:
            pixels[x, y] = 255
        else:
            pixels[x, y] = 0

# 显示分割后的图像
img.show('result.jpg')
优点:
	1.迭代阈值图像分割相对于静态阈值分割而言,具有更高的实用性和鲁棒性。
	2.该方法能够有效地应对光照变化、背景复杂多样等情况下的图像分割问题。
缺点:
	对于大尺寸图像,迭代阈值图像分割的计算速度可能成为其一个缺点。
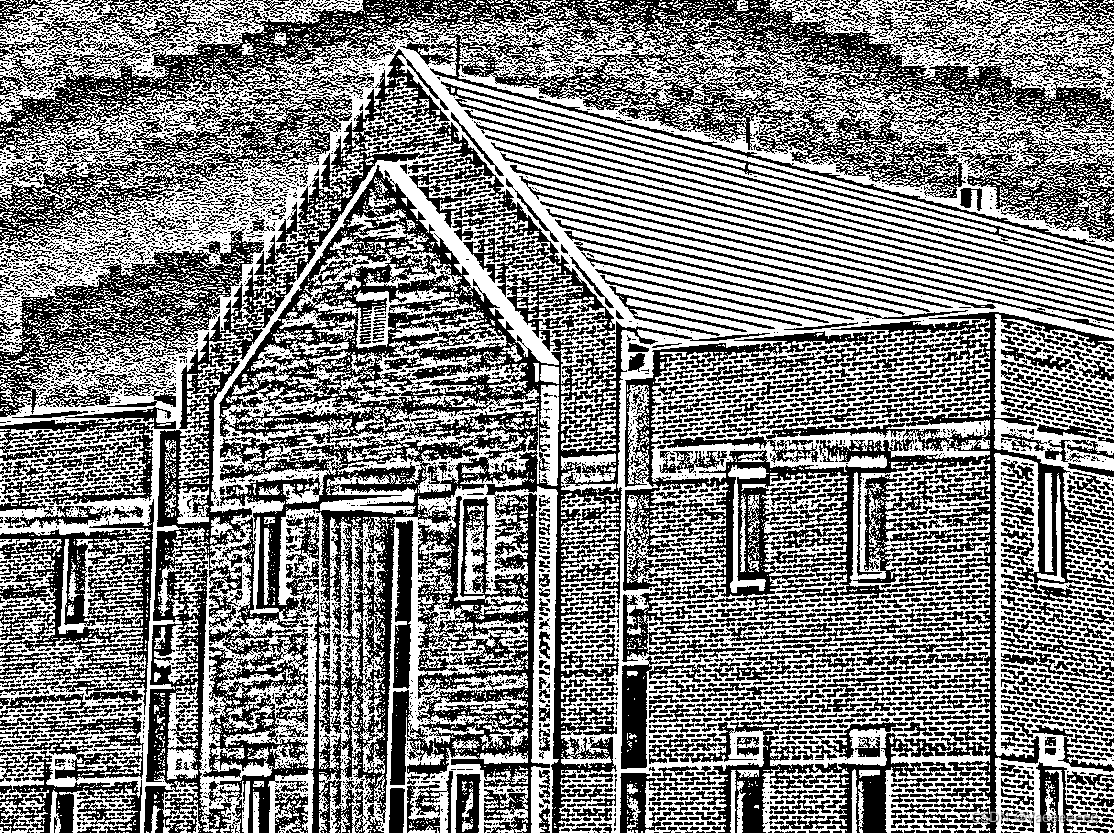
1.3 Adaptive Threshold Image Segmentation
1.3.1 Conventional methods
The segmentation steps are as follows:
- For the input grayscale image, define a size of N × NN×NN×In the window of N , select a pixel in the center of the window as the core pixel for processing.
- Calculate the local threshold value according to the pixel information in the window, as the threshold value of the current pixel, this threshold value can be statistics such as mean value, median value, mode, etc.
- Comparing the processed pixels with the local threshold of the current pixel, the pixels greater than or equal to the threshold are set to white, and the pixels smaller than the threshold are set to black, and a new binary image is segmented.
- Move the window to other regions of the image, and continue to perform Gaussian adaptive threshold segmentation on each region until all regions of the image are segmented into a binary image.
code:
# 自适应阈值图像分割
import numpy as np
from PIL import Image

# 图像预处理
img = Image.open('house.tif').convert('L')
width, height = img.size
pixels = img.load()
block_size = 11  # 设置块大小

# 分割图像并计算局部阈值
for y in range(0, height, block_size):
    for x in range(0, width, block_size):
        # 获取局部区域
        region = []
        for j in range(y, y+block_size):
            for i in range(x, x+block_size):
                if i < width and j < height:
                    region.append(pixels[i, j])
        # 计算局部区域平均值作为阈值
        threshold = sum(region) // len(region)
        # 对区域进行二值化处理
        for j in range(y, y+block_size):
            for i in range(x, x+block_size):
                if i < width and j < height:
                    if pixels[i, j] > threshold:
                        pixels[i, j] = 255
                    else:
                        pixels[i, j] = 0

#显示分割后的图像
img.show('result.jpg')
You can also call cv2.adaptiveThreshold()the function implementation directly.
import cv2
# 读取原始图像
img = cv2.imread('house.tif', 0)
# 自适应阈值分割
img_thresh = cv2.adaptiveThreshold(img, 255, cv2.ADAPTIVE_THRESH_GAUSSIAN_C, cv2.THRESH_BINARY, 11, 2)
# 显示结果
cv2.imshow('Original Image', img)
cv2.imshow('Adaptive Thresholding', img_thresh)
cv2.waitKey(0)
cv2.destroyAllWindows()
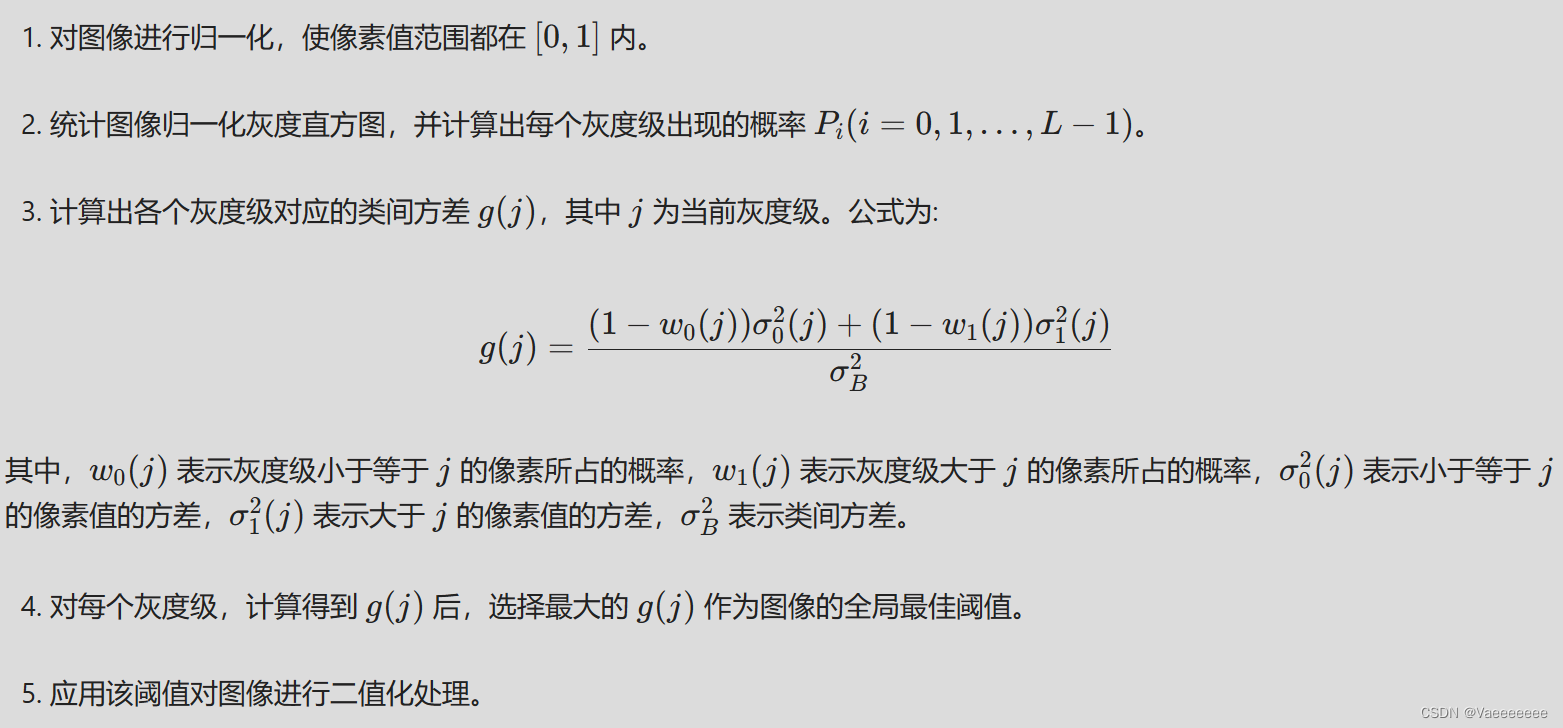
1.3.2 Otsu Method (OTSU)
大津法基于以下观察结果:
当图像被分为多个区域时,如果区域内的像素值差异较小,区域的均值方差就会较小。
而当区域内像素值差异较大时,区域的均值方差就会较大。
因此,局部图像的全局最佳阈值是能使类间方差最大的那个灰度级。
Steps:
Code:
import cv2

# 读取图片
img = cv2.imread('house.tif', 0)

# 大津法阈值分割
ret, img_thresh = cv2.threshold(img, 0, 255, cv2.THRESH_BINARY + cv2.THRESH_OTSU)

# 显示结果
cv2.imshow('Original Image', img)
cv2.imshow('OTSU Thresholding', img_thresh)
cv2.waitKey(0)
cv2.destroyAllWindows()

优点:
	多种检测任务效果较好。
缺点:
	计算量比较大,适用于数据量较小的图像分割场合。
references:
[1] Ruan Qiuqi, translated by Ruan Yuzhi; (US) Raphael C. Gonzalez, Richard E. Woods. Digital Image Processing 4th Edition of Foreign E-books and Communication Textbook Series [M]. Beijing: Electronic Industry Press, 2020