Component library design | Let your React components get code completion and attribute hints
- written in front
- source of demand
- build project
- Code completion (snippets)
- Smart Tips
- package release
-
- 1. The first step is to install the vscode packaging tool globally
- 2. The second step is to create a vscode account
- 3. The third step is to create an organization token
- 4. The fourth step is to create a publisher
- configuration
- Automatically update README.md
- Automatically upgrade package.json version
- Summarize
written in front
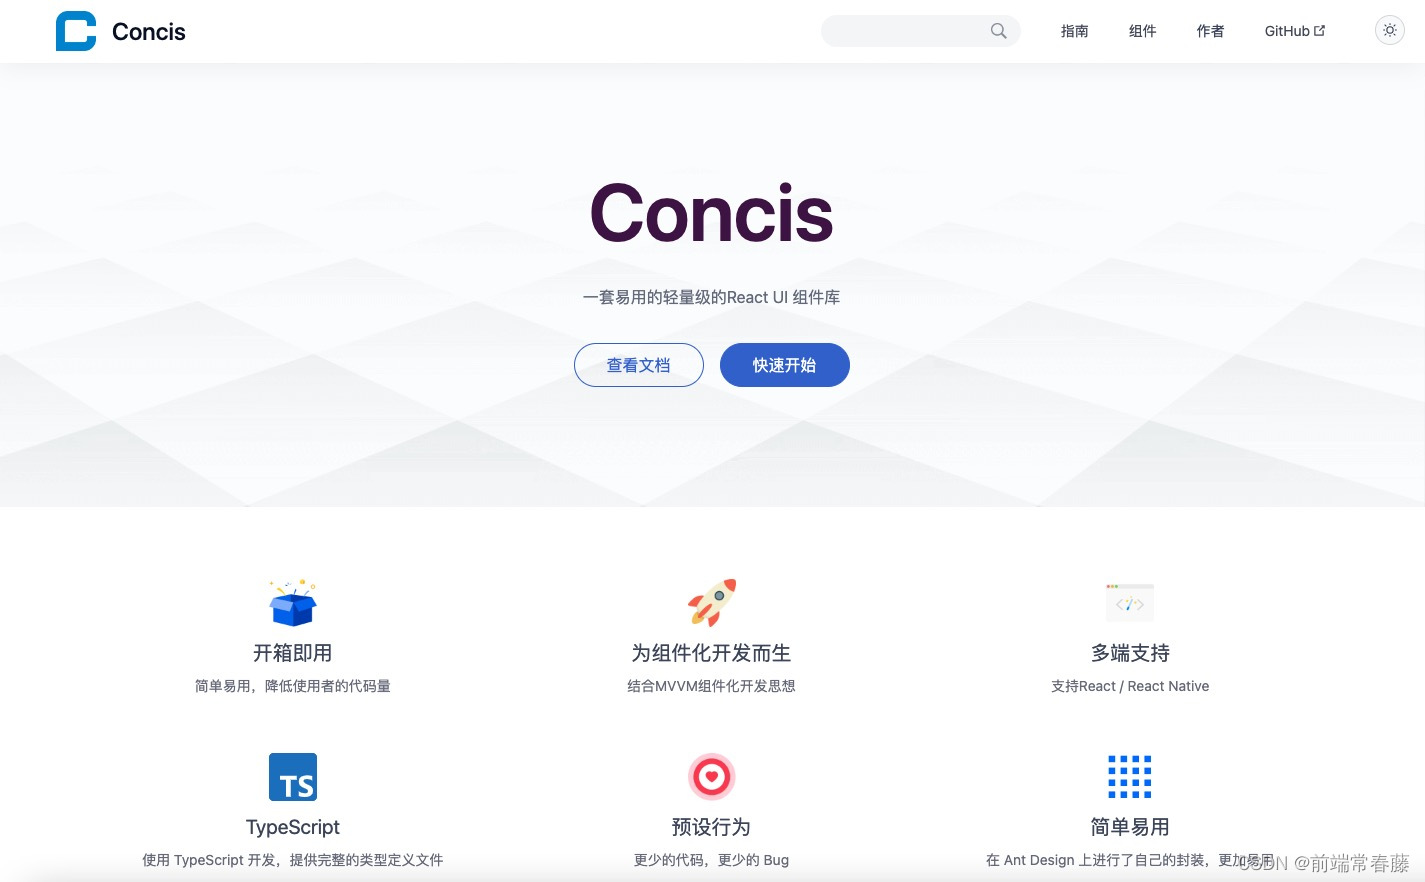
The React component library Concis is recruiting a large number of small partners to participate in the development of open source projects. There are still many plans to implement, including PC-side component expansion, mobile-side component development, Concis ecological plug-in development, etc. For details, please refer to this article:
React component library Concis, looking for interested partners in the community to join...
Links related to the Concis component library, I hope everyone will encourage and support, give more stars, and give the author more motivation
source of demand
During the development of the component library and the actual project testing process, the blogger suddenly discovered Concisthat the components needed to be written by hand, but recalled that antd/elwhen using the component library in the past, code blocks could be automatically generated, and some corresponding prompts could be seen by moving to the label Information, so bloggers began to explore the development of Vscode plug-ins.
build project
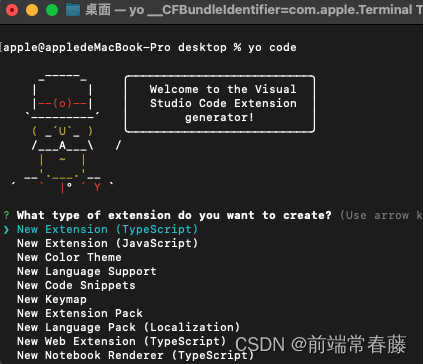
First install vscode scaffolding globally
npm install -g yo generator-code
After the installation is complete, enter on the command line
yo code
Select New Extension directly in the prompt to generate a vscode plug-in project. The following items are the scaffolding for individual function development provided by vscode , which can be understood as small plug-ins. Since this is specific to the entire Concisproject, choose the first one.
Next, enter the name of some plug-ins to generate the project. The processed project directory is as follows:
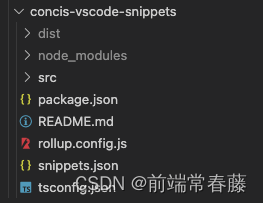
Here we will talk about some configurations of custom packaging later.
Code completion (snippets)
The code completion function is relatively simple, just create snippets.jsona file in the project and configure snippets in it.
There is a website that can help us quickly create code snippets https://snippet-generator.app/

Generate the corresponding snippet and copy it to snippets.json, like this:
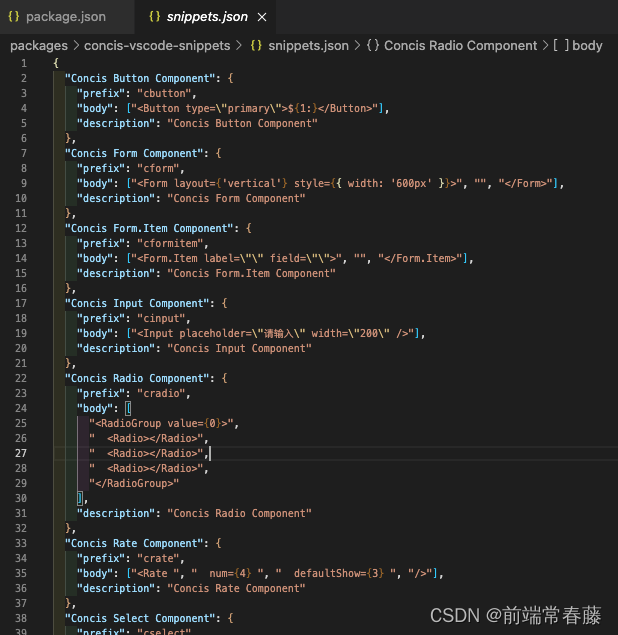
At the same time , configure in package.jsoncontributes to specify the file that the plug-in takes effect. The blogger is a React component library, so js/ts/jsx/tsxfour file types are set
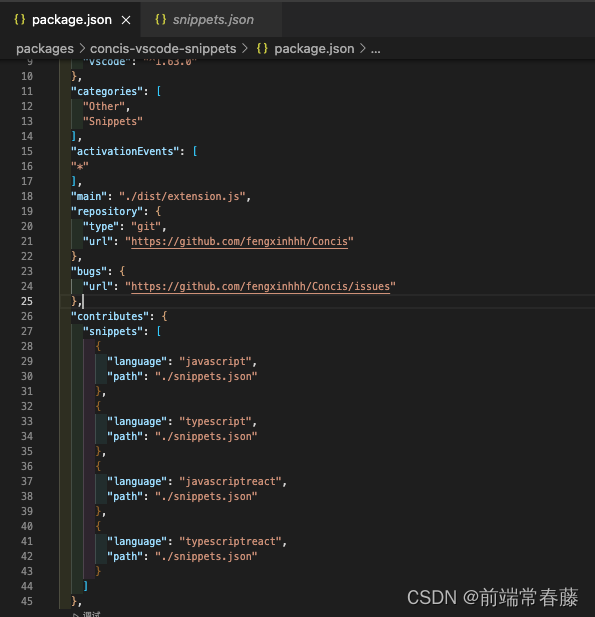
It's very simple, you don't need to use your brain to write a line of code, and the automatic completion function is realized.
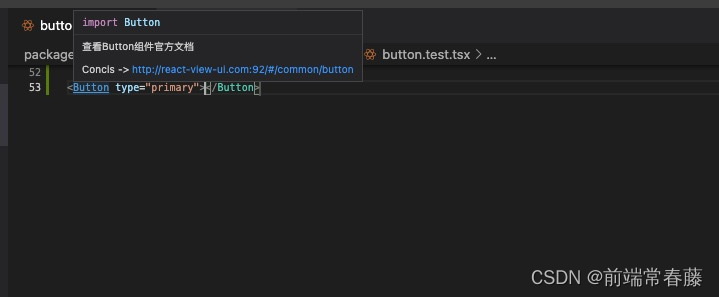
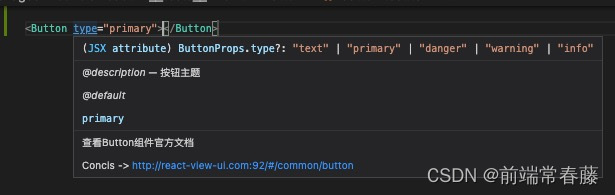
Smart Tips
If prompted, we need to get started, write the api of vscode, open extension.tsthe file generated by the project, and write the code like this:
import * as vscode from 'vscode'

const compileFiles = ['react', 'typescript', 'javascript', 'javascriptreact', 'typescriptreact'];

function providerHover(document: vscode.TextDocument, position: vscode.Position) {

    }

export function activate(context: vscode.ExtensionContext) {


  context.subscriptions.push(
    vscode.languages.registerHoverProvider(compileFiles, {


      provideHover,
    }),
  );
}

export function deactivate() {

    }
In the above code, we vscode.languages.registerHoverProviderregister the mouse move event and compileFilesspecify the file type, and the business functions to be realized by the plug-in are provideHoverrealized in it.
function provideHover(document: vscode.TextDocument, position: vscode.Position) {


  //移入Concis组件Dom,出现介绍
  const line = document.lineAt(position);
  let isConcisComponentDom = false;
  let matchComponent = '';
  for (let i = 0; i < componentList.length; i++) {


    const component = componentList[i];
    if (line.text.includes(`<${

      component}`)) {


      isConcisComponentDom = true;
      matchComponent = component;
    }
  }
  if (isConcisComponentDom) {


    const isCN = vscode.env.language === 'zh-cn';
    let componentDocPath = '';
    for (let i = 0; i < matchComponent.length; i++) {


      const str = matchComponent[i];
      if (i !== 0 && str.charCodeAt(0) >= 65 && str.charCodeAt(0) <= 90) {


        componentDocPath += '-';
      }
      componentDocPath += str;
    }
    let text = isCN
      ? `查看${

      matchComponent}组件官方文档\n
Concis -> http://react-view-ui.com:92/#/common/${

      componentDocPath.toLowerCase()}`
      : `View the official documentation of the Button component\n
Concis -> http://react-view-ui.com:92/#/common/${

      componentDocPath.toLowerCase()}`;

    return new vscode.Hover(text);
  }
}
Next, let's interpret the functions here:
- First, by
document.lineAtobtaining the code line, it is judged whether the keyword of the Concis component appears in the code contentline.text; - If the conditions are met, obtain the online document address of the component, edit the content information of the prompt, and correspond to the code segment
text; - will be returned
textvianew vscode.Hover;
So far, the code auto-completion + smart prompt function has been completed, let’s take a look at the effect:
package release
1. The first step is to install the vscode packaging tool globally
npm i -g vsce
2. The second step is to create a vscode account
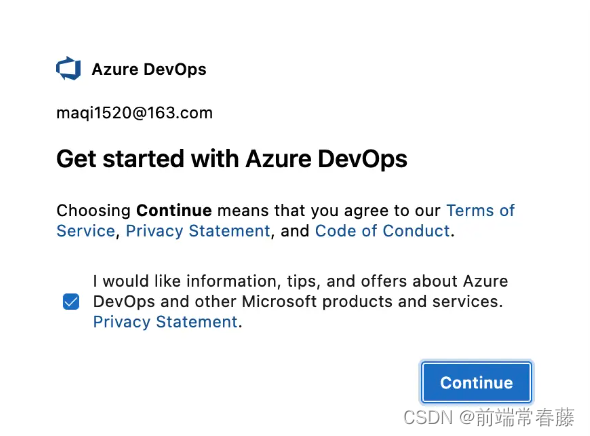
First visit https://login.live.com/ to log in to your Microsoft account. If you don’t have one, register one first, and then visit: https://aka.ms/SignupAzureDevOps . If you have never used Azure, you must create it first. An Azure DevOps organization will create an organization named after the mailbox prefix by default.
3. The third step is to create an organization token
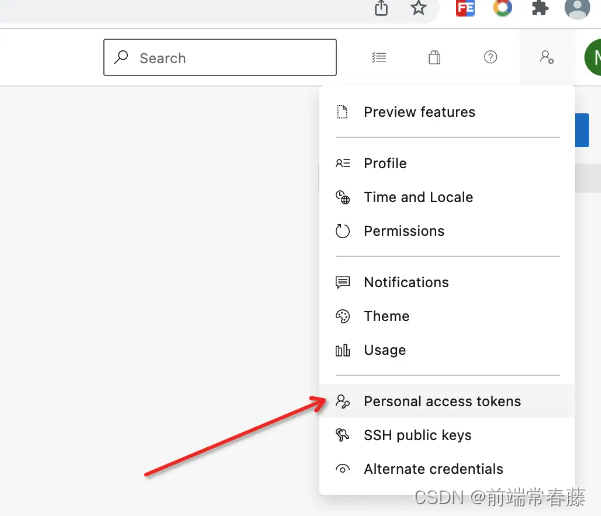
Click User Settings in the upper right corner, click Create New Personal Access Token.
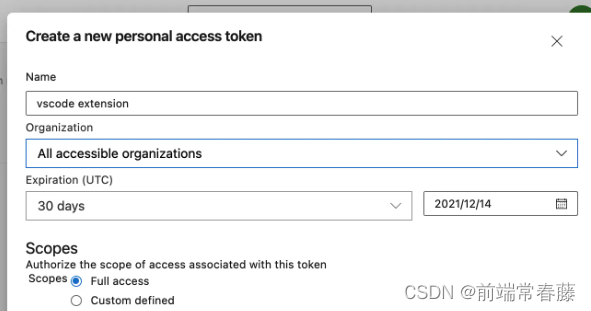
Please select here All accessible organizations, otherwise the plugin will not be able to be deployed.
A token will appear after creation, please manually record this token, because the official will not save it for you, and this token will be used when publishing.
4. The fourth step is to create a publisher
Go to the plug-in market https://marketplace.visualstudio.com/ to create one publisher, and package.jsonadd
publisherfields in it, keeping the name consistent.
configuration
Well, here you have completed the preparatory work.
The blogger rolluppackages the code and then uses the built-in packaging of vscode to publish, so the packaging process is as follows:
- rollup package
- vsce packaging
- release vsce
rollup.config.jsThe configuration is as follows:
import typescript from 'rollup-plugin-typescript2';
import clear from 'rollup-plugin-clear';
import resolve from 'rollup-plugin-node-resolve';
import commonjs from 'rollup-plugin-commonjs';
import {

     terser } from 'rollup-plugin-terser';
import {

     uglify } from 'rollup-plugin-uglify';

export default {


  input: ['./src/extension.ts'],
  output: [
    {


      file: 'dist/extension.js',
      format: 'cjs',
      name: 'cjs.js',
    },
  ],
  plugins: [
    typescript(), // 会自动读取 文件tsconfig.json配置
    clear({


      targets: ['dist'],
    }),
    resolve(),
    commonjs(),
    terser(),
    uglify(),
  ],
  external: ['react', 'react-dom'],
};
Configure the command line in package.json, so that our packaging and publishing process is as follows:
	"scripts": {


		"upgrade": "node ../../scripts/replace-version-in-vscode.ts",					//升级package.json中版本
		"compile": "rollup -c ./rollup.config.js",										//rollup打包
		"build": "vsce package",														//vsce打包
		"generate:readme": "node ../../scripts/vscode/generate-vscode-snippet.ts",		//生成README.md内容
		"publish": "npm run compile && npm run build && vsce publish"					//部署
	},
Here upgradeare generate:readmetwo scripts added by the blogger for the Concis component library. Let's take a look publish, and we can see that the packaging and construction are carried out in the order mentioned above, so that the configuration at the code level has been completed.
Execute npm run publish, enter the token created and saved before, and the release is successful.
Seeing this, you have mastered vscodethe content of developing a project and packaging it for release. The blogger’s extension to the requirements of the component library is the two commands mentioned above:
npm run upgrade				//升级package.json中版本
npm run generate:readme		//根据组件项目目录,自动生成README.md
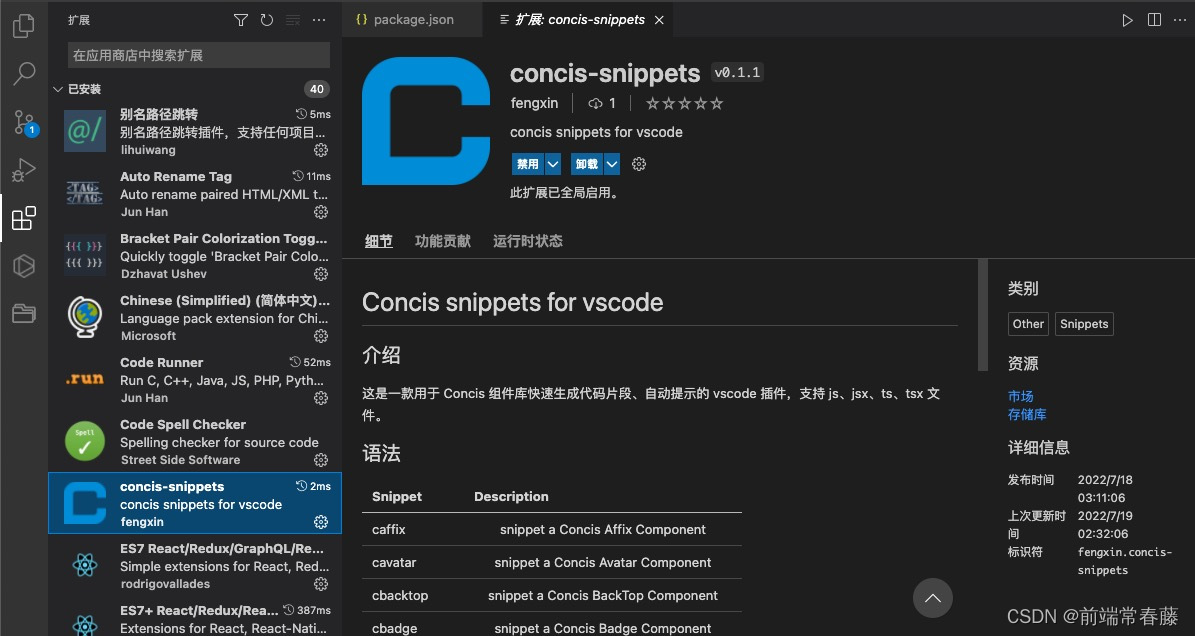
From Concis-snippetsthe introduction of the plug-in, you can see that there is a table below, which introduces each snippetcorresponding introduction. You should have imagined this, right? At this time, the blogger has developed two more components, but he does not want to manually update README.md, so a custom script is required.
Automatically update README.md
//根据项目目录写入vscode-snippets README.md
const fs = require('fs-extra');
const path = require('path');

const baseTemplate = fs.readFileSync(path.join(__dirname, 'base-template.md'), 'utf-8');
const componentList = fs.readdirSync(path.join(__dirname, '../../packages/concis-react/src'));

let tableTemplate = '';

componentList.forEach((f) => {


  if (f[0].charCodeAt(0) >= 65 && f[0].charCodeAt(0) <= 90) {


    //组件
    tableTemplate += `|c${

      f.toLowerCase()}|snippet a Concis ${

      f} Component|\n`;
  }
});

const fileContent = `${

      baseTemplate}${

      tableTemplate}`;
console.log(fileContent);

fs.writeFile(
  path.resolve(__dirname, '../../packages/concis-vscode-snippets/README.md'),
  fileContent,
  'utf-8',
).then(() => {


  console.log('生成concis-vscode-snippets 成功'); // eslint-disable-line
});
Here we have a basic template, which contains README.mdthe content that will never change in the upper part, corresponding to the code base-template.md, and then reads the component directory, splicing the basic template and the content of the table, and that's it.
Automatically upgrade package.json version
//更新concis-vscode-snippets/package.json中的版本
const fs = require('fs-extra');
const path = require('path');
const {

     version } = require('../packages/concis-vscode-snippets/package.json');

const fileText = fs.readFileSync(
  path.join(__dirname, '../packages/concis-vscode-snippets/package.json'),
  'utf-8',
);

const replacedVersion = fileText.split('\n').map((t) => {


  if (/"version":/.test(t)) {


    let newVersion = version.split('.');
    let [first, secord, third] = newVersion;
    if (third >= 10 || secord >= 10) {


      if (third >= 10) {


        third = 0;
        secord = Number(secord) + 1;
      }
      if (secord >= 10) {


        third = 0;
        secord = 0;
        first = Number(first) + 1;
      }
    } else {


      third = Number(third) + 1;
    }

    newVersion[newVersion.length - 1] = Number(newVersion[newVersion.length - 1]) + 1;
    console.log(`"version": "${

      first}.${

      secord}.${

      third}"`);
    return `  "version": "${

      first}.${

      secord}.${

      third}",`;
  }
  return t;
});

fs.outputFile(
  path.resolve(__dirname, '../packages/concis-vscode-snippets/package.json'),
  replacedVersion.join('\n'),
).then(() => {


  console.log('替换 package.json 中的 version 成功!'); // eslint-disable-line
});
The code implements a package.jsonfunction of replacing the version in the file. With the support of these two automatic scripts, we can change publishit to this:
"scripts": {


	"upgrade": "node ../../scripts/replace-version-in-vscode.ts",
	"compile": "rollup -c ./rollup.config.js",
	"build": "vsce package",
	"generate:readme": "node ../../scripts/vscode/generate-vscode-snippet.ts",
	"publish": "npm run upgrade && npm run generate:readme && npm run compile && npm run build && vsce publish"
}
Summarize
This article explains the whole process of developing a vscode plug-in from preparation to function realization and finally packaging and publishing through the actual case of Concis by the blogger. If the article is useful, I hope you can support it.
Concis component library address

Concis component library online link: http://react-view-ui.com:92
github: https://github.com/fengxinhhh/Concis
npm: https://www.npmjs.com/package/concis
Open source is not easy, welcome to learn and experience, please support if you like it, please leave a message if you have any questions, if this article is helpful to you, the blogger needs your support, thank you.