Summarize the process of the game, save two rookies, welcome to advise
1. Competition tasks
For details, please refer to the detailed rules of the 17th Competition of the 17th Smart Car Competition for the Intelligent Vision Group_Zhuo Qing's Blog-CSDN Blog_Intelligent Vision Group , I will briefly introduce it here.
The task process can be summarized as: the car scans a piece of A4 paper at the starting point (there are coordinate points on the A4 paper to obtain the position of each target) -> after scanning, it starts to reach the target according to this -> after reaching the vicinity of each target, check the target Carry out identification -> After the identification is completed, different categories are transported to the designated position by electromagnets as required -> Return to the starting point after all targets are transported.
The A4 paper used in the task and the kt board with the target photo are shown in the figure below.
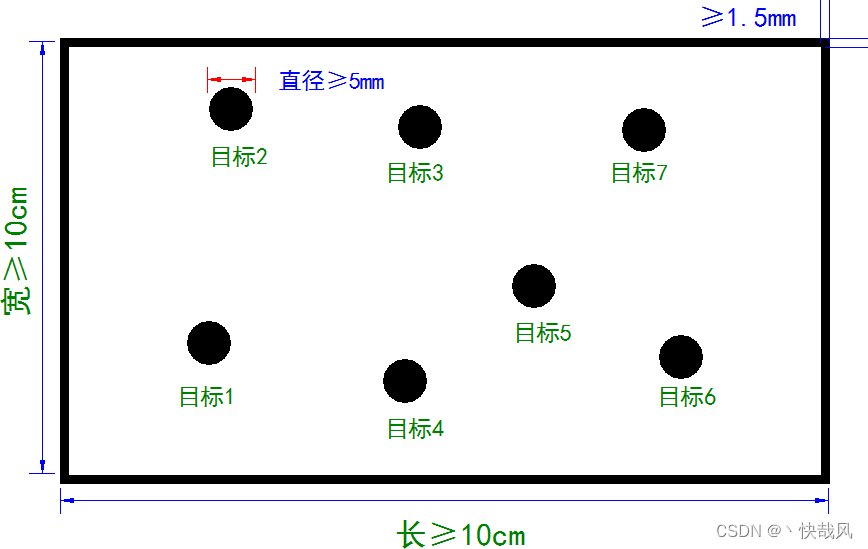
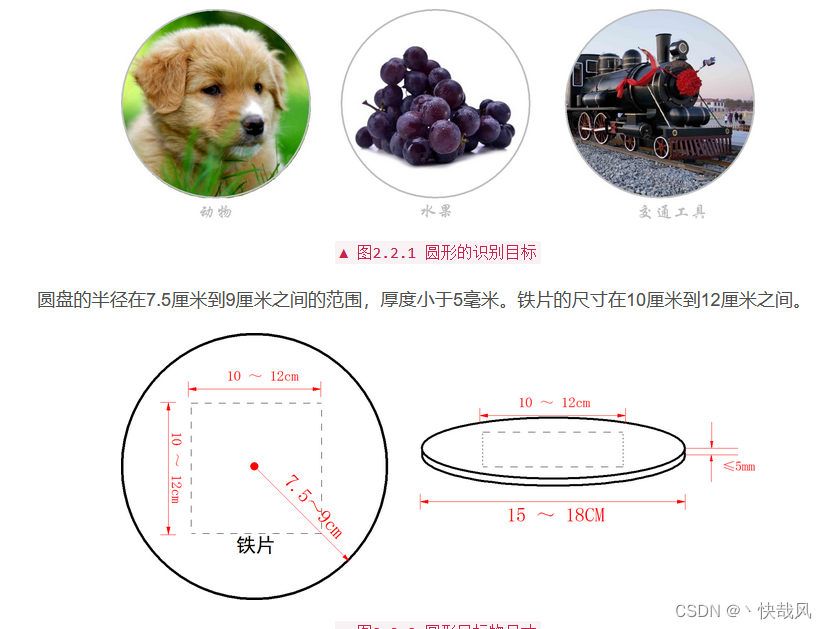
[PS: At the beginning, the rule release was a circular kt board, but later it was changed to a square one]
To deal with the content mentioned above, there are also Aptag QR codes arranged around the competition field to help the positioning of the car. However, I hardly saw anyone using this QR code during our competition. Basically, they only used The coordinates of the A4 paper.
2. Team division
(1) Captain: Responsible for the control of the car (movement, positioning, inertial navigation of the mecanum wheel)
(2) Teammate 1 (me): Responsible for the visual part (recognition of A4 coordinate paper, fine-tuning algorithm for the car approaching the target, training deployment of deep learning model)
(3) Teammate 2: Responsible for the hardware part
3. Visual part
This part introduces how I complete the various tasks of the visual part. The code and the photo data set I took are all placed on github [if it is useful to you, please give me a star, thank you], and students who need it can pick it up.
https://github.com/KZF-kzf/smartcar--hfut
3.1 Openart-mini camera introduction
We used two openartmini cameras in the game, no total drill wind was used. openart is a kind of openmv. Here are two reference documents of openmv. In addition, there is a teaching video about openMV by Xingtong Technology on station b. Students who need it can also watch it.
Overview — MicroPython 1.9.2 documentation
3.2 A4 paper recognition
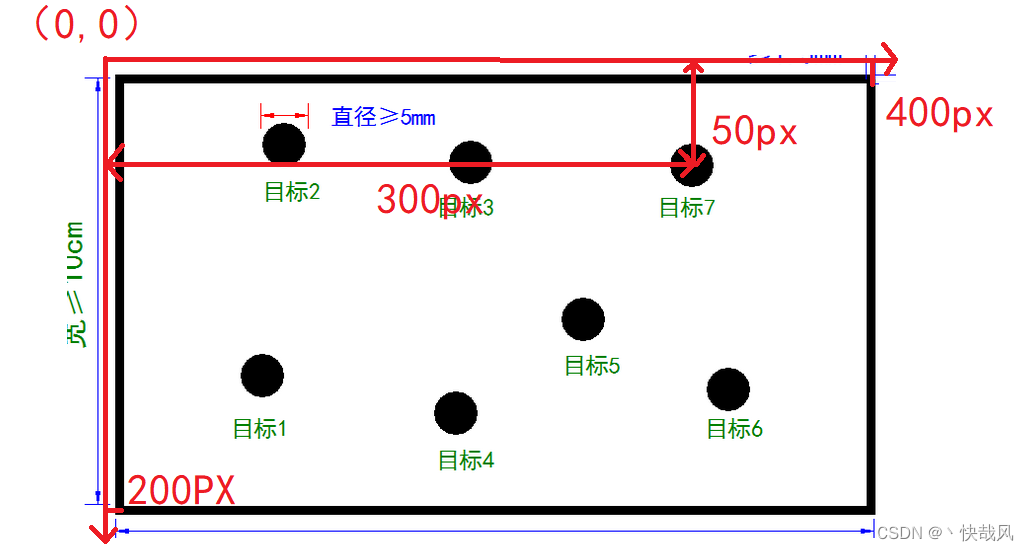
The principle of this part is very simple, it is to obtain the coordinates of each point on the A4 paper, and then scale it according to the size of the actual site. Assuming that the actual site is 12*7 meters, as shown in the figure below, px represents the number of pixels, and the coordinates obtained in the camera are all pixel coordinates. Then the coordinates of the center of target 7 are (300, 50), and the length and width of the A4 paper in the camera are 400px and 200px respectively, so the ratio of target 7 in A4 paper is (300/400, 50/200) multiplied by this ratio The actual length and width (12,7) are the coordinates of target 7 in the actual field.
Using openmv to realize the above A4 paper recognition function, there are two main ideas: 1. Use the find_blob function; 2. Use the find_circle function. I have tried these two algorithms, and friends who will participate in the competition can also try it. In the final competition, I used find_blob, but I suggest that if the students in the future use the find_blob function, find a way to come up with an algorithm that automatically adjusts the threshold.
3.3 Fine-tuning algorithm
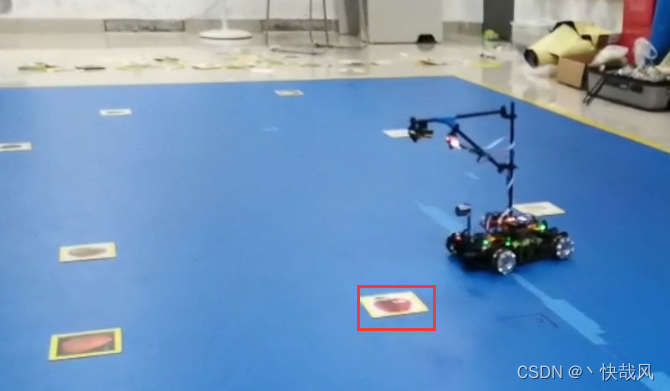
Let me first describe in detail the problem that this subsection aims to address. Any sensor has errors, and the encoder and gyroscope used in our car navigation system are no exception. Even if we have very precise coordinates in advance, we cannot precisely control the car to move to the target point. As shown in the figure below, although the car has moved to the side of the target at this time, if you want to carry the target, the position error cannot exceed 5 cm. When the trolley moves to the side of the target, use the openart camera to detect the position of the target, and slightly adjust the position of the trolley itself, so that when the electromagnet falls, it can just attract the target and complete the handling task.
Specific solutions: We set the coordinates of the center position of the picture in the camera at this time as the target position, and in the actual operation process, we make a difference between the coordinates of the center position of the picture at any time and the coordinates of the center position we set. If we get If the value of is non-zero, it means that there is a deviation between the position of the car and the target position, and the positive or negative of this value represents the direction. Then we use pid technology to make the car move in the direction of reducing the deviation, so as to realize the tracking effect. The algorithm workflow is as shown in the figure below.

3.4 Deep Learning Model Training Deployment
Regarding the part of deep learning, I suggest that if you have not done related projects or have a good deep learning foundation, then you can completely use the EIQ software provided by NXP, which can basically meet the normal needs of the competition. Moreover, I communicated with some friends at that time, and some of the models they trained and quantified by themselves were not as good as the models exported by eiq.
(1) Brief description of the whole process of model training and quantitative deployment
Here only the steps to use eiq
① First, you need to import the dataset into eiq. For the words here, you can refer to the NXP training videos from previous years, which are available on station b, but I wrote a dataloader by myself after reading the official documents of eiq, which can be used. In short, it is finally necessary to make your data set into a project file that eiq can open. Here is one thing to pay attention to: you must turn on eiq when making a data set, otherwise an error of connection failure will be reported.
② After importing the data set, you can start training. The training of eiq is particularly simple and highly visualized. What needs to be mentioned here is the setting of data augmentation. It is also recommended to go to the training of the 17th NXP session at station b, which briefly mentions how to perform data augmentation. Then there is one thing to pay attention to: do not directly use the data augmentation data set for training, first use the original data set for training, and then add data augmentation after training until convergence, otherwise the model may not be able to converge if data augmentation is used from the beginning .
③It can be exported directly after training
(2) Self-made data set
That is, in addition to using the officially provided data sets, these pictures must be printed and then used to shoot and make data sets with openart. The purpose of this is to restore the real situation of the target seen in the camera while the car is running. We printed and photographed all the data sets at the beginning, and this data set was placed on the github mentioned above, and students who needed it could pick it up by themselves. In addition, if you want to print it yourself, you can print it from Taobao. Be careful not to be cheated by some Taobao shops. I found several shops at the time, and finally found the cheapest one, which was only 300 yuan. The merchant wants to charge me 700 and there are more than 1,000.
(3) Identification scheme
At that time, we had two mainstream solutions. One was to use one model to directly identify fifteen subcategories, and the other was to use three models, each of which identified five subcategories. I used the first one in the competition, and the effect was Not very good, I recommend you to try the second one.