Article directory
Reprinted from the article of Intranet Penetration Tool: Linux Builds Minecraft MC Server - MCSM Panel [Extranet Remote Online Tutorial]
foreword
Using the MCSM panel in Linux to build a Minecraft private server is relatively simpler than windwos, and it is also a popular setting method at present. It is also very easy to install MCS Manger in Linux, and the script can be installed with one-click command.
The following introduces MCSManager to build Minecraft private server + cpolar intranet forwarding tool to realize remote connection outside, no need for public network IP, no public network server, just use a local Linux server.
1. Install JAVA
The version of java17 is required to run Minecraft, check the Linux java version
java -version

If java is not installed, you can use yum to install it with one click
yum install java-17-openjdk.x86_64
2. MCSManager installation
Use the download command script on the official website to download and install directly. The installation script only supports mainstream x86_64-bit operating systems such as Ubuntu/Centos/Debian/Arch.
wget -qO- https://gitee.com/mcsmanager/script/raw/master/setup.sh | bash
After the installation is complete, we can see the accessed address and the related port number. The following command is the operation command.
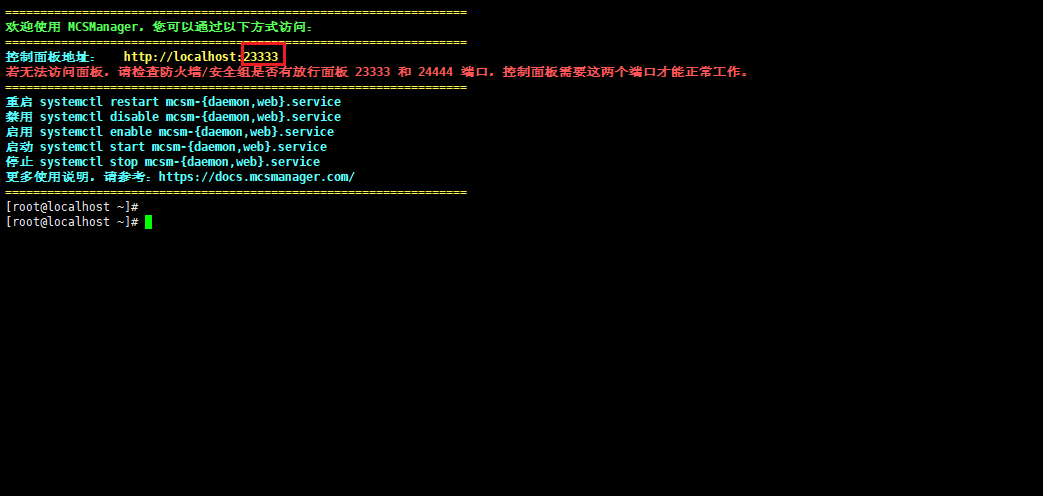
Execute the above command to start the service
systemctl enable mcsm-{

    daemon,web}.service
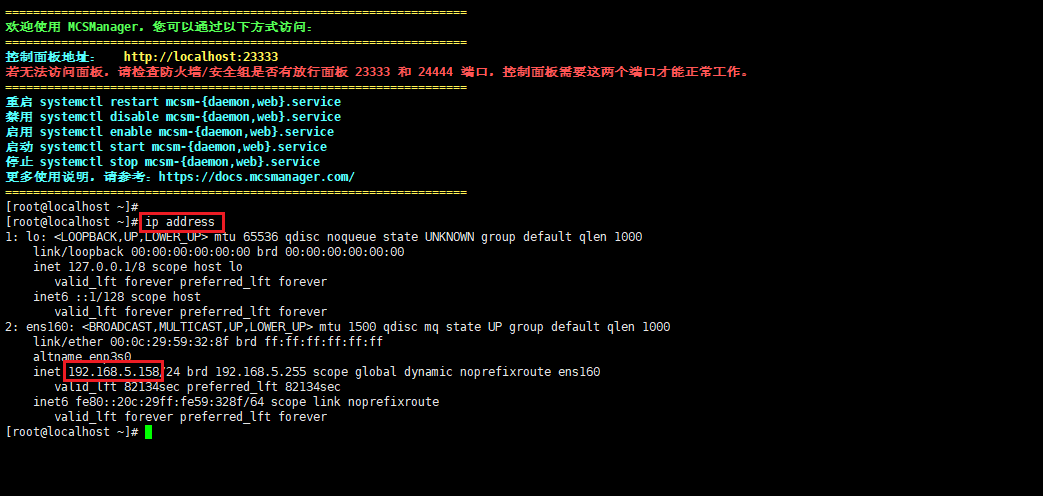
3. LAN access to MCSM
Through the above ip address, we can see that the port number is 23333. We can use the LAN ip address on the external computer to access port 23333 in the browser, and check the Linux LAN ip address:
ip address
After entering the command, we can see the relevant LAN ip address
Then use an external browser to access through the LAN ip address plus port 23333, and you can see the web interface of MCSM. For the first login, you need to create an account

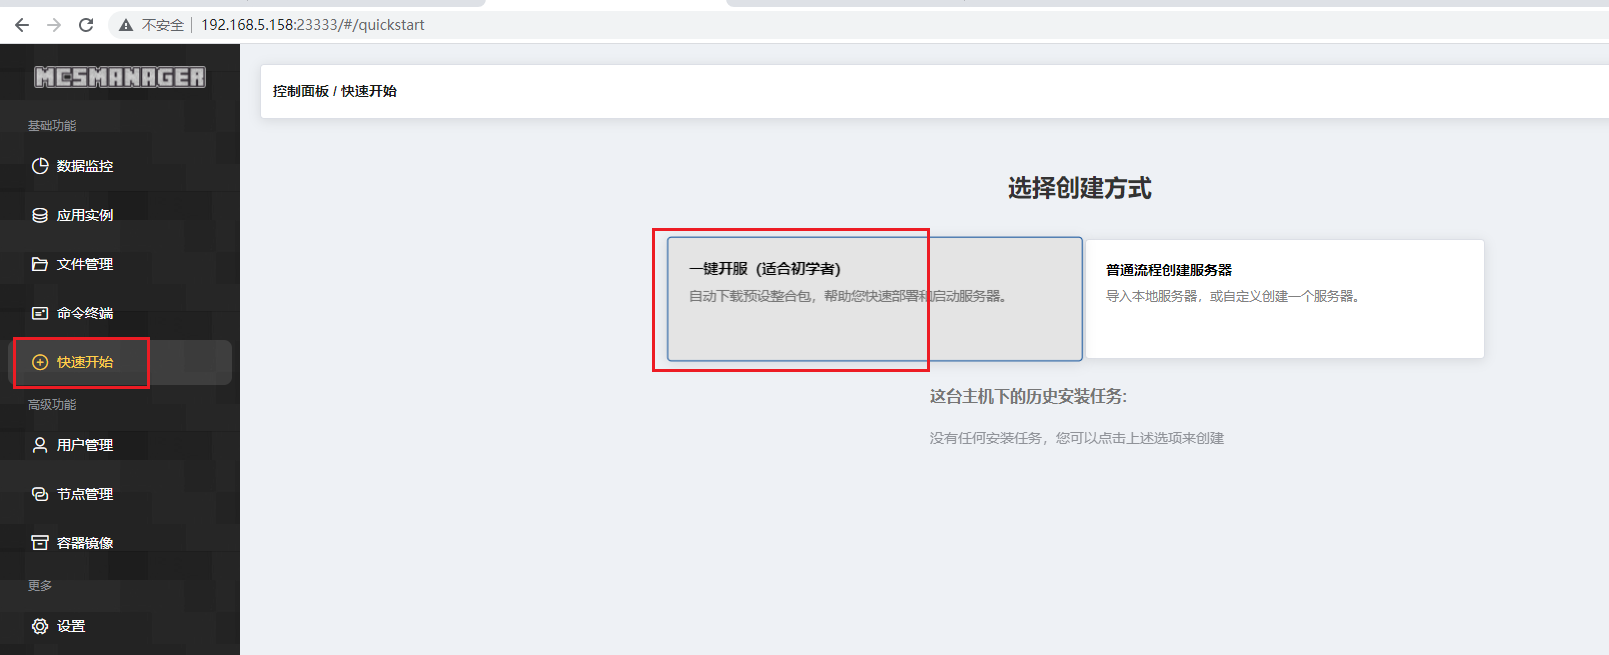
4. Create a minecraft server
In the panel, we click Quick Start to create a Minecraft server

Choose one-click service opening, simple and fast
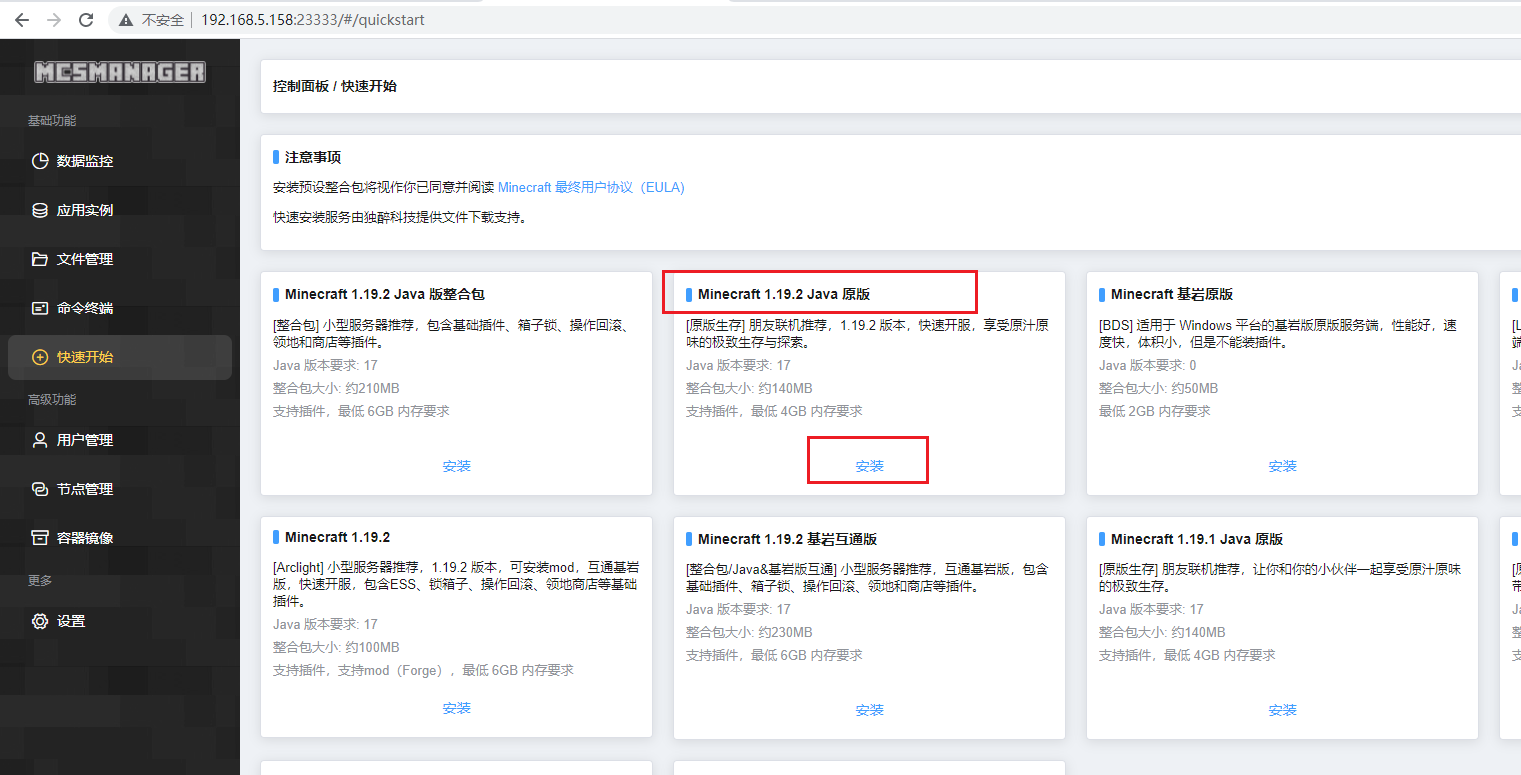
Here select version 1.19.2, click install
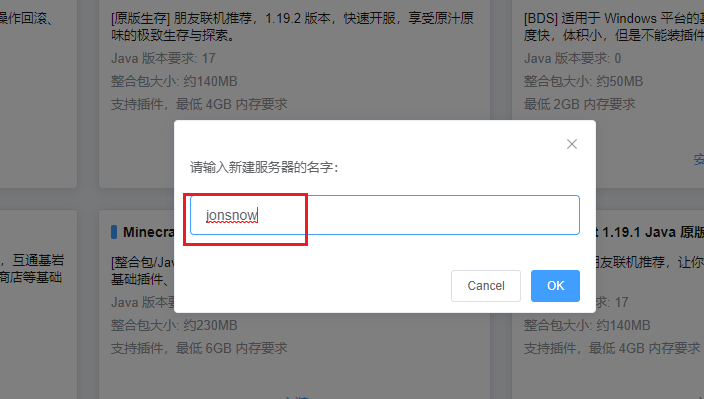
Give the server a name, then click OK, and wait for the installation
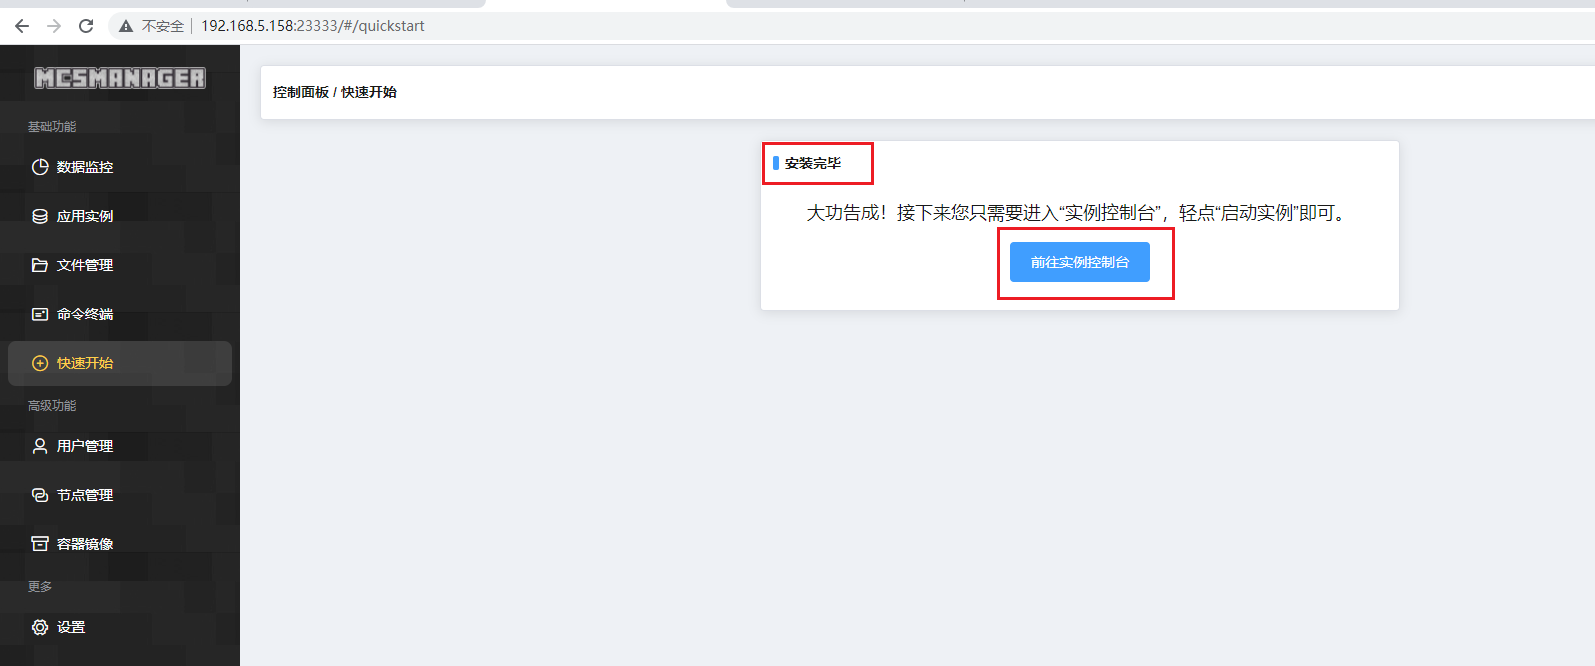
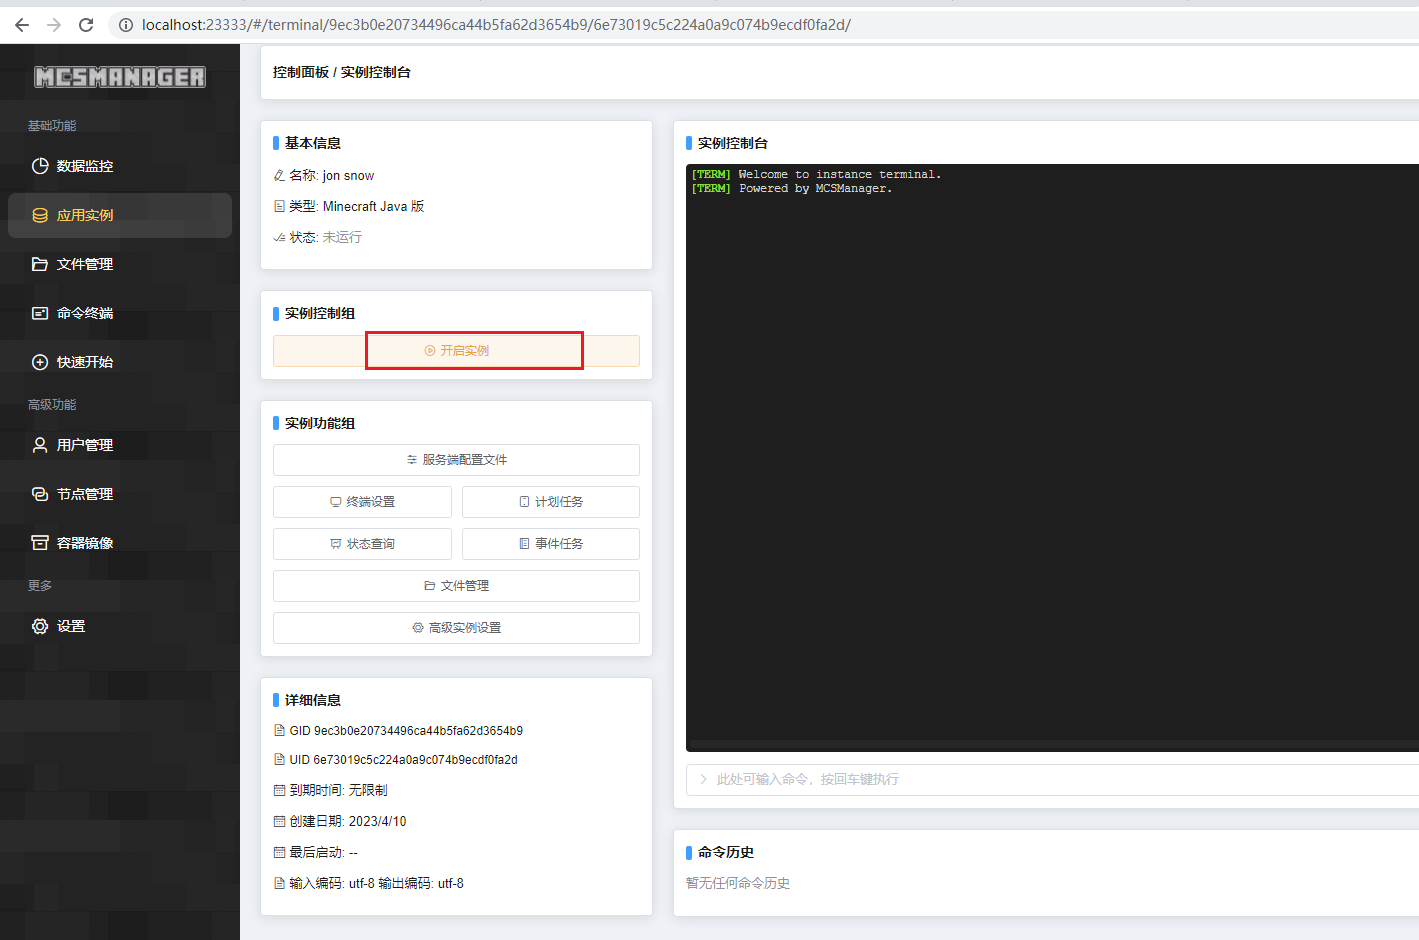
After the installation is successful, we click the button to go to the instance console
Then the online mode appears, we click below to skip the selection of setting the online mode

Then click to open the instance. After opening the instance, a server.propertiesfile will be generated. If the instance is not opened, it will not be generated.
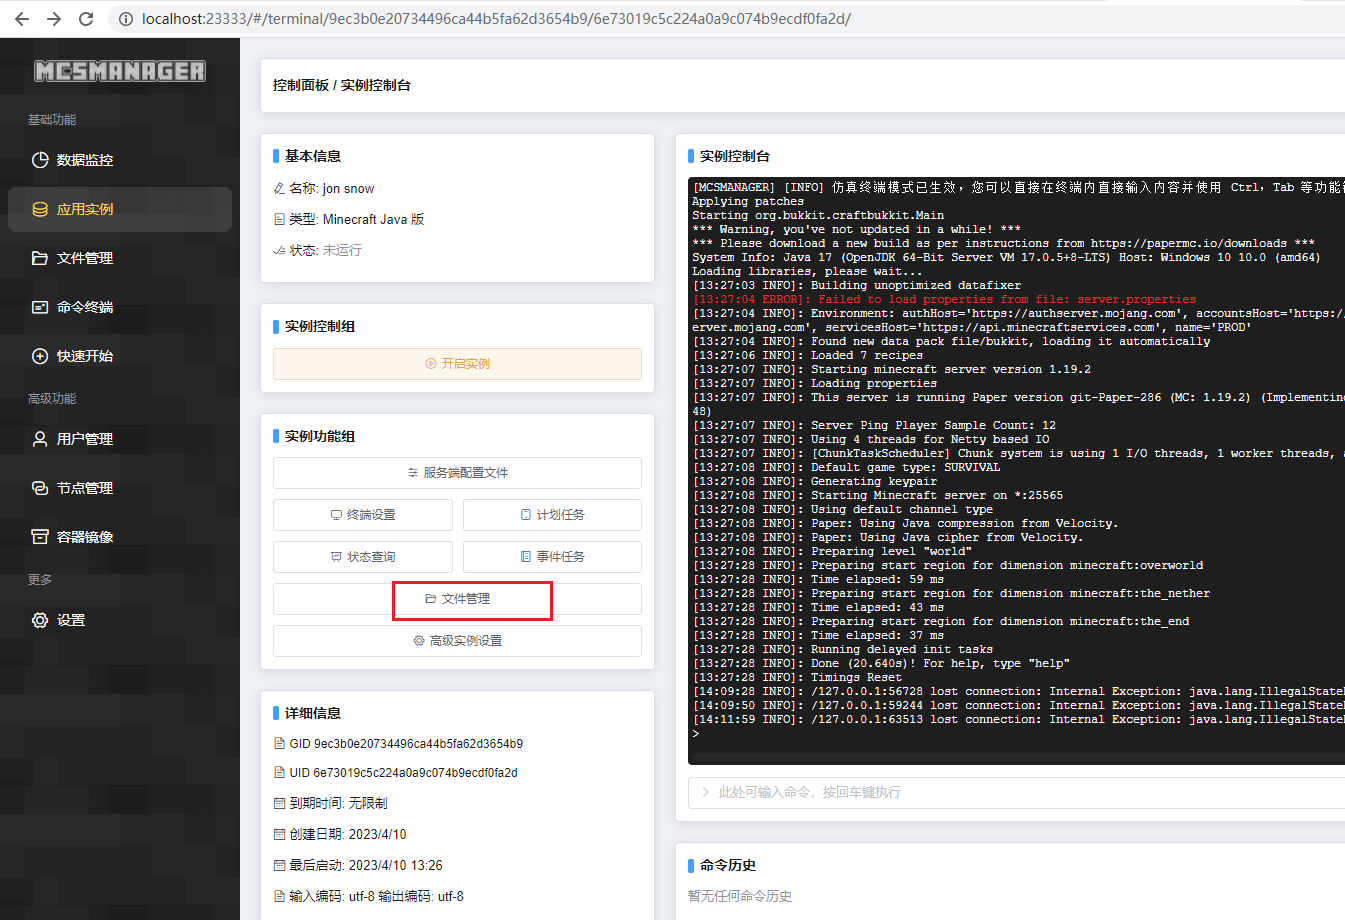
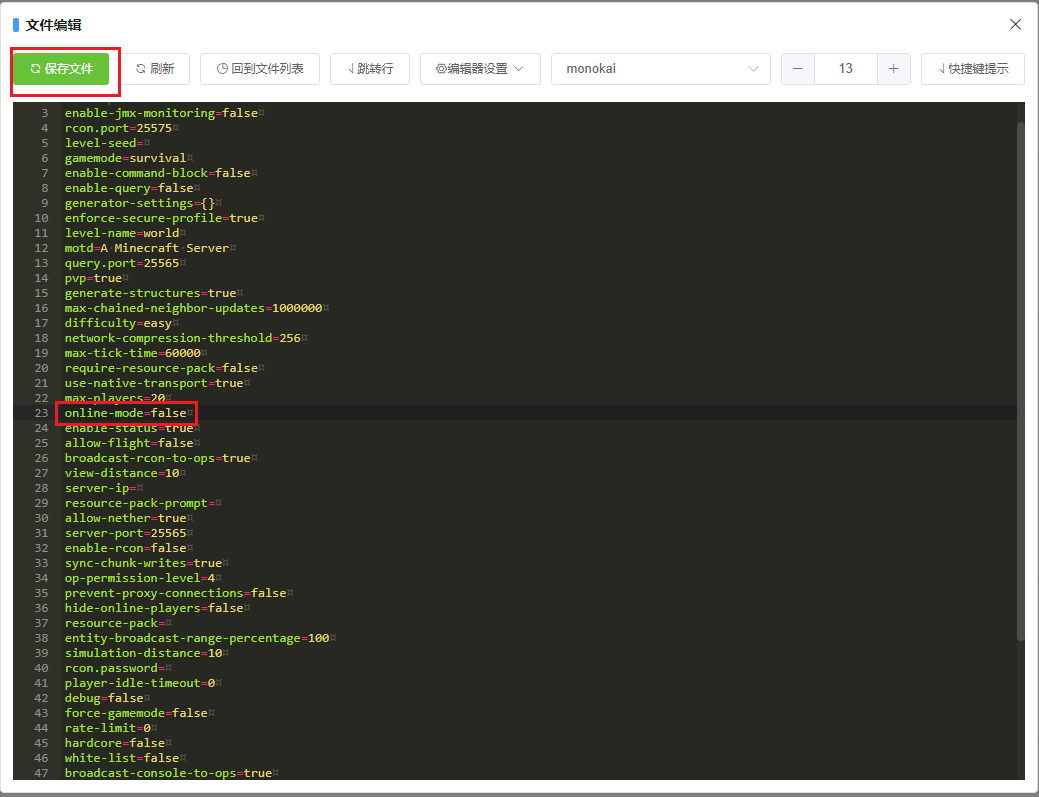
Then stop the instance, modify the configuration file, 取消正版服务器的验证and click File Management
Find the server.properties file, click Edit, the first page cannot be found, click the second page at the bottom

Change online-modethe value to false, then save and close
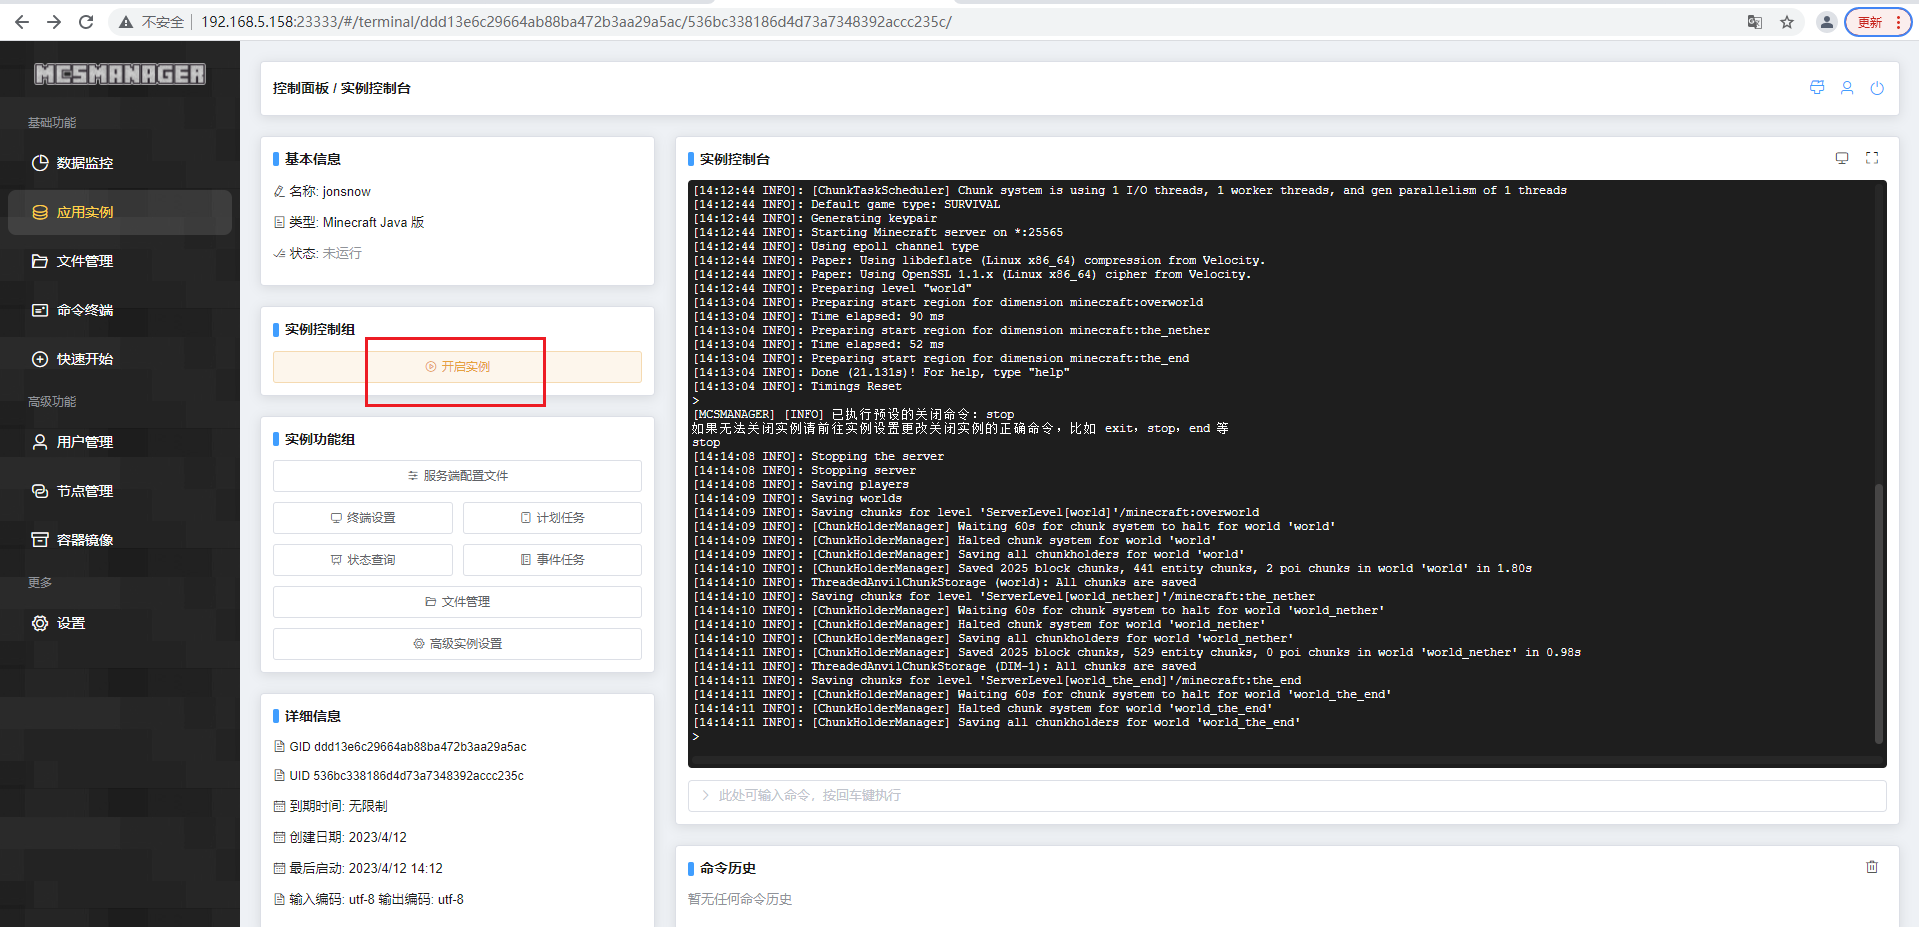
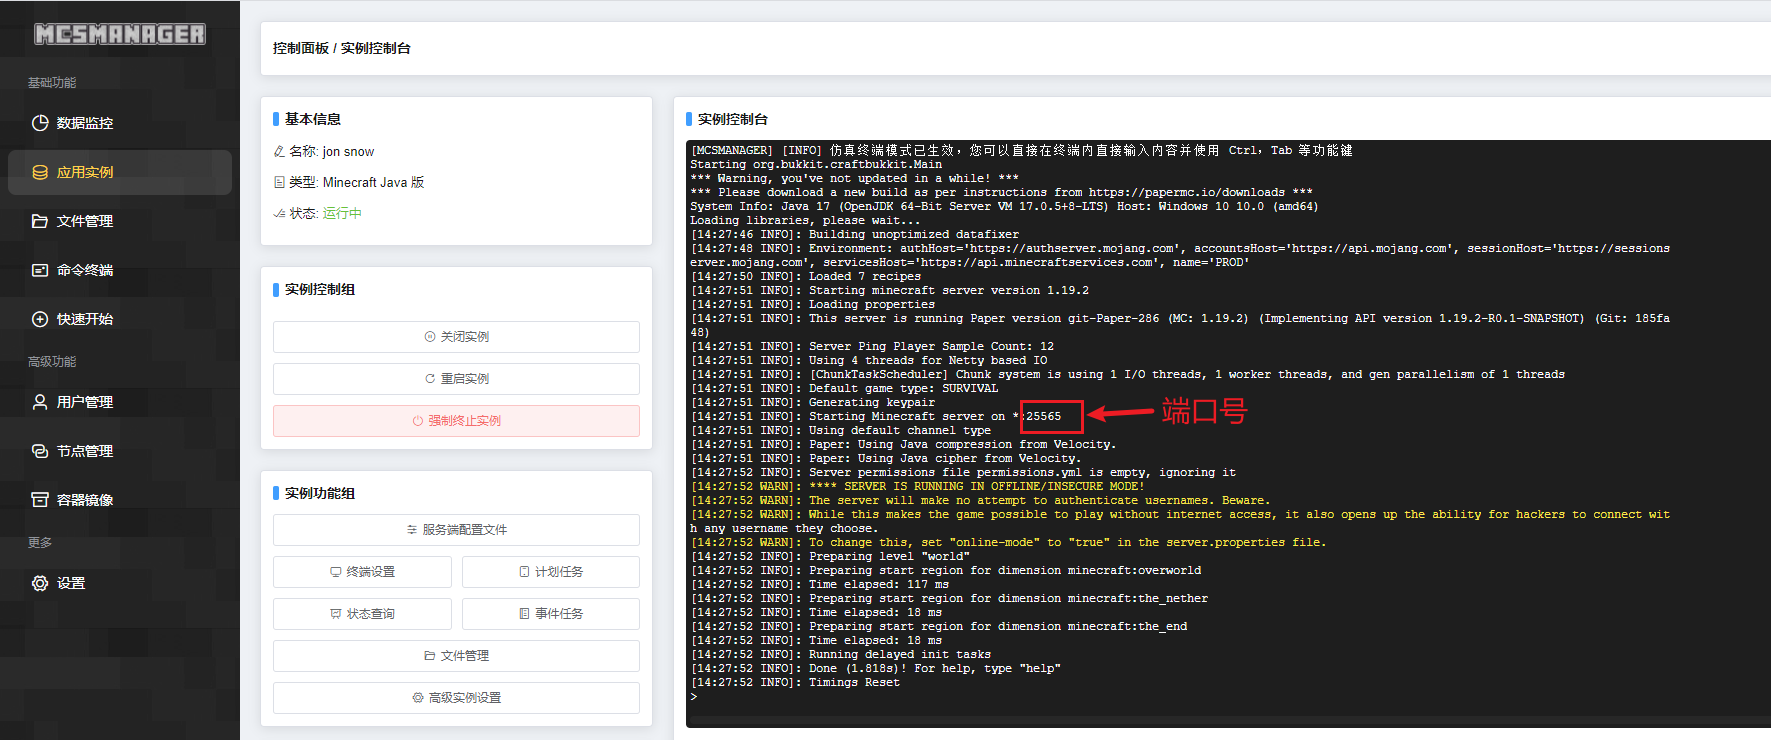
Then start the instance, where the instance means the service
The startup is successful, we can see the port information, the port number is:25565
5. LAN online test
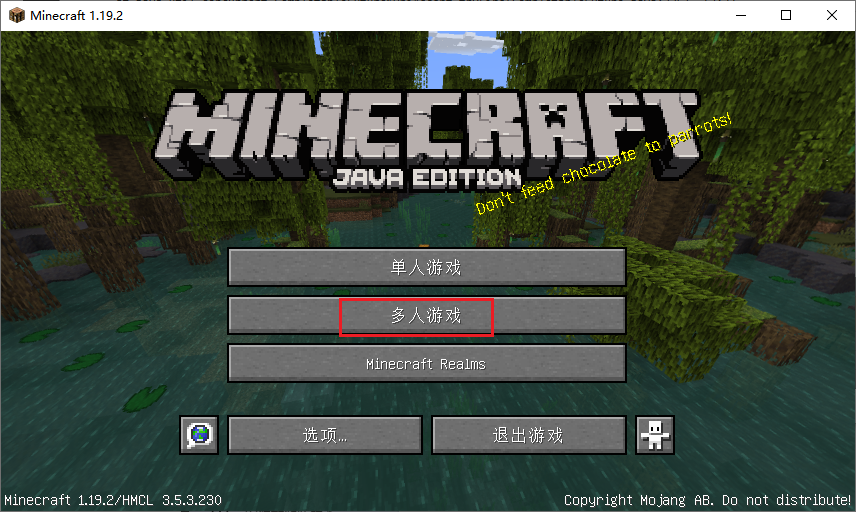
Open the Minecraft launcher, select the same version as the server 1.19.2, start

then click on multiplayer
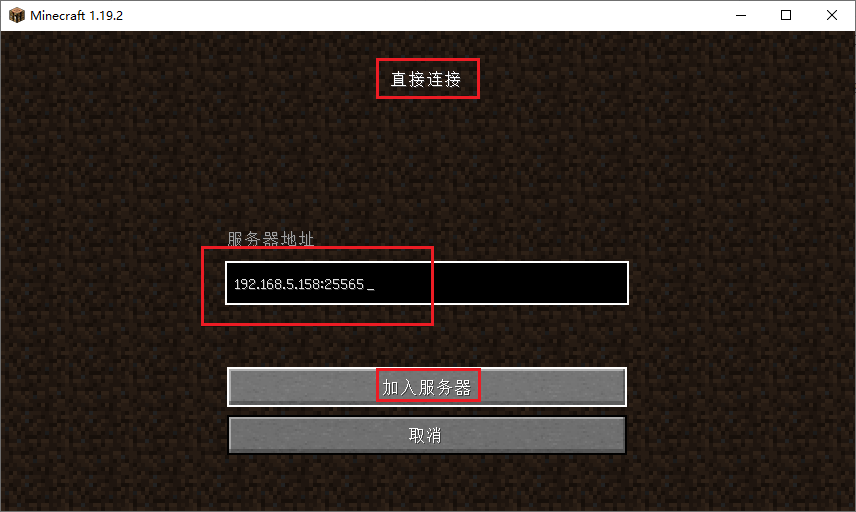
Click the direct connection below, then enter the LAN ip address plus port 25565 192.168.5.158:25565, and click to join the server
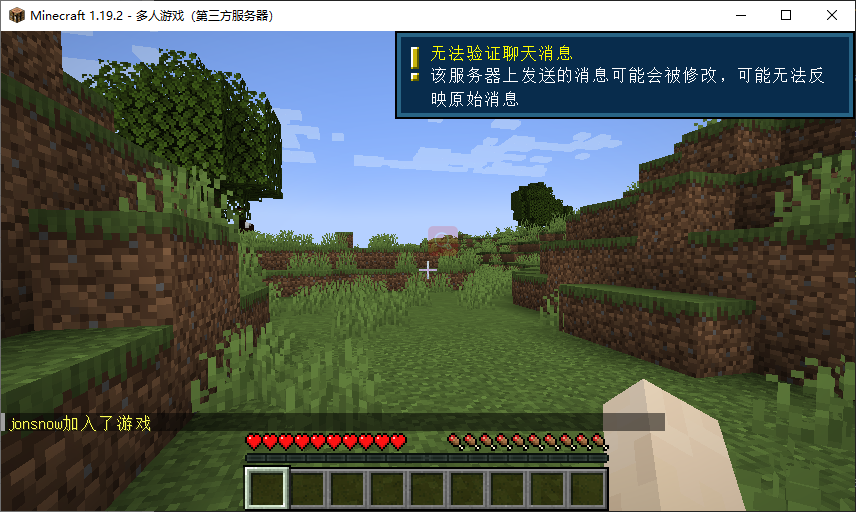
Then we can see that successfully entered the game
6. Install cpolar intranet penetration
Above we installed the MCSM panel on the local Linux and started the Minecraft service. Next, we installed the cpolar intranet penetration tool, and used it to create a tcp tunnel, map port 25565, and it will generate the corresponding public network address.
Through the tcp public network address of cpolar, we can easily connect remotely without registering a domain name to purchase a cloud server. The following are the steps to install cpolar for linux services
cpolar official website: https://www.cpolar.com/
- Install commands using one-click scripts
curl -L https://www.cpolar.com/static/downloads/install-release-cpolar.sh | sudo bash
- token authentication
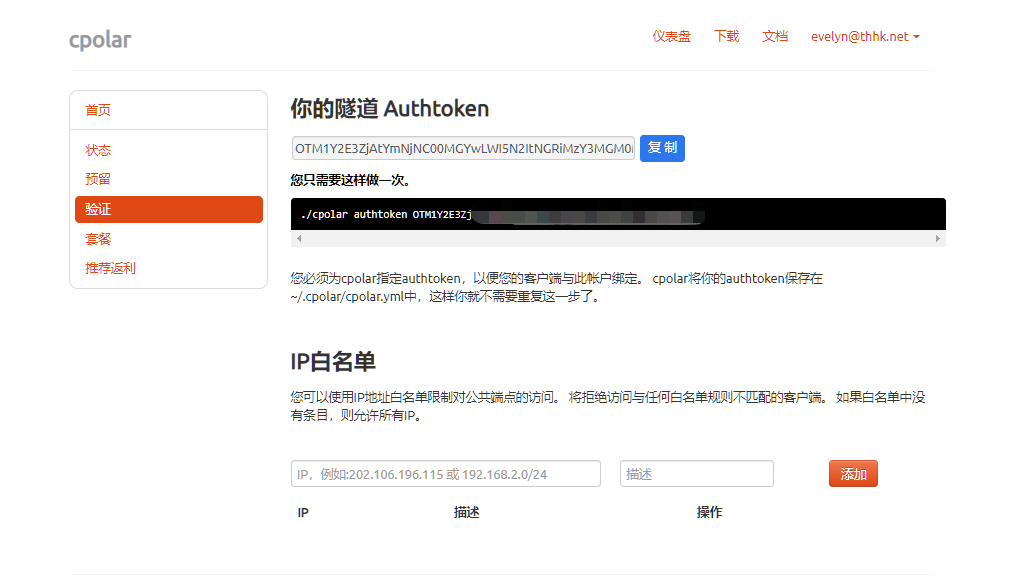
Log in to the background of the cpolar official website, click the verification on the left to view your own authentication token, and then paste the token in the command line:
cpolar authtoken xxxxxxx
- Add a service to the system
sudo systemctl enable cpolar
- Start the cpolar service
sudo systemctl start cpolar
7. Configure the public network access address
After successfully starting the cpolar service, we visit the Linux LAN ip address + port 9200 on the browser, and log in to the cpolar web UI management interface.
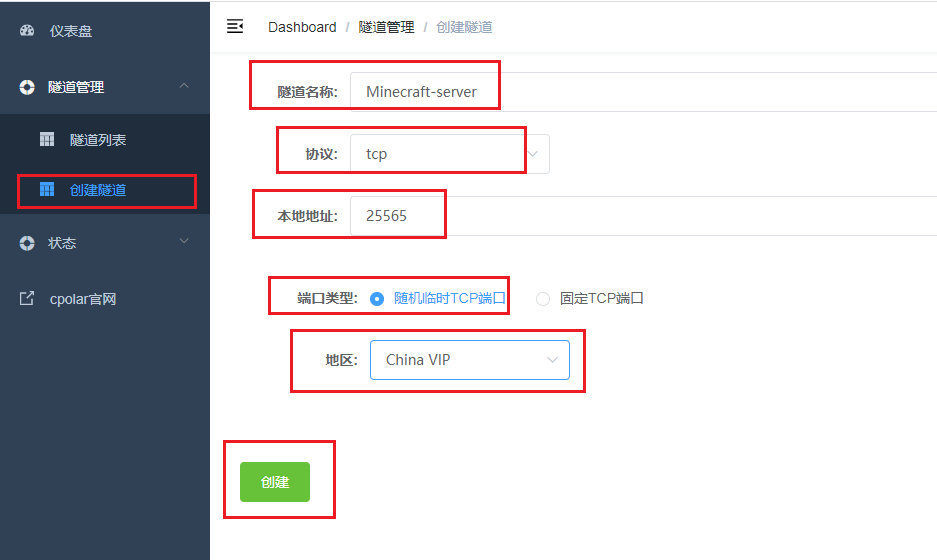
After successful login, click Tunnel Management on the left dashboard - Create Tunnel, and create a tcp protocol tunnel pointing to port 25565 above:
- Tunnel name: can be customized, be careful not to duplicate the existing tunnel name
- protocol: tcp
- Local address: 25565
- Domain name type: choose a random domain name for free
- Region: Select China VIP
click创建
Then open the online tunnel list, view and copy the public network address, pay attention that tcp://there is no need to copy

8. Remote online test
Open Minecraft, select multiplayer game, click to connect directly, we use the public network address generated in cpolar to connect

successful remote connection
9. Configure fixed remote online port address
It should be noted that the above steps use a random temporary tcp port address, and the generated public network address is a random temporary address, which will change randomly within 24 hours. In order to facilitate the remote connection of small partners, we will configure a fixed TCP port address for it next. This address will not change, which is convenient for small partners to connect remotely without repeatedly modifying the server address every day.
To configure a fixed tcp port address, you need to upgrade cpolar to a professional package or above.
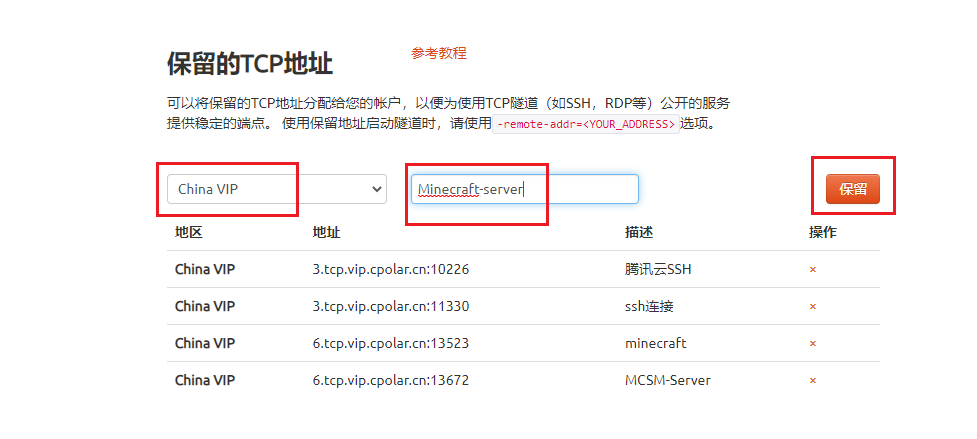
9.1 Reserve a fixed tcp address
Log in to the cpolar official website , click on the reservation on the left, find the reserved tcp address, let's reserve a fixed tcp address for Minecraft:
- Region: Select China VIP
- Description: It is a note, which can be customized
click保留
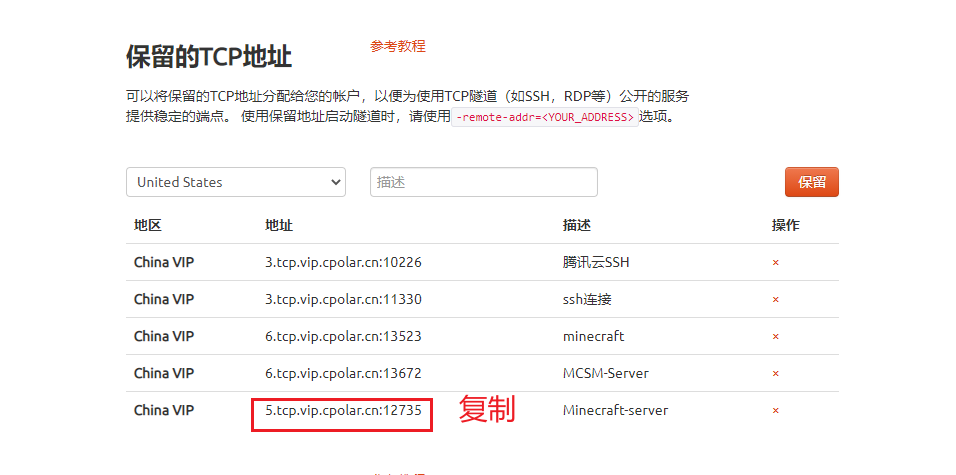
After the address is successfully reserved, the system will generate a corresponding fixed public network address and copy it down. Note that there is no need to copytcp://
9.2 Configuring a fixed public network TCP address
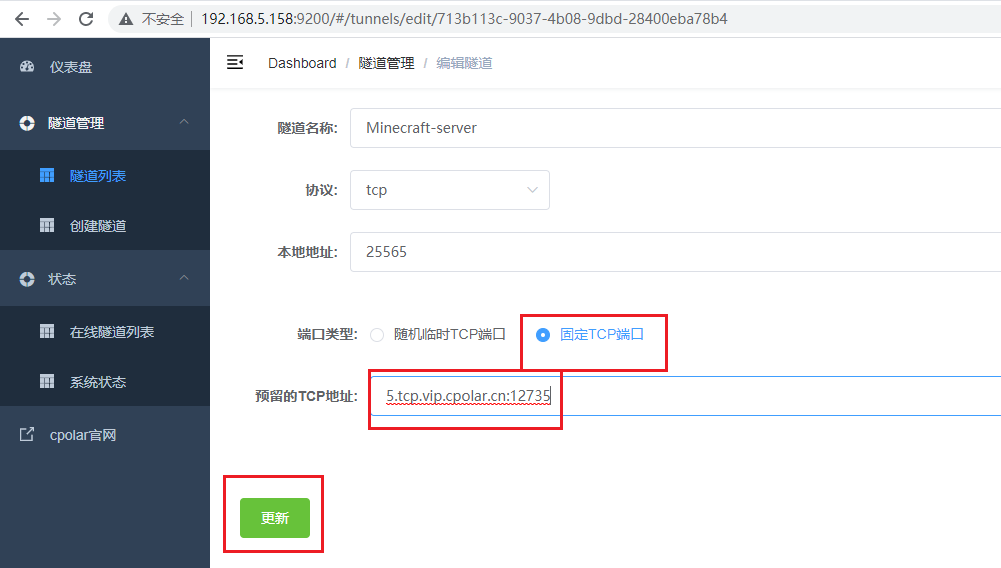
In the cpolar web ui management interface, click Tunnel Management on the left dashboard - Tunnel List, find the Minecraft tunnel created earlier, and click on the right编辑

Modify the tunnel information and configure the successfully reserved fixed tcp address into the tunnel
- Port type: modified to fixed tcp port
- Reserved tcp address: fill in the successfully reserved address
click更新
After the tunnel is successfully updated, click the status on the left dashboard - online tunnel list, find the minecraft tunnel, and you can see that the public network address has been updated to a fixed tcp address.
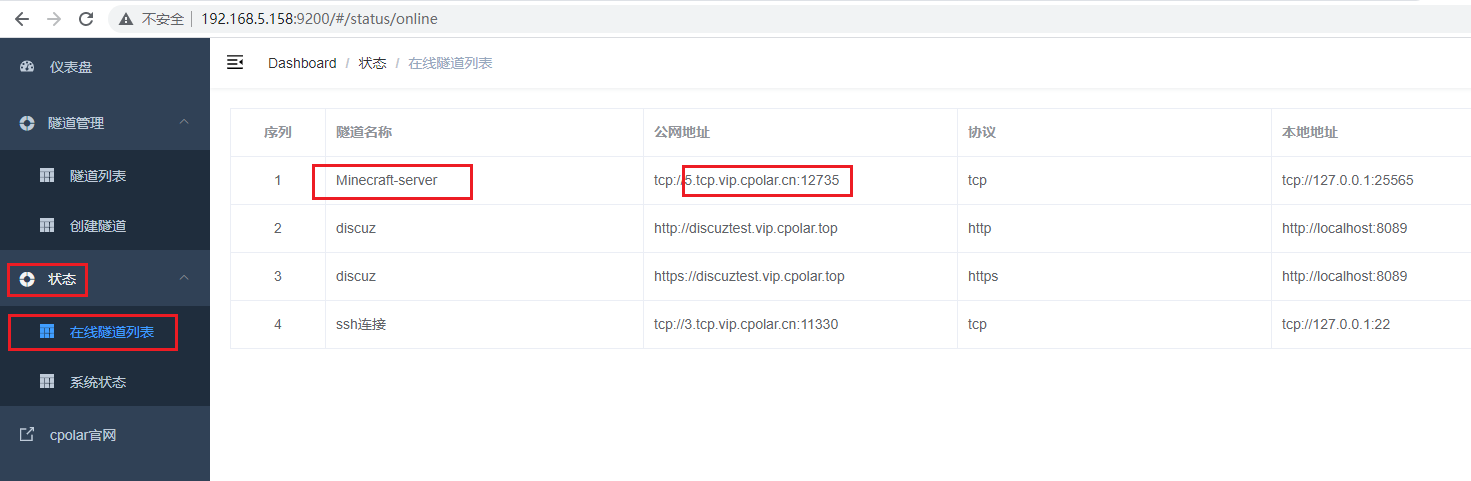
9.3 Use a fixed public address to connect remotely
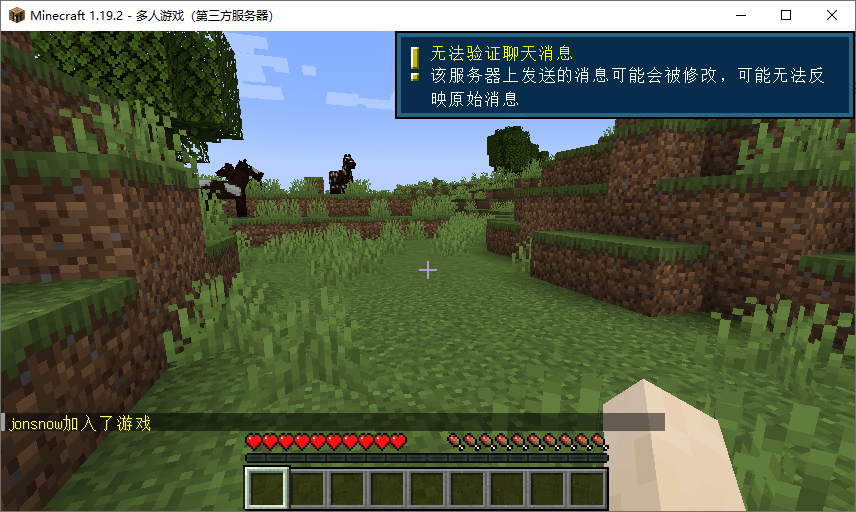
Open Minecraft, click multiplayer game, select direct connection, enter the fixed public network TCP address port above for remote connection
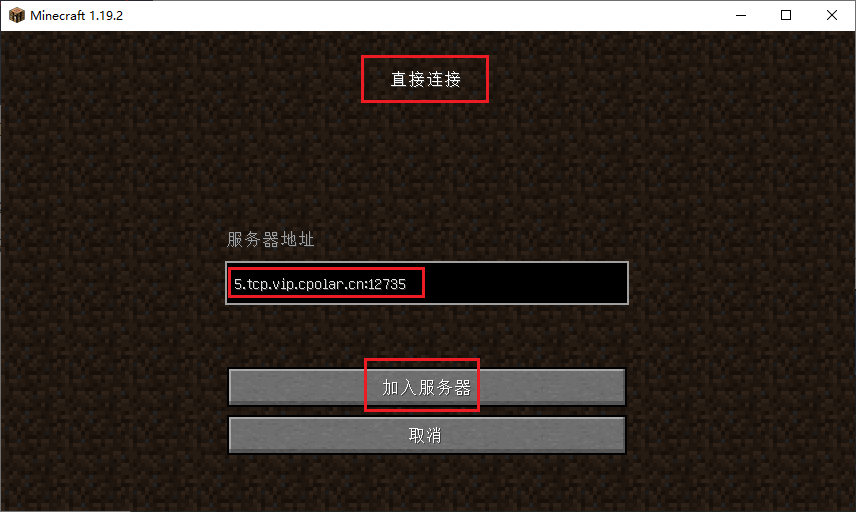
The public network remote connection is successful! Now, the public network address will no longer change randomly.
