1 Overview
This blog will introduce Ignite's basic environment, cluster snapshots, distributed computing, SQL query and processing, machine learning, etc.
2. Content
2.1 What is Ignite?
Before learning Ignite, let's first understand what is Ignite? First, Ignite is one of the top Apache open source projects. The Ignite memory array organization framework is a high-performance, integrated and distributed in-memory computing and transaction platform for large-scale data set processing, which has higher performance than traditional disk-based or flash-based technologies. It provides high-performance, distributed in-memory data organization and management functions between different data sources.
2.2 Installation environment requirements
Apache Ignite is officially tested in the following environments:
- JDK: Oracle JDK8, 11 or 17, Open JDK8, 11 or 17, IBM JDK8, 11 or 17;
- OS: Linux (any version), Mac OS X (10.6 and above), Windows (XP and above), Windows Server (2008 and above), Oracle Solaris;
- Network: no limit (recommended 10G or even faster network bandwidth);
- Architecture: x86, x64, SPARC, PowerPC.
Supports installation modes such as Docker, DEB/RPM, Kubernetes, and virtual machines.
2.3 Ignite start and stop
There are two types of nodes: server nodes and client nodes. The server node participates in caching, calculation execution, stream data processing, etc. The client node provides the ability to remotely access the server, and has complete Ignite API support, including near cache, transaction, calculation, stream processing, service, etc. All nodes start in server mode by default, and client mode needs to be specified explicitly.
1. Start the server node
Execute the following command:
ignite.sh path/to/configuration.xml
2. Start the client node
Execute the following Java code snippet:
IgniteConfiguration cfg = new IgniteConfiguration();

// enable client mode
cfg.setClientMode(true);

// start the client
Ignite ignite = Ignition.start(cfg);
3. Stop the service node
Forcibly stopping a node may result in data loss or data inconsistency, or even prevent the node from restarting. A force stop should be used as a last resort when a node is unresponsive and cannot be shut down gracefully. A normal stop allows the node to complete critical operations and complete its life cycle correctly. The correct process for performing a normal stop is as follows:
- Stop the node using one of the following methods :
- Call Ignite.close() programmatically;
- Programmatically call System.exit();
- Send user interrupt signal. Ignite uses JVM shutdown hooks to execute custom logic before the JVM is stopped. If you start node by running ignite.sh and don't detach it from the terminal, you can stop node by pressing Ctrl+C.
- Remove the node from the baseline topology . This step does not have to be performed if baseline auto-adjustment is enabled.
Removing a node from the baseline topology will start the rebalancing process on the remaining nodes. If you plan to restart the node immediately after stopping, then rebalancing is not necessary. In this case, do not remove the node from the baseline topology.
2.4 Cluster snapshot
Ignite provides the ability to create full cluster snapshots for deployments using Ignite Persistence. Ignite snapshots include a consistent, cluster-wide copy of all data records persisted to disk and some other files needed for the recovery process. The snapshot structure is similar to the layout of the Ignite Persistence storage directory, with a few exceptions. Let's take this snapshot as an example to review the structure:
work
└── snapshots
    └── backup23012020
        └── db
            ├── binary_meta
            │         ├── node1
            │ ├── node2
            │ └── node3
            ├── marshaller
            │         ├── node1
            │ ├── node2
            │ └── node3
            ├── node1
            │    └── my-sample-cache
            │ ├── cache_data.dat
            │        ├── part-3.bin
            │        ├── part-4.bin
            │        └── part-6.bin
            ├── node2
            │    └── my-sample-cache
            │ ├── cache_data.dat
            │        ├── part-1.bin
            │        ├── part-5.bin
            │        └── part-7.bin
            └── node3
                └── my-sample-cache
                    ├── cache_data.dat
                    ├── part-0.bin
                    └── part-2.bin
- Snapshots are located in this directory and named work\snapshots as Ignite's working directory. backup23012020work
- Snapshots were created for a 3-node cluster, all nodes running on the same machine. In this example, the nodes are named node1, node2, and node3, while in practice the names are equal to the nodes' consistent IDs.
- The my-sample-cache snapshot keeps a cached copy.
- This folder holds the db copy of the data records in files. Write-ahead and checkpoints are not added to the snapshot as long as they are not required by the current restore process. part-N.bincache_data.dat
- binary_meta and catalog store metadata and marshaller-specific information.
Note: Usually snapshots are distributed across the cluster
The preceding examples show snapshots taken for a cluster running on the same physical machine. So the whole snapshot is in one place. In practice, all nodes will run on different machines, and the snapshot data is distributed across the cluster. Each node keeps a snapshot of the data belonging to that particular node. The recovery process explains how to join all the segments together during the recovery process.
2.4.1 Configuration
1. Snapshot directory
By default, a portion of the snapshot is stored in the working directory of each Ignite node and uses the same storage medium that Ignite Persistence keeps data, indexes, WAL, and other files. Since snapshots can consume as much space as the persistent file already occupies, and can affect application performance by sharing disk I/O with Ignite Persistence routines, it is recommended to store snapshots and persistent files on different media superior.
2. Snapshot Execution Pool
By default, the snapshot thread pool size has a value of 4. Reducing the number of threads involved in snapshot creation increases the overall time to take a snapshot. However, this will keep the disk load within reasonable bounds.
2.4.2 Create a snapshot
Ignite provides several APIs for creating snapshots.
1. Use the control script
Ignite provides control scripts that support the snapshot-related commands listed below:
# Create a cluster snapshot named "snapshot_09062021" in the background:
control.(sh|bat) --snapshot create snapshot_09062021

# Create a cluster snapshot named "snapshot_09062021" and wait for the entire operation to complete:
control.(sh|bat) --snapshot create snapshot_09062021 --sync

# Create a cluster snapshot named "snapshot_09062021" in the "/tmp/ignite/snapshots" folder (the full path to the snapshot files will be /tmp/ignite/snapshots/snapshot_09062021):
control.(sh|bat) --snapshot create snapshot_09062021 -dest /tmp/ignite/snapshots

# Cancel a running snapshot named "snapshot_09062021":
control.(sh|bat) --snapshot cancel snapshot_09062021

# Kill a running snapshot named "snapshot_09062021":
control.(sh|bat) --kill SNAPSHOT snapshot_09062021
2. Use JMX
Use the SnapshotMXBean interface to perform snapshot-specific procedures via JMX:
| method | describe |
| createSnapshot(String snpName) | create snapshot |
| cancelSnapshot(String snpName) |
Canceling a snapshot on a node started its creation |
3. Using the Java API
Additionally, snapshots can be created programmatically in Java:
CacheConfiguration<Integer, String> ccfg = new CacheConfiguration<>("snapshot-cache");

try (IgniteCache<Integer, String> cache = ignite.getOrCreateCache(ccfg)) {
    cache.put(1, "Maxim");

    // Start snapshot operation.
    ignite.snapshot().createSnapshot("snapshot_02092020").get();
}
finally {
    ignite.destroyCache(ccfg.getName());
}
2.4.3 Check snapshot consistency
Usually all cluster nodes run on different machines, and the snapshot data is distributed across the cluster. Each node stores its own snapshot segments, so in some cases it may be necessary to check the data integrity of the snapshot and the data consistency of the entire cluster before restoring from the snapshot.
For such cases, Apache Ignite provides built-in snapshot consistency check commands that enable you to verify internal data consistency, compute data partition hashes and page checksums, and print the results if problems are found. The check command also compares the primary partition's hash to the corresponding backup partition and reports any differences.
2.4.4 Restoring from a snapshot
Snapshots can be restored manually on a stopped cluster, or automatically on an active cluster. Both procedures are described below, however, it is best to only use the restore command in the control script.
1. Manual snapshot recovery process
The snapshot structure is similar to the layout of Ignite Native Persistence, so for manual snapshot restore, you have to perform snapshot restore only on the same cluster consistentId with the same nodes and the same topology where the snapshot was taken. If you need to restore a snapshot on a different cluster or a different cluster topology, use the automated snapshot restore process.
In general, stop the cluster, then replace persistent data and other files with the data in the snapshot, and then restart the nodes.
The detailed process is as follows:
- Stop the cluster for recovery
- Delete all files from the checkpoint $IGNITE_HOME/work/cp directory
- Do the following on each node:
- {nodeId} Delete the file associated with $IGNITE_HOME/work/db/binary_meta from the directory.
- {nodeId} deletes the file associated with $IGNITE_HOME/work/db/marshaller from the directory.
- {nodeId} Delete the files and subdirectories related to your directory $IGNITE_HOME/work/db. db/{node_id} If the directory is not under the Ignite directory, please clean up the directory work separately.
- Copy the files belonging to the node with the {node_id} snapshot into the $IGNITE_HOME/work/ directory. If the db/{node_id} directory is not under the Ignitework directory, then you will need to copy the data files there.
- Restart the cluster
2. Automatic snapshot recovery process
The automated restore process allows users to restore cache groups from snapshots on the active cluster using Java API or command-line scripting.
Currently, this process has several limitations, which will be addressed in a future release:
- Restoration is only possible if all parts of the snapshot exist in the cluster. Each node looks for local snapshot data in the configured snapshot path by the given snapshot name and consistent node ID.
- The recovery process can only be applied to user-created cache groups.
- The cache group to be restored from the snapshot must not exist in the cluster. If they exist, the user must destroy them before starting this operation.
- Concurrent restore operations are not allowed. Therefore, if an operation has already started, another operation cannot be started until the first operation completes.
The following code snippet demonstrates how to restore a single cache group from a snapshot.
// Restore cache named "snapshot-cache" from the snapshot "snapshot_02092020".
ignite.snapshot().restoreSnapshot("snapshot_02092020", Collections.singleton("snapshot-cache")).get();
3. Use the CLI to control restore operations
The control.sh|bat script provides the ability to start and stop recovery operations.
# Start restoring all user-created cache groups from the snapshot "snapshot_09062021" in the background.
control.(sh|bat) --snapshot restore snapshot_09062021 --start

# Start restoring all user-created cache groups from the snapshot "snapshot_09062021" and wait for the entire operation to complete.
control.(sh|bat) --snapshot restore snapshot_09062021 --start --sync

# Start restoring all user-created cache groups from the snapshot "snapshot_09062021" located in the "/tmp/ignite/snapshots" folder (the full path to the snapshot files should be /tmp/ignite/snapshots/snapshot_09062021):
control.(sh|bat) --snapshot restore snapshot_09062021 --src /tmp/ignite/snapshots

# Start restoring only "cache-group1" and "cache-group2" from the snapshot "snapshot_09062021" in the background.
control.(sh|bat) --snapshot restore snapshot_09062021 --start --groups cache-group1,cache-group2

# Cancel the restore operation for "snapshot_09062021".
control.(sh|bat) --snapshot restore snapshot_09062021 --cancel
2.4.5 Consistency Guarantee
All snapshots are fully consistent with respect to concurrent cluster-wide operations and ongoing changes with Ignite. Persist data, indexes, schemas, binary metadata, marshallers and other files on the node.
Cluster-wide snapshot consistency is achieved by triggering the Partition-Map-Exchange process. By doing this, the cluster will eventually reach a point where all previously started transactions have completed and new transactions are suspended. Once this happens, the cluster will initiate the snapshot creation process. The PME process ensures that snapshots include both the primary and backups in a consistent state.
Consistency between an Ignite Persistence file and its snapshot copy is achieved by copying the original file to the target snapshot directory and tracking all concurrent in-progress changes. Tracking changes may require additional space on the Ignite Persistence storage medium (up to 1x the size of the storage medium).
2.5 Distributed Computing
Ignite provides an API for distributing computation among cluster nodes in a balanced and fault-tolerant manner. You can submit individual tasks for execution, or you can implement the MapReduce pattern with automatic task splitting. The API provides fine-grained control over job assignment policies.
2.5.1 Obtain computing interface
The main entry point for running distributed computing is the Compute interface, which is available from Ignite.
Ignite ignite = Ignition.start();

IgniteCompute compute = ignite.compute();
2.5.2 Specify the node set for calculation
Each instance of a compute interface is associated with a set of nodes on which to execute the task. When called with no arguments, ignite.compute() returns the compute interfaces associated with all server nodes. To get instances for a specific subset of nodes, use Ignite.compute(ClusterGroup group). In the following example, the compute interface is only bound to remote nodes, i.e. all nodes except the one running this code.
Ignite ignite = Ignition.start();

IgniteCompute compute = ignite.compute(ignite.cluster().forRemotes());
2.5.3 Executing tasks
Ignite provides three interfaces that can be implemented to represent a task and execute it through the computing interface:
- IgniteRunnable — which extends java.lang.Runnable can be used to implement computations that take no input parameters and return no results.
- IgniteCallablejava.util.concurrent.Callable—Extension that returns a specific value.
- IgniteClosure—a functional interface that accepts parameters and returns a value.
You can execute the task once (on one of the nodes) or broadcast it to all nodes.
2.5.4 Executing a runnable task
To execute a runnable task, use the run(…) method of the compute interface. Tasks are sent to one of the nodes associated with the compute instance.
IgniteCompute compute = ignite.compute();

// Iterate through all words and print
// each word on a different cluster node.
for (String word : "Print words on different cluster nodes".split(" ")) {
    compute.run(() -> System.out.println(word));
}
2.5.5 Executing callable tasks
To execute a callable task, use the call(…) method of the computed interface.
Collection<IgniteCallable<Integer>> calls = new ArrayList<>();

// Iterate through all words in the sentence and create callable jobs.
for (String word : "How many characters".split(" "))
    calls.add(word::length);

// Execute the collection of callables on the cluster.
Collection<Integer> res = ignite.compute().call(calls);

// Add all the word lengths received from cluster nodes.
int total = res.stream().mapToInt(Integer::intValue).sum();
2.5.6 Executing IgniteClosure
To execute an IgniteClosure, use the apply(…) method of the computed interface. The method accepts the task and the task's input parameters. The IgniteClosure parameter is passed to the given IgniteClosure at execution time.
IgniteCompute compute = ignite.compute();

// Execute closure on all cluster nodes.
Collection<Integer> res = compute.apply(String::length, Arrays.asList("How many characters".split(" ")));

// Add all the word lengths received from cluster nodes.
int total = res.stream().mapToInt(Integer::intValue).sum();
2.5.7 Broadcast task
This method broadcast() executes the task on all nodes associated with the compute instance.
// Limit broadcast to remote nodes only.
IgniteCompute compute = ignite.compute(ignite.cluster().forRemotes());

// Print out hello message on remote nodes in the cluster group.
compute.broadcast(() -> System.out.println("Hello Node: " + ignite.cluster().localNode().id()));
2.5.8 Asynchronous execution
All methods described in previous sections have asynchronous counterparts:
- callAsync(…)
- runAsync(…)
- applyAsync(…)
- broadcastAsync(…)
Asynchronous methods return an IgniteFuture representing the result of the operation. In the following example, a set of callable tasks are executed asynchronously.
IgniteCompute compute = ignite.compute();

Collection<IgniteCallable<Integer>> calls = new ArrayList<>();

// Iterate through all words in the sentence and create callable jobs.
for (String word : "Count characters using a callable".split(" "))
    calls.add(word::length);

IgniteFuture<Collection<Integer>> future = compute.callAsync(calls);

future.listen(fut -> {
    // Total number of characters.
    int total = fut.get().stream().mapToInt(Integer::intValue).sum();

    System.out.println("Total number of characters: " + total);
});
2.5.9 Executing timeout tasks
You can set a timeout for task execution. If a task does not finish within the given time frame, it is stopped and all jobs spawned by that task are cancelled.
To perform a timeout task, use the withTimeout(…) method of the compute interface. This method returns a compute interface that executes the first task given to it in a time-bound manner. Subsequent tasks do not have a timeout: you need to call withTimeout(…) for each task that should have a timeout.
IgniteCompute compute = ignite.compute();

compute.withTimeout(300_000).run(() -> {
    // your computation
    // ...
});
2.5.10 Sharing state between jobs on the local node
It is often useful to share state between different computing jobs executing on a node. For this, there is a shared concurrent local map on each node.
IgniteCluster cluster = ignite.cluster();

ConcurrentMap<String, Integer> nodeLocalMap = cluster.nodeLocalMap();
Node-local values are similar to thread-local variables in that the values are not distributed and persist only on the local node. Node-local data can be used to share state between compute jobs. It can also be used by deployed services.
In the following example, a node-local counter is incremented each time the job executes on a node. As a result, a node-local counter on each node tells us how many times the job was executed on that node.
IgniteCallable<Long> job = new IgniteCallable<Long>() {
    @IgniteInstanceResource
    private Ignite ignite;

    @Override
    public Long call() {
        // Get a reference to node local.
        ConcurrentMap<String, AtomicLong> nodeLocalMap = ignite.cluster().nodeLocalMap();

        AtomicLong cntr = nodeLocalMap.get("counter");

        if (cntr == null) {
            AtomicLong old = nodeLocalMap.putIfAbsent("counter", cntr = new AtomicLong());

            if (old != null)
                cntr = old;
        }

        return cntr.incrementAndGet();
    }
};
2.5.11 Accessing data from compute tasks
If your computing tasks need to access data stored in the cache, you can use the following examples to complete Ignite:
public class MyCallableTask implements IgniteCallable<Integer> {

    @IgniteInstanceResource
    private Ignite ignite;

    @Override
    public Integer call() throws Exception {

        IgniteCache<Long, Person> cache = ignite.cache("person");

        // Get the data you need
        Person person = cache.get(1L);

        // do with the data what you need to do

        return 1;
    }
}
Note that the example shown above may not be the most efficient approach. The reason is that the person object 1 corresponding to the key may be located on a node different from the node executing the task. In this case, the object is fetched over the network. This can be avoided by co-locating tasks with data.
Notice:
If you want to use key and value objects in IgniteCallable and IgniteRunnable tasks, make sure the key and value classes are deployed on all cluster nodes.
2.6 SQL query and processing
Ignite comes with an ANSI-99 compliant, horizontally scalable, and fault-tolerant distributed SQL database. Distribution is provided by partitioning or full replication of data across cluster nodes, depending on the use case.
As a SQL database, Ignite supports all DML commands, including SELECT, UPDATE, INSERT, and DELETE queries, and also implements a subset of DDL commands relevant to distributed systems.
You can interact with Ignite just like any other SQL-enabled store by connecting JDBC or ODBC drivers from external tools and applications. Java, .NET and C++ developers can take advantage of the native SQL API.
Internally, SQL tables have the same data structures as key-value caches. This means you can change the partition distribution of your data and take advantage of affinity hosting techniques for better performance.
Ignite's default SQL engine uses the H2 database to parse and optimize queries and generate execution plans, but an Apache Calcite-based SQL engine can also be enabled to execute queries.
2.6.1 Distributed query
Queries against partitioned tables are executed in a distributed fashion:
- The query is parsed and split into multiple "map" queries and a "reduce" query.
- All map queries are executed on all nodes where the required data resides.
- All nodes provide locally executed result sets to the query initiator, which in turn incorporates the provided result sets into the final result.
You can force queries to be processed locally, that is, on a subset of the data stored on the node executing the query.
2.6.2 Local query
If a query is executed against the replicated table, it will be run against the local data.
Queries on partitioned tables are executed in a distributed fashion. However, you can force local queries on partitioned tables.
2.6.3 SQL Architecture
Ignite has a number of default schemas and supports the creation of custom schemas.
By default there are two modes available:
- SYS schema, which contains a number of system views with cluster node information. You cannot create tables in this schema. See the System Views page for details.
- PUBLIC schema, used by default when no schema is specified.
A custom schema is created when:
- You can specify custom modes in the cluster configuration.
- Ignite creates a schema for each cache created through one of its programmatic interfaces or XML configuration
1. Public mode
The PUBLIC schema is used by default whenever required and no schema is specified. For example, when you connect to a cluster via JDBC without explicitly setting the mode, you connect to the PUBLIC mode.
2. Custom mode
Custom schemas can be set via the sqlSchemas property of IgniteConfiguration. You can specify a list of schemas in the configuration before starting the cluster, and then create objects in those schemas at runtime.
Below is an example configuration with two custom patterns.
IgniteConfiguration cfg = new IgniteConfiguration();

SqlConfiguration sqlCfg = new SqlConfiguration();

sqlCfg.setSqlSchemas("MY_SCHEMA", "MY_SECOND_SCHEMA" );

cfg.setSqlConfiguration(sqlCfg);
To connect to a specific schema via e.g. a JDBC driver, provide the schema name in the connection string:
jdbc:ignite:thin://127.0.0.1/MY_SCHEMA
3. Cache and Schema Names
When you create a cache with queryable fields, you can use the SQL API to manipulate the cached data. In SQL terminology, each such cache corresponds to a separate schema whose name is equal to the name of the cache.
Likewise, when you create a table through a DDL statement, you can access it as a key-value cache through the programming interfaces supported by Ignite. The name of the corresponding cache can be specified by providing the CACHE_NAME parameter in the statement section. WITH CREATE TABLE
CREATE TABLE City (
  ID INT(11),
  Name CHAR(35),
  CountryCode CHAR(3),
  District CHAR(20),
  Population INT(11),
  PRIMARY KEY (ID, CountryCode)
) WITH "backups=1, CACHE_NAME=City";
2.6.4 SQL indexes
Ignite automatically creates indexes for each primary key and affinity key field. When you define an index on a field in a value object, Ignite creates a composite index consisting of the indexed field and the cached primary key. In SQL terms, this means that the index will consist of two columns: the column to be indexed and the primary key column.
1. Use annotations to configure indexes
@QuerySqlField can configure indexes and queryable fields from code through annotations. In the example below, the Ignite SQL engine will create indexes for the id and salary fields.
public class Person implements Serializable {
    /** Indexed field. Will be visible to the SQL engine. */
    @QuerySqlField(index = true)
    private long id;

    /** Queryable field. Will be visible to the SQL engine. */
    @QuerySqlField
    private String name;

    /** Will NOT be visible to the SQL engine. */
    private int age;

    /**
     * Indexed field sorted in descending order. Will be visible to the SQL engine.
     */
    @QuerySqlField(index = true, descending = true)
    private float salary;
}
Type names are used as table names in SQL queries. In this case, our table name will be Person (use and definition of schema names are explained in schema section).
id and are both salary index fields. id will be sorted ascending (default) and salary descending.
If you don't want to index a field, but you still need to use it in SQL queries, then the field must be annotated without the index=true parameter. Such fields are called queryable fields. In the example above, name is defined as a queryable field.
The age field is neither queryable nor indexed, so it cannot be accessed from SQL queries.
When defining an index field, you need to register the index type.
2. Index nested objects
Fields of nested objects can also be indexed and queried using annotations. For example, consider a Person object that has Address objects as fields:
public class Person {
    /** Indexed field. Will be visible for SQL engine. */
    @QuerySqlField(index = true)
    private long id;

    /** Queryable field. Will be visible for SQL engine. */
    @QuerySqlField
    private String name;

    /** Will NOT be visible for SQL engine. */
    private int age;

    /** Indexed field. Will be visible for SQL engine. */
    @QuerySqlField(index = true)
    private Address address;
}
The structure of the class Address might look like this:
public class Address {
    /** Indexed field. Will be visible for SQL engine. */
    @QuerySqlField (index = true)
    private String street;

    /** Indexed field. Will be visible for SQL engine. */
    @QuerySqlField(index = true)
    private int zip;
}
In the above example, the @QuerySqlField(index = true) annotation Person is specified on all fields of the class as well as on the Address object in the Address class.
This makes it possible to execute SQL queries like:
QueryCursor<List<?>> cursor = personCache.query(new SqlFieldsQuery( "select * from Person where street = 'street1'"));
Note that you do not need to specify address.street in the WHERE clause of the SQL query. This is because the fields of the Address class are flattened in the Person table which only allows us to directly access the Address fields in the query.
3. Register index type
After defining indexes and queryable fields, they must be registered with the SQL engine, along with the object type they belong to.
To specify which types should be indexed, pass the corresponding key-value pairs in the method CacheConfiguration.setIndexedTypes() as shown in the example below.
// Preparing configuration.
CacheConfiguration<Long, Person> ccfg = new CacheConfiguration<>();

// Registering indexed type.
ccfg.setIndexedTypes(Long.class, Person.class);
This method only accepts pairs of types: one for key classes and one for value classes. Primitives are passed as boxed types.
4. Group index
To set up a multi-field index that can speed up complex conditional queries, you can use the @QuerySqlField.Group annotation. If you want a field to be part of multiple groups, you can add multiple @QuerySqlField.Group annotations. orderedGroups
For example, in the class below Person, we have a field age that belongs to the index group, the age_salary_idx group is sorted with a group order of "0" and descending. Also, in the same group we have salary a field with group order "3" and ascending order. In addition, the field salary itself is a single-column index (index = true specifies parameters in addition to the orderedGroups declaration). The group order does not have to be a specific number. Only fields within a particular group need to be sorted.
public class Person implements Serializable {
    /** Indexed in a group index with "salary". */
    @QuerySqlField(orderedGroups = { @QuerySqlField.Group(name = "age_salary_idx", order = 0, descending = true) })

    private int age;

    /** Indexed separately and in a group index with "age". */
    @QuerySqlField(index = true, orderedGroups = { @QuerySqlField.Group(name = "age_salary_idx", order = 3) })
    private double salary;
}
5. Use the query entity to configure the index
Indexes and queryable fields can also be configured via the org.apache.ignite.cache.QueryEntity class to facilitate Spring XML-based configuration.
All concepts discussed as part of annotation-based configuration above also apply to QueryEntity-based methods. Additionally, types whose fields are configured with the @QuerySqlField annotation and registered with the CacheConfiguration.setIndexedTypes() method are internally converted to query entities.
The following examples show how to define single field indexes, group indexes and queryable fields.
CacheConfiguration<Long, Person> cache = new CacheConfiguration<Long, Person>("myCache");

QueryEntity queryEntity = new QueryEntity();

queryEntity.setKeyFieldName("id").setKeyType(Long.class.getName()).setValueType(Person.class.getName());

LinkedHashMap<String, String> fields = new LinkedHashMap<>();
fields.put("id", "java.lang.Long");
fields.put("name", "java.lang.String");
fields.put("salary", "java.lang.Long");

queryEntity.setFields(fields);

queryEntity.setIndexes(Arrays.asList(new QueryIndex("name"),
        new QueryIndex(Arrays.asList("id", "salary"), QueryIndexType.SORTED)));

cache.setQueryEntities(Arrays.asList(queryEntity));
In this case, our table name will be Person (use and definition of schema names are explained on the Schemas page).
Once defined, QueryEntity can execute SQL queries as follows:
SqlFieldsQuery qry = new SqlFieldsQuery("SELECT id, name FROM Person" + "WHERE id > 1500 LIMIT 10");
6. Configure index inline size
Proper index inline size can help speed up queries on indexed fields. For information on how to choose an appropriate inline size, see the dedicated section in the SQL Tuning Guide.
In most cases, you only need to set the inline size for indexes on variable-length fields such as strings or arrays. The default value is 10.
You can change the default by setting
- Individual inline sizes for each index, or
- CacheConfiguration.sqlIndexMaxInlineSize property for all indexes in the given cache, or
- IGNITE_MAX_INDEX_PAYLOAD_SIZE system property for all indexes in the cluster
Settings are applied in the order listed above.
You can also configure the inline size individually for each index, which overrides the default. To set the index inline size for a user-defined index, use one of the following methods. In all cases, the value is in bytes.
- When using annotations:
@QuerySqlField(index = true, inlineSize = 13)
private String country;
- When using QueryEntity:
QueryIndex idx = new QueryIndex("country");
idx.setInlineSize(13);
queryEntity.setIndexes(Arrays.asList(idx));
- If you create an index with the CREATE INDEX command, you can set the inline size with the INLINE_SIZE option:
create index country_idx on Person (country) INLINE_SIZE 13;
7. Custom keys
If you only use predefined SQL datatypes for primary keys, then you don't need to do anything extra with SQL schema configuration. These data types are defined by the GridQueryProcessor.SQL_TYPES constant as shown below.
Predefined SQL data types include:
- All primitives and their wrappers, except char and Character
- String
- BigDecimal
- byte[]
- java.util.Date, java.sql.Date,java.sql.Timestamp
- java.util.UUID
However, once you decide to introduce a custom complex key and reference its fields from DML statements, you need to:
- QueryEntity defines these fields in the same way it sets fields for value objects.
- Use the new configuration parameter QueryEntity.setKeyFields(..) to distinguish between key fields and value fields.
The example below shows how to do this.
// Preparing cache configuration.
CacheConfiguration<Long, Person> cacheCfg = new CacheConfiguration<Long, Person>("personCache");

// Creating the query entity.
QueryEntity entity = new QueryEntity("CustomKey", "Person");

// Listing all the queryable fields.
LinkedHashMap<String, String> fields = new LinkedHashMap<>();

fields.put("intKeyField", Integer.class.getName());
fields.put("strKeyField", String.class.getName());

fields.put("firstName", String.class.getName());
fields.put("lastName", String.class.getName());

entity.setFields(fields);

// Listing a subset of the fields that belong to the key.
Set<String> keyFlds = new HashSet<>();

keyFlds.add("intKeyField");
keyFlds.add("strKeyField");

entity.setKeyFields(keyFlds);

// End of new settings, nothing else here is DML related

entity.setIndexes(Collections.<QueryIndex>emptyList());

cacheCfg.setQueryEntities(Collections.singletonList(entity));

ignite.createCache(cacheCfg);
2.6.5 SQL API
In addition to using the JDBC driver, Java developers can also use Ignite's SQL API to query and modify data stored in Ignite.
This class SqlFieldsQuery is an interface for executing SQL statements and browsing results. SqlFieldsQuery is executed by returning a query cursor through IgniteCache.query(SqlFieldsQuery).
1. Configure queryable fields
If you want to use SQL statements to query the cache, you need to define which fields of the value object are queryable. Queryable fields are fields of the data model that the SQL engine can "see" and query.
In Java, queryable fields can be configured in two ways:
- usage notes
- Query entities by definition
To make a specific field queryable, annotate the field with the @QuerySqlField annotation and call CacheConfiguration.setIndexedTypes(…) in the value class definition
class Person implements Serializable {
    /** Indexed field. Will be visible to the SQL engine. */
    @QuerySqlField(index = true)
    private long id;

    /** Queryable field. Will be visible to the SQL engine. */
    @QuerySqlField
    private String name;

    /** Will NOT be visible to the SQL engine. */
    private int age;

    /**
     * Indexed field sorted in descending order. Will be visible to the SQL engine.
     */
    @QuerySqlField(index = true, descending = true)
    private float salary;
}

public static void main(String[] args) {
    Ignite ignite = Ignition.start();
    CacheConfiguration<Long, Person> personCacheCfg = new CacheConfiguration<Long, Person>();
    personCacheCfg.setName("Person");

    personCacheCfg.setIndexedTypes(Long.class, Person.class);
    IgniteCache<Long, Person> cache = ignite.createCache(personCacheCfg);
}
Make sure to call CacheConfiguration.setIndexedTypes(…) to let the SQL engine know about annotated fields.
2. Query entity
QueryEntity You can use this class to define queryable fields. Query entities can be configured via XML configuration.
class Person implements Serializable {
    private long id;

    private String name;

    private int age;

    private float salary;
}

public static void main(String[] args) {
    Ignite ignite = Ignition.start();
    CacheConfiguration<Long, Person> personCacheCfg = new CacheConfiguration<Long, Person>();
    personCacheCfg.setName("Person");

    QueryEntity queryEntity = new QueryEntity(Long.class, Person.class)
            .addQueryField("id", Long.class.getName(), null).addQueryField("age", Integer.class.getName(), null)
            .addQueryField("salary", Float.class.getName(), null)
            .addQueryField("name", String.class.getName(), null);

    queryEntity.setIndexes(Arrays.asList(new QueryIndex("id"), new QueryIndex("salary", false)));

    personCacheCfg.setQueryEntities(Arrays.asList(queryEntity));

    IgniteCache<Long, Person> cache = ignite.createCache(personCacheCfg);
}
3. Query
To perform a select query on the cache, simply create a SqlFieldsQuery object providing the query string to the constructor and run cache.query(…) . Note that in the following example, the Person cache must be configured to be visible to the SQL engine.
IgniteCache<Long, Person> cache = ignite.cache("Person");

SqlFieldsQuery sql = new SqlFieldsQuery(
        "select concat(firstName, ' ', lastName) from Person");

// Iterate over the result set.
try (QueryCursor<List<?>> cursor = cache.query(sql)) {
    for (List<?> row : cursor)
        System.out.println("personName=" + row.get(0));
}
SqlFieldsQuery returns a cursor that iterates over the results that match the SQL query.
4. Local Execution
To force the query to be executed locally, use SqlFieldsQuery.setLocal(true). In this case, the query is executed against data stored on the node running the query. This means that the results of queries are almost always incomplete. Use local mode only if you are sure you understand this limitation.
5. Subqueries in the WHERE clause
SELECT queries used in INSERT and MERGE statements and SELECT queries generated by UPDATE and DELETE operations are distributed and executed in colocated or non-colocated distributed mode.
However, if there is a subquery executed as part of the WHERE clause, it can only be executed in colocated mode.
For example, let's consider the following query:
DELETE FROM Person WHERE id IN
    (SELECT personId FROM Salary s WHERE s.amount > 2000);
The SQL engine generates a SELECT query to get a list of entries to delete. The query is distributed and executed across the cluster as follows:
SELECT _key, _val FROM Person WHERE id IN
    (SELECT personId FROM Salary s WHERE s.amount > 2000);
However, subqueries in the IN clause ( SELECT personId FROM Salary …) are not distributed further, but are executed on the local dataset available on the node.
6. Insert, update, delete and merge
SqlFieldsQuery You can execute other DML commands to modify data:
// insert
IgniteCache<Long, Person> cache = ignite.cache("personCache");

cache.query(
        new SqlFieldsQuery("INSERT INTO Person(id, firstName, lastName) VALUES(?, ?, ?)")
                .setArgs(1L, "John", "Smith"))
        .getAll();
// renew
IgniteCache<Long, Person> cache = ignite.cache("personCache");

cache.query(new SqlFieldsQuery("UPDATE Person set lastName = ? " + "WHERE id >= ?")
        .setArgs("Jones", 2L)).getAll();
// delete
IgniteCache<Long, Person> cache = ignite.cache("personCache");

cache.query(new SqlFieldsQuery("DELETE FROM Person " + "WHERE id >= ?").setArgs(2L))
        .getAll();
// merge
IgniteCache<Long, Person> cache = ignite.cache("personCache");

cache.query(new SqlFieldsQuery("MERGE INTO Person(id, firstName, lastName)"
        + " values (1, 'John', 'Smith'), (5, 'Mary', 'Jones')")).getAll();
When using SqlFieldsQuery to execute DDL statements, you must call getAll() on the cursor returned from the query(…) method.
7. Specify the architecture
By default, any SELECT statement executed by SqlFieldsQuery will be parsed against the PUBLIC schema. However, if the table you are querying is in a different schema, you can specify the schema by calling SqlFieldsQuery.setSchema(…). In this case, the statement is executed in the given mode.
SqlFieldsQuery sql = new SqlFieldsQuery("select name from City").setSchema("PERSON");
Alternatively, you can define the schema in the statement:
SqlFieldsQuery sql = new SqlFieldsQuery("select name from Person.City");
8. Create table
You can pass any supported DDL statement to and execute on the SqlFieldsQuery cache as shown below.
IgniteCache<Long, Person> cache = ignite
        .getOrCreateCache(new CacheConfiguration<Long, Person>().setName("Person"));

// Creating City table.
cache.query(new SqlFieldsQuery(
        "CREATE TABLE City (id int primary key, name varchar, region varchar)")).getAll();
In terms of SQL mode, executing the code creates the following tables:
- Table "Person" in the "Person" schema (if not created before).
- Table "City" in the "Person" schema.
To query the "City" table, use a statement like select * from Person.City or new SqlFieldsQuery("select * from City").setSchema("PERSON") (note the capitalization).
9. Cancel query
There are two ways to cancel long running queries.
The first way is to prevent queries from getting out of hand by setting query execution timeouts.
SqlFieldsQuery query = new SqlFieldsQuery("SELECT * from Person");

// Setting query execution timeout
query.setTimeout(10_000, TimeUnit.SECONDS);
The second way is to stop the query by using QueryCursor.close().
SqlFieldsQuery query = new SqlFieldsQuery("SELECT * FROM Person");

// Executing the query
QueryCursor<List<?>> cursor = cache.query(query);

// Halting the query that might be still in progress.
cursor.close();
2.6.6 Machine Learning
Apache Ignite Machine Learning (ML) is a set of simple, scalable, and efficient tools for building predictive machine learning models without expensive data transfers.
The rationale for adding machine and deep learning (DL) to Apache Ignite is simple. Today's data scientists must deal with two major factors that prevent ML from being adopted mainstream:
- First, train and deploy the model (after training) in a different system. Data scientists have to wait for ETL or some other data transfer process to move the data into systems like Apache Mahout or Apache Spark for training. Then they have to wait for this process to complete and redeploy the model in production. The entire process can take hours to move terabytes of data from one system to another. Also, the training part usually happens on old datasets.
- The second factor has to do with scalability. ML and DL algorithms that have to deal with datasets that no longer fit on a single server cell are growing. This drives data scientists to come up with complex solutions, or to turn to distributed computing platforms such as Apache Spark and TensorFlow. However, most of these platforms only address part of the model training puzzle, burdening developers with deciding how to deploy models in production later.
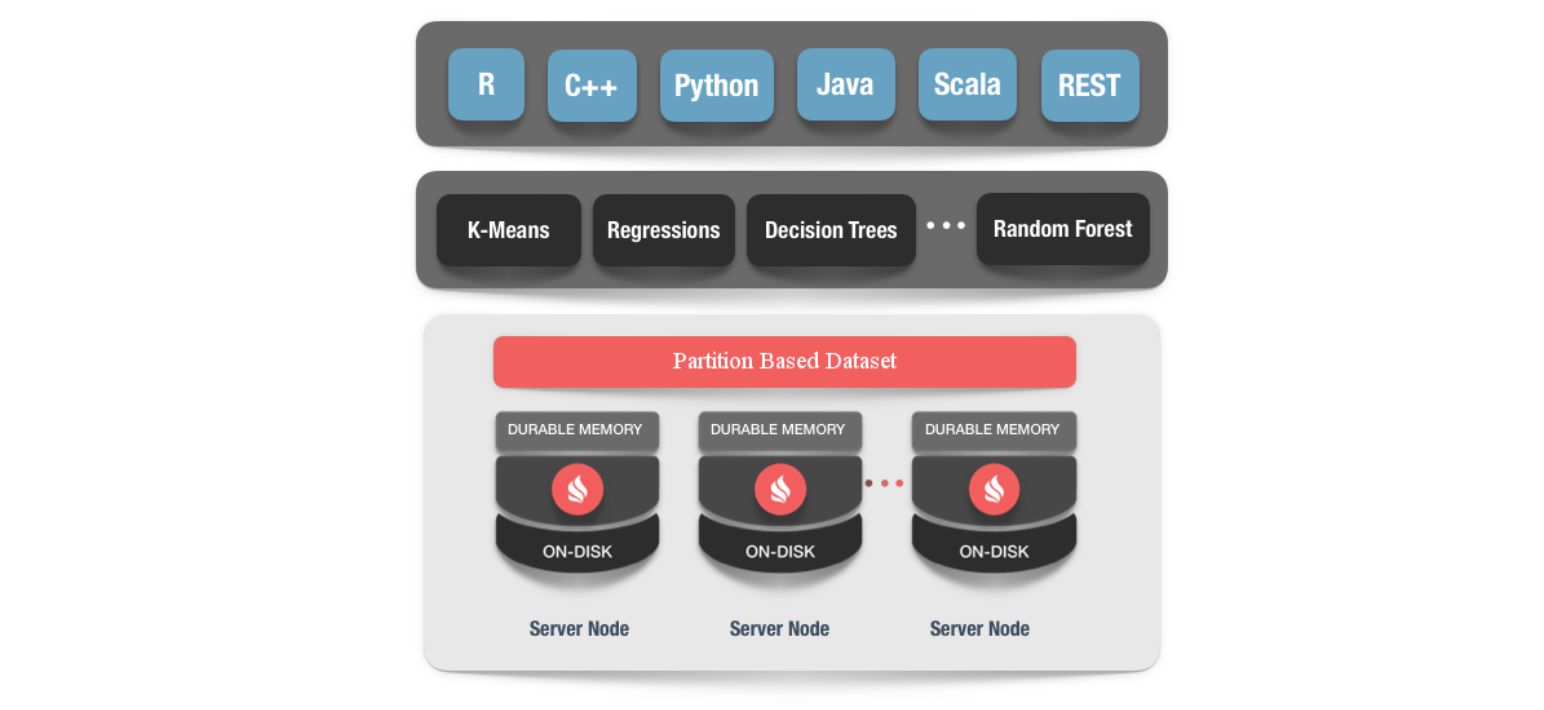
1. Zero ETL and massive scalability
Ignite Machine Learning relies on Ignite's memory-centric storage, which brings massive scalability to ML and DL tasks and eliminates the wait imposed by ETL between different systems. For example, it allows users to run ML/DL training and inference directly on data stored across memory and disk in an Ignite cluster. Next, Ignite provides a large number of ML and DL algorithms optimized for Ignite's collocated distributed processing. These implementations provide memory speed and unlimited horizontal scalability when operating against large datasets or incrementally against incoming data streams without moving data to another storage. By eliminating data movement and long processing wait times
2. Fault tolerance and continuous learning
Apache Ignite machine learning is tolerant of node failures. This means that in case of a node failure during the learning process, all the recovery process is transparent to the user, the learning process is not interrupted, and we get results similar to the case where all nodes are working normally.
3. Algorithm and Applicability
3.1 Classification
Identify which category a new observation belongs to based on the training set.
- Applicability: spam detection, image recognition, credit scoring, disease recognition.
- Algorithms: Logistic Regression, Linear SVM (Support Vector Machines), k-NN Classification, Naive Bayes, Decision Trees, Random Forests, Multilayer Perceptrons, Gradient Boosting, ANN (Approximate Nearest Neighbors)
3.2 Regression
Models the relationship between a scalar dependent variable (y) and one or more explanatory or independent variables (x).
- Applicability: drug response, stock price, supermarket revenue.
- Algorithms: linear regression, decision tree regression, k-NN regression.
3.3 Clustering
Groups a set of objects in such a way that objects in the same group (called a cluster) are more similar to each other (in a sense) than objects in other groups (clusters).
- Applicability: customer segmentation, grouping of experiment results, grouping of shopping items.
- Algorithms: K-Means Clustering, Gaussian Mixture (GMM).
3.4 Recommended
Build recommender systems, which are a subclass of information filtering systems designed to predict users' "ratings" or "preferences" for items.
- Applicability: Playlist generators for video and music services, product recommenders for services
- Algorithm: Matrix factorization.
3.5 Preprocessing
Feature extraction and normalization.
- Applicability: Transform input data (e.g. text) for use in machine learning algorithms to extract the features we need to adapt, normalize the input data.
- Algorithms: Apache Ignite ML supports custom preprocessing using partition-based dataset features and has default preprocessors such as normalization preprocessor, one-hot-encoder, min-max scaler, etc.
3. Summary
Ignite and Hadoop solve problems in different business scenarios, even though similar underlying technologies may be applied to a certain extent. Ignite is a multi-purpose, related to OLAP/OLTP in-memory data structures, and Hadoop is just one of many data sources natively supported by Ignite.
Spark is a project similar to Ignite. But Spark focuses on OLAP, and Ignite has better performance in hybrid OLTP/OLAP scenarios with its powerful transaction processing capabilities. Especially for Hadoop, Ignite will provide plug-and-play acceleration for the existing MapReduce framework and Hive jobs, avoiding the practice of reinventing the wheel, while Spark needs to do data ETL first, which is more suitable for developing new analysis applications.
I wish everyone a happy Sunday, and leave a small tail " Hospital Certificate Encyclopedia "