Experimental topology

Experimental demand
1. The user needs within the corporate network through a gateway server to share Internet
2. Internet users need to access the web server
3. Only allow 192.168.10 .0 / 24ping gateway and server
4. The server and gateway servers remotely through an SSH, for safety the default SSH port to 12345, allowing only 192.168.10.10 host SSH server and gateway, internal servers allow Internet SSH
lab environment
1. Gateway server: Centos7 -1
2. within the enterprise network tester: Centos7 -2
3. Website Server: Centos7 -3
4.Internet testing machine: Centos7 -4
1, network card and gateway server address configuration
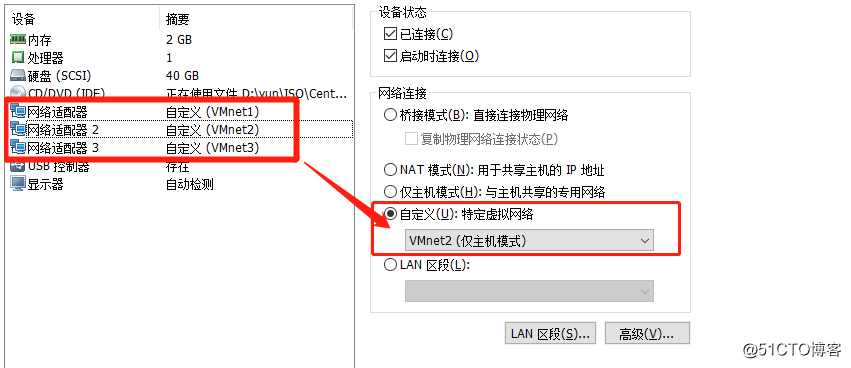
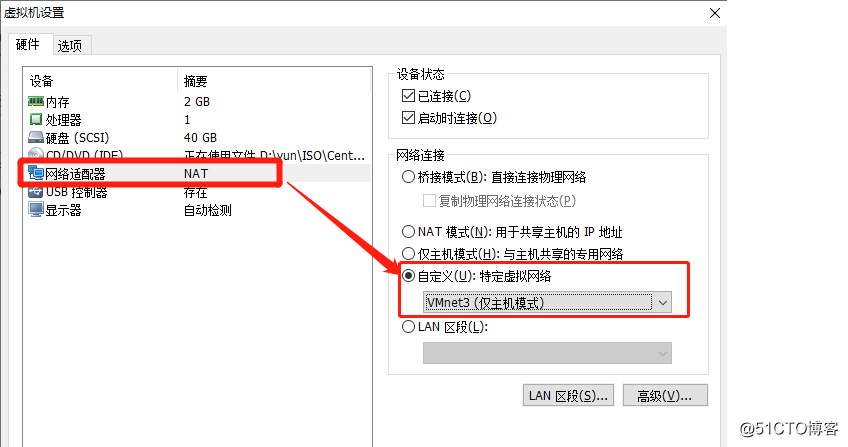
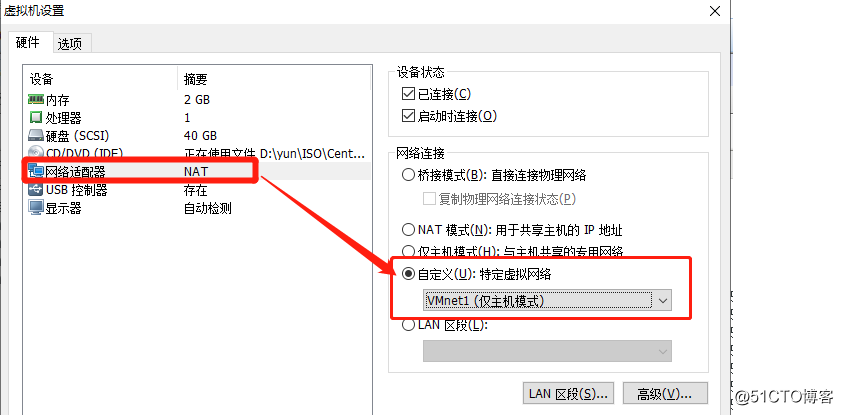
1) Create a gateway server 3 card, do static, NIC 1 binding VMnet1, as a trusted zone, NIC 2 binding VMnet2, the DMZ area, NIC 3 binding VMnet3. External area.
2) Configure each NIC Gateway address
ens33 card
    [root@localhost ~ ]# vim /etc/sysconfig/network-scripts/ifcfg-ens33
    TYPE=Ethernet
    PROXY_METHOD=none
    BROWSER_ONLY=no
    BOOTPROTO=static
    DEFROUTE=yes
    IPV4_FAILURE_FATAL=no
    IPV6INIT=yes
    IPV6_AUTOCONF=yes
    IPV6_DEFROUTE=yes
    IPV6_FAILURE_FATAL=no
    IPV6_ADDR_GEN_MODE=stable-privacy
    NAME=ens33
    UUID=88cf4975-29b8-4041-9cb0-456a56d1fddb
    DEVICE=ens33
    ONBOOT=yes
    IPADDR=100.1.1.10          ##设置网关地址
    NETMASK=255.255.255.0  ##设置子网掩码
ens36 card
    [root@localhost ~ ]# vim /etc/sysconfig/network-scripts/ifcfg-ens36
    TYPE=Ethernet
    PROXY_METHOD=none
    BROWSER_ONLY=no
    BOOTPROTO=static
    DEFROUTE=yes
    IPV4_FAILURE_FATAL=no
    IPV6INIT=yes
    IPV6_AUTOCONF=yes
    IPV6_DEFROUTE=yes
    IPV6_FAILURE_FATAL=no
    IPV6_ADDR_GEN_MODE=stable-privacy
    NAME=ens36    ##此处要修改网卡为36,UUID要删除
    DEVICE=ens36
    ONBOOT=yes
    IPADDR=192.168.10.1       ##网关地址和子网掩码
    NETMASK=255.255.255.0
ens37 card
    [root@localhost ~ ]# vim /etc/sysconfig/network-scripts/ifcfg-ens37
    TYPE=Ethernet
    PROXY_METHOD=none
    BROWSER_ONLY=no
    BOOTPROTO=static
    DEFROUTE=yes
    IPV4_FAILURE_FATAL=no
    IPV6INIT=yes
    IPV6_AUTOCONF=yes
    IPV6_DEFROUTE=yes
    IPV6_FAILURE_FATAL=no
    IPV6_ADDR_GEN_MODE=stable-privacy
    NAME=ens37     ##此处需要修改为37,UUID要删除
    DEVICE=ens37
    ONBOOT=yes
    IPADDR=192.168.20.1        ##设置网关地址,子网掩码
    NETMASK=255.255.255.0
3) open the routing forwarding
    [root@localhost ~]# vim /etc/sysctl.conf
    ......                                                                          //省略注释内容
    net.ipv4.ip_forward = 1                                         //添加此条目
    [root@192 network-scripts]# sysctl -p                   //载入sysctl配置文件
    net.ipv4.ip_forward = 1
2, configure address and gateway internal trust zone within the network tester
1) binding network card vmnet3 (Host mode only)
2) the ip address and gateway
[root@localhost ~]# vim /etc/sysconfig/network-scripts/ifcfg-ens33
[root@localhost ]#service network restart    //重启网络服务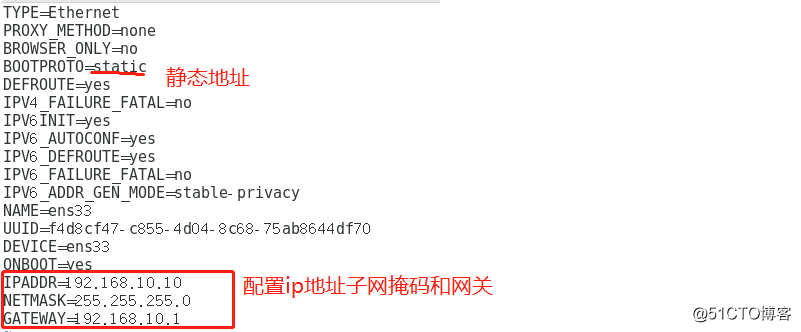
3, configure address and gateway to the DMZ web server, and open web services
1) installation services in nat http mode
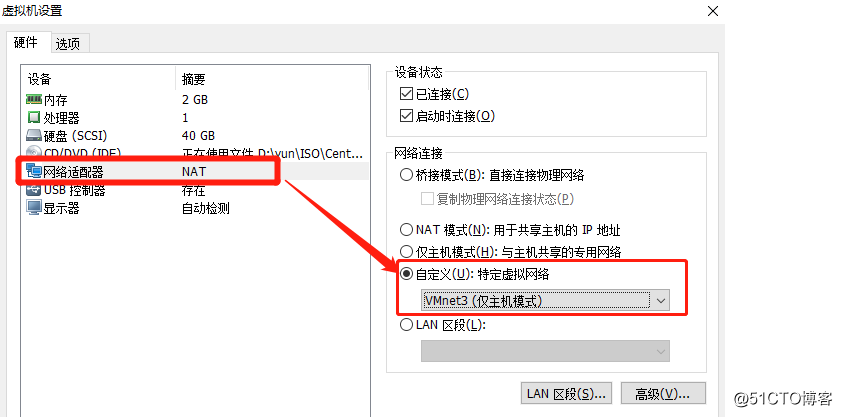
[root@localhost ~]# yum install httpd -y2) Binding card vmnet3 (Host mode only)
3) the ip address and gateway
    [root@localhost ~]# vim /etc/sysconfig/network-scripts/ifcfg-ens33
    TYPE=Ethernet
    PROXY_METHOD=none
    BROWSER_ONLY=no
    BOOTPROTO=static           //将dhcp改为static
    DEFROUTE=yes
    IPV4_FAILURE_FATAL=no
    IPV6INIT=yes
    IPV6_AUTOCONF=yes
    IPV6_DEFROUTE=yes
    IPV6_FAILURE_FATAL=no
    IPV6_ADDR_GEN_MODE=stable-privacy
    NAME=ens33
    UUID=f4d8cf47-c855-4d04-8c68-75ab8644df70
    DEVICE=ens33
    ONBOOT=yes
    IPADDR=192.168.20.20       //IP地址
    NETMASK=255.255.255.0     //子网掩码
    GATEWAY=192.168.20.1             //网关
    [root@localhost ~]# service network restart       //重启网络服务
4) open web services and web content editor
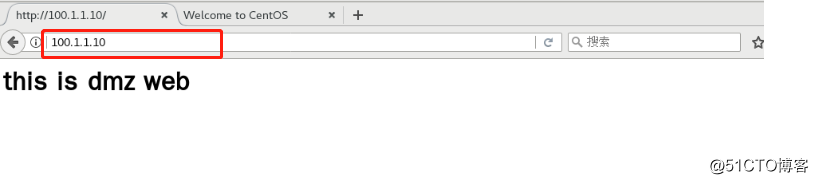
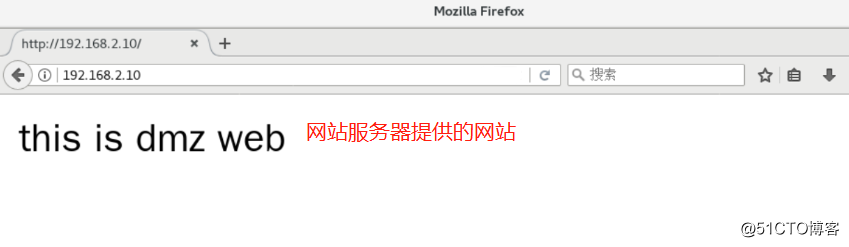
    [root@localhost ~]# vim /var/www/html/index.html
    [root@localhost ~]# cat /var/www/html/index.html
    <h1>this is dmz web</h1>
    [root@dmz html]# systemctl start httpd
4, configure the firewall policy on the DMZ web server
    [root@localhost ~]# firewall-cmd --set-default-zone=dmz
    success
    [root@localhost ~]# firewall-cmd --add-service=http --zone=dmz --permanent
    //将防火墙的默认区域改为dmz区域
    success
    [root@localhost ~]# firewall-cmd --remove-service=ssh --zone=dmz --permanent
    //添加http服务到dmz区域永久设置中
    success
    [root@localhost ~]# firewall-cmd --add-icmp-block=echo-request  --zone=dmz --permanent
    //禁止使用ssh进行登录
    success
    [root@localhost ~]# firewall-cmd --reload
    //重载防火墙
    success
5, NIC address external external area of Internet testing machine, and start the web service
1) installation services in nat http mode
[root@localhost ~]# yum install httpd -y2) Binding card is vmnet1 (Host mode only)
3) the ip address and gateway
    [root@localhost ~]# vim /etc/sysconfig/network-scripts/ifcfg-ens33
    TYPE=Ethernet
    PROXY_METHOD=none
    BROWSER_ONLY=no
    BOOTPROTO=static           //将dhcp改为static
    DEFROUTE=yes
    IPV4_FAILURE_FATAL=no
    IPV6INIT=yes
    IPV6_AUTOCONF=yes
    IPV6_DEFROUTE=yes
    IPV6_FAILURE_FATAL=no
    IPV6_ADDR_GEN_MODE=stable-privacy
    NAME=ens33
    UUID=f4d8cf47-c855-4d04-8c68-75ab8644df70
    DEVICE=ens33
    ONBOOT=yes
    IPADDR=100.1.1.20       //IP地址
    NETMASK=255.255.255.0     //子网掩码
    GATEWAY=100.1.1.10           //网关
    [root@localhost ~]# service network restart       //重启网络服务
4) open the site services, and turn off the firewall
[root@localhost ~]# systemctl stop firewalld.service //关闭防火墙
[root@localhost ~]# setenforce 0
[root@localhost ~]# systemctl start httpd //开启http服务
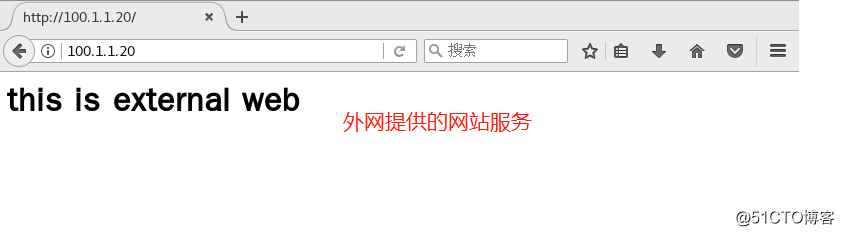
[root@localhost ~]# vim /var/www/html/index.html //配置网页内容
<h1>this is external web</h1>6, the firewall configuration on the gateway server policy
[root@localhost ~]# firewall-cmd --set-default-zone=external
//将防火墙默认区域改为extemal
success
[root@localhost ~]# firewall-cmd --change-interface=ens36 --zone=trusted --permanent
//将ens36网卡设为信任区域
The interface is under control of NetworkManager, setting zone to 'trusted'.
success
[root@localhost ~]# firewall-cmd --change-interface=ens37 --zone=dmz --permanent
//将ens37网卡设为dmz区域
The interface is under control of NetworkManager, setting zone to 'dmz'.
success
[root@localhost ~]# firewall-cmd --zone=dmz --remove-service=ssh --permanent
//dmz区域内禁止使用ssh登录
success
[root@localhost ~]# firewall-cmd --zone=dmz --add-service=http --permanent
//dmz区域内添加http服务
success
[root@localhost ~]# firewall-cmd --zone=dmz --add-icmp-block=echo-request --permanent
//dmz区域内阻塞icmp协议
success
[root@localhost ~]# firewall-cmd --zone=external --add-service=http --permanent
//在外部区域添加http服务
success
[root@localhost ~]# firewall-cmd --reload
//重载防火墙
success
7, using the intranet site verification testing machine testing machine and the Internet server provided
8, a port on the gateway server converts
[root@localhost ~]# firewall-cmd --zone=external --add-forward port=port=80:proto=tcp:toaddr=192.168.20.20 --permanent
//设置端口映射
success
[root@localhost ~]# firewall-cmd --reload   //重载防火墙
success
9, using the test machine Internet access DMZ web server, you can see the source address is translated