Table of contents
2. Server-side rendering and client-side rendering
1. What is server-side rendering
2. What is client-side rendering
3. What are the advantages and disadvantages of the two methods?
2. Nuxt.js server-side rendering
5. Pages, Navigation and Routing
1. Search engine optimization
1. What is SEO?

Summary: seo is a website that adjusts and optimizes the structure and content of the website in order to improve its own website ranking and obtain more traffic , so that search engines (Baidu, Google, etc.) can better capture the content of high-quality websites .
2. Search engine workflow

Common SEO methods such as:
- For the standardization of url links, use restful style urls and static resource urls;
- Pay attention to the settings of keywords, description, and title;
- Use of h1-h6 and a tags
- etc.
Note: the spider does not support javascript well, and the JSON data obtained by ajax cannot be crawled by the spider
What technology is good for SEO? Answering this question requires an understanding of server-side rendering and client-side rendering.
2. Server-side rendering and client-side rendering
1. What is server-side rendering
Server-side rendering, also known as SSR (Server Side Render), is to complete the content rendering of the page on the server side instead of completing the rendering of the page content on the client side.
SSR is not a unique front-end technology. The JSP technology and Thymeleaf technology we have learned are typical SSR
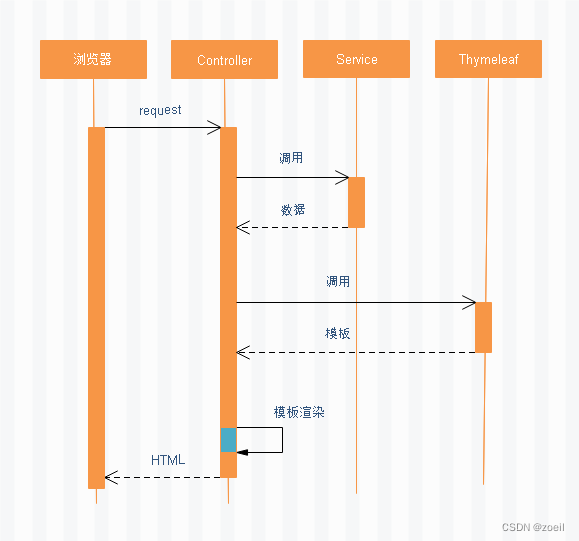
Features of server-side rendering :
- Generate dom elements of html web pages on the server side
- The client (browser) is only responsible for displaying the content of the dom element
2. What is client-side rendering
The client (browser) uses AJAX to initiate an http request to the server, obtains the desired data, starts rendering the html webpage, generates dom elements, and finally displays the webpage content to the user.
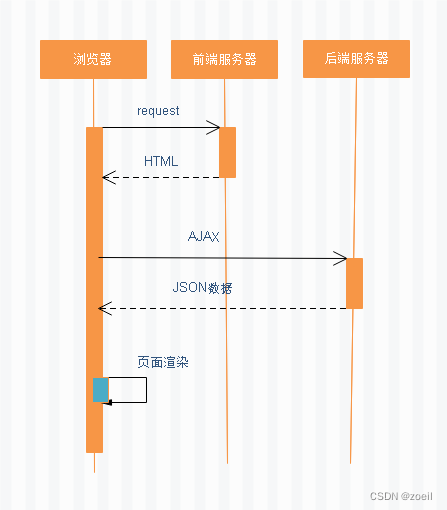
Features of Client Rendering :
- On the server side, the data is only responded to the client, not the html web page
- The client (browser) is responsible for obtaining data from the server to generate dom elements
3. What are the advantages and disadvantages of the two methods?
Server-side rendering:
- Advantages: It is good for SEO. The website directly leads the search engine to the server through the href url, and the server provides high-quality web content to the search engine.
- Disadvantages: The server completes part of the work of the client. Usually, the code of the client and the server needs to be modified to complete a requirement. The development efficiency is low, which is not conducive to the stability of the system.
- Applicable scenarios: systems that require SEO, such as portal homepages, product details pages, etc.
Client rendering:
- Advantages: The client is responsible for rendering, and the user experience is good. The server only provides data and does not care about the content of the user interface, which is conducive to improving the development efficiency of the server.
- Disadvantages: It is not conducive to website SEO, because the website uses javascript technology extensively, which is not conducive to search engines to crawl web pages.
- Applicable scenarios: systems that do not require SEO, such as background management systems, such as e-commerce background management, user management, etc.
3. Nuxt.js
1. Introduction to Nuxt.js
The rise of the mobile Internet has promoted the development of the front-end and back-end separation development model of the web. The server-side only focuses on business, and the front-end only focuses on user experience. For example, the popular vue.js realizes powerful front-end rendering. However, if you use front-end rendering technology to develop web pages with SEO requirements, it will not be conducive to SEO. Is there a technology that uses vue.js front-end technology to achieve server-side rendering?
Nuxt.js is a lightweight application framework based on Vue.js. It can be used to create server-side rendering (SSR) applications, and can also be used as a static site engine to generate static site applications. It has elegant code structure layering and hot loading, etc. characteristic.
Official website: Nuxt - The Intuitive Vue Framework
Summarize:
- server-side rendering
- static site engine
2. Nuxt.js server-side rendering
The figure below shows the overall workflow from client request to Nuxt.js for server-side rendering:

Summarize:
1) The user opens the browser, enters the URL request to the front-end View component in Node.js
2) The Nuxt.js application deployed on Node.js receives the browser request and requests the server to obtain data
3) Nuxt.js performs server-side rendering after obtaining the data
4) Nuxt.js responds the html webpage to the browser
4. Installation and operation
Online installation method: Reference: Nuxt - Installation
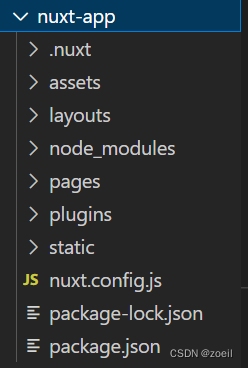
Directory Structure
5. Pages, Navigation and Routing
1. Page
By default, the files in the pages directory are recognized, and the extension needs to be .vue. Create a pages directory and create index.vue in the pages directory
<template>
  <h1>Hello world!</h1>
</template>
Run the project through the integrated terminal
npm run devAccess the project: http://localhost:3000/
Then create an about.vue page in the pages directory for later testing
<template>
  <h1>关于我们</h1>
</template>
Visit the page: http://localhost:3000/about
2. Navigation
Use the <NuxtLink> tag to navigate between different pages in the program, which is equivalent to the role of the <a> tag. Generally, we use <NuxtLink> to connect different routing addresses inside the program, and use the <a> tag to connect to external addresses.
pages/index.vue
<template>
  <div>

    <NuxtLink to="/about">
      关于我们
    </NuxtLink>
    <NuxtLink to="/lend">
      我要投资
    </NuxtLink>
    <NuxtLink to="/user">
      用户中心
    </NuxtLink>
    <a href="http://atguigu.com" target="_blank">尚硅谷</a>

    <h1>Home page</h1>
  </div>
</template>
3. Automatic routing
In the vue project, we need to create pages and configure routing for each page, and Nuxt will automatically generate routing configurations based on the pages in the pages path.
- Basic route 1: /user points to the pages/user.vue page
<template>
  <div>
    <h1>用户中心</h1>
  </div>
</template>- Basic route 2: /lend points to the pages/lend/index.vue page
<template>
  <div>
    <h1>投资产品列表</h1>
    <NuxtLink to="/lend/1">
      产品1
    </NuxtLink>
    <NuxtLink to="/lend/2">
      产品2
    </NuxtLink>
  </div>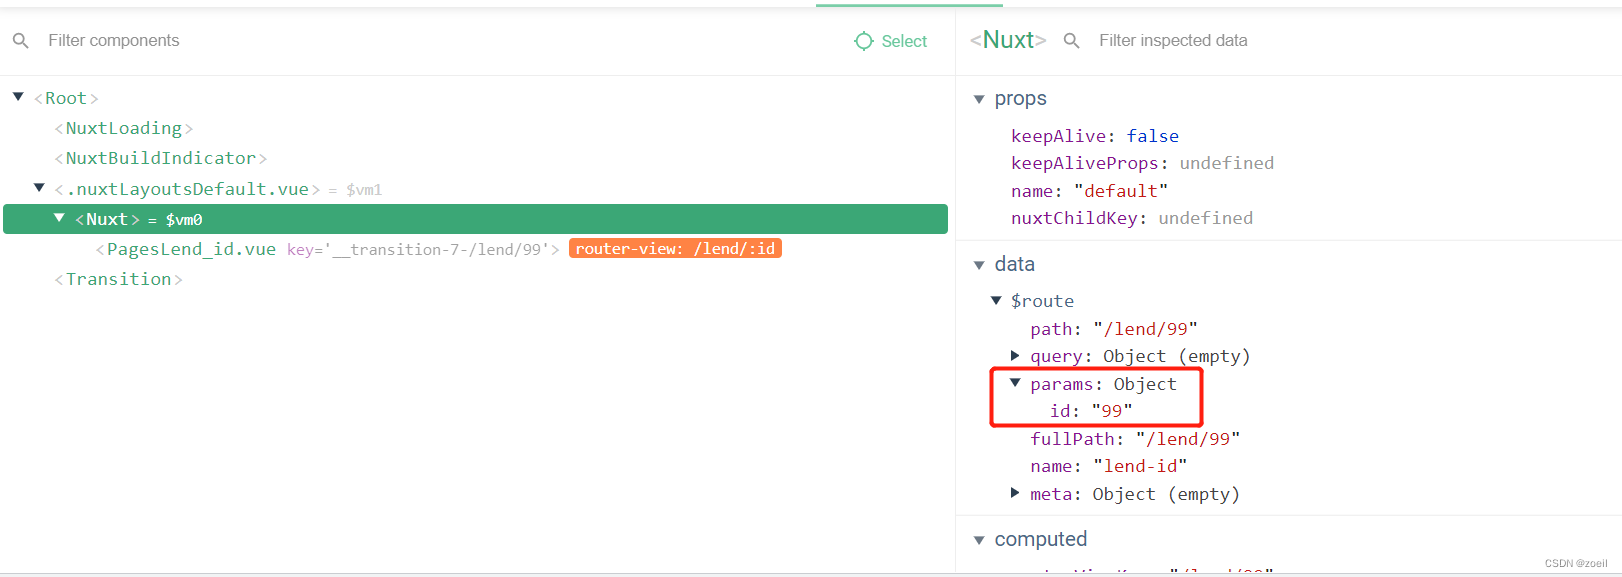
</template>- Dynamic routing: /lend/1, lend/2, etc. point to the pages/lend/_id.vue page, and get the dynamic path through this.$route.params.id
Through the page vue plug-in, you can see that the component automatically injects the route parameter. There are params under the route parameter, and the params contain the id we need
<template>
  <h1>投资产品 {

   { id }}</h1>
</template>

<script>
export default {
  data() {
    return {
      id: null,
    }
  },

  created() {
    this.id = this.$route.params.id
  },
}
</script>- Nested routing: If pages/user.vue and pages/user/index.vue exist at the same time, we can use nested routing
<template>
  <div>
    <h1>用户中心</h1>
    <NuxtLink to="/user">
      我的账户
    </NuxtLink>
    <NuxtLink to="/user/user1">
      我的投资
    </NuxtLink>
    <NuxtLink to="/user/user2">
      我的个人信息
    </NuxtLink>
    <!--Nuxt子路由,上面的链接的内容都会放在这个位置展示-->
    <NuxtChild />
  </div>
</template>
6. Layout Layout
1. Default layout
If you want to have a unified page style, for example: consistent header and footer, you can use Layout, the default name of the layout file is default.vue, placed in the layouts directory
Note: The newly created layout is applied after restarting the front-end server
layouts/default.vue
<template>
  <div>
    <Nuxt />
    <div>default footer</div>
  </div>
</template>
2. Custom layout
You can also customize Layout: layouts/my.vue
<template>
  <div>
    <Nuxt />
    <div>my footer</div>
  </div>
</template>
Use the layout attribute in the page to specify the layout file: pages/user.vue
<script>
export default {
  layout: 'my',
}
</script>
7. Configuration file
1、Meta Tags and SEO
We can configure the following content in nuxt.config.js, and Nuxt will automatically generate the <head> tag of the website, which is also a necessary means for search engine optimization.
module.exports = {
  head: {
    title: '尚融宝',
    meta: [
      { charset: 'utf-8' },
      { name: 'viewport', content: 'width=device-width, initial-scale=1' },
      {
        hid: 'meta-key-words',
        name: 'keywords',
        content:
          '尚融宝官网_纽交所上市企业,网络借贷平台,解决个人小额借款、短期借款问题。 资金银行存管,安全保障。',
      },
      {
        hid: 'description',
        name: 'description',
        content:
          '尚融宝官网_纽交所上市企业,网络借贷平台,解决个人小额借款、短期借款问题。 资金银行存管,安全保障。',
      },
    ],
    link: [{ rel: 'icon', type: 'image/x-icon', href: '/favicon.ico' }],
  },
}
2. Style
step1: Create assets/css/main.css
body {
  background-color: pink;
}
Step2: Configure the style in nuxt.config.js (same level as head)
css: [
    // CSS file in the project
    '~/assets/css/main.css',
],
3. Port number
Configure in nuxt.config.js
server: {
    port: 3001, // default: 3000
},
8. Integrate axios
We can introduce the axios component encapsulated in Nuxt, which has more functions and easier programming
Reference: Introduction - Axios Module
1. Configuration
nuxt.config.js
module.exports = {
  modules: [
    '@nuxtjs/axios', //引入axios模块
  ]
}
2. Client rendering
Add the following code in pages/index.vue
<script>
export default {
  data() {
    return {
      ip: null,
    }
  },
  created() {
    this.$axios.$get('http://icanhazip.com').then((response) => {
      console.log(response)
      this.ip = response
    })
  },
}
</script>
The ip is displayed in the template
    <div>您的ip是:{

   { ip }}</div>
3. Server-side rendering
// 这一个是异步请求,相当于java中的静态方法,会在方法调用之前执行
  // page是方法自带参数,page名字自定义,会自动封装
  // asyncData(page) {
  //   console.log(page)
  //   page.$axios.get('http://icanhazip.com').then((response) => {
  //     console.log(response)
  //   })
  //   return {
  //     ip1: null,
  //   }
  // },
  // 因为我们只需要使用page里面的axios对象,可以使用解构赋值
  // asyncData({ $axios }) {
  //   console.log($axios)
  //   $axios.$get('http://icanhazip.com').then((response) => {
  //     console.log('asyncData', response)
  //   })
  //   return {
  //     ip1: response, //这种写法的问题是:前面的远程调用是异步的,无法在这获取到response
  //   }
  // },
  // 改为异步方式,此时是前端服务器发送请求给后端服务器,接收数据渲染后传递给浏览器
  async asyncData({ $axios }) {
    console.log('asyncData')
    let response = await $axios.$get('/') // 等待这个异步请求执行后再执行下面的返回,此时response就有值了
    return {
      message1: response,
    }
  },
  data() {
    return {
      ip: null,
    }
  },
  // 这一个vue的created周期函数中的axios请求是由浏览器向服务器发送的,浏览器会直接获得响应数据
  created() {
    // this.$axios.get('http://icanhazip.com').then((response) => {
    //   console.log(response)
    //   this.ip = response.data
    // })
    // response就是响应中的data
    // this.$axios.$get('http://icanhazip.com').then((response) => {
    //   console.log(response)
    //   this.ip = response // 相当于上面的response.data
    // })
  },
4. Axios global options
Add the following configuration in nuxt.config.js
axios: {
    // Axios options here
    baseURL: 'http://icanhazip.com',
},
Write relative path directly in asyncData
let response = await $axios.$get('/')5. Interceptor
Create interceptor plugin plugins/axios.js
export default function({ $axios, redirect }) {
  $axios.onRequest((config) => {
    console.log('Making request to ' + config.url)
  })

  $axios.onResponse((response) => {
    console.log('Making resposne')
    return response
  })

  $axios.onError((error) => {
    console.log(error) // for debug
  })
}
Configure plugins in nuxt.config.js
plugins: [
    '~/plugins/axios'
]